


Content
Enable the Required Analytics for Smart Search
Search for People or Vehicles Using Smart Search
Filter and Review Smart Search Results
Introduction
Smart Search is an AI-powered video search feature that uses Smart Analytics and Object Attribute Analysis to identify and categorize people and vehicles captured by connected cameras. This helps administrators find the recordings they need more efficiently.
This article explains how to use the Omada Guard App to configure Smart Search on a Fusion Pro Gateway running the Omada Guard Application, enable the required analytics, and search recordings. It also demonstrates how attribute filters narrow search results and how to view the matching recordings.
Requirements
- Omada Guard App
- Omada Fusion Pro Gateway
- VIGI InSight Cameras
- Local Storage (SSD on Fusion Pro Gateway / HDDs on NVR)
Note: For directly managed cameras, the cameras must support Smart Search. For cameras managed through an NVR, both the NVR and the cameras must support Smart Search. For compatible models and Smart Search support, refer to the Omada Fusion Gateway Compatibility List.
Configuration
This article uses Fusion Pro 2.5G as an example to demonstrate how to enable the analytics required for Smart Search, search for people or vehicles, filter the results, and review matching recordings in the Omada Guard App.
Enable the Required Analytics for Smart Search
Before using Smart Search, select the target Fusion Pro organization and enable Smart Analytics and the required Object Attribute Analysis options.
Step 1. Log in and select the Fusion Pro organization
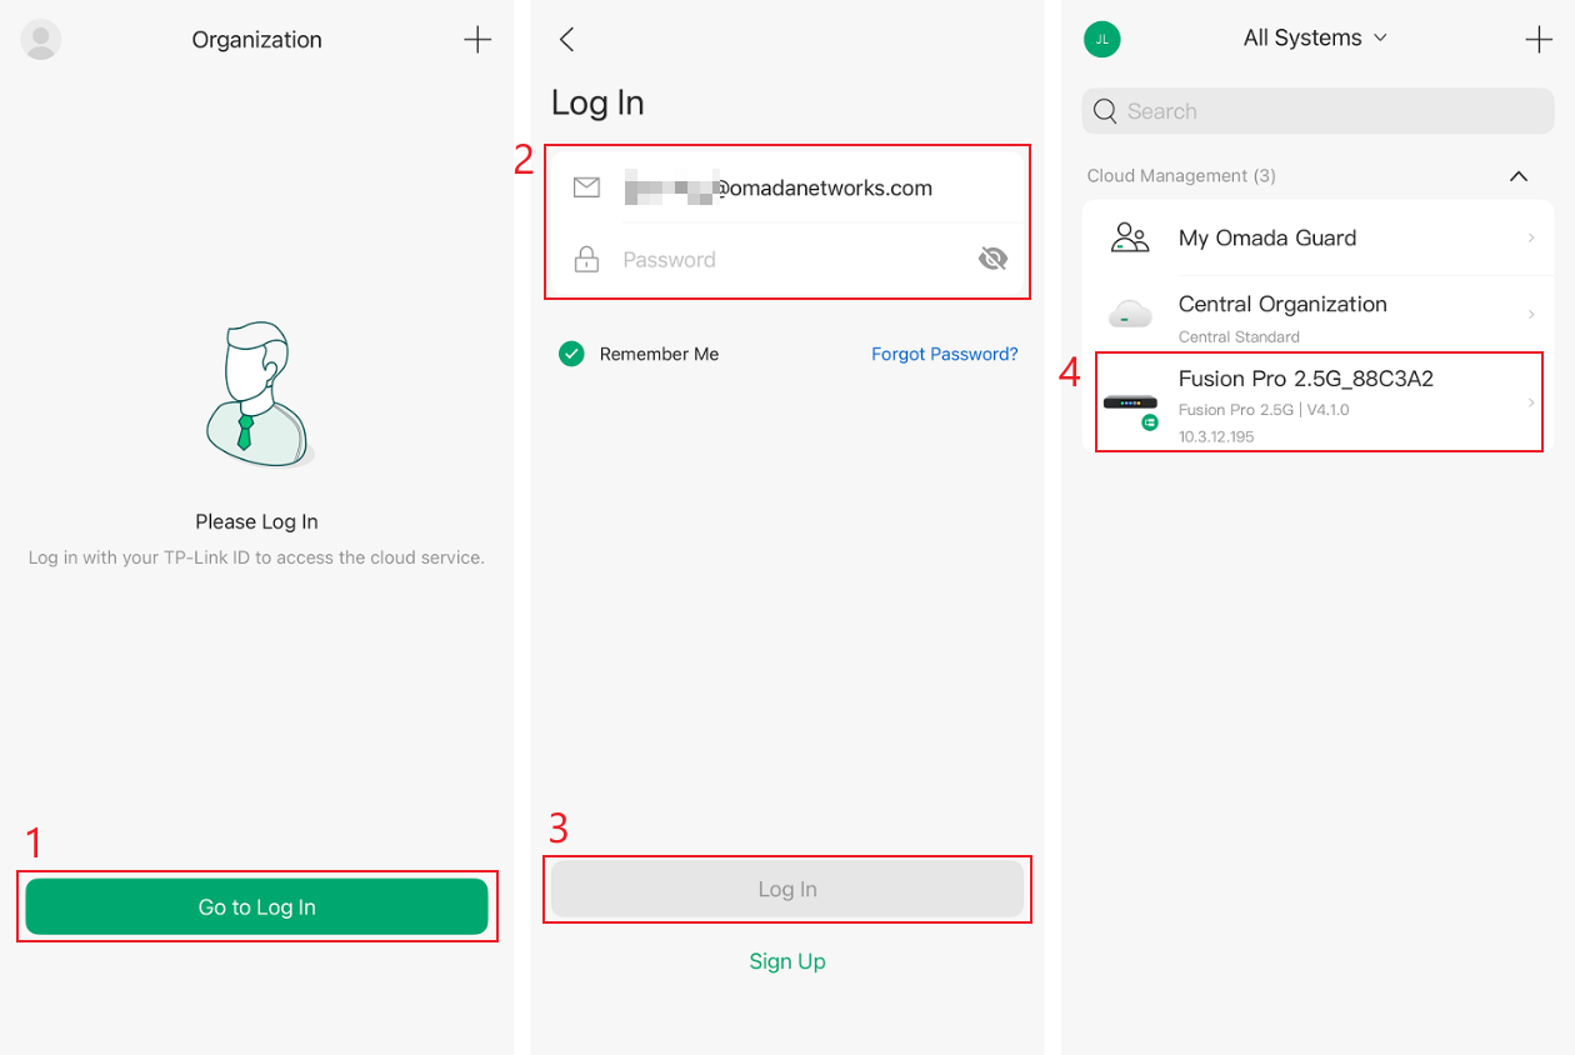
Open the Omada Guard App and tap Go to Log In. Enter your TP-Link ID and password, then tap Log In. On the All Systems page, select the organization for your Fusion Pro Gateway. This example uses Fusion Pro 2.5G_88C3A2.
Step 2. Enable Smart Analytics
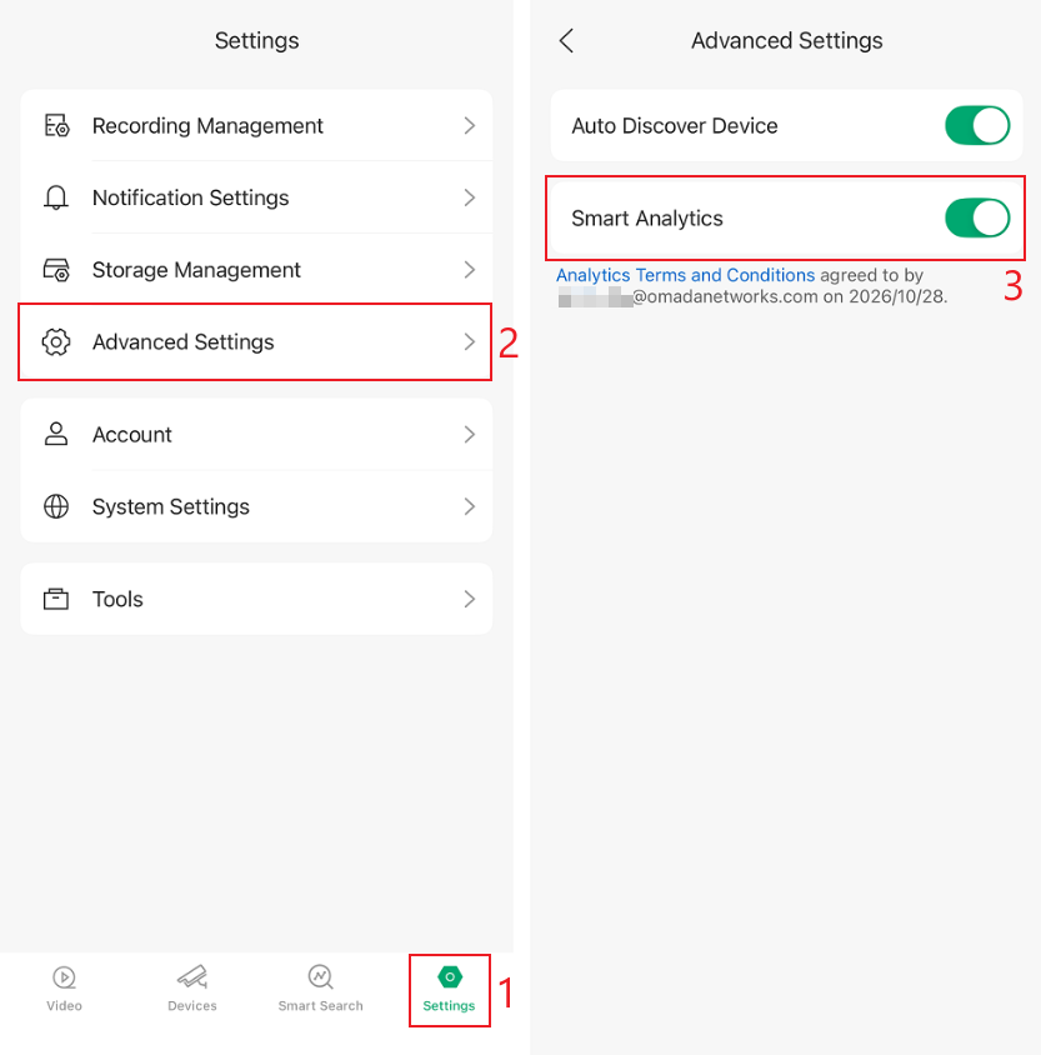
Tap Settings in the bottom navigation bar and go to Advanced Settings.
Make sure Smart Analytics is enabled. If it is disabled, turn it on. If prompted, read the Analytics Terms and Conditions and follow the on-screen instructions to confirm acceptance.
Step 3. Select the camera
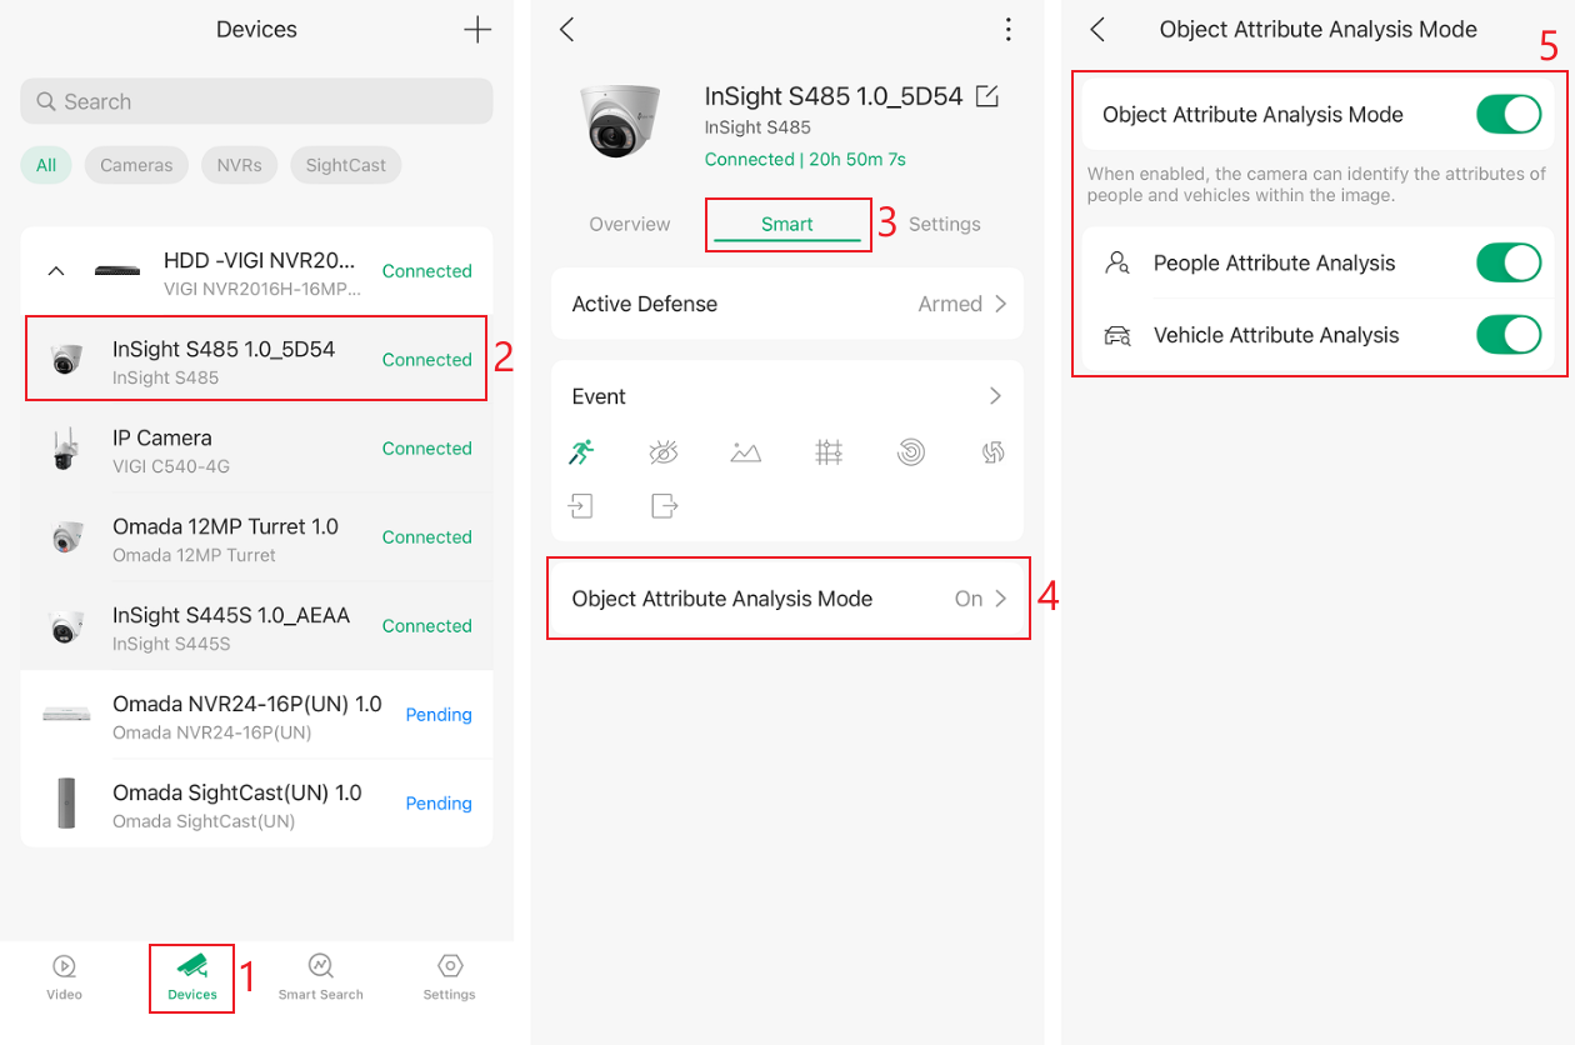
Return to the system's main page and tap Devices. Locate the camera to configure and make sure its status is Connected.
Tap the camera to open its details. If the camera is managed through an NVR, expand the NVR first, and then select the camera.
Step 4. Enable Object Attribute Analysis
On the camera details page, go to Smart > Object Attribute Analysis Mode.
Enable Object Attribute Analysis Mode, and then enable the required analysis options:
- People Attribute Analysis for people searches
- Vehicle Attribute Analysis for vehicle searches
Note: Some cameras may need to restart when the analysis mode is changed, and certain analysis modes may not operate simultaneously. Follow the confirmation message displayed in the app. If a restart is required, wait until the camera returns to Connected status before continuing. After enabling attribute analysis for the first time, capture new activity before testing Smart Search
Search for People or Vehicles Using Smart Search
After the required analytics are enabled, use Smart Search to locate recordings of people or vehicles.
Step 1. Open Smart Search
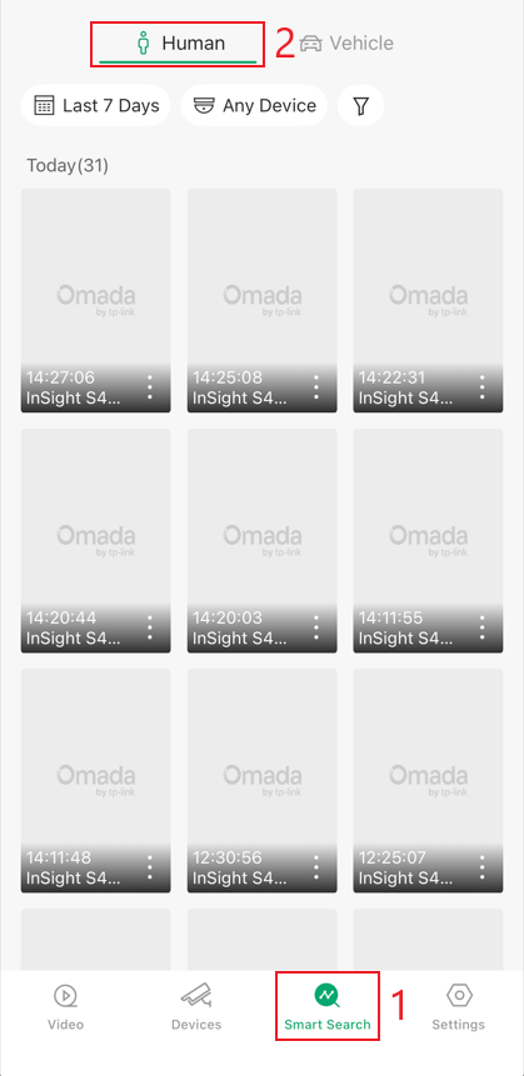
Tap Smart Search in the bottom navigation bar.
Select Human or Vehicle according to the target to search for. This example uses Human.
Step 2. Specify the search criteria
By default, Smart Search uses Last 7 Days, searches Any Device, and applies no attribute filters.
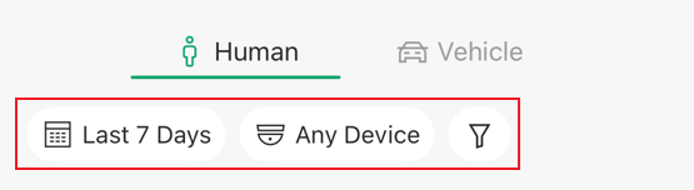
Adjust the following search criteria as needed:
- Last 7 Days: Tap the time filter and select the search period.
- Any Device: Tap the device filter and select the cameras to include in the search.
- Funnel icon: Open More Filters to specify additional target attributes.
The search results are displayed based on the selected criteria.
Filter and Review Smart Search Results
Attribute filters can be used to further narrow the Smart Search results and locate relevant recordings more efficiently.
Step 1. Apply attribute filters
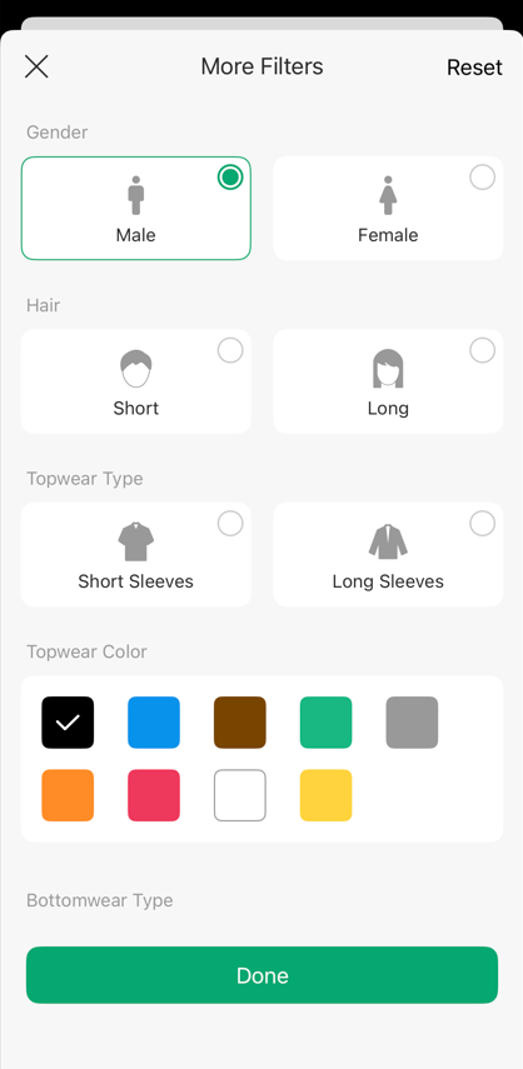
Tap the funnel icon to open More Filters.
Select the required attribute criteria, and then tap Done to apply the filters. To clear the selected attribute filters, tap Reset.
If an attribute is uncertain, leave it unselected to avoid excluding potentially relevant results
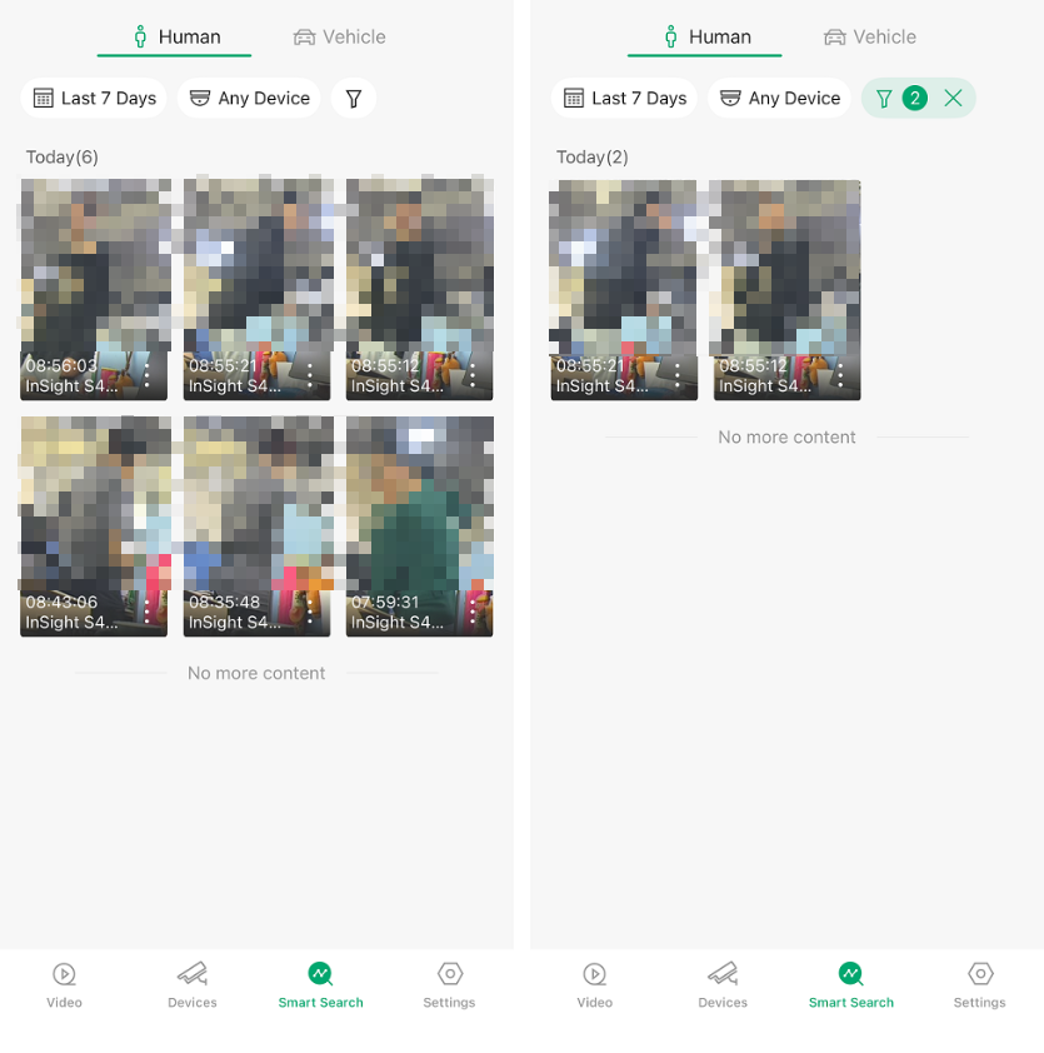
The following example shows how attribute filters can narrow the search results. Before filtering, Today(6) indicates six matching results. After two attribute filters are applied, the results are narrowed to Today(2).
Step 2. Refine the search results
- Review the result thumbnails, timestamps, and device names.
- If there are too many results, narrow the time range, select specific devices, or add attributes that are known.
- If there are too few results, remove uncertain attribute filters or expand the time range
Step 3. Review a matching recording
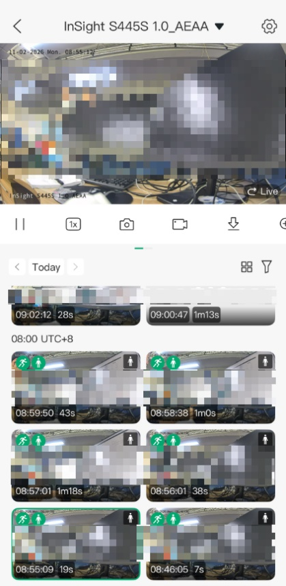
Tap a search result to view the corresponding recording.
Check the device name, recording time, and footage to confirm that the recording contains the target activity.
Conclusion
With Smart Search in the Omada Guard App, relevant recordings of people or vehicles can be located more efficiently by specifying the search period and target devices and applying available attribute filters. Matching results can then be opened directly to review the corresponding footage, reducing the time required to manually search through recordings.
To learn more about each function and configuration, please visit Support Home to download or check the manual for your product.
QA
Q1: Why is Smart Search missing from my app?
A1: The Smart Search entry is hidden when the organization has no cameras that support Smart Search. For directly managed cameras, make sure the cameras support Smart Search. For cameras managed through an NVR, make sure both the NVR and the cameras support Smart Search.
Q2: Why does Smart Search not return the expected results?
A2: Check that the selected category, time range, and devices are correct, and that the corresponding attribute analysis options are enabled on the target cameras. Also make sure Smart Analytics is enabled on Fusion Pro. Remove uncertain attribute filters and try again. If you have just enabled attribute analysis, test with new activity captured afterward.
Q3: Can I search recordings made before attribute analysis was enabled?
A3: No. Recordings made before attribute analysis was enabled cannot be searched using Smart Search.
