


Contents
Hotspot 2.0 Feature Advantages:
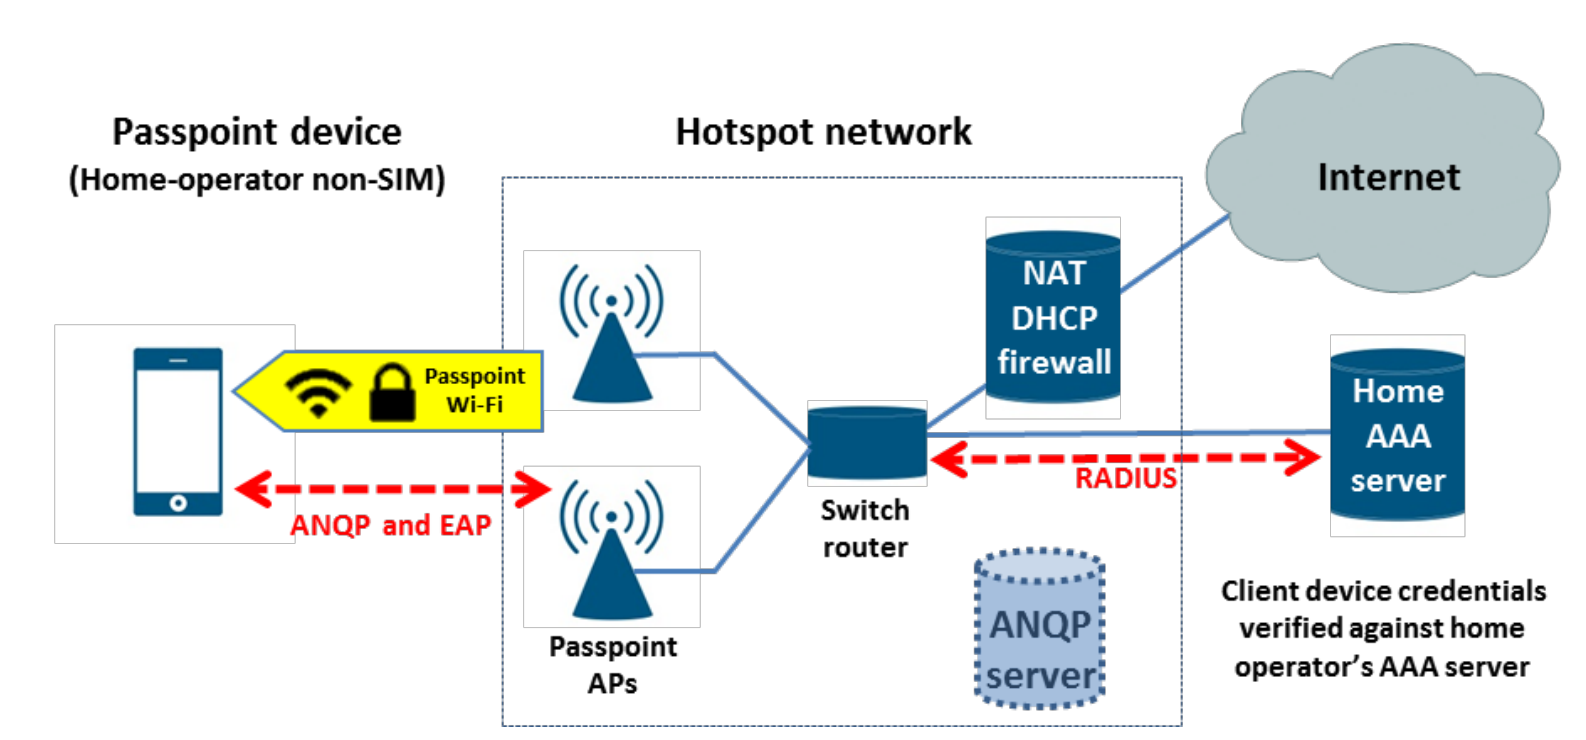
Typical Hotspot 2.0 network topology
Hotspot 2.0 Wi-Fi Connection Process
Related Terminology Explanations
Establishing the Hotspot 2.0 network environment
Configuration of Radius profile
Configuration of Hotspot 2.0 Wi-Fi
Objective
This article introduces Hotspot 2.0 Wi-Fi and provides a step-by-step guide on how to configure Hotspot 2.0 on Omada Controller.
Requirements
- Omada Controller v5.15.24 and above
- EAP
Introduction
Background
Actually, clients typically need to manually select and authenticate to access Internet. Operators aim for seamless roaming between cellular networks and Wi-Fi networks, where clients automatically connect to the appropriate Wi-Fi network based on the current network environment without requiring manual authentication. To address this need, the Wi-Fi Alliance and Wireless Broadband Alliance developed the Hotspot 2.0 protocol based on the 802.11u standard. This protocol enables clients to automatically discover, register, and associate with wireless Wi-Fi networks that have roaming agreements with their cellular network service providers. It facilitates automatic switching between cellular data networks and wireless Wi-Fi networks, delivering a user experience comparable to cellular networks.
Hotspot 2.0 Feature Advantages:
For Internet Service Providers:
• User traffic can be carried over 2G/3G/4G networks or offloaded to Wi-Fi networks.
• Enables users to access Wi-Fi networks via roaming.
• Expands user network access options, encouraging network usage.
For End Users:
• Can automatically and easily connect to WI-FI networks.
• End users require only one set of credentials to access multiple Wi-Fi networks, eliminating the need for separate accounts per network.
• Hotspot2.0 networks utilize 802.1X authentication, significantly enhancing user online security.
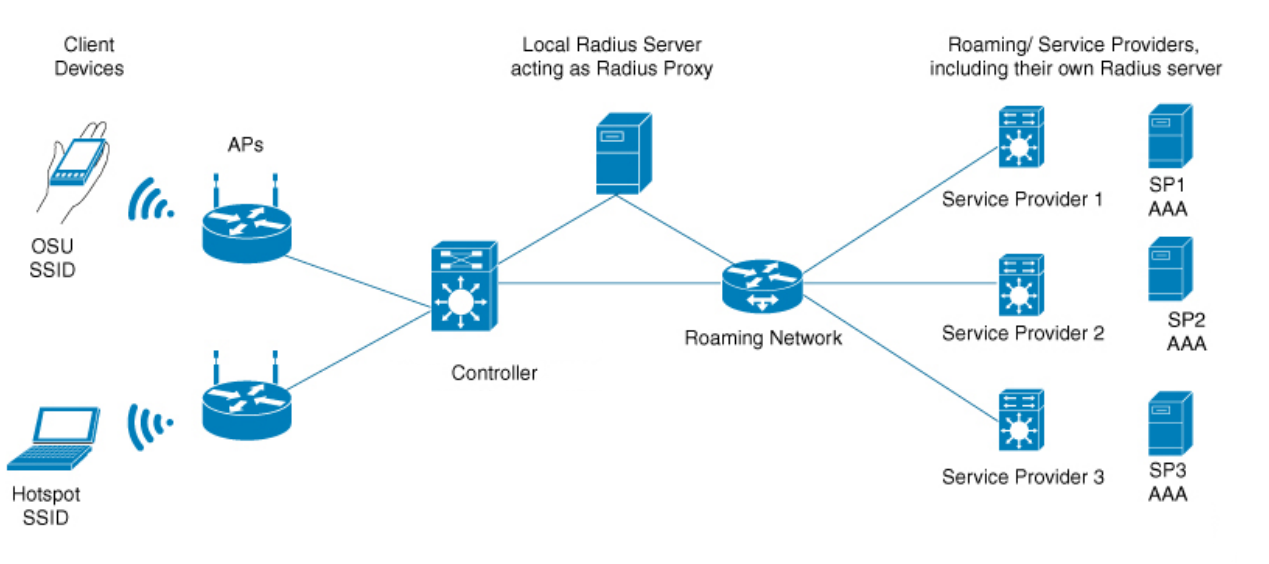
Typical Hotspot 2.0 network topology:
The following diagram illustrates a typical Hotspot 2.0 network topology:
• Wireless clients (mobile phones, computers, etc.) : support Hotspot 2.0 functionality
• AP devices: support Hotspot 2.0 functionality
• Hotspot 2.0 Operator: Provide network setup (including AP/Controller/Local RADIUS Server/Roaming Network) and configuration of necessary parameters.
• The Operator should provide the RADIUS server as specified by the protocol, and provide the OSU Server (Online Set UP Sever) utilizing the SOAP XML (SPP) protocol for online set up. EAP hotspot 2.0 feature doesn’t support online set up.
|
Devices |
Description |
|
Client |
Needs to support an 802.1X client and discover Passpoint networks through ANQP frames. Therefore, it is also called an ANQP client. |
|
AP |
Wireless access point, needs to support the Passpoint protocol and WPA2-802.1X access. It can send information to the client through ANQP. |
|
Controller |
Used for batch management and configuration of APs, needs to support 802.1X authentication. |
|
AAA Server |
Authentication, Authorization, and Accounting server. Supports 802.1X authentication and EAP-SIM/AKA/TLS/TTLS methods. It can obtain authentication vectors and WI-FI subscriber information from the HLR. |
|
HLR |
Database in cellular networks used to store user information, including subscriber data, mobile station location information, MSISDN, IMSI, etc. |
|
BOSS |
Operation support platform that handles customer service, rating, billing, accounting, and dunning (payment collection) tasks. |
Hotspot 2.0 Wi-Fi Connection Process:
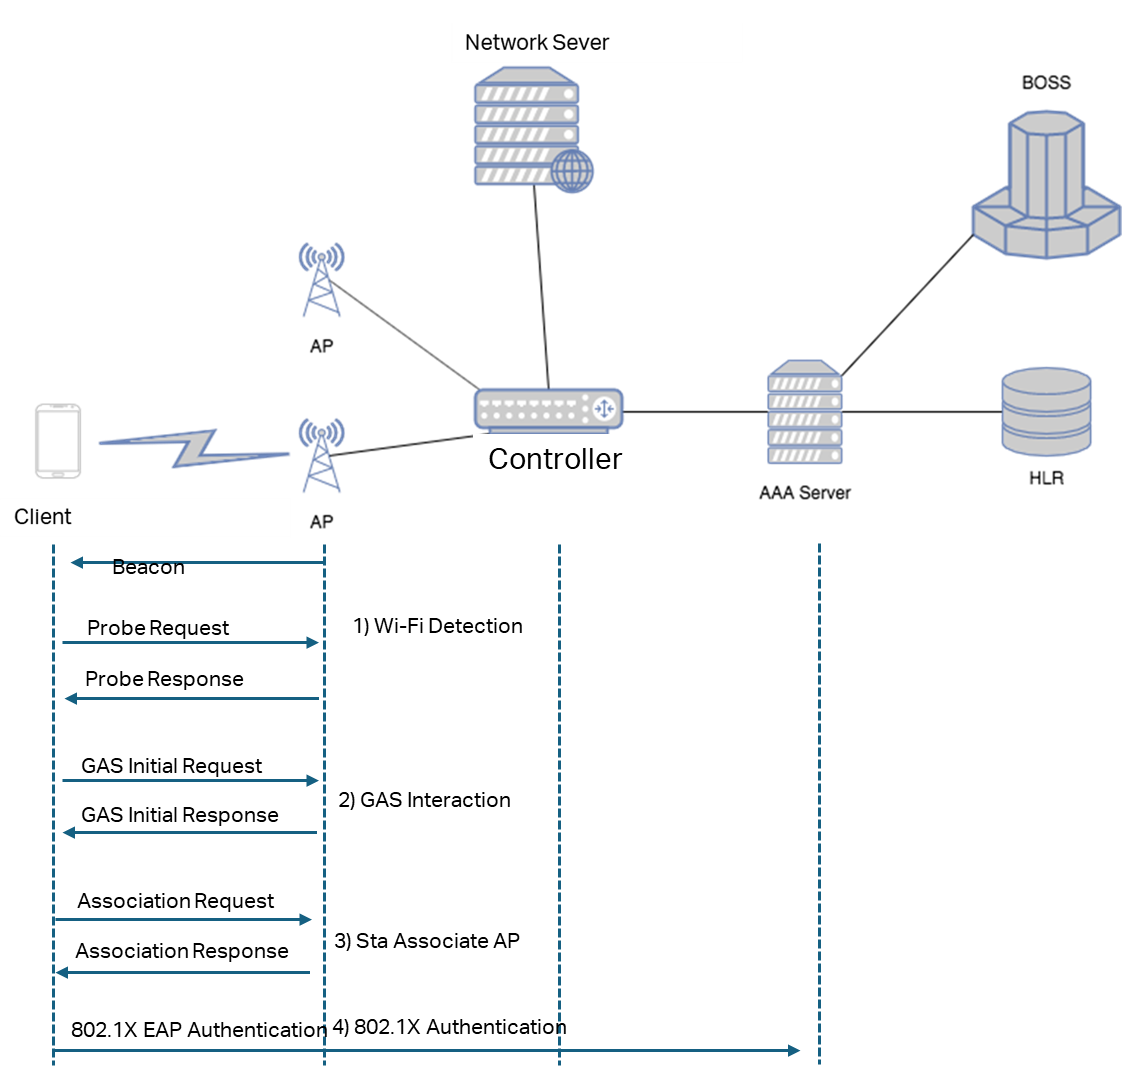
- Wireless Scanning
The STA (Station) discovers available Hotspot 2.0 networks in its vicinity through either active scanning or passive scanning.
Active Scanning
- The STA periodically broadcasts Probe Request frames that include information about the desired network type.
- Upon receiving a Probe Request, the AP (Access Point) verifies whether the requested network type matches the one it provides. If so, it responds with a Probe Response frame containing elements such as the Hotspot 2.0 indication, BSS Load, network type, and Service Provider Identifier.
- After receiving the Probe Response, the STA detects Hotspot 2.0 support from the indication element and parses the Roaming Consortium element to obtain the Organization Identifier (OI) of the service provider. Based on this information, the STA determines whether it can access the network and may also use the BSS Load information to select an AP with lower utilization for association.
Passive Scanning
- The AP periodically transmits Beacon frames containing the Hotspot 2.0 indication, BSS Load, network type, and service provider information.
- Upon receiving a Beacon frame, the STA recognizes Hotspot 2.0 support from the indication element and parses the Roaming Consortium element to obtain the service provider OI. It then determines whether the network is suitable for access and may use the BSS Load data to choose the AP with the lightest load.
- GAS interaction
In a roaming scenario, the STA (Station) can obtain additional network information by sending a GAS Initial Request message.
This message allows the STA to retrieve details such as the list of available service providers, supported authentication methods, network operators, IP address and port information, as well as wired interface traffic statistics.
The AP (Access Point) responds with a GAS Initial Response message that contains the corresponding ANQP (Access Network Query Protocol) parameters.
If the GAS Initial Response exceeds the allowable frame size limit, the AP first sends a GAS Initial Response indicating that the STA should wait for a specified Comeback Delay period. After this interval, the STA issues a GAS Comeback Request to continue retrieving the Hotspot 2.0 parameters. The AP then returns a GAS Comeback Response carrying the remaining Hotspot 2.0 information.
- Online Set up
The online set up process is only supported by Version 2 clients. When a client first connects to a Hotspot 2.0 wireless network, after completing the GAS interaction, it must obtain a client certificate or authentication information from the online set up server. The client can then use this certificate or authentication information to automatically select and connect to Hotspot 2.0 wireless networks in subsequent sessions without requiring re-authentication.
Please note that Omada EAP Hotspot 2.0 only supports release 1 and does not support online set up. EAP supports 802.1X authentication.
- 802.1X Authentication
Based on acquired network information (such as domain name, authentication method, etc.) and the preconfigured Network Access Identifier (NAI) along with corresponding access credentials on the STA, the STA automatically selects a Wi-Fi network for access. The STA sends an Association Request carrying a Hotspot2.0 indicator, specifying AES encryption and 802.1X authentication. The AP responds with an Association Response to the STA.
The STA sends an 802.1X authentication request. The AP forwards the authentication packet to the AAA server for verification. The STA also reports the NAI information. The AAA server routes the request based on the NAI field to the authentication server of the user's home provider for verification. Upon successful authentication, the STA connects to the Wi-Fi network.
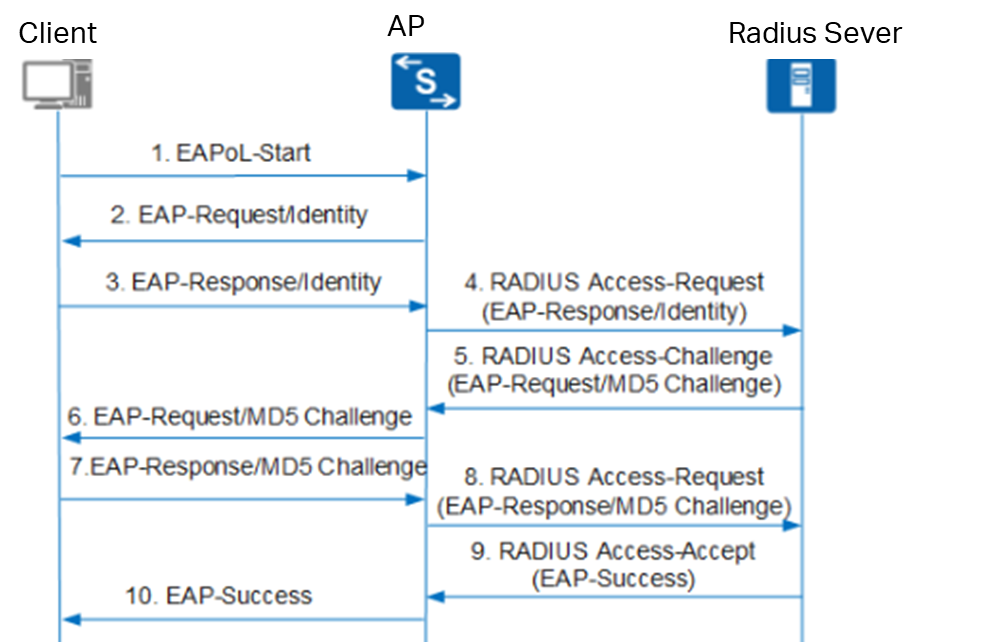
-
- Upon receiving the authentication request message, the device sends an Identity-type request message (EAP-Request/Identity) to prompt the user's client program to submit the entered username.
- The client program responds to the device's request by sending the username information to the device via an Identity-type response message (EAP-Response/Identity).
- The device encapsulates the EAP message from the client's response within a RADIUS message (RADIUS Access-Request) and sends it to the authentication server for processing.
- Upon receiving the forwarded username information, the RADIUS server compares it against the username list in its database. It locates the corresponding password entry, encrypts the password using a randomly generated MD5 Challenge, and sends this MD5 Challenge to the device via a RADIUS Access-Challenge message.
- The device forwards the MD5 Challenge received from the RADIUS server to the client.
- Upon receiving the MD5 Challenge from the device, the client encrypts the password portion using this Challenge, generates an EAP-Response/MD5 Challenge message, and sends it to the device.
- The device encapsulates this EAP-Response/MD5 Challenge message within a RADIUS message (RADIUS Access-Request) and sends it to the RADIUS server.
- The RADIUS server compares the received encrypted password with the locally encrypted password. If they match, the user is deemed legitimate, and the server sends an authentication success message (RADIUS Access-Accept) to the device.
- Upon receiving the authentication success message, the device sends an authentication success message (EAP-Success) to the client and changes the port to an authorized state, allowing the user to access the network through that port.
Authentication Process
Authentication Methods
The Hotspot 2.0 protocol specifies the following authentication methods supported by the network, as shown in the table below.

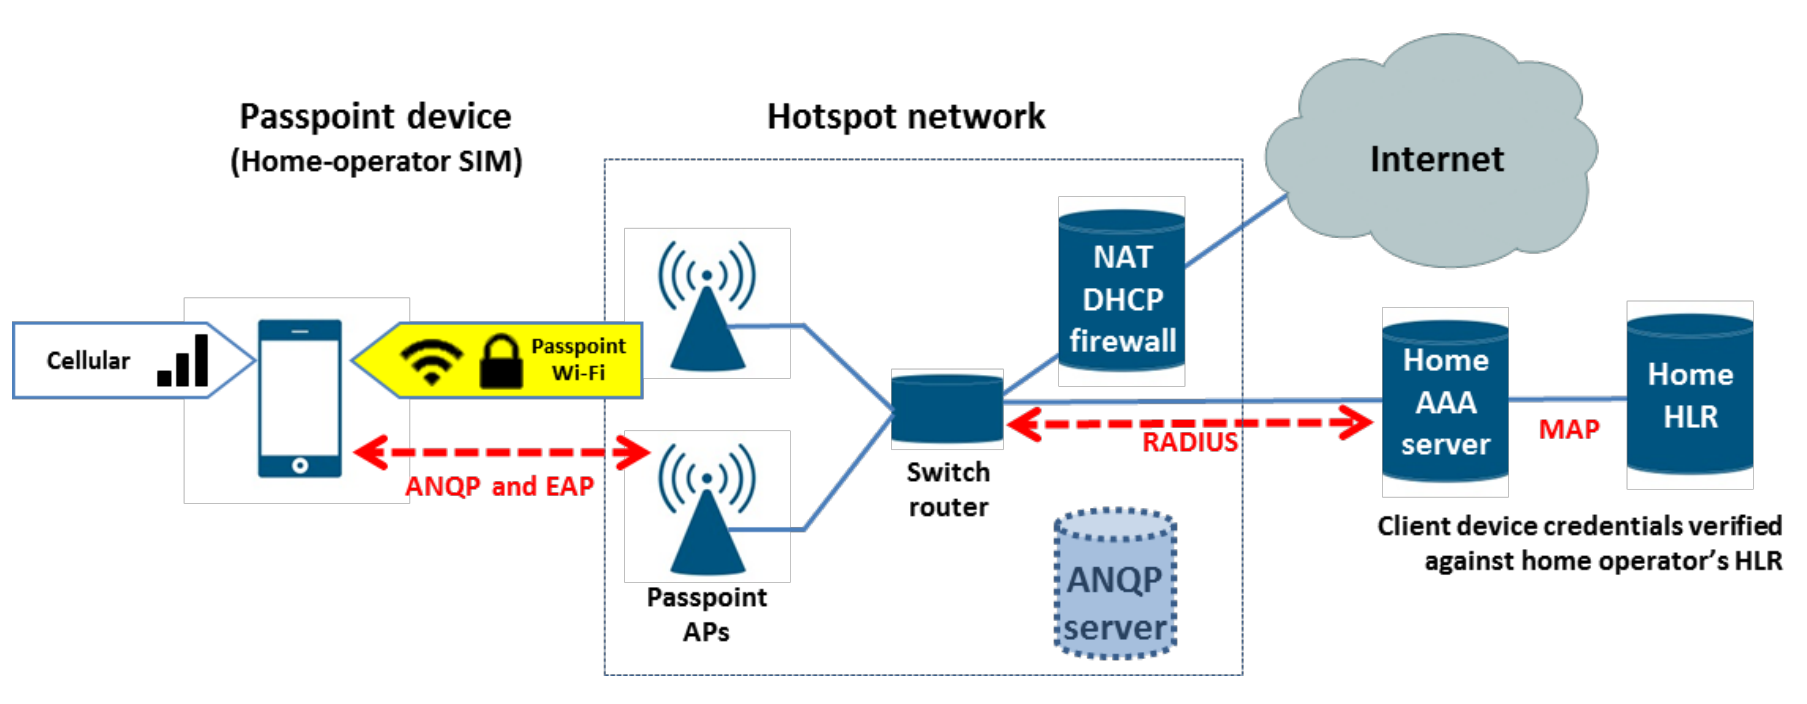
- SIM/USIM Card
Among them, the EAP-SIM, EAP-AKA, and EAP-AKA' authentication methods primarily target clients equipped with SIM/USIM cards.
Their network topology is illustrated in the figure below, with the specific process as follows:
- Client scans for wireless networks bearing the Hotspot 2.0 identifier.
- Client initiates the ANQP (Access Network Query Protocol) process to obtain specific Hotspot 2.0 information.
- Client verifies network PLMN ID matches SIM card and initiates authentication association.
- After association, client authenticates with AAA server using corresponding method.
- AAA server then interacts with 3GPP core network HLR via MAP interface to complete authentication.
Note:
- The HLR (Home Location Register) stores basic user information such as your SIM card number, mobile phone number, and contract details, along with dynamic information like your current location and whether the device is powered off.
- Mobile devices equipped with a SIM or USIM certificate send GAS/ANQP queries for 3GPP cellular network information and compare the response with the PLMD ID stored on their SIM or USIM to determine whether they can access the network of their home cellular SP via a Passpoint AP.
- without a SIM/USIM card
For clients without a SIM/USIM card, the credentials used during 802.1x authentication are the username/password and certificate. Network operators distribute configuration credentials/certificates to clients through methods such as web downloads, in-app link downloads, and online set up. Please note that EAP hotspot 2.0 only supports release 1 and does not support online set up. The Operator should provide the RADIUS server as specified by the protocol, and provide the online set up server utilizing the SOAP XML (SPP) protocol for online set up.
The network discovery and authentication process is as follows:
-
- The STA detects the AP's support for Hotspot 2.0 in its beacon frames.
- The STA queries the ANQP server for the Network Access Identifier (NAI), Realm, and Roaming Alliance OI.
- The STA matches the received NAI and OI against its credentials and preferred network list.
- The STA automatically associates with the Passpoint AP.
- The STA performs 802.1X authentication with the Home AAA server using EAP-TLS or EAP-TTLS with MS-CHAPv2.
Omada EAP Hotspot 2.0
|
Features |
Omada |
Description |
|
Passpoint,aka Hotspot2.0 |
Supported |
Omada APs and controller v5.15.24 support Hotsopt 2.0 release 1 |
|
802.1x with RADIUS |
Supported |
Support WPA2-enterprise and WPA-3 Enterprise |
|
RadSec, aka RADIUS over TLS |
Supported |
Omada Controller v6.1 support Radsec Omada Controller v5.15.24 doesn’t support Radsec |
Related Terminology Explanations
- Passpoint / Hotspot2.0
Passpoint is the Wi-Fi Alliance certification program corresponding to Hotspot 2.0.
A device that has obtained Passpoint certification is compliant with the Hotspot 2.0 standard, meaning it supports automatic and secure Wi-Fi network discovery and authentication.
Most vendors now use “Passpoint” in product documentation and configuration interfaces to indicate Hotspot 2.0 capability.
- GAS (Generic Advertisement Service)
A mechanism defined in IEEE 802.11u that allows a STA (Station) to obtain network information from the network side through Request and Response message exchanges.
GAS serves as a transport layer for higher-level information discovery protocols such as ANQP.
- ANQP (Access Network Query Protocol)
A network query protocol carried over GAS, used by a STA to retrieve access-related information from an AP before association.
Through ANQP, a STA can learn details such as roaming consortiums, service providers, authentication methods, IP address availability, and other network parameters.
- OSU (Online Sign-Up)
The Online Sign-Up process allows a user to register for network access through an OSU Server provided by the AP or service provider.
During OSU, the AP advertises available service providers and directs the STA to a secure onboarding portal for subscription or credential provisioning.
- SP (Service Provider)
The Service Provider is the entity offering network access services.
It is represented within Passpoint/Hotspot 2.0 through identifiers such as:
- NAI Realm (Network Access Identifier)
- 3GPP Cellular Network information
- Roaming Consortium ANQP elements
- T&C (Terms and Conditions) Information
In Hotspot 2.0 Release 3, a STA must explicitly accept the Terms and Conditions before being granted network access.
The T&C information defines the contractual or policy requirements for connecting to the Passpoint network.
- Subscription Remediation
A process used to resolve subscription-related issues with the Service Provider (SP).
It corrects problems involving user credentials, provisioning data, or the subscription itself (for example, overdue payments or expired certificates).
- FQDN (Fully Qualified Domain Name)
A Fully Qualified Domain Name represents the complete domain path of a host within the DNS hierarchy.
It consists of the hostname and the domain name (FQDN = Hostname + DomainName).
An FQDN uniquely identifies the host’s position in the domain tree, and DNS resolves it into an IP address during access.
Configuration
Establishing the Hotspot 2.0 network environment
The key to establishing a network environment lies in connecting to the authentication servers of operators providing corresponding services. Enterprises operating such networks may include public Wi-Fi providers or cellular network operators. Notable public Wi-Fi providers include Canary Wharf, Clair Global, Presidio, Boingo, and GlobalReach. Additionally, initiatives like OpenRoaming and Orion Wi-Fi propose building global public Wi-Fi networks based on Hotspot 2.0.
Configuration of Radius profile
Radius Profile configuration is divided into whether RadSec is required. If your APs does not support RadSec and the server does not enforce RadSec, please proceed directly to step 6.
The following is a RADIUS profile configuration that require the Radsec feature.
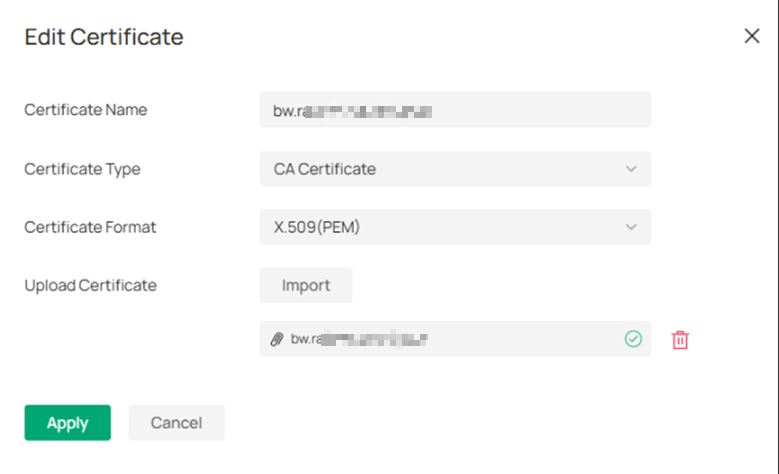
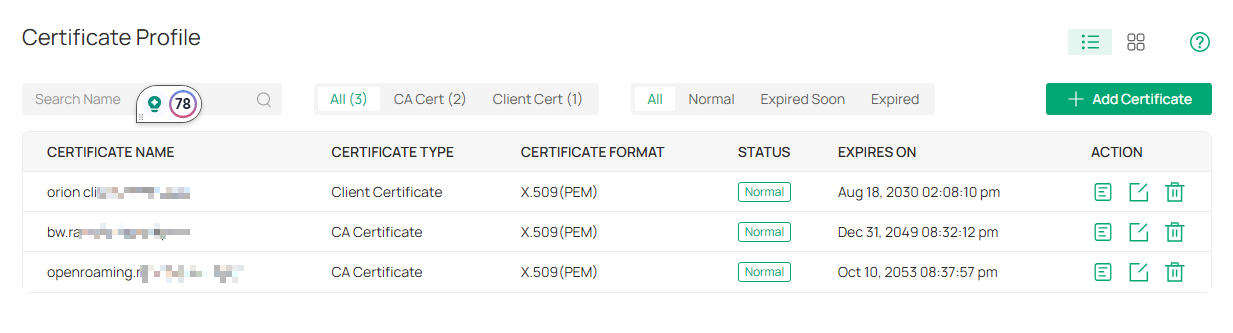
Step 1. Go to Global View > Settings > Certificate Profile, Add Certificates.

Step 2. Uplode CA certificate.
Step 3. Upload Client Certificate.
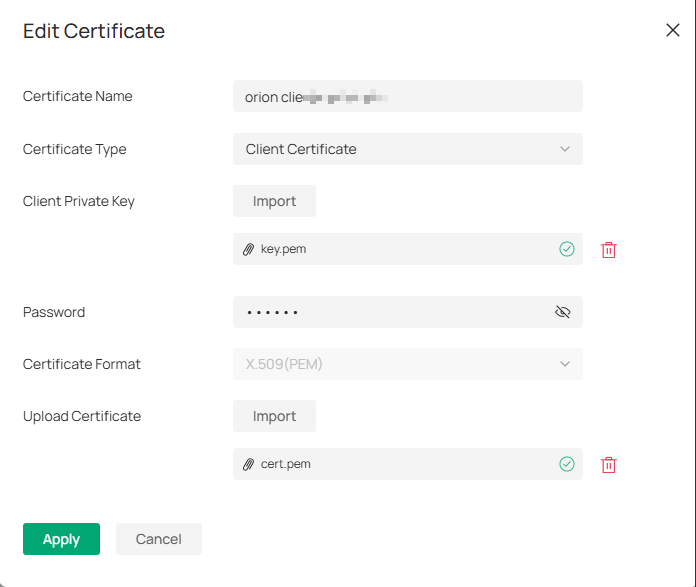
Click Apply to successfully upload all the certification.
Step 4. Go to Site View > Network Config > Profile > Radius Profile, Create New Radius Profile.
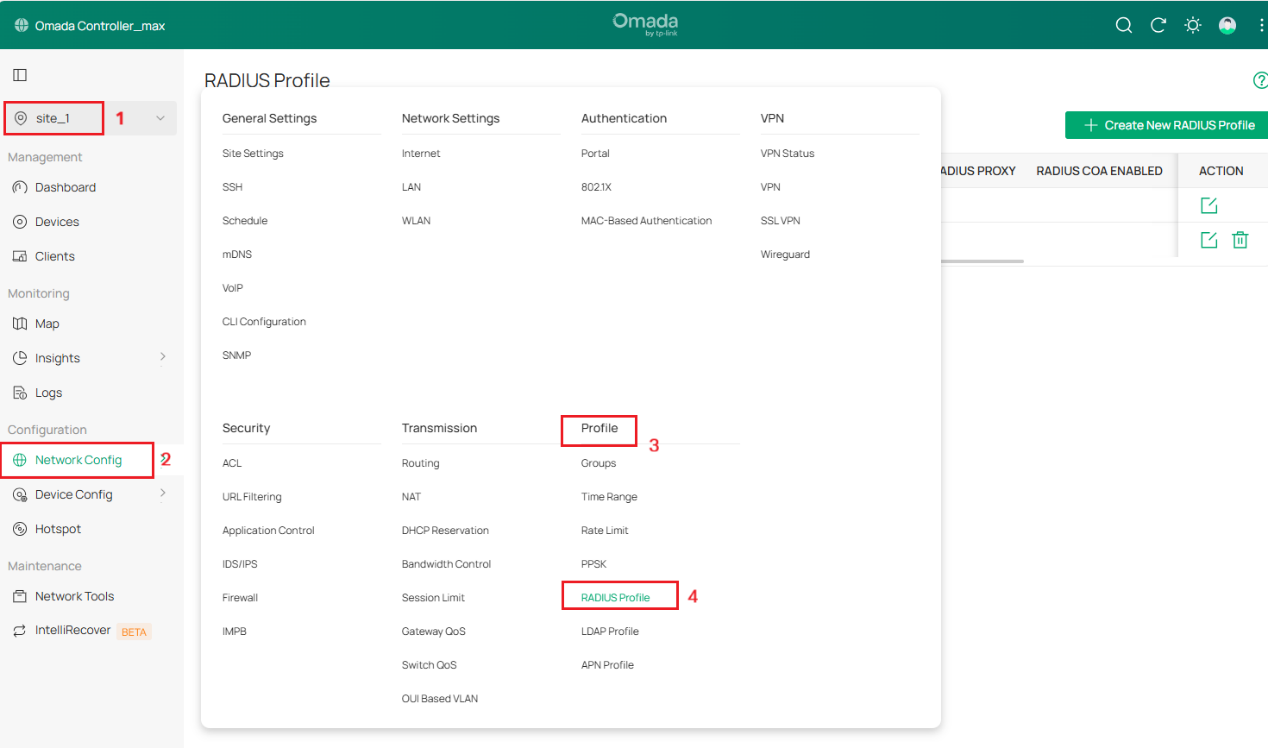
Step 5. Create new Radius Profile
- Give the profile a Name, such as Orion
- Enable VLAN Assignment (disabled by default).
- Add an Authentication Server Server IP/URL, port 2083, secret radsec
- Select the CA certificate and Client certificate you just uploaded.
- Enable Radius Accounting
- Add an Accounting Server IP/URL, port 2083, secret radsec.
- Enable Interim Update and set Interim Update Interval to 300 Seconds (5 minutes)
- Click ‘Save’ to complete the radius sever profile setting
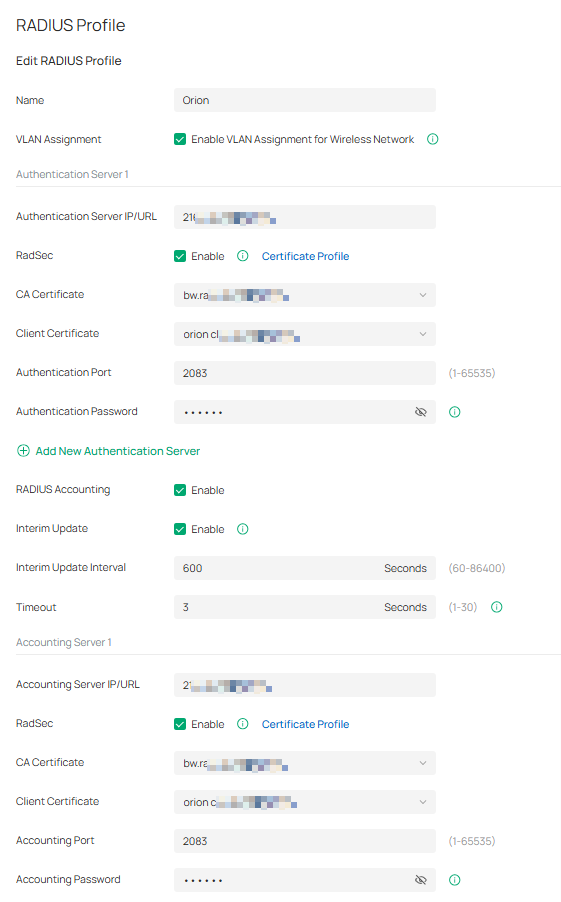
Note: RadSec is applicable only when the device supports the feature. To make this feature work properly, it is recommended to upgrade your devices to the latest firmware version. If there are old devices in the device list that do not support this feature, it is recommended to configure a backup server that is not enabled with this feature.
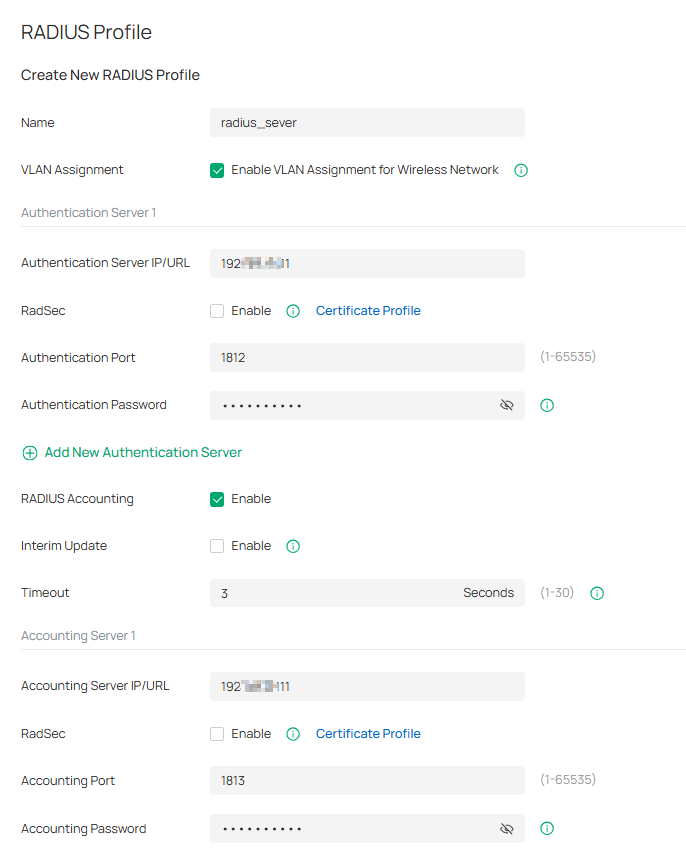
The following is a RADIUS profile configuration that does not require the Radsec feature.
Step 6. Create new Radius Profile, enable VLAN Assignment. Please enter your Radius Authentication Sever IP/URL and Radius Accounting IP/URL.
Configuration of Hotspot 2.0 Wi-Fi
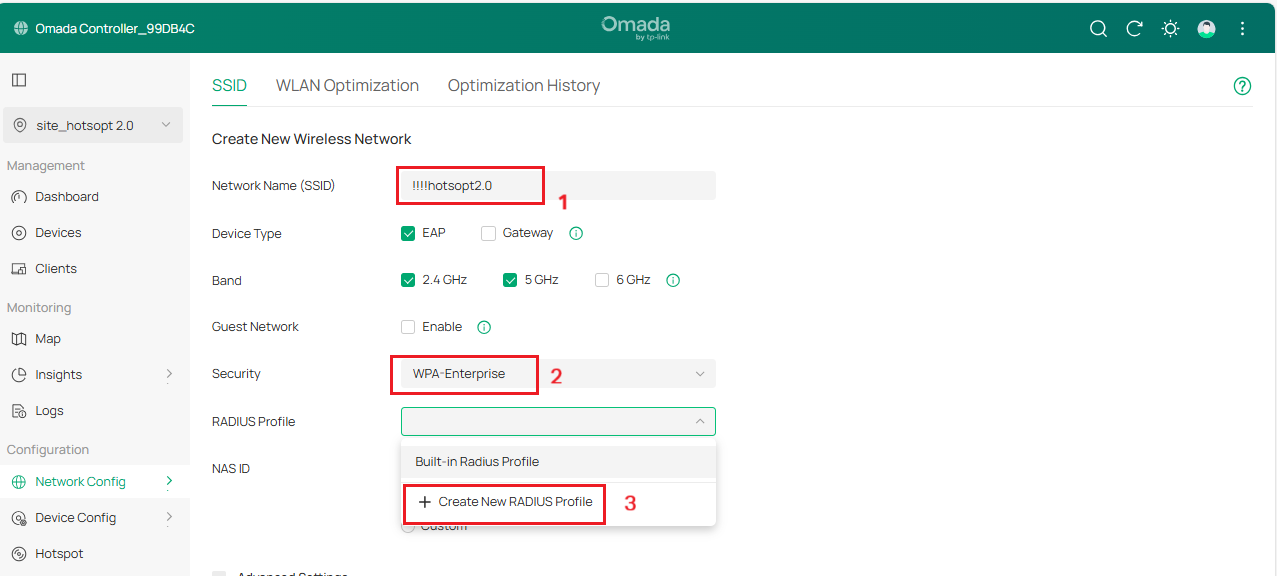
Step 1. Go to Site View > Network Config > Network Settings > WLAN > SSID, click Create New Wireless Network.
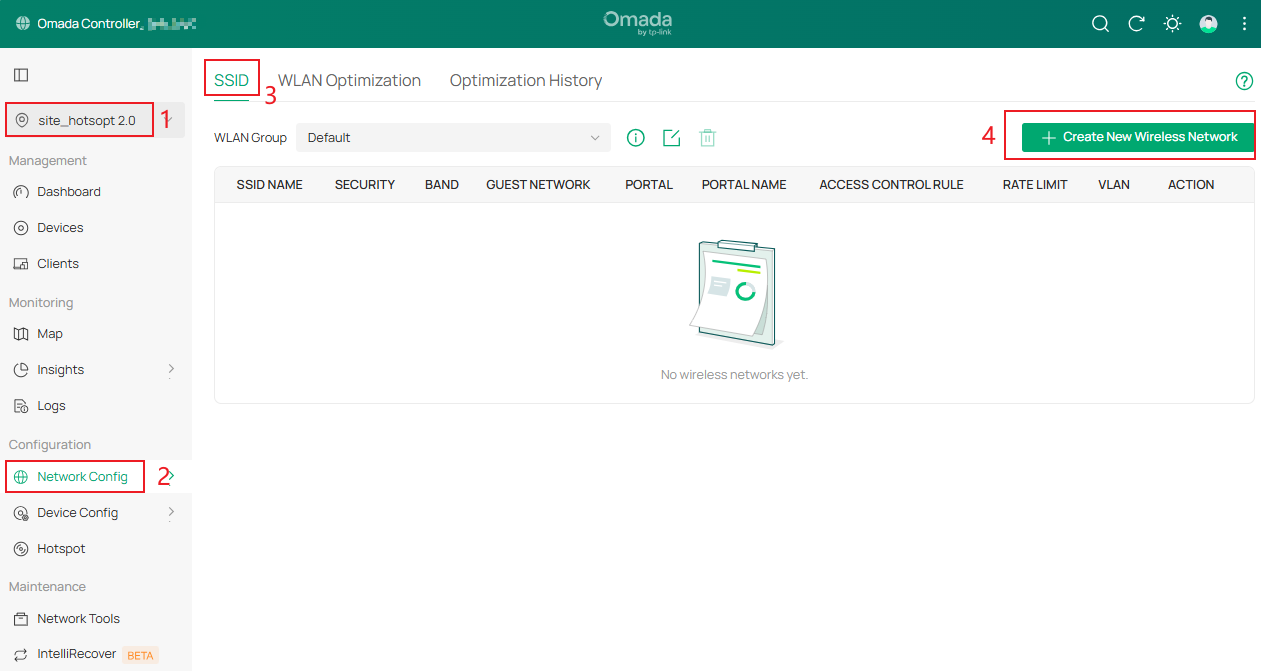
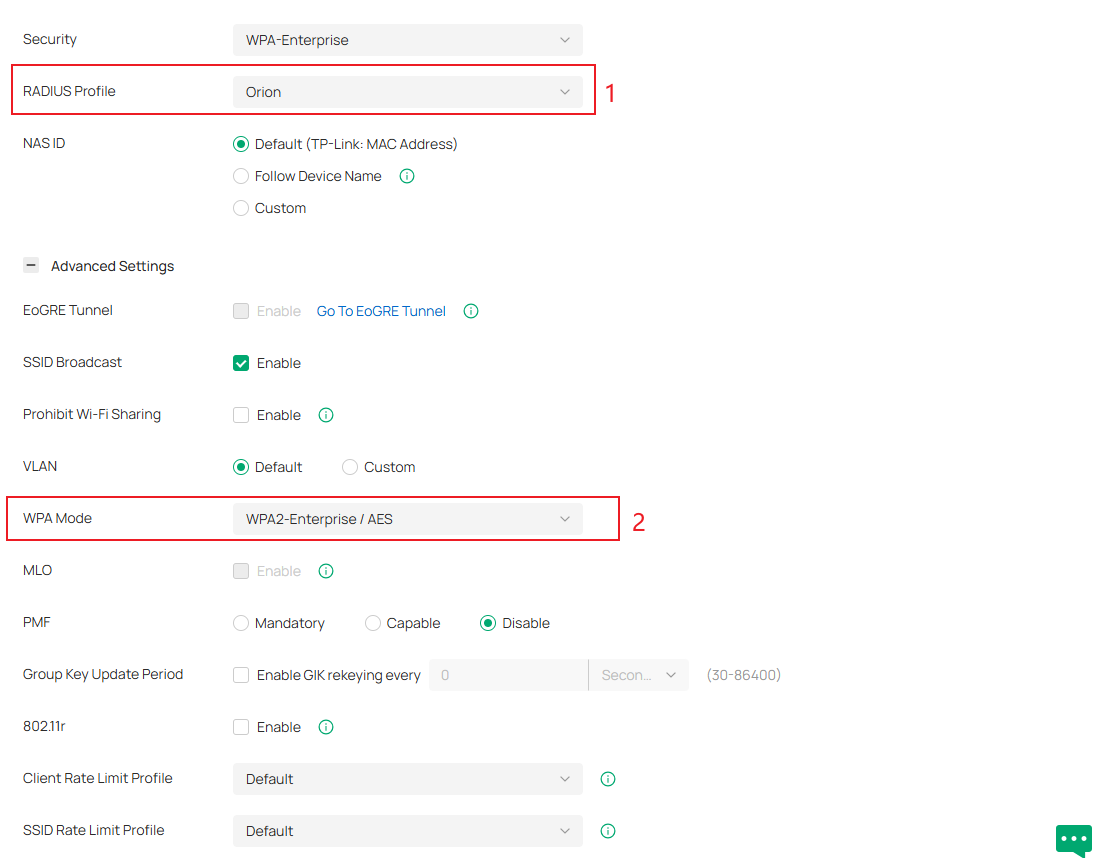
Step 2. Enter Network Name, select WPA2-Enterprise as Security, and select the Radius Profile with the above configuration or click Create New Radius Profile.
Step 3. Apply the above RADIUS settings to your ‘!!!hotspot 2.0’ SSID for both Authentication and Accounting. Go to Advanced Settings > WPA Mode, select WPA2-Enterprise/AES or WPA3-Enterprise.
Step 4. Under Advanced Settings, there is a dropdown menu for Hotspot 2.0, enable Hotspot 2.0 and configure related parameters.
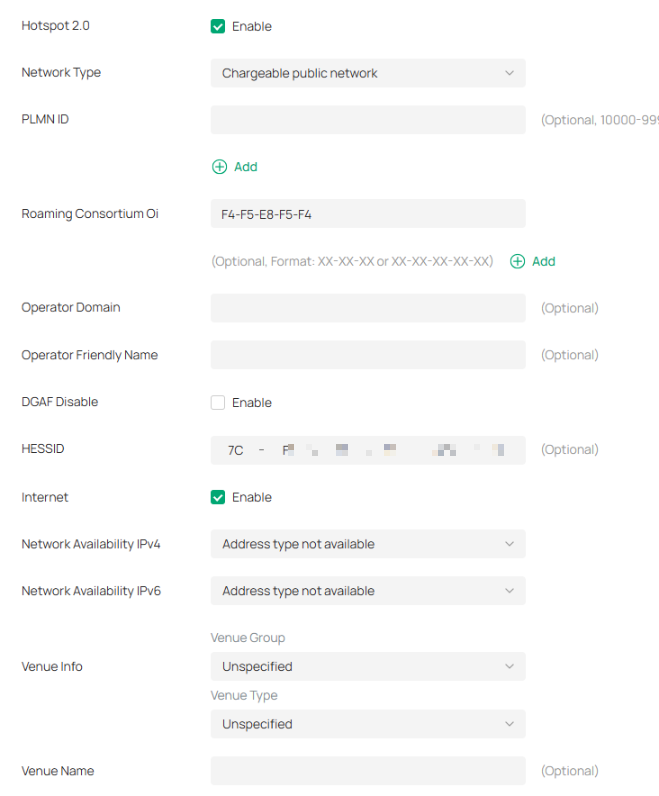
Hotspot 2.0 Configuration Parameters
|
Parameter |
Description |
Explanation |
|
Network Type |
Configure the 802.11u access network type |
Identifies whether the network is public, private, guest, etc. |
|
PLMN ID (Public Land Mobile Network) |
Configure 802.11u 3GPP cellular network information (PLMN = MCC + MNC) |
Mobile Country Code (MCC) is a 3-digit decimal number. Mobile Network Code (MNC) is a 2- or 3-digit decimal number. The AP informs the terminal of the Hotspot 2.0 operator info via PLMN so the terminal can decide whether to use this Hotspot 2.0 network for cellular access. |
|
Roaming Consortium Oi |
802.11u roaming organization identifier list |
When the Hotspot 2.0 network has roaming agreements with other operators, the roaming consortium list can be configured with Oi. After connecting, the user terminal can roam to other operators’ networks while staying online. |
|
Operator Domain Name |
Hotspot 2.0 operator’s domain name |
Configured on the AP; terminals can query this via ANQP and use it to decide network selection. |
|
Operator Friendly Name |
Operator’s friendly name for the hotspot |
Can define names in different languages to help users select the network. Currently only English format input is supported. |
|
DGAF (Downstream Group-Addressed Forwarding) |
DGAF Disabled mode: AP does not forward downstream multicast-addressed frames |
Broadcast traffic uses the same GTK key, which poses risks. AP discards ARP/multicast frames to prevent attackers from exploiting the same GTK within a BSS. Note: Disabled by default. Enabling it may break certain multicast services. |
|
HESSID (Homogeneous Extended Service Set Identifier) |
Identifies a homogeneous ESS network. |
Must match one of the AP BSSIDs in the zone. Helps terminals distinguish service providers in overlapping hotspots where SSIDs are not unique. |
|
Internet |
Indicates Internet reachability |
Specifies whether the network allows Internet access. |
|
Network Availability (IPv4) |
Indicates IPv4 address availability type |
AP can pass IPv4 address availability info to terminals via ANQP, so users know the type of IP address they will obtain after connecting. |
|
Network Availability (IPv6) |
Indicates IPv6 address availability type |
Same as IPv4, but for IPv6 address availability. |
|
Venue Info |
Venue group and venue type (using international building codes) |
AP provides venue type info to terminals during Hotspot 2.0 access, helping users choose a network. |
|
Venue Name |
Venue name info |
Identifies the physical location of the network. |
|
NAI Realm List |
Network Access Identifier (NAI) realms accessible via the AP, including domain name, authentication method, and authentication parameters |
Realm name: usually the provider’s domain name. Encoding: 0 = RFC 4282 formatted; 1 = non-RFC 4282 UTF-8 string. EAP Method: supported EAP authentication methods. Authentication param: EAP parameters and identifiers. |
Step 5. Click Apply to complete the Wi-Fi setting.
Conclusion
By following the steps above, you have successfully configured the Hotspot 2.0 network on Omada Controller.
QA
Q1:How to understand Hotspot 2.0 and Passpoint?
A1: Passpoint is the Wi-Fi Alliance's certification program corresponding to Hotspot 2.0. Passpoint certification indicates a device's robust support for Hotspot 2.0. Currently, most manufacturers' product descriptions and device configurations can be identified using Passpoint.
Q2: Does Omada Controller support Radsec? Does Hotspot 2.0 and Radsec require consideration of device-side firmware support?
A2:
- Omada Controller v6.1 support Radsec.
- Omada Controller V5.15.24 just support Hotspot 2.0, but doesn’t support Radsec.
- Both Hotspot 2.0 and RADIUS require firmware support on the device to function.
Q3: Does Omada Controller and EAPs support online set up.
A3:
For clients without a SIM/USIM card, the credentials during 802.1x authentication are the username/password and certificate by online set up. Currently, EAP hotspot 2.0 only supports release 1 and does not support online set up functionality.
Get to know more details of each function and configuration please go to Download Center to download the manual of your product.
