


Content
Periodic Upgrade Configuration for Controller Mode
Reboot Schedule Configuration for Controller Mode
Reboot Schedule Configuration for Standalone Mode
WLAN Schedule Configuration for Controller Mode
WLAN Schedule Configuration for Standalone Mode
Objective
This article will show you how to set up automated upgrades, reboot cycles and Wi-Fi Radio "On/Off" schedules for your Omada EAPs.
Requirements
One of the following requirements must be met, depending on your selected management method: Controller or Standalone mode.
- Any type of Omada Controller v6.0 or higher, with all EAPs running compatible firmware and successfully adopted.
- Omada EAPs.
Introduction
This article explores the configuration of Upgrade, Reboot and Wi-Fi Schedules for Omada EAPs in both Controller and Standalone modes. These features allow administrators to automate periodic system upgrades and reboots, as well as control wireless radio uptime, helping to enhance network stability, upgrade firmware during off-hours, and reduce power consumption.
Configuration
Please find the configuration steps below.
Periodic Upgrade Configuration for Controller Mode
Step 1. Go to Global View > Firmware > Periodic Upgrade.
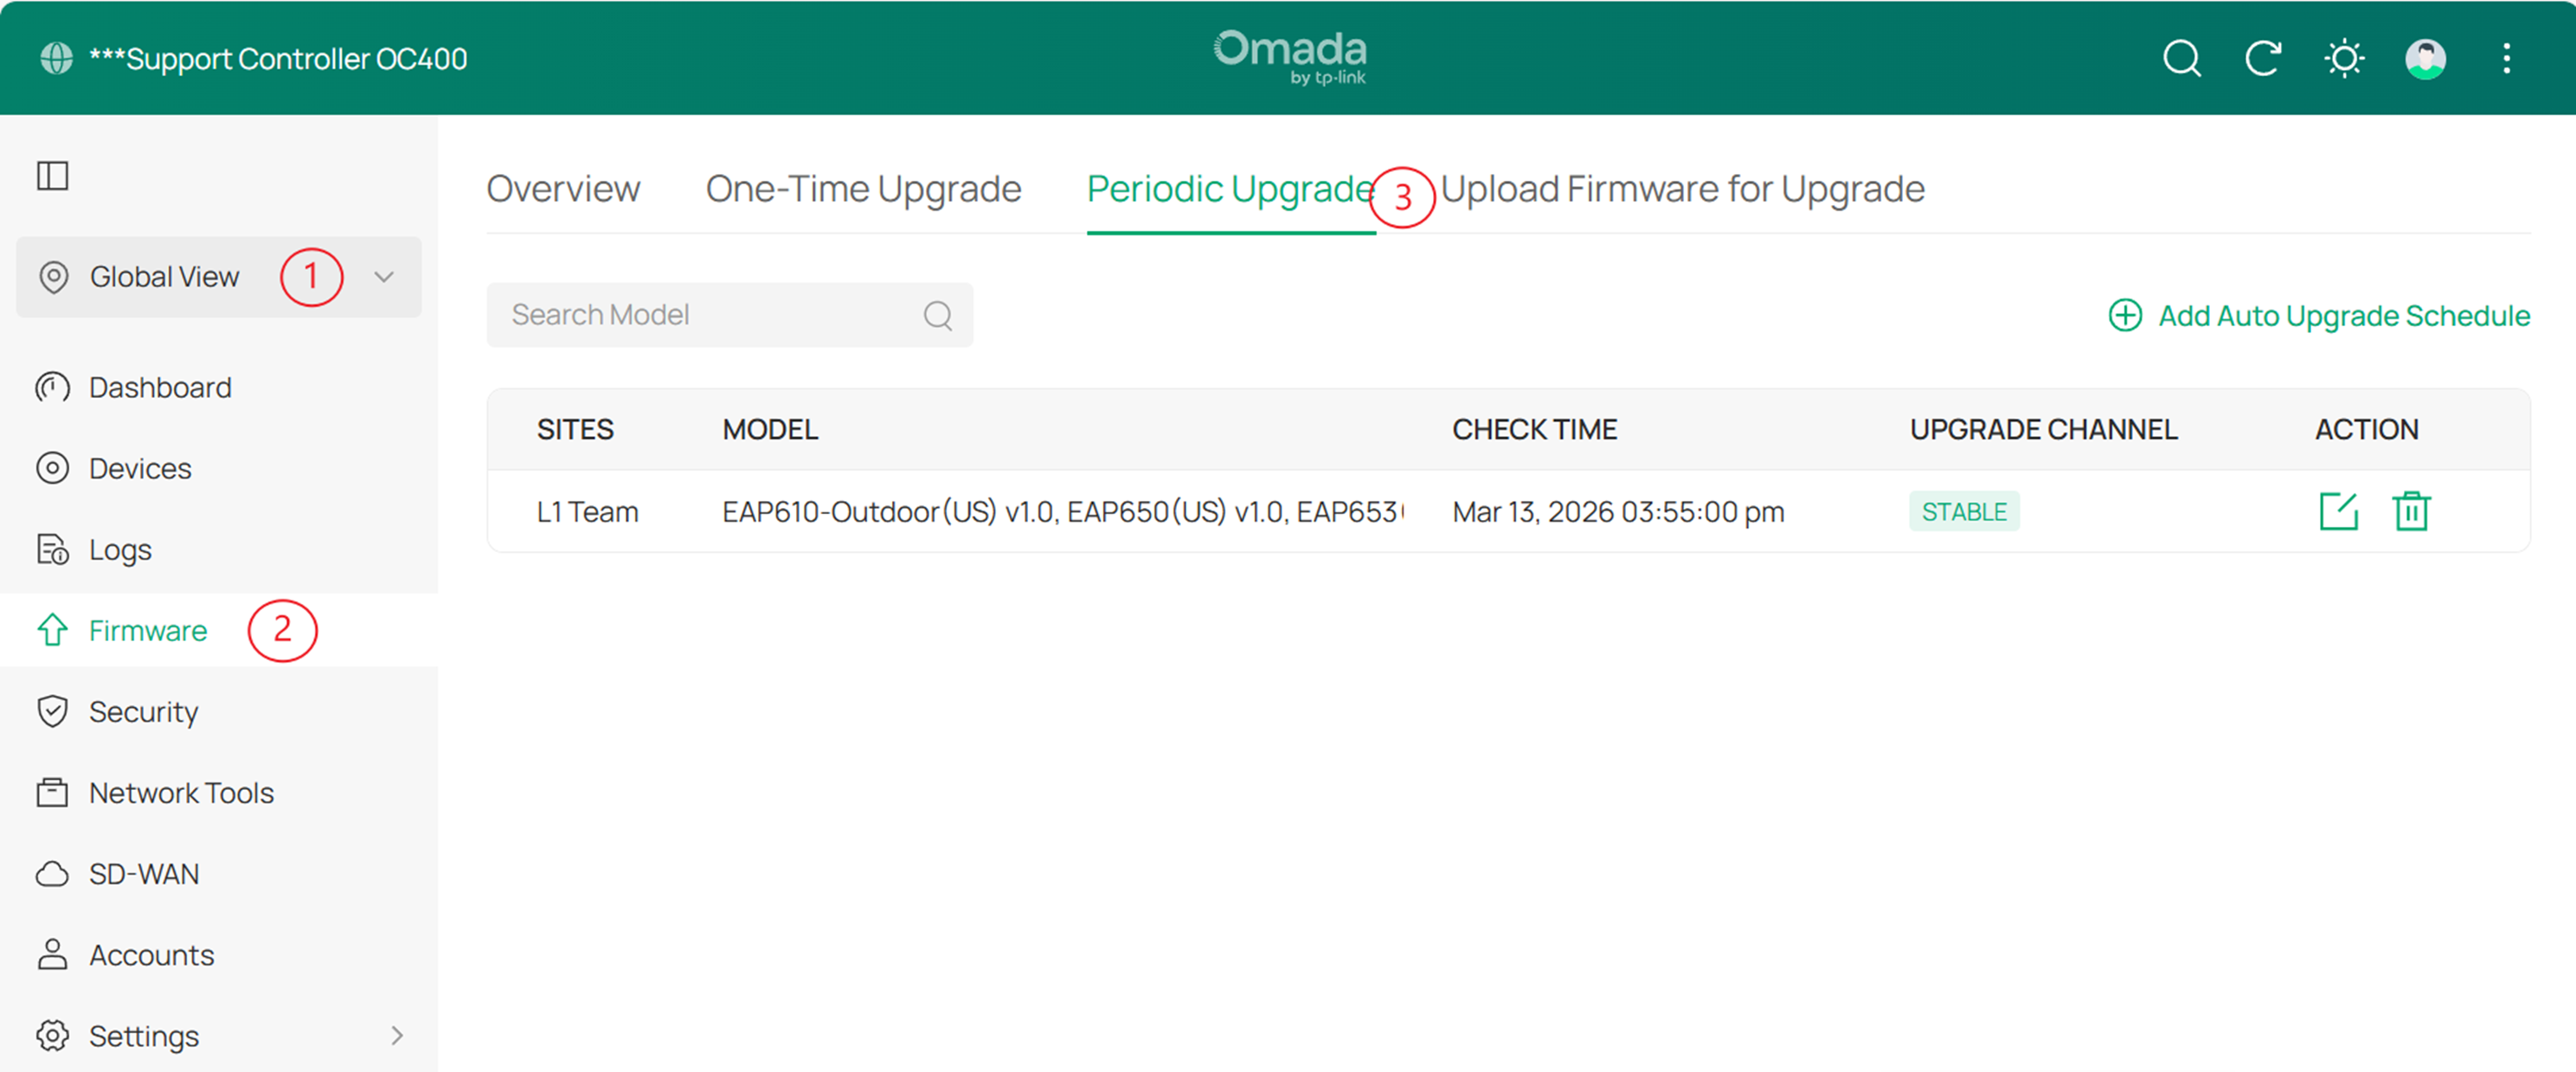
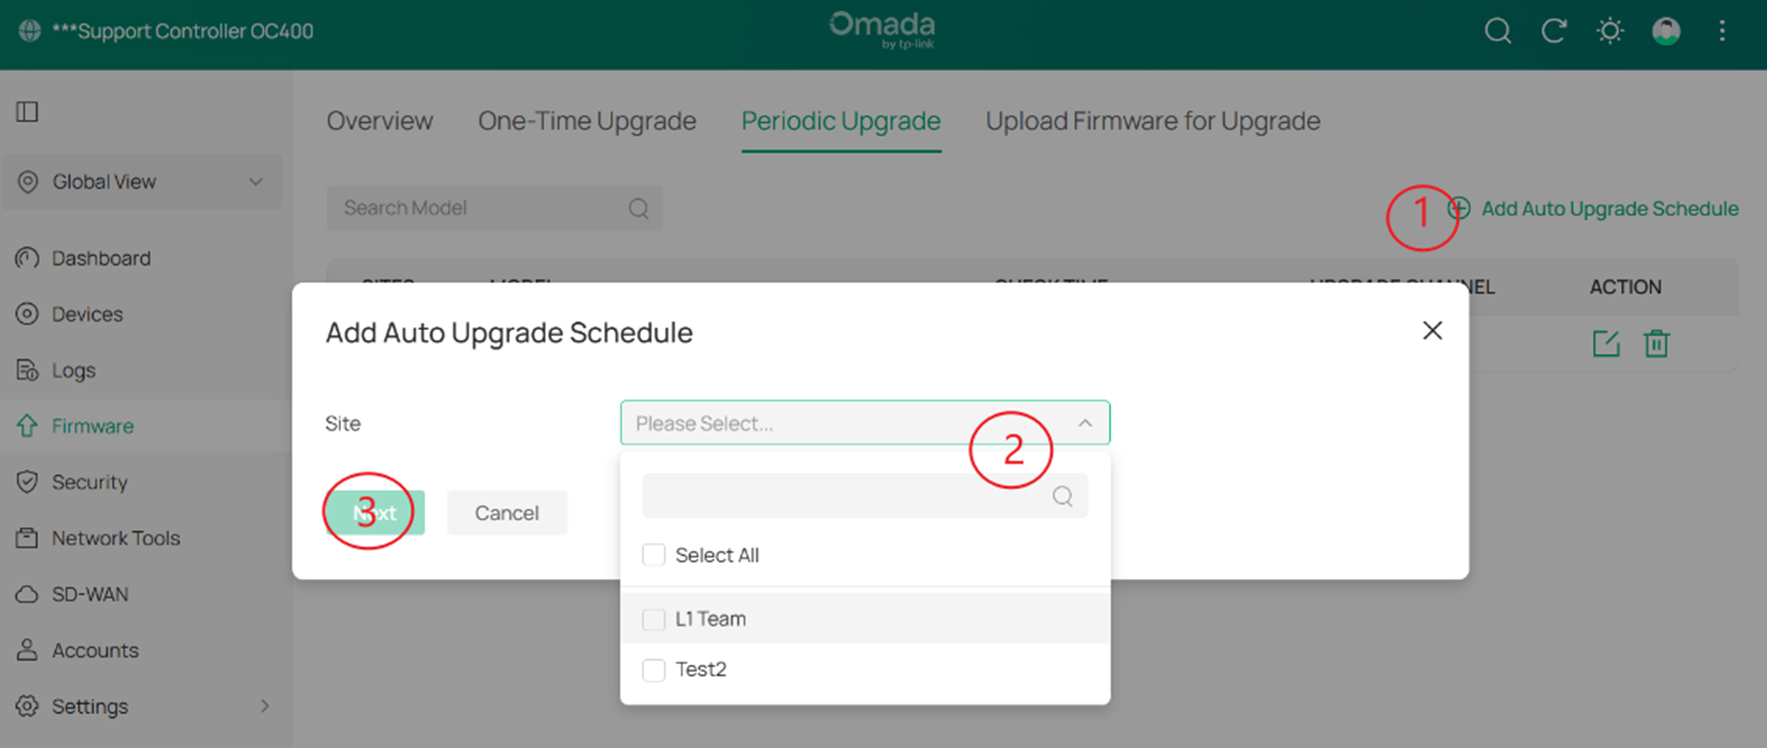
Step 2. Click on Add Auto Upgrade Schedule > select one, multiple, or all sites from Site dropdown and then click Next.
Step 3. Select the EAP models from Model dropdown, then choose the preferred Occurrence , the release Channel from which the controller will download the firmware (Stable) and click Confirm.
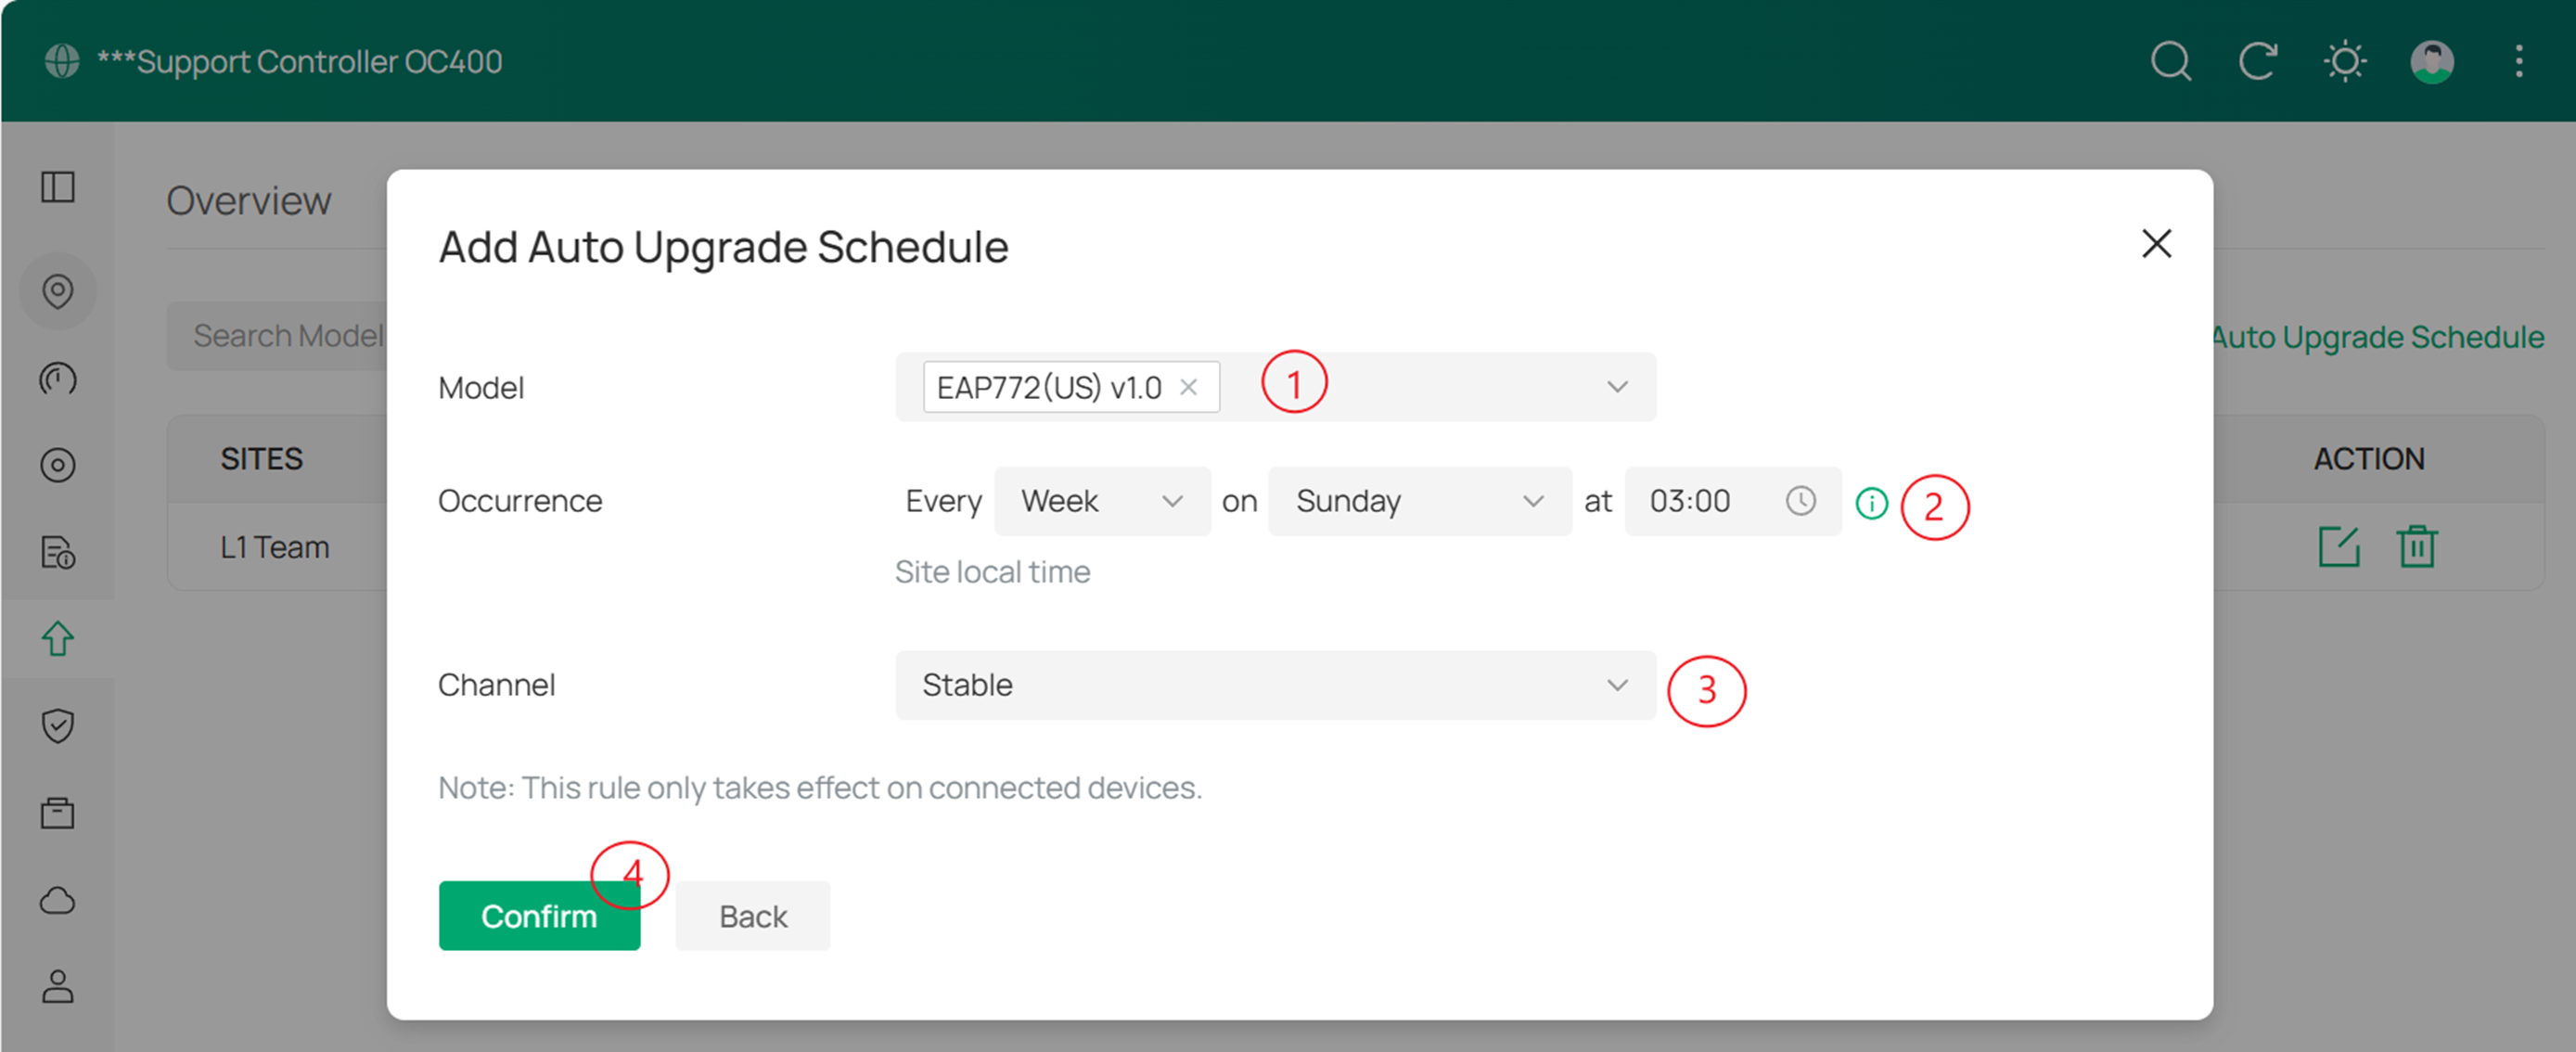
Note:
1.The time set here is based on the time zone of site local time. You can change the time zone on site settings page.
2.This rule only takes effect on connected devices.
Reboot Schedule Configuration for Controller Mode
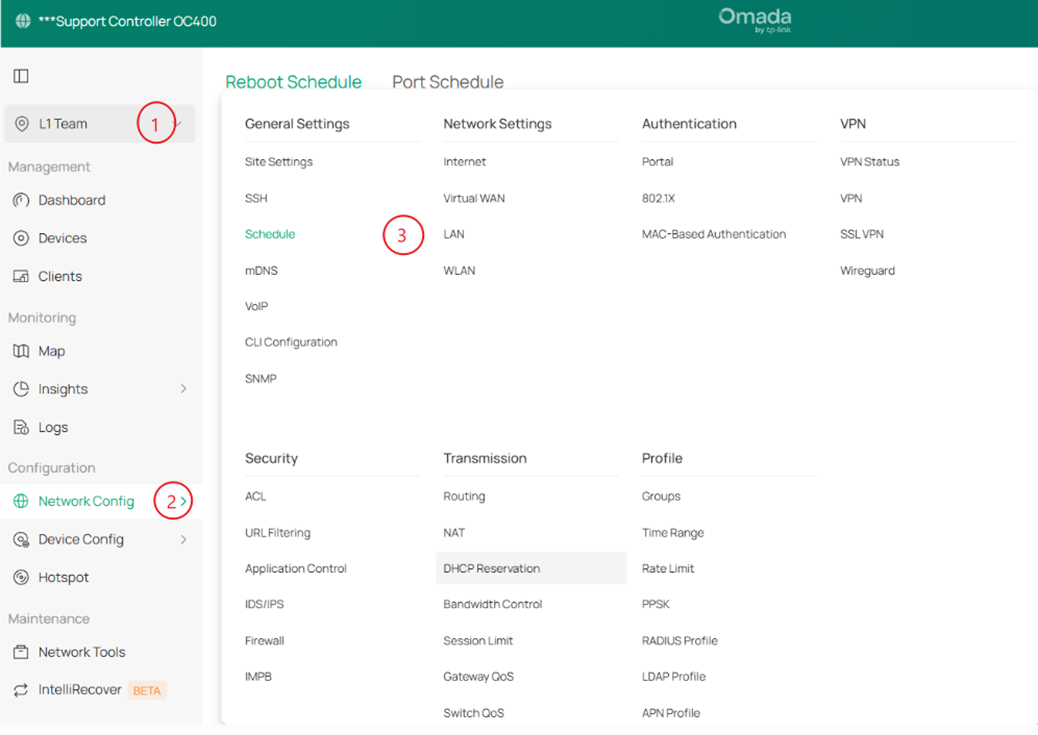
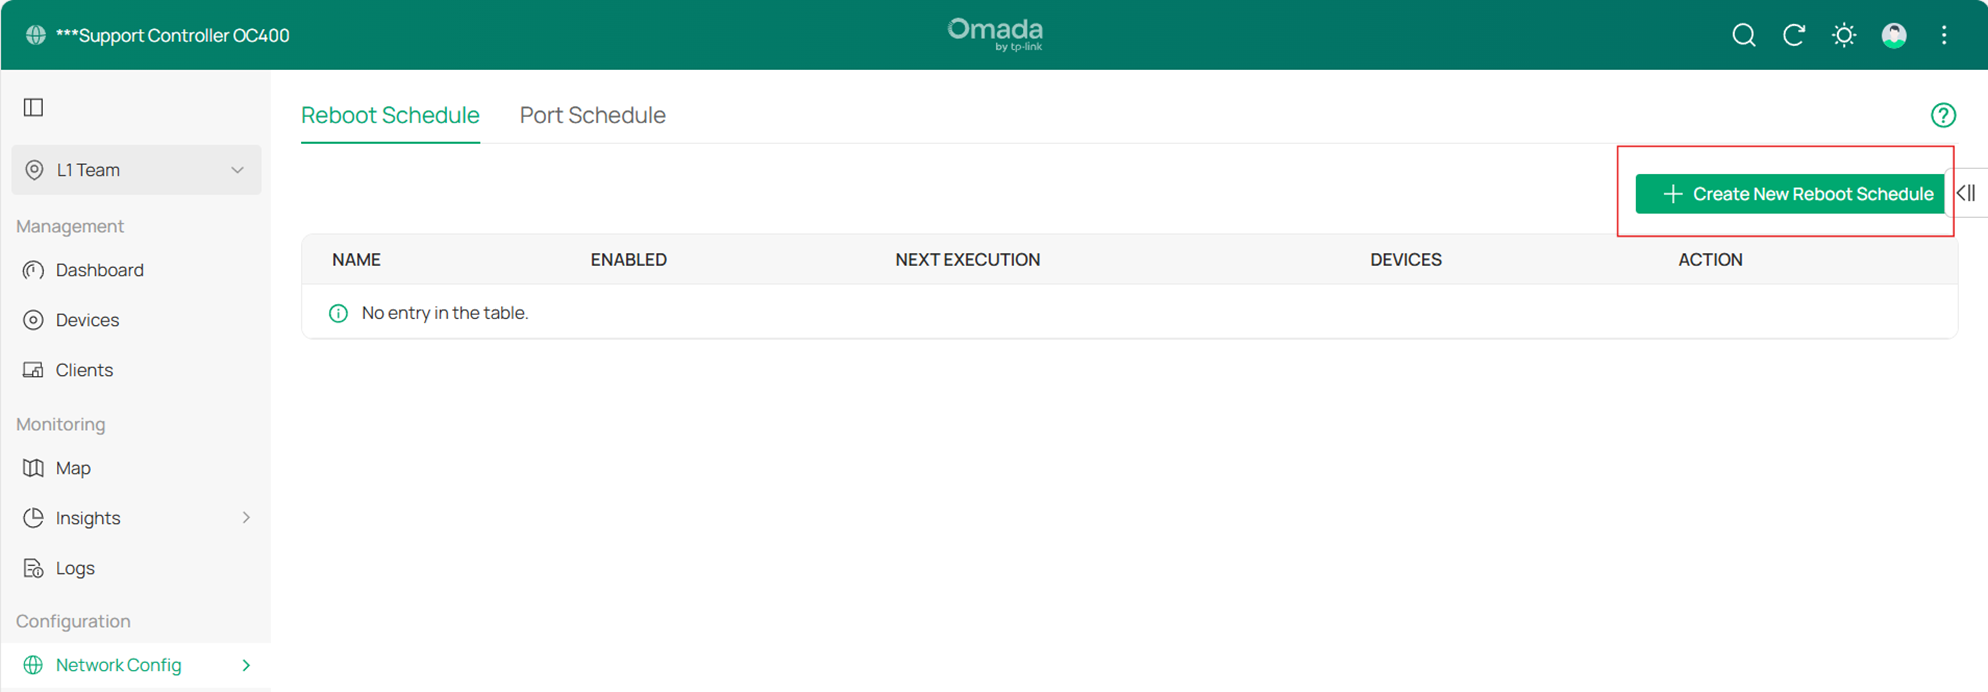
Step 1. Go to Site > Network Config > Schedule.
Step 2. Click on Create New Reboot Schedule.
 .
.
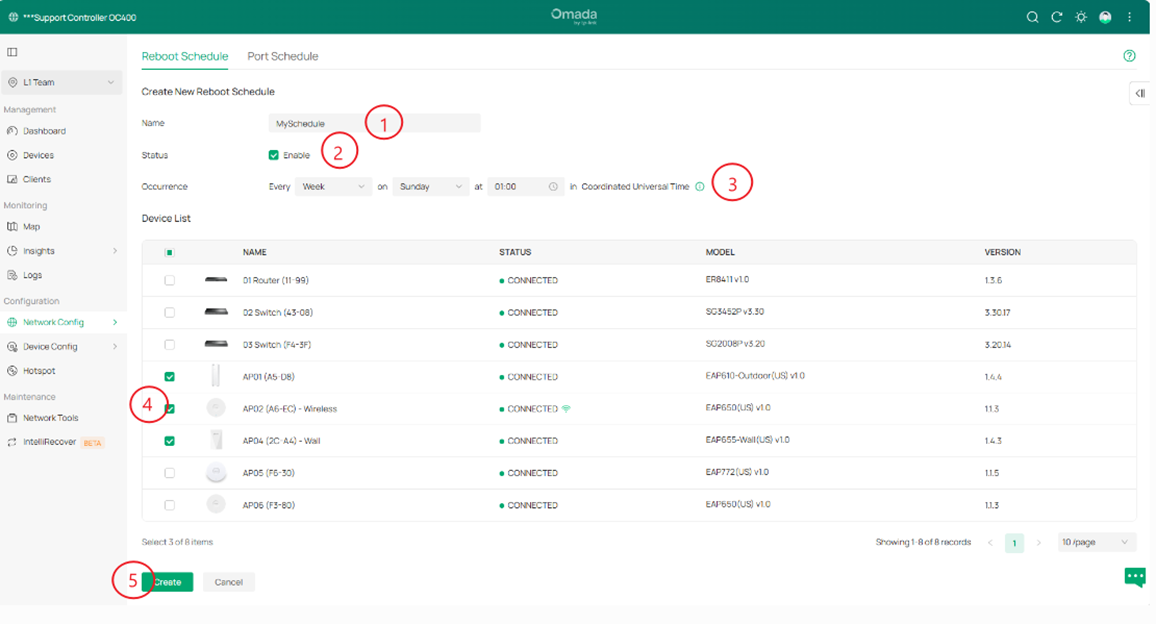
Step 3. Assign a Name to your Reboot Schedule and ensure the Status is set to Enabled. Define the Occurrence interval, select the specific Omada EAPs to be included in the schedule, and click Create to save your settings.
Reboot Schedule Configuration for Standalone Mode
On newer firmware versions of Omada EAPs, this feature is not supported in Standalone Mode.
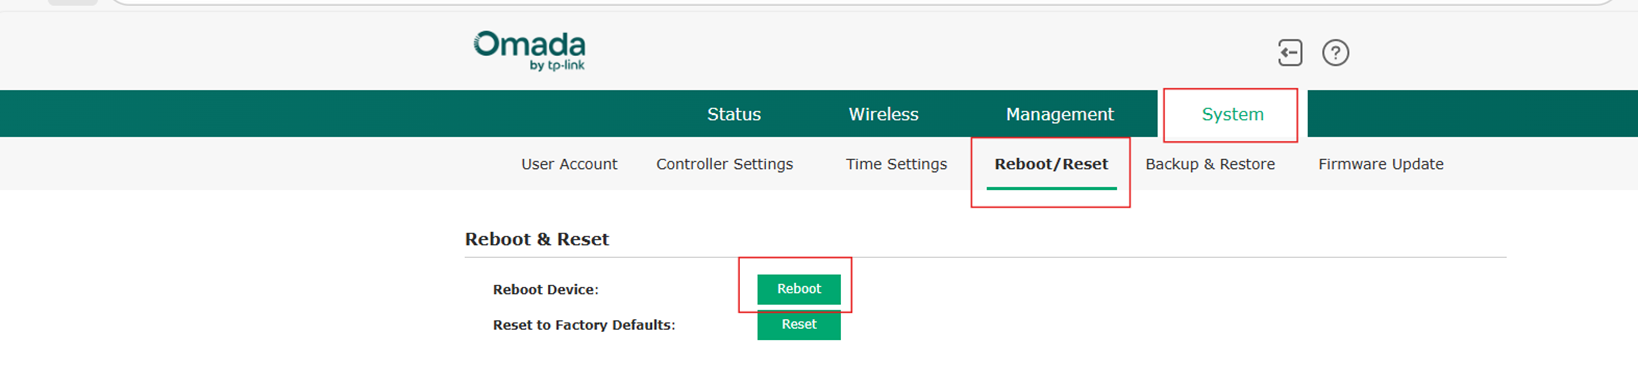
To manually reboot your EAP, please login to the EAPs web interface and go to System > Reboot/Reset > Reboot.
Note: When accessing your EAP locally via its IP address, your browser may display a "Not Secure" or "Your connection is not private" warning.
This notification occurs because the EAP uses a self-signed SSL certificate rather than one verified by a public Certificate Authority. Since you are accessing the device directly within your own private network, it is perfectly safe to bypass the warning and proceed to the login page.
WLAN Schedule Configuration for Controller Mode
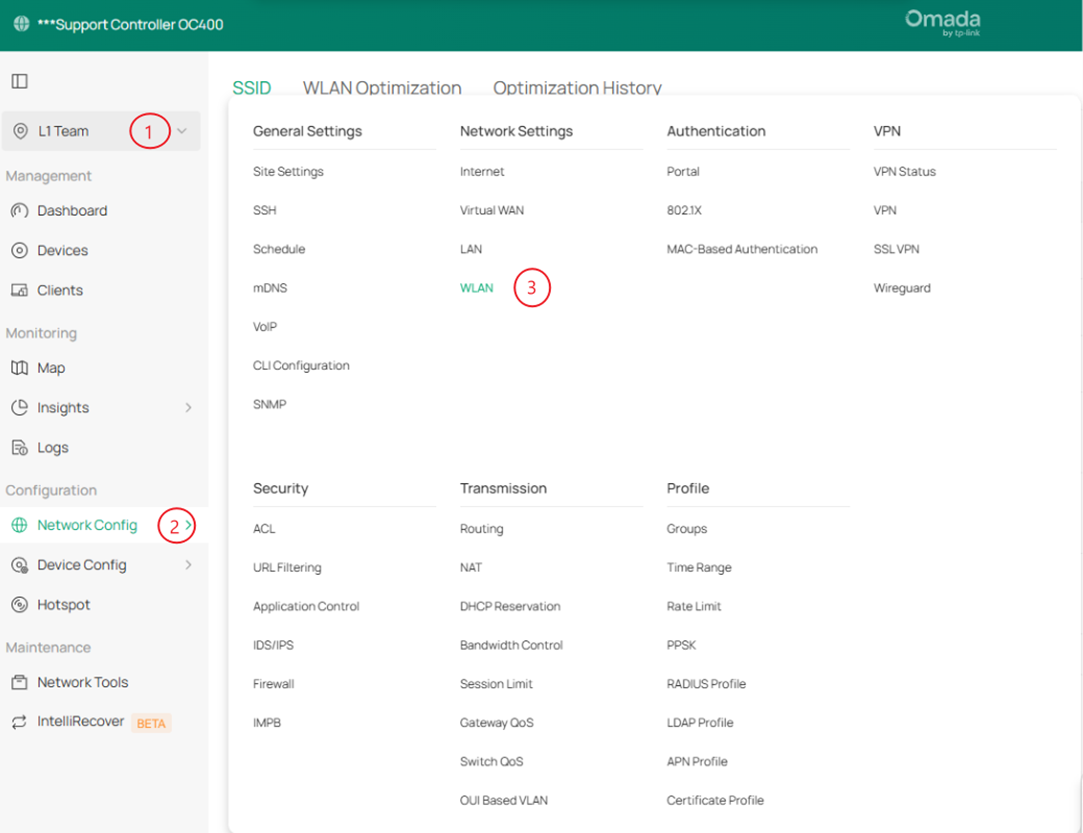
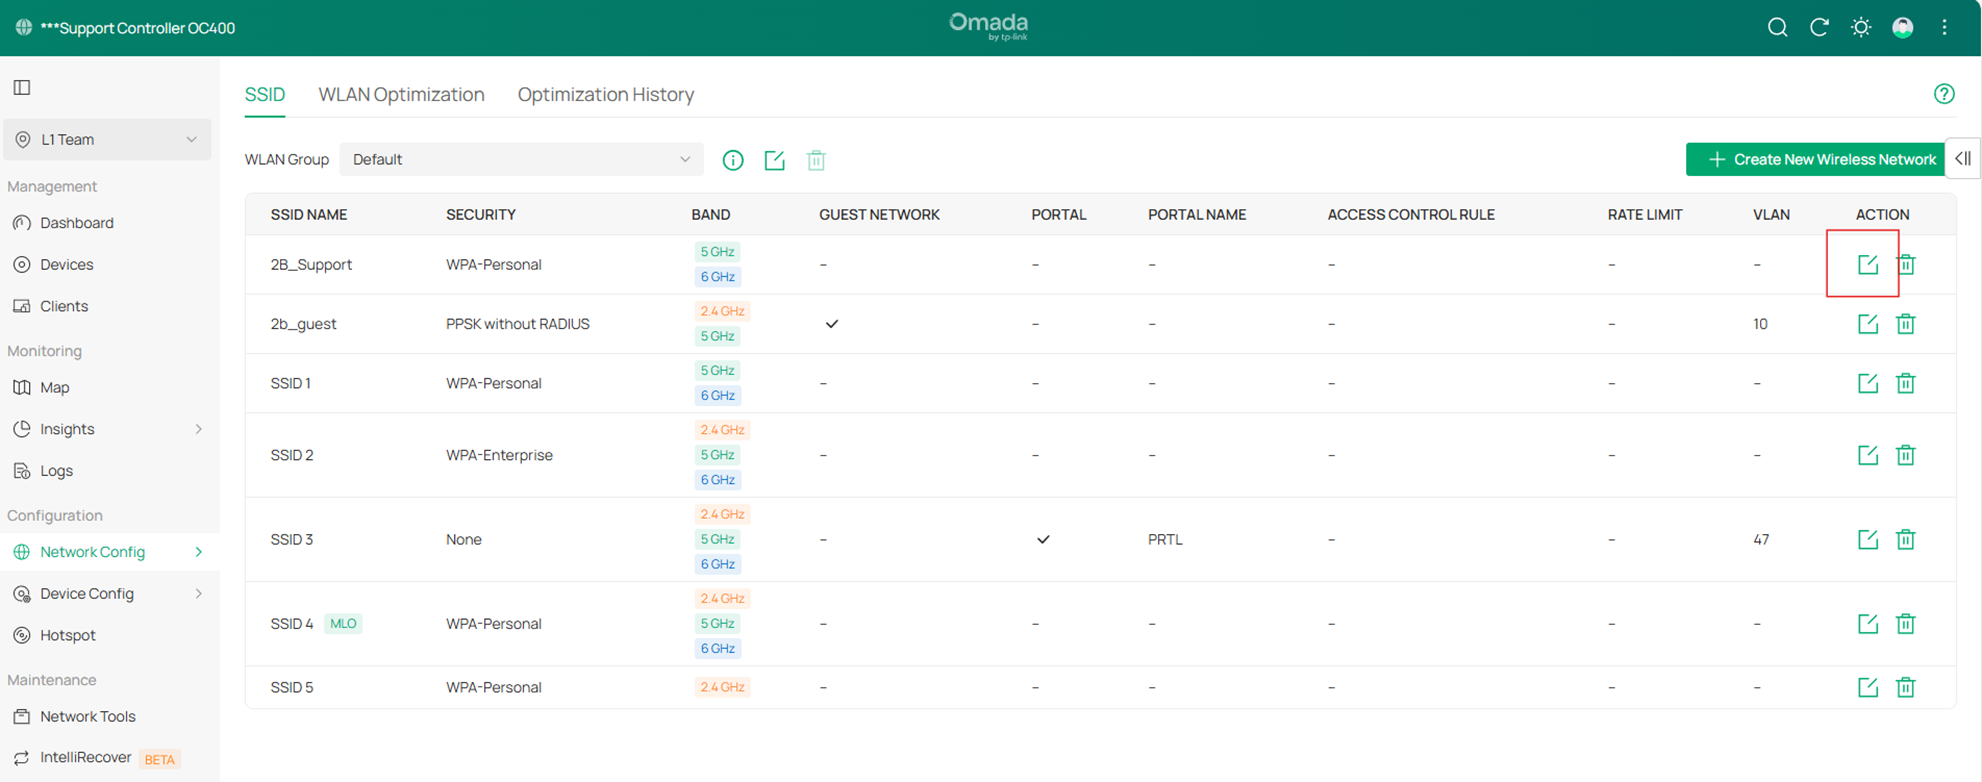
Step 1. Go to Site > Network Config > WLAN.
Step 2. Click the Edit icon under the Action column for your preferred SSID.
Step 3. Expand the WLAN Schedule section and toggle the Status to Enabled. Select your preferred Action (Radio On or Radio Off), define the desired Time Range and then Save.
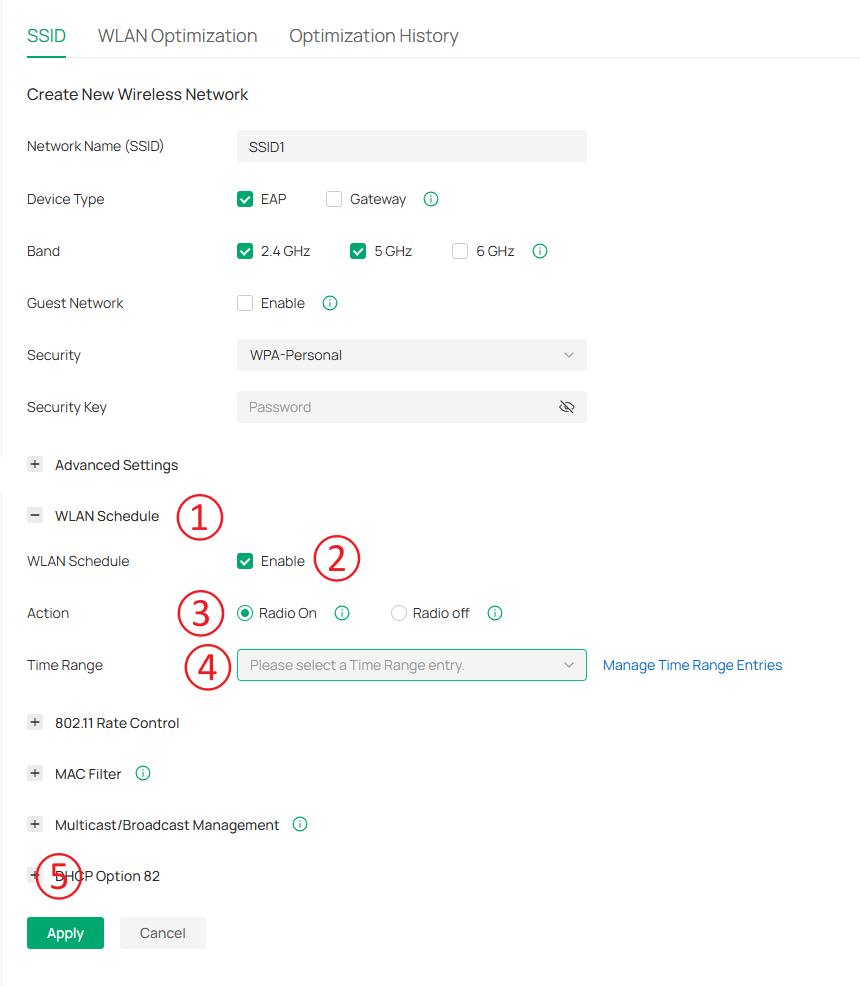
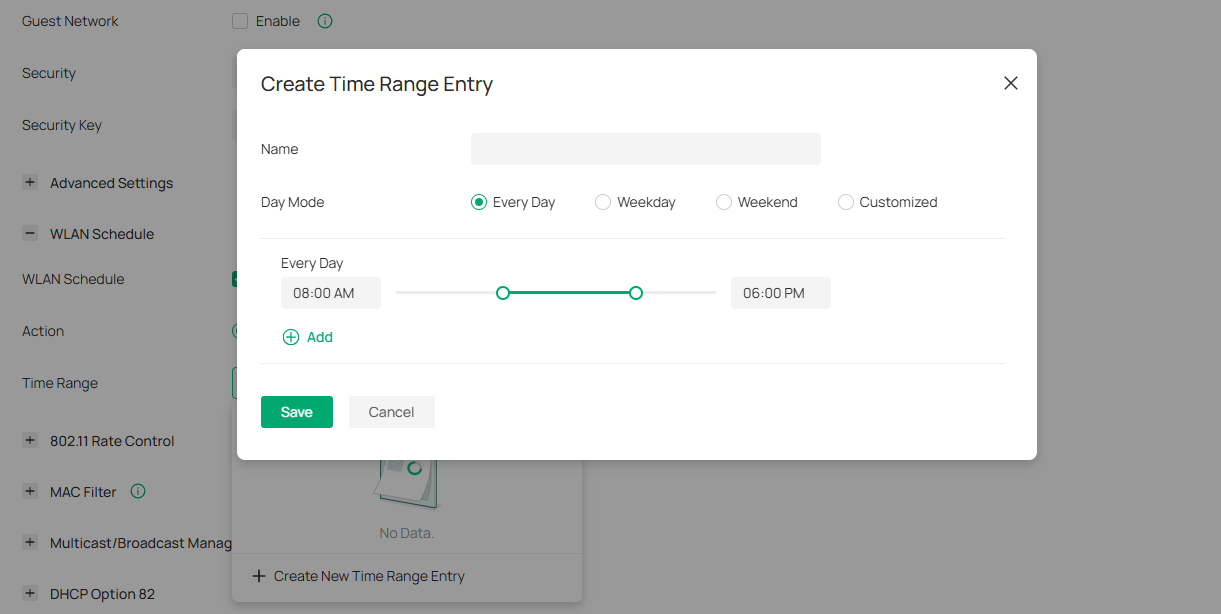
Note: If a Time Range has not been created yet, click + Create New Time Range in the Time Range dropdown and configure a new entry.
WLAN Schedule Configuration for Standalone Mode
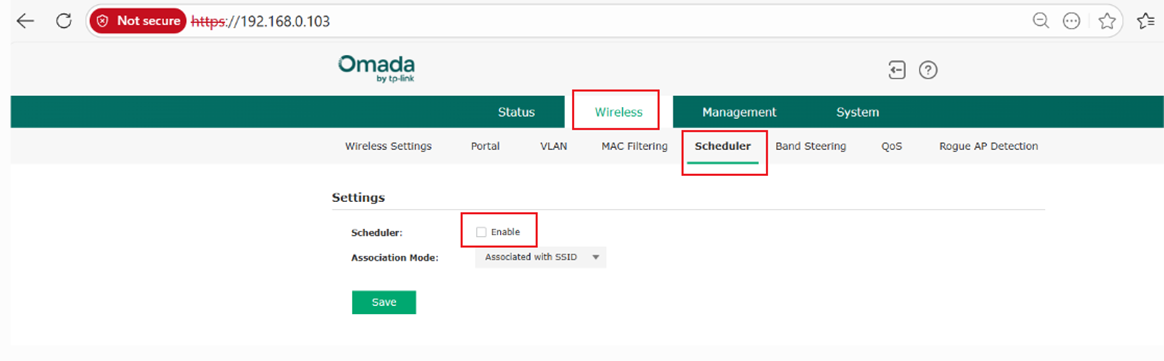
Step 1. Access the web interface of your EAP.
Note: When accessing your EAP locally via its IP address, your browser may display a "Not Secure" or "Your connection is not private" warning.
This notification occurs because the EAP uses a self-signed SSL certificate rather than one verified by a public Certificate Authority. Since you are accessing the device directly within your own private network, it is perfectly safe to bypass the warning and proceed to the login page.
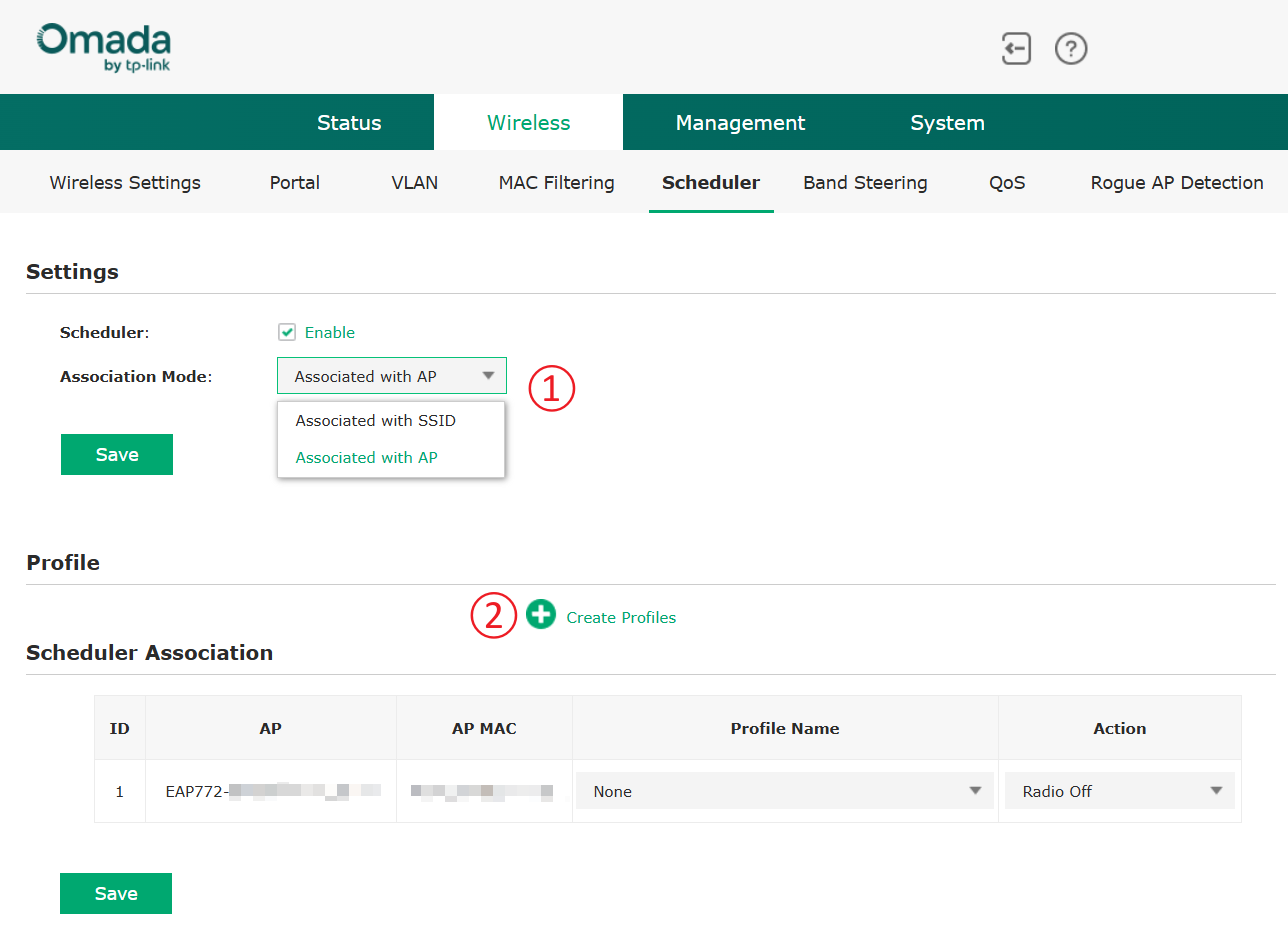
Step 2. Go to Wireless > Scheduler and check the box to Enable Scheduler. This action will reveal the Profile and Scheduler Association configuration menus.
Step 3. Choose your preferred Association Mode, then click on Create Profile under the Profile section.
Note: Select Associate with SSID to manage individual wireless networks, or Associate with AP to enable or disable the Access Point’s entire radio according to your schedule.
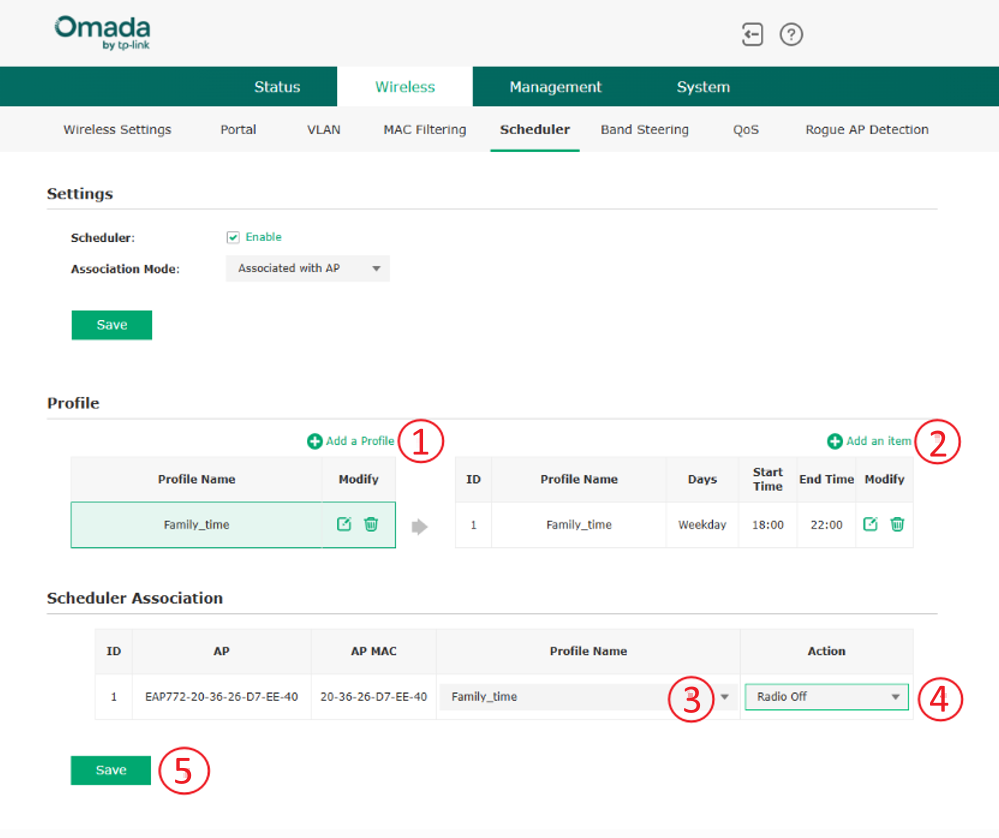
Step 4. Click Add Profile to create a new entry, then Add an item to configure the specific time intervals. Finally, complete the Scheduler Association by linking the profile to the AP or SSID(s) (based on the selected Association Mode), choose the desired action (Radio On or Radio Off), and click Save.
Verification
Controller Mode
- Periodic Upgrade: Go to Global View > Firmware > Periodic Upgrade and verify that your schedule is listed. After the scheduled upgrade time, check the firmware version of the targeted EAPs. If a newer firmware version has been published on the selected release channel (Stable), the EAPs will be upgraded accordingly. If no newer version has been released since the last upgrade, the EAPs will retain their current firmware version.
- Reboot Schedule: Go to Logs > Alerts. Look for entries indicating "AP [Name] was rebooted by Reboot Schedule" at the specified time to confirm the automated cycle is active.
- WLAN Schedule: Verify Wi-Fi Uptime: Check the Clients list or the AP status during a "Radio Off" interval. The specific SSID or the AP’s radio should no longer be visible or broadcasting.
Standalone Mode
- WLAN Schedule: Check the Clients list or the AP status during a "Radio Off" interval. The specific SSID or the AP’s radio should no longer be visible or broadcasting.
Conclusion
Proper configuration of both the Wireless Scheduler and the Reboot Scheduler provides administrators with enhanced control over network performance and maintenance. By defining radio on/off time intervals, associating scheduler profiles with the appropriate APs or SSIDs, and scheduling automatic reboots, administrators can optimize availability, improve long-term stability, and minimize manual intervention.
Get to know more details of each function and configuration please go to Download Center to download the manual of your product.
FAQ
Q1. What is the difference between the Wireless Scheduler and the Reboot Scheduler?
A1. The Wireless Scheduler controls the radio status (Radio On/Off) at specified times, while the Reboot Scheduler automatically restarts the device at scheduled intervals to maintain performance and system stability.
Q2. Does the Reboot Scheduler in Controller Mode disconnect users?
A2. Yes. When a scheduled reboot occurs, the Access Point will temporarily go offline, and all connected clients will be disconnected until the device fully restarts.
Q3. Does the Reboot scheduler feature work in standalone mode on EAPs?
A3. No, in newer firmware versions this option is not available in Standalone Mode.
