


Contents
Troubleshooting Steps in Controller mode
Troubleshooting Steps in Standalone mode
Introduction
If you encounter the issue of devices unable to authenticate successfully after configuring the 802.1X feature on the Omada Switch, you can follow the troubleshooting steps below to resolve the problem.
Requirements
- Omada Access, Access Plus, Access Pro, Access Max, Aggregation, Campus Switch
- Omada Controller (Software Controller / Hardware Controller / Cloud Based Controller, V6.0 and above)
Troubleshooting Steps
Troubleshooting Steps in Controller mode
The 802.1X protocol controls a user's access to the network and prevents unidentified or unauthorized users from transmitting and receiving data. For how to configure this feature, please refer to the link below. How to build an 802.1X access authentication system using Switches on Omada Controller
Step 1. Check the Dot 1X authentication global configuration.
Go to Network Config > Authentication > 802.1X, where you can see that the 802.1X function has been enabled and the EAP protocol has been selected.
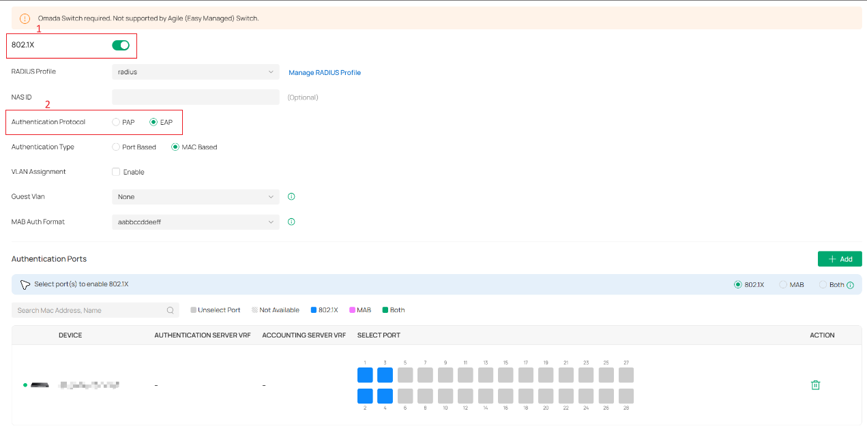
For the authentication protocol, the Omada Switch supports both EAP and PAP protocols.
EAP is a flexible authentication framework where the switch acts as a pass-through device, relaying messages between the client and the RADIUS server. The server performs the actual authentication using specific EAP methods (such as EAP-TLS or PEAP), providing higher security and more advanced capabilities.
PAP, by contrast, is a simpler method that sends the username and password to the RADIUS server for verification without strong encryption. It is widely supported but less secure, so the appropriate protocol should be selected based on security requirements and deployment needs.
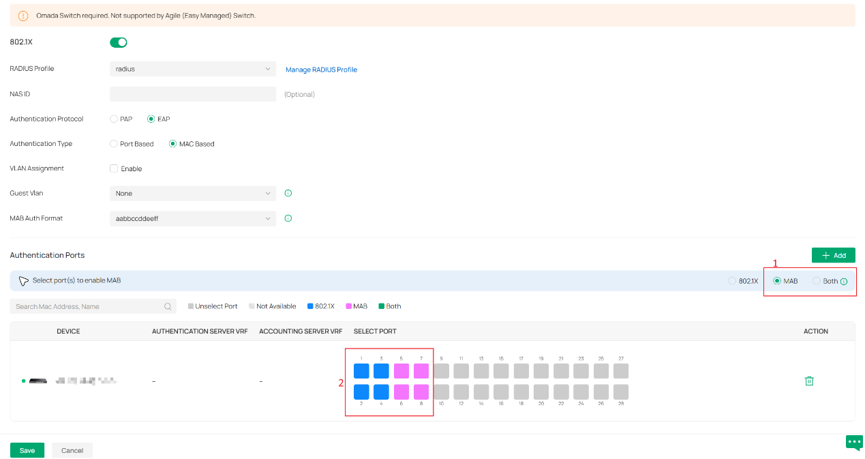
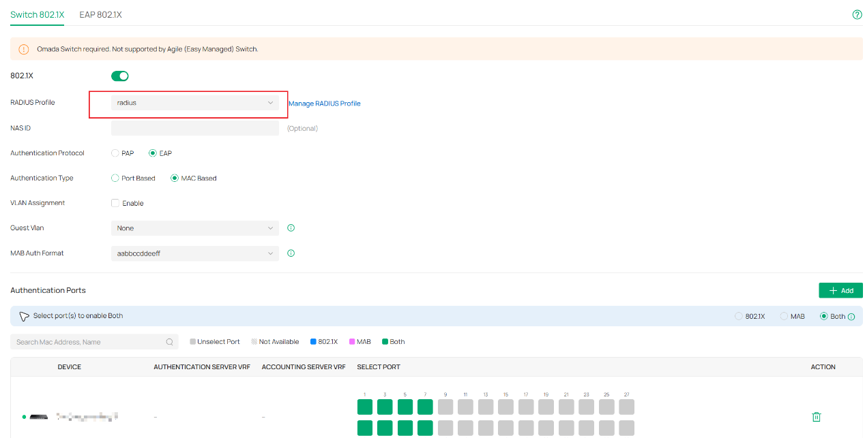
Step 2. Check the Dot 1X authentication port configuration.
Go to Network Config> Authentication > 802.1X, where you can see the switches that have 802.1X enabled and the ports that have been enabled. In the Controller mode, the Port Control is set to Auto by default.
For user devices that do not support 802.1X function, the corresponding ports need to enable both the 802.1X and MAB functions. Most printers, IP phones, and fax machines do not support 802.1X function. After enabling the MAB function, the switch will send the RADIUS access request to the Radius Server using the user device's MAC address as the username and password.
Step 3. Check the network connectivity.
Make sure the network link between the switch and the Radius Server is normal, and also ensure that the authentication port (usually 1812, but there are exceptions) used by the Radius Server is enabled.
Step 4. Check the Radius Server configuration.
Go to Network Config > Profiles > RADIUS Profile to check whether the Radius Server’s IP address, Shared Key, and authentication port are configured correctly.
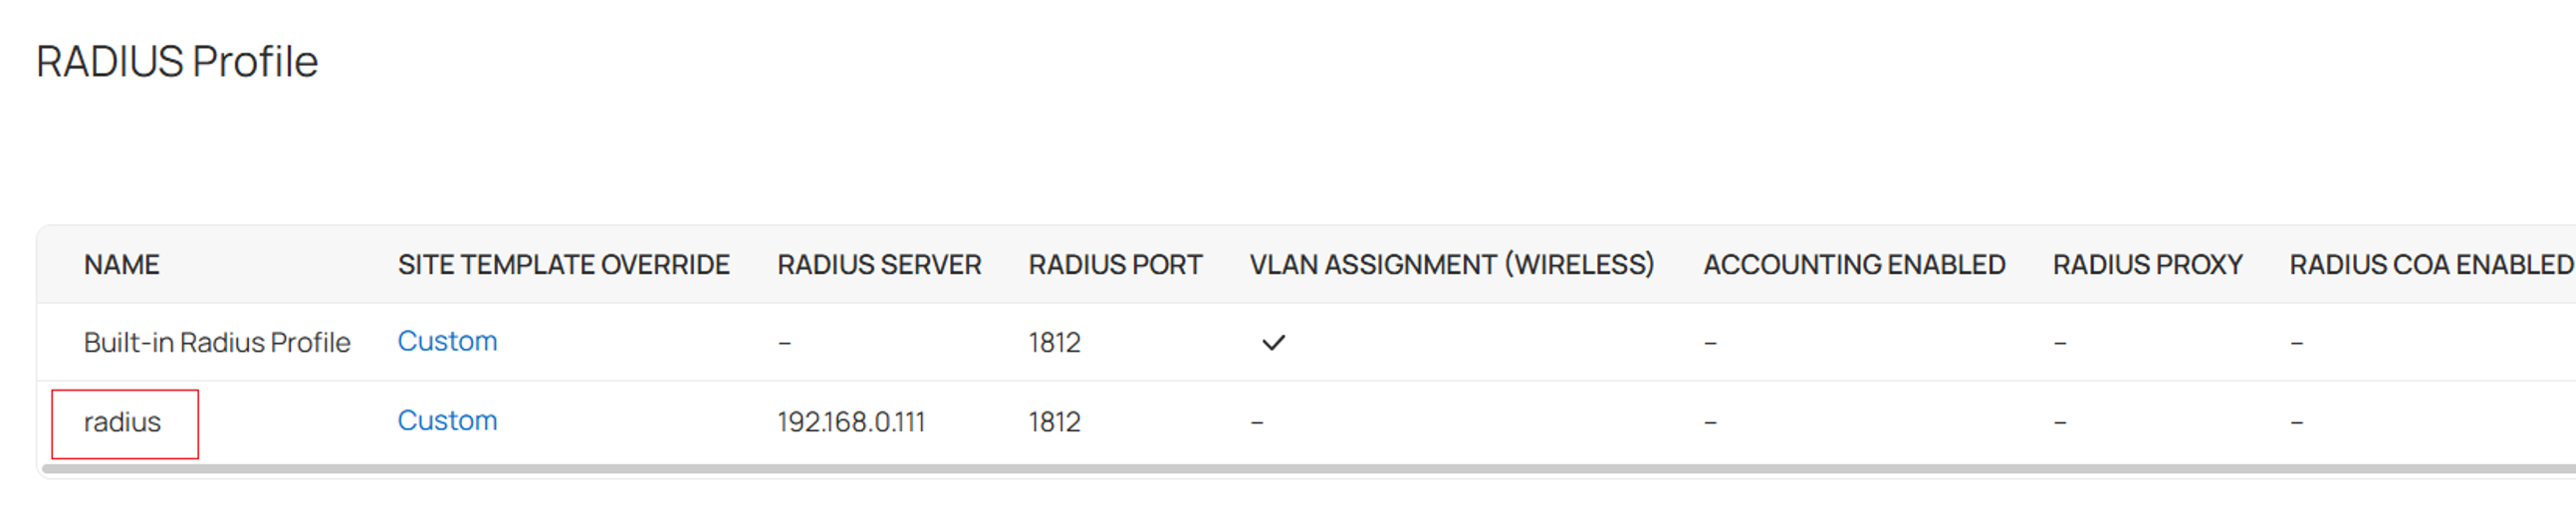
Step 5. Check the Radius Server Group selected for 802.1X.
Go to Network Config > Authentication > 802.1X, where you can see the RADIUS Profile selected is the one you saw in Step 4.
Step 6. Check if ACL, IMPB, MAC Filtering, or other security policies are configured.
Step 7. Check the client software.
Make sure the client software is not damaged and the client software version supports the current authentication method.
If the above troubleshooting steps still cannot solve the problem, you can try to replace the client software.
Troubleshooting Steps in Standalone mode
This section describes the configuration steps. The steps in standalone mode are almost the same as those in controller mode. A brief introduction is provided below. If you would like a more detailed configuration procedure, please refer to the following link: Configuring 802.1x
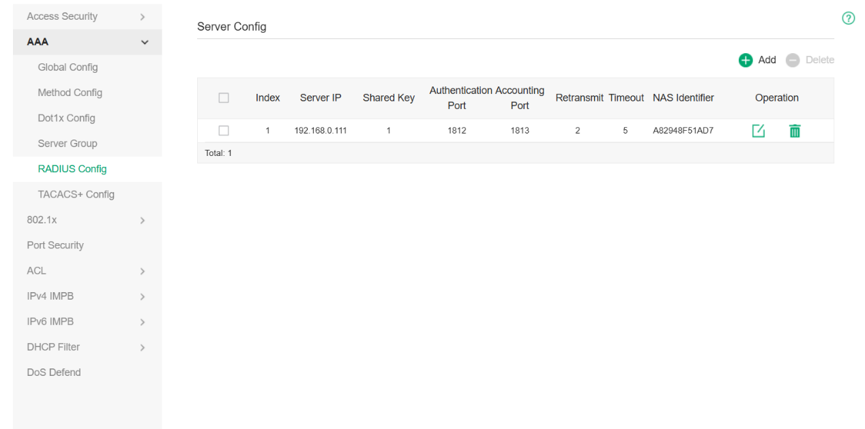
Step 1. Go to AAA > RADIUS Config page and verify that the RADIUS server is correctly configured for both authentication and accounting (including IP address, ports, and shared key).
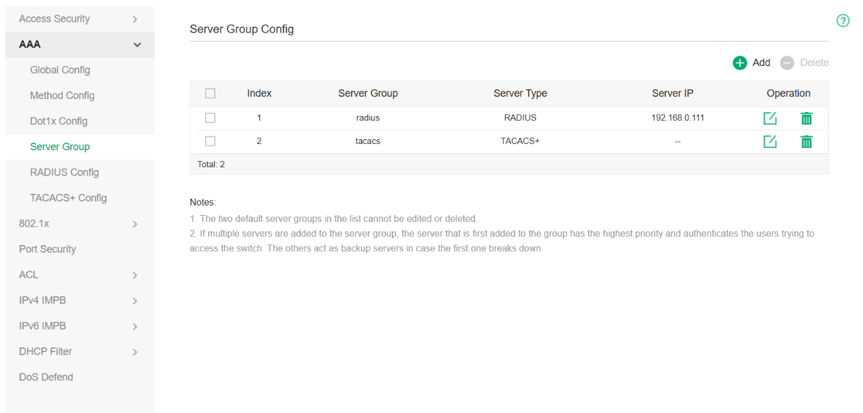
Step 2. Go to AAA > Server Group page and check whether the RADIUS server group is properly created and whether the correct RADIUS server has been added to the group.
Step 3. Go to AAA > Dot1x Config page and confirm that the correct RADIUS server group is selected for authentication and accounting.
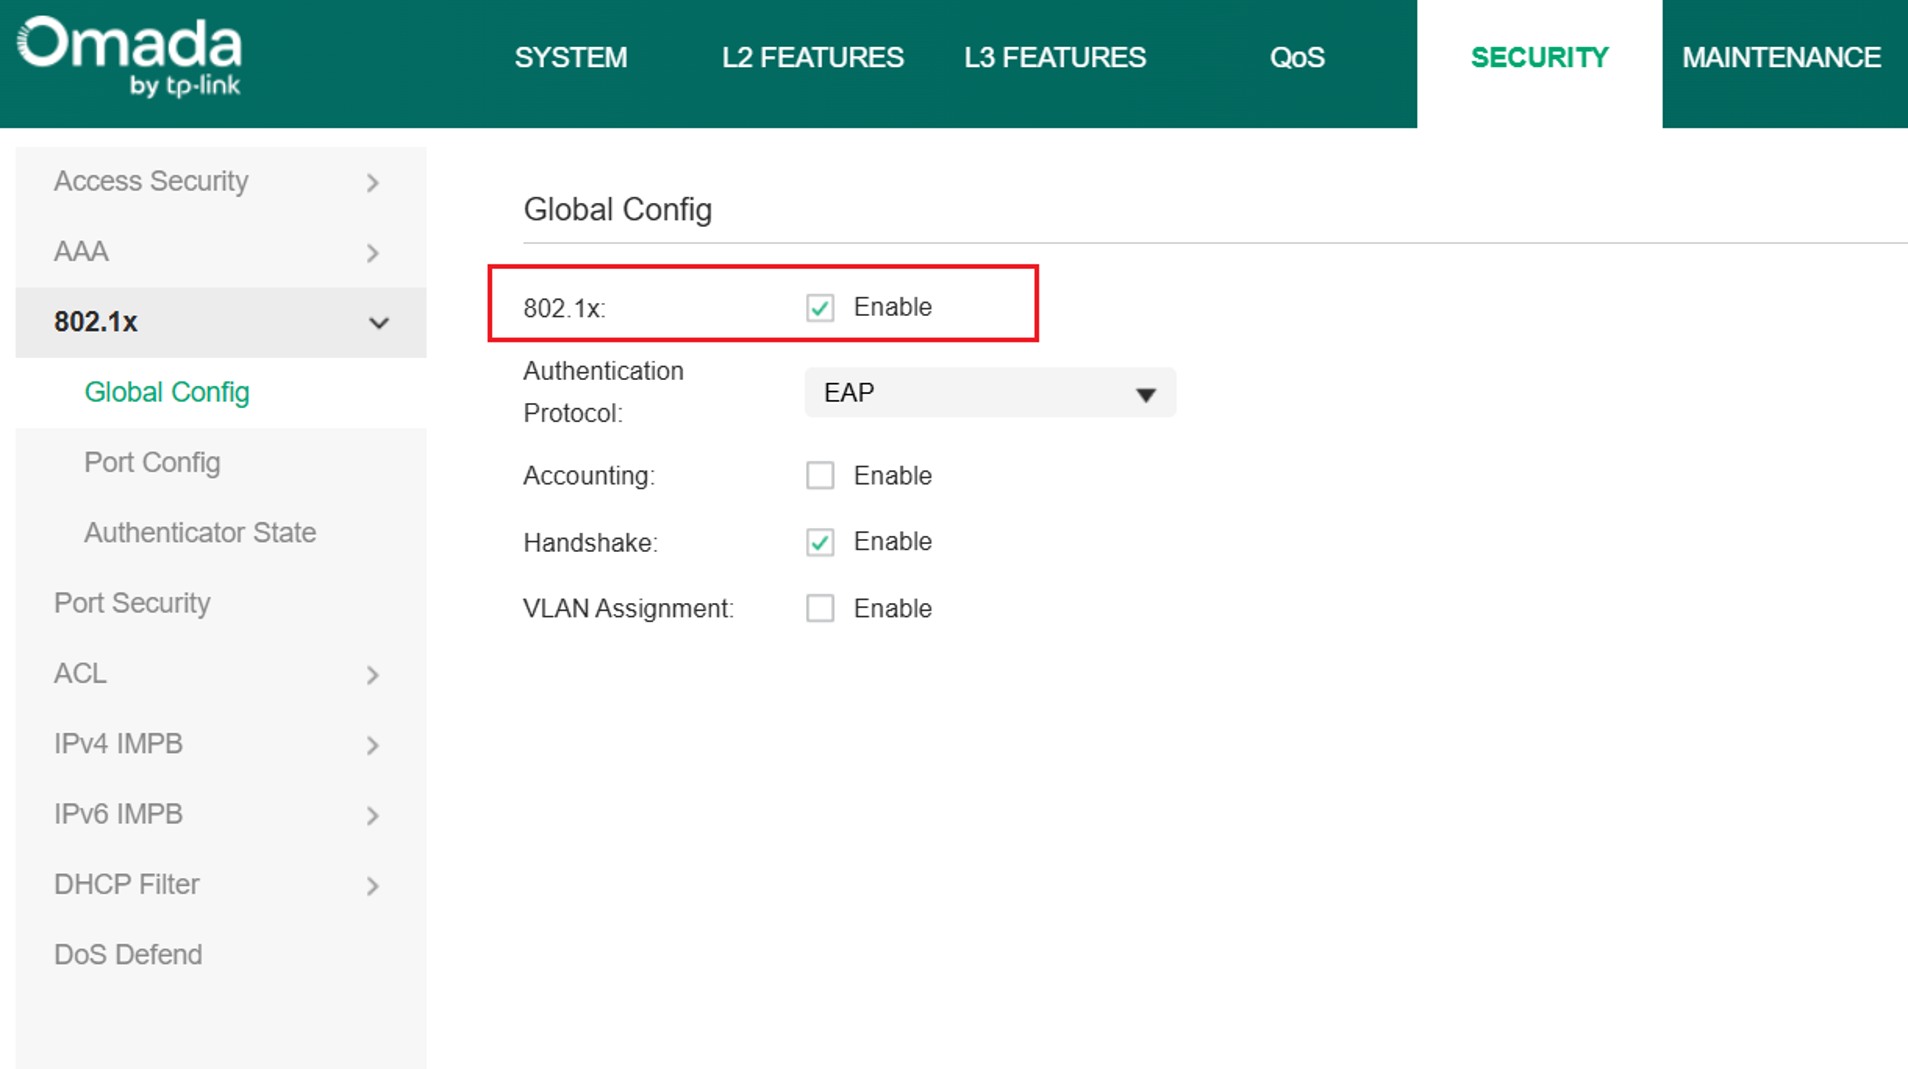
Step 4: Go to 802.1x > Global Config, verify that 802.1X is enabled globally and that the global parameters are configured correctly according to the network requirements.
On the Standalone Global Config page, the Handshake mechanism can also be configured. This feature is designed to detect whether a client is still online by maintaining communication between the switch and the client. It is a proprietary function supported specifically by the TP-Link 802.1X client.
It is important to note that the built-in Windows 802.1X client does not support the Handshake mechanism. After successful authentication, it does not send EAPOL packets to maintain the session. Therefore, users should enable or disable the Handshake feature based on the type of client in use.
Step 5. Go to 802.1x > Port Config page and check whether 802.1X authentication is enabled on the required ports, and ensure that all port-related parameters are properly configured.
Conclusion
This FAQ introduces some troubleshooting methods for 802.1X configuration.
To learn more about each function and configuration, please visit Support Home to download or check the manual for your product.
