


Contents
Introduction
Omada Gateways supports Quality of Service (QoS) to identify, classify, and mark incoming traffic. With the QoS feature, you can intelligently allocate and utilize network bandwidth based on the network's status and traffic information.
Network Requirements: A home network user uses IPv4 to access the internet, with a total bandwidth of 1000Mbps. The requirement is to divide the home network into three categories: Host, IoT, and Guest, and achieve the following network bandwidth allocation:
- Limit the internet bandwidth for the Guest network to 20 Mbps and restrict the IoT network's internet bandwidth to 10 Mbps to ensure the Host network performance.
- Set a maximum bandwidth limit of 20 Mbps for FTP (or any other protocol) traffic to prevent excessive bandwidth consumption by large FTP downloads, which could impact other applications.
- Ensure high priority for VoIP service traffic.
Other traffic that doesn't fall into the above categories will not be subject to bandwidth restrictions.
In this example, you can configure Quality of Service as follows.
Requirements
- Omada Gateway
- Omada Software Controller / Hardware Controller / Cloud-Based Controller
Configuration
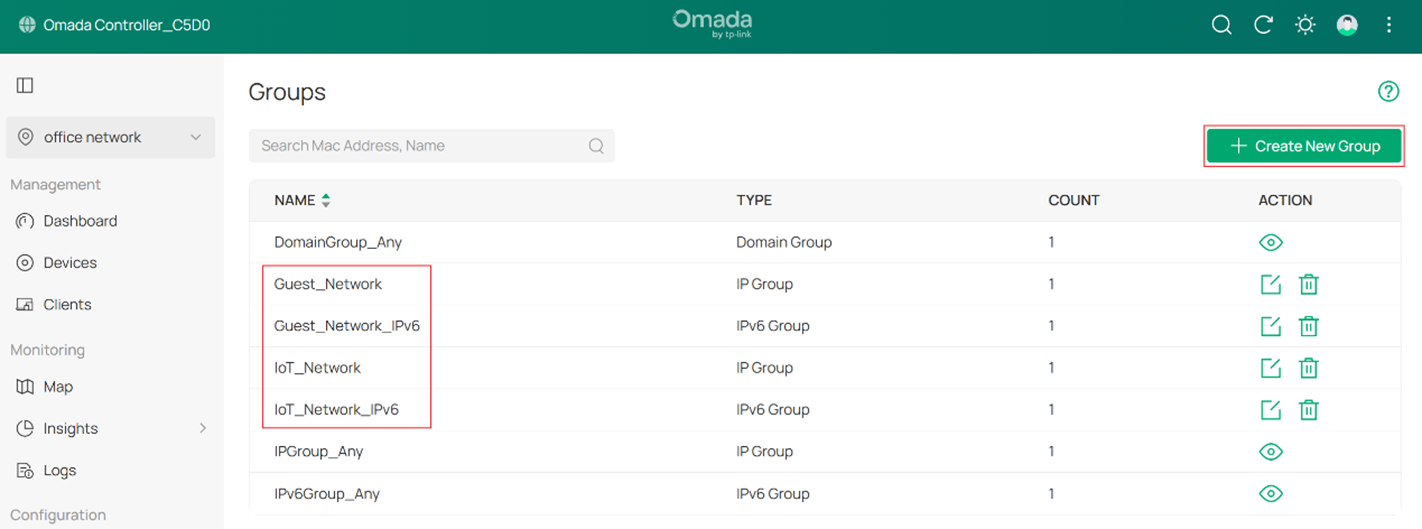
Step 1. Log in to the Controller via web browser, go to Site Settings > Network Config > Profile > Groups to configure specific IP group and IPv6 group to identify IoT network and Guest network, as shown in the figure below.
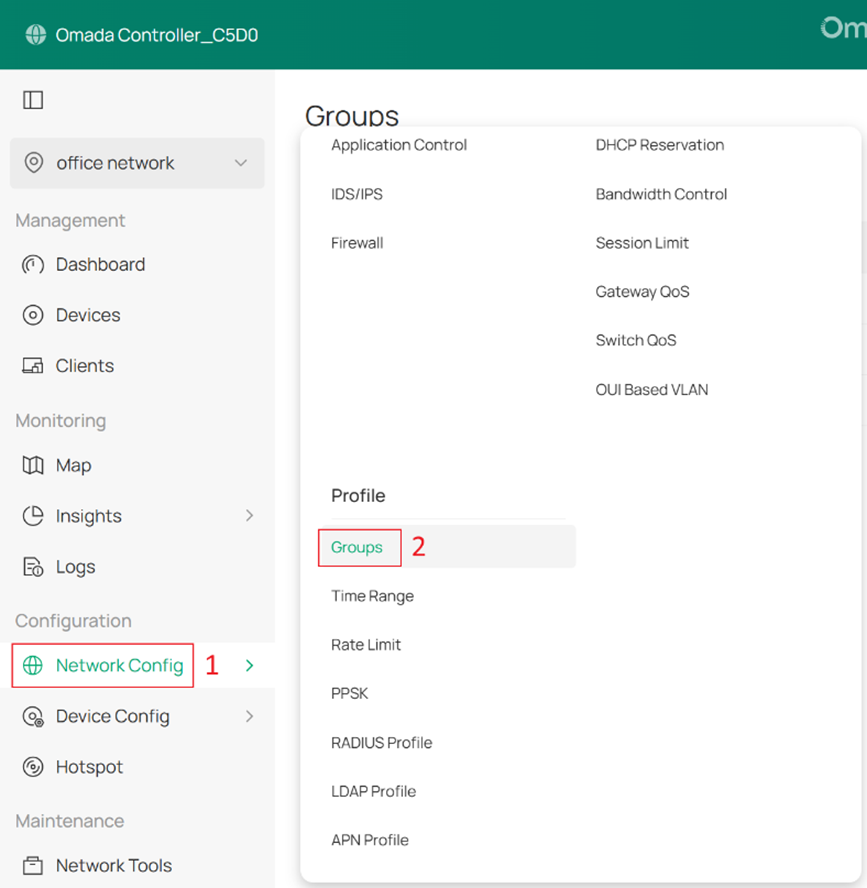
You can create a new group using Create New Group, or edit an existing group.
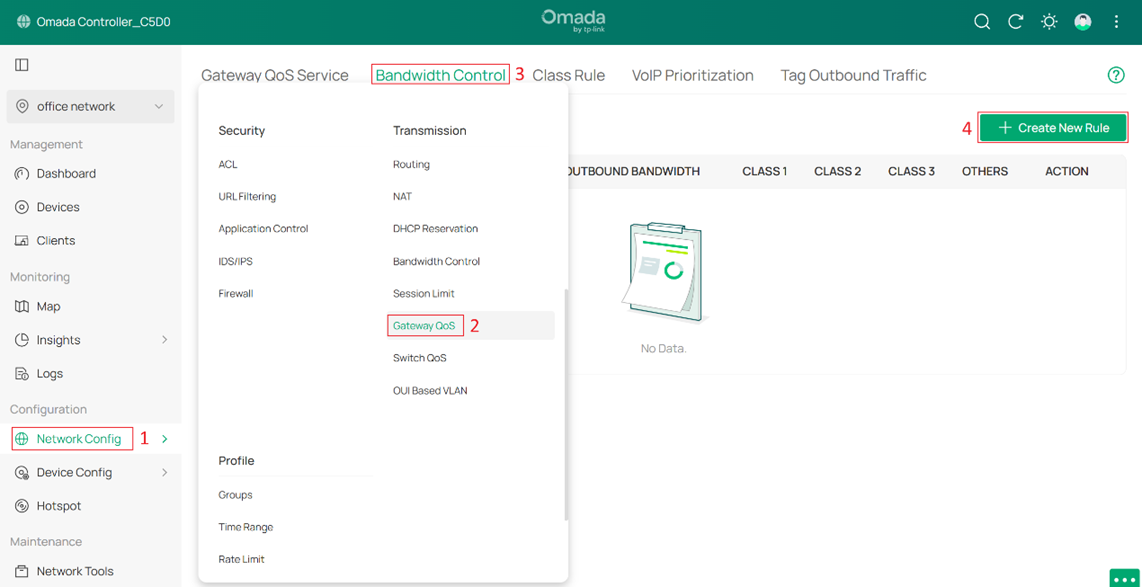
Step 2. Go to Network Config > Transmission > Gateway QoS > Bandwidth Control to allocate bandwidth resources to different categories of traffic on the WAN based on actual usage. Four classes are available: Class 1, Class 2, Class 3, and Others.
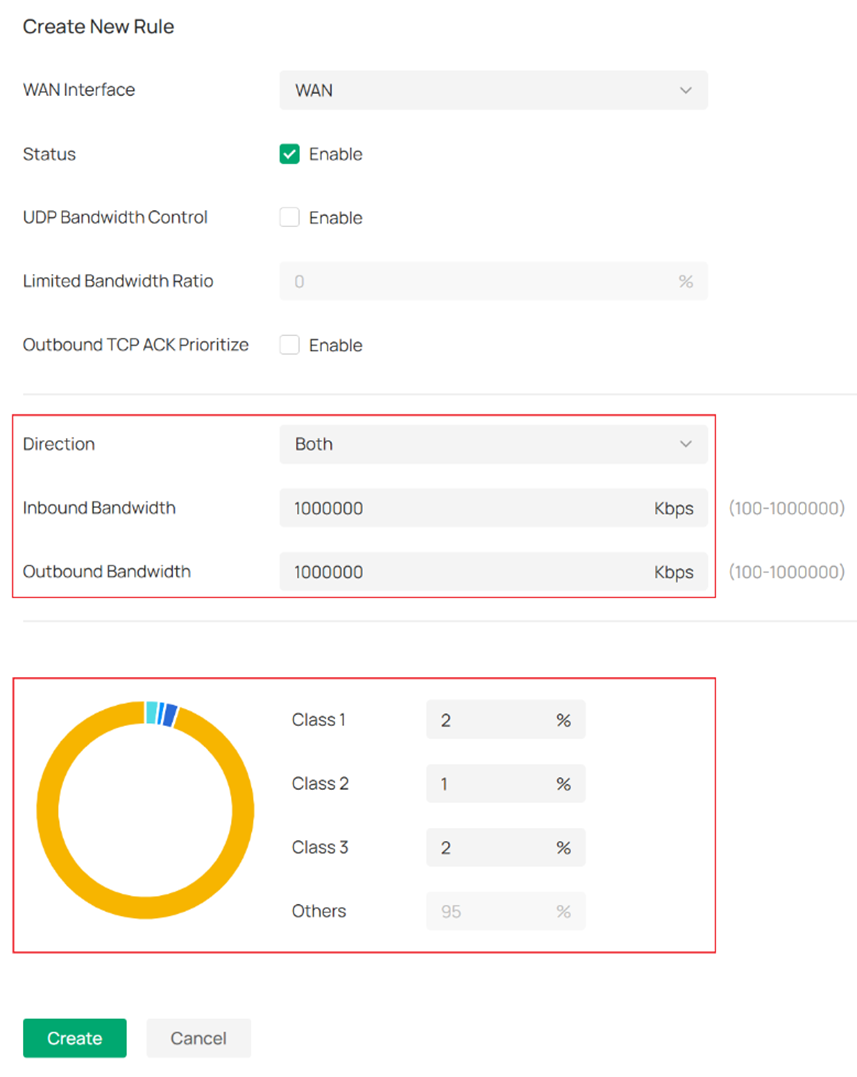
- Set Inbound / Outbound Bandwidth as 1000000.
- Specify Guest network traffic as Class 1 and limit the bandwidth to 20Mbps: As shown in the figure below, set the Class 1 upstream to 1000 Mbps x 2% = 20 Mbps and the downstream to 1000 Mbps x 2% = 20 Mbps.
- Specify IoT traffic as Class 2 and set it to 10 Mbps, 1% of the total bandwidth.
- Specify FTP traffic as Class 3 and set it to 20 Mbps, 2% of the total bandwidth.
- Others cannot be configured. The remaining bandwidth after allocating Class 1, Class 2, and Class 3 is 95%.
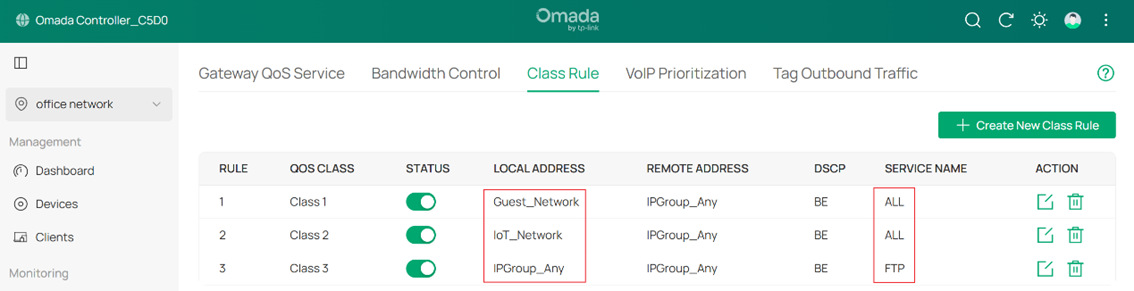
Step 3. Go to Site Settings > Transmission > Gateway QoS > Class Rule to configure Class Rules.

Configure the parameters for the Guest network as shown in the figure below.
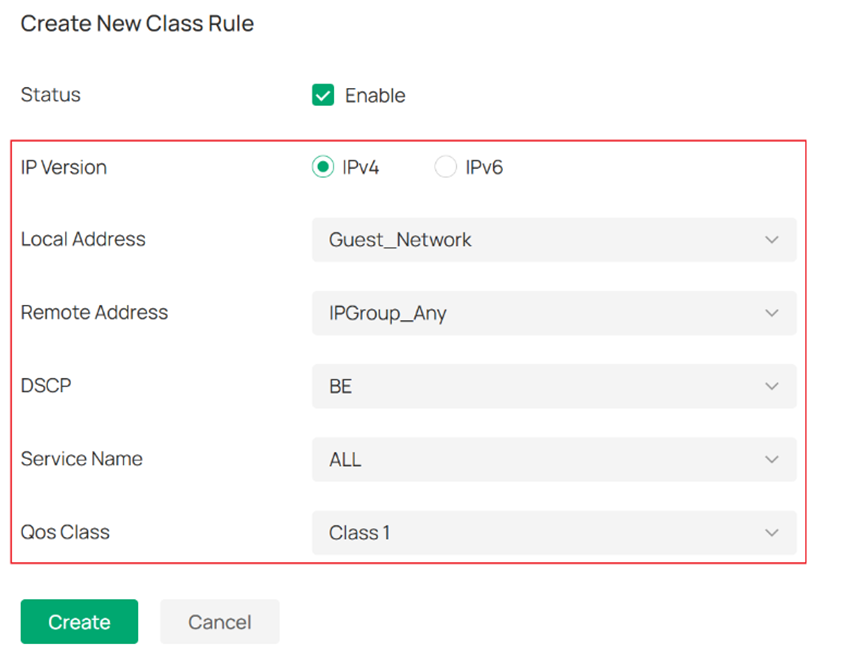
- IP Version: This identifies IPv4 traffic and IPv6 traffic.
- Local Address: This identifies the source address of the traffic. Select the IP Group configured in Step 1 to differentiate the network.
- Remote Address: This identifies the traffic destination address. If there are no specific requirements to restrict access to specific websites, it is generally set to IPGROUP_ANY.
- DSCP: This identifies the DSCP field of traffic (located in the IP header) used to classify the traffic's quality of service.
- Service Name: This identifies the traffic type based on the source and destination ports of the packets.
- QoS Class: Select from the classes set in Step 2 to apply different bandwidth limits to the traffic.
The configuration of the IoT network and FTP traffic is similar to the Guest network.
Note: The Service Type has 13 rules by default, as shown in Gateway QoS Service.
If the default rules cannot meet your need, click Create New Gateway QoS Service to configure a new Gateway QoS Service.
Step 4. Go to Site Settings > Transmission > Gateway QoS > VoIP Prioritization to enable the First Priority for VoIP SIP/RTP as shown in the figure below. With this feature enabled, Omada Gateway prioritizes SIP/RTP packets with the specified destination port (typically port 5060) in congested network environments. 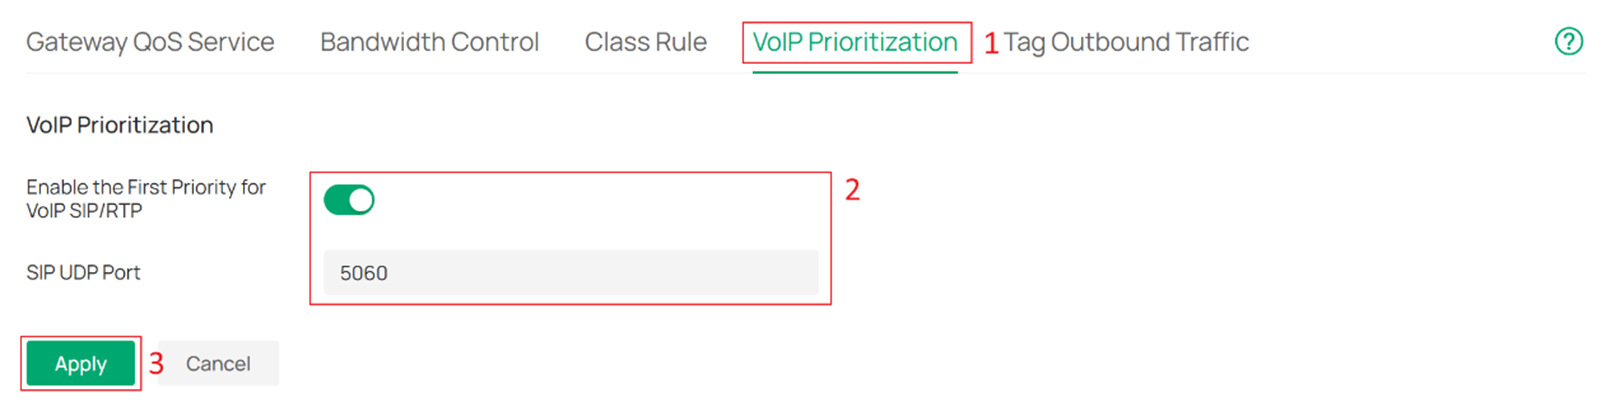
Verification
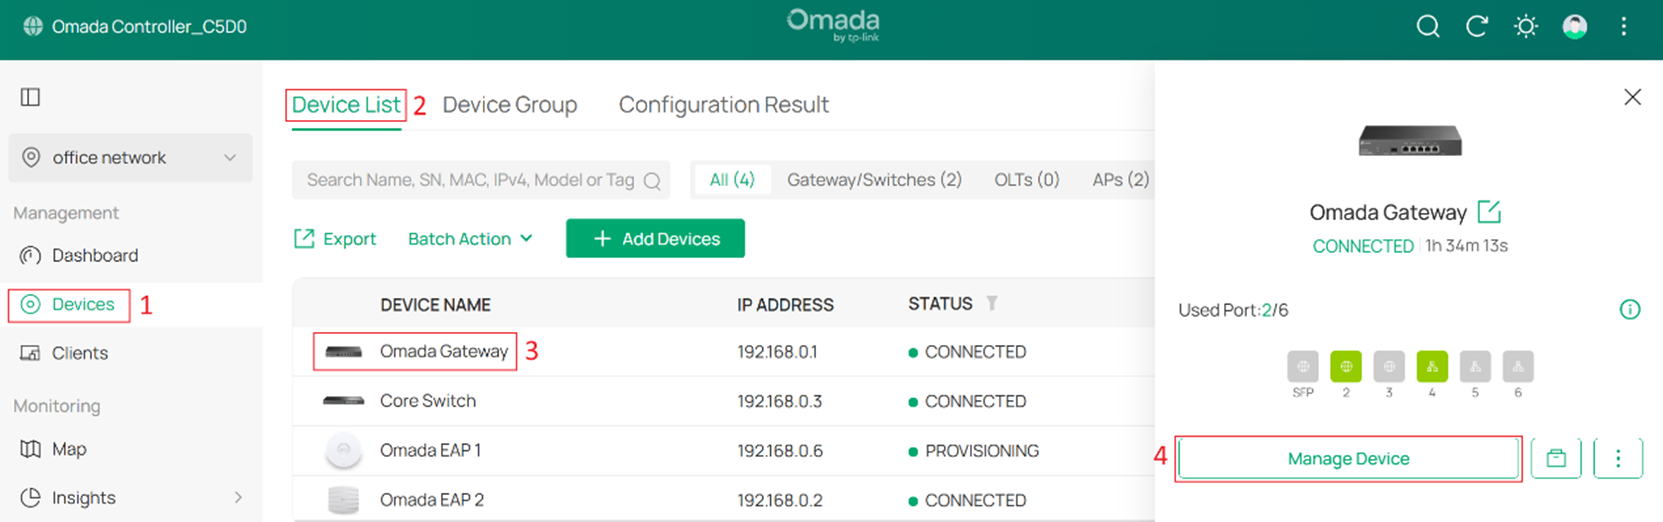
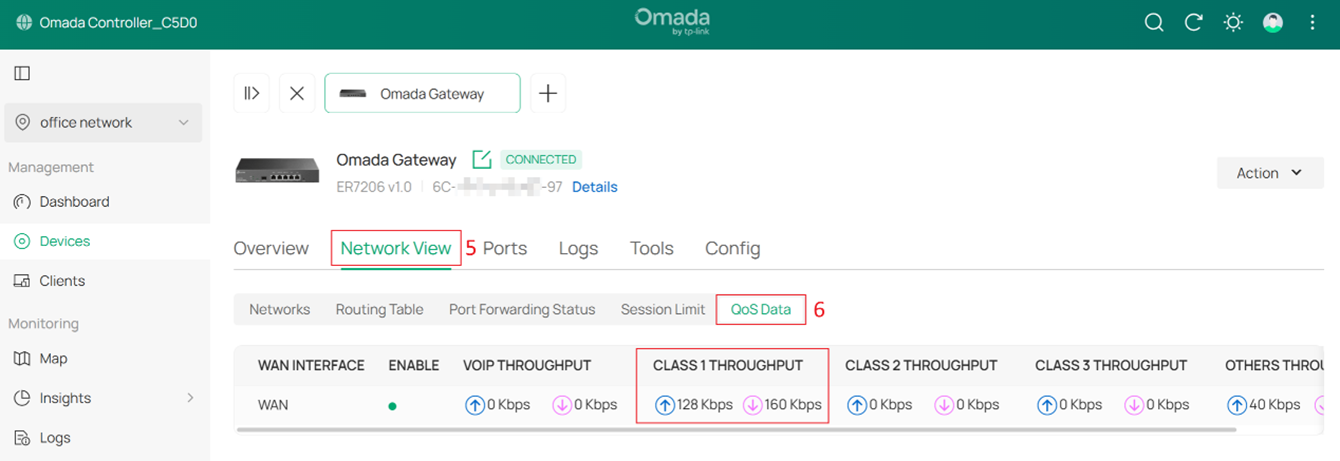
Go to Devices > Device List > Gateway > Manage Device > Network View > QoS Data to view the WAN’s real-time traffic statistics of each class, as shown in the figure below. With the real-time traffic statistics, you can determine if the traffic classification and bandwidth control are working.
Conclusion
You have now successfully configured Quality of Service on Omada Gateway.
Get to know more details of each function and configuration please go to Download Center to download the manual of your product.
