


Contents
Introduction
Using a SIM card as the WAN connection on an Omada gateway provides a flexible and reliable networking solution, especially in scenarios where traditional wired connections are unavailable or unstable. It is widely used in applications such as remote sites, temporary deployments, backup WAN failover, and mobile or outdoor environments.
By leveraging cellular networks (4G/5G), users can quickly deploy internet access without relying on fixed-line infrastructure, ensuring continuous connectivity and improved network resilience. This makes SIM-based WAN an ideal choice for businesses requiring rapid setup, high availability, and deployment flexibility.
Requirements
- Omada Controller (Software Controller / Hardware Controller / Cloud-Based Controller)
- 4G/5G Wi-Fi Gateways
SIM Card Plan Recommendations
For Omada gateways, we recommend the following when selecting a SIM card plan:
1. For data-only applications, choose a Data Only plan from a mainstream carrier.
2. SMS is supported. If SMS functionality is required, choose a Text & Data plan from a mainstream carrier. Please note that AT&T Text & Data plans may not be compatible with Omada gateways.
Note: "Text & Data plan" refers to a plan that supports both SMS text messaging and data services. Such plans from AT&T may not be compatible with our products. A Text & Data plan refers to a plan that supports both SMS messaging and cellular data services.
3. Please confirm if your SIM card plan can have normal internet access. If not, that means it’s an IP plan of a local network, and you will need to do some custom configuration of online detection in order to optimally use link backup and SIM failover (If supported). This will be explained in detail in the Configuration section below.
4. If you are unsure which plan to choose, consult your carrier for detailed recommendations and compatibility information.
Configuration
The following section describes how to configure SIM-related functions. Take ER706W-4G V1.0 as an example for demonstration.
On Omada Controller
Step 1. Insert the SIM card into the device and adopt your device.
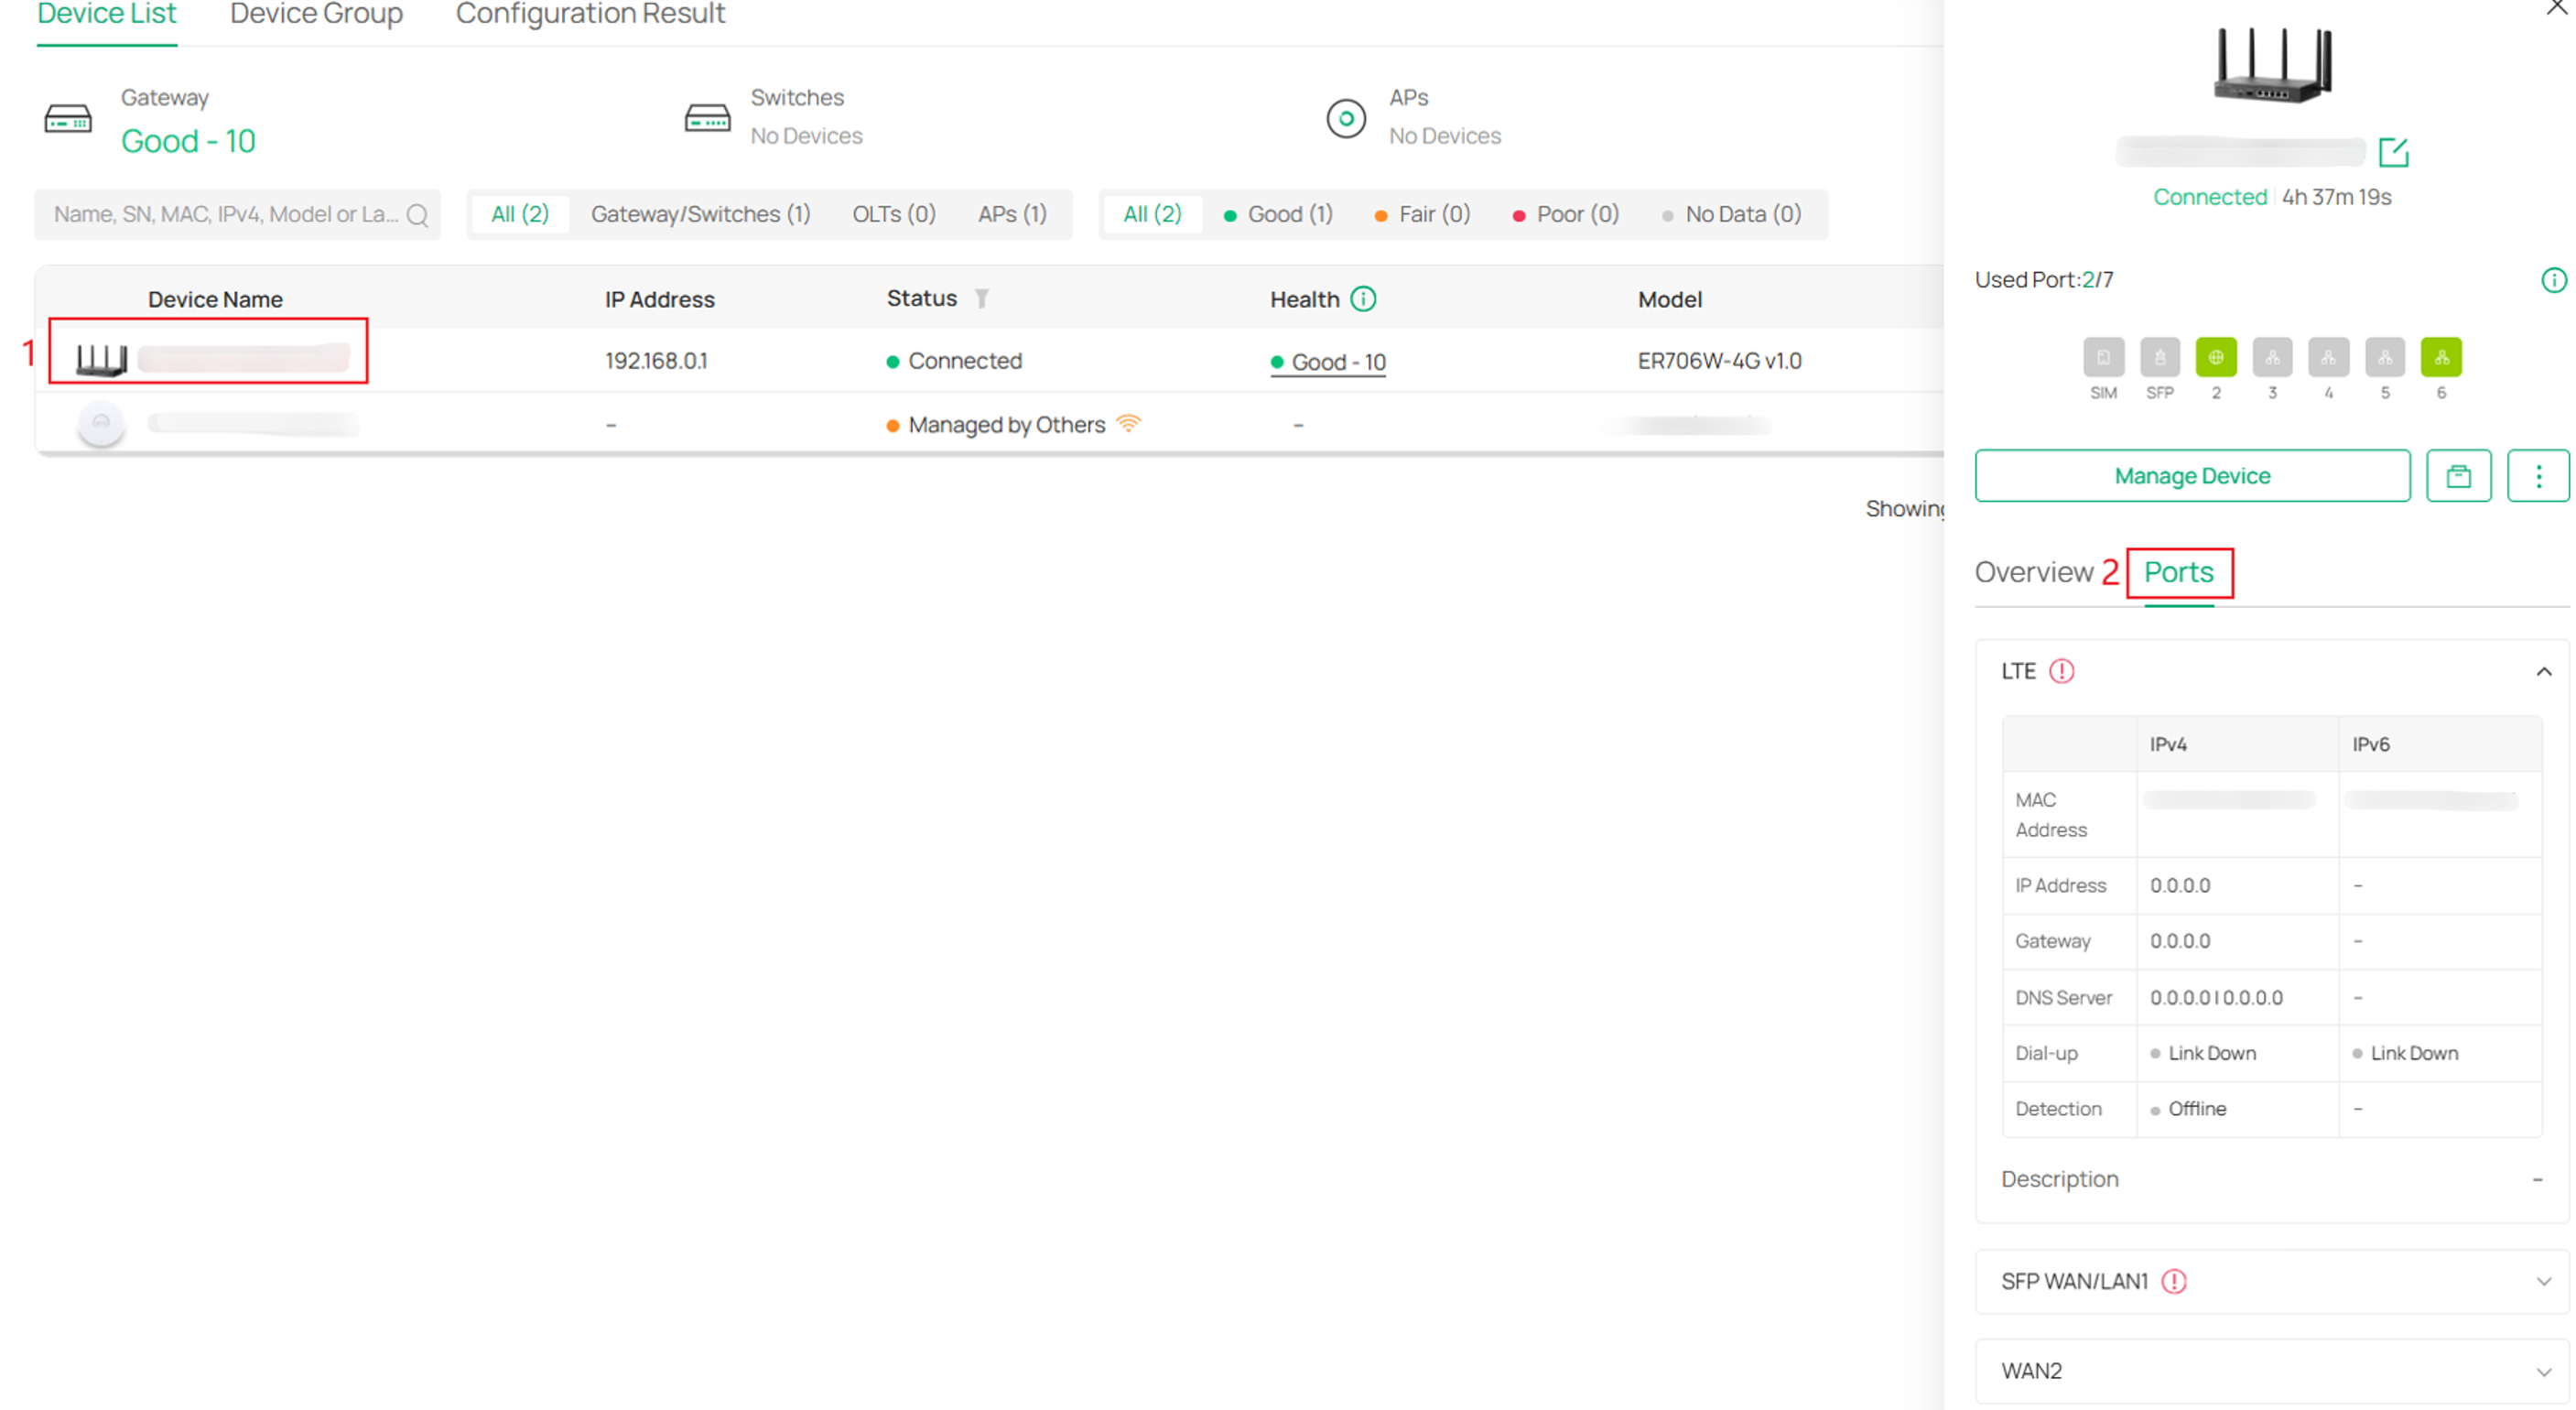
Step 2. You can click on your device and in the pop-up window, click Ports to view the LTE WAN port status.
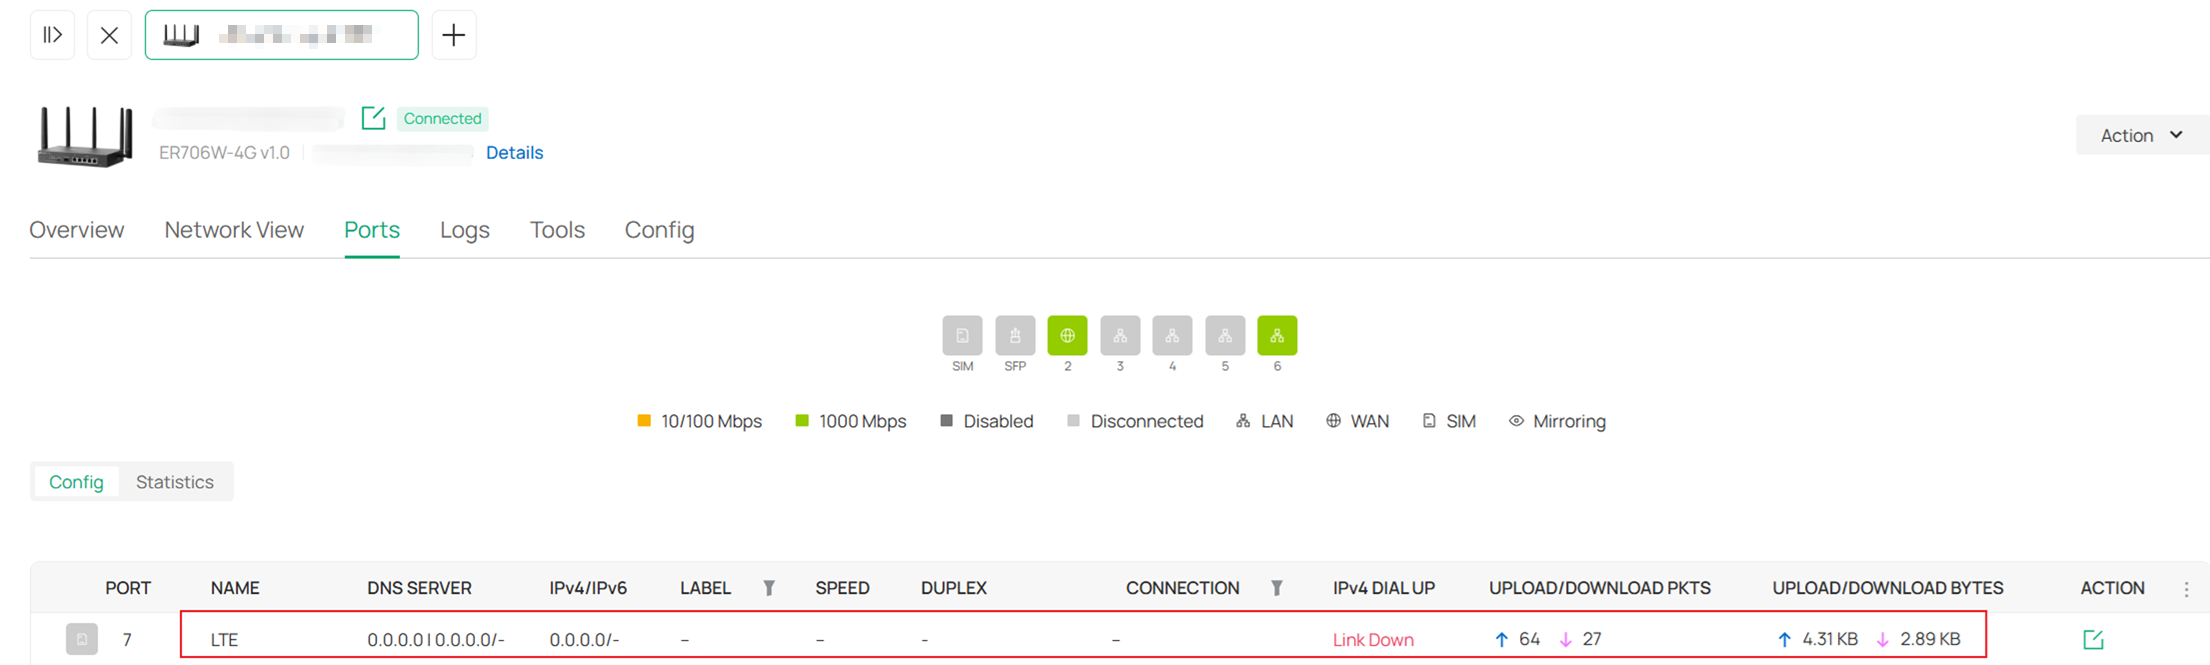
Alternatively, you can go to Manage Device > Ports to check the LTE WAN port status.
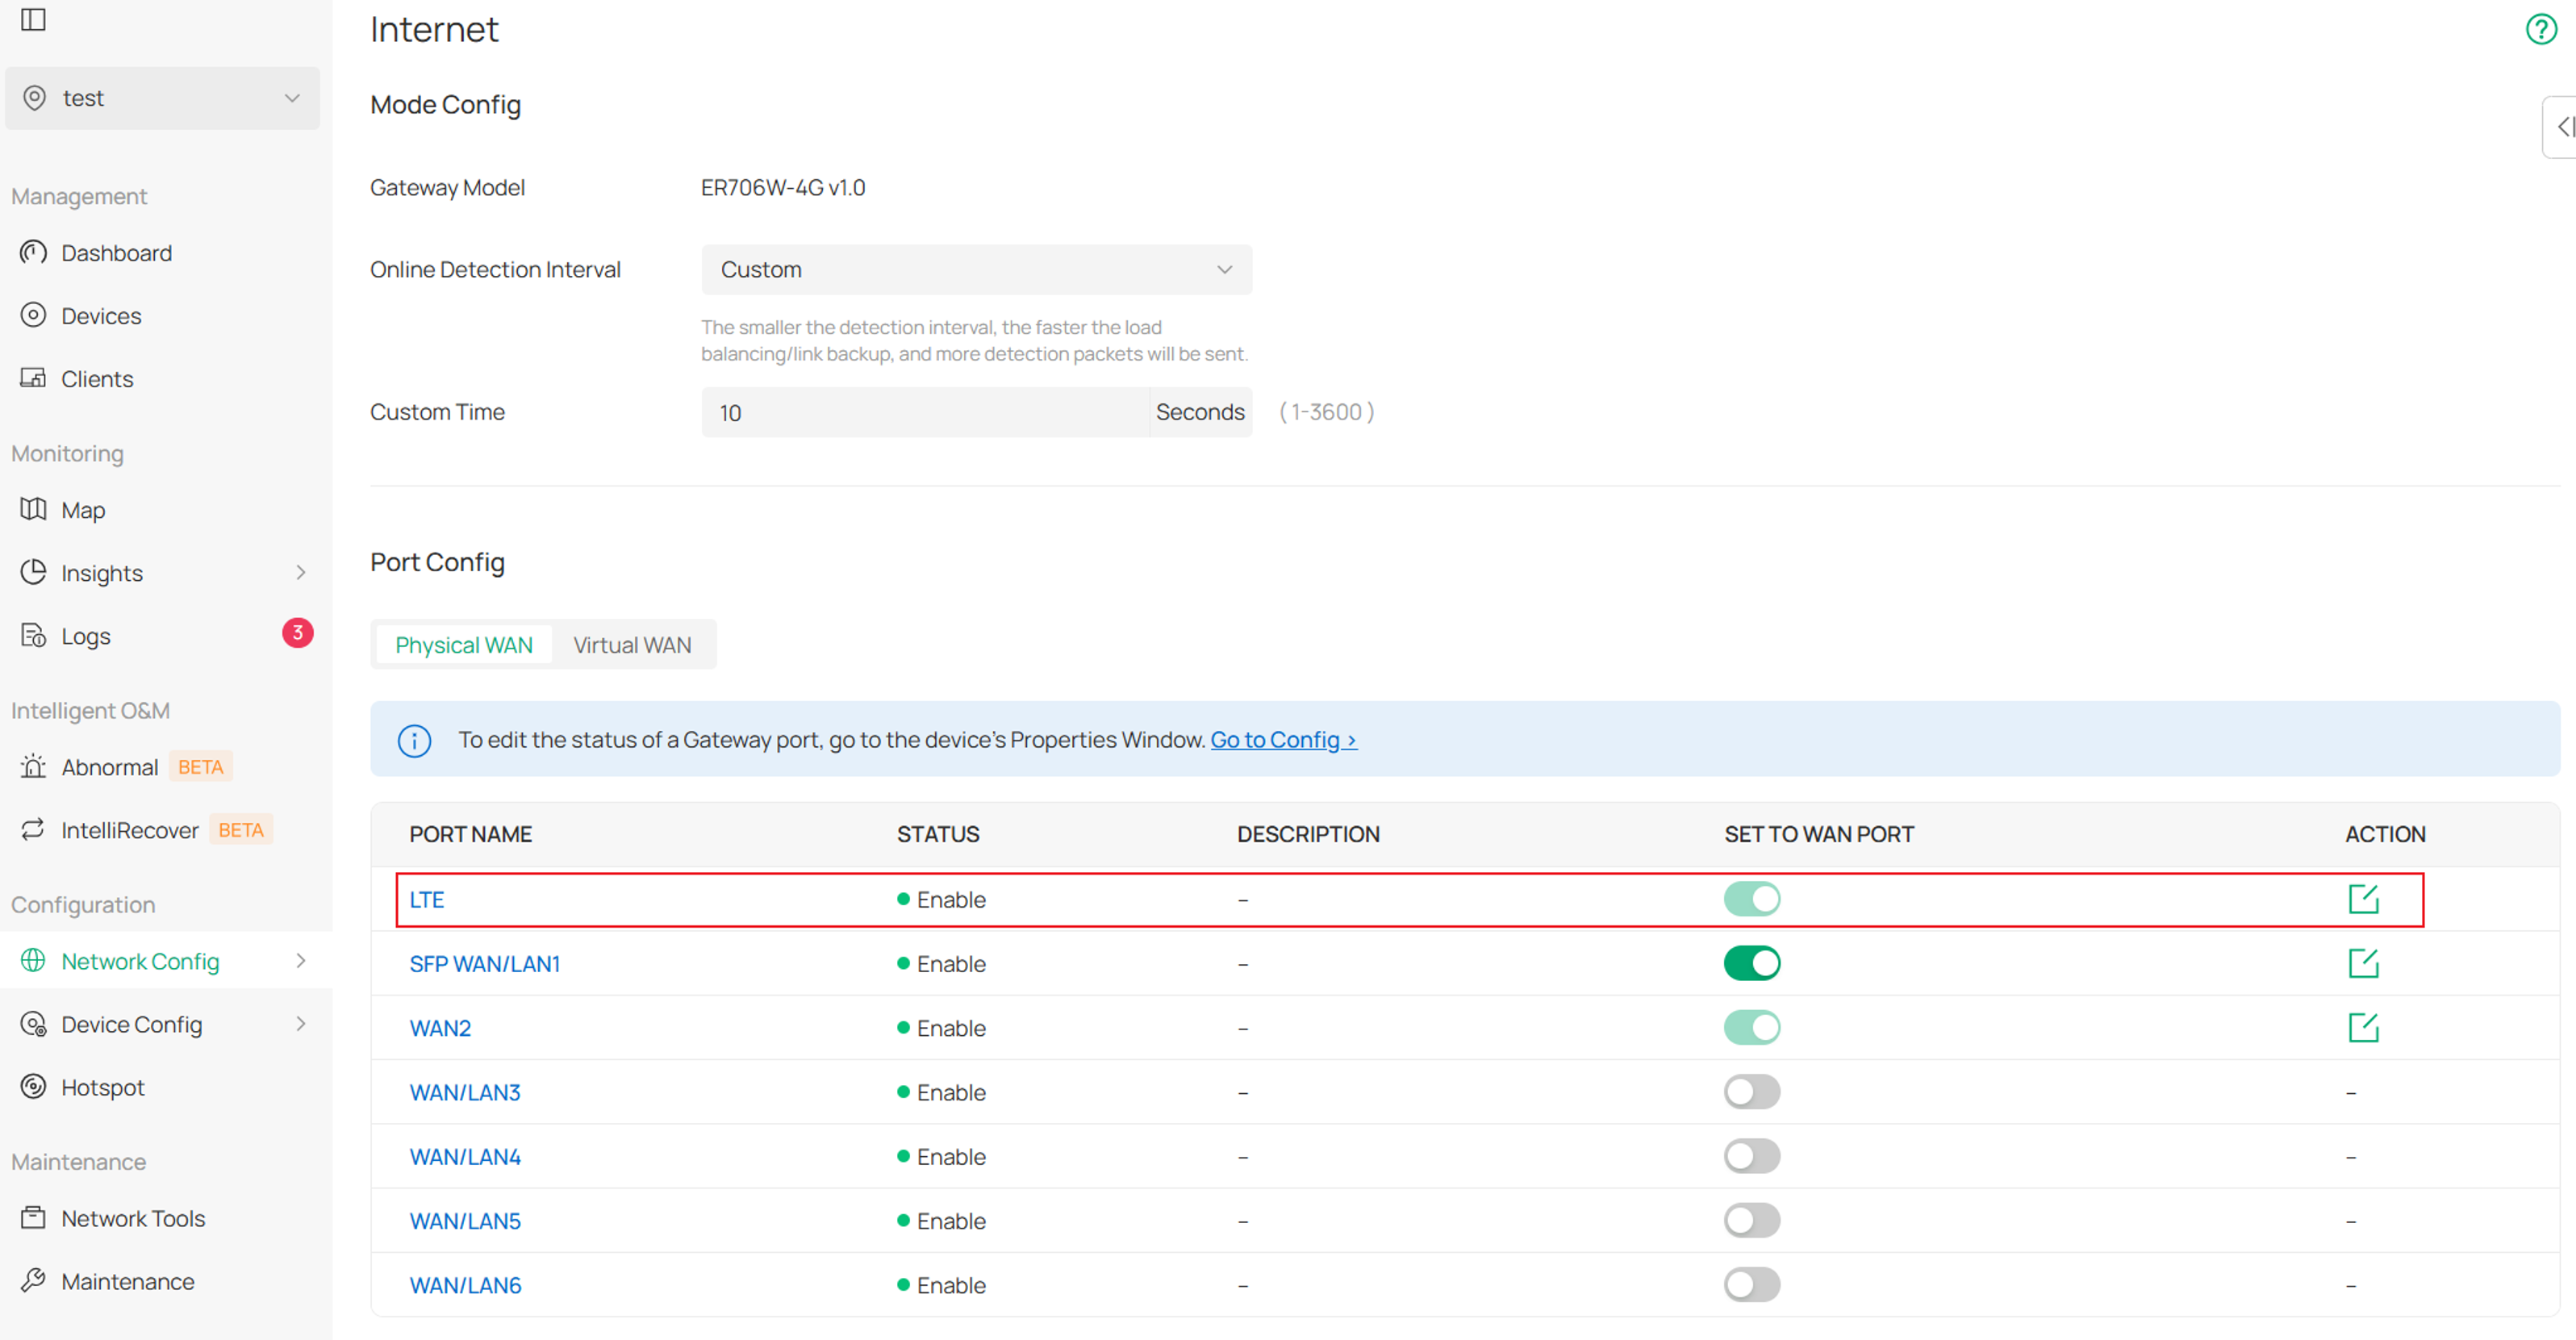
Step 3. The LTE configuration can be modified under Network Config > Internet.
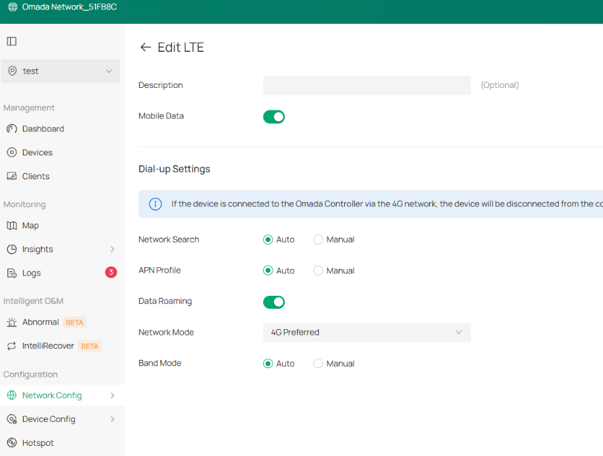
|
Network Search |
Auto: The device automatically selects the available network from the SIM card’s carrier. Manual: You can manually select a specific mobile network. |
|
APN Profile |
Auto: The device automatically uses the default APN settings. Manual: You can manually choose or configure an APN profile if required. |
|
Data Roaming |
Turn this on only if your SIM card supports roaming and you need to connect outside your home network. |
|
Network Mode |
Different network selection policies are available. For the ER706W-4G V1.0, 4G Preferred/4G Only/3G Only are supported. |
|
Band Mode |
Auto: The device automatically selects the appropriate frequency bands. Manual: You can manually select specific bands used by your carrier. |
Note: You can add or edit APN profiles under Network Config > Profile > APN Profile.
Step 5. You can manage the SIM card status and SMS under Manage Device > Config > SIM Config.
PIN Management:
Under PIN Management, you can check the current status of your SIM card.
You can also enable PIN Lock. If you select Enable, you will be required to enter the PIN code each time the device restarts or when the SIM card is reinserted. Otherwise, the SIM card will be locked, and the device will be unable to dial up or access the LTE network.
If the PIN code is entered incorrectly 3 times, the SIM card will be locked. In this case, you will need to enter the PUK code to unlock it.
The PUK code is an 8-digit number that cannot be changed by the user. You have up to 10 attempts to enter the correct PUK code. If all 10 attempts fail, the SIM card will be permanently locked and cannot be used again.
If you enable Auto-unlock PIN, the PIN code you saved will be automatically entered to unlock the SIM card when the device starts or the SIM is reinserted.
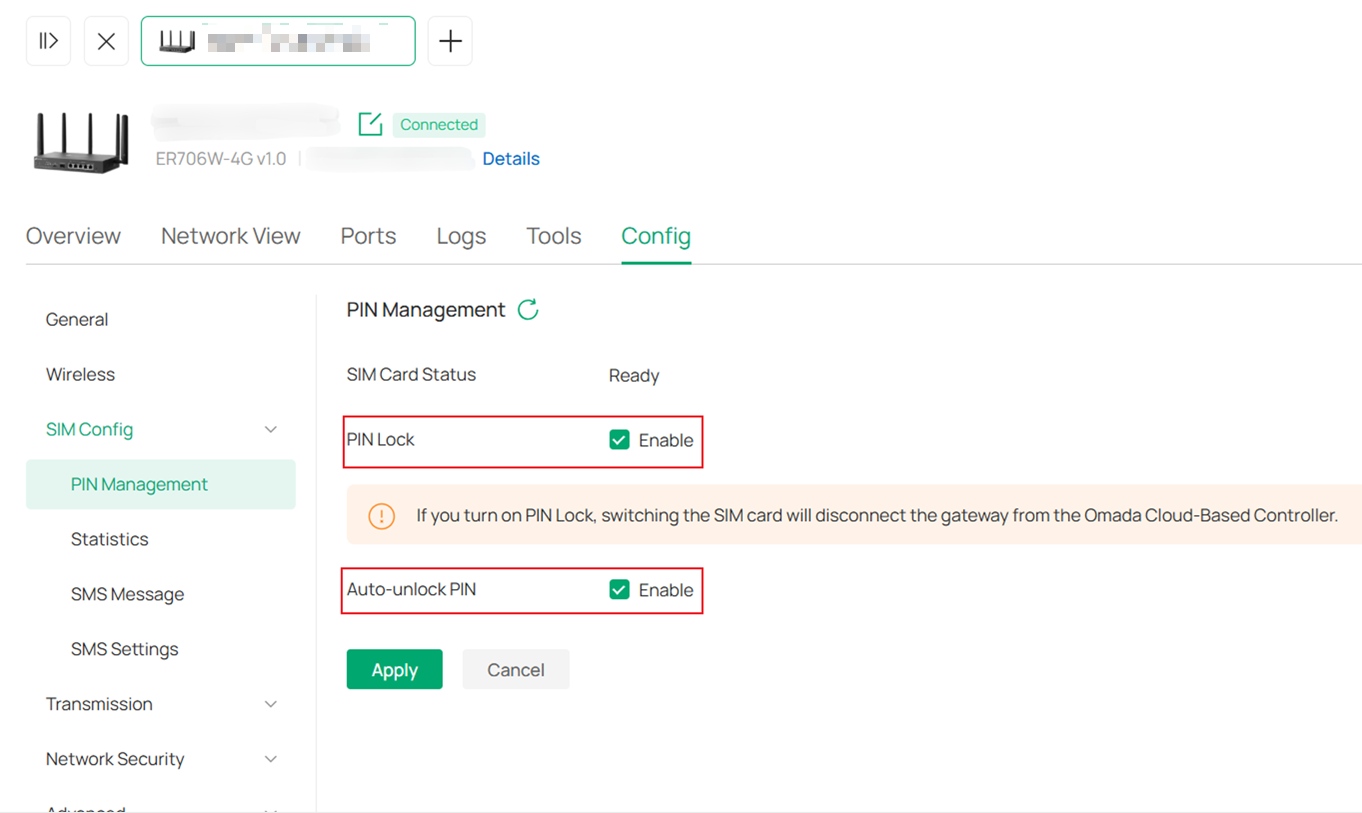
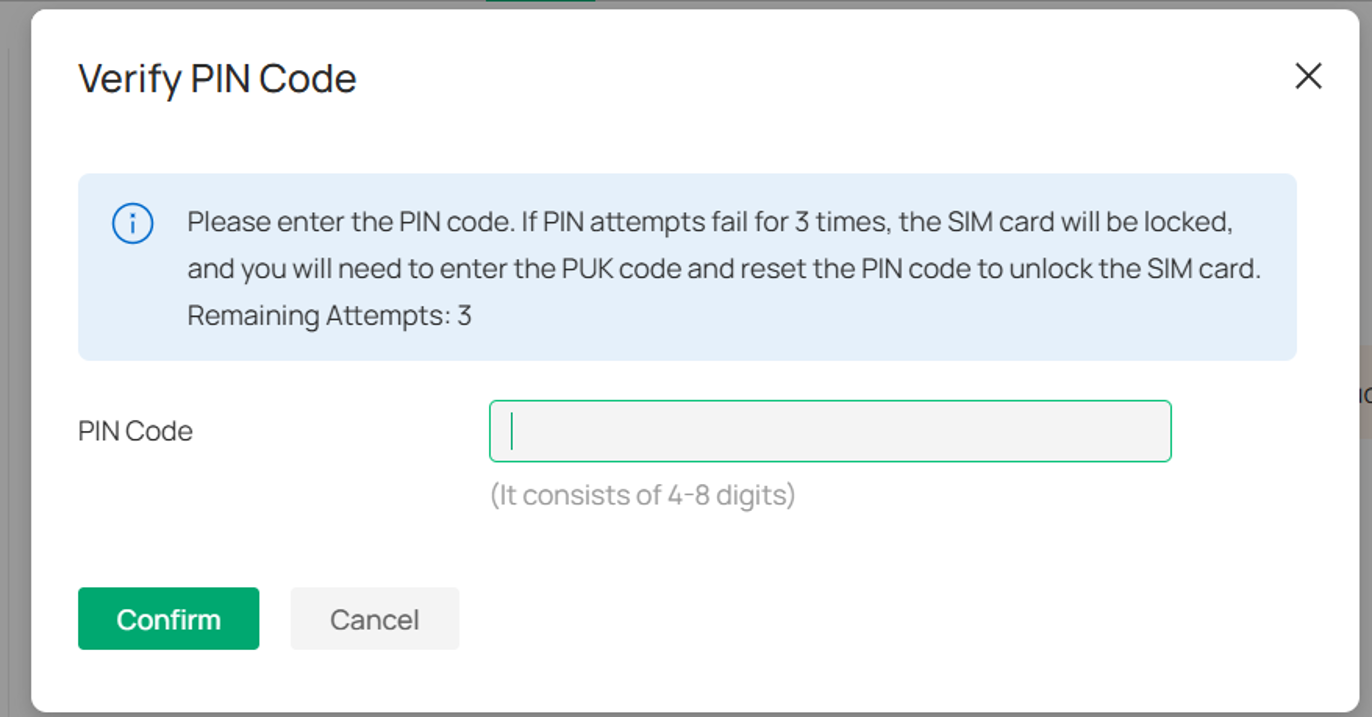
Note: You’d better enable the Auto-unlock PIN when you adopt your device via CBC (Cloud-Based Controller). It could avoid access disconnected between the device and CBC when the device has been restarted, SIM card hot-swap and SIM failover (If support).
Statistics:
Under Statistics, you can view SIM Data and SMS statistics. You can also set limits on data and SMS quotas and configure SMS alerts to be sent when a specified usage threshold is reached.
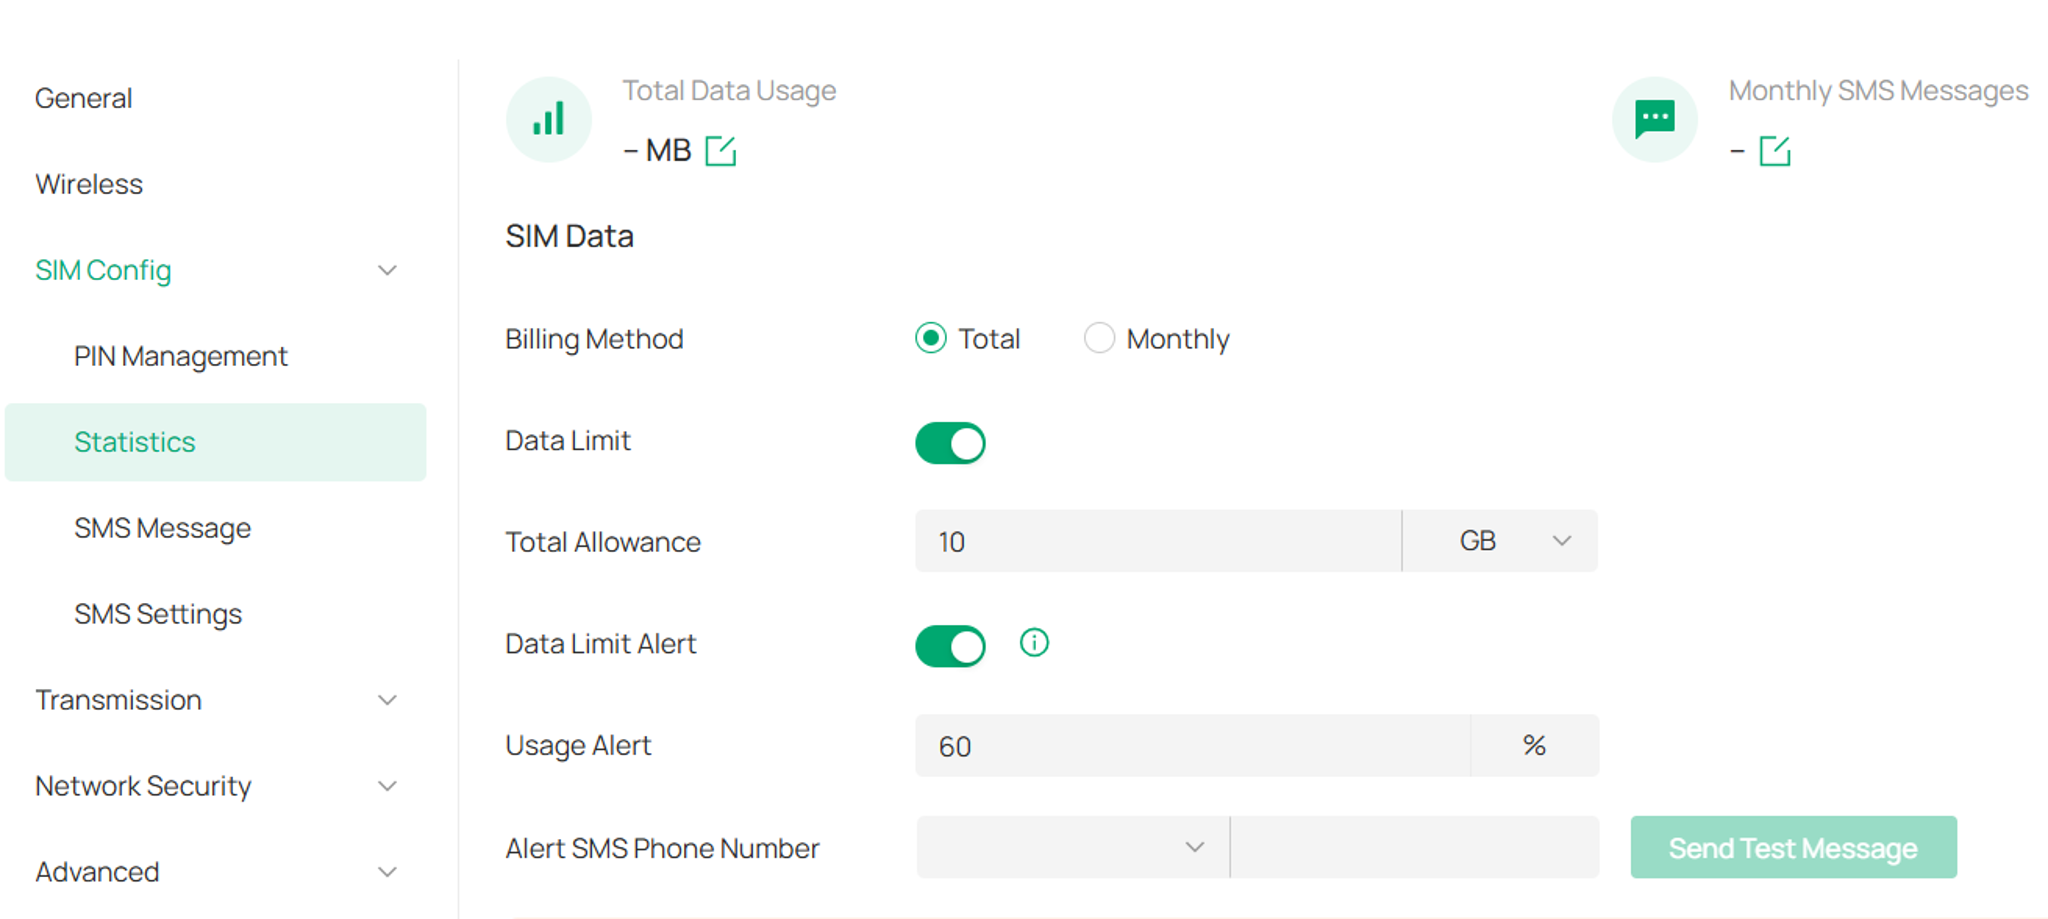
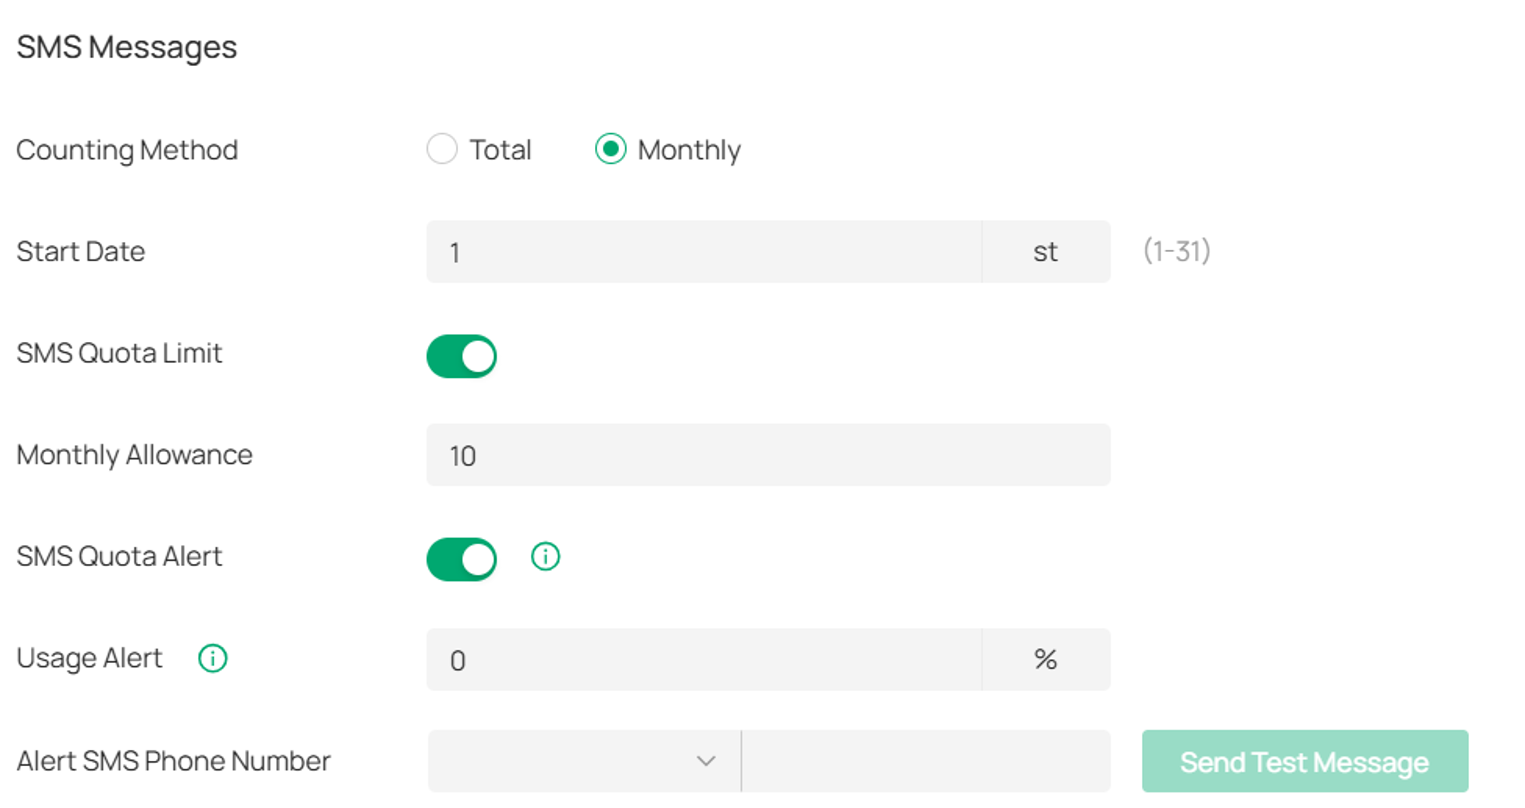
SMS Message:
In the SMS message, you can see the sending and receiving status as well as the details of the message.
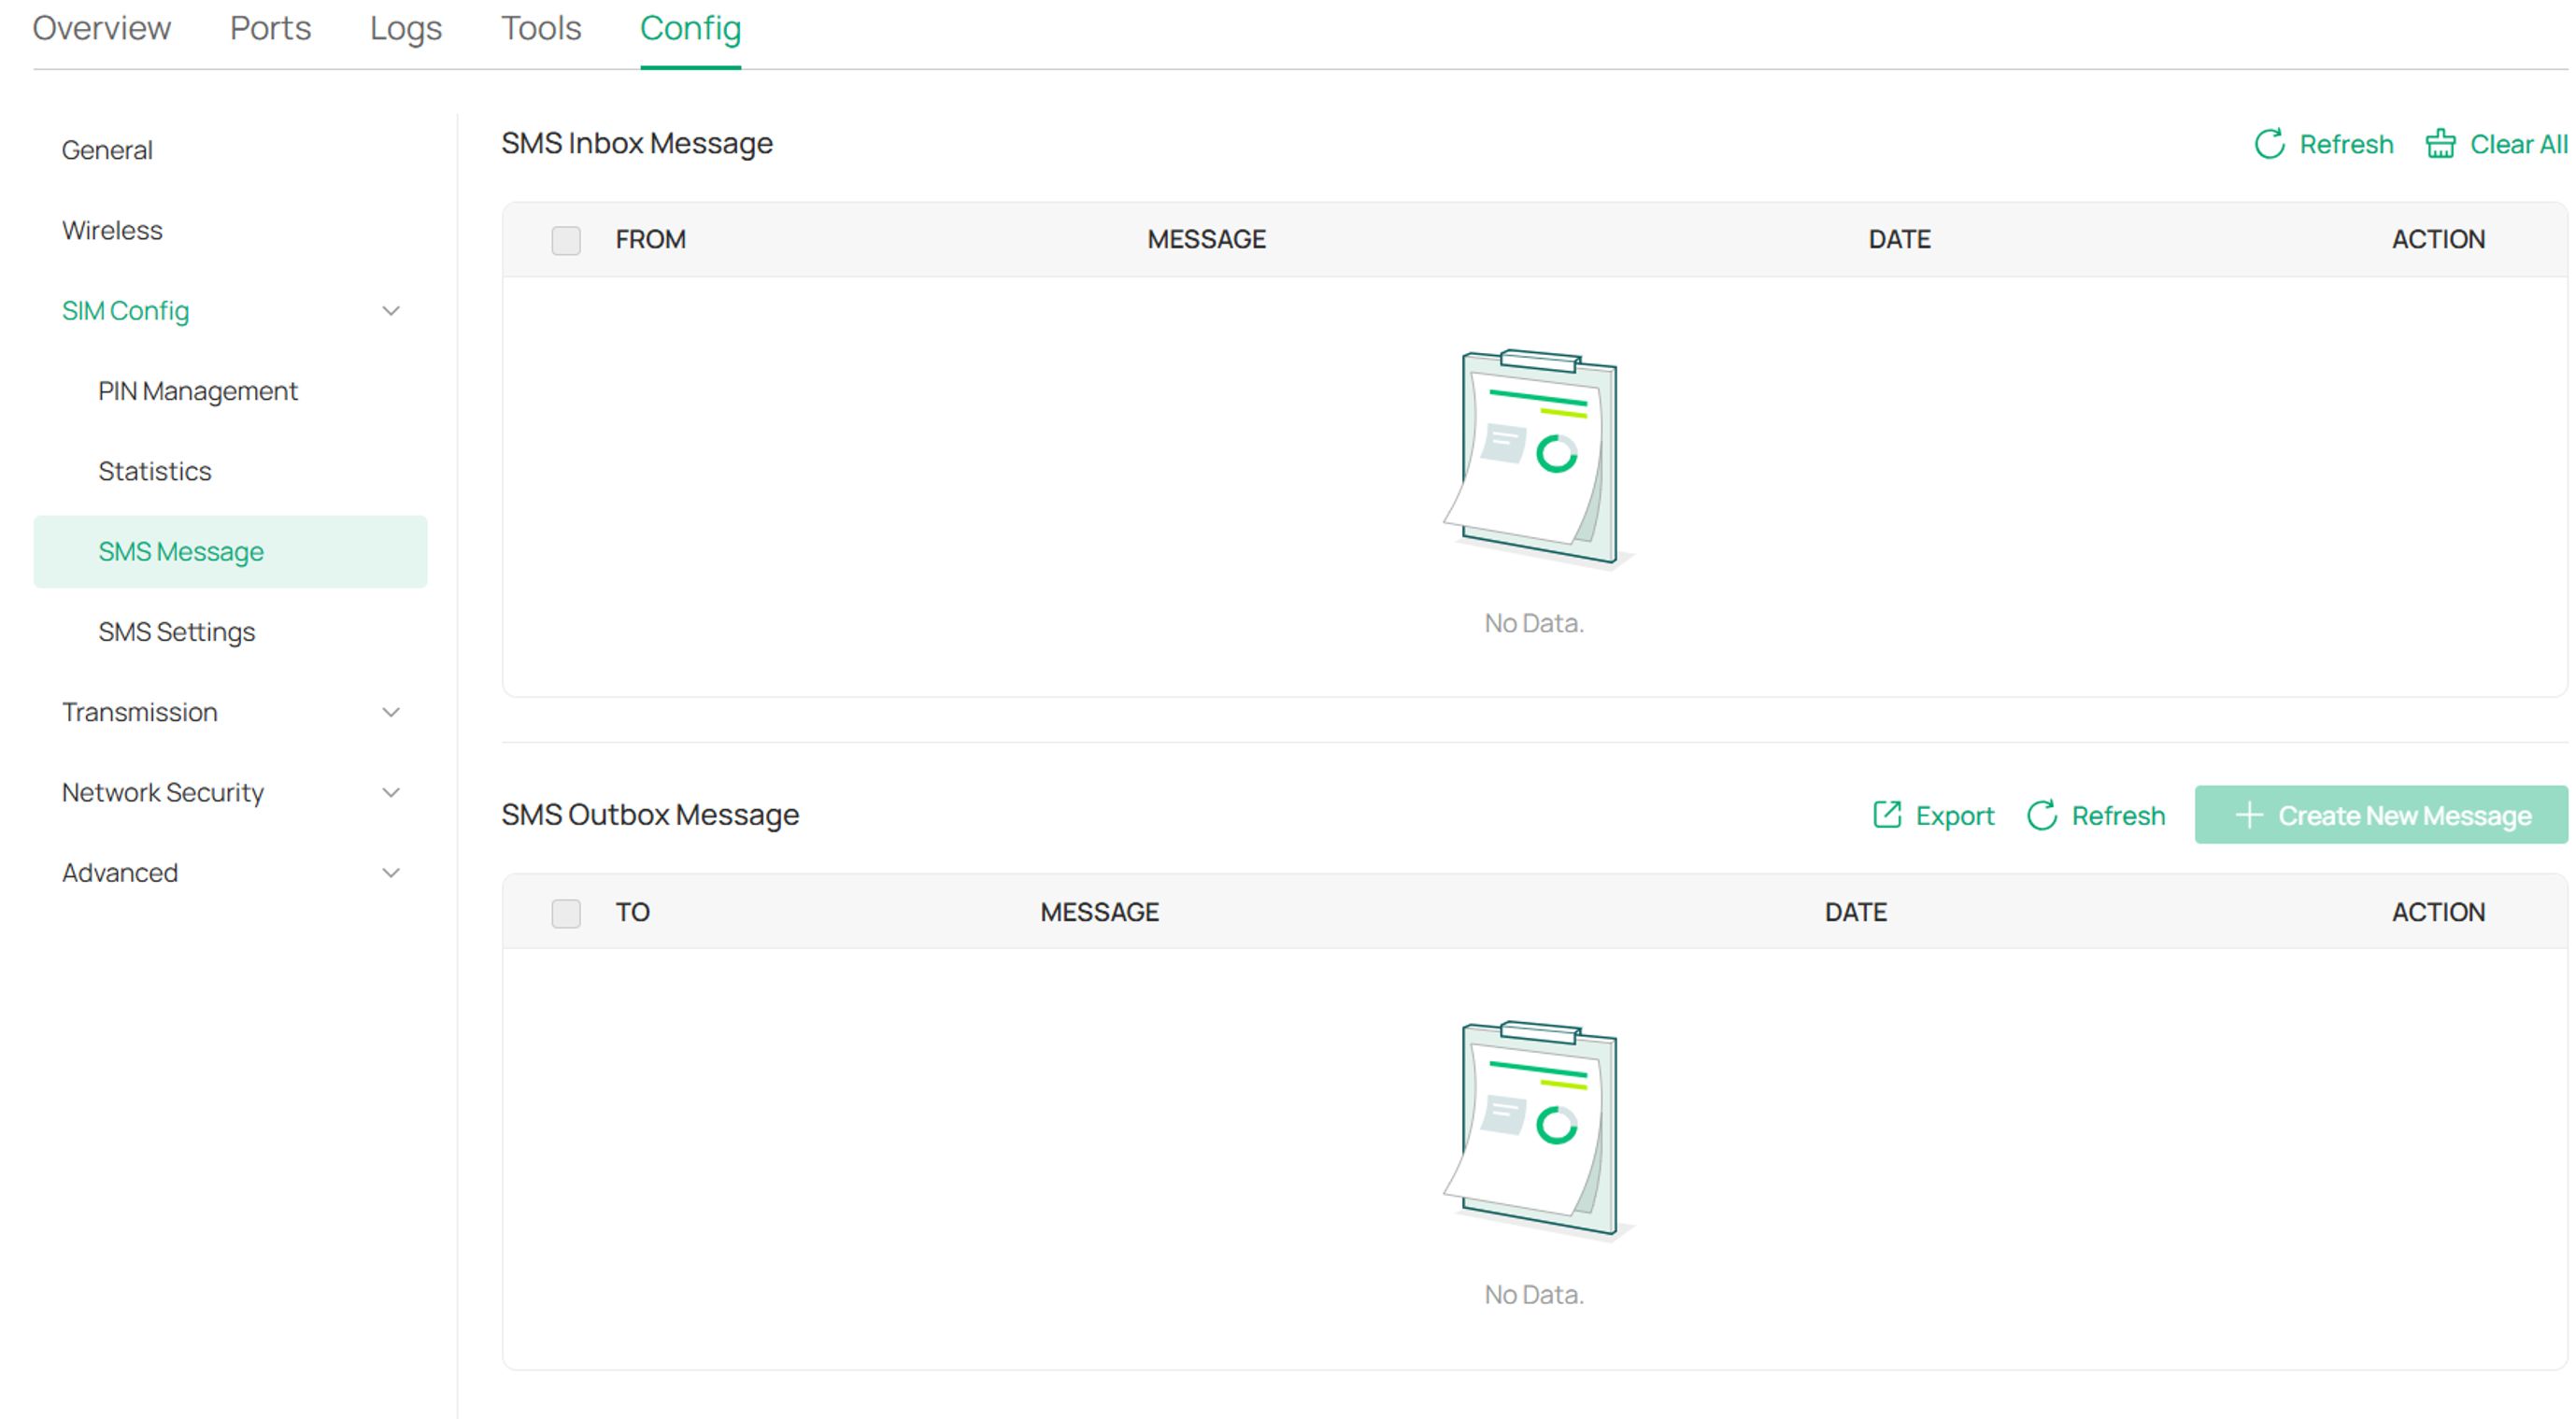
Note: Some IoT SIM cards don’t support SMS services. Please make sure your SIM card plan supports SMS services.
SMS Settings:
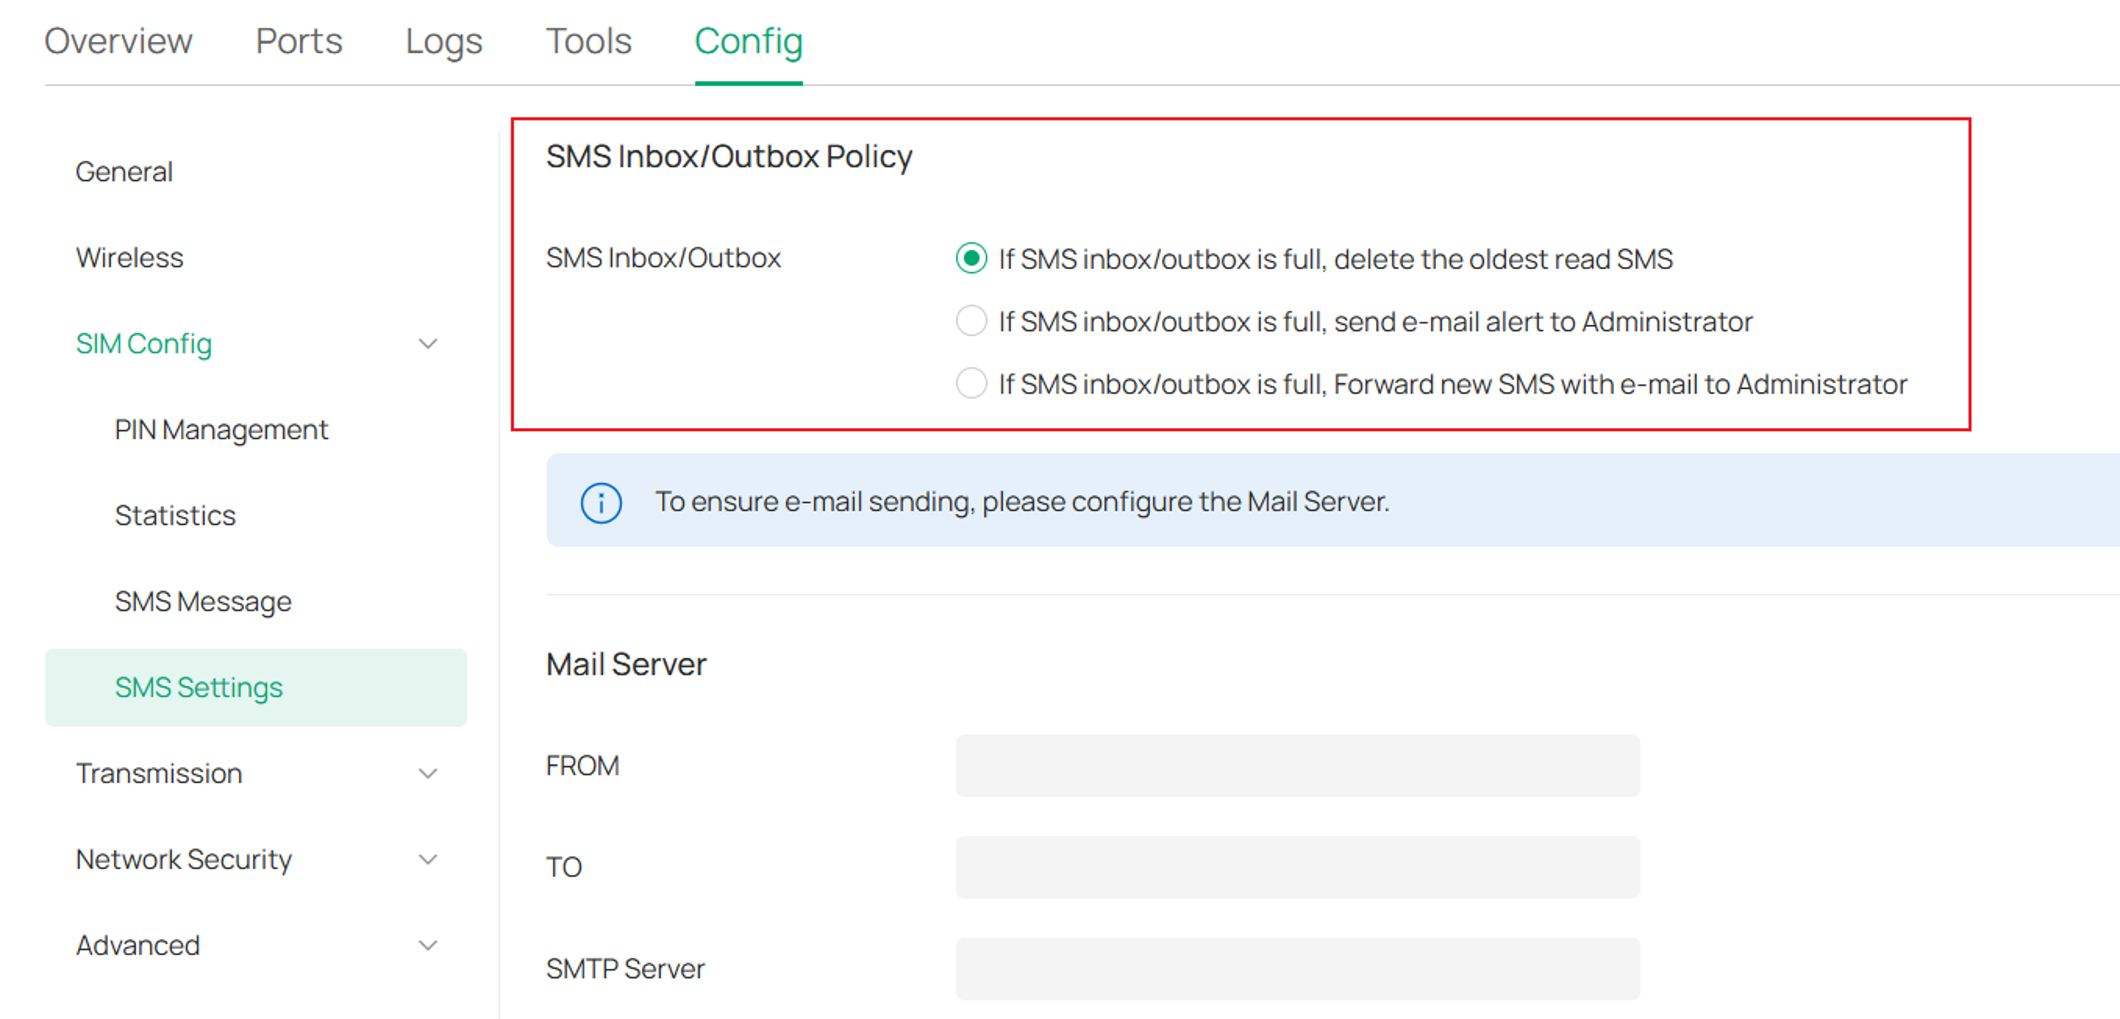
This page allows you to configure how the device handles SMS messages, including inbox management, email notifications, and SMS-based remote control.
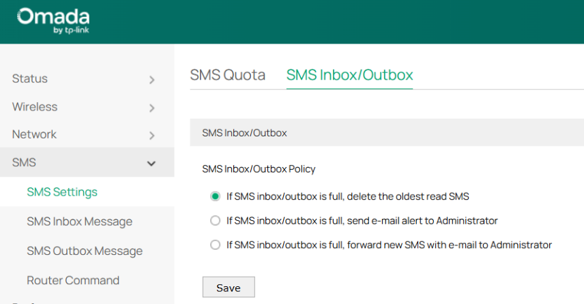
SMS Inbox/Outbox defines what happens when the SMS inbox or outbox becomes full:
--Delete the oldest read SMS
Automatically deletes the oldest read message to free up space.(Recommended for continuous operation)
--Send e-mail alert to Administrator
Sends a notification email when the inbox or outbox is full.
--Forward new SMS via e-mail to Administrator
Automatically forwards incoming SMS messages to the administrator's email.
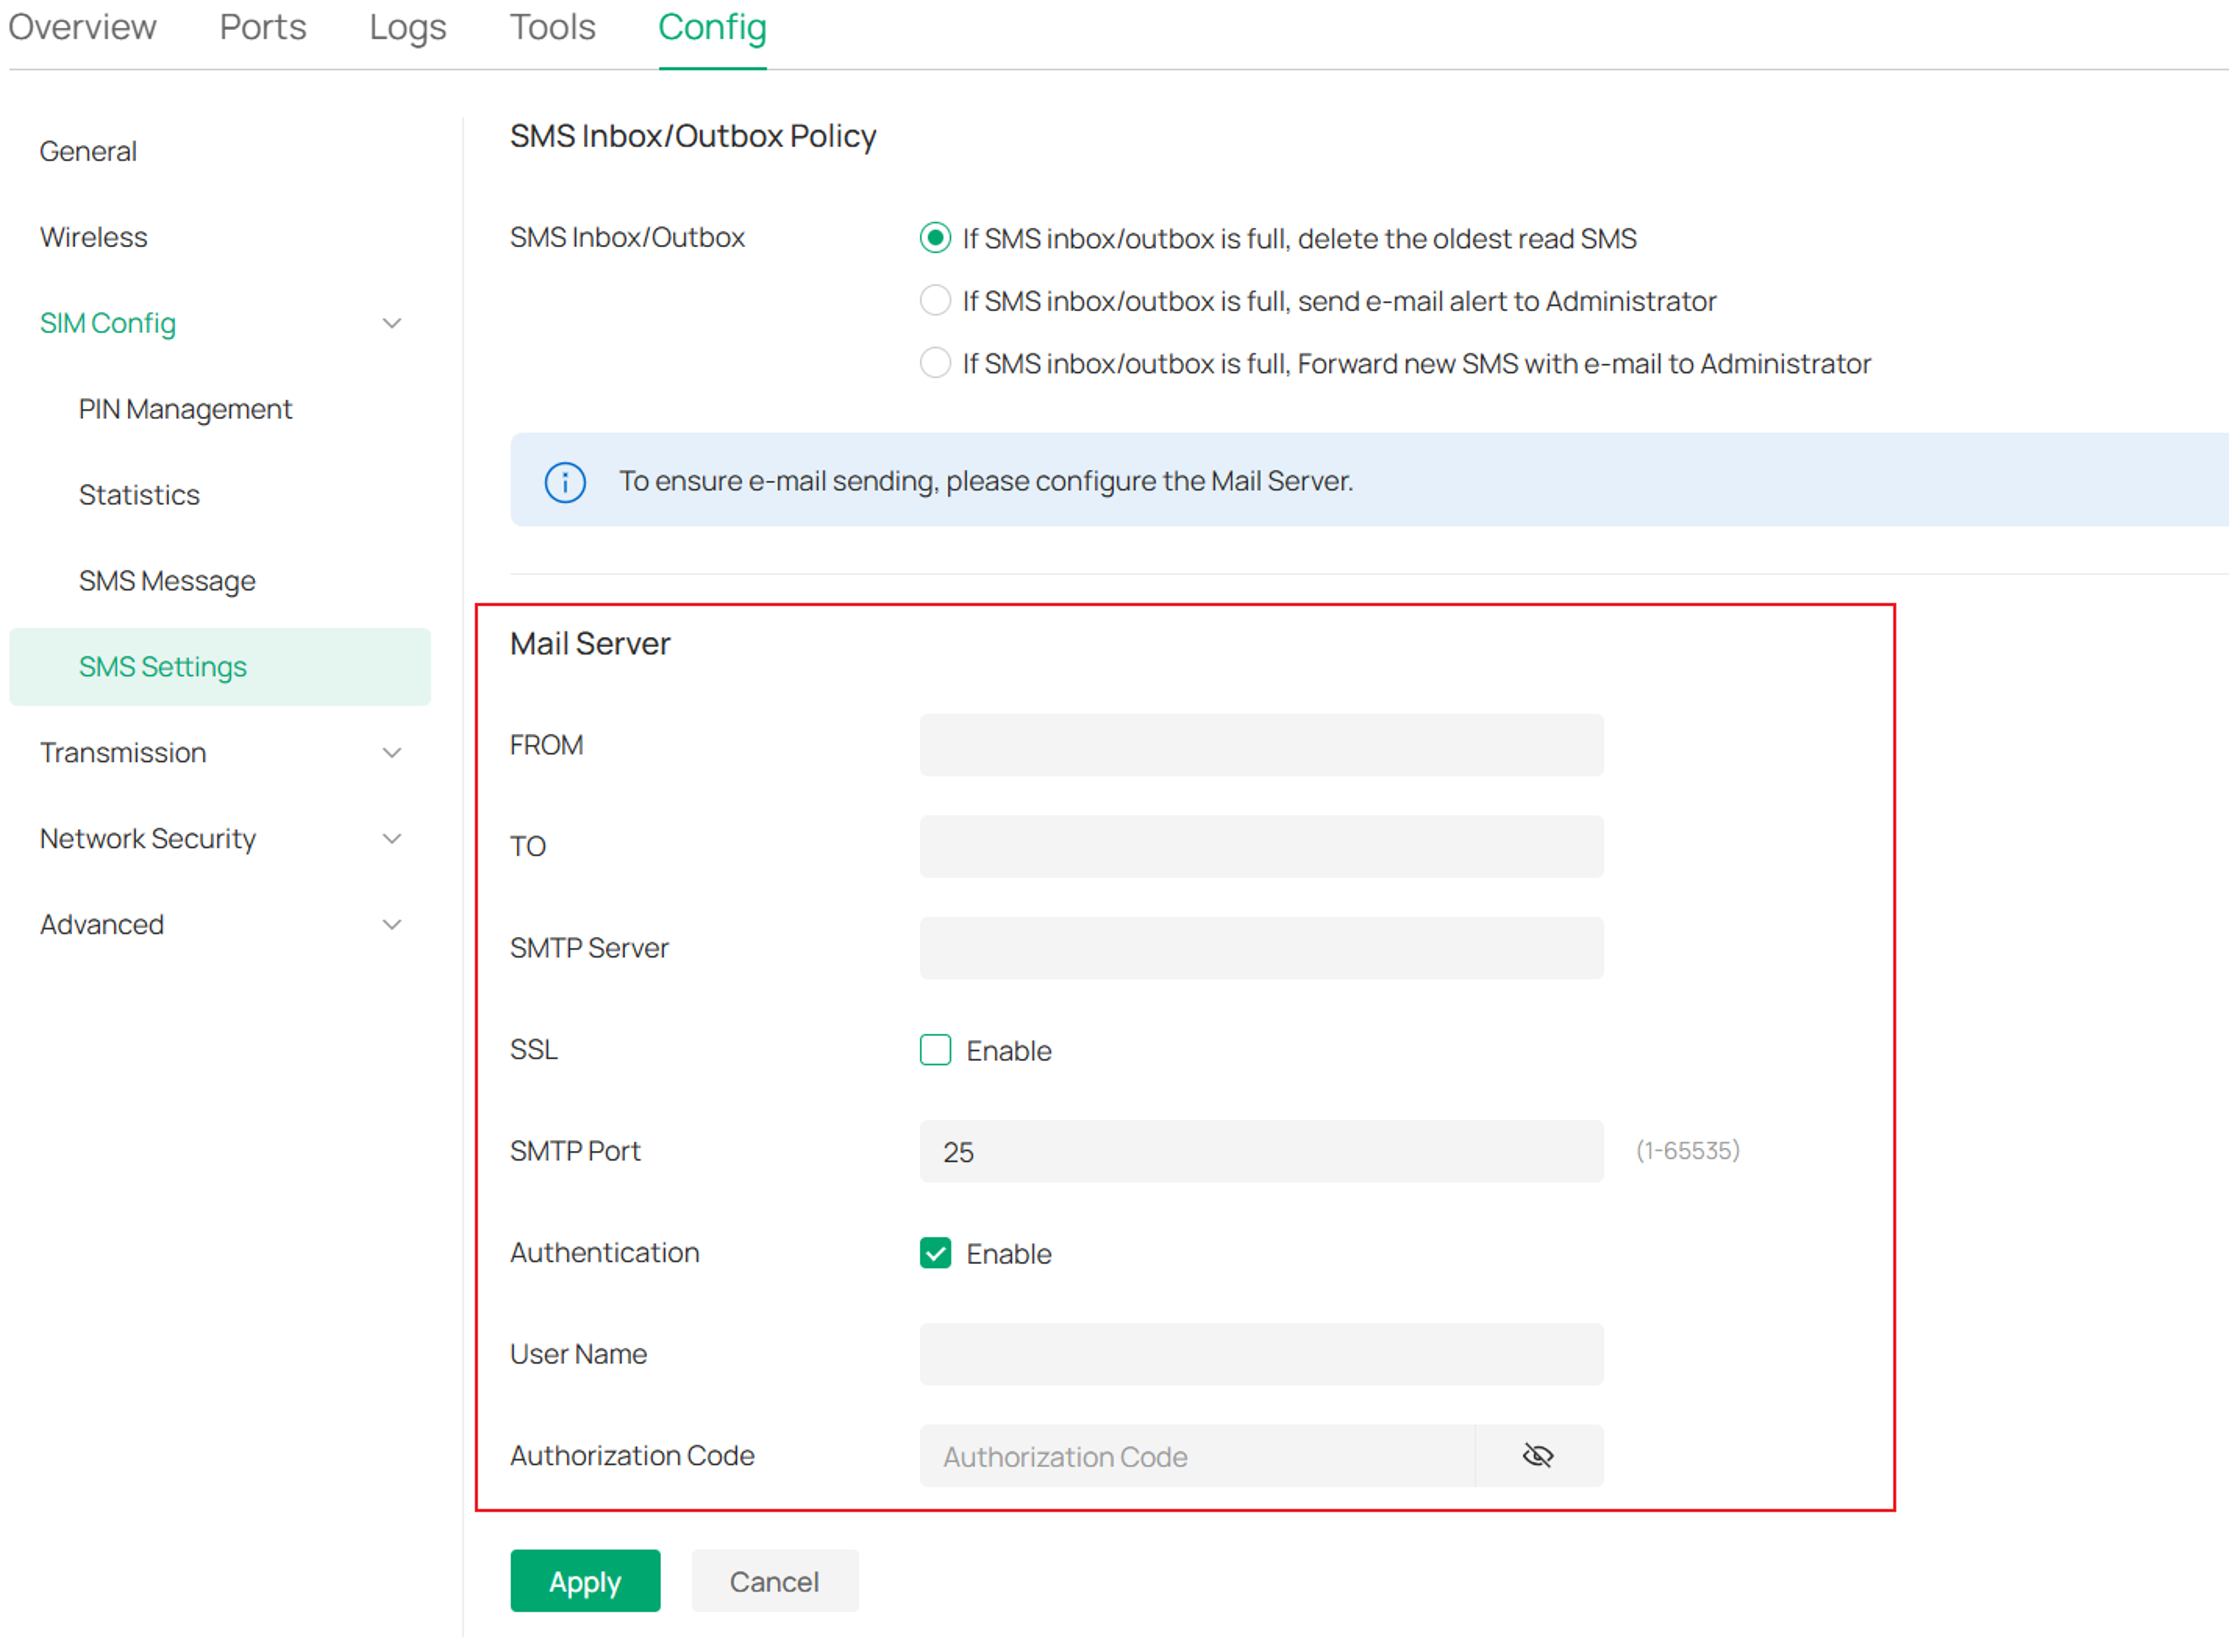
Mail Server Settings is used to configure email notifications and forwarding:
• FROM
The sender email address used by the device.
• TO
The recipient email address (usually the administrator).
• SMTP Server
The address of your email provider’s SMTP server.
• SSL
Enable this option if your mail server requires encrypted (SSL/TLS) connections.
• SMTP Port
The port used by the SMTP server (commonly 25, 465, or 587).
• Authentication
Enable this option if your mail server requires login credentials (the username and password of your mailbox).
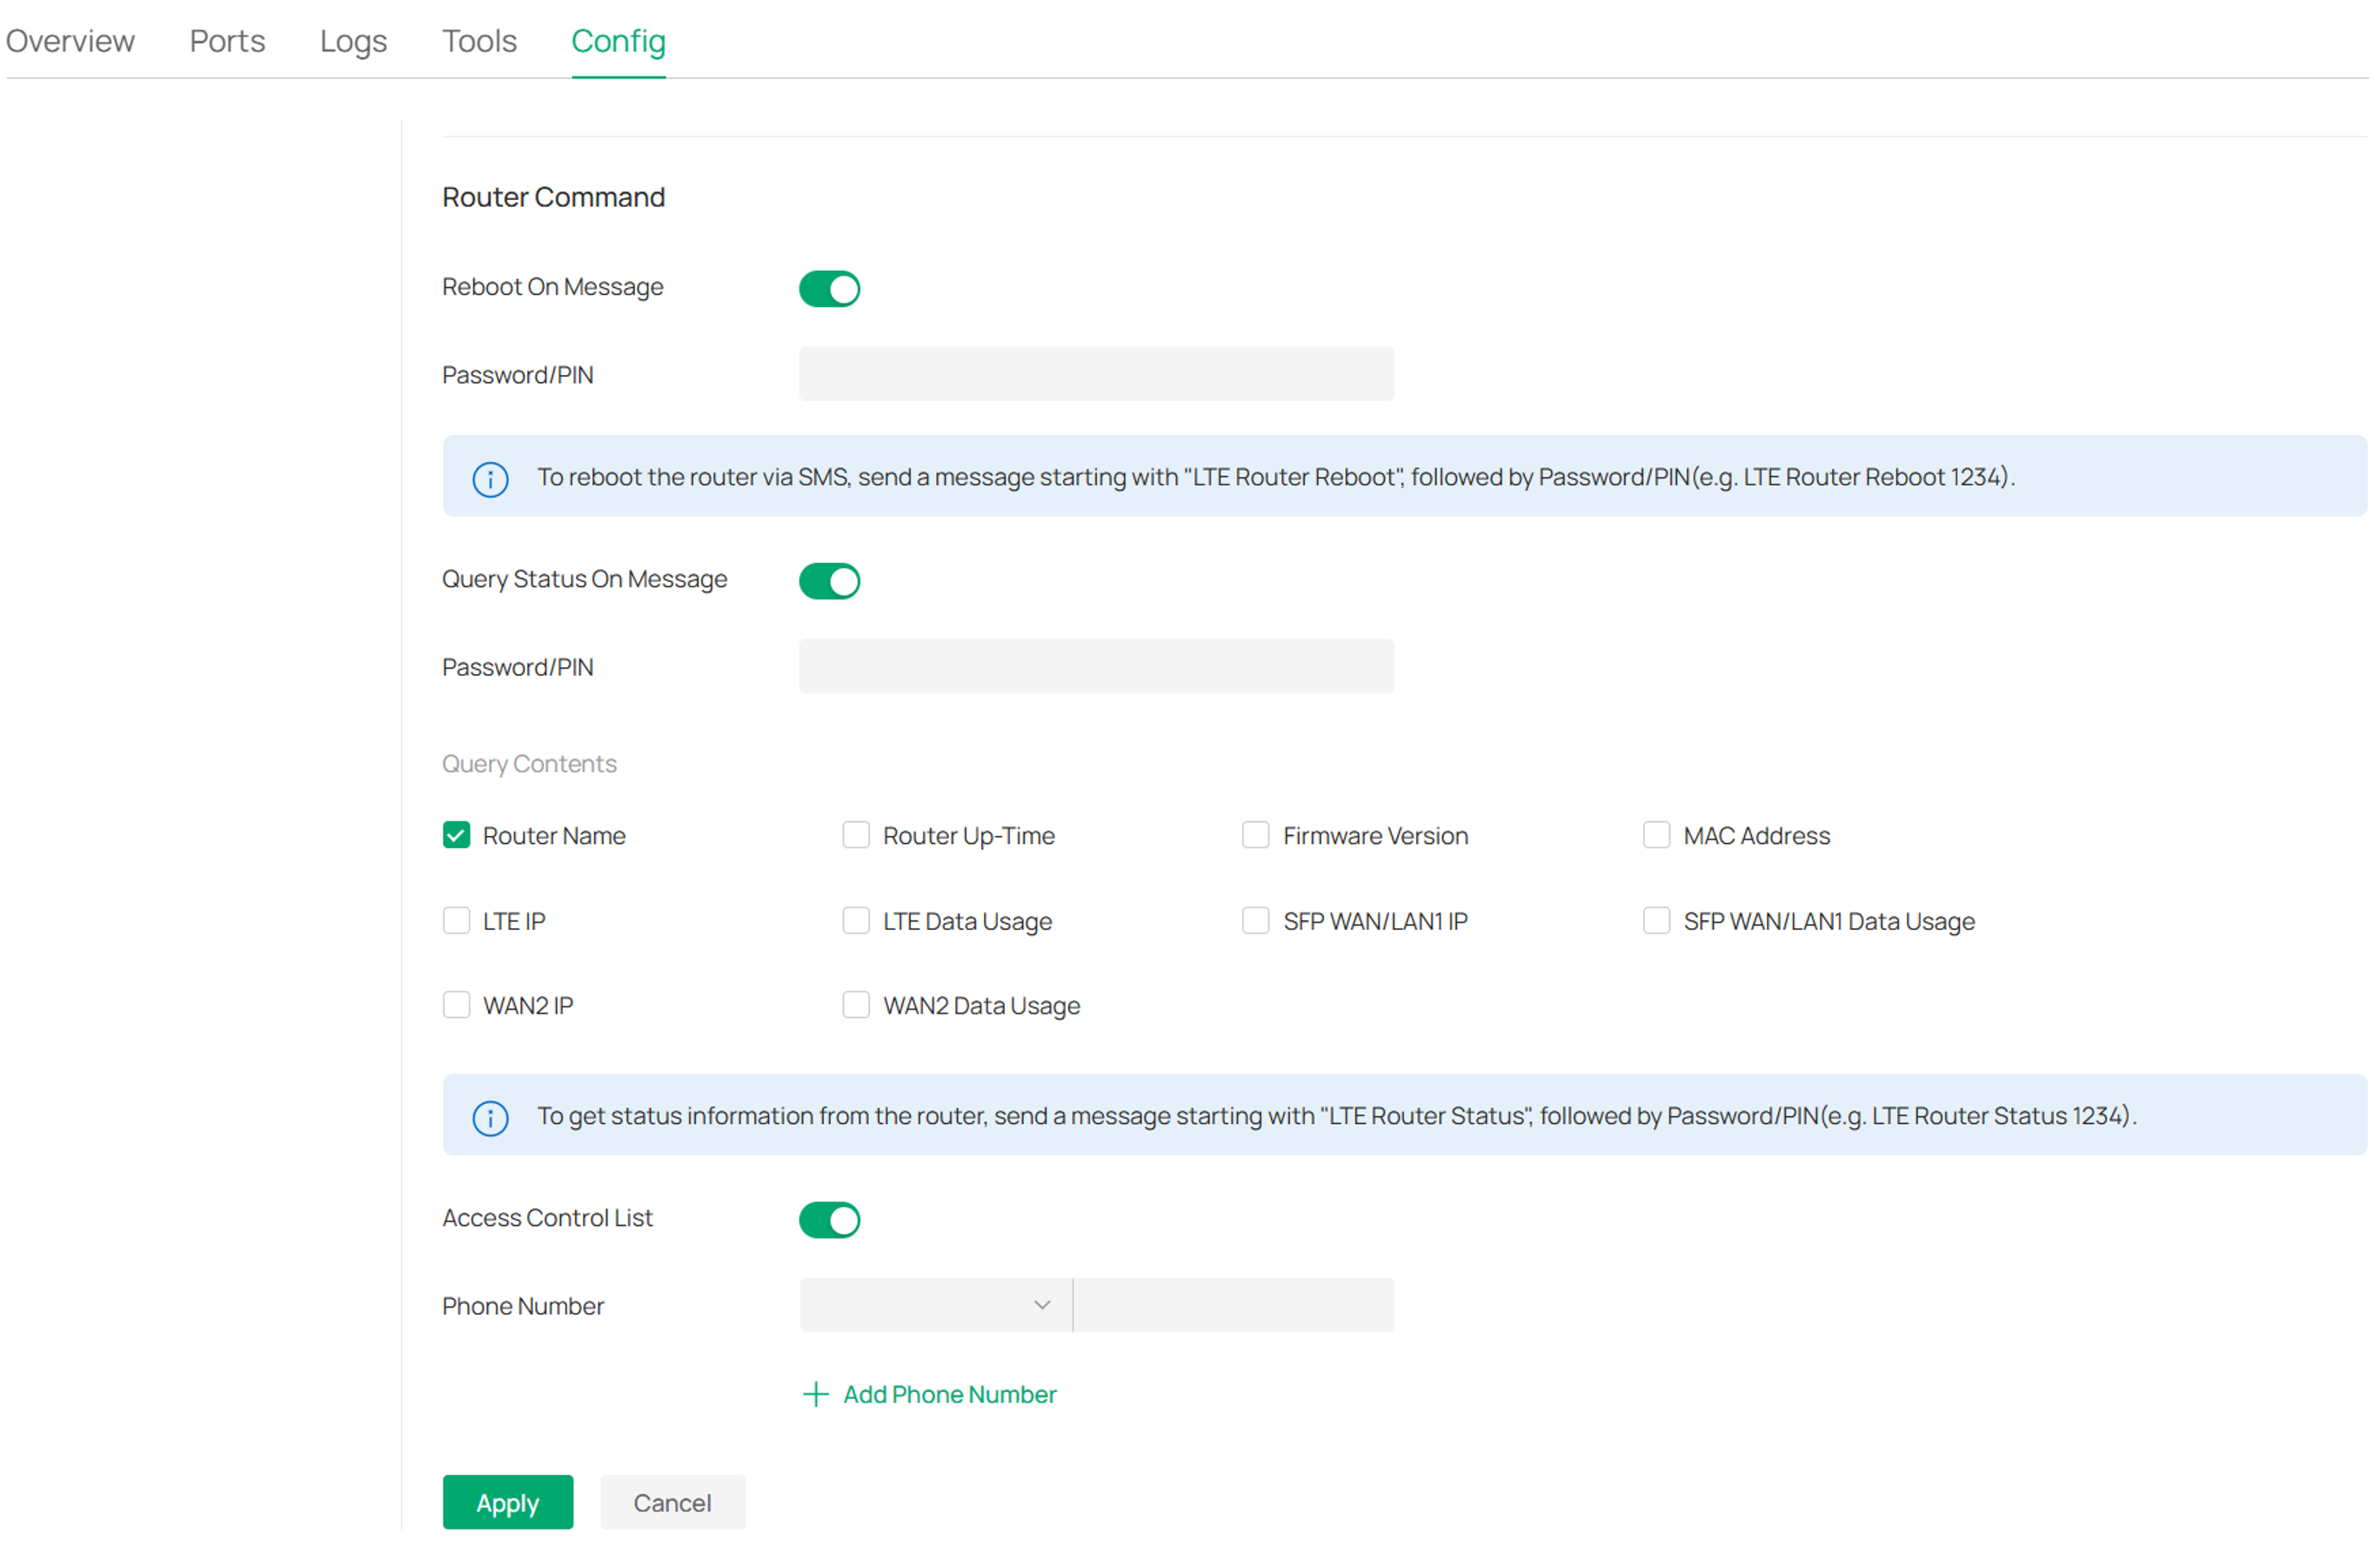
The Router Command feature allows you to remotely control and monitor the router via SMS messages. It includes the following three functions:
Reboot On Message allows you to reboot the router remotely by sending a specific SMS command. After enabling this option, you need to configure a Password/PIN. To reboot the router, send an SMS in the following format:
LTE Router Reboot <Password/PIN>
Example: LTE Router Reboot 1234
Query Status on Message allows you to query the router’s status via SMS. After enabling this option, set a Password/PIN. Send an SMS command in the following format:
LTE Router Status <Password/PIN>
Example: LTE Router Status 1234
The router will reply with the selected status information.
Access Control List restricts which phone numbers are allowed to send SMS commands to the router. Enable this option to enhance security. Add one or more trusted phone numbers to the list.
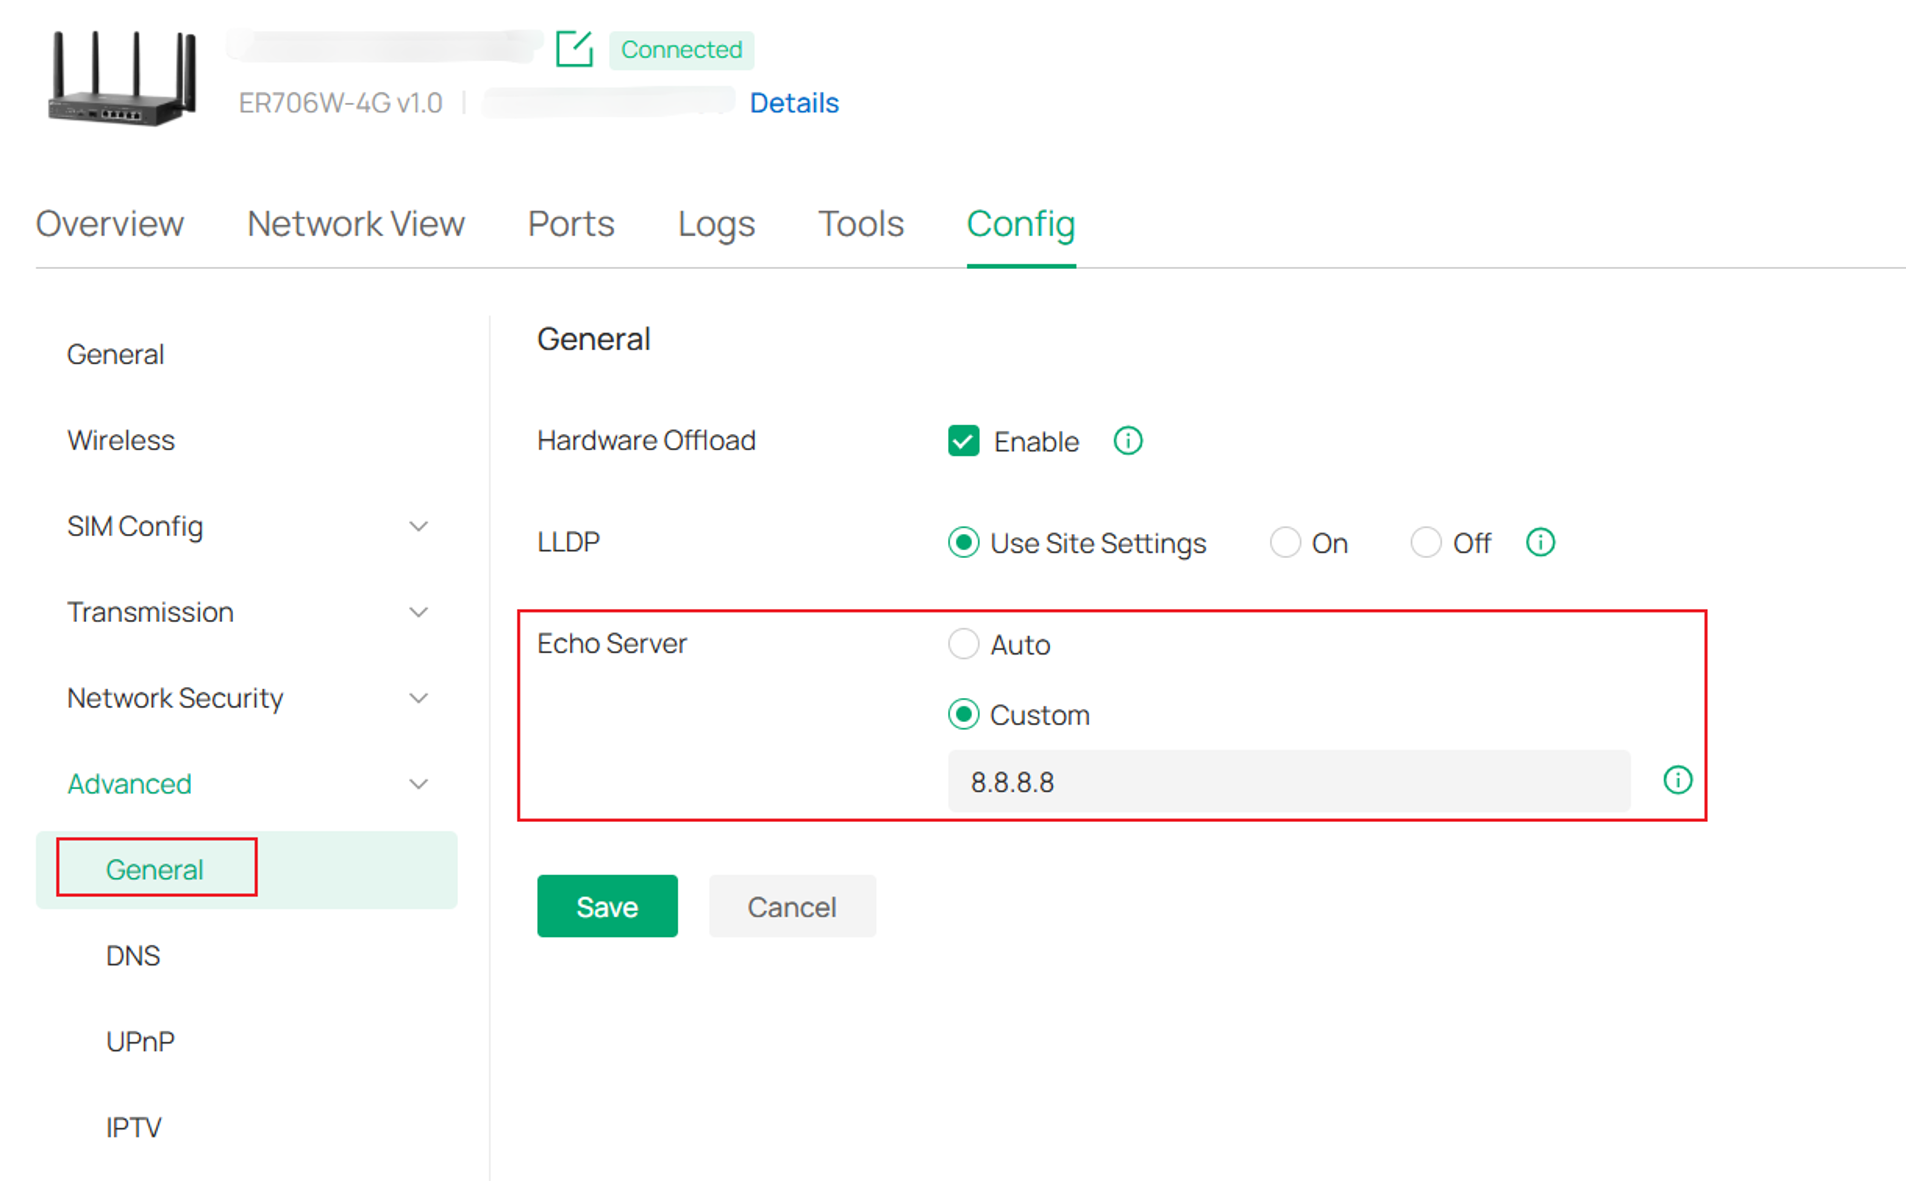
Echo Server allows you to check if the LTE WAN can access the internet.
As mentioned in SIM Card Plan Recommendations, if your SIM card plan doesn’t have normal internet access, you’d better change the Echo Server mode to Custom, and specify the IP address to ping, so that the device can accurately check the dial-up connectivity.
On Standalone Mode
Step 1. Insert the SIM card into the device.
Step 2. During the quick setup process, the inserted SIM card will be automatically detected. You need to enter the required SIM configuration information, which can be obtained from your carrier.
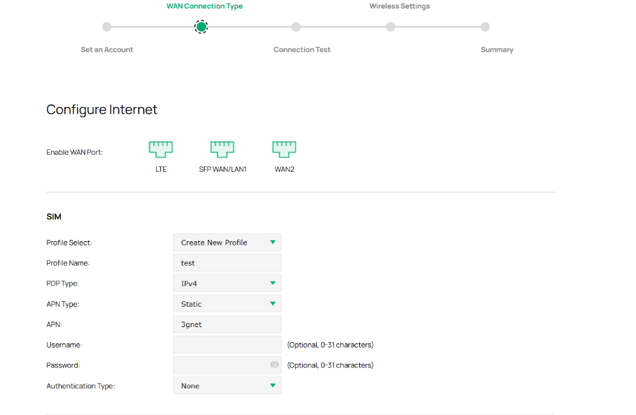
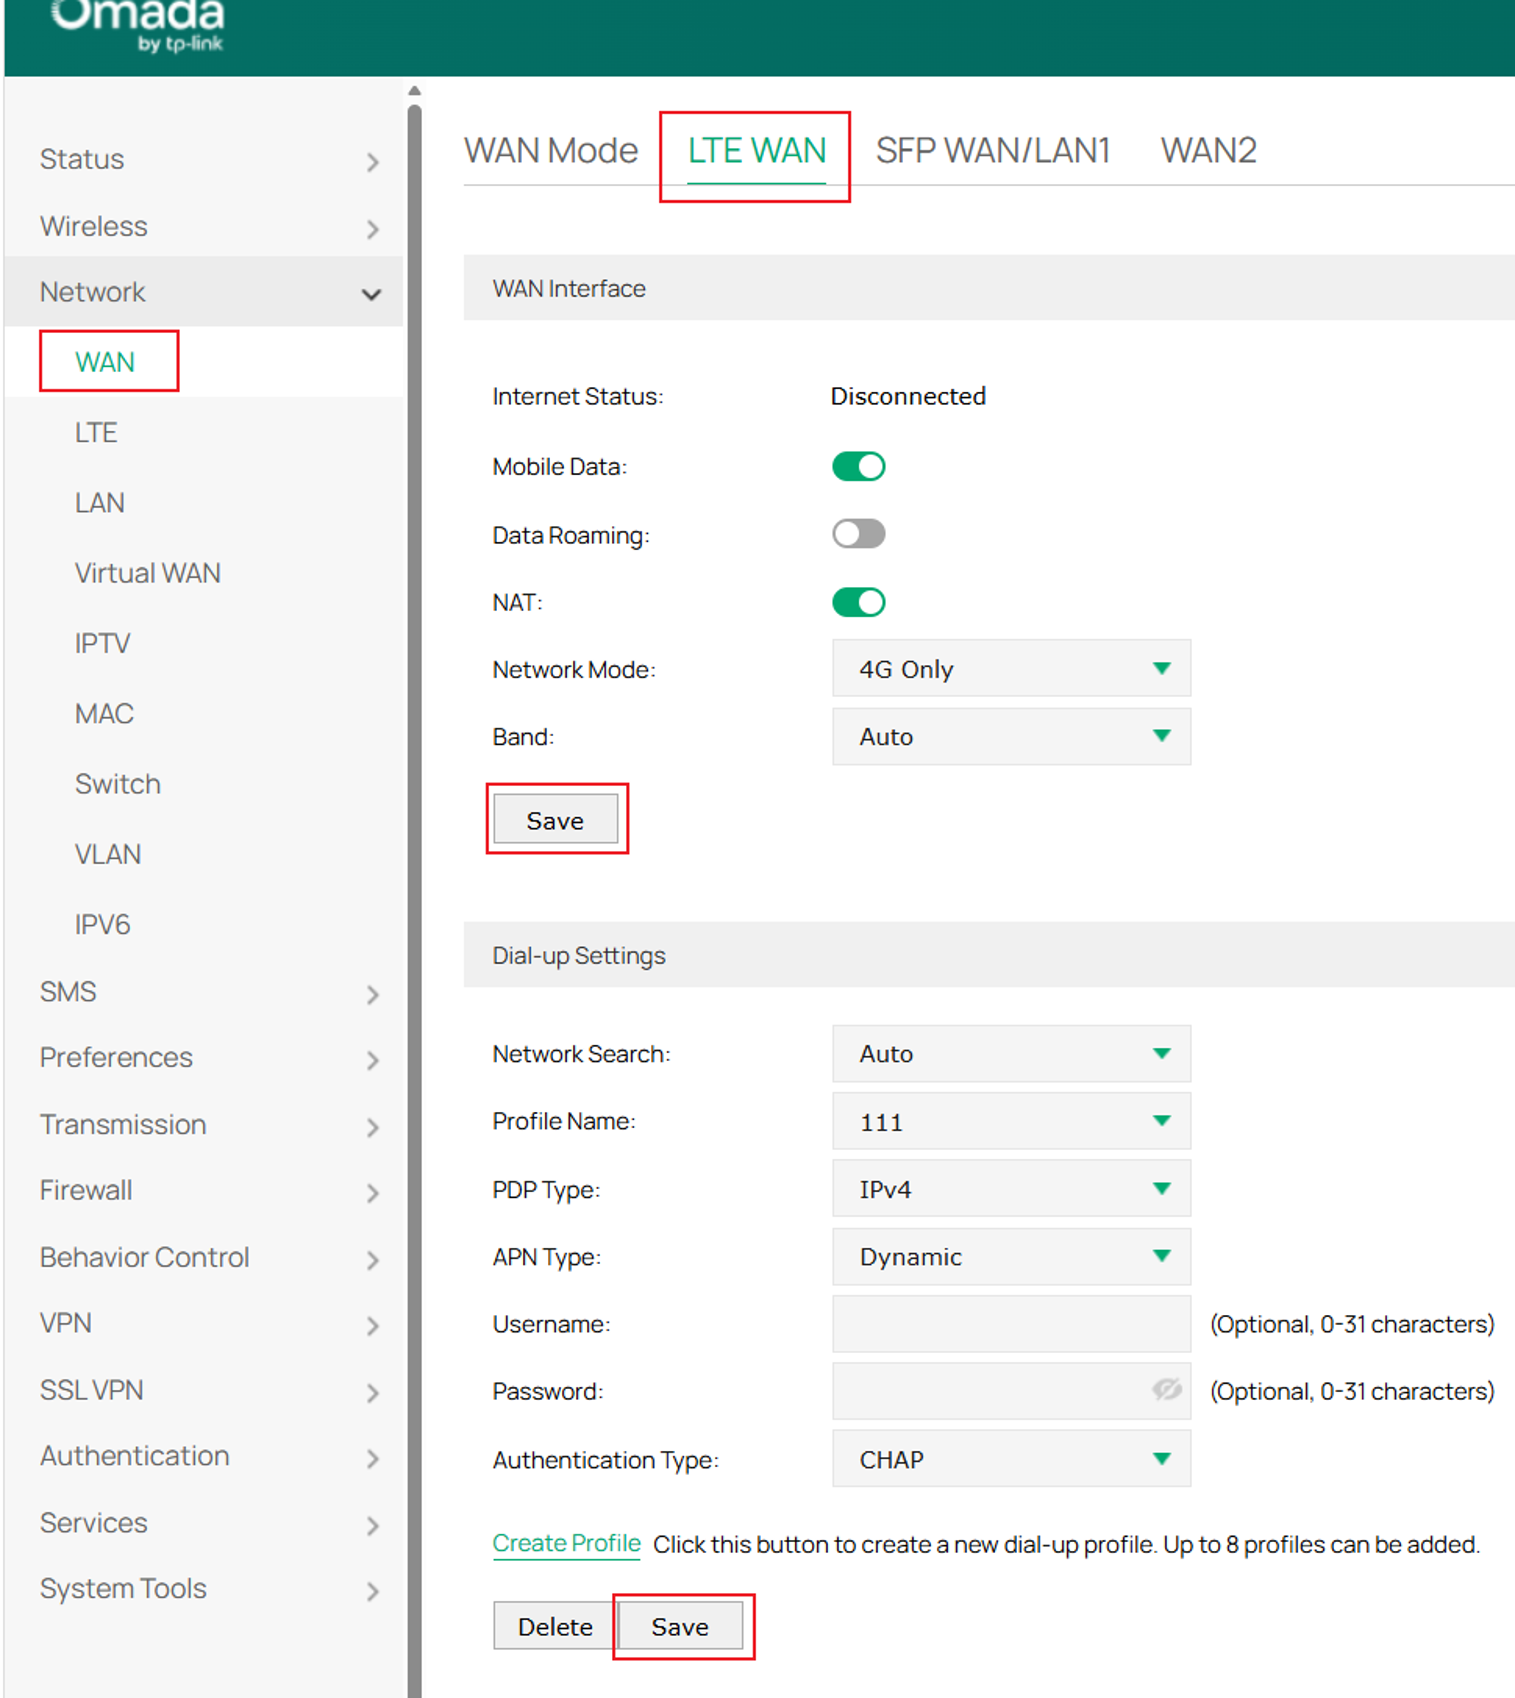
After completing quick setup, you can also configure the settings for LTE WAN in Network > WAN > LTE WAN.
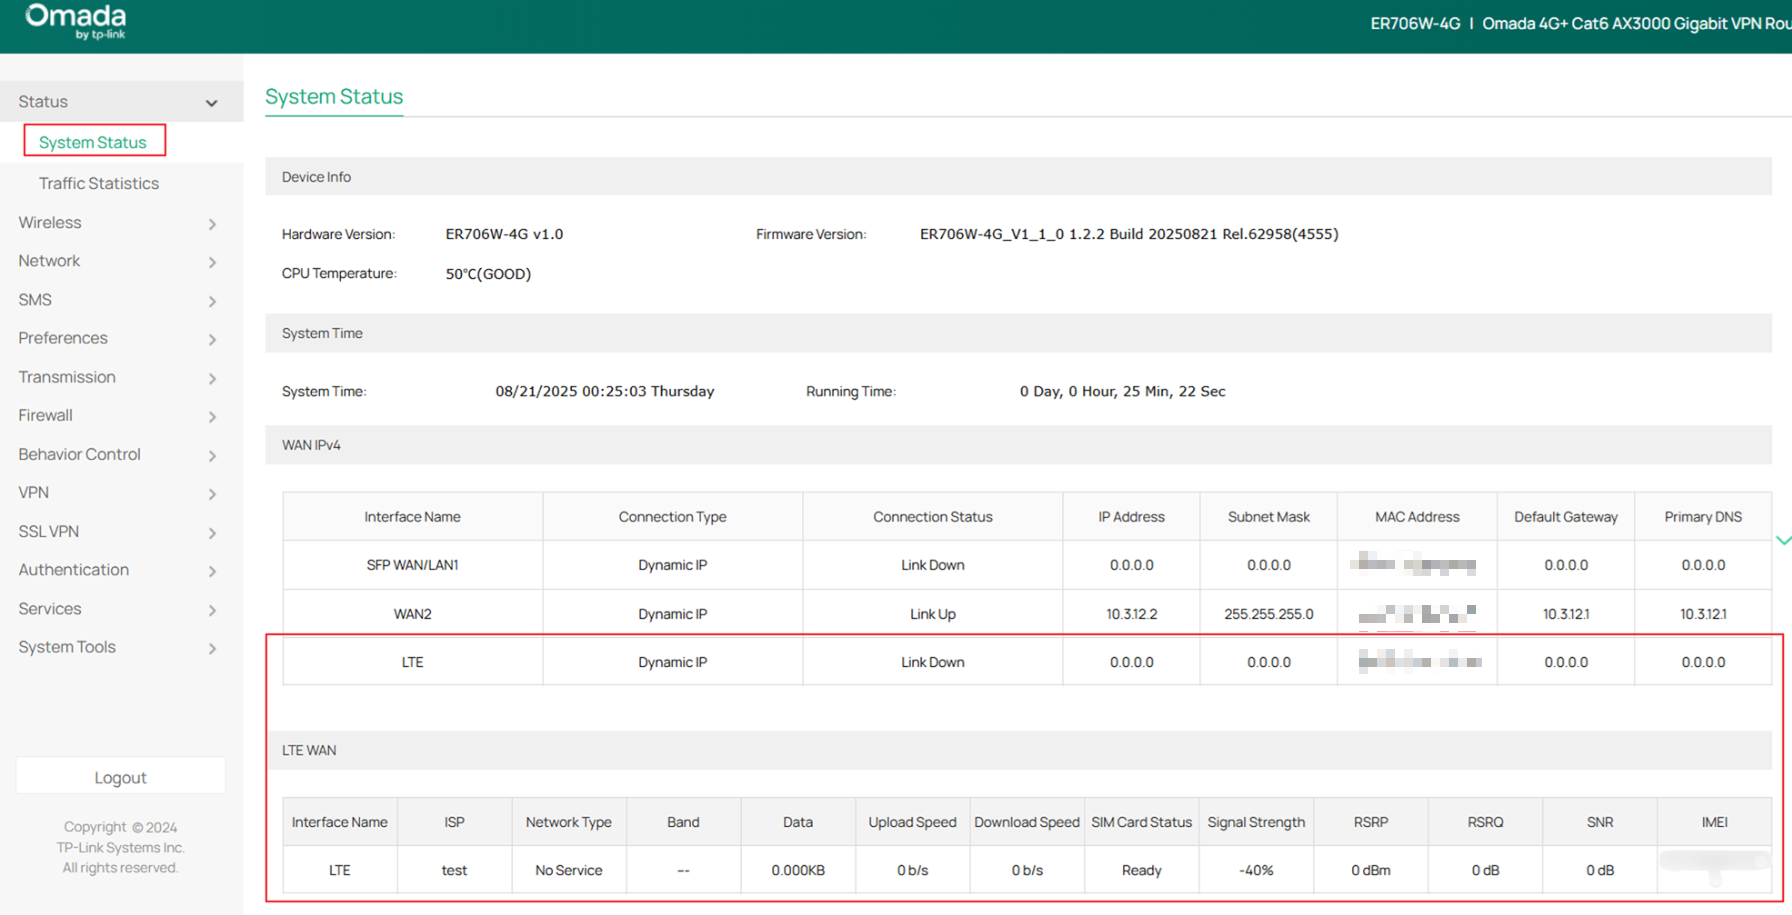
And the status of LTE WAN port can be checked in Status > System Status.
Online Detection allows you to check if the LTE WAN can access the internet.
As mentioned in SIM Card Plan Recommendations, if your SIM card plan doesn’t have normal internet access, you should change the Online Detection mode to Manual, and specify the IP address to ping, so that the device can accurately check the dial-up connectivity.
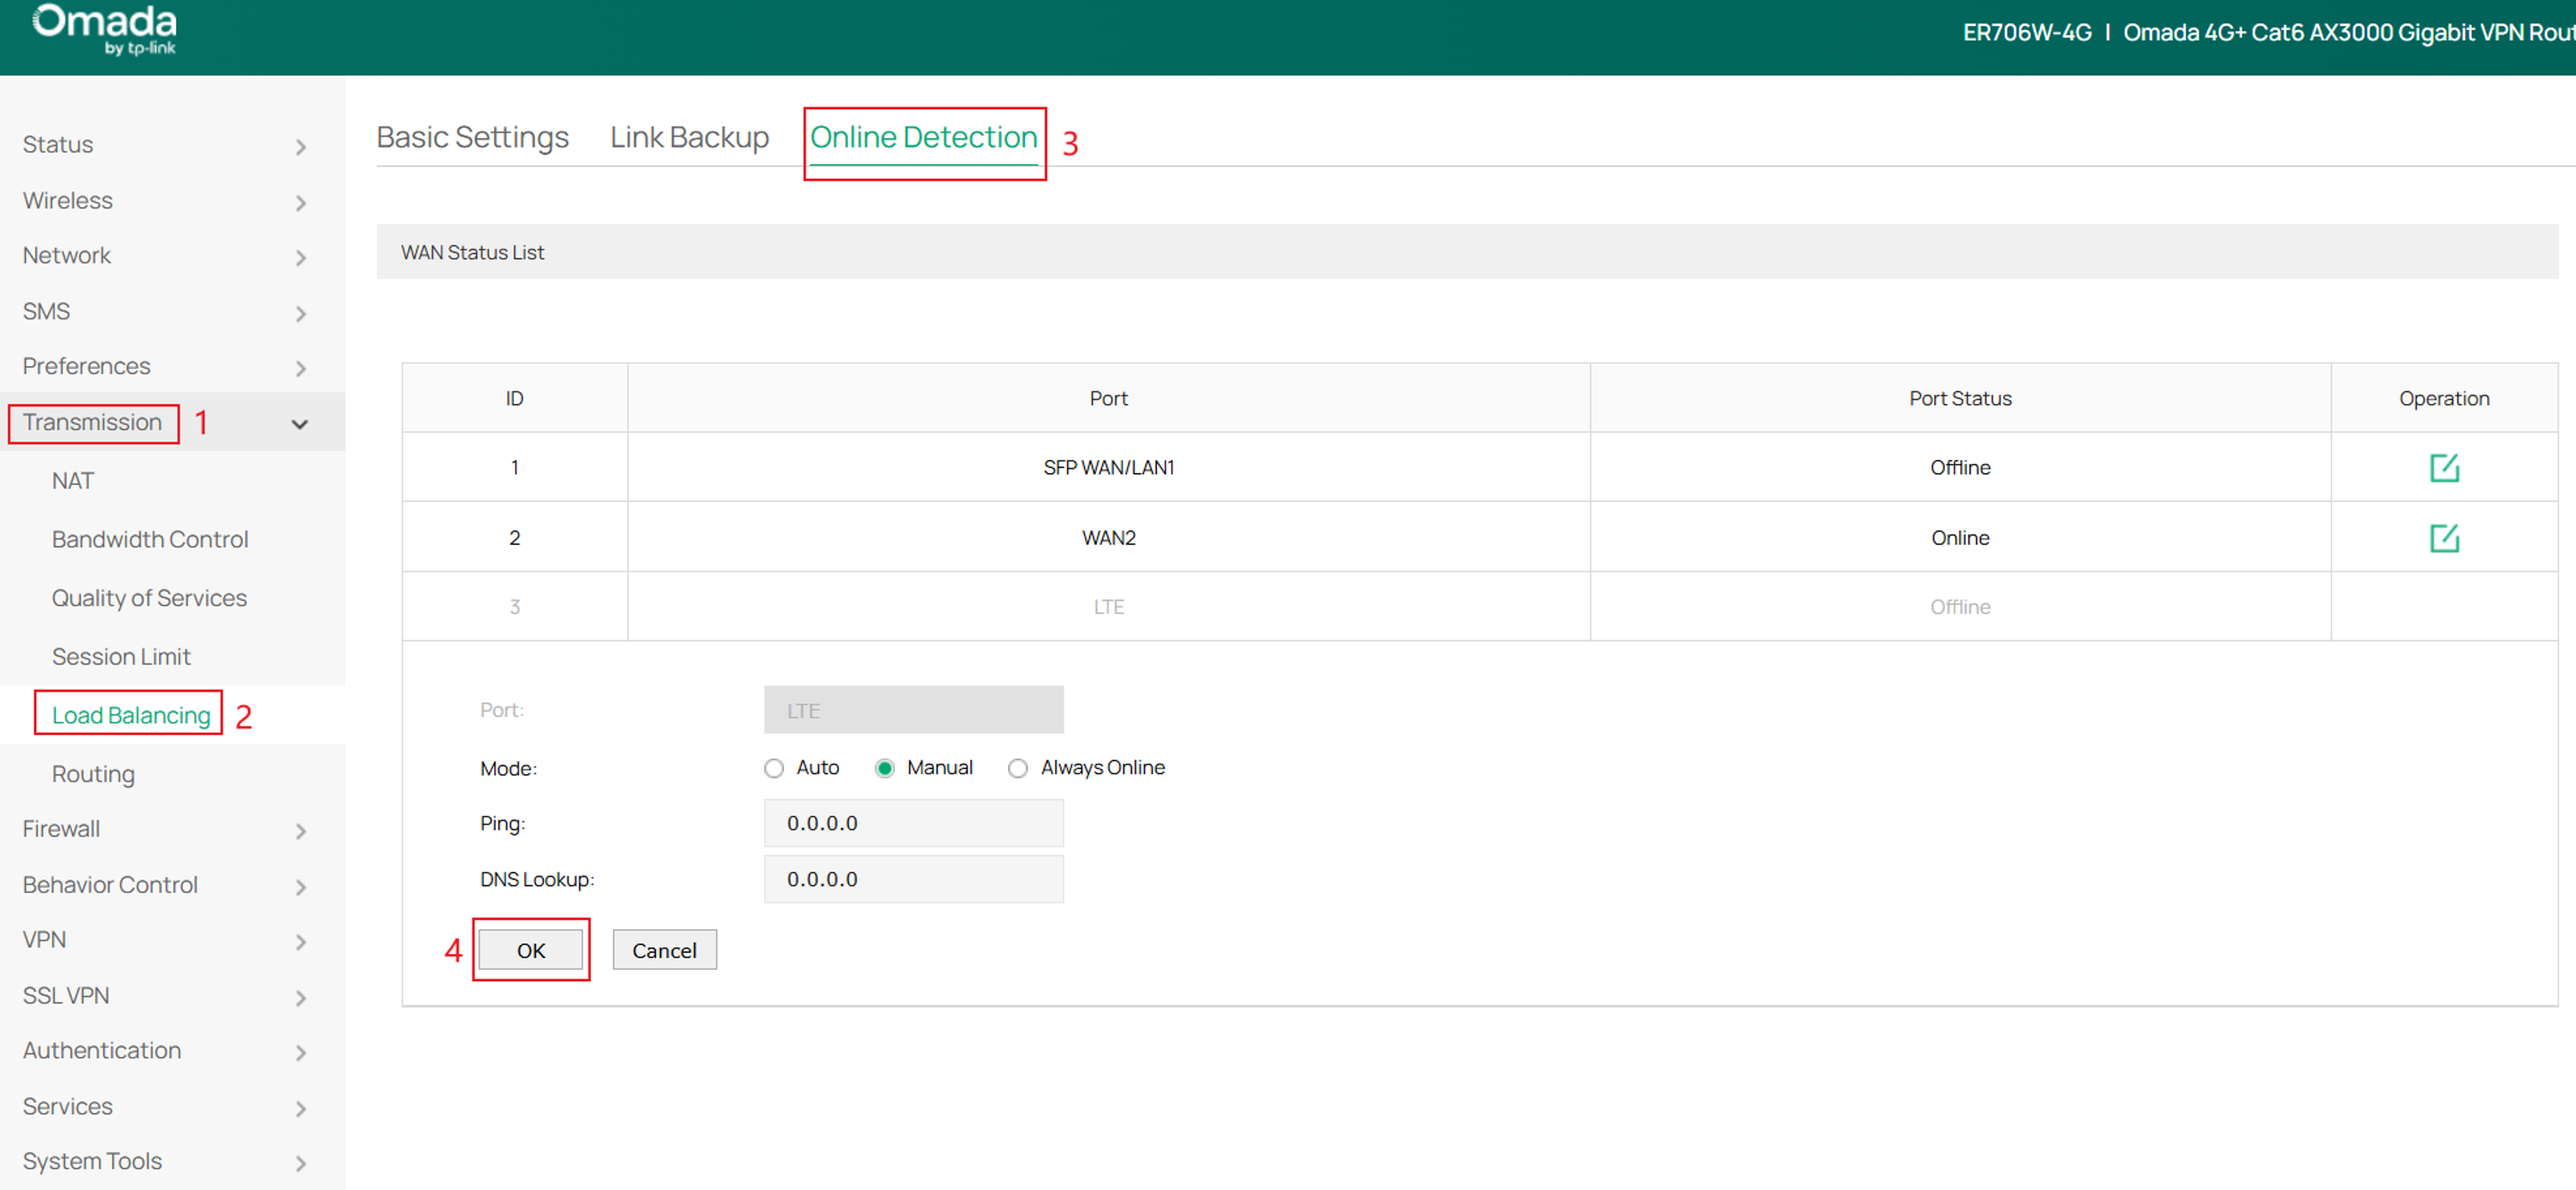
Step 3. The configuration of SIM-related features is as follows:
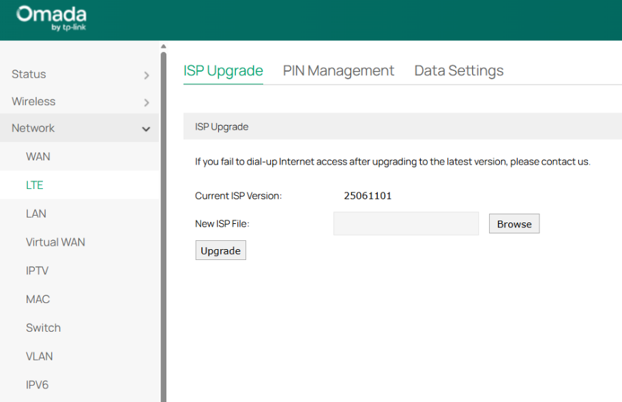
ISP Upgrade: the ISP information can be updated by importing a file.
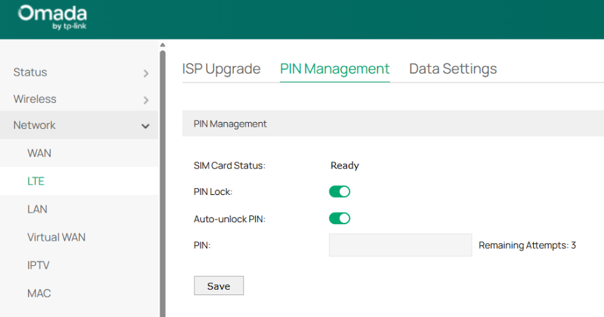
PIN Management:
PIN Lock: Enables SIM card protection, requiring a PIN code to unlock the SIM card before it can connect to the network.
Auto-unlock PIN: Automatically enters the saved PIN code to unlock the SIM card when the device starts or the SIM is reinserted.
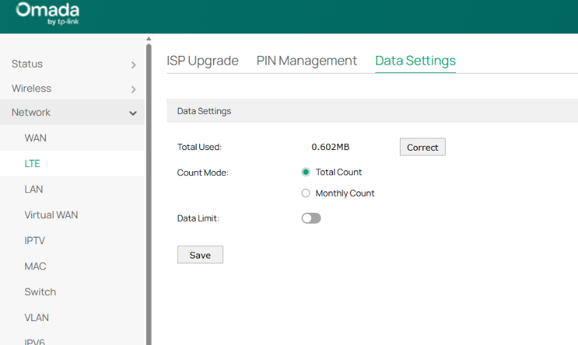
Data Settings: Monitor data usage and set limits on the SIM card’s data consumption.
SMS features:
The functions of the SMS features below are the same as those described in the Controller section above. For detailed information, please refer to the previous section.
SMS Settings:
SMS Quota: Monitor SMS messages and set limits on the SIM card’s SMS Quota.
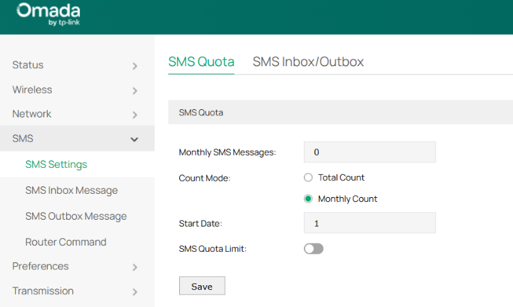
SMS Inbox/Outbox: policy for handling a full SMS inbox/outbox.
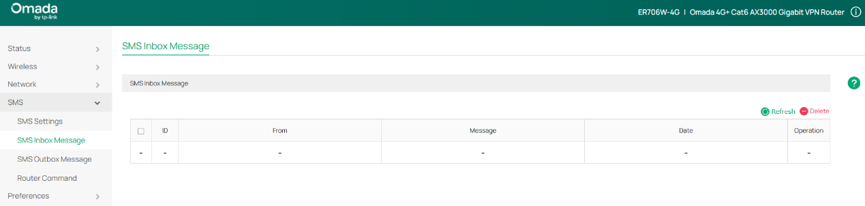
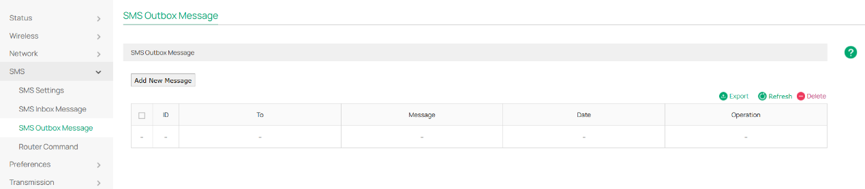
SMS Inbox/Outbox Message: history details of the inbox/outbox messages.
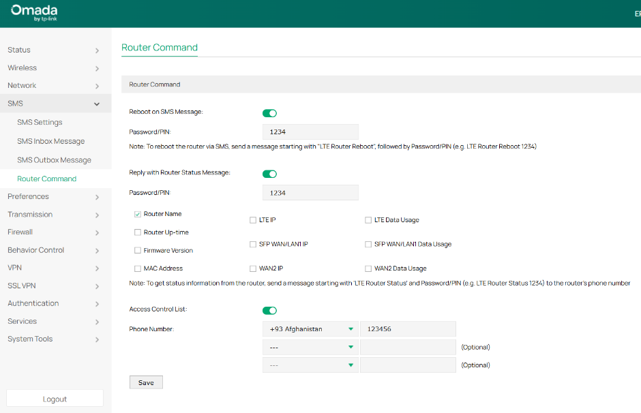
Router Command: allows the device to be rebooted or its status to be checked by sending SMS commands.
Conclusion
Through this article, you will gain a basic understanding of how to select a SIM card and how to configure SIM-related features on an Omada gateway.
To learn more about each function and configuration, please visit Support Home to download or check the manual for your product.
