


Contents
Scenario 1: Directly reachable security devices do not appear in the device list
Scenario 2: Security devices configured with an Inform URL do not appear in the device list
Collect logs for technical support
Introduction
Omada Fusion Pro Gateway can automatically discover and manage supported security devices, including cameras and NVRs. When a device does not appear in the device list, the issue is typically related to network connectivity, device compatibility, firmware versions, device status, or an existing management relationship with another Omada Fusion Pro Gateway.
This article explains how to troubleshoot supported security devices that do not appear through automatic discovery or do not appear after an Inform URL is configured.
Requirements
- Omada Fusion Pro Gateway operating properly with basic network settings configured
- Security devices, such as IPCs and NVRs, powered on and operating properly
- IP connectivity between Omada Fusion Pro Gateway and the security devices
- Omada Fusion Pro Gateway runs an official firmware version. The latest official firmware version is recommended.
- Security devices supported by Omada Fusion Pro Gateway
Scenarios & troubleshooting
Scenario 1: Directly reachable security devices do not appear in the device list
Problem description
Supported security devices on networks that Omada Fusion Pro Gateway can directly access do not appear through automatic discovery or cannot be added manually by IP address.
Troubleshooting steps
Step 1. Verify Omada Fusion Pro Gateway settings and firmware.
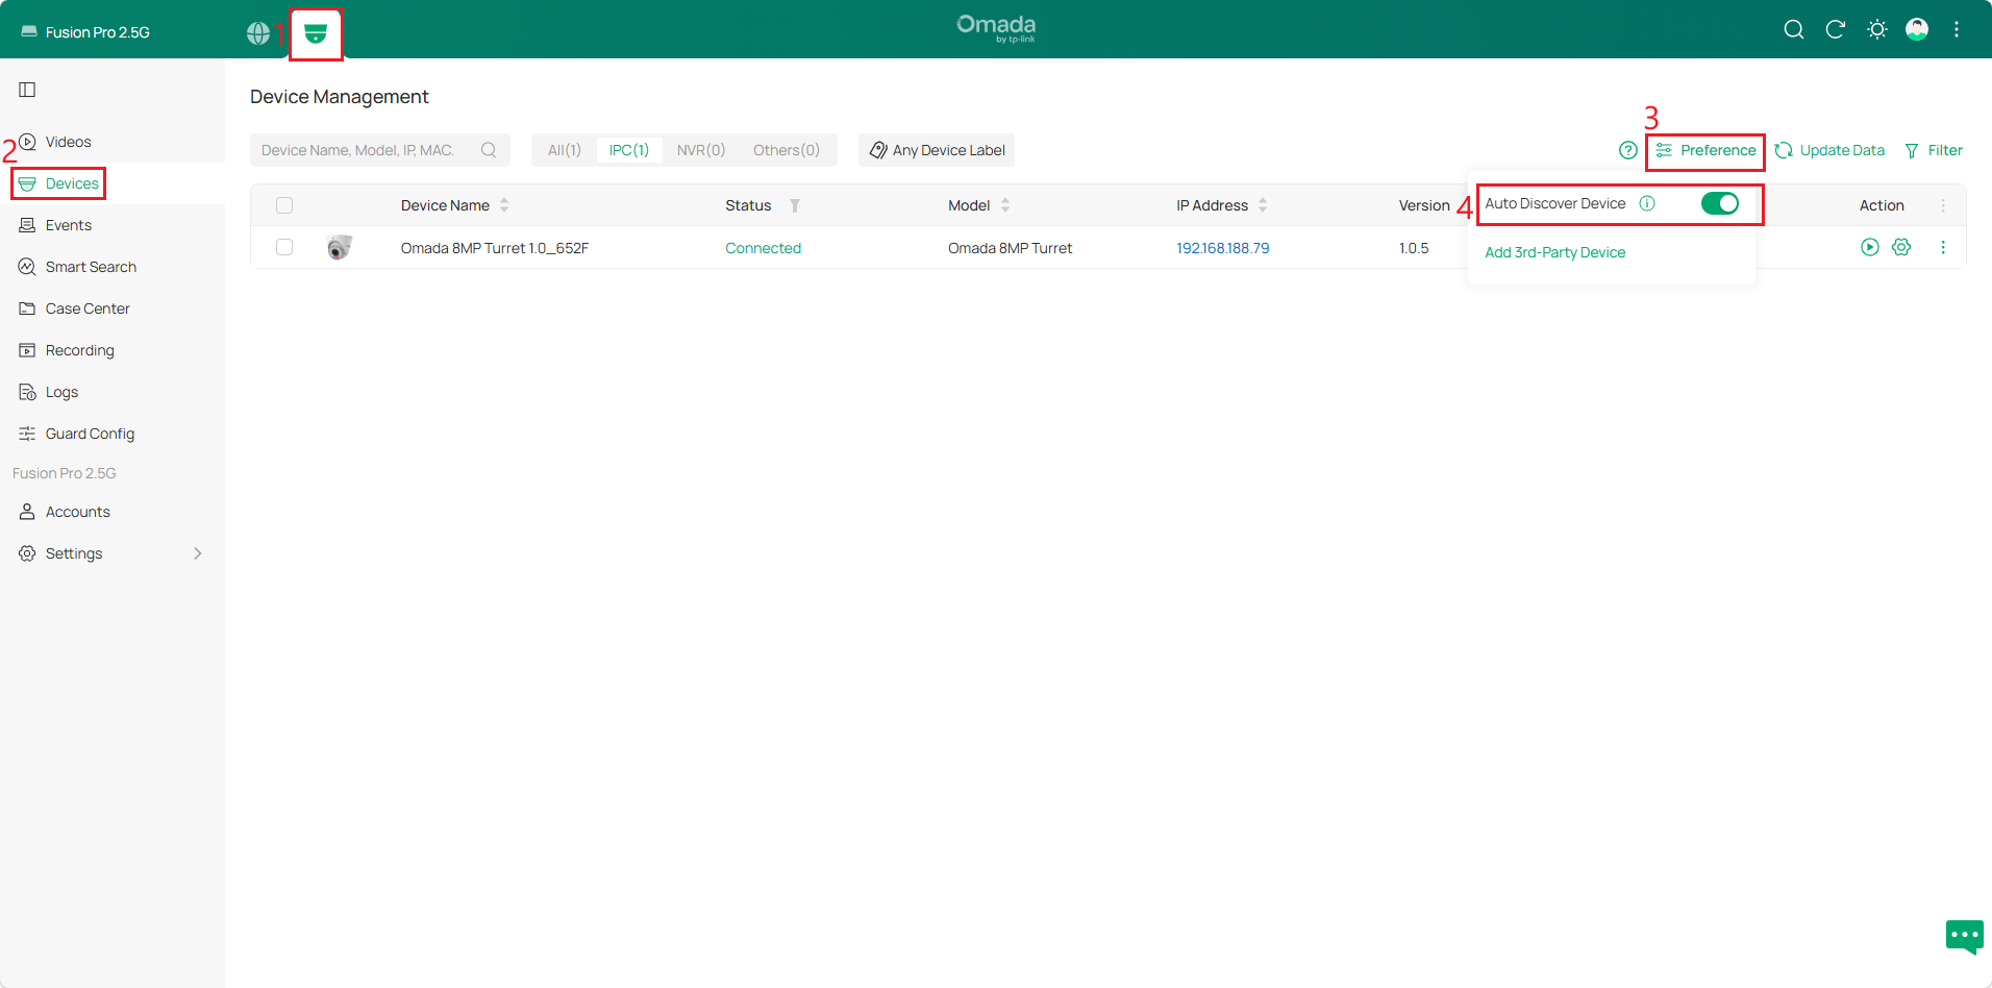
- Log in to the Omada Fusion Pro Gateway, open Omada Guard > Devices > Preference. For automatic discovery, verify that Auto Discover Device is enabled.
Note: Auto Discover Device is enabled by default.
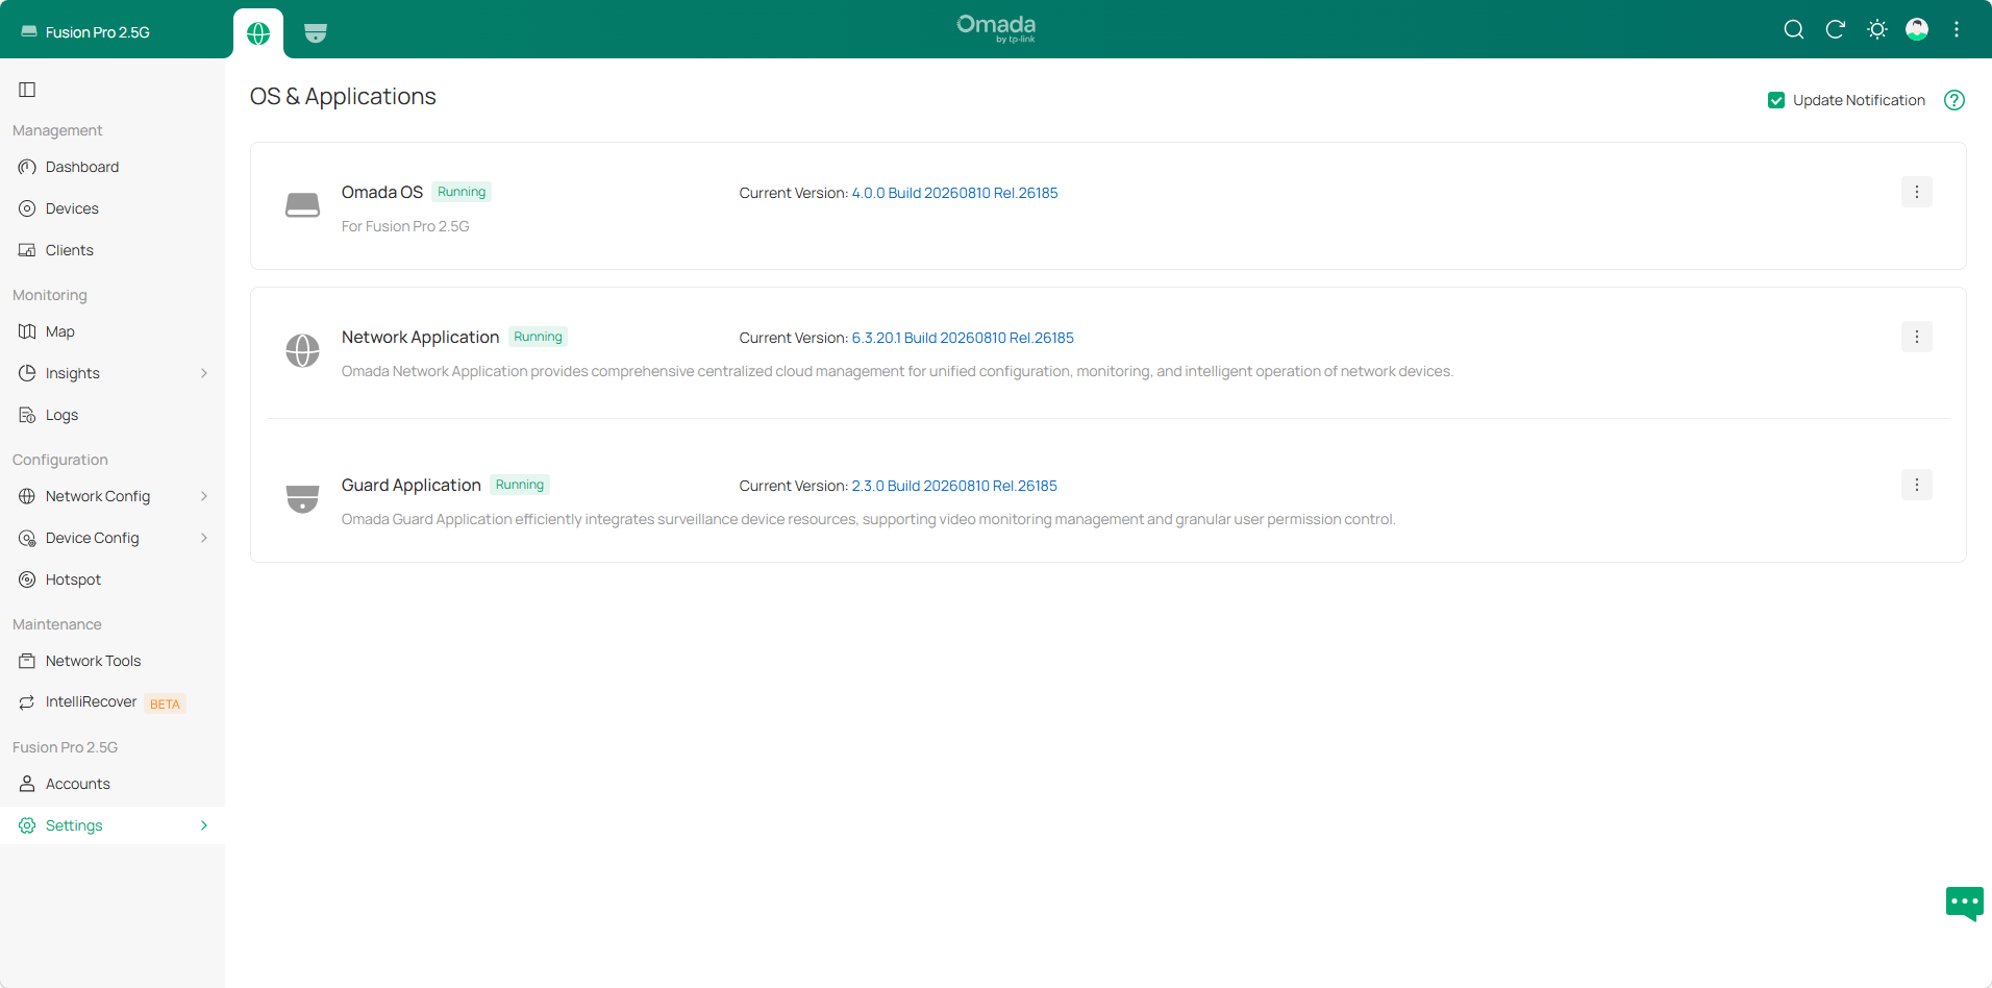
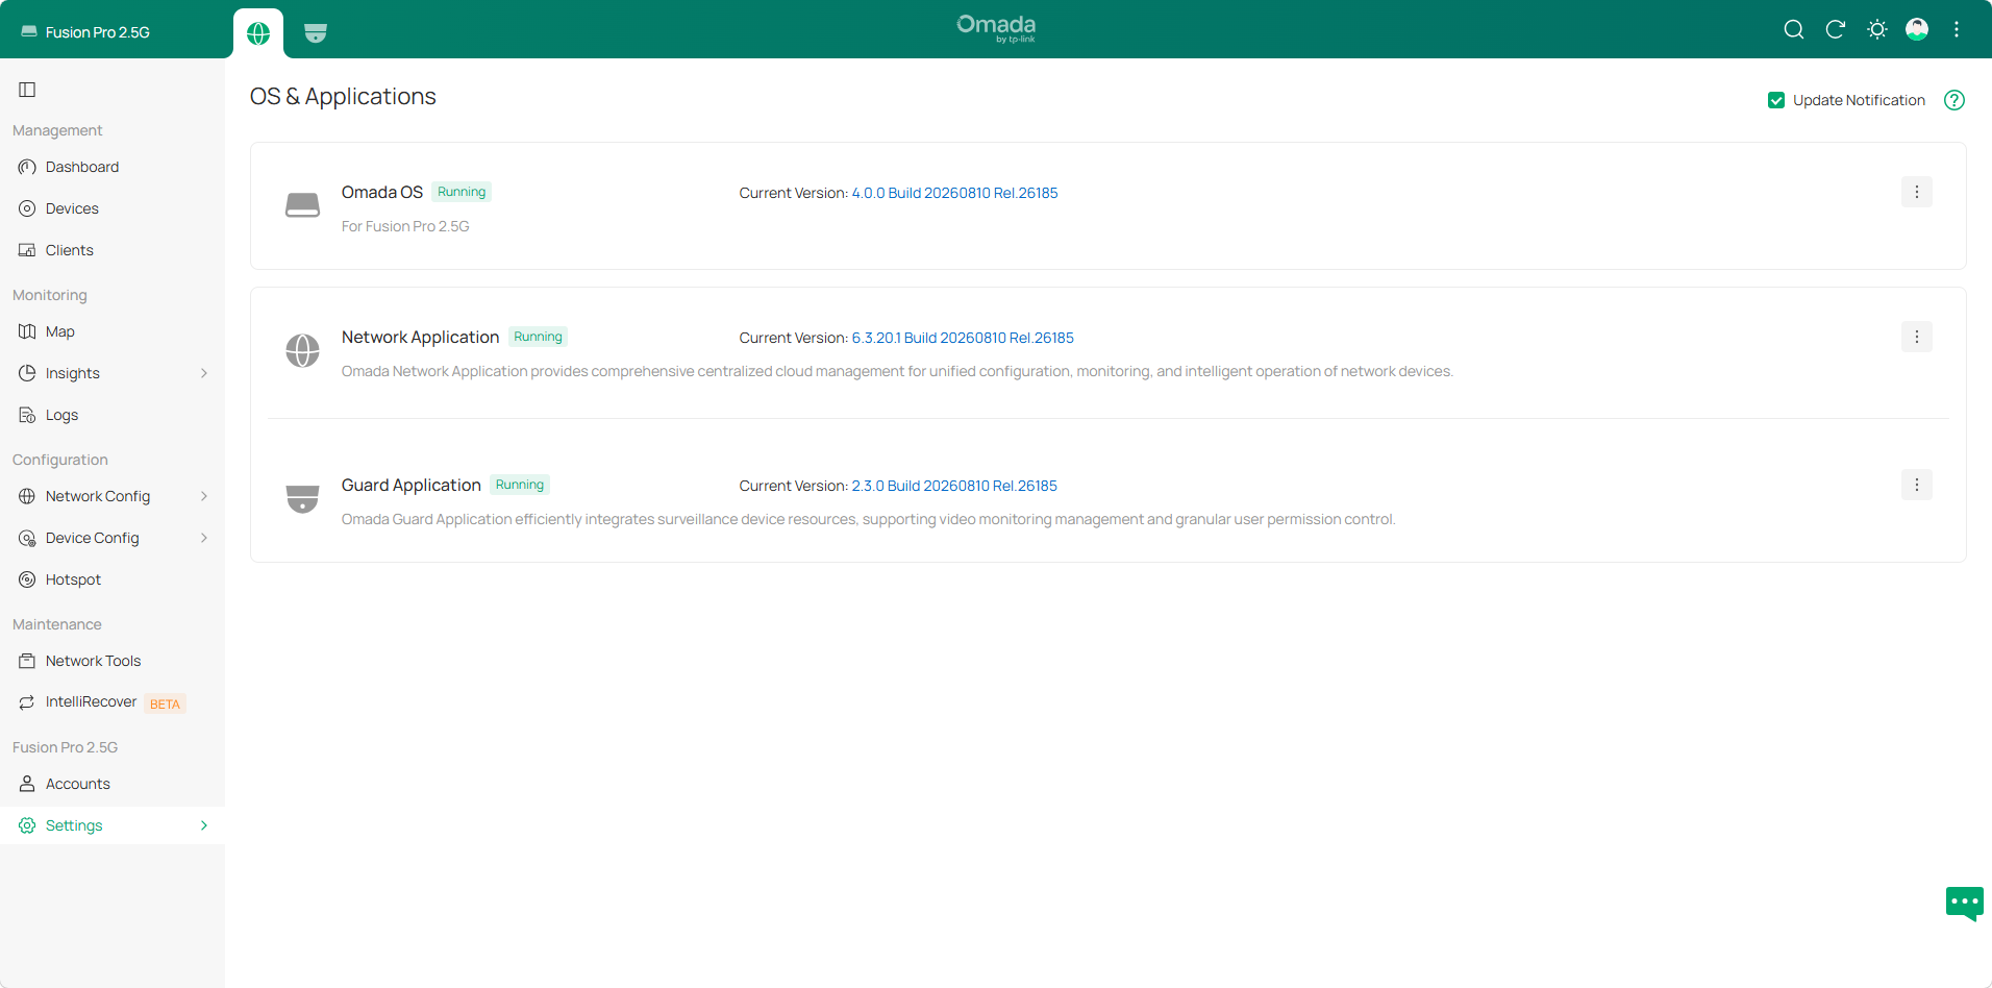
Navigate to Settings > OS & Applications and verify that the gateway is running the latest official firmware version.
Step 2. Verify device compatibility.
Confirm that the security device is supported by Omada Fusion Pro Gateway.
Refer to Supported Omada and VIGI Cameras & NVRs for Omada Fusion Gateways (Fusion Pro Series) for supported device models.
Step 3. Verify device operating status.
Confirm that the security device has started successfully:
- Verify the power supply is functioning properly.
- Verify all power and network connections are secure.
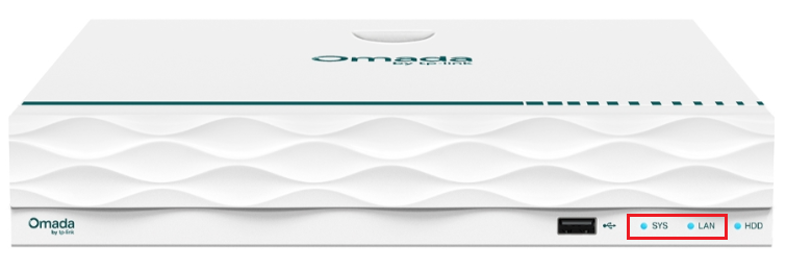
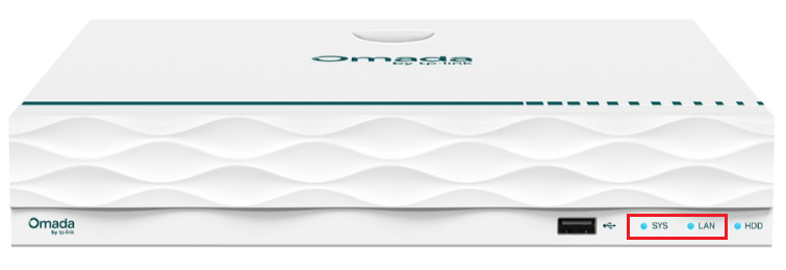
- Check the device status LEDs, if available.
For example, on an Omada NVR, confirm both the SYS and LAN LEDs indicate normal operation.
Step 4. Verify network connectivity for automatic discovery or manual addition.
Check the applicable network requirements based on how the device is discovered or added:
- For supported Omada and VIGI security devices, Omada Fusion Pro Gateway automatically discovers devices on the same local area network and displays them in the device list. For automatic discovery, ensure that the devices and the gateway are in the same broadcast domain.
Note: To add a discovered device, ensure that the device and the gateway can communicate over IP. - For devices that need to be added manually by IP address, make sure the IP address and required service ports are reachable from the Omada Fusion Pro Gateway. If the device is unreachable, check its IP settings, VLAN assignment, routing, ACL, and firewall policies. If the device is behind a NAT device, also verify the port-forwarding settings.
Step 5. Check the physical connections and network access controls.
Verify the following:
- Ethernet cable is connected properly.
- Intermediate switch ports are operational.
- ACLs, port isolation, or other access control settings are not blocking traffic.
For cameras connected directly to an Omada or VIGI NVR PoE port:
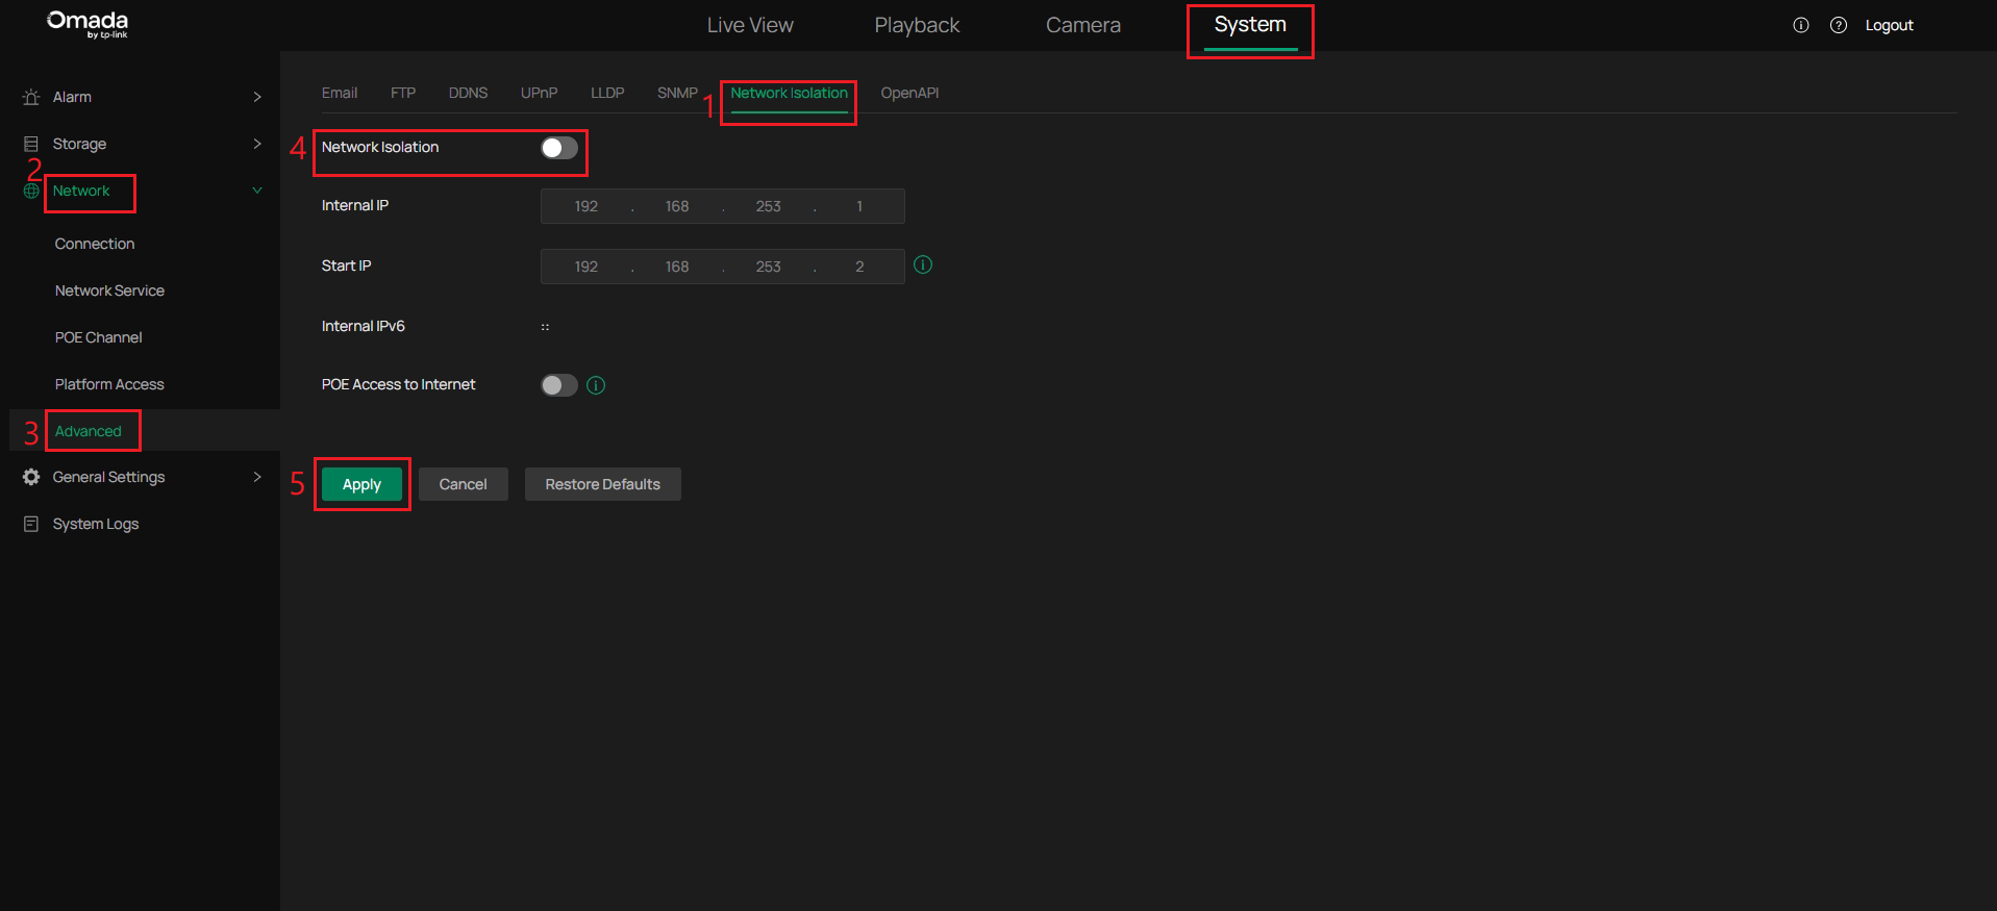
- Check whether Network Isolation is enabled.
- If enabled, disable Network Isolation and click Apply. Return to Omada Guard > Devices, allow some time for discovery, and check whether the camera appears in the device list.
Step 6. Check for an existing Omada Fusion Pro Gateway management connection.
Note: An Omada or VIGI security device managed by one Omada Fusion Pro Gateway cannot be discovered by another.
Use either of the following methods:
- Option 1: Disable Inform URL. For example, log in to the Omada NVR web interface and go to System > Network > Platform Access. Disable Inform URL and click Apply. Return to Omada Guard > Devices, wait for device discovery, and check the device list.
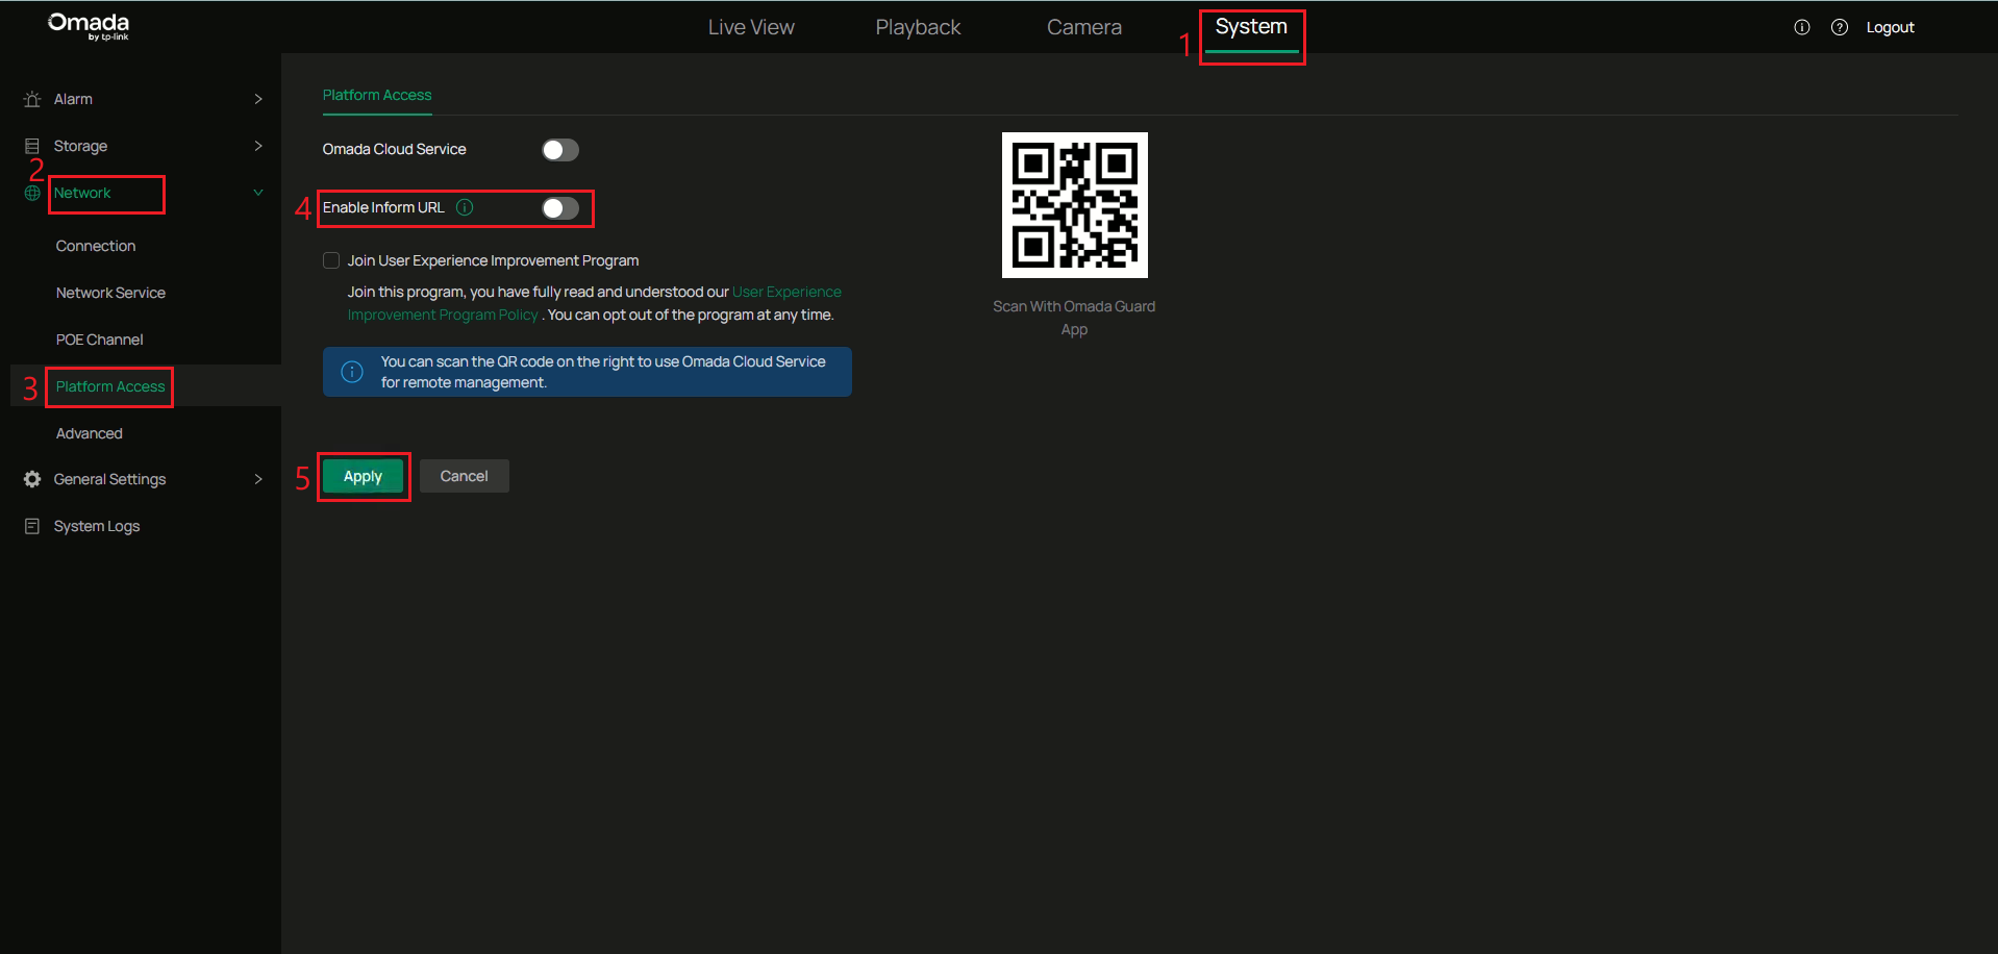
- Option 2: Reset the device. Restore the device to factory defaults and then try device discovery again.
Step 7. Verify ONVIF settings for third-party cameras.
For Third-Party cameras:
- Verify ONVIF is supported.
- Verify ONVIF is enabled.
- Verify any required ONVIF account has been configured.
Refer to the camera manufacturer's documentation for model-specific ONVIF requirements.
Scenario 2: Security devices configured with an Inform URL do not appear in the device list
Problem description
Supported Omada or VIGI security devices have been configured with the Inform URL of the target Omada Fusion Pro Gateway but do not appear in its device list.
Troubleshooting steps
Step 1. Verify firmware versions.
Confirm the Omada Fusion Pro Gateway is running the latest official firmware version. Navigate to Settings > OS & Applications.
Step 2. Verify device operating status.
Confirm that the security device has started properly, and verify the following:
- The power supply is functioning properly.
- The power connection is secure.
- If available, check that the device status indicators show normal operation. For example, for an Omada NVR, verify that both the SYS and LAN indicators are On.
Step 3. Verify Inform URL configuration.
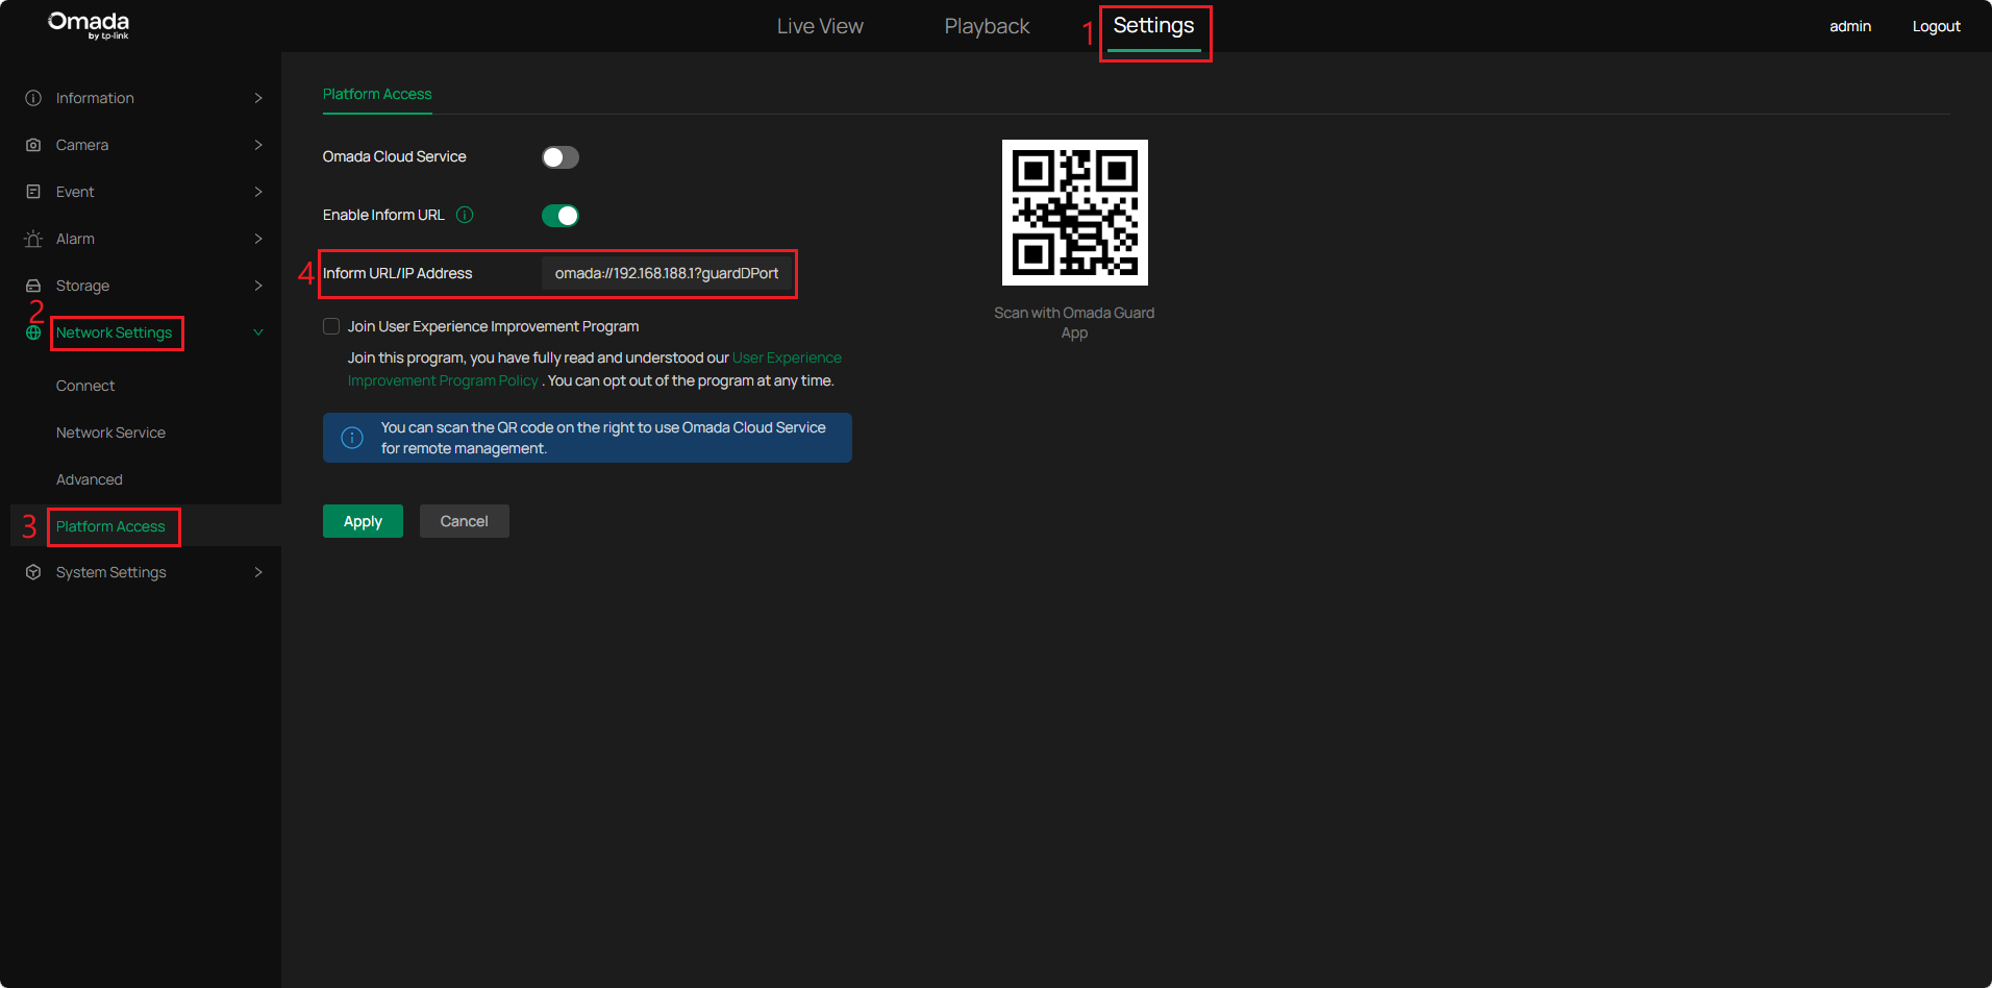
Confirm that the Inform URL configured on the security device matches the target Omada Fusion Pro Gateway.
For example, on an Omada camera, navigate to Settings > Network Settings > Platform Access.
To identify the correct Inform URL:
- Log in to the target Omada Fusion Pro Gateway
- Navigate to Omada Guard > System Settings > OS Settings.
- Verify that the Inform URL configured on the security device matches the URL displayed here.
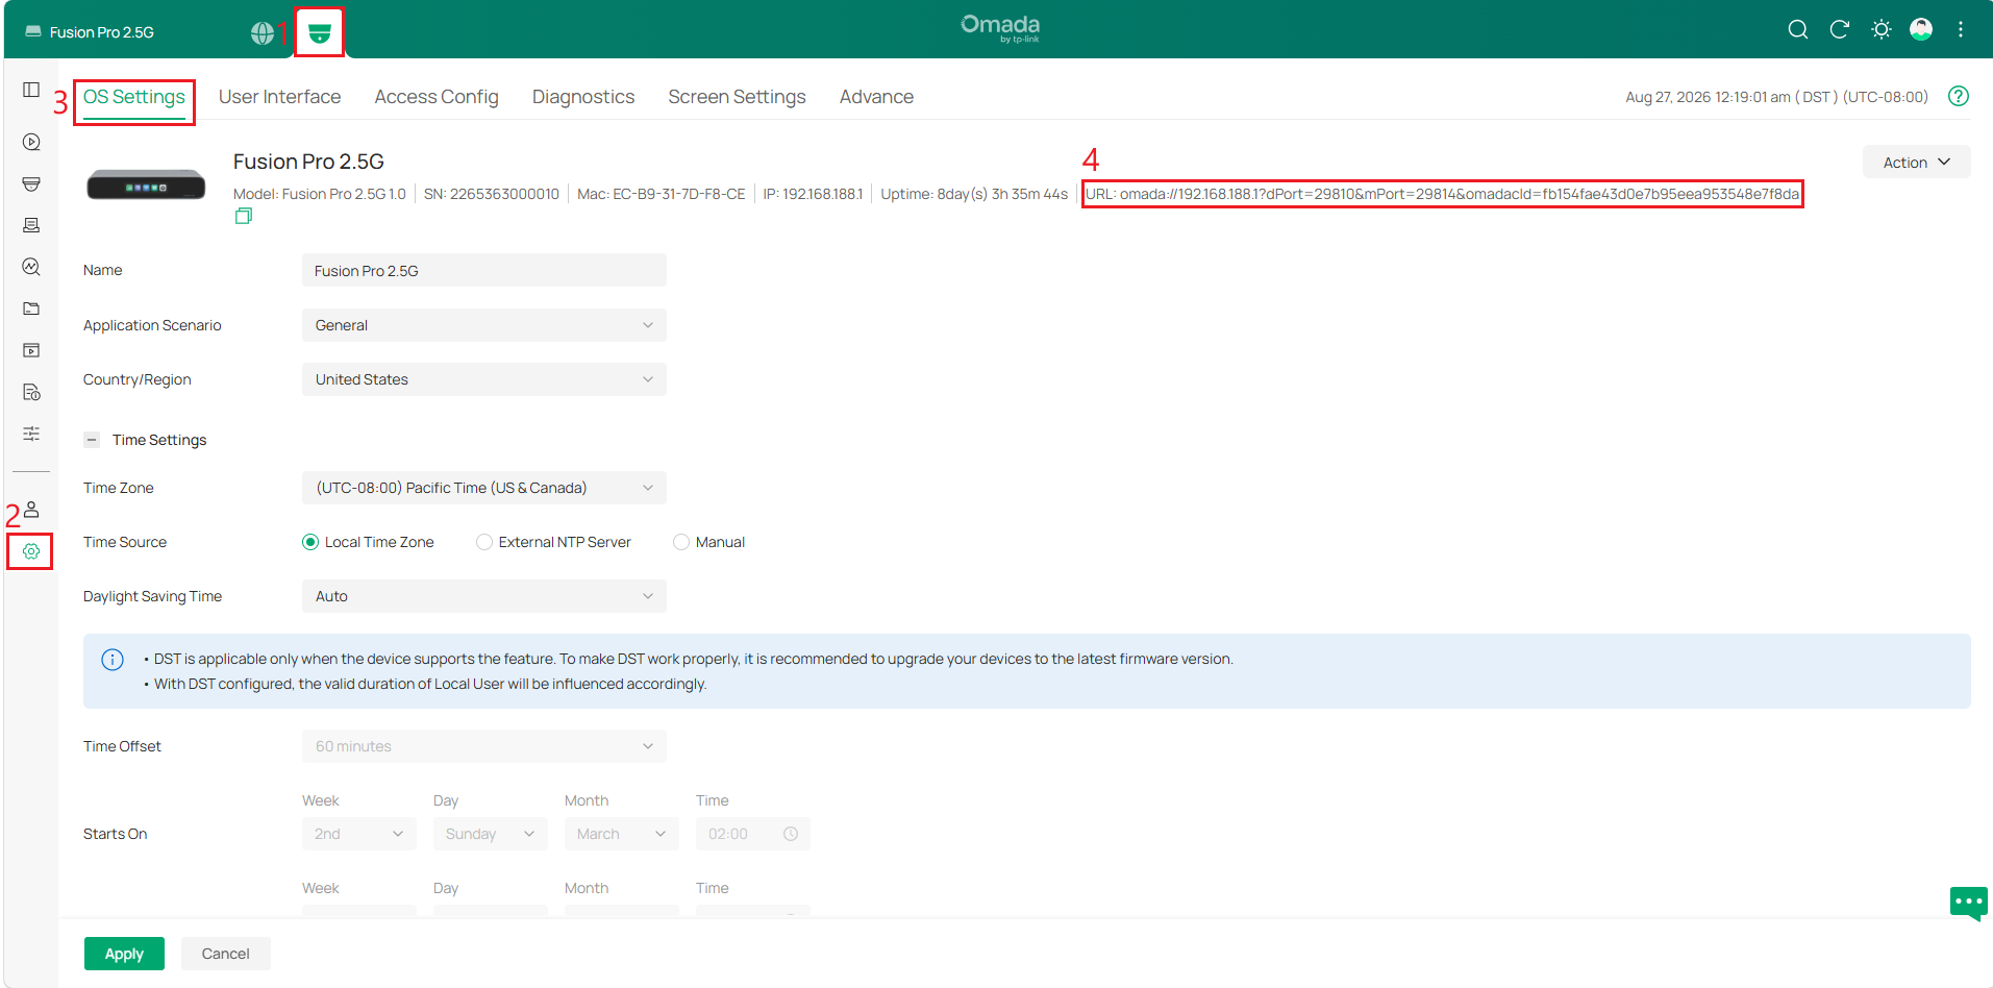
Note:
- If the message "Please enable Device Remote Management" appears instead of a URL, enable Device Remote Management first.
- Ensure that Device Management Hostname/IP is configured with an address that is reachable by the security device.
- Return to OS Settings and verify the generated Inform URL.
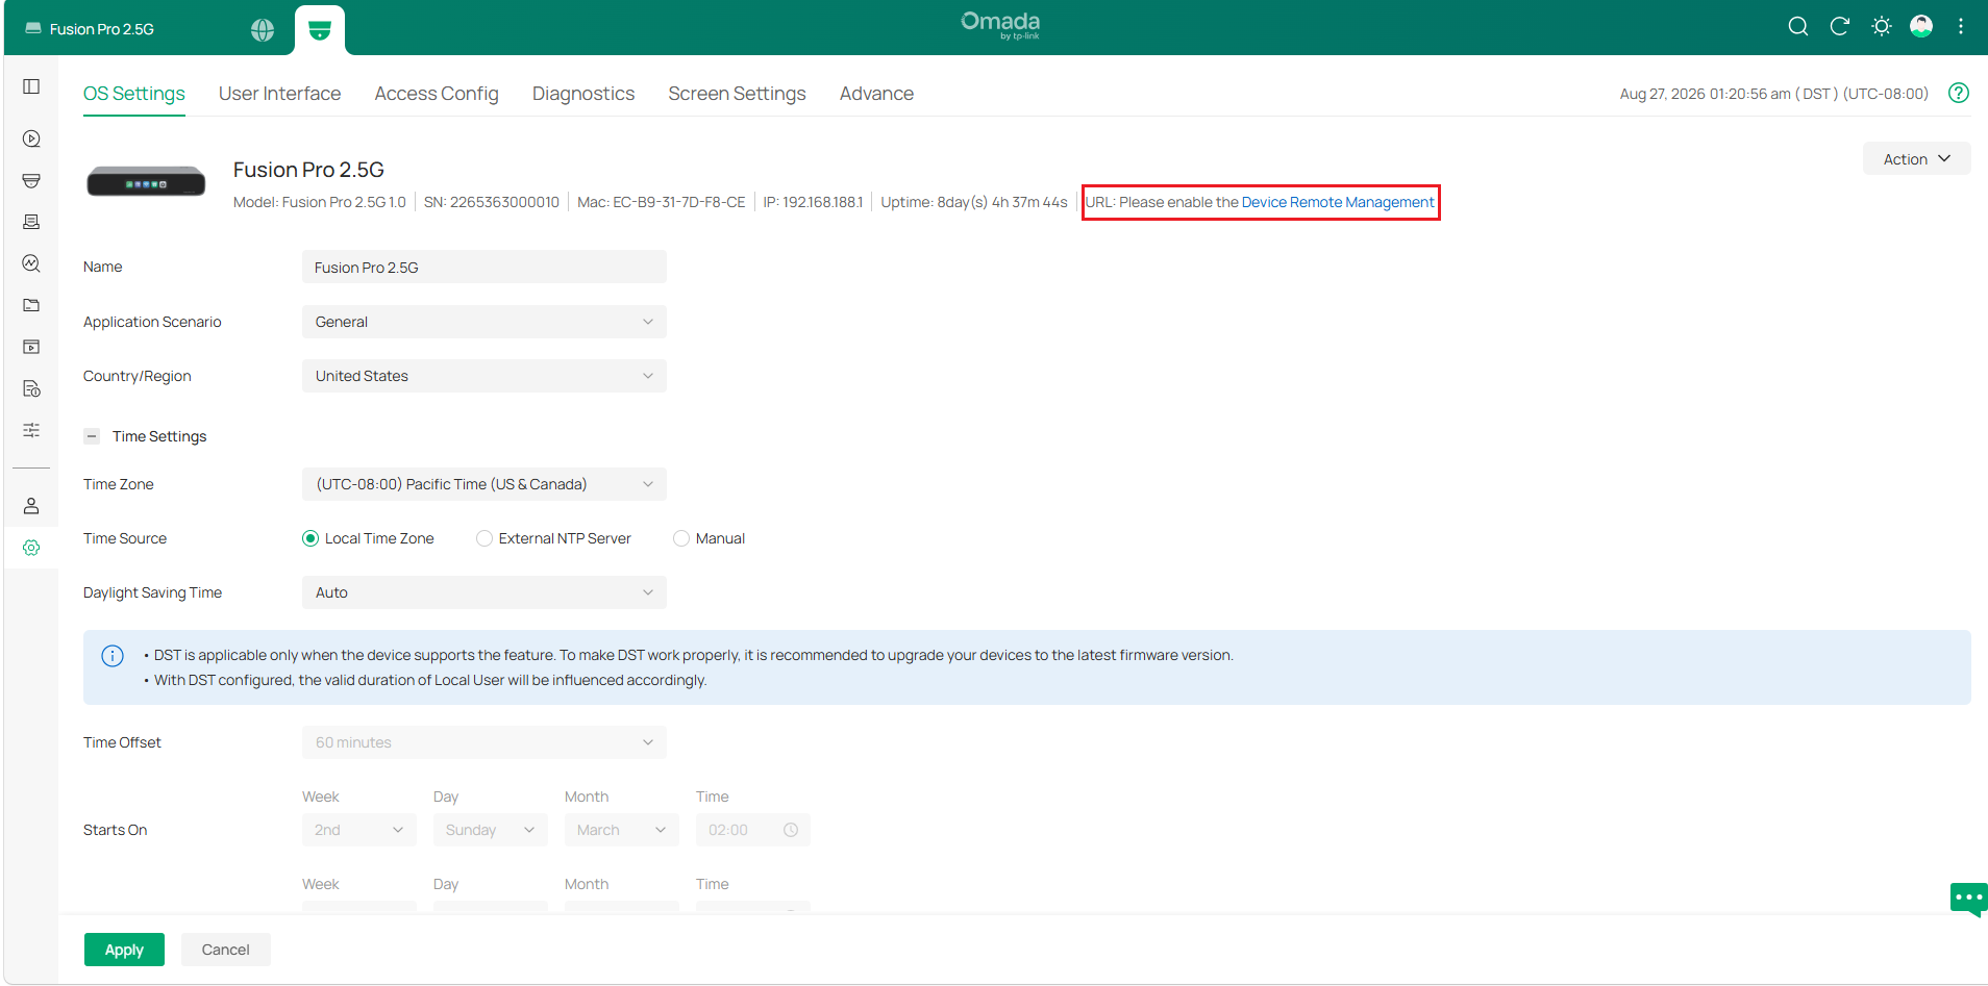
- If ports 29810 or 29814 are mapped to different external ports through NAT, configure the Inform URL using the corresponding external port numbers.
Step 4. Verify network connectivity.
Confirm the device can communicate with the gateway. Verify the following:
- Routing: Verify that the security device has a valid default gateway and can reach the Omada Fusion Pro Gateway over the network. If available, use ping or traceroute to help identify connectivity issues.
- NAT: If the Omada Fusion Pro Gateway is behind NAT, verify that the required external ports are forwarded to the correct IP address and ports of the gateway.
- Firewall: Check whether any firewall rule blocks traffic from the security device to the Omada Fusion Pro Gateway. If available, use firewall logs or rule statistics to determine whether the traffic is allowed or blocked.
- Access control: Check whether any ACL or other access control policy on the security device network, the Omada Fusion Pro Gateway network, or intermediate network devices blocks traffic between the security device and the gateway.
- Port Accessibility: For security devices accessing the Omada Fusion Pro Gateway from an external network through the WAN interface, ensure that the required service ports 10122, 10123, 6000, and 6005, as well as ports 29810 and 29814 used by the Inform URL, are reachable from the security device.
Step 5. Verify NVR network isolation settings.
If the IPC has the correct Inform URL but still cannot be added to Omada Fusion Pro Gateway, check whether the IPC is connected to a PoE port of an NVR with Network Isolation enabled.
If an IPC is connected to an NVR PoE port:
- Verify whether Network Isolation is enabled.
- If enabled, verify POE Access to Internet is also enabled.
Otherwise, the IPC may be unable to communicate with Omada Fusion Pro Gateway.
For example, on an Omada NVR, go to System > Network > Advanced > Network Isolation and verify the POE Access to Internet setting.
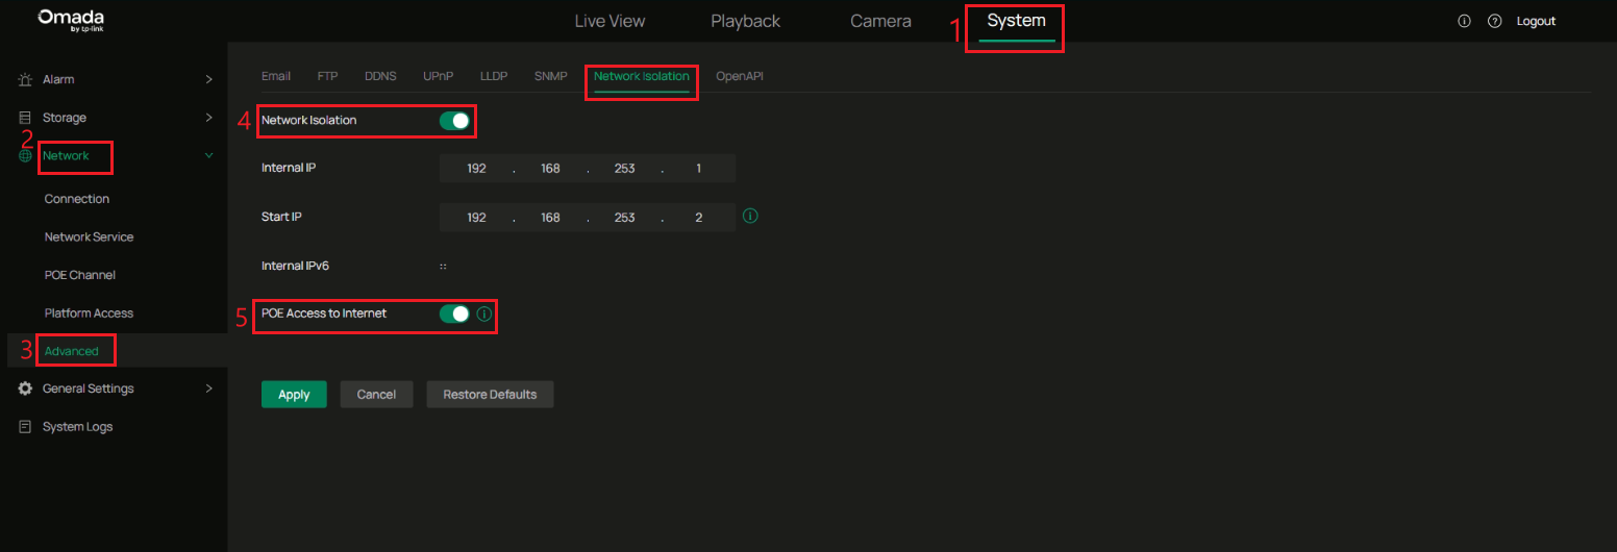
Verification
After completing the troubleshooting steps above, return to the Omada Fusion Pro management interface and go to Omada Guard > Devices. Wait for the device list to update, and verify the following:
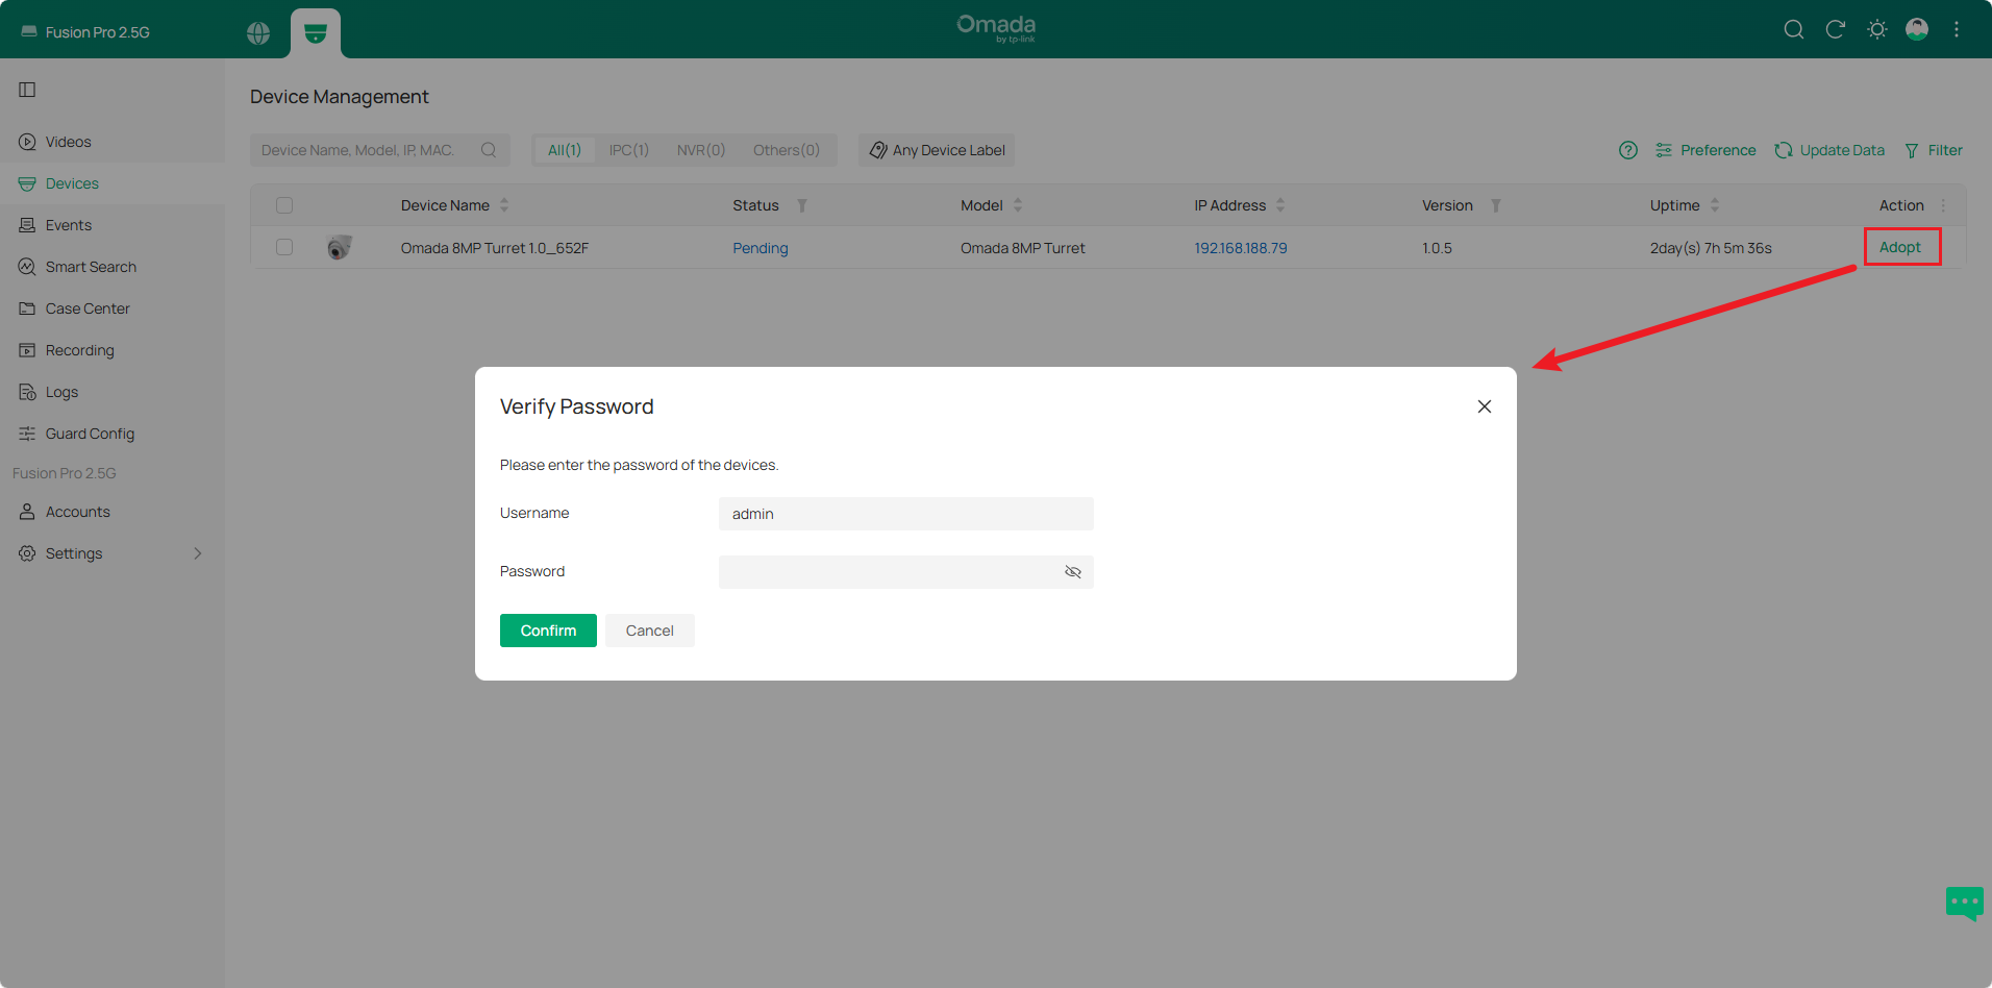
- For an Omada or VIGI device discovered automatically or connected through an Inform URL, verify that it appears with the status Pending.
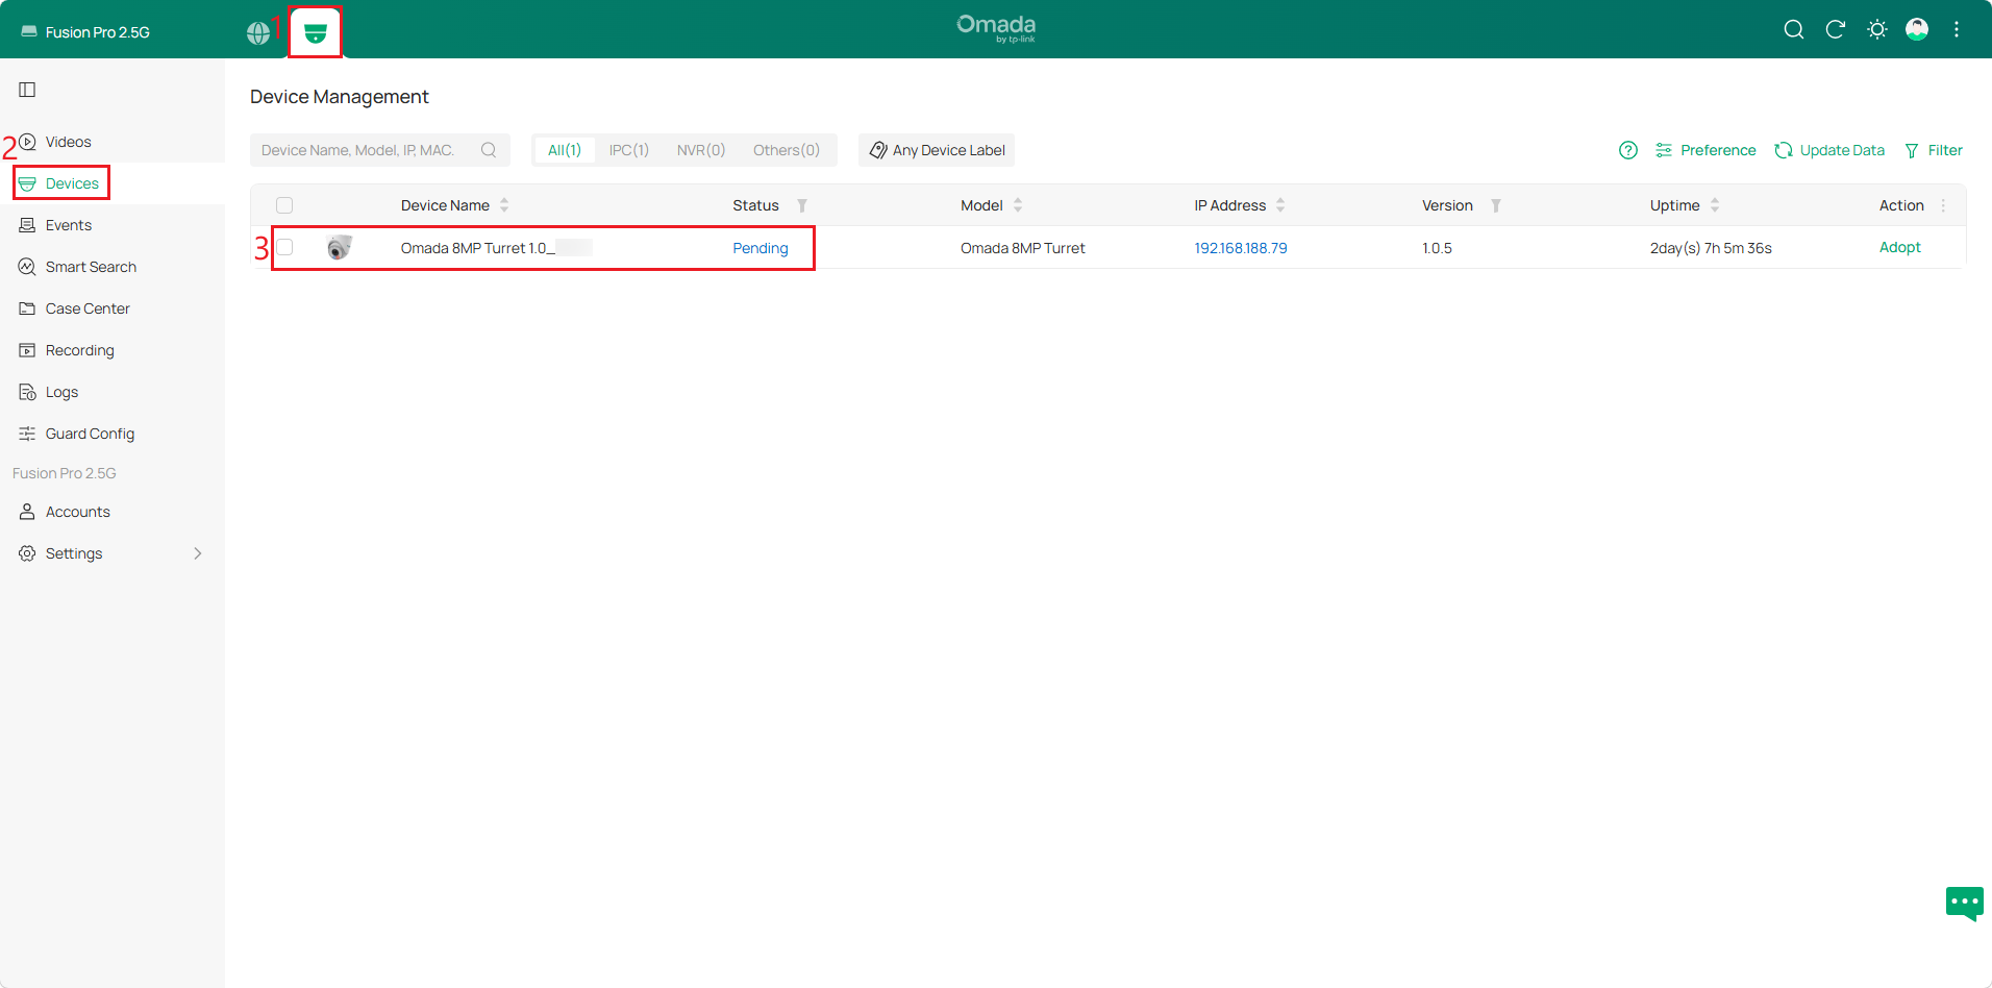
The device can be successfully adopted by clicking Adopt, entering the security device Username and Password, and clicking Confirm.
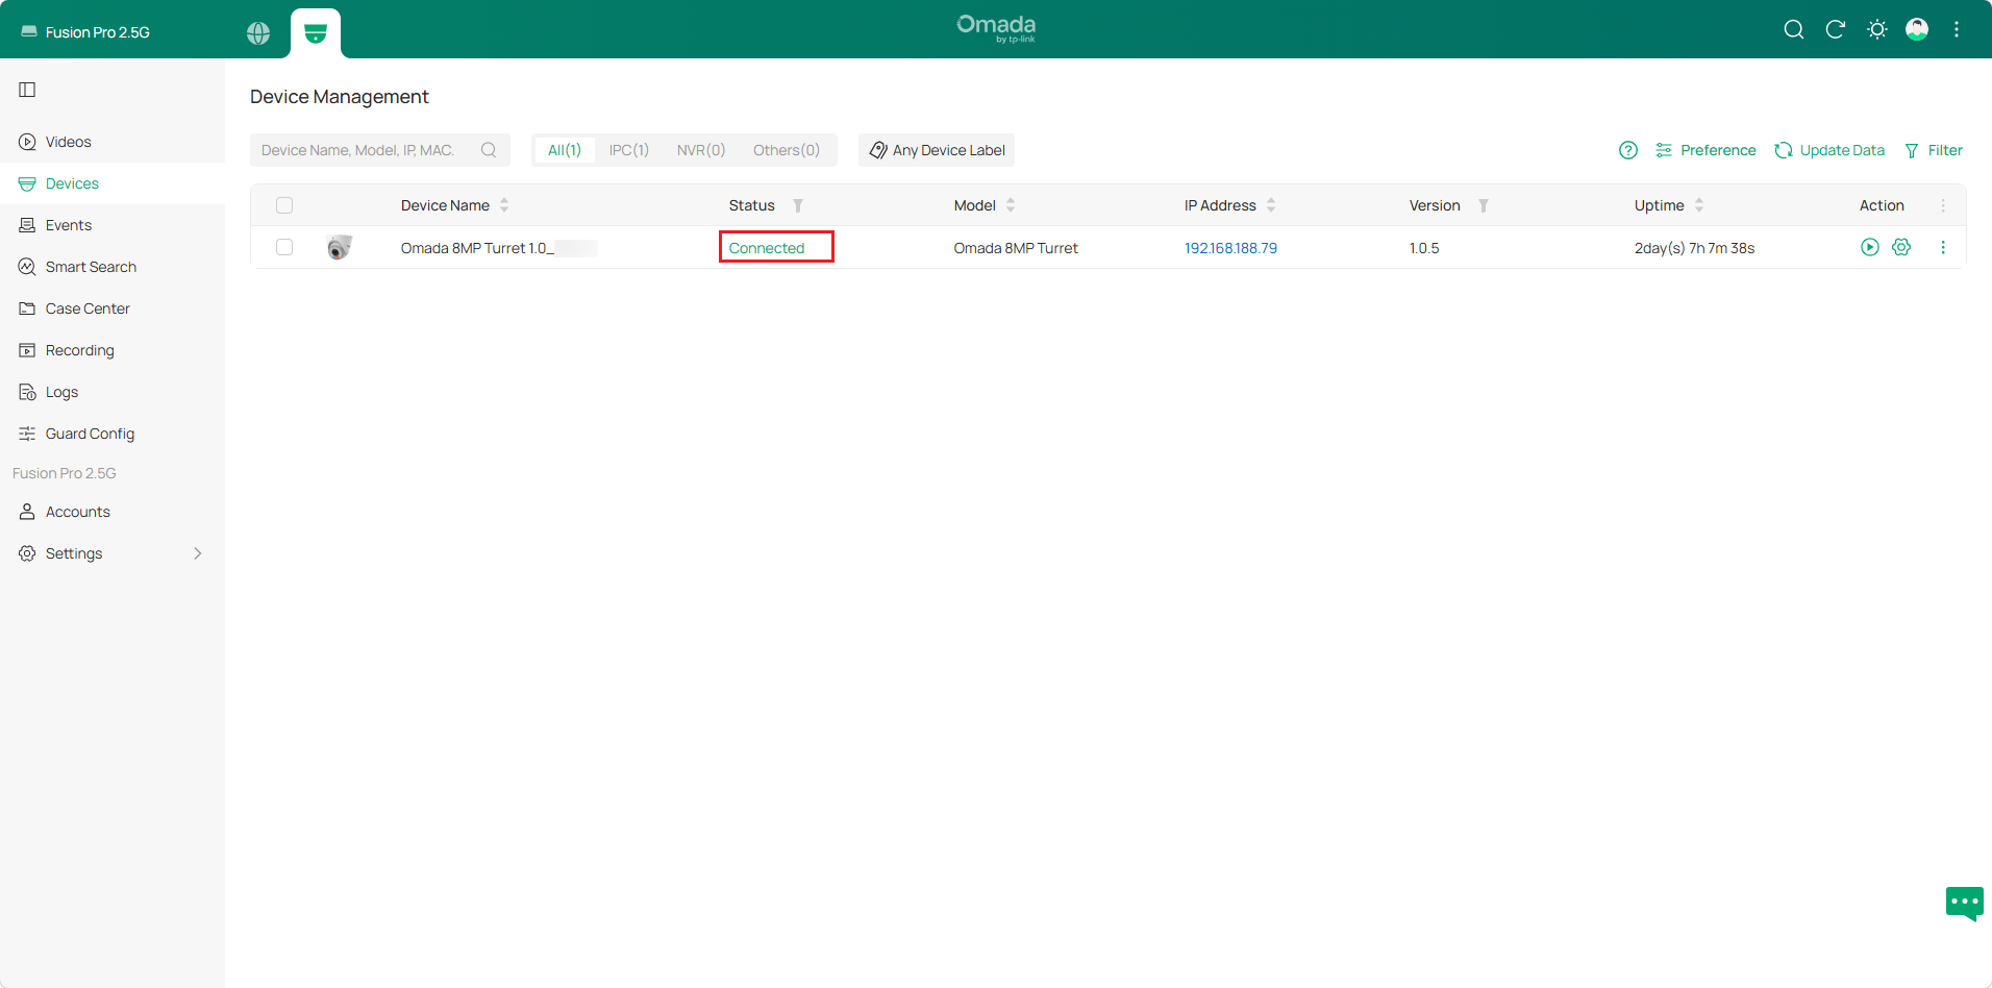
- After adoption is complete, the device status changes to Connected.
Collect logs for technical support
If the security device still does not appear in the device list after completing the troubleshooting steps above, collect the Omada Fusion Pro Gateway logs for further analysis.
Step 1. Enable debug logging.
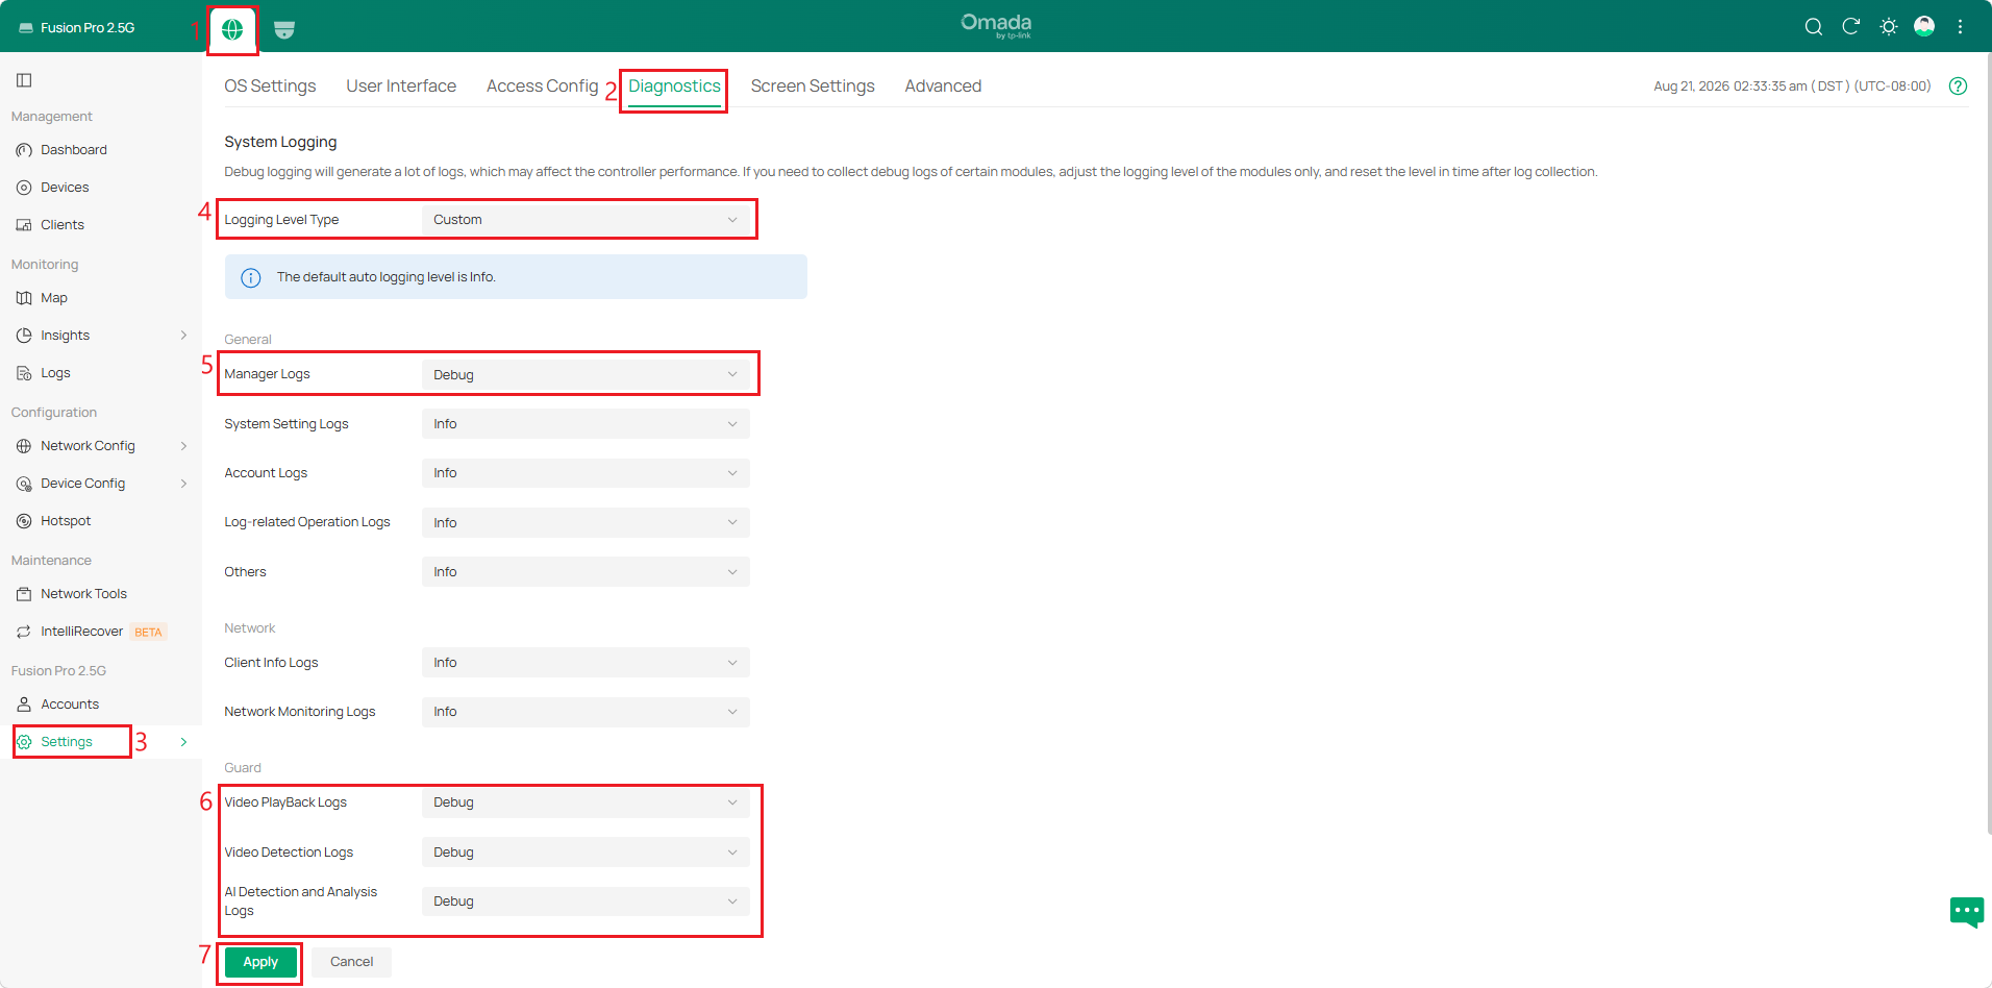
Click the Omada Network icon in the top navigation bar. Navigate to Settings > System Settings > Diagnostics. Set Logging Level Type to Custom.
Configure the following logs as Debug:
- Manager Logs
- Video Playback Logs
- Video Detection Logs
- AI Detection and Analysis Logs
Leave all other log types set to Info, then click Apply to save the settings.
Step 2. Reproduce the issue.
Keep the security device powered on and connected to the network for a short period to allow the relevant activity to be recorded in the debug logs.
Step 3. Export running logs.
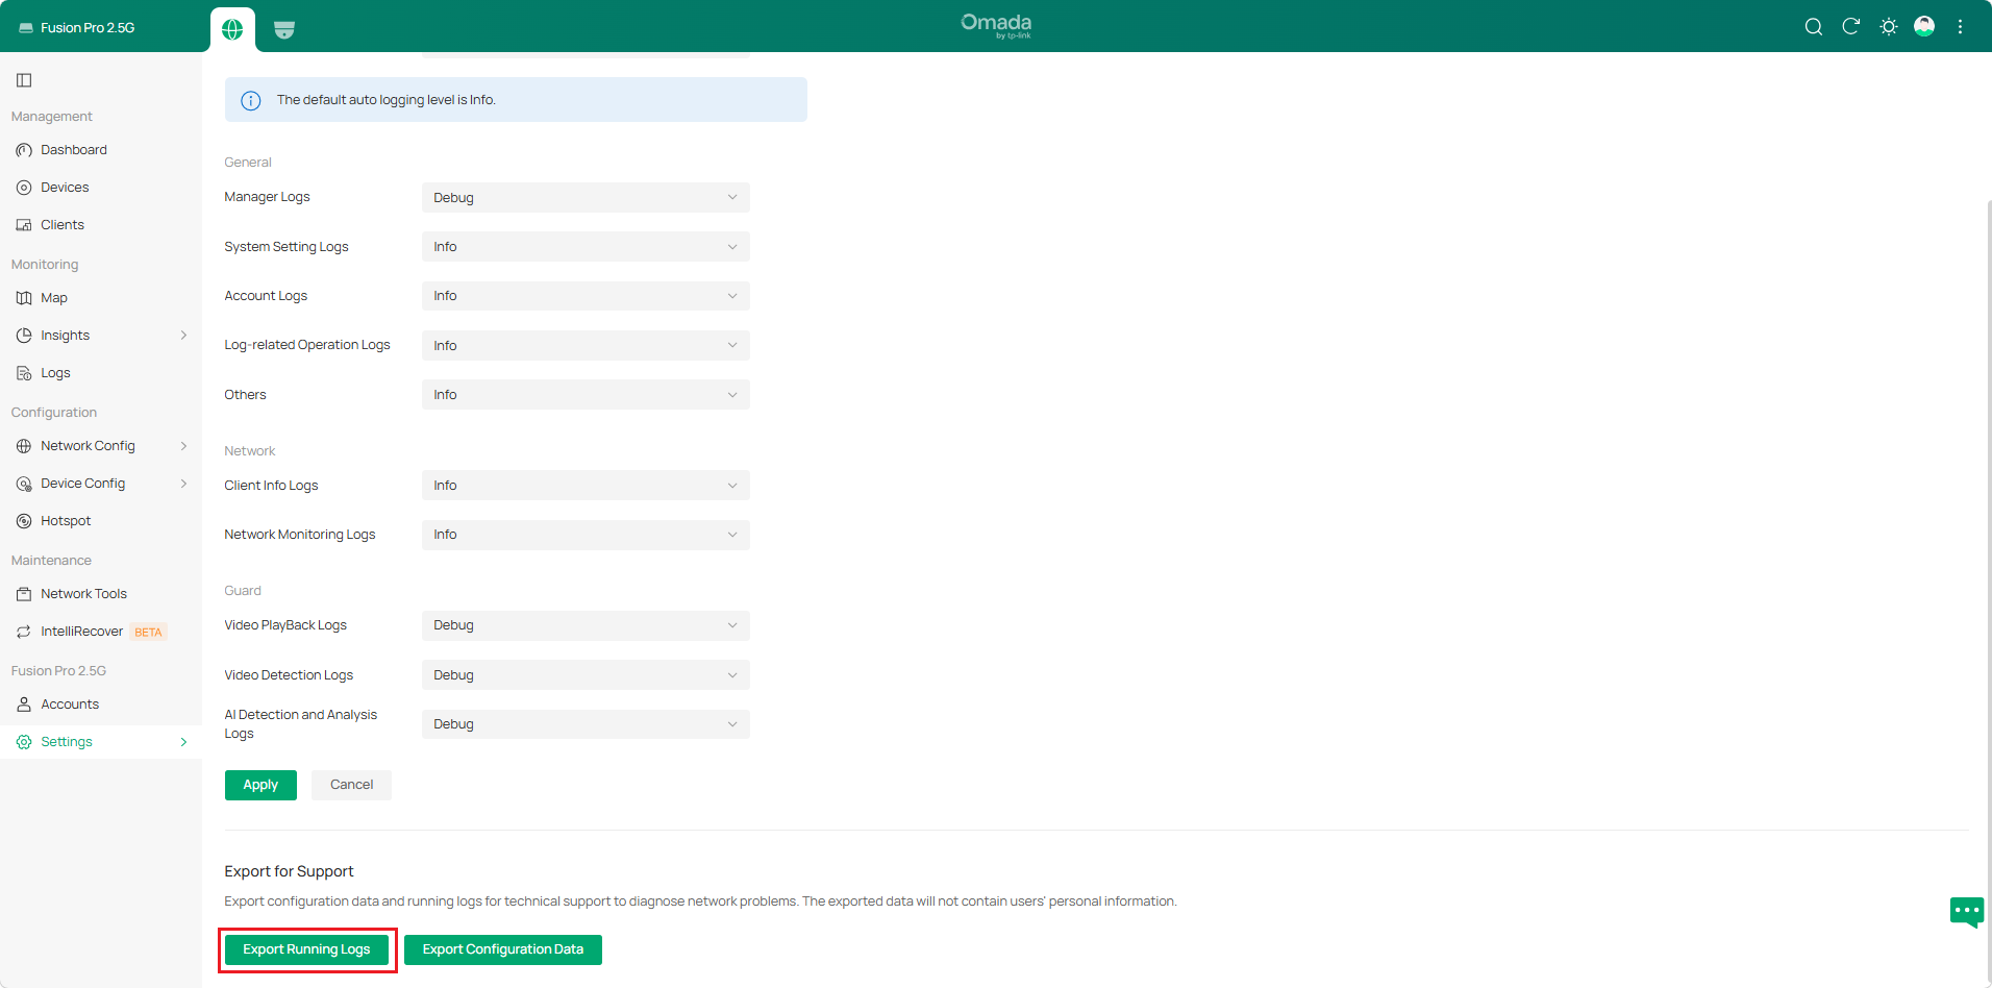
Navigate to Settings > System Settings > Diagnostics, click Export Running Logs to export the collected logs, and provide them to Omada Technical Support for further analysis.
Note: Restore logging levels from Debug back to Info after the logs have been collected.
Conclusion
Following the troubleshooting procedures in this guide can help identify and resolve issues affecting automatic discovery, manual IP addition, and Inform URL registration. If the problem persists, collect the gateway logs and contact Omada Technical Support for further analysis.
To learn more about each function and configuration, please visit Support Home to download or check the manual for your product.
QA
Q1: Can Omada Fusion Pro Gateway discover and manage third-party NVRs through ONVIF?
A1: No. Omada Fusion Pro Gateway currently supports adding and managing compatible third-party cameras through ONVIF only. Third-party NVRs are not supported through ONVIF.
Q2: Why does the security device appear in the network but not in the Omada Guard device list?
A2: Verify that the device is supported by Omada Fusion Pro Gateway, is not already managed by another Omada Fusion Pro Gateway, and can communicate with the gateway without restrictions from ACLs, network isolation settings, or firewall policies.
Q3: Why is a camera connected to an NVR PoE port not being discovered?
A3: Check whether Network Isolation is enabled on the NVR. If the camera needs to communicate directly with Omada Fusion Pro Gateway, disable Network Isolation or enable POE Access to Internet, depending on the deployment scenario.
Q4: Why does a security device configured with an Inform URL not appear in the device list?
A4: Verify that the Inform URL matches the URL displayed in Omada Guard > System Settings > OS Settings, that the required ports are reachable, and that no NAT, routing, firewall, or access control policies are blocking communication between the device and the gateway.
Q5: Can a security device be managed by multiple Omada Fusion Pro Gateways at the same time?
A5: No. A supported Omada or VIGI security device can be managed by only one Omada Fusion Pro Gateway at a time. Disable the existing Inform URL configuration or reset the device before attempting discovery with another gateway.
Q6: Do devices need to be in the same subnet to be discovered?
A6: For automatic discovery, the security device and Omada Fusion Pro Gateway must be in the same subnet. Devices added manually by IP address can be located in a different subnet if the device IP address and required service ports are reachable. Devices configured with an Inform URL can also connect across different networks when the required routing, NAT, firewall, and port settings are correctly configured.
