


Contents
Troubleshooting with Controller Logs
Troubleshooting: Clients Cannot Detect AP Wi-Fi
Troubleshooting: Clients Unable to Connect to AP Wi-Fi
Troubleshooting: Clients Unable to Obtain an IP Address
Troubleshooting: Clients Unable to Access Local LAN
Troubleshooting: Clients Unable to Access the Internet
Troubleshooting: Poor Throughput
Troubleshooting: Abnormal Client Behaviors
Introduction
In a wireless network, clients may occasionally experience issues such as being unable to detect an SSID, connect to Wi-Fi, obtain an IP address, access local network resources, or reach the internet. In some cases, users may also experience poor throughput or other abnormal client behavior.
This article provides a step-by-step troubleshooting workflow for common wireless issues in Omada environments. You can first review Controller logs to identify the stage at which the failure occurs, and then follow the relevant troubleshooting section based on the symptom observed on the client side.
Requirements
- Omada AP
- Omada Controller (Software Controller/Hardware Controller/CBC, v6.3 and above)
Troubleshooting
Troubleshooting Workflow
To improve troubleshooting efficiency, it is recommended to follow this order:
- Confirm the exact symptom observed on the client.
- Check Controller logs for abnormal client events.
- Follow the corresponding troubleshooting section below based on the symptom.
Troubleshooting with Controller Logs
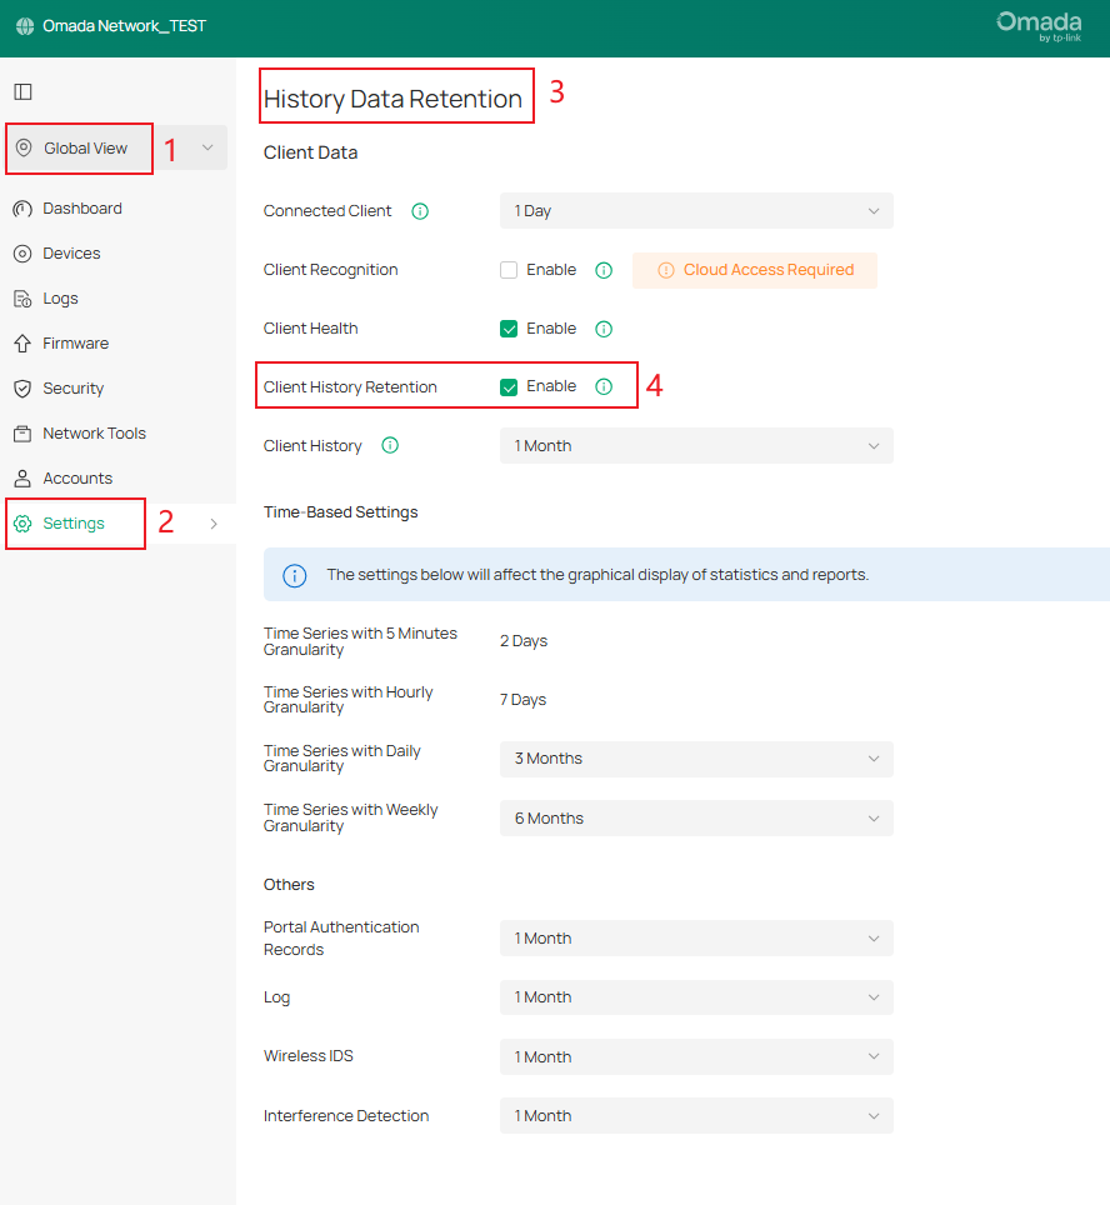
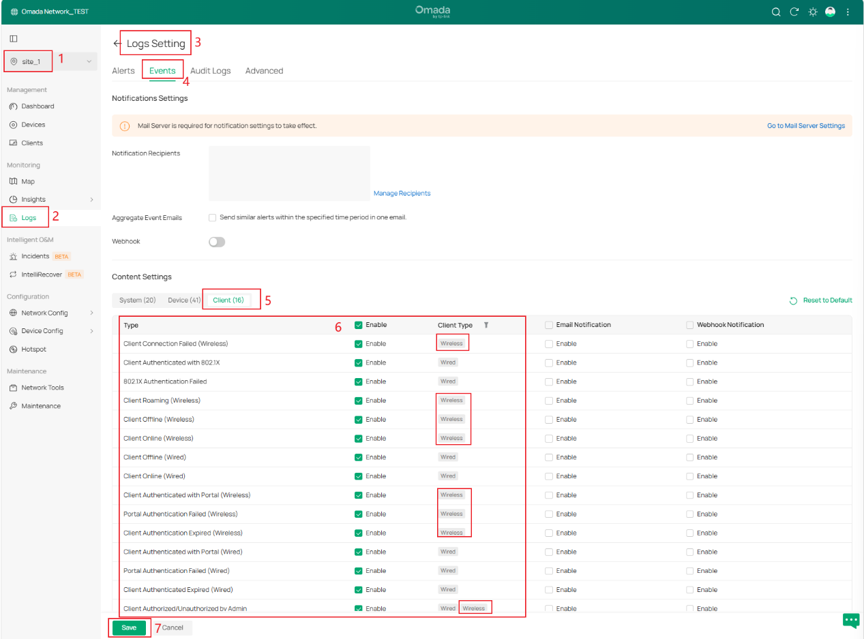
The Controller logs can record abnormal client events such as association failures, authentication failures, and roaming events. It is recommended to enable all wireless client-related log types in advance. When a client issue occurs, reviewing the logs can help identify the cause and quickly narrow the troubleshooting scope.
Srep 1. Go to Global view > Settings > History Data Retention > Client History Retention, enable the Client History Retention, client history and client statistical logs will be recorded.
Step 2. Please go to Site View > Logs > Settings (The icon is in the top right corner) > Events > Client, is recommended to enable all wireless client-related log types.
Troubleshooting: Clients Cannot Detect AP Wi-Fi
If the client cannot find the target SSID, check the following items:
Step 1. Check whether the AP Group configured for the target SSID includes the target AP.
Step 2. Check whether SSID Broadcast is enabled on the target SSID. Check whether Conditional SSID Broadcast Control is enabled on the target SSID.
Step 3. Check whether a WLAN Schedule is configured and whether the SSID is currently scheduled to be unavailable.
Step 4. Check whether SSID Override is enabled and affecting the SSID on the AP.
Step 5. Check whether the Radio is enabled on the target AP.
Step 6. Check whether the AP's actual working channel is the DFS Channel.
Step 7. Confirm that the client supports the AP’s current working band and channel.
Step 8. Check whether the EoGRE Tunnel is enable on the target SSID, and check whether the AP can ping the gateway IP address of the EoGRE tunnel; if it cannot, this will also cause the AP cannot broadcast the SSID.
Step 9. Check whether the Mesh AP is in Isolated state. When Mesh is enabled, an AP may enter the isolated state if it cannot reach the gateway and not reach the controller. In this state, the AP will not broadcast its SSIDs, so clients will be unable to detect the Wi-Fi. Check the AP status in the Controller or verify whether the AP LED is blinking slowly. Try connecting this Mesh AP to the root AP with the stronger signal.
Troubleshooting: Clients Cannot Connect to AP Wi-Fi
If the client can detect the SSID but cannot connect, check the following:
Step 1. If the Wi-Fi password has been changed, clients that record the previous password will fail to connect to the Wi-Fi. In this case, please forget the Wi-Fi on the clients and then reconnect using the new password.
Step 2. Check the Security Key and enter the correct password to associate Wi-Fi.
Step 3. Check whether the Network Name (SSID) contains non-ASCII characters. Some clients may not recognize them properly. If necessary, remove those characters and test again.
Step 4. Check whether the client supports the configured WPA Mode. For example, if WPA3 is enabled, some IoT devices or 802.11n-only clients may fail to connect. In this case, configure the SSID to WPA2-PSK only and try again.
Step 5. Check whether the configured Wireless Mode is compatible with the client. For example, if 11ac only is configured, clients that support only 11a/n will be unable to connect.
Step 6. Check whether the SSID is configured with the PMF function. When the PMF function is set to Mandatory, clients that do not support PMF may be unable to connect to the network. In this case, you should disable the PMF function and try again.
Step 7. Check the client’s signal strength. If the Wi-Fi signal strength at a client is weak, the client association will fail. In this case, you can move the client closer to the AP and test again.
Step 8. Check whether a third-party authentication server is involved in the client authentication process. If the SSID uses WPA-Enterprise, PPSK with RADIUS, or MAC-Based Authentication, verify the related RADIUS settings on the SSID, the network, and the client.
- Check whether the SSID security method is configured as WPA-Enterprise or PPSK with RADIUS.
- Check whether MAC-Based Authentication is enabled.
- Verify that the RADIUS Profile is configured correctly, including the RADIUS server IP address, authentication port, and shared secret.
- Check whether the AP can reach the RADIUS server. Make sure the network path between the AP and the RADIUS server is normal, and that the required RADIUS ports are not blocked by VLAN, ACL, firewall, or routing issues.
- If PPSK with RADIUS or MAC-Based Authentication is used, make sure that the configured MAC Address Format matches the format expected by the RADIUS server.
- If WPA-Enterprise is used, also verify the client-side enterprise authentication settings:
- Phase 1 EAP method: Check the EAP type required by the RADIUS server, such as PEAP, EAP-TLS, or TTLS, and make sure the client is configured with the same method. For example, if the RADIUS server requires PEAP but the client is configured for TTLS or EAP-TLS, the client will fail to authenticate.
- Phase 2 authentication method: If the client uses PEAP or TTLS, check the inner authentication method configured on the client, such as MSCHAPv2, PAP, or GTC, and make sure it matches the method allowed by the RADIUS server. For example, if the server is configured for PEAP-MSCHAPv2 but the client uses PEAP-GTC, authentication will fail. If EAP-TLS is used, this item does not apply because EAP-TLS uses certificate-based authentication and does not require a Phase 2 method.
- CA certificate: Check whether the client trusts the CA certificate used to sign the RADIUS server certificate, and make sure the certificate is valid and not expired. If the client is configured to validate the server certificate, a missing or incorrect CA certificate may cause authentication to fail.
- Client certificate: If EAP-TLS is used, verify that the correct client certificate is installed on the client and matches the RADIUS server requirements.
Step 9. Check whether MAC-related functions are configured to block specific clients.
- Check whether MAC Filter is enabled and whether the client is on the deny list.
- Check the Blocked list on the Clients page. You can go to Site View > Clients > Blocked and check. Clients in the blocked list will be unable to access the network.
- Check whether Lock to AP is enabled. If Lock to AP is enabled, the client can only associate with a specific AP. You can go to Site View > Clients >Offline, select the corresponding time and target client to check whether the client is locked to a specific AP.
- Check the WIPS Dynamic Block List (supported only in Omada Controller v6.3). If the above function is configured, you need to disable it and try to associate again.
Step 10. Check whether Load Balance is enabled.
- Check whether Load Balance is enabled in the target SSID.
- Check whether Maximum Associated Clients is enabled. If it is enabled, check whether the number of currently connected clients has reached the threshold.
- Check whether RSSI Threshold is enabled. If RSSI Threshold is enabled, clients with signal strength below the set threshold cannot access the network.
During troubleshooting, you can try to disable this function or move closer to the AP to reconnect.
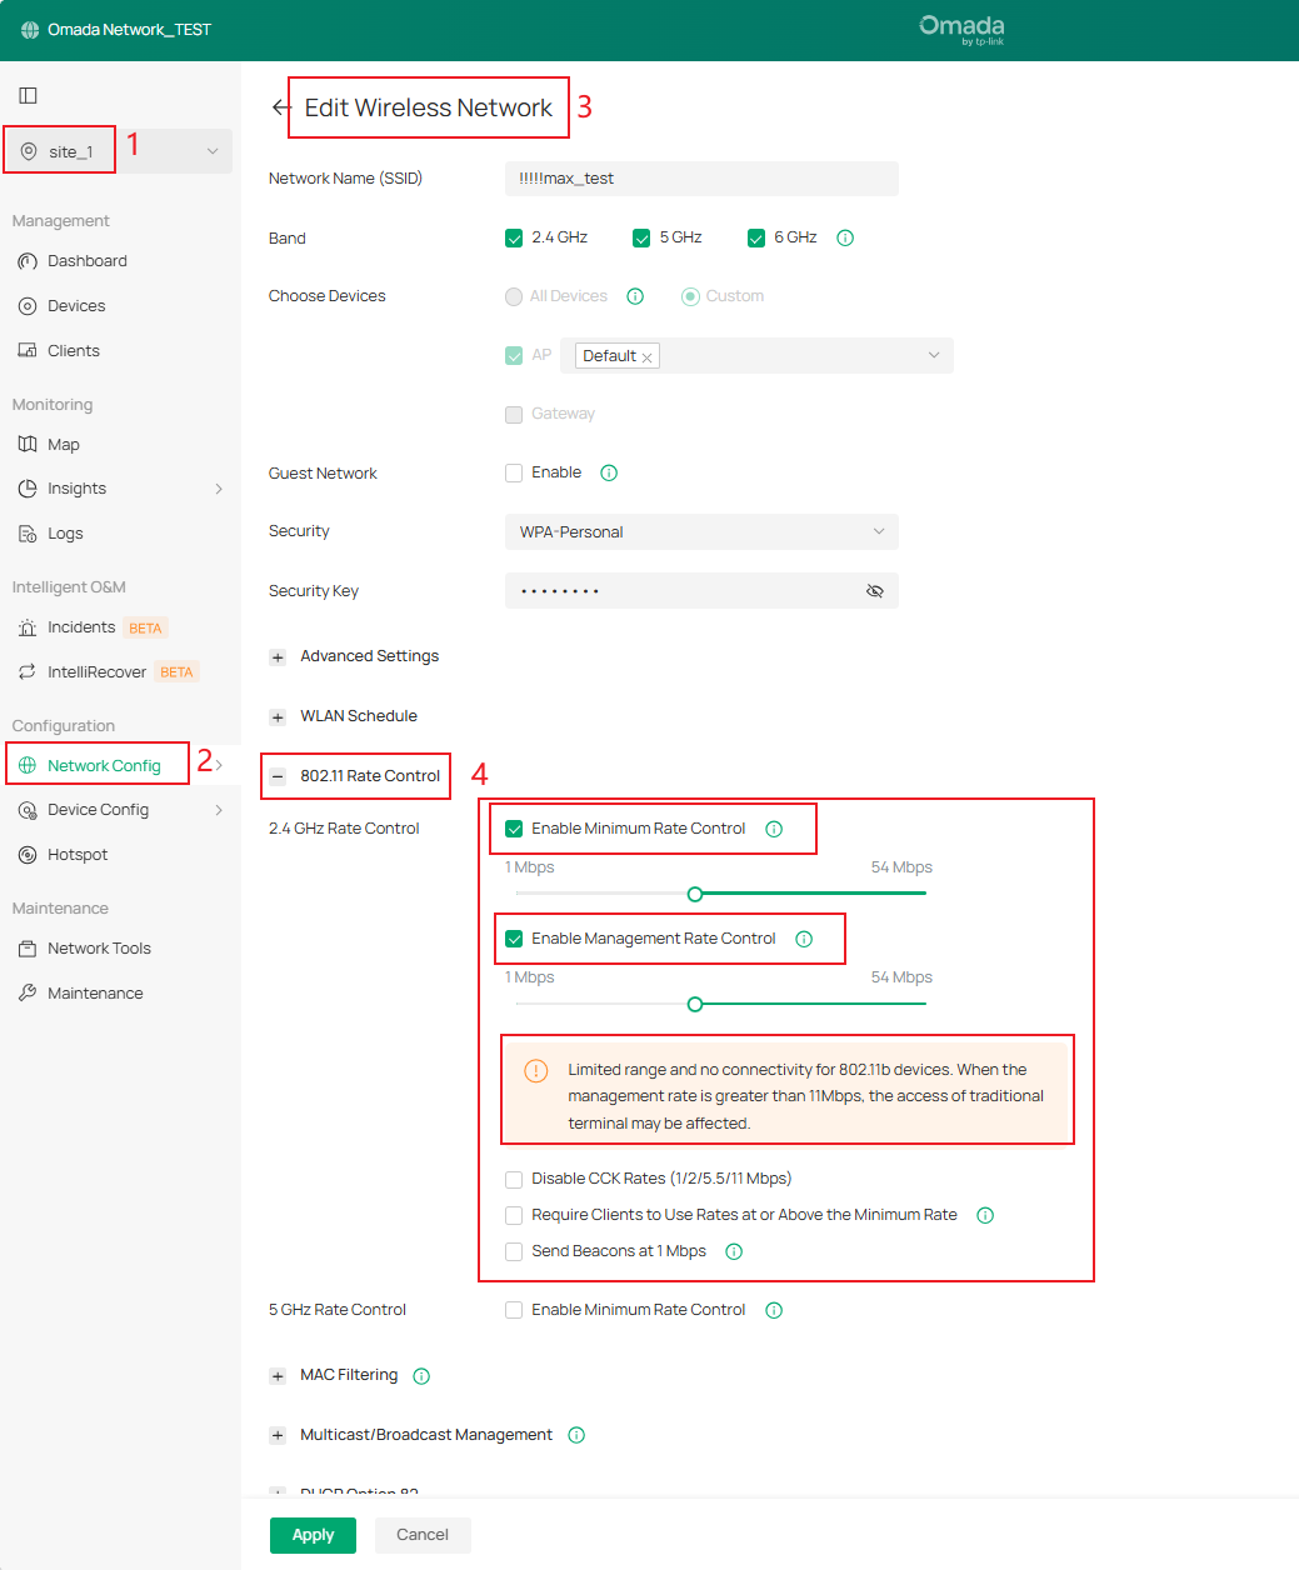
Step 11. Check if 802.11Rate Control is enabled. For example, if Rate Control is set to 24M on 2.4G, devices with a negotiated rate lower than this rate, such as 802.11b-only devices, will be unable be connect. In this case, you can turn off this function and try to reconnect the clients.
Troubleshooting: Clients Unable to Obtain an IP Address
If the client connects to Wi-Fi but does not receive an IP address, check the following:
Step 1. Check whether the DHCP server is reachable. You can use the Network Check function provided by the Controller to test connectivity. When performing the test, use the gateway IP address of the VLAN Interface configured for the SSID as the destination IP address.
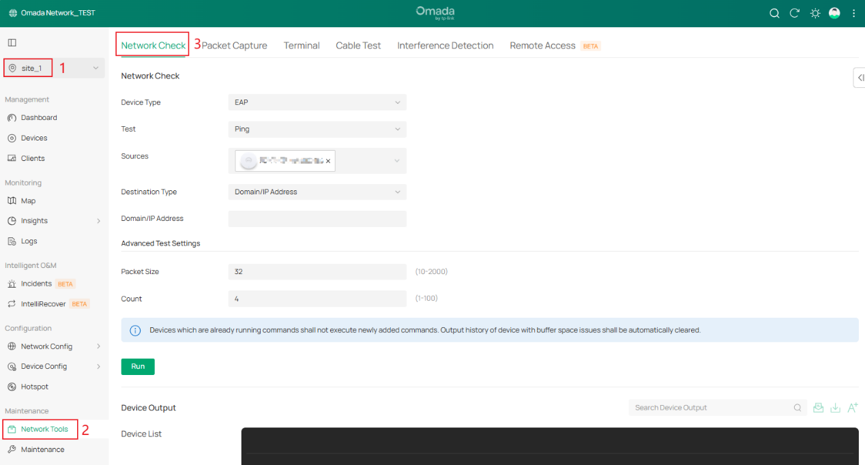
Step 2. Check whether the DHCP address pool has any available addresses. If the pool is exhausted, expand the pool.
Step 3. Check whether the VLAN configuration in the network is correct.
- Check whether SSID VLAN is enabled. If SSID VLAN is enabled, check whether the corresponding ports of the switch and gateway in the network are configured with the corresponding VLAN.
- If the SSID’s Security is PPSK without RADIUS, check whether the PPSK profile is configured with VLAN attributes, and check whether the corresponding ports of the switch and gateway at the front end of the network are configured with the corresponding VLAN.
- If a RADIUS server is required, check whether VLAN assignment is enabled in the RADIUS Profile and whether the VLAN authorization attribute configuration in the
- Tunnel-Type = 13 (VLAN)
- Tunnel-Medium-Type = 6
- Tunnel-Private-Group-ID = expected VLAN ID
- For AP models with downlink ports, also check whether the Port VLAN is enabled, and whether the corresponding ports of the switches and gateways at the front end of the network are configured with the corresponding VLAN.
Troubleshooting: Clients Unable to Access Local LAN
If the client can connect to Wi-Fi but cannot access local network resources, check the following:
Step 1. Check whether Guest Network is enabled on the SSID. If it is, isolation from the local LAN may be expected behavior.
Step 2. Check whether ACL rules are configured and blocking local access.
Step 3. Check whether a firewall is enabled on the client device, and disable it temporarily for testing.
Troubleshooting: Clients Unable to Access the Internet
If the client can connect to Wi-Fi but cannot reach the internet, check the following:
Step 1. Check that the client obtained correct network parameters:
- If there is an illegal DHCP server in the network that assigns a wrong IP address or gateway to the client, the client will be unable to access the Internet. Therefore, it is necessary to check whether the parameters such as the IP address, subnet mask, gateway IP address, and DNS sever IP address obtained by the client are correct. If they are incorrect, find the illegal DHCP server and remove it.
- If the client uses the static IP address, ensure that it is configured with the gateway IP address and the DNS server IP address.
Step 2. Check whether there is an IP conflict on the client. If IP conflict occurs, the client's IP address cannot be used normally. You can check for IP conflict in the following two ways:
- Check the client IP addresses in the Clients list of the Controller.
- Check whether there are duplicate IP addresses in the DHCP Client List on the DHCP server.
Step 3. Check whether the connectivity between the client and the gateway is normal.
Step 4. Check whether the connectivity between the client and the DNS server is normal.
- Check whether the client can ping the DNS server.
- Check whether the DNS resolution is normal. For example, in Windows system, enter the nslookup command in the cmd window, such as nslookup www.google.com , to see if there is a response.
- Change the DNS server address to the IP address of a public DNS server, for example: 8.8.8.8, and try again.
Step 5. Check whether the wired network can access the Internet normally. Connect a wired client directly through the gateway or switch at the front end of the network to check whether the wired client can access the Internet normally. If not, check the wired network.
Step 6. Check whether there is severe interference in the wireless environment, which prevents the client from accessing the Internet. When the channel utilization of the associated frequency band is greater than 70%, the user's Internet experience may be affected. Check the channel utilization. If the channel utilization is too high, it is recommended to switch to a channel with lower channel utilization.
Step 7. Check whether there are illegal multicast or broadcast sources occupying wireless resources. Check the multicast and broadcast message statistics on the Omada Controller (supported by Omada Controller 5.14 and above). If there are too many multicast or broadcast messages in a short period of time, it is recommended to enable Multicast/Broadcast Rate Limit (supported by Omada Controller 5.14.30 and above) or Multicast Filtering (supported by Omada Controller 5.9 and above).
Step 8. Check whether the communication rules are configured to restrict the client's Internet access. It is recommended to turn off the special configuration and then try to access the Internet.
- Check whether EAP ACL is enabled.
- Check whether URL Filtering is enabled.
- Check whether Portal authentication is enabled.
Temporarily disable these features and test again if needed.
Step 9. Check whether the client has set up firewall rules. Please disable the firewall and try again.
Troubleshooting: Poor Throughput
If the client can access the network but experiences slow performance, check the following:
Step 1. Check the client signal strength (RSSI) in the Clients list. Generally speaking, the client signal strength is required to be greater than -65 dBm. If the client signal strength is too weak, you can:
- Increase the AP's transmit power (TX Power) to increase coverage.
- Increase the number of AP to eliminate coverage blind spots and weak signal areas.
- Move the client closer to the AP and test again.
Step 2. Check the AP channel utilization. If the channel utilization is higher than 70%, it may affect the user's network experience. In this case, you can:
- Manually set a cleaner channel for testing.
- If multiple APs are deployed, it is recommended to enable WLAN Optimization to automatically deploy power and channels to reduce interference between APs.
Step 3. Check the multicast and broadcast traffic in the network. If there are too many multicast and broadcast messages, a large amount of air interface resources will be occupied, affecting the normal network experience of the client. In this case, it is recommended to use the following methods to control multicast and broadcast traffic:
- Enable Multicast/Broadcast Rate Limit (supported by Omada Controller 5.14.30 and above).
- Enable ARP-to-Unicast Conversion (enabled by default in Omada Controller 5.14.30 and above) and Multicast-to-Unicast Conversion (enabled by default in Omada Controller 5.9 and above).
- If there is no multicast application in the network, you can enable Multicast Filtering.
Step 4. Check whether there are other clients in the network that are performing large-volume operations, such as downloading large files. You can view the traffic usage information of each client in the Clients list. In this case, you can set Rate Limit.
- Enable SSID Rate Limit. SSID Rate Limit sets an overall speed limit for all clients associated with the SSID.
- Enable Client Rate Limit. Client Rate Limit limits the speed of a single client.
Step 5. Check whether there are many clients with weak signals and low rates in the network. You can view RSSI information in the Client list. In this case, you can enable RSSI Threshold to eliminate clients with weak signals.
Step 6. Check whether the AP which the client is currently connected is overloaded. If so, enable Maximum Associated Clients to control the number of clients that can access the AP.
Step 7. Check whether Band Steering is enabled (enabled by default in Omada Controller 5.14 and above). The interference in the 2.4G band in a wireless environment is generally stronger than that in the 5G/6G band. Therefore, it is recommended to enable Band Steering and set it to Prefer 5GHz/6GHz to guide clients that support 5GHz/6GHz to associate with the 5GHz/6GHz band first.
Step 8. Check if there is any other Wi-Fi interference in the network environment. Please conduct a comparative test after eliminating the interference source.
Troubleshooting: Abnormal Client Behaviors
Use different clients to test to check whether the wireless issues only occurs on a specific client. If yes, it is recommended to restart the client and try again.
Conclusion
This article provides a detailed troubleshooting analysis of some common wireless issues. If you encounter related wireless issues, you can follow the troubleshooting process in this article to troubleshoot.
To learn more about each function and configuration, please visit Support Home to download or check the manual for your product.
