Contents
How to set up Site Template and Device Template
How to bind the sites to Site Template
How to bind the devices to Device Template
How to unbind the sites to Site Template
How to unbind the devices to Device Template
Introduction
The Site Template feature is implemented at the Controller’s Global View to facilitate users to configure and manage sites in bulk. Most of the site’s functions are supported to be set up in the Site Templates, such as Internet/LAN/WLAN/ACL/URL Filtering/Portal/MAC Authentication, etc. By binding each site to a different template, you can quickly and easily realize the batch configuration of a large number of sites. For example, if a Controller manages several different sites and needs to make bulk configuration changes for them for business changes or other reasons, you can create Site Templates ahead of time and then apply the target Site Templates directly to the sites to be changed without having to go into each site individually to make adjustments to them. The greater the number of sites, the more the feature will work.
In addition, you can also create Device Template in Site template, then choose to bind the devices with the same model to the related Device template after binding them to Site template, which greatly improves the efficiency of managing and configuring devices. For instance, a large number of SG3452XP v2.20 are deployed on the same site, but the configurations are not exactly the same, in this case, it’s possible to create a Device Template for each configuration, i.e. to set up different Ports/VLAN interface/Static Route/Service settings, and then apply each Device Template to the required devices.
In this article, we give instructions on how to configure the Site Template feature based on the Omada Software Controller v6.0.0.23.
Requirements
- Omada Controller (Software Controller / CBC, v5.15.20 or above)
- Omada Gateway/Switch
Configuration
How to set up Site Template and Device Template
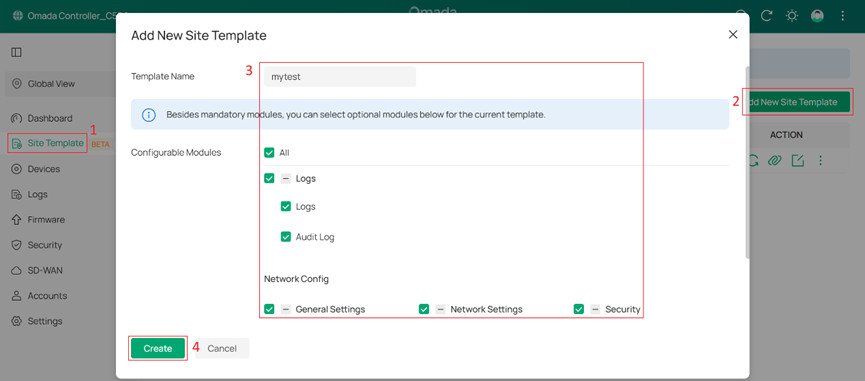
Step 1. Log in Omada Controller, go to Global View’s Site Template to click “+ Add New Site Template” in the top right corner of this page, name it and select the optional configuration according to your own needs, then tap the “Create” button and “Edit” button popped out automatically to continue the process. In this article, we name the created ones as mytest, which will be used in the following to refer to this template we created here.
Note:
1. Most of the site’s Configurable Modules are supported to be set up in the Site Template, some of them are mandatory and some are optional (you can set them up only if they are selected here). Please refer to Site Template feature list at the end of this article to know all modules supported in Site Template feature in detail.
2. After the Site Template is created, its configurable modules cannot be changed.

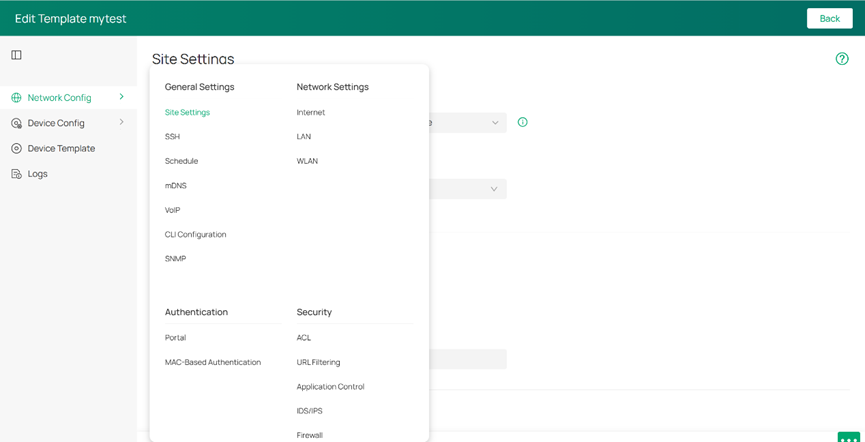
Step 2. Enter the mytest template, you can find that all mandatory and optional modules selected in the last step are configurable here, then just please set them up according to your own reality. The configuration steps in Network Config/Device Config/Logs are the same as those in a regular site, so we won't go into detail here, and you can refer to other articles on TP-Link's website to learn more about each function.
Step 3 (Optional). Go to Device Template to click “+ Add New Device Template”, edit its name, then select the device type/device model/the configuration modules you would like to set up. Here we take ER8411 v1.0 and SG3218XP-M2 v1.0 as examples to create 2 templates for them (ER_01 for ER8411 v1.0, SG_01 for SG3218XP-M2 v1.0).
Note:
1. Only Omada Gateways and Switches are supported with the Device Template.
2. There is only one device template available for Gateway in each Device Template.
3. After the Gateway template is created, WAN configurations of the bound sites will be overwritten by the configurations in the template, including Online Detection, WAN Port status, Load Balancing configurations, etc.
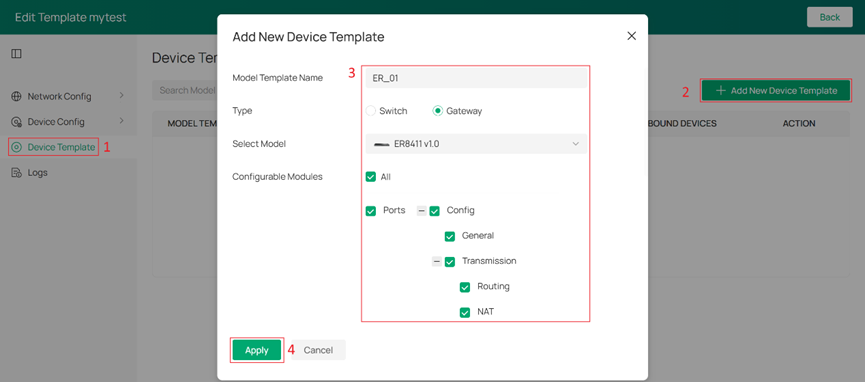
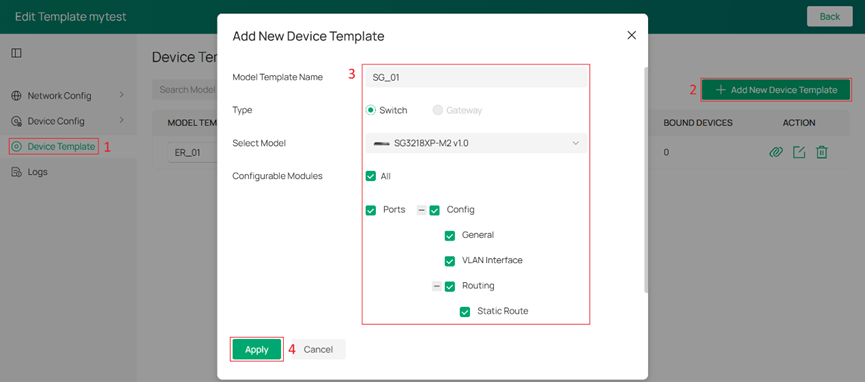
Step 4 (Optional). Tap the “Edit” button in the ACTION column of the relevant template items, then set up “Ports” and “Config” in this device’s properties window based on your needs.

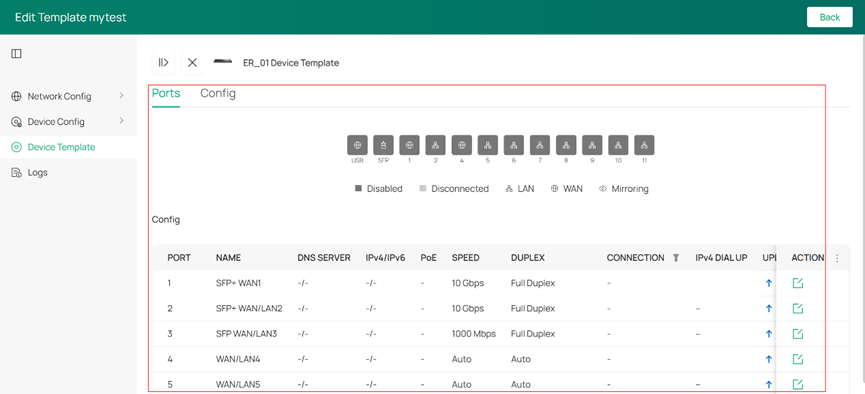
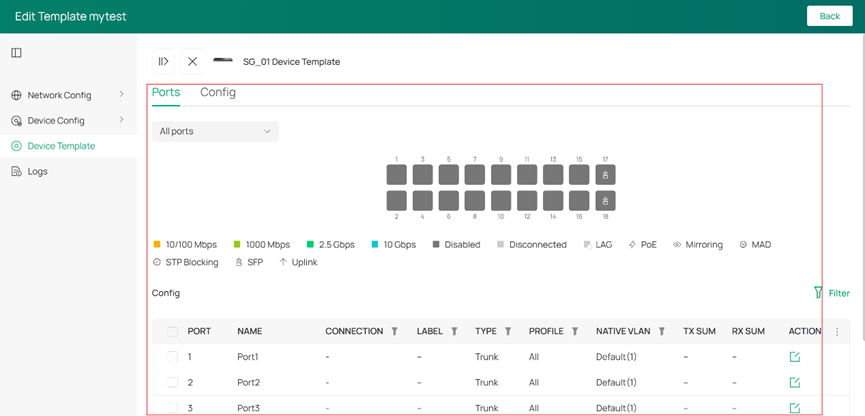
Step 5. Now you have successfully created this Site Template which is called mytest. If you want to apply this template to the actual sites in this Controller, please go to the next chapter How to bind the sites to Site Template.

How to bind the sites to Site Template
According to the chronological sequence of the creation time of the site and the site template, there are two ways for you to bind the site to the site template: the first is to create a site template and then bind it to the existing sites, the second is to choose and apply a specified site template when creating a new site.
Configuration for the existing sites
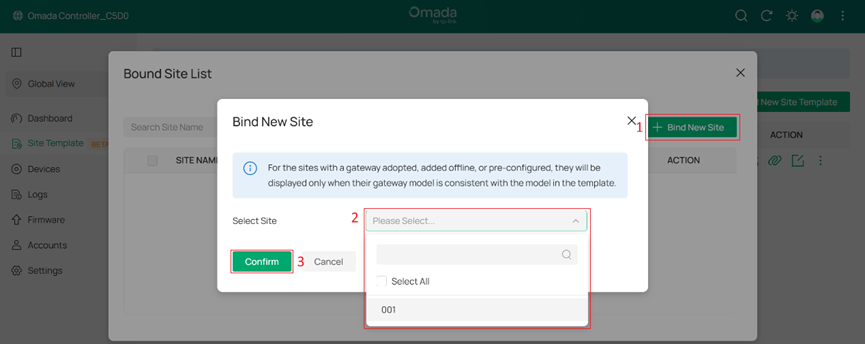
Go to Global View’s Site Template, click the “Bound Site List” button and then tap the “+ Bind New Site” to select the target sites you want to bind, finally click the “Confirm” button.
Note: After clicking the “Confirm” button, this template’s configuration will be immediately synchronized to the bound sites.

Configuration when creating a new site
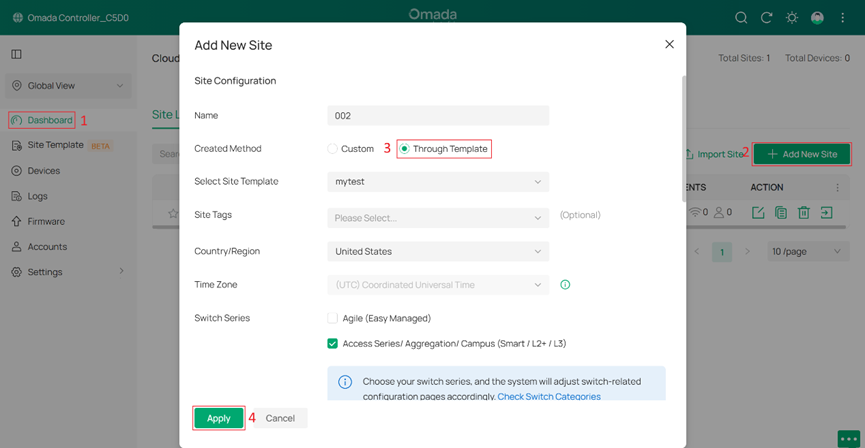
Go to Global View’s Dashboard, click the “+ Add New Site” and select “Through Template” as Created Method, then complete the other items in this page and click the “Apply” button.
How to bind the devices to Device Template
If you want to bind some devices to a device template to make them work in the same way, please enter the Device Template module of this Site Template, then:
For Omada Gateway: If there is an Omada Gateway managed in the site, it will be automatically bound to the gateway Device Template after this site is bound to certain Site Template, i.e. the “AUTO BIND” will be enabled and the “STATUS” will be set to “Completed” by default. For example. in this article, ER8411 v1.0 in the 001 site will be bound to the ER_01 template. If you don’t want the ER8411 v1.0 bind with the ER_01 template, just please click the “Edit” and select this model to tap the “unbind” button.
Note: You can only configure the Internet if the Gateway Device Template is created.


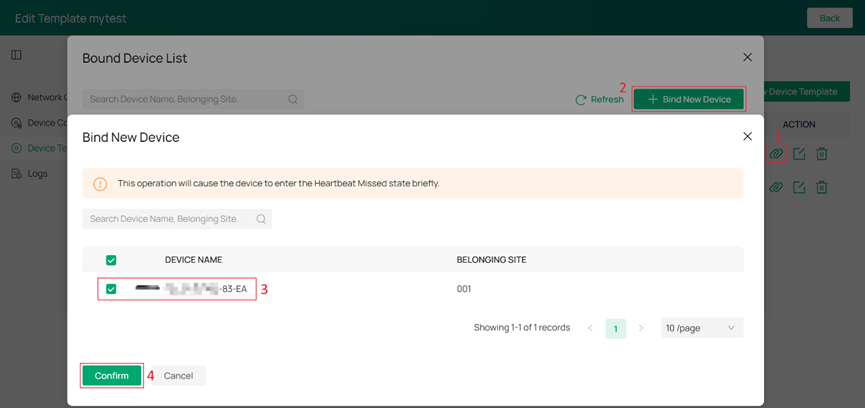
For Omada Switch: Adjust the “STATUS” to “Completed” from “Draft” firstly, otherwise, we’re not allowed to bind devices to it. Then, click the “Edit” button and ”+ Bind New Device” button in turn, select the model to tap the “Confirm” button.
Note:
1. When the device template has been bound with the exact model, its “STATUS” does not support to be change to “Draft” anymore.
2. With “AUTO BIND” enabled, the devices with the same model will automatically bind the template and use template configurations. If the configurations are incorrect, the network will be disconnected.
3. To enable “AUTO BIND”, the template should meet any of the following requirements:
- The switch template is not configured with static IP or DHCP server in VLAN Interface > Manage VLAN > IP Address Mode.
- The switch template is configured with static IP or DHCP server in VLAN Interface > Manage VLAN > IP Address Mode, and there is at most 1 device of this model in the site.

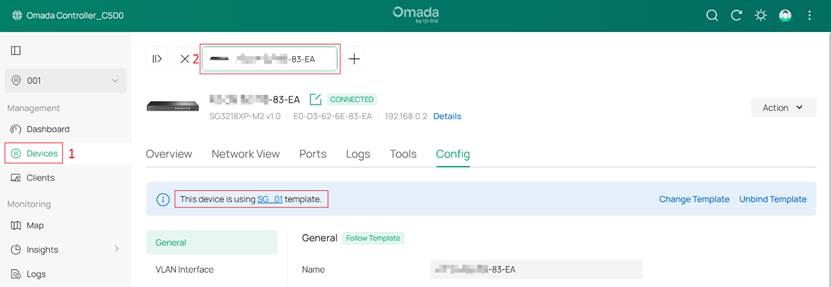
Step 3 (Optional). Go to the site 001 bound with mytest template, and we can see that it has been marked with “Site Template: mytest” at the lower left corner of this page. Click the SG2008P bound with SG_01 template, it’s also marked with “This device is using template SG_01.”

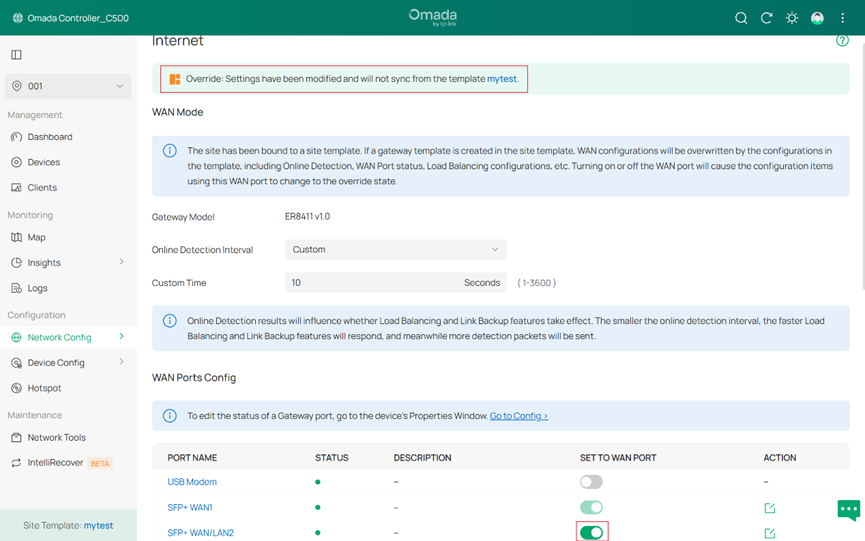
Step 4 (Optional): If you don’t want multiple sites applied to the same device template to be exactly consistent, you can override the sites and devices’ configuration as you’d like. For example, here we enable the WAN/LAN1 port to be the 3rd WAN port which doesn’t match the mytest template, then this site will be marked with “Override: Settings have been modified and will not sync from the template mytest.” in the top of this page.
How to unbind the sites to Site Template
After being unbound with the Site Template, the selected sites will no longer synchronize configurations from the template but can retain the current configurations (including local overrides). Depending on the number of unbound target sites, you can operate in the following two ways:
1) Unbind all/partial sites to the specific Site Template
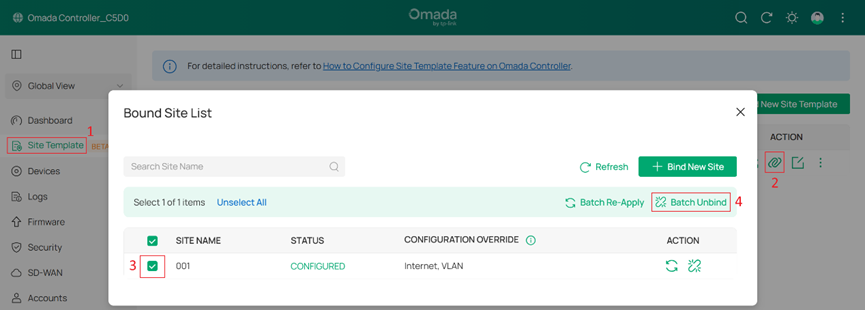
Go to Global View’s Site Template, click the “Bound Site List” button and then select the target sites you want to unbind, finally tap the “Unbind” button.

2) Unbind one site to the specific Site Template
Go to Global View’s Site Template, click the “Bound Site List” button and then select the target sites you want to unbind, finally tap the “Batch Unbind” button.
How to unbind the devices to Device Template
After completing the unbind operations, those devices will no longer synchronize configurations from the device template but can retain the current configurations (including local overrides). Depending on the number of unbound target sites, you can operate in the following two ways:
1) Unbind one device to the specific Device Template
There are two methods for you to unbind one device to the specific Device Template on Omada Controller, one is configured in the Site Template and the other in the actual site.
Method 1: Configuration in the Site Template
Enter the mytest template, click the “Bound Site List” button of the device template you’d like to operate, tick the target device and tap the “Unbind” button.

Method 2: Configuration in the actual site
Enter the actual site’s Devices module, click the target device to open its properties window and tap the “Unbind Template” button.
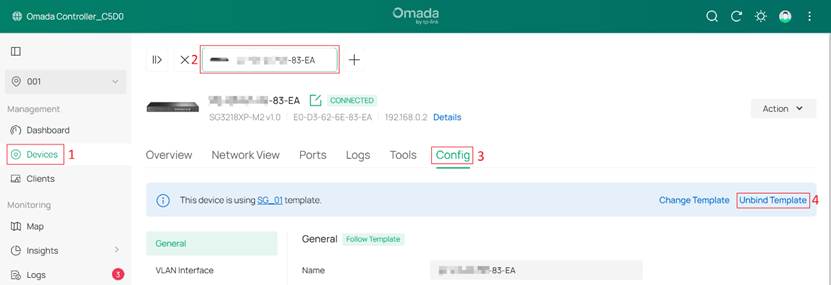
2) Unbind all/partial devices to the specific Device Template
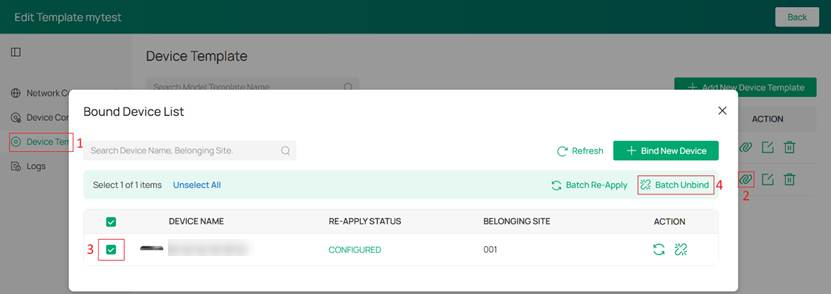
Verification
Here's just a few examples of how it works when Site Template feature is configured, if you're interested you can explore it in more detail on your own.
Step 1. Inheriting the configurations of “How to set up Site Template and Device Template”, we configure the Internet settings for mytest template as the following figures show: Two Interfaces (Default for VLAN 1-192.168.0.1/24 and Site_Template_LAN for VLAN 10-192.168.10.1/24). LAN1 Port’s PVID is set as VLAN 10 for ER_01 template.

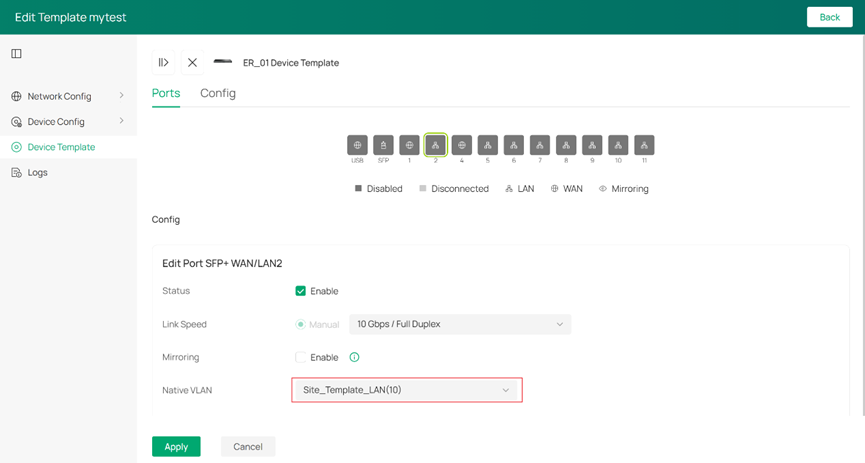
Step 2. Go to site 001, we can notice that its Internet settings and gateway’s settings are already the same as in mytest template and ER_01 template separately.

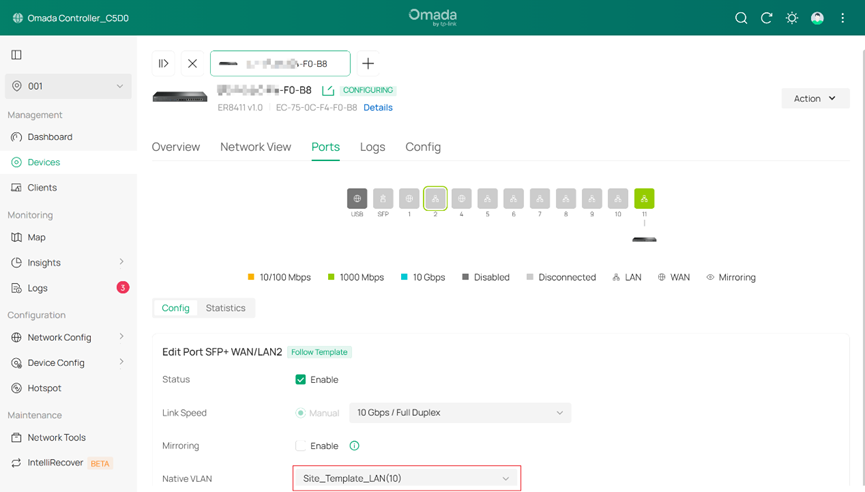
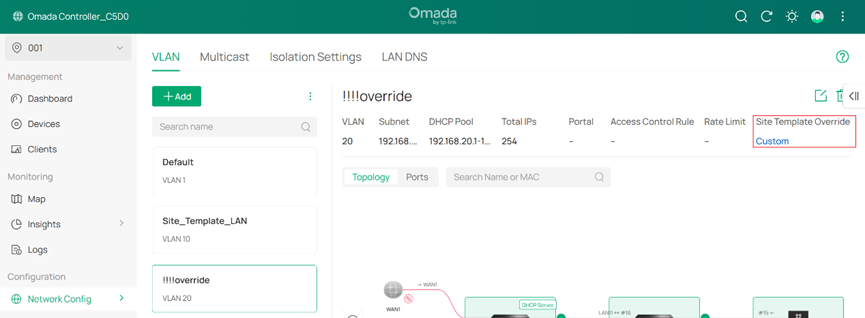
Step 3. If we modify the LAN settings in site 001 by adding one new interface (!!!!override for VLAN 20-192.168.20.1/23), then this LAN Profile will be marked with “Custom”.
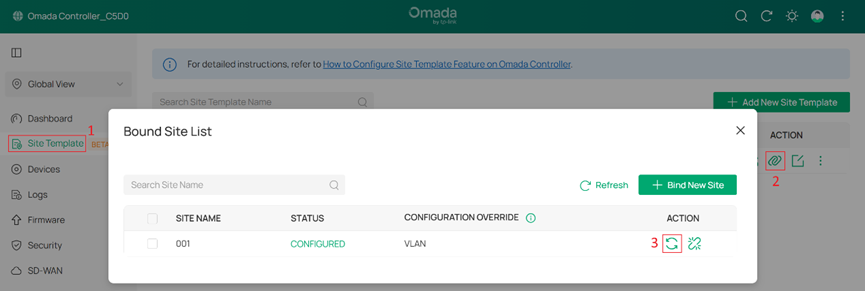
Step 4. After we click the “Re-Apply” button for this site, then all the settings of site 001 will revert back to the same as mytest template.
Conclusion
With Site Templates and Device Templates, you can quickly configure multiple sites and devices in bulk. This greatly reduces repetitive work and ensures consistent settings across your network.
Get to know more details of each function and configuration please go to Download Center to download the manual of your product.
QA
Q1: What modules does Site Template feature support to configure, and which are mandatory/optional/unsupported?
A1: Please see the table below.
|
Module |
Support |
Mandatory |
Only for Omada Pro Controller |
|
|
1 |
Dashboard |
× |
|
× |
|
2 |
Statistics |
× |
|
× |
|
3 |
Devices |
√ |
√ |
× |
|
4 |
Clients |
× |
|
× |
|
5 |
Insights |
× |
|
× |
|
6 |
Logs |
√ |
× |
× |
|
7 |
Audit Logs |
√ |
× |
× |
|
8 |
Health |
× |
|
√ |
|
9 |
Abnormal |
√ |
× |
√ |
|
10 |
Reports |
× |
|
× |
|
11 |
Map |
× |
|
× |
|
12 |
Network Tools |
× |
|
× |
|
13 |
Site Settings |
√ |
√ |
× |
|
14 |
Internet |
√ |
√ |
× |
|
15 |
Virtual WAN |
× |
|
× |
|
16 |
LAN |
√ |
√ |
× |
|
17 |
WLAN |
√ |
√ |
× |
|
18 |
WLAN Optimization |
√ |
× |
× |
|
19 |
SIM |
√ |
× |
× |
|
20 |
ACL |
√ |
√ |
× |
|
21 |
URL Filtering |
√ |
√ |
× |
|
22 |
MAC Filtering |
√ |
√ |
× |
|
23 |
Attack Defense |
√ |
√ |
× |
|
24 |
Firewall |
√ |
× |
× |
|
25 |
IP-MAC Binding |
× |
|
× |
|
26 |
Wireless IDS/IPS |
√ |
× |
√ |
|
27 |
IDS/IPS |
√ |
√ |
× |
|
28 |
Application Control |
× |
|
× |
|
29 |
Routing |
√ |
√ |
× |
|
30 |
Switch OSPF |
× |
|
× |
|
31 |
NAT |
√ |
√ |
× |
|
32 |
Session Limit |
√ |
√ |
× |
|
33 |
Bandwidth Control |
√ |
√ |
× |
|
34 |
Gateway Qos |
√ |
√ |
× |
|
35 |
Switch Qos |
× |
|
× |
|
36 |
VRRP |
× |
|
× |
|
37 |
OUI Based VLAN |
√ |
√ |
√ |
|
38 |
VPN |
× |
|
× |
|
39 |
DHCP Reservation |
× |
|
× |
|
40 |
Dynamic DNS |
√ |
√ |
× |
|
41 |
mDNS |
√ |
√ |
× |
|
42 |
SNMP |
√ |
√ |
× |
|
43 |
UPnP |
√ |
√ |
× |
|
44 |
SSH |
√ |
√ |
× |
|
45 |
Reboot Schedule |
√ |
× |
× |
|
46 |
Port Schedule |
√ |
× |
× |
|
47 |
IPTV |
√ |
√ |
× |
|
48 |
DNS Proxy |
√ |
√ |
× |
|
49 |
DNS Cache |
√ |
√ |
× |
|
50 |
Auto Send Data to Email |
× |
|
× |
|
51 |
Portal |
√ |
√ |
× |
|
52 |
802.1X |
× |
|
× |
|
53 |
MAC-Based Authentication |
√ |
√ |
× |
|
54 |
Groups |
√ |
√ |
× |
|
55 |
Time Range |
√ |
√ |
× |
|
56 |
Rate Limit |
√ |
√ |
× |
|
57 |
PPSK |
√ |
√ |
× |
|
58 |
RADIUS Profile |
√ |
√ |
× |
|
59 |
LDAP Profile |
√ |
√ |
× |
|
60 |
APN Profile |
√ |
√ |
× |
|
61 |
Gateway Qos Service |
√ |
√ |
× |
|
62 |
Bonjour Service |
√ |
√ |
× |
|
63 |
OUI Profile |
√ |
√ |
√ |
|
64 |
Site CLI |
√ |
× |
× |
|
65 |
Device CLI |
× |
|
× |
Q2: How many site templates and device templates can be created on the same Omada Controller?
A2: For one Omada Controller, the maximum number of Site Template is 100 per customer (For MSP Mode)/Controller, the maximum number of Device Template is 257 (256 for Switch and 1 for Gateway) per Site Template.
Q3: What should I do if I want the sites bound to a site template but overridden to revert back to the original Site Template?
A3:
- If you want to revert all sites bound to the specific template, you can go to Global View’s Site Template and click the “Re-apply” button directly.
- If you want to revert partial sites bound to the specific template, you can go to Global View’s Site Template, and click the “Bound Site List” button, then tick the desired sites and tap the “Batch Re-Apply” button.
- If you want to revert one site bound to the specific template, you can go to Global View’s Site Template, and click the “Bound Site List” button, then tick the desired site and tap the “Re-Apply” button.
Note: This operation will overwrite all site-level configurations of the selected sites, overwrite private configurations of the devices whose models are specified in the template, and may clear the configurations that the template does not support. Therefore, if there are custom LAN networks on the site, they will also be deleted, which may cause devices offline or network abnormalities.


