


Contents
Storage Management Configuration
Introduction
The Fusion Pro 2.5G and Fusion Pro 2.5G PoE introduce a new Storage Management feature for video storage. This FAQ provides guidance on the available settings and configuration options, including best practices for formatting an SSD and an explanation of the various UI elements within the Storage Management interface.
Requirements
- Fusion Pro 2.5G or Fusion Pro 2.5G PoE
- Omada Guard
- NVMe SSD (sold separately)
SSD Requirements
- Maximum Supported Capacity: 2 TB
- Form Factor: M.2
- Supported M.2 Sizes: 2230, 2242, 2260, 2280, 22110
- Interface: NVMe
- Compatibility: NVMe SSDs only. SATA M.2 SSDs are not supported.
- PCIe Interface: PCIe x2. SSD performance is limited by the PCIe x2 interface.
SSD Installation
Before configuring Storage Management, install a supported M.2 2280 NVMe SSD in the Fusion Pro device.
Step 1. Power off the Fusion Pro device before installing or removing the SSD.
Step 2. Pull out the SSD tray, install the SSD as shown below, then secure the SSD and push the tray back into the device.
Note: Hot swapping is not supported. Always power off the Fusion Pro device before installing or removing the SSD to help prevent data loss or device damage.
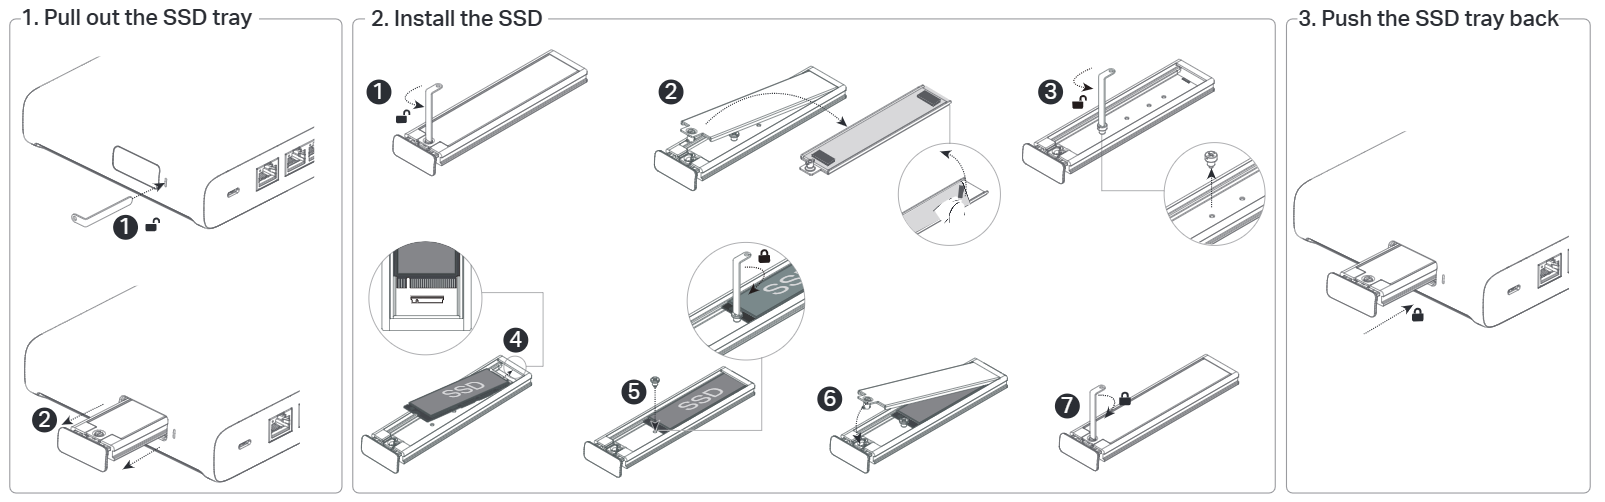
Storage Management Configuration
Step 1. Select the Omada Guard tab > Guard Config then Storage Management. You will now be in the Storage Management interface. After making any changes, save by selecting Apply.
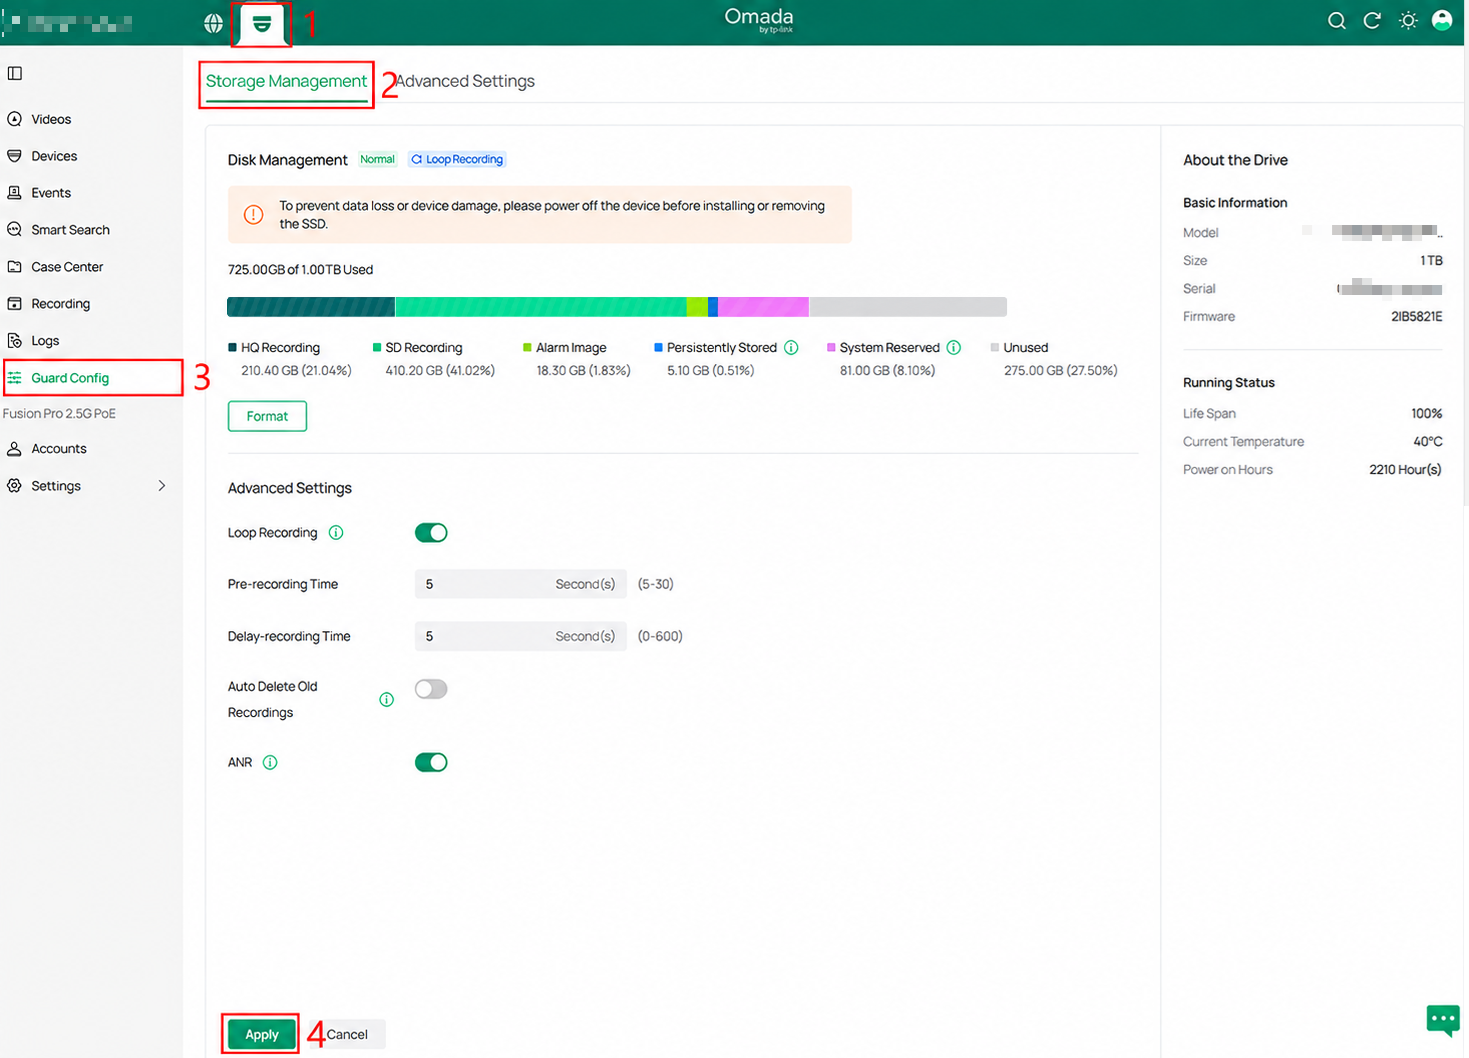
Storage Management settings
The elements on the Storage Management page can be divided into several groups. This section introduces the available UI elements and configuration options for managing storage.
The Disk Management section displays the current SSD status, recording mode, storage usage, and available disk-management options.
- Disk Status: Displays the current operating status of the SSD. In this example, the status is Normal.
- Loop Recording: Indicates that loop recording is enabled. When the available recording space is full, older recordings can be overwritten according to the system's recording rules.
- SSD Installation Warning: Reminds users to power off the device before installing or removing the SSD to prevent data loss or device damage.
- Storage Usage: Displays the total amount of SSD storage currently in use. This will display used capacity against total capacity. In this example, 725.00 GB of 1.00 TB is used.
- Storage Usage Bar: Provides a visual breakdown of how the SSD capacity is allocated.
- HQ Recording: Storage used for high-quality recordings.
- SQ Recording: Storage used for standard-quality recordings.
- Alarm Image: Storage used for images captured by alarm events.
- Persistently Stored: Storage reserved for recordings or data configured to be retained.
- System Reserved: Storage reserved by the system for system-related functions.
- Unused: Storage that is currently unallocated or available.
- Format: Formats the installed SSD and removes the data stored on it.
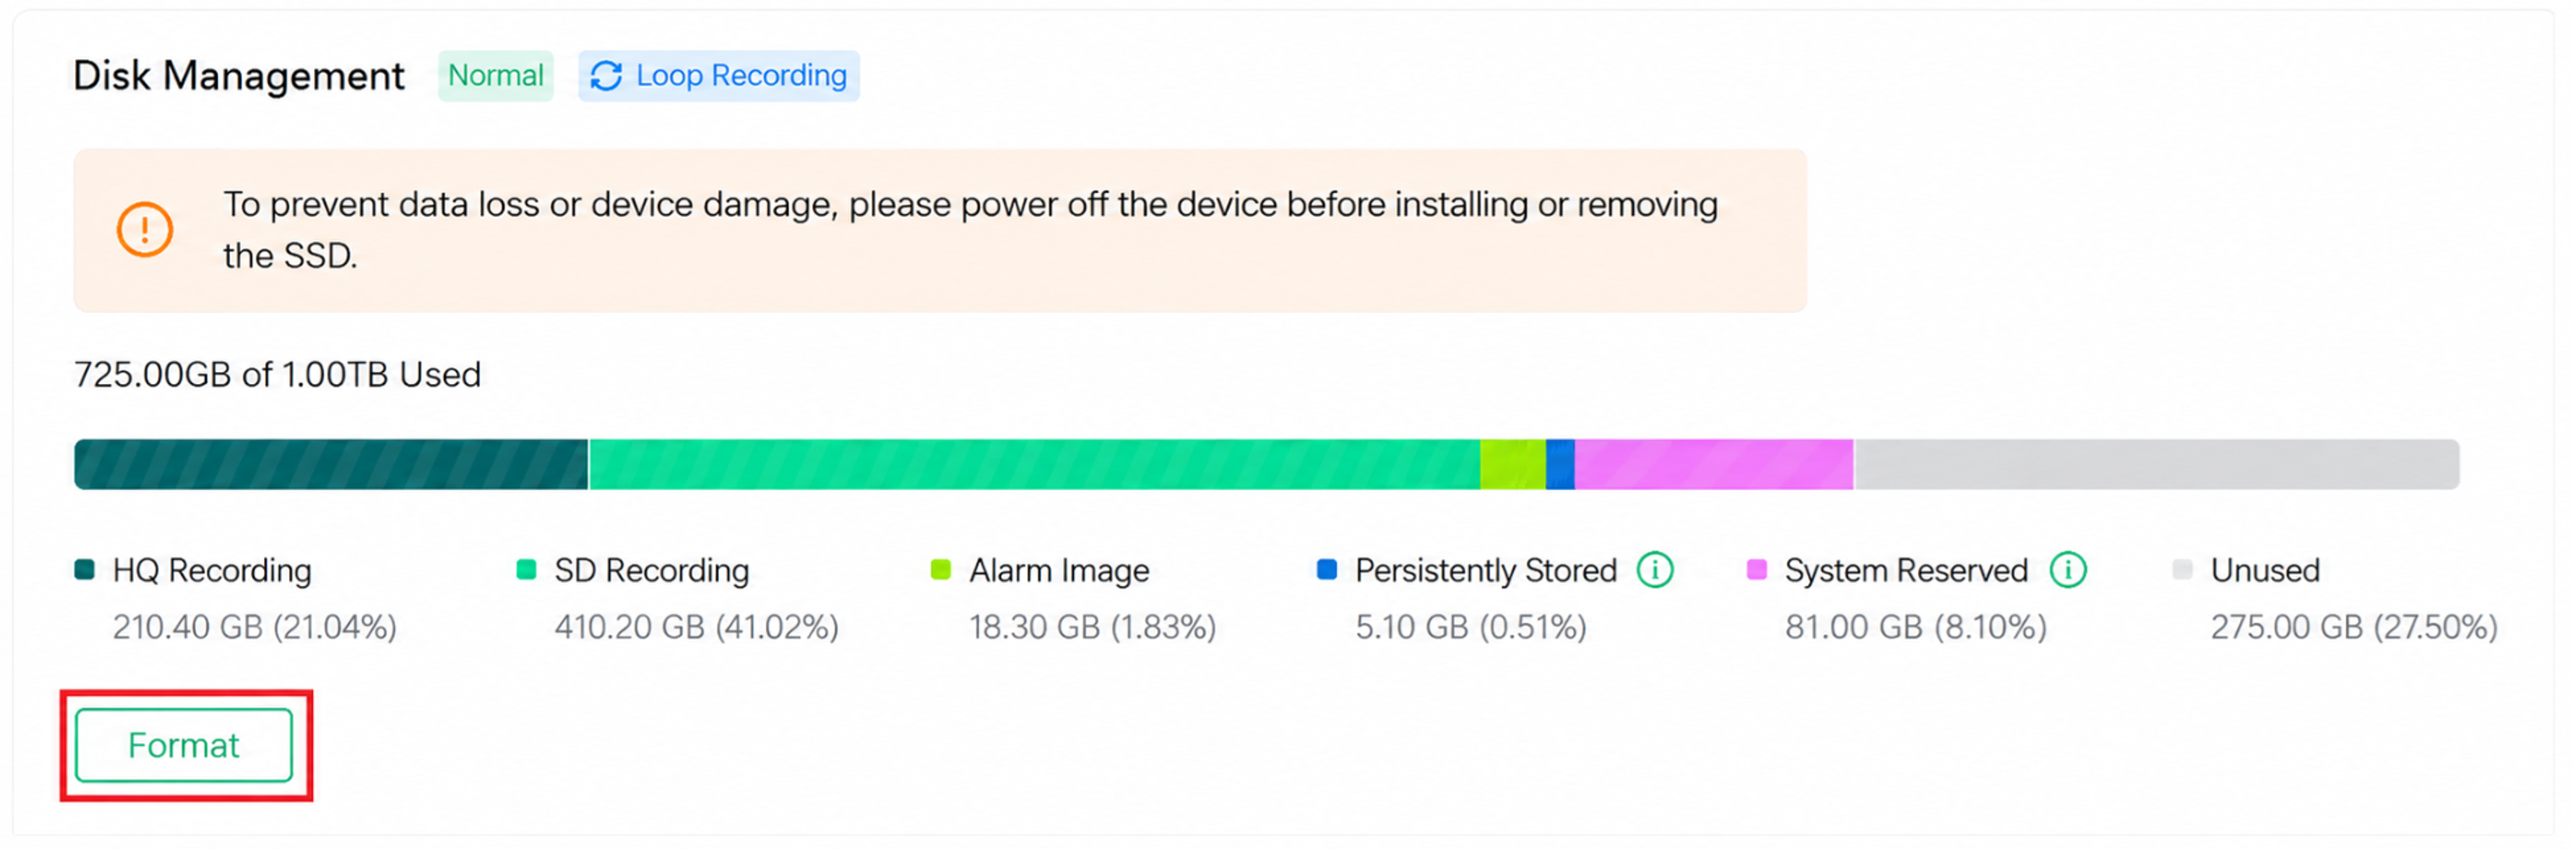
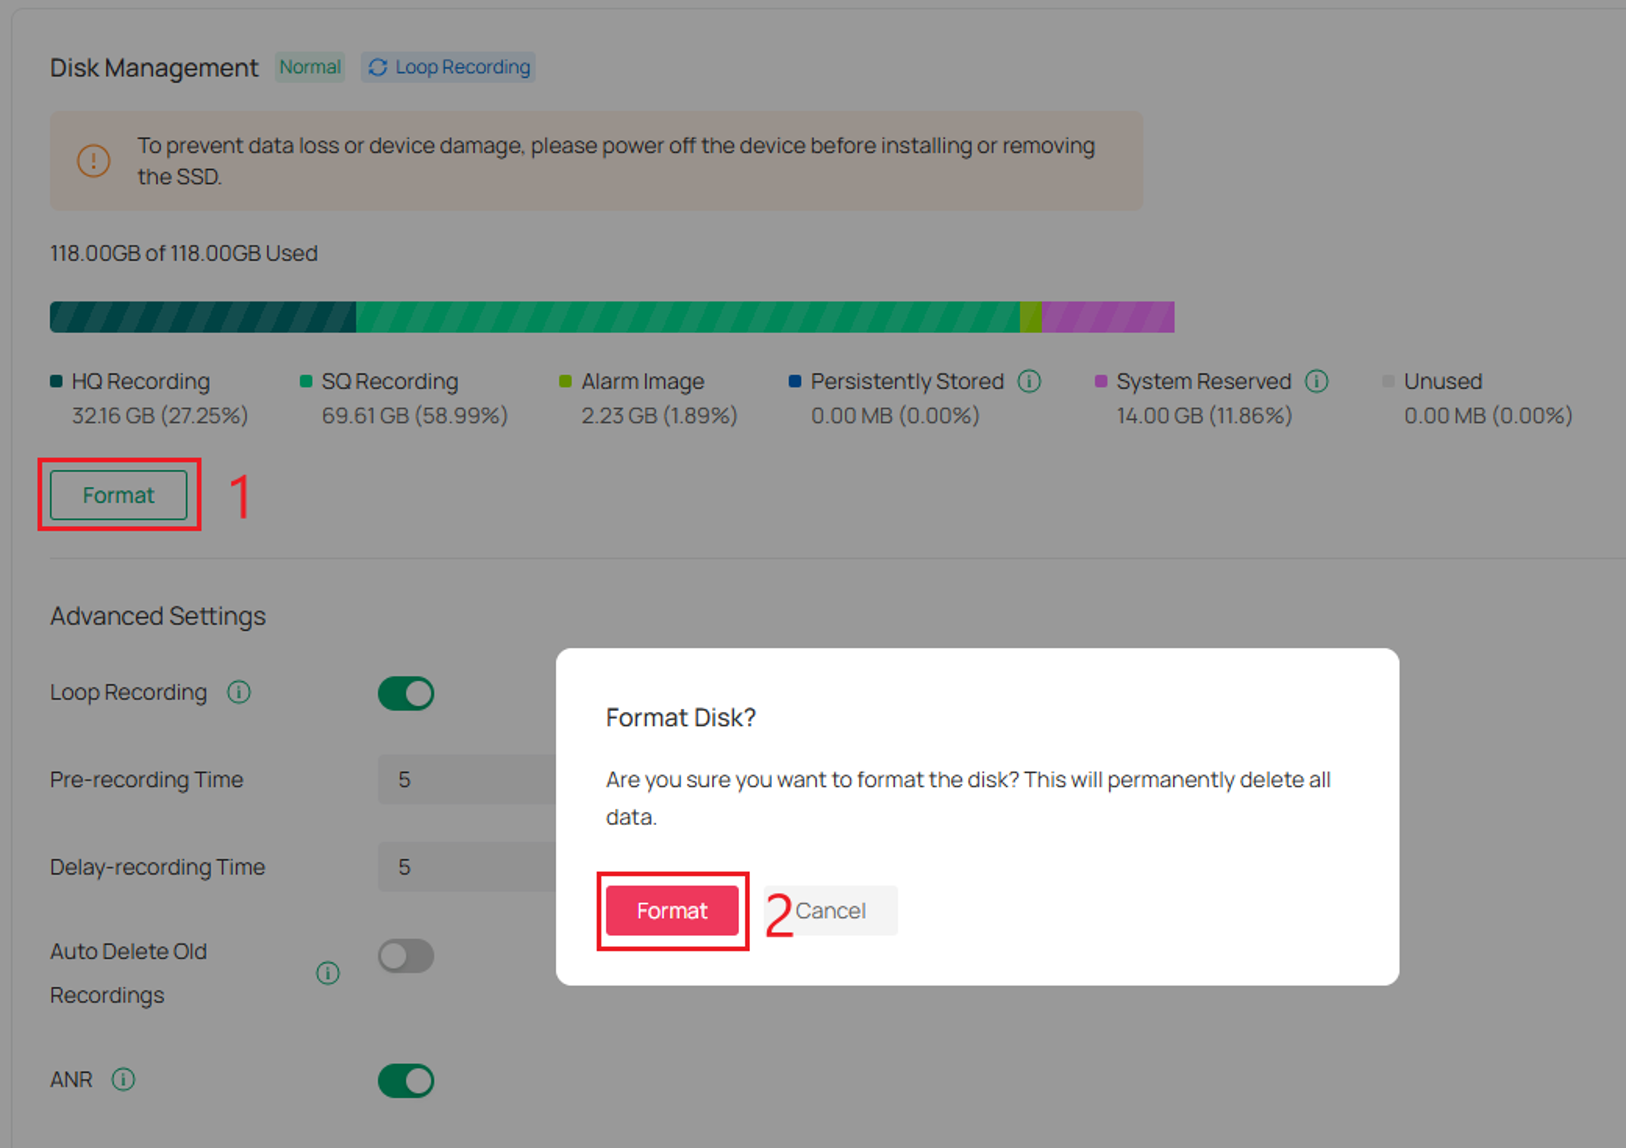
To format the SSD, select the Format button, then select Format again in the popup window.
Note: Formatting the SSD will erase all data stored on it. Only format the SSD if you are sure it does not contain any important data, or if the data has already been backed up.
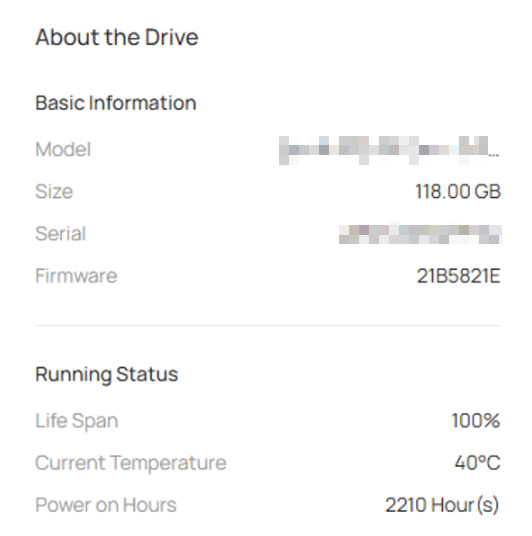
The About the Drive section displays basic information and the current operating status of the installed storage drive.
- Model: Displays the model name or number of the installed drive.
- Size: Displays the total storage capacity of the drive.
- Serial: Displays the unique serial number assigned to the drive.
- Firmware: Displays the firmware version currently installed on the drive.
The Running Status section provides information about the current health and usage of the drive.
- Life Span: Displays the estimated remaining lifespan or health of the drive as a percentage.
- Current Temperature: Displays the current operating temperature of the drive.
- Power on Hours: Displays the total amount of time the drive has been powered on.
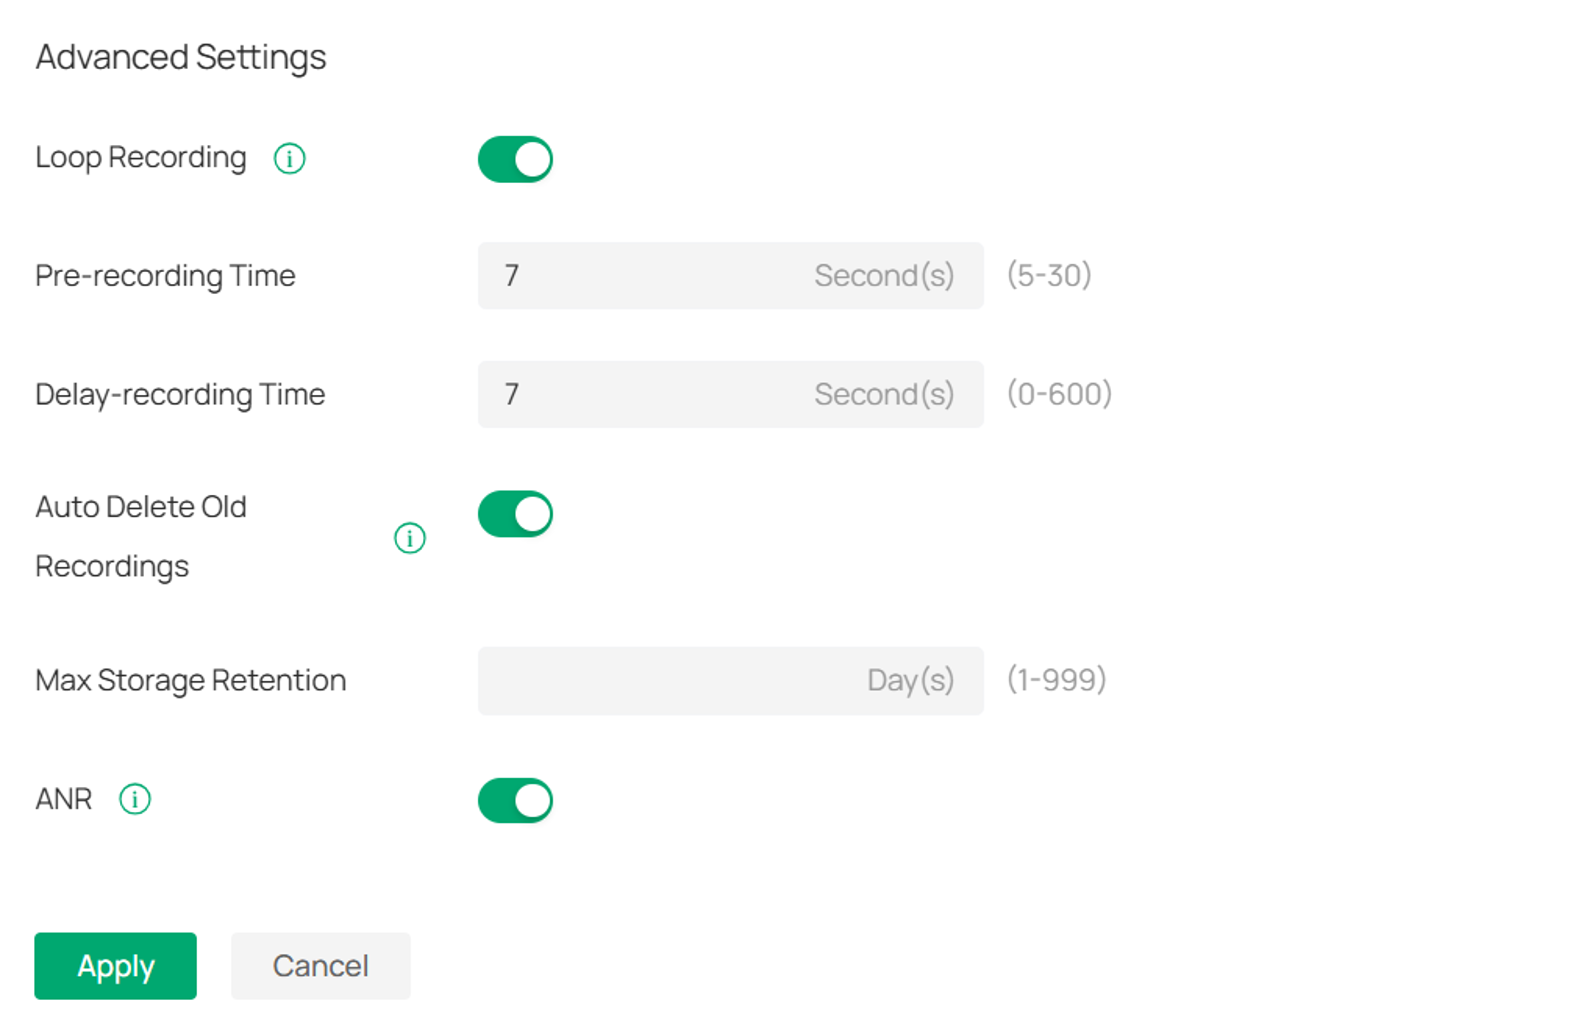
The Advanced Settings section provides additional options for controlling recording behavior and storage management.
- Loop Recording: When enabled, new recordings overwrite older recordings when there is not enough available storage space.
- Pre-recording Time: Specifies how many seconds of video are saved before a recording event is triggered. The configurable range is 5–30 seconds.
- Delay-recording Time: Specifies how long recording continues after the recording event ends. The configurable range is 0–600 seconds.
- Auto Delete Old Recordings: Automatically deletes recordings that have exceeded the configured retention period.
- When enabled, the Max Storage Retention option becomes available. Set the maximum number of days that recordings will be retained before they are automatically deleted. The configurable range is 1-999 days.
- ANR: Automatic Network Replenishment allows the camera's SD card to act as backup storage if the network connection is interrupted. After the connection is restored, the camera automatically synchronizes the recordings from the SD card back to the system to fill gaps in the recording history.
Conclusion
You have now configured and reviewed the Storage Management settings for your Fusion Pro device. These settings allow you to monitor SSD status, manage recording behavior, configure retention, and protect recordings during network interruptions.
To learn more about each function and configuration, please visit Support Home to download or check the manual for your product.
QA
Q1: Why is my SSD not detected by the Fusion Pro device?
A1: Confirm that the SSD is an M.2 2280 NVMe SSD with a capacity of 2 TB or less. SATA M.2 SSDs are not supported. Power off the Fusion Pro 2.5G before checking or reinstalling the SSD.
Q2: Can I install or remove the SSD while the Fusion Pro device is powered on?
A2: No. Hot swapping is not supported. Power off the device before installing or removing the SSD to help prevent data loss or device damage.
Q3: Can I use a SATA M.2 SSD?
A3: No. The Fusion Pro 2.5G supports NVMe SSDs only. SATA M.2 SSDs are not supported.
Q4: What is the maximum supported SSD capacity?
A4: The maximum supported SSD capacity is 2 TB.
Q5: What happens when I format the SSD?
A5: Formatting permanently erases all data stored on the SSD. Ensure that any important recordings or data have been backed up before formatting.
Q6: What happens when Loop Recording is enabled?
A6: When available storage space becomes insufficient, new recordings can overwrite older recordings according to the system's recording rules.
Q7: What does Auto Delete Old Recordings do?
A7: It automatically deletes recordings that exceed the configured retention period. When enabled, configure Max Storage Retention to specify how many days recordings are retained.
Q8: What is the difference between Pre-recording Time and Delay-recording Time?
A8: Pre-recording Time saves video from before an event is triggered, while Delay-recording Time continues recording for a configured period after the event ends.
Q9: What does ANR do?
A9: Automatic Network Replenishment uses the camera's SD card as backup storage during a network interruption. When connectivity returns, recordings are synchronized back to the system to fill gaps in the recording history.
Q10: Why is some SSD capacity shown as System Reserved?
A10: System Reserved storage is allocated by the system for system-related functions and is not available for normal recording storage.
