


Contents
Configuration for PPTP/L2TP Server
Configuration for PPTP/L2TP Client Mode
Introduction
This guide demonstrates how to configure a PPTP/L2TP VPN Server on an Omada Gateway in Standalone Mode. PPTP/L2TP VPN allows remote users to securely connect to the local network and access internal resources from a remote location. This guide covers creating the VPN server, setting up user accounts, and verifying a successful VPN connection. This guide will also be presented primarily through L2TP policies, but the configurations are the same.
Requirements
- Omada Gateway
Configuration
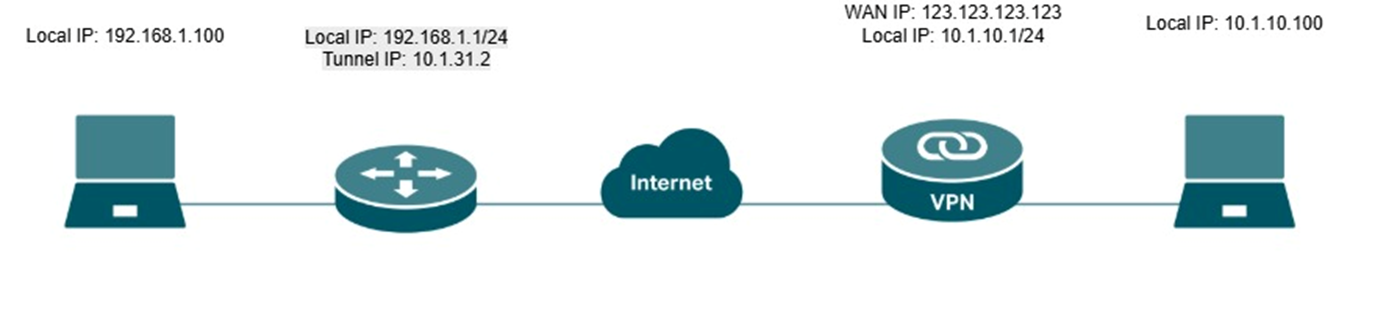
Note: The local LAN subnet and the remote VPN client subnet should not overlap. If both networks use the same IP subnet (for example, 192.168.1.0/24 on both sides), routing conflicts may occur, and clients may be unable to access resources across the VPN tunnel. It is recommended to configure unique IP subnets for the local network and VPN clients before establishing the VPN connection.
Configuration for PPTP/L2TP Server
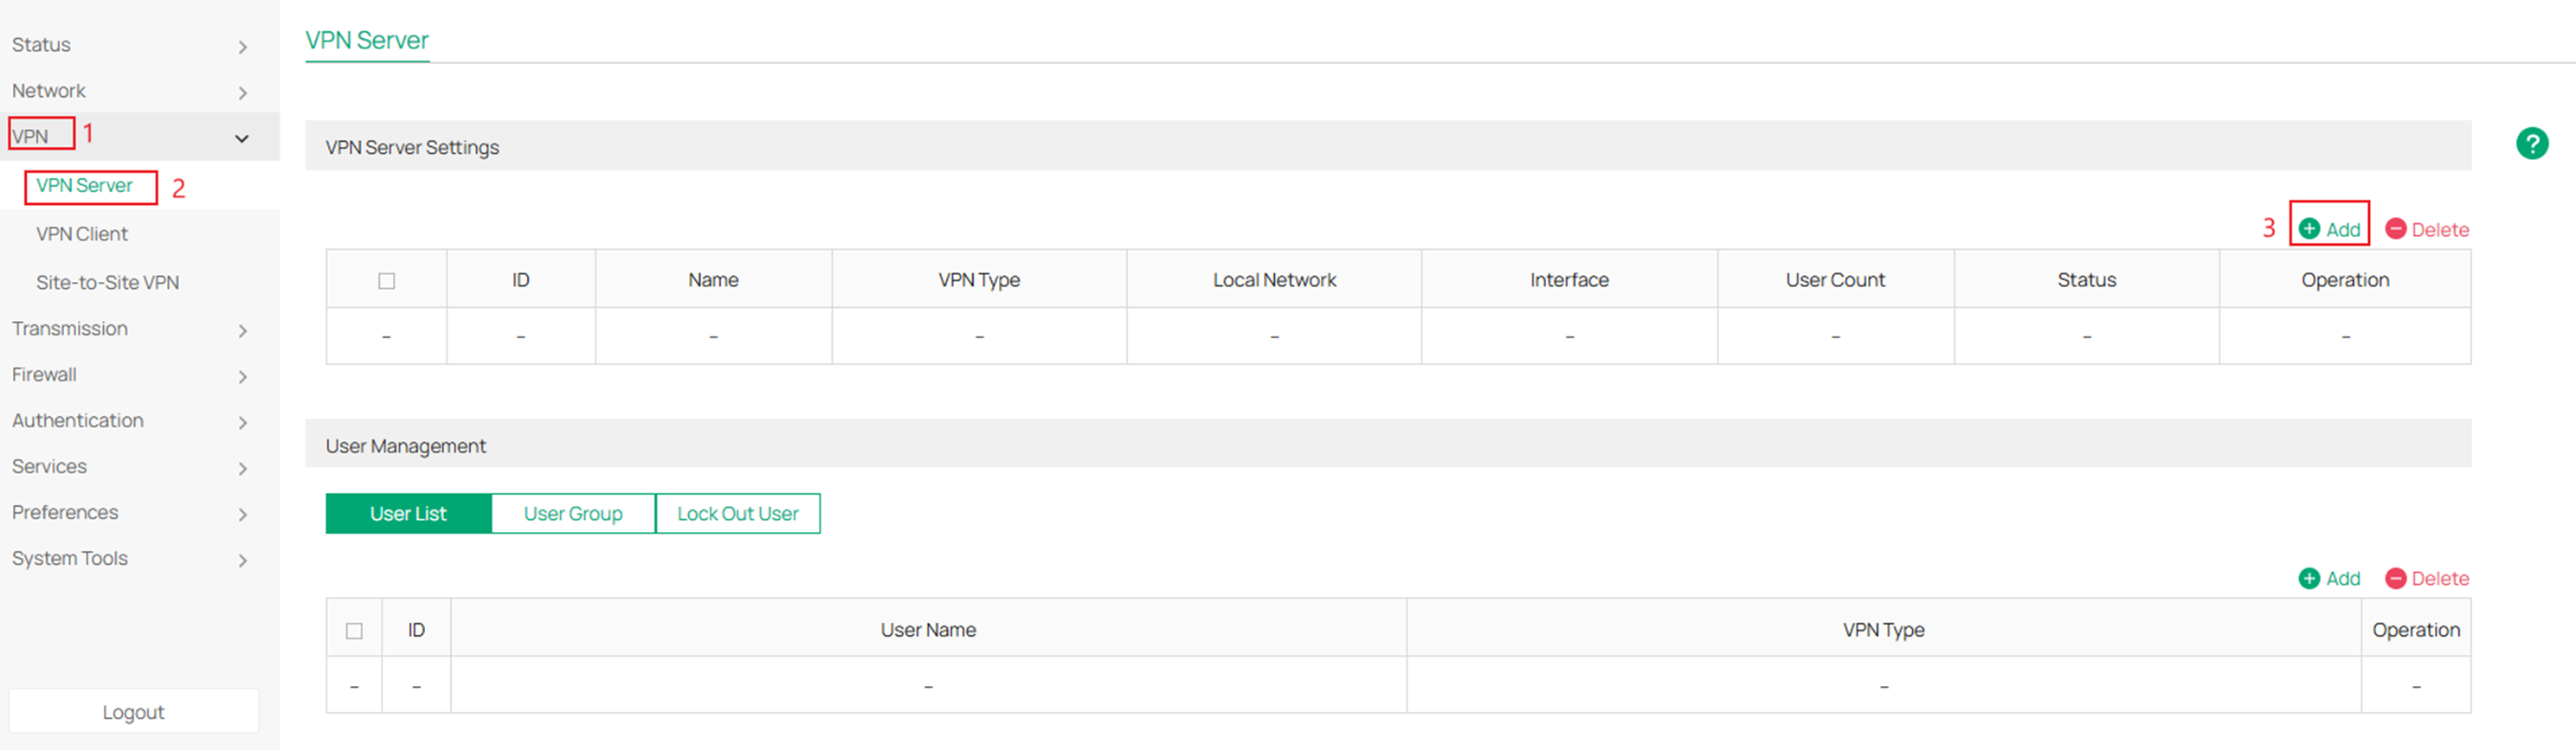
Step 1. Log in to your router and navigate to VPN > VPN Server and click Add.
Step 2. Select L2TP in the VPN Type section and fill in the parameters.
After completion click OK

Interface: Specify the WAN port used for L2TP tunnel.
IPsec Encryption: Specify whether to enable the encryption for the tunnel. If enabled, the L2TP tunnel will be encrypted by IPsec (L2TP over IPsec). If you choose Auto, the L2TP server will determine whether to encrypt the tunnel according to the client’s encryption settings.
Authentication Mode: Specify the authentication method used by the L2TP server.
Local: Use a built-in authentication server to authenticate when the tunnel is created. If you don’t have an additional external server, you can choose local authentication.
LDAP: Use an external LDAP server to authenticate when the tunnel is created.
LDAP Profile: Specify an LDAP entry that you have configured in Authentication > LDAP.
Pre-shared Key: When the IPsec Encryption is configured as Encrypted or Auto, specify the Pre-shared Key for IKE authentication.
VPN User: Select a user associated to the VPN server. Click Add User to add a new user.
Local Network Type: Select the type to set the local network for VPN Policy, there are two types: Network and Custom IP.
Local Networks: Select the local networks to apply the VPN Policy. The VPN Policy will only apply to the selected or filled local network.
IP Pool Type: Specify the format of the IP pool.
IP Pool: If you select IP Address/Mask type, enter the IP Address and subnet Mask to decide the range of VPN IP pool. If you select IP Address Range type, enter the start and end IP addresses of the VPN IP pool.
DNS Server: When enabled, the system will automatically generate the DNS server information and send it to the client. By default, the device's default LAN gateway (IPsec, L2TP, PPTP) or the virtual IP assigned to the current server by IP Pool (OpenVPN, SSL VPN, WireGuard) will be used as the DNS address.
Primary/ Secondary DNS Server: Specify the DNS address to be assigned to the VPN client (eg 8.8.8.8). You can enter the router's LAN IP.
Step 3. Next create a user for the L2TP VPN Server.
Click Add in the User Management section and fill in the parameters.
Click OK when complete.
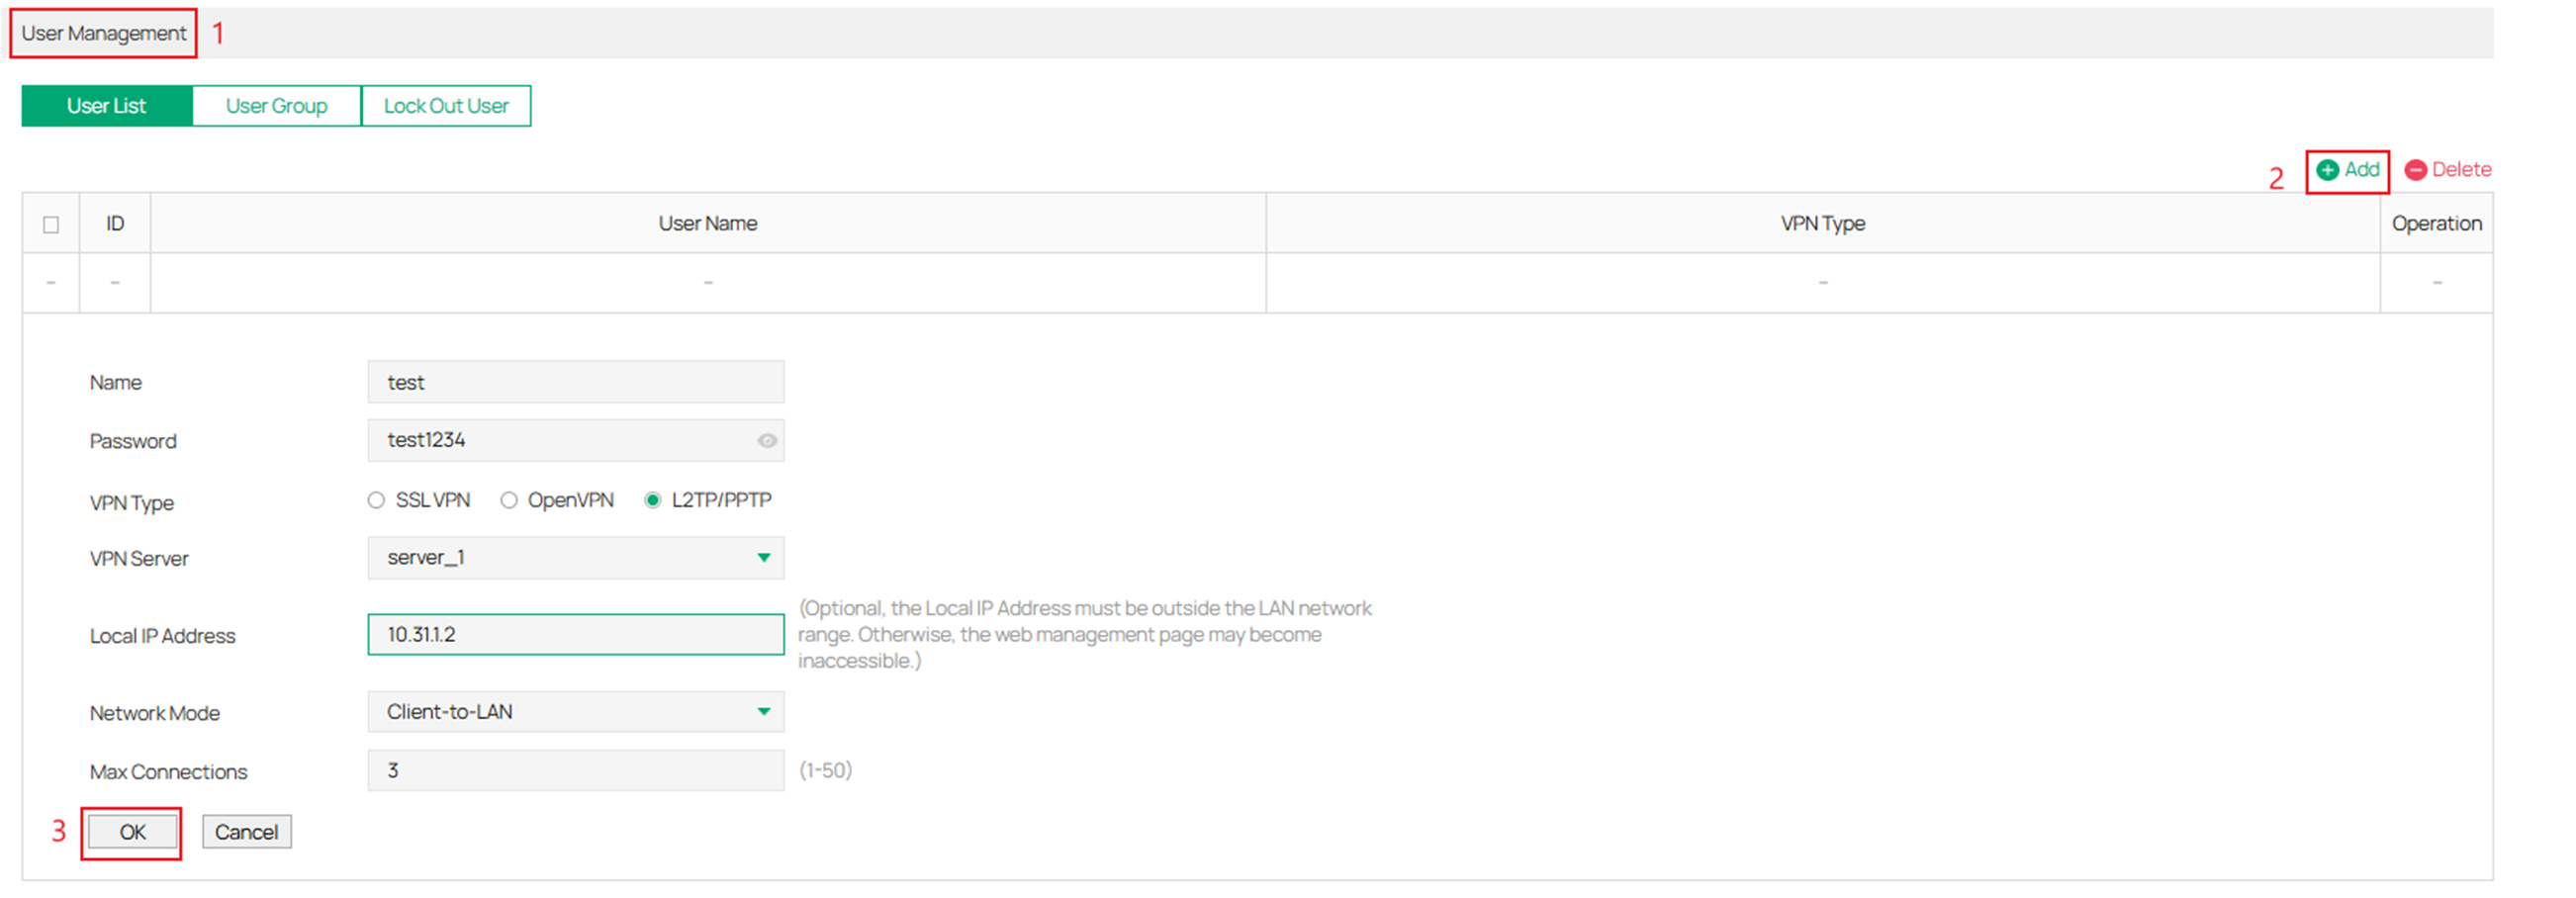
Name: Specify the account name used for the VPN tunnel.
Password: Specify the account password used for the VPN tunnel. Your VPN clients will use the account name and password for authentication.
VPN Server: Select the L2TP/PPTP server to which the user belongs. Only the server with the username and password authentication option enabled can be selected.
Local IP Address: Specify the local virtual IP address for the VPN server. Please avoid using the IP address in the DHCP range, which may cause IP confliction, you can enter the LAN IP of the router. To find out the DHCP Range, go to Network > LAN > Network List and view the information of the desired network.
Network Mode: Specify the network mode. There are two modes:
Client-to-LAN: Select this option when the L2TP/PPTP client is a single host. It’s commonly used to access the internal service from outside.
LAN-to-LAN: Select this option when the L2TP/PPTP client is a VPN gateway. The tunneling request is always initiated by a device. It’s commonly used for access between two offices.
Max Connections: Specify the maximum number of connections that the tunnel can support. Wihen Client-to-LAN network mode is enabled, it can be used to limit the number of devices connected at the same time.
Remote Subnet: Specify a remote network. (This is the IP address range of the LAN on the remote peer of the L2TP/PPTP tunnel.) It’s the combination of IP address and subnet mask. It takes effect when LAN-to-LAN network mode is enabled.
Configuration for PPTP/L2TP Client Mode
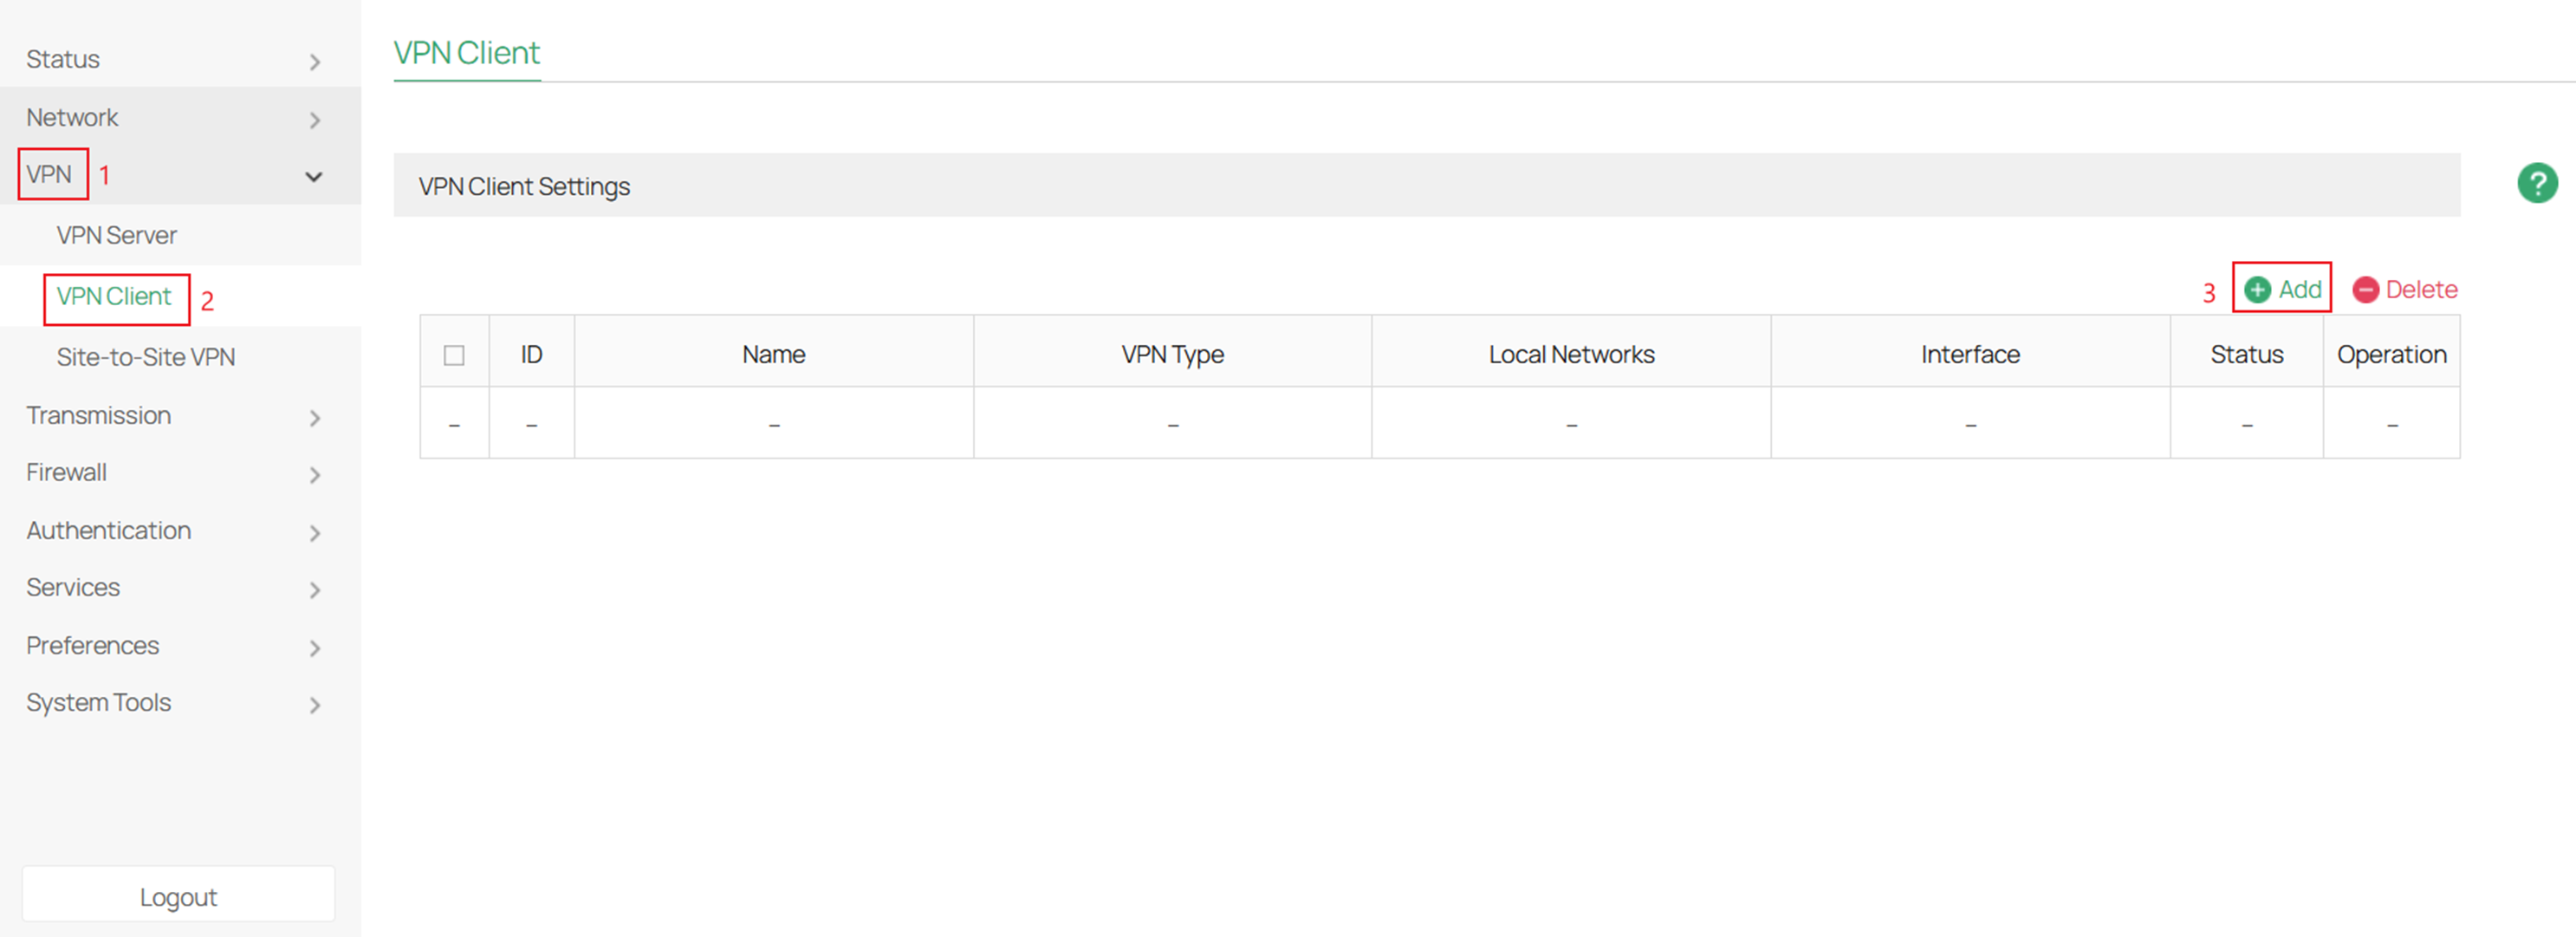
Step 1. Log into your router and navigate to VPN > VPN Client and click Add.
Step 2. For VPN Type click L2TP and fill in the parameters.
Click OK once complete.
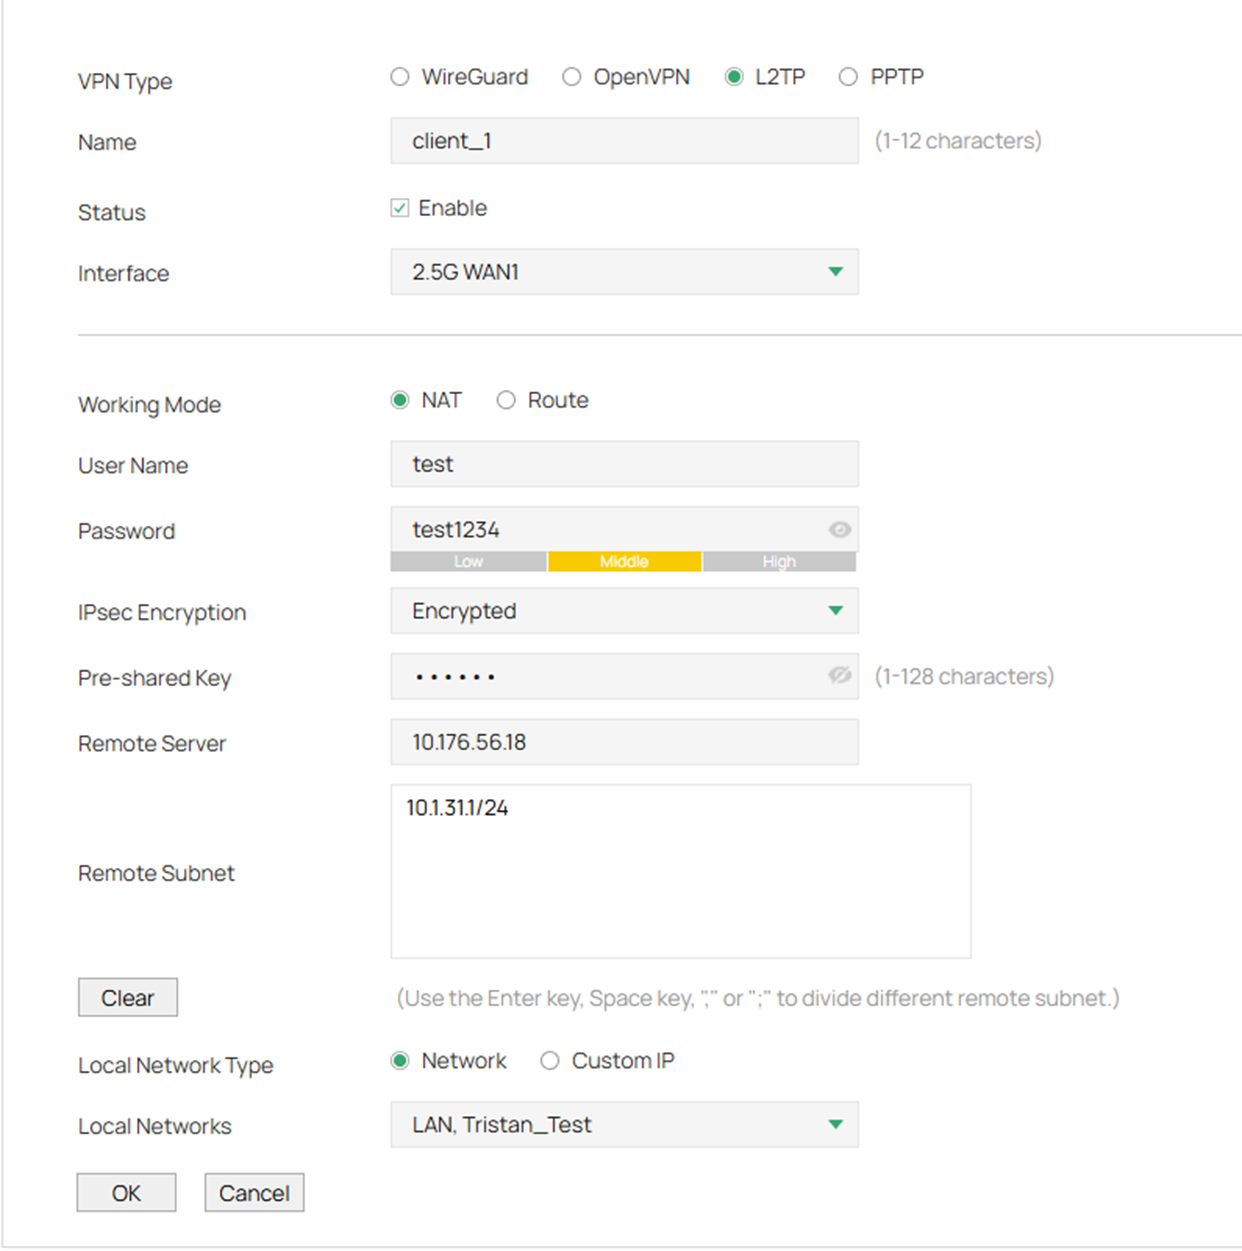
Interface: Specify the WAN port used for L2TP tunnel.
Working Mode: Specify the Working Mode as NAT or Routing.
NAT: NAT (Network Address Translation) mode allows the router to translate source IP address of L2TP packets to its WAN IP when forwarding L2TP packets. This working mode is recommended when the network mode is configured as Client-to-LAN.
Route: Route mode allows the router to forward L2TP packets via routing protocol.
User Name: Specify the account name of L2TP tunnel. It should be configured identically on server and client.
Password: Specify the password of L2TP tunnel. It should be configured identically on server and client.
IPsec Encryption: Specify whether to enable the encryption for the tunnel. If enabled, the L2TP tunnel will be encrypted by IPSec (L2TP over IPSec). Please follow the configuration of L2TP Server.
Pre-shared Key: When the IPsec Encryption is configured as Encrypted, specify the Pre-shared Key for IKE authentication.
Remote Server: Specify the IP address or domain name of L2TP server.
Remote Subnet: Specify the remote network. It’s always the IP address range of LAN on the remote peer of the VPN tunnel. It’s the combination of IP Address and subnet mask. Traffic to the remote network will be forwarded via L2TP tunnel.
Local Network Type: Select the type to set the local network for VPN Policy, there are two types: Network and Custom IP
Local Networks: Select the local networks to apply the VPN Policy. The VPN Policy will only apply to the selected or filled local network.
Note: To make it a full-tunnel make the Remote Subnet 0.0.0.0/0. If you specify only a certain subnet it will make it a split tunnel.
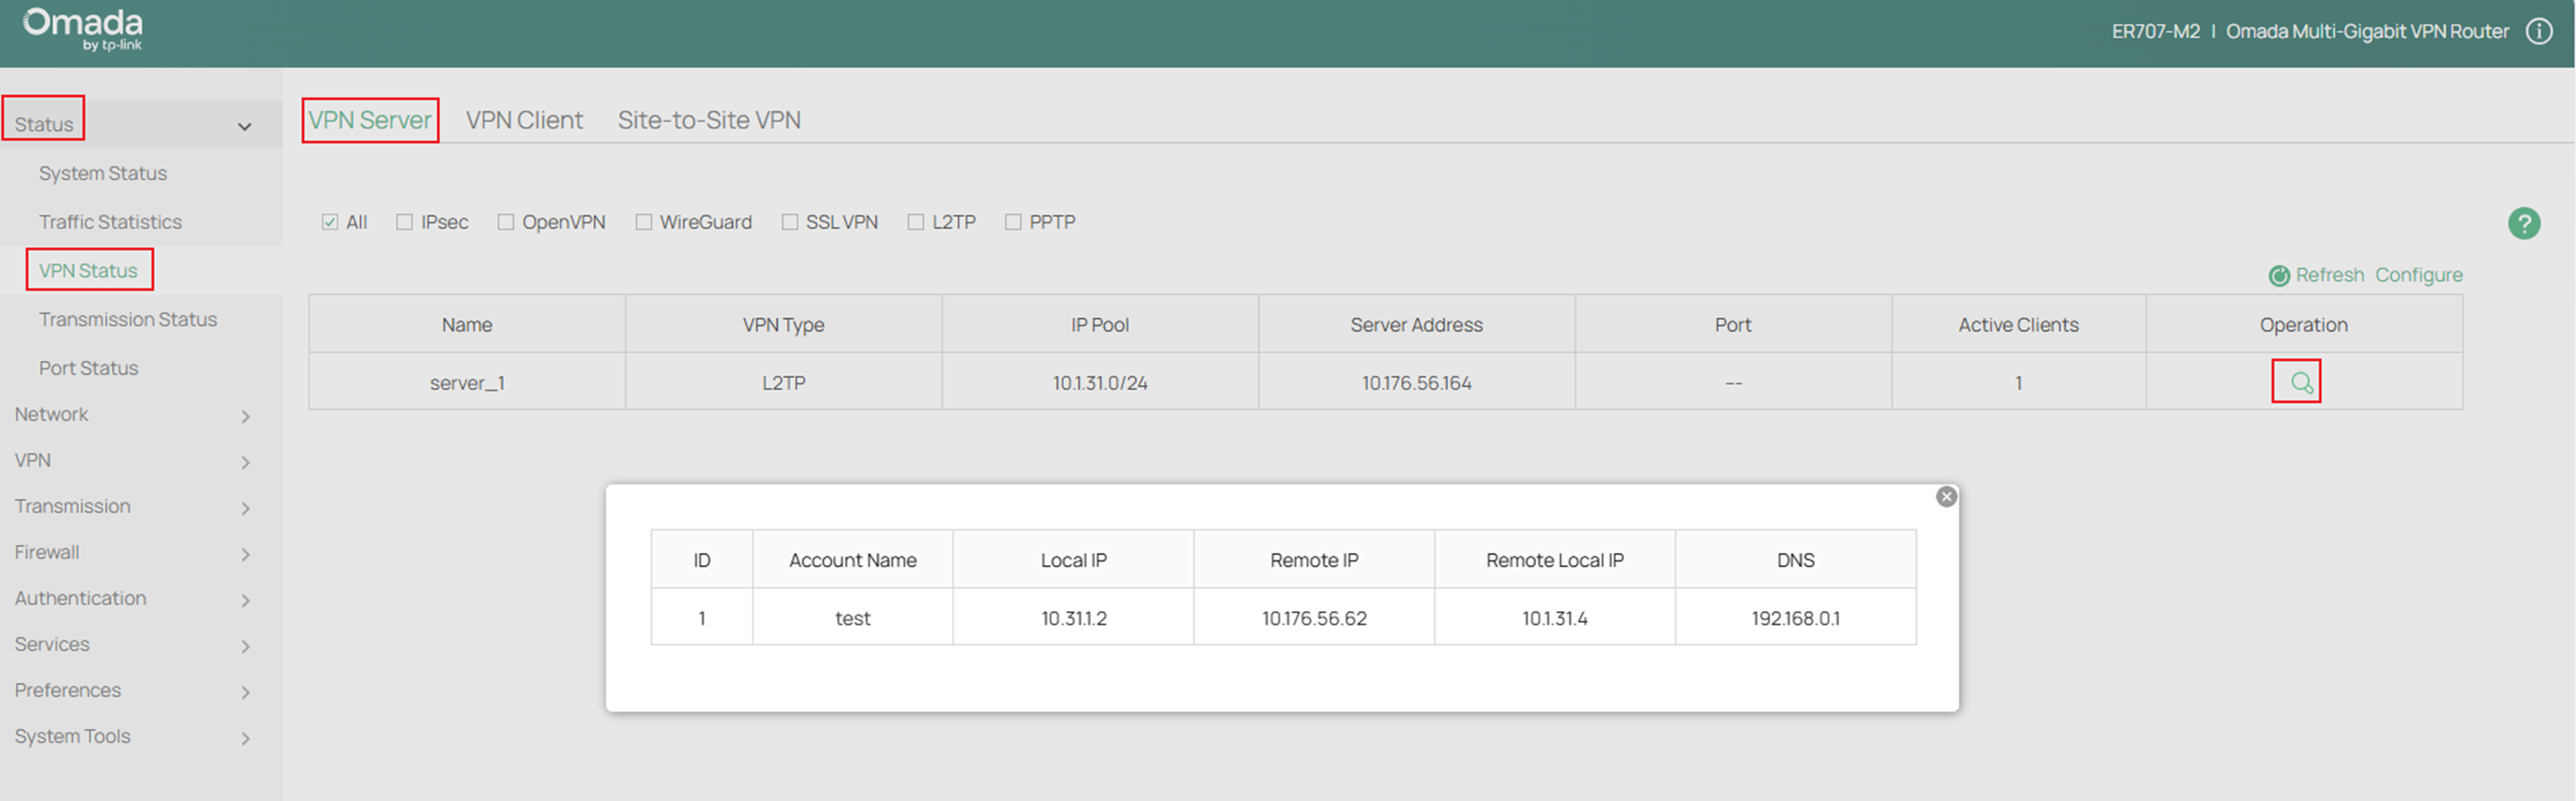
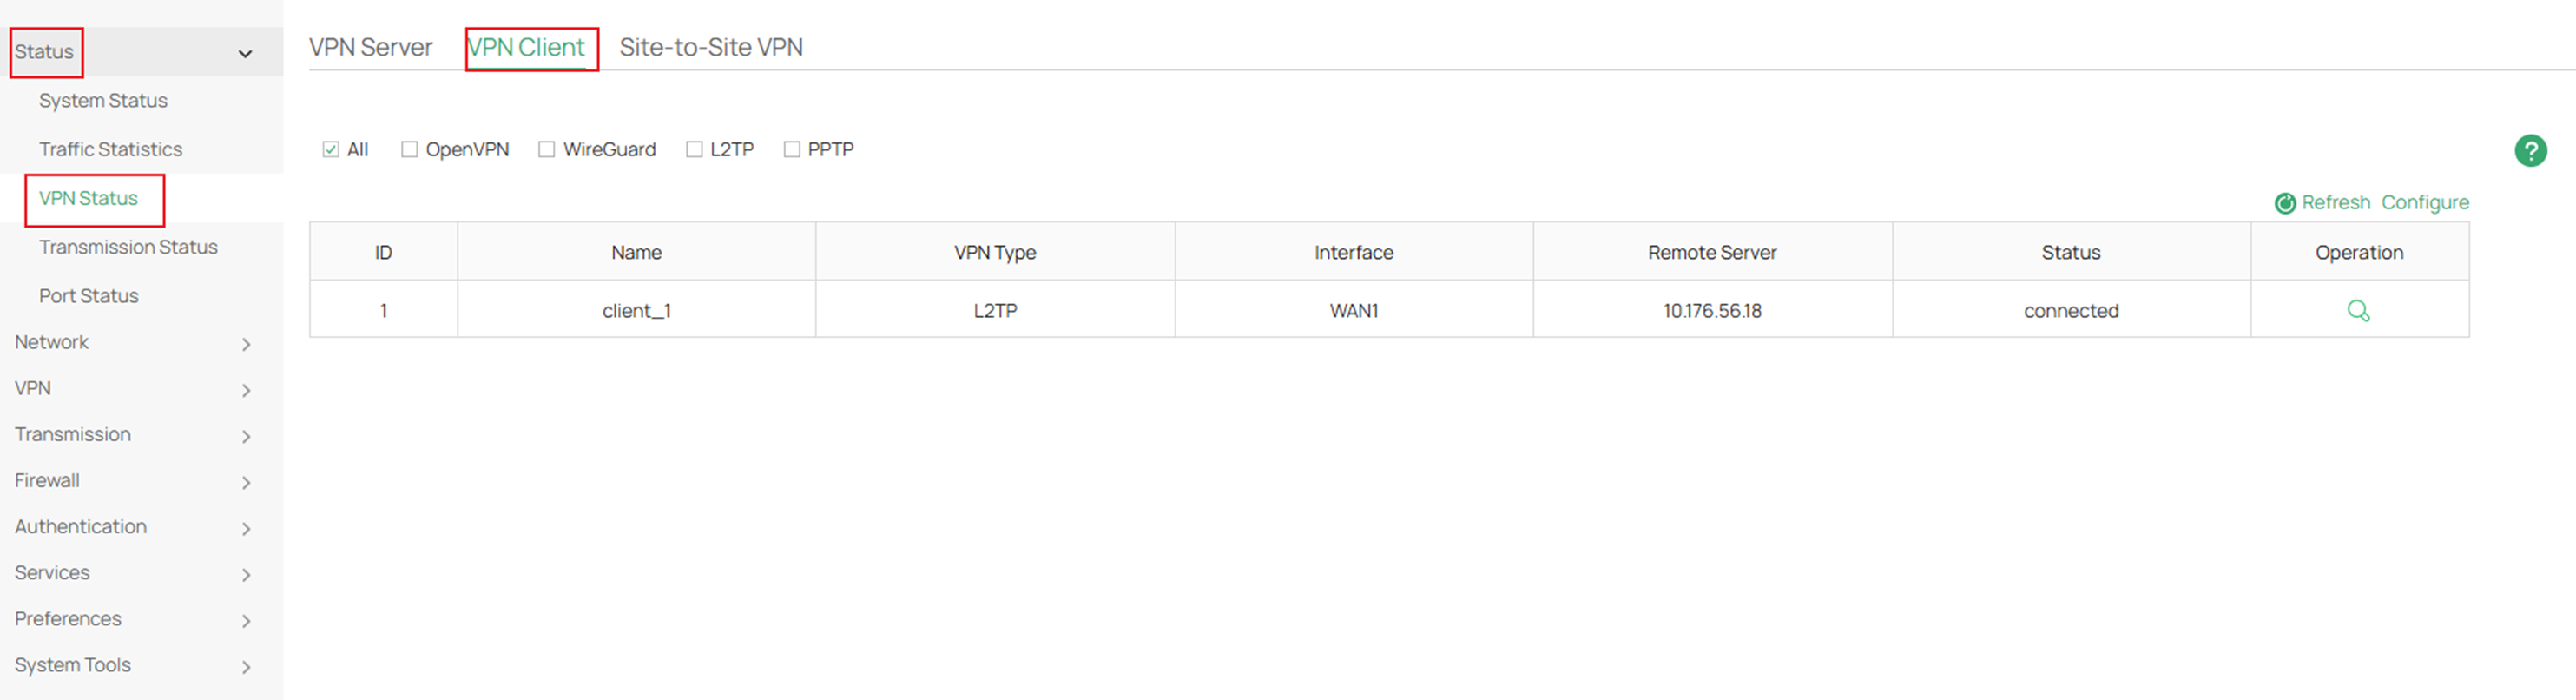
Verification
If you navigate to Status > VPN Status you will be able to see the live tunnels.
VPN Server
VPN Client
Conclusion
By following this guide, you have successfully configured a PPTP/L2TP VPN Server and a PPTP/L2TP VPN Client on an Omada Gateway in standalone mode and created VPN user accounts for remote access. Remote users can now securely connect to the network and access permitted resources through the VPN tunnel.
Get to know more details of each function and configuration please go to Download Center to download the manual of your product.
QA
Q1: What should I do if fail to connect to the server.
A1: See if the router has a public IP address on its WAN port. If it does not, put the modem in bridge mode.
