


Comment configurer un serveur VPN SSL sur une passerelle Omada en mode contrôleur


Sommaire
Introduction
Le VPN SSL (Secure Sockets Layer Virtual Private Network) permet aux utilisateurs distants d’accéder de manière sécurisée aux ressources d’un réseau privé via Internet grâce à des connexions chiffrées. Avec une passerelle Omada, vous pouvez configurer l’authentification des utilisateurs et définir des règles de contrôle d’accès afin de limiter les ressources réseau auxquelles chaque client VPN peut accéder. Cette solution fournit une connectivité distante sécurisée tout en contribuant à protéger les ressources internes sensibles. Cet article explique comment configurer un serveur VPN SSL sur une passerelle Omada et connecter des clients distants de manière sécurisée.
Prérequis
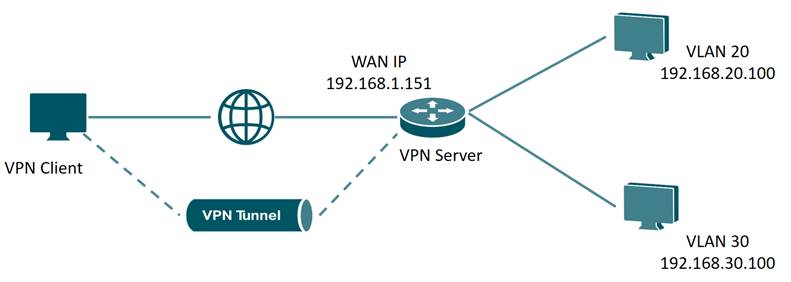
Selon la topologie réseau suivante, créez trois comptes avec différents niveaux d’autorisation sur le serveur VPN SSL afin de répondre à différents besoins.
- Compte 1 : le client VPN utilise le serveur VPN comme proxy pour accéder à Internet ;
- Compte 2 : le client VPN peut uniquement accéder au VLAN 20, mais ne peut pas accéder au VLAN 30 ;
- Compte 3 : le client VPN et les appareils situés derrière le serveur peuvent uniquement communiquer via le protocole ICMP.
Configuration
Étape 1. Créer le serveur VPN SSL.
Accédez à Configuration réseau > VPN > Serveur VPN, puis cliquez sur Créer un nouveau serveur VPN. Sélectionnez VPN SSL. Ici, nous nommons le serveur SSL_VPN_Server_1, configurons l’adresse IP de début sur 10.10.10.10 et l’adresse IP de fin sur 10.10.10.100, puis cliquez sur Appliquer pour enregistrer les paramètres. Vous pouvez définir ces valeurs selon votre réseau.
Assurez-vous que la plage du pool d’adresses IP ne chevauche aucune des interfaces LAN créées.
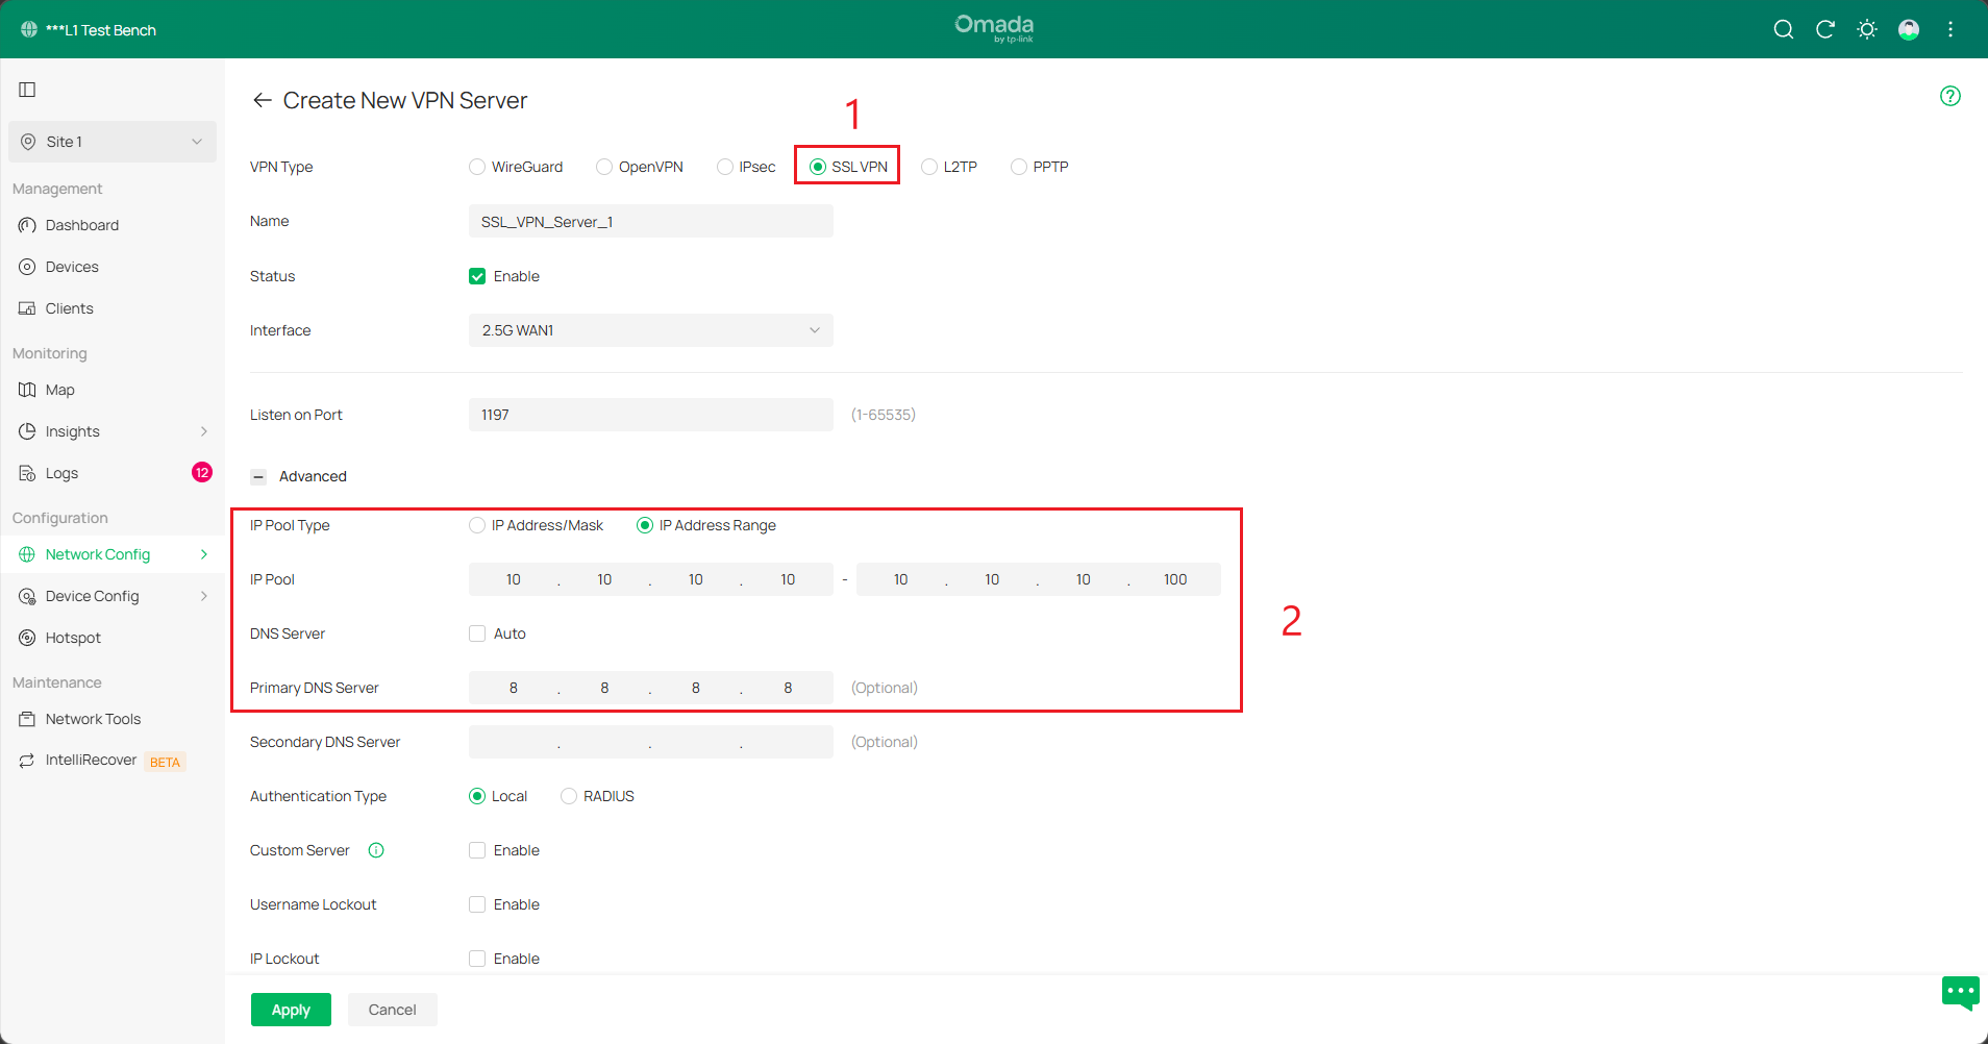
Le DNS principal est une préférence. Dans cet exemple, nous utilisons le serveur DNS public de Google.
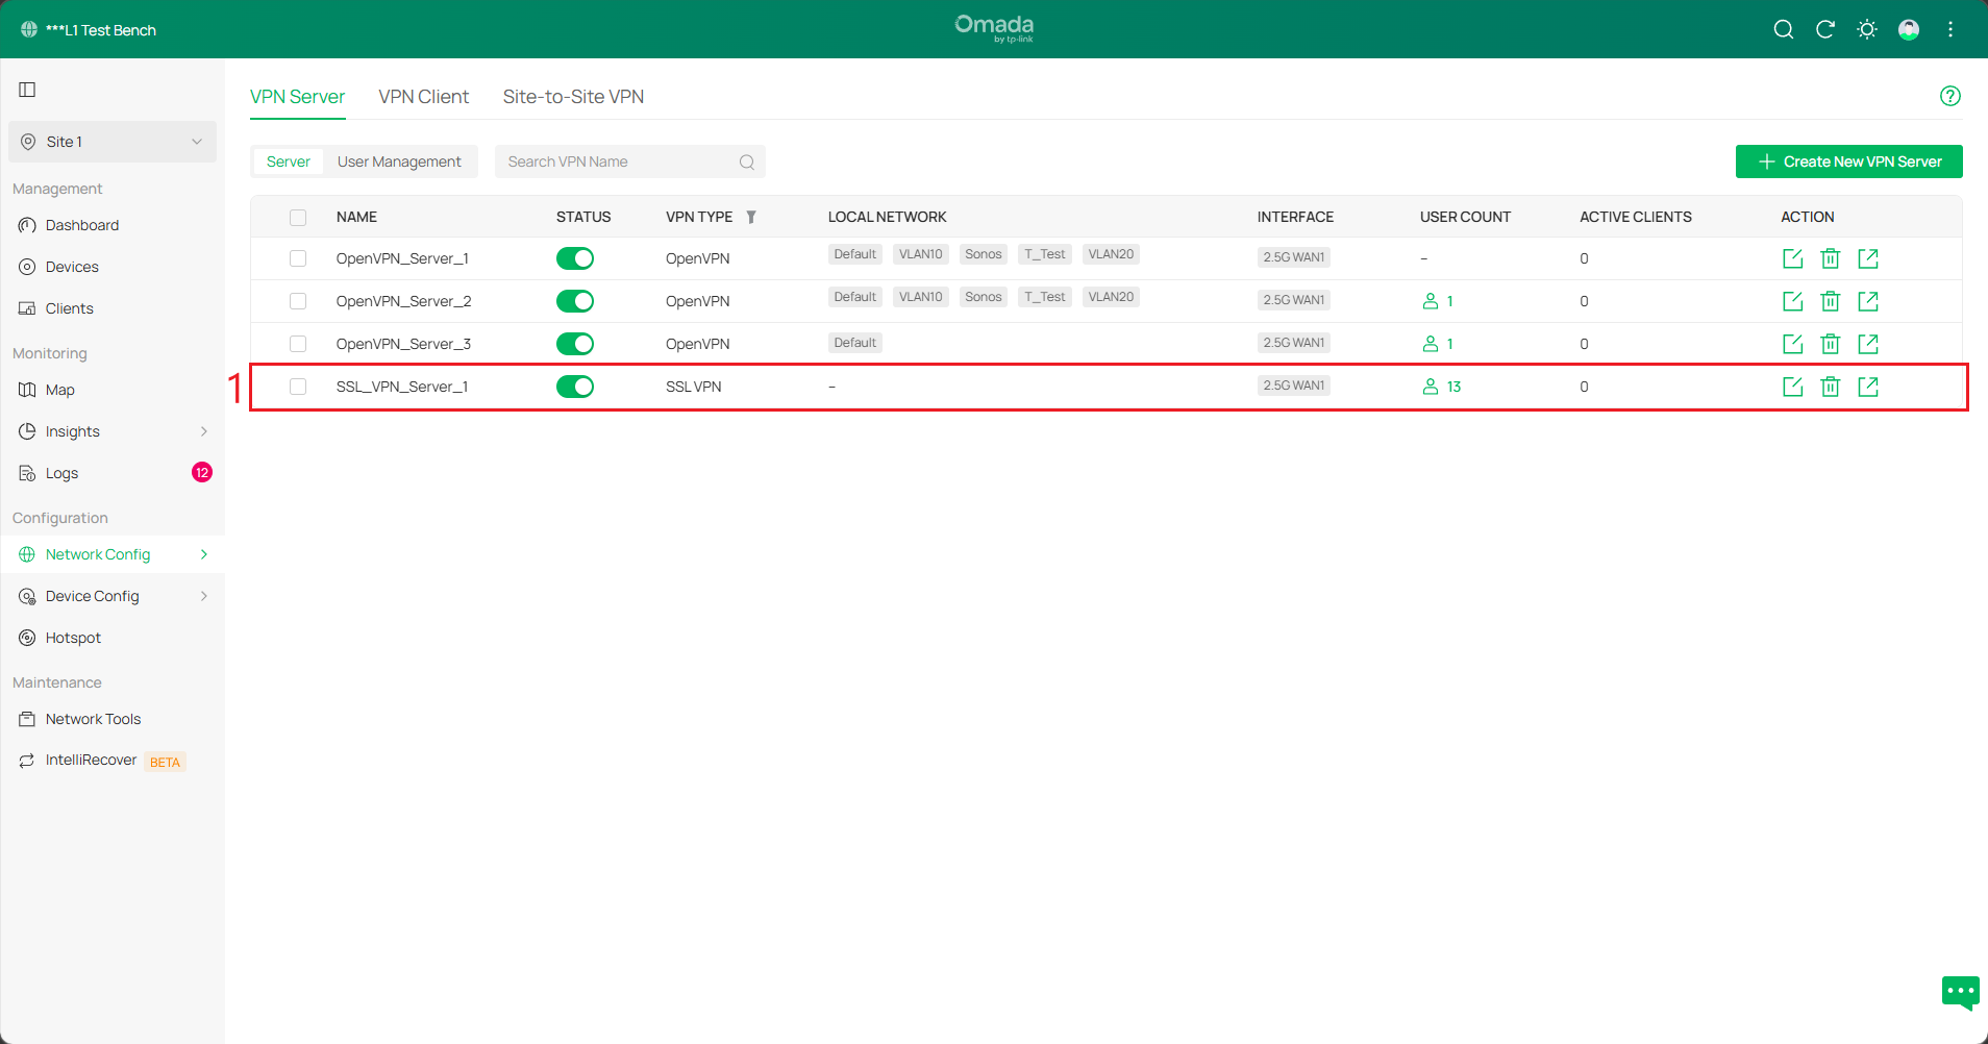
Étape 2. Activer le serveur VPN SSL. Accédez à Configuration réseau > Serveur VPN, puis cochez Activer.
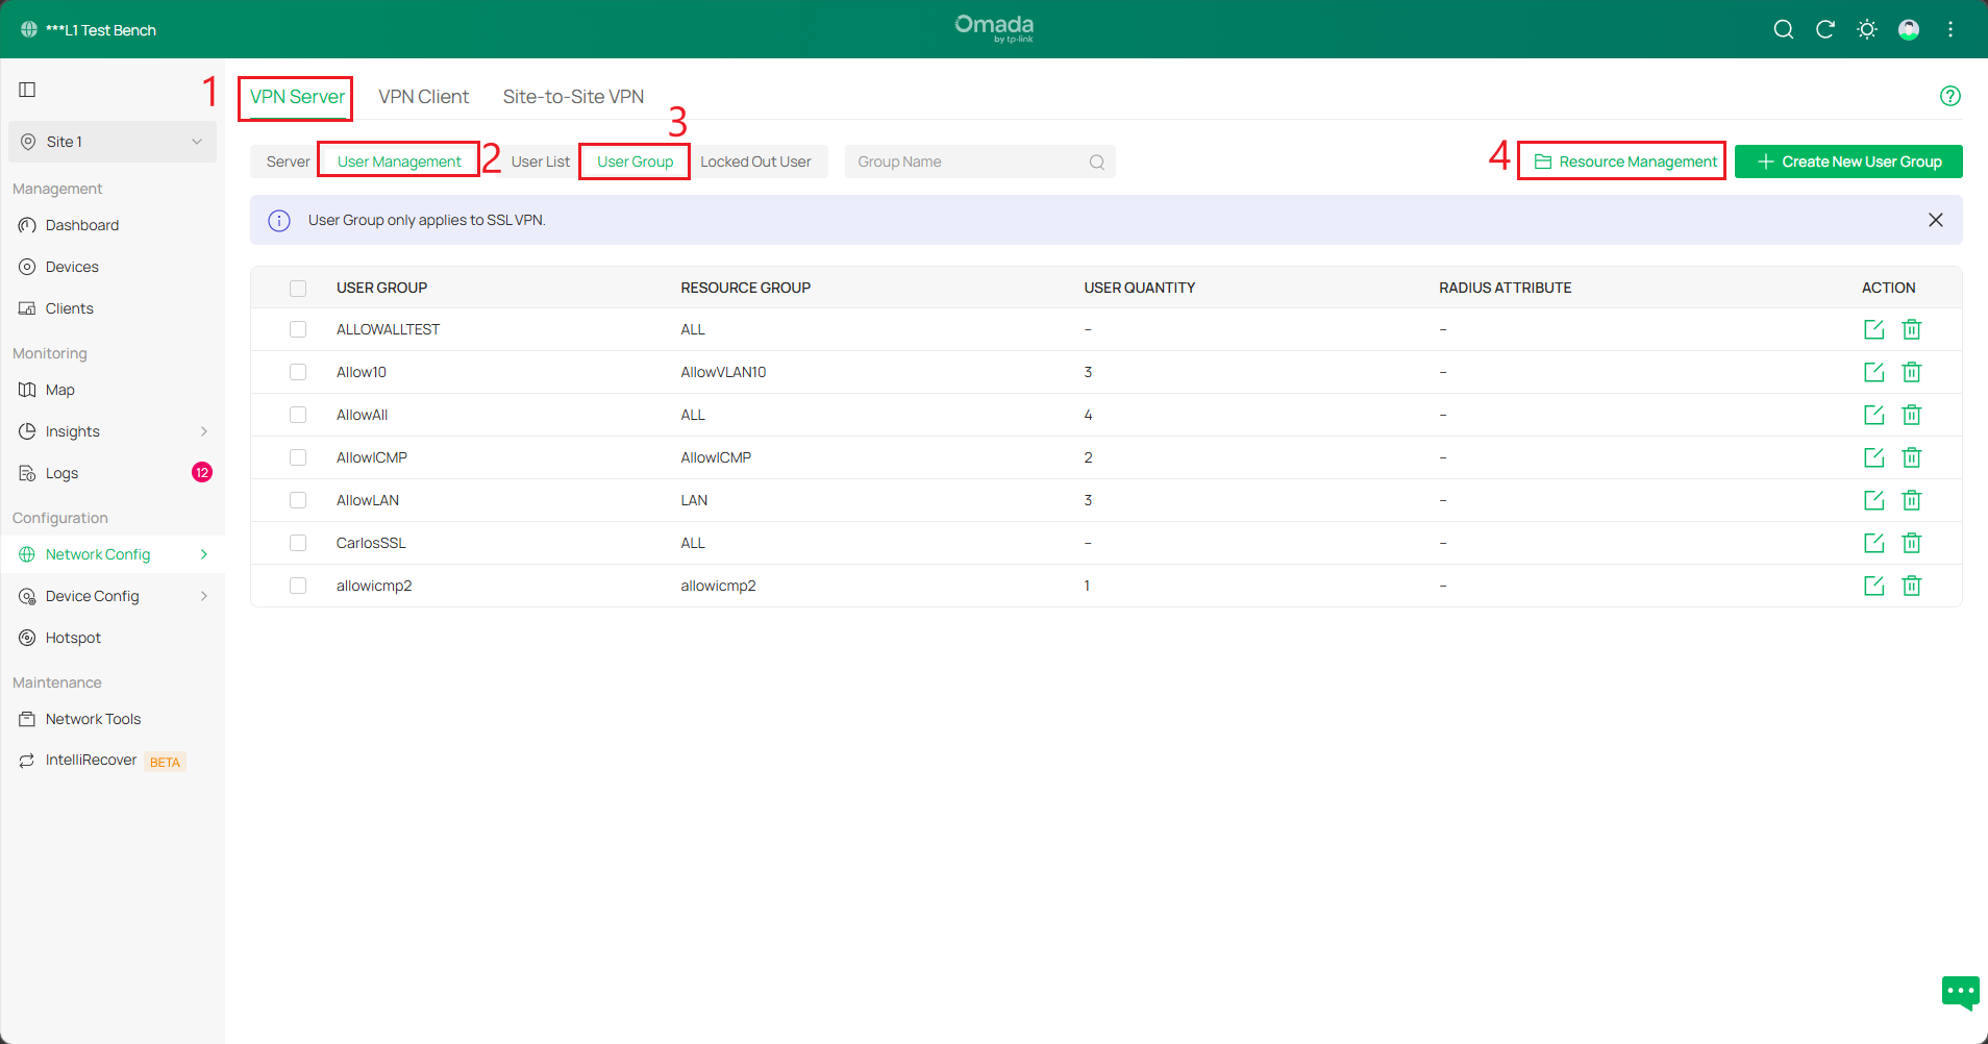
Étape 3. Créer les ressources de tunnel. Accédez à VPN > Gestion des utilisateurs > Groupe d’utilisateurs > Gestion des ressources > Ressources de tunnel, puis cliquez sur Créer une nouvelle ressource de tunnel afin de créer les deux groupes de ressources suivants. Dans la fenêtre contextuelle, Autoriser VLAN20 ; Autoriser ICMP utilise le protocole ICMP pour limiter les ressources.
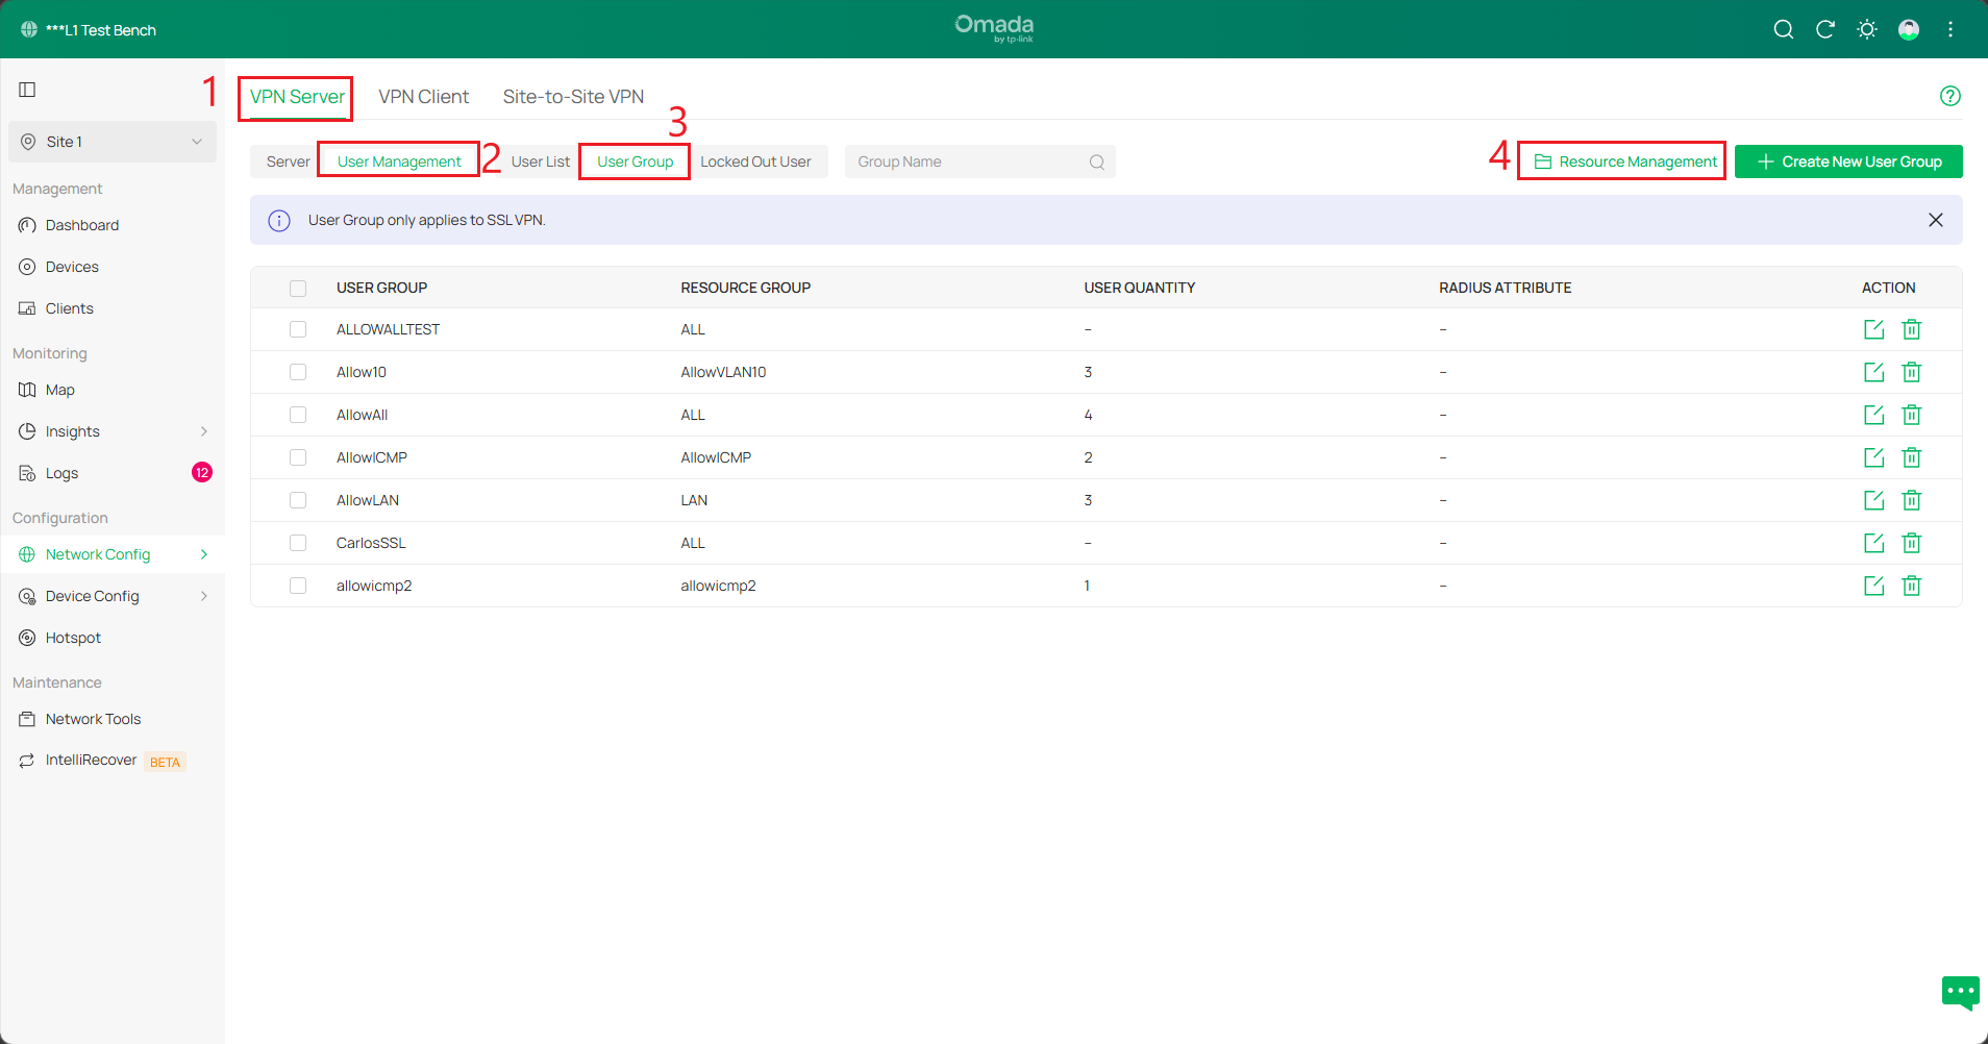
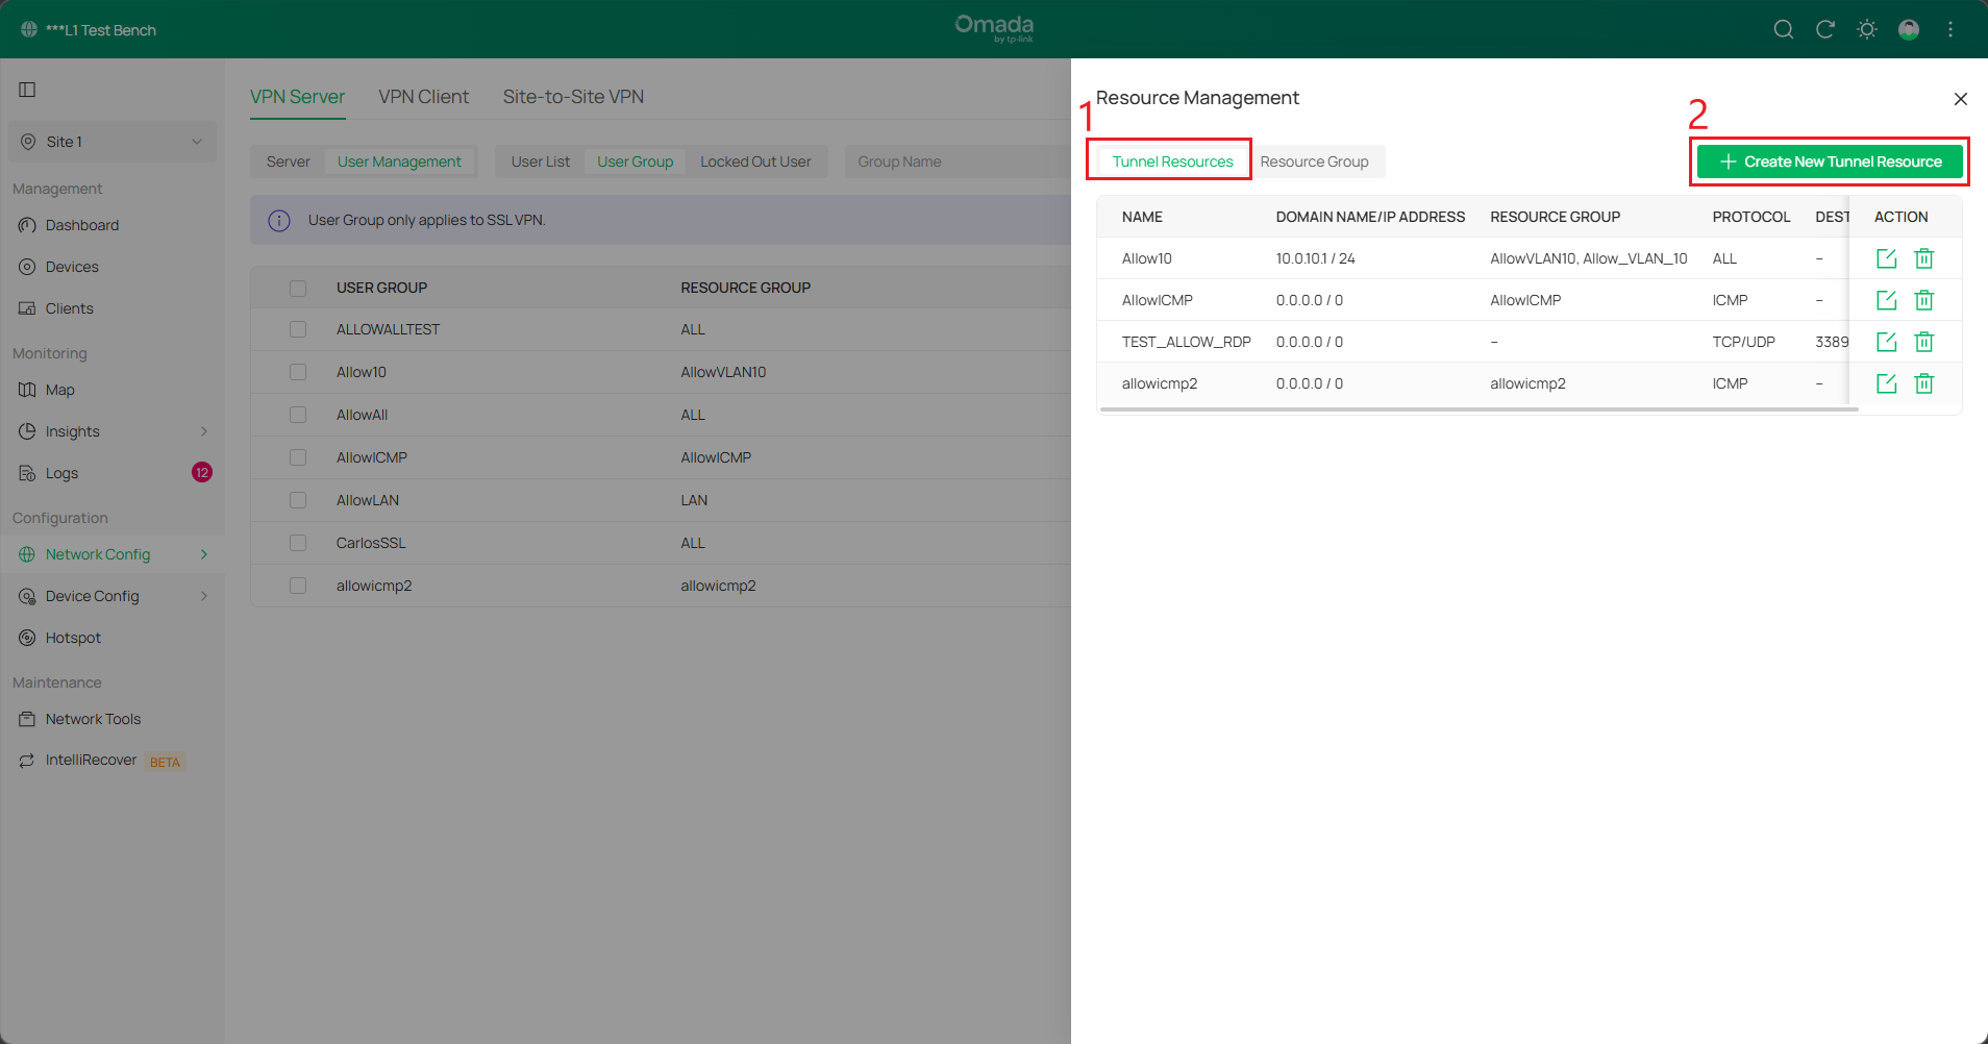
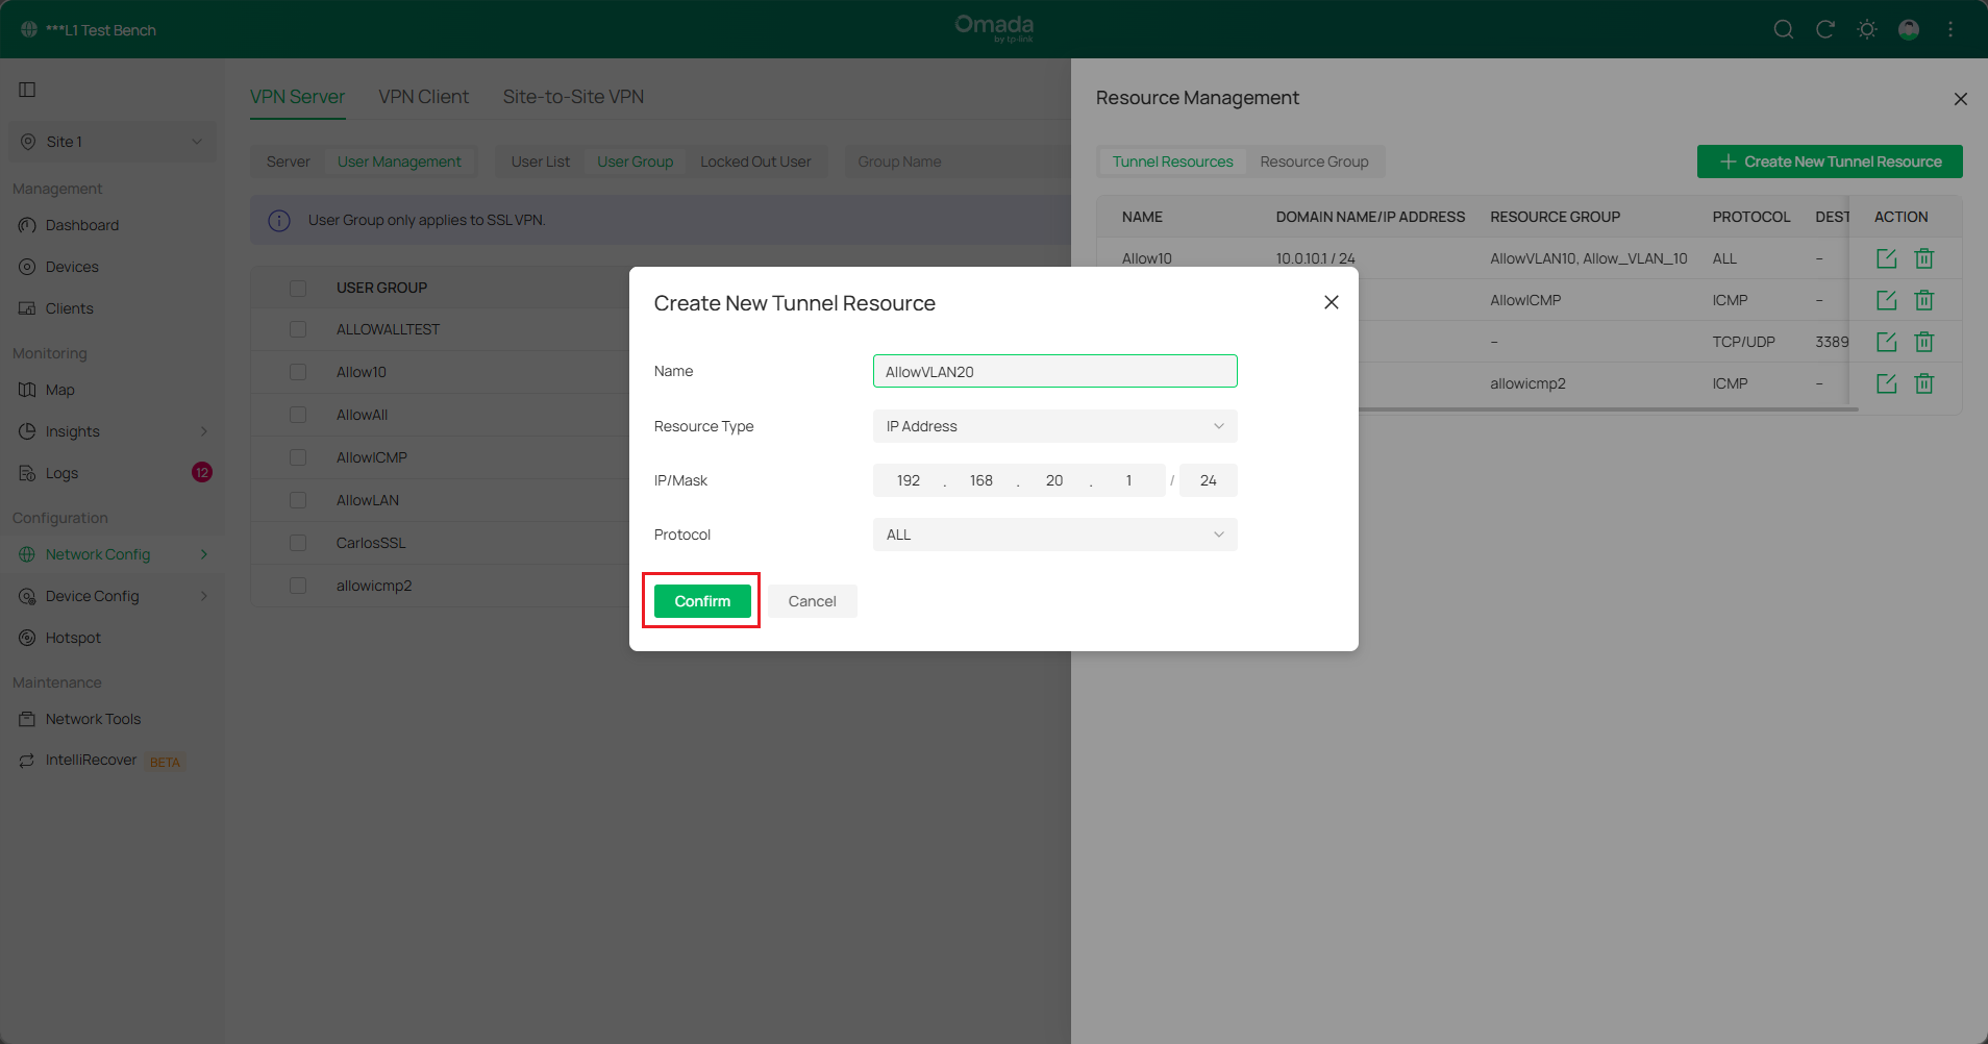
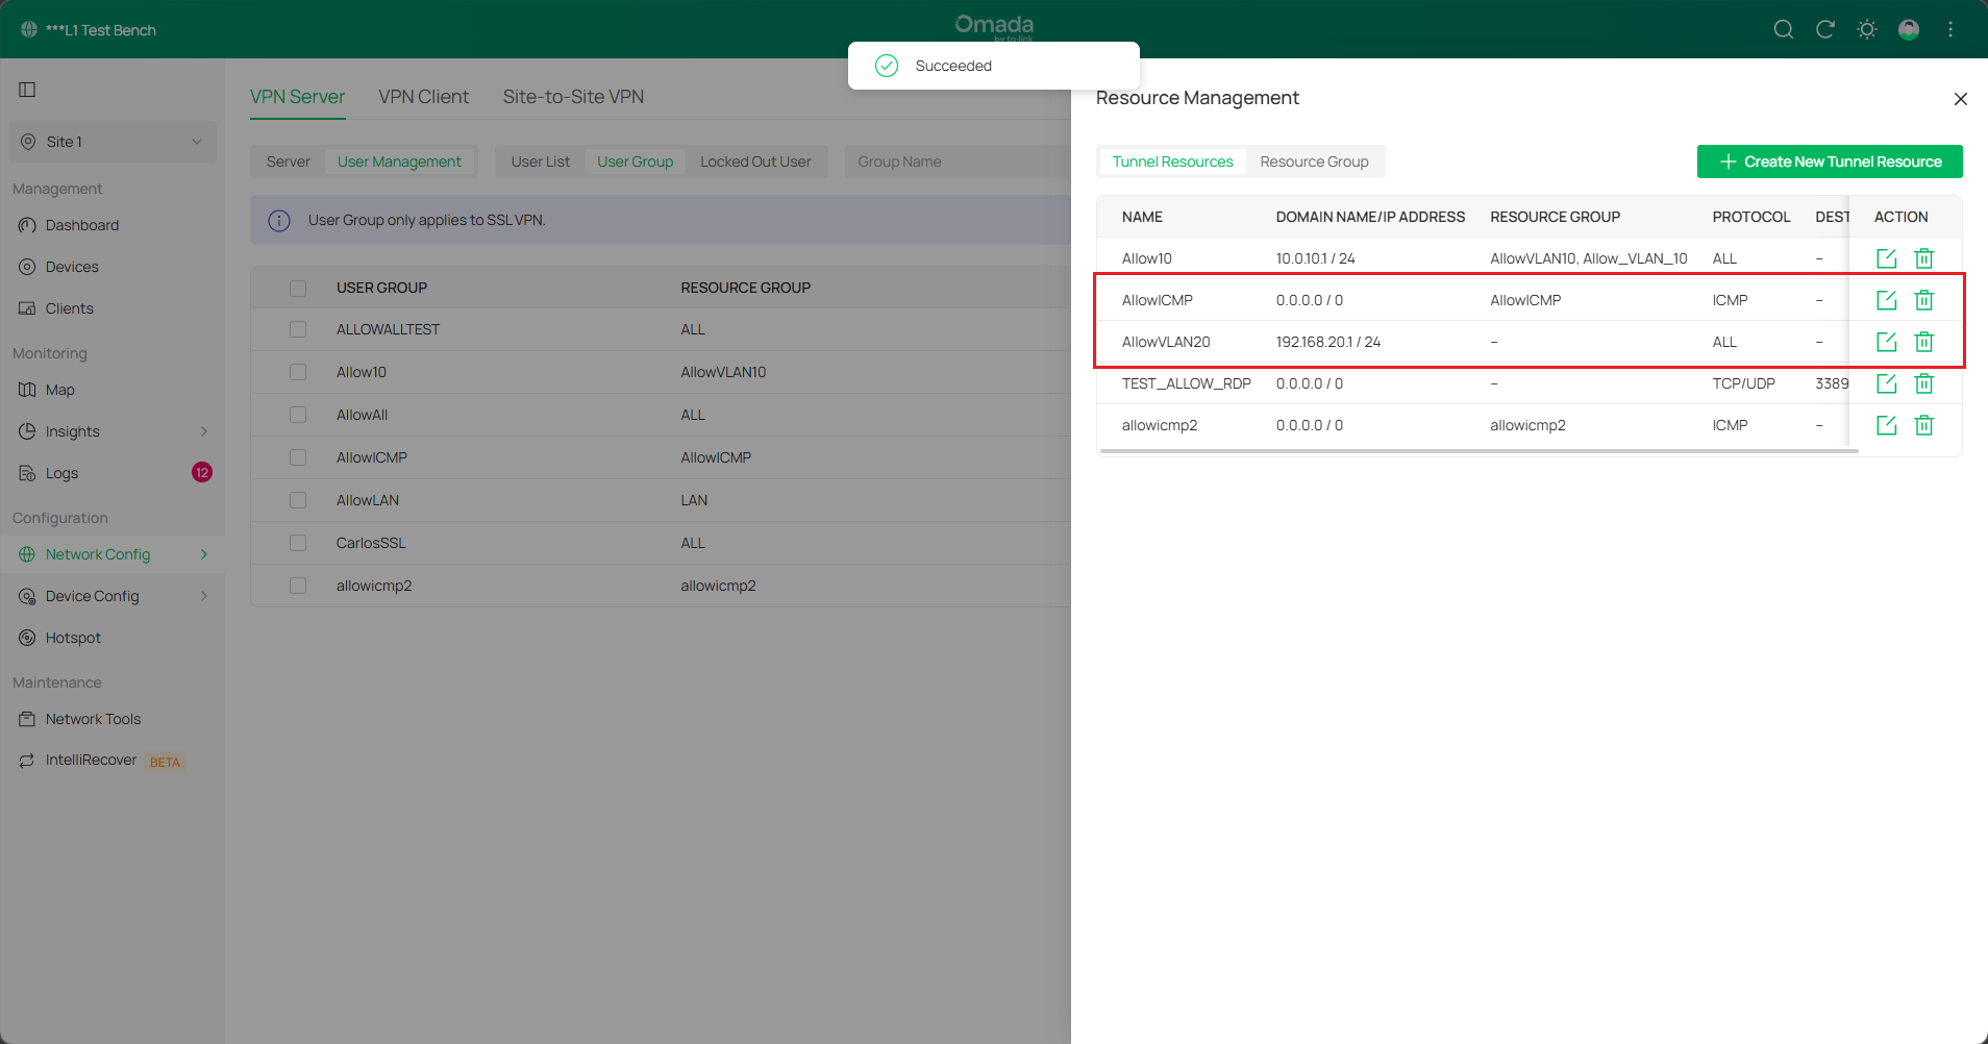
Étape 4. Accédez à VPN > Gestion des utilisateurs > Groupe d’utilisateurs > Gestion des ressources > Groupe de ressources, puis cliquez sur Créer un nouveau groupe de ressources afin d’appliquer les deux ressources de tunnel créées à l’étape 3 à deux groupes de ressources différents.
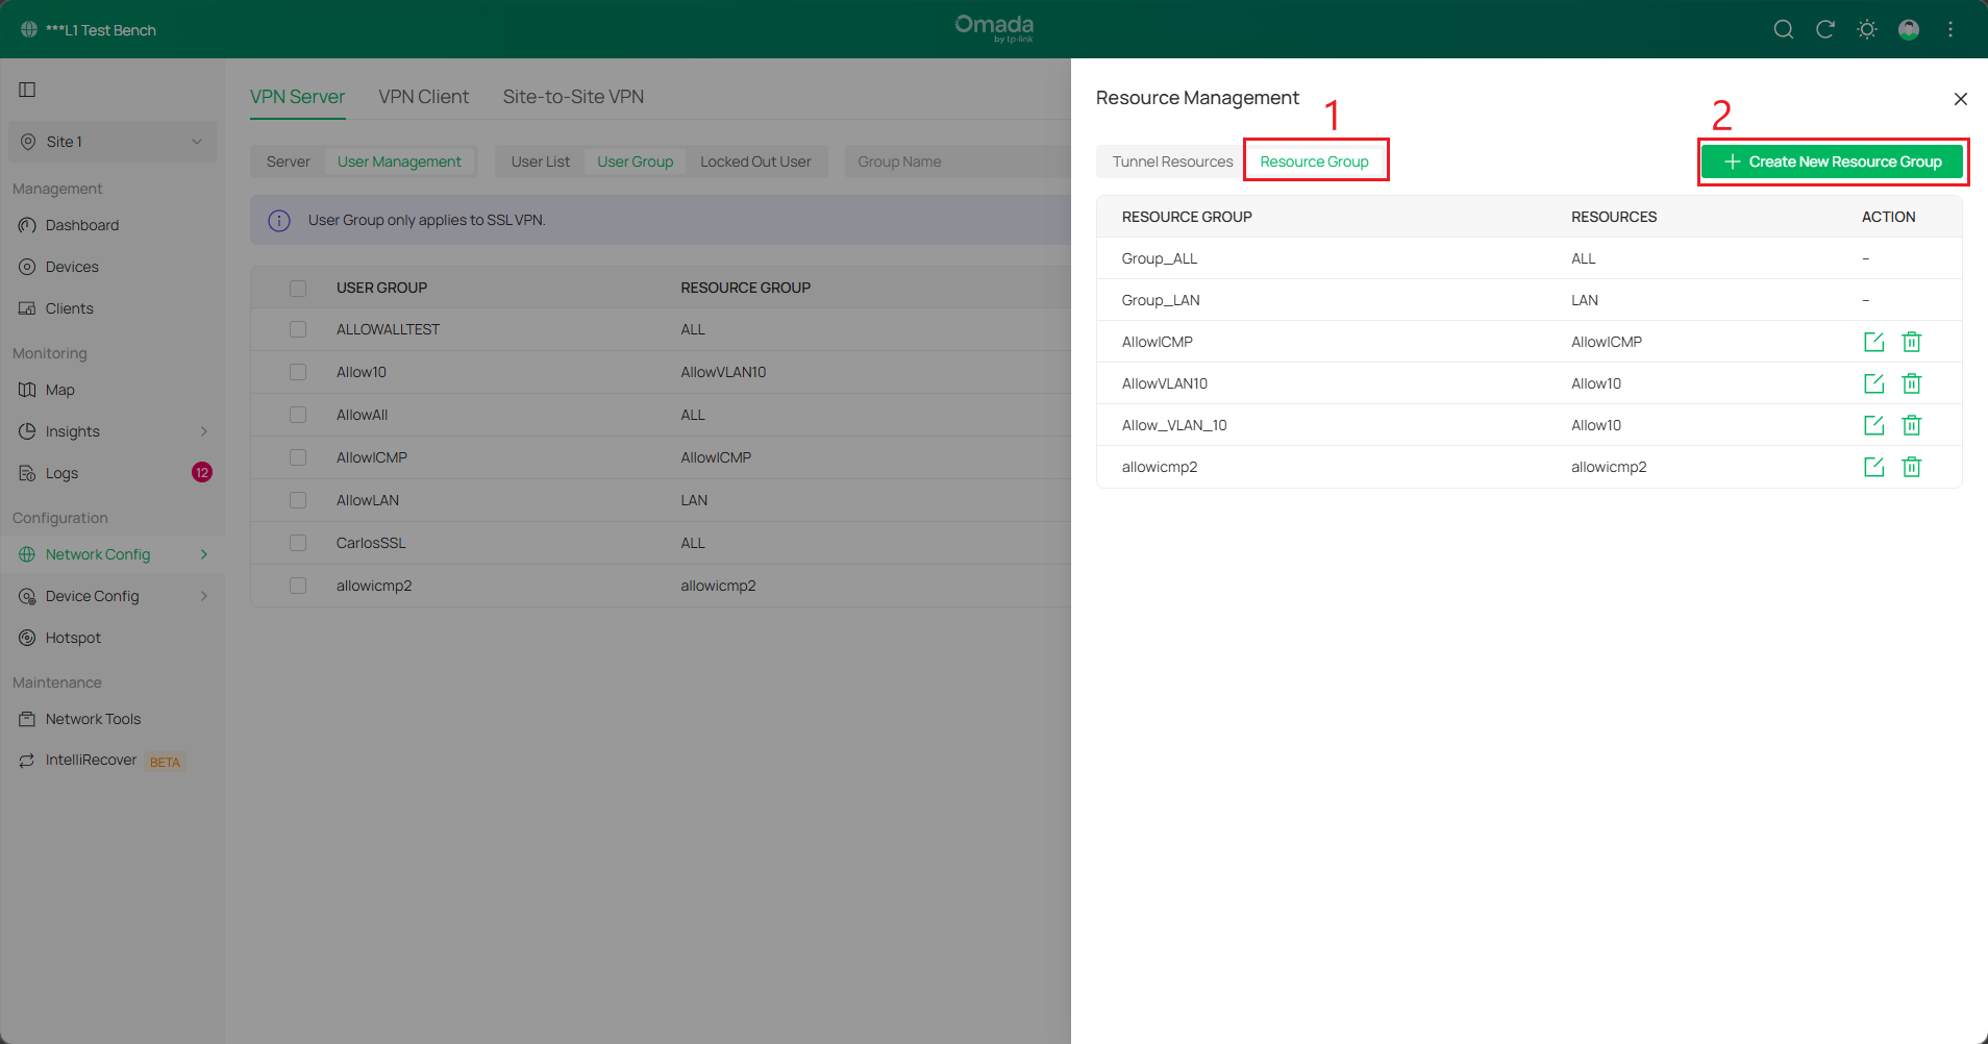
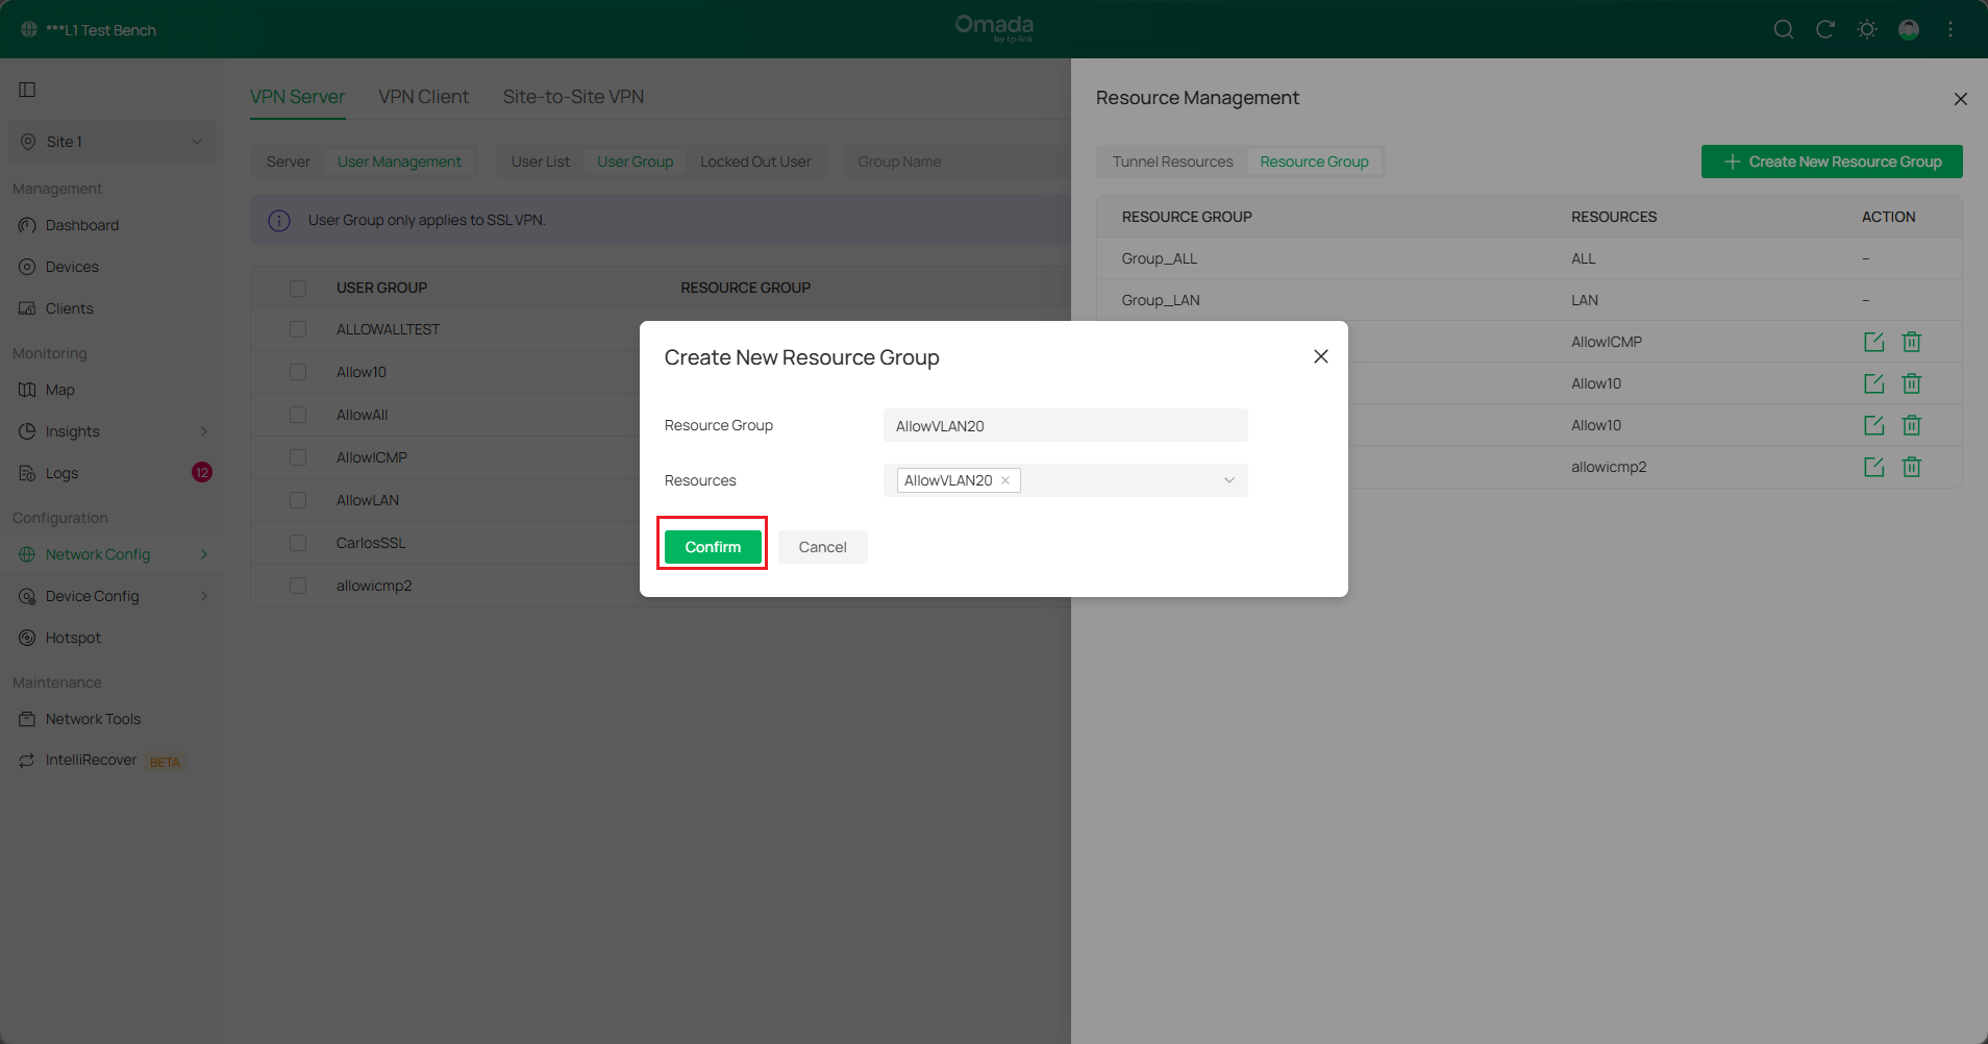
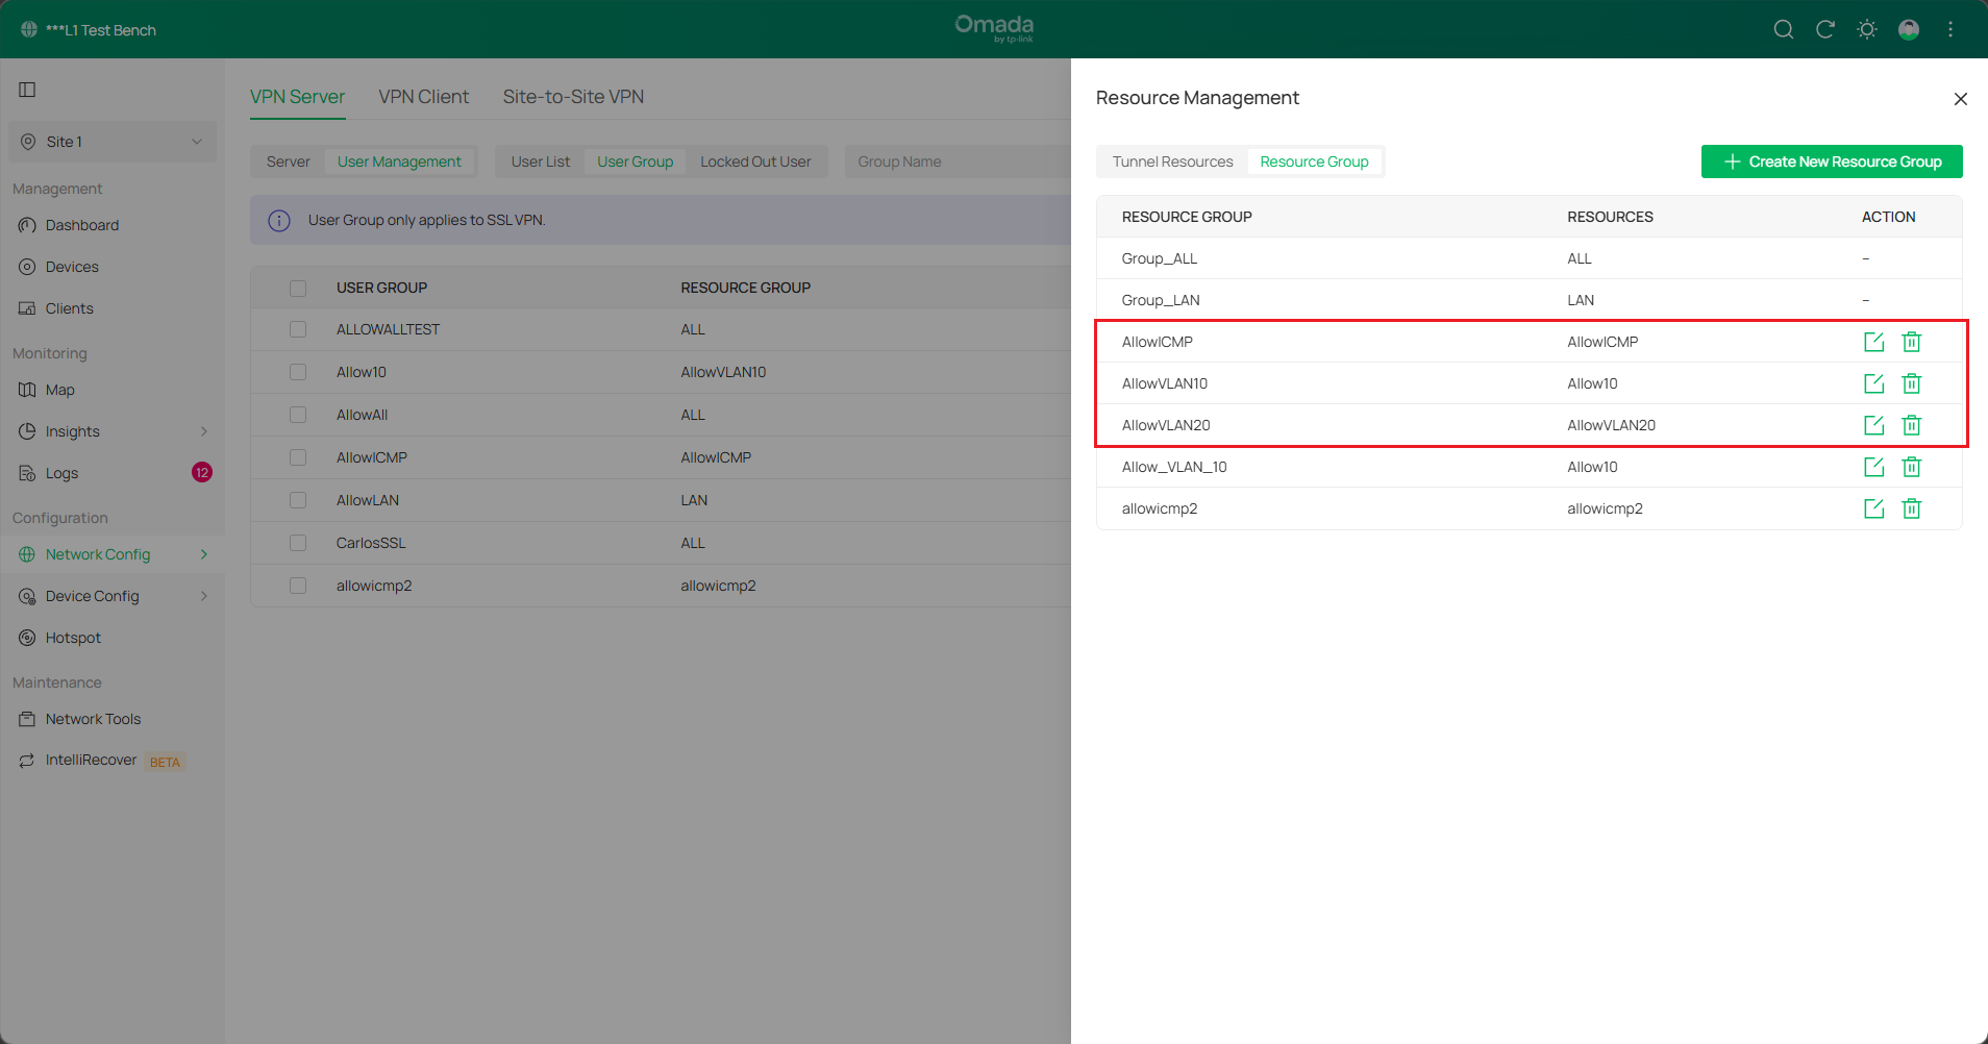
Assurez-vous d’associer la ressource correspondante au groupe de ressources approprié.
Étape 5. Créer un groupe d’utilisateurs. Accédez à VPN > Serveur VPN > Gestion des utilisateurs > Groupe d’utilisateurs, puis cliquez sur Créer un nouveau groupe d’utilisateurs afin de créer trois groupes d’utilisateurs. Appliquez différents groupes de ressources aux trois groupes d’utilisateurs selon les différents niveaux d’autorisation des trois comptes. Notez que si vous souhaitez permettre au client d’utiliser le serveur VPN comme proxy pour accéder à Internet, sélectionnez le groupe de ressources ALL.
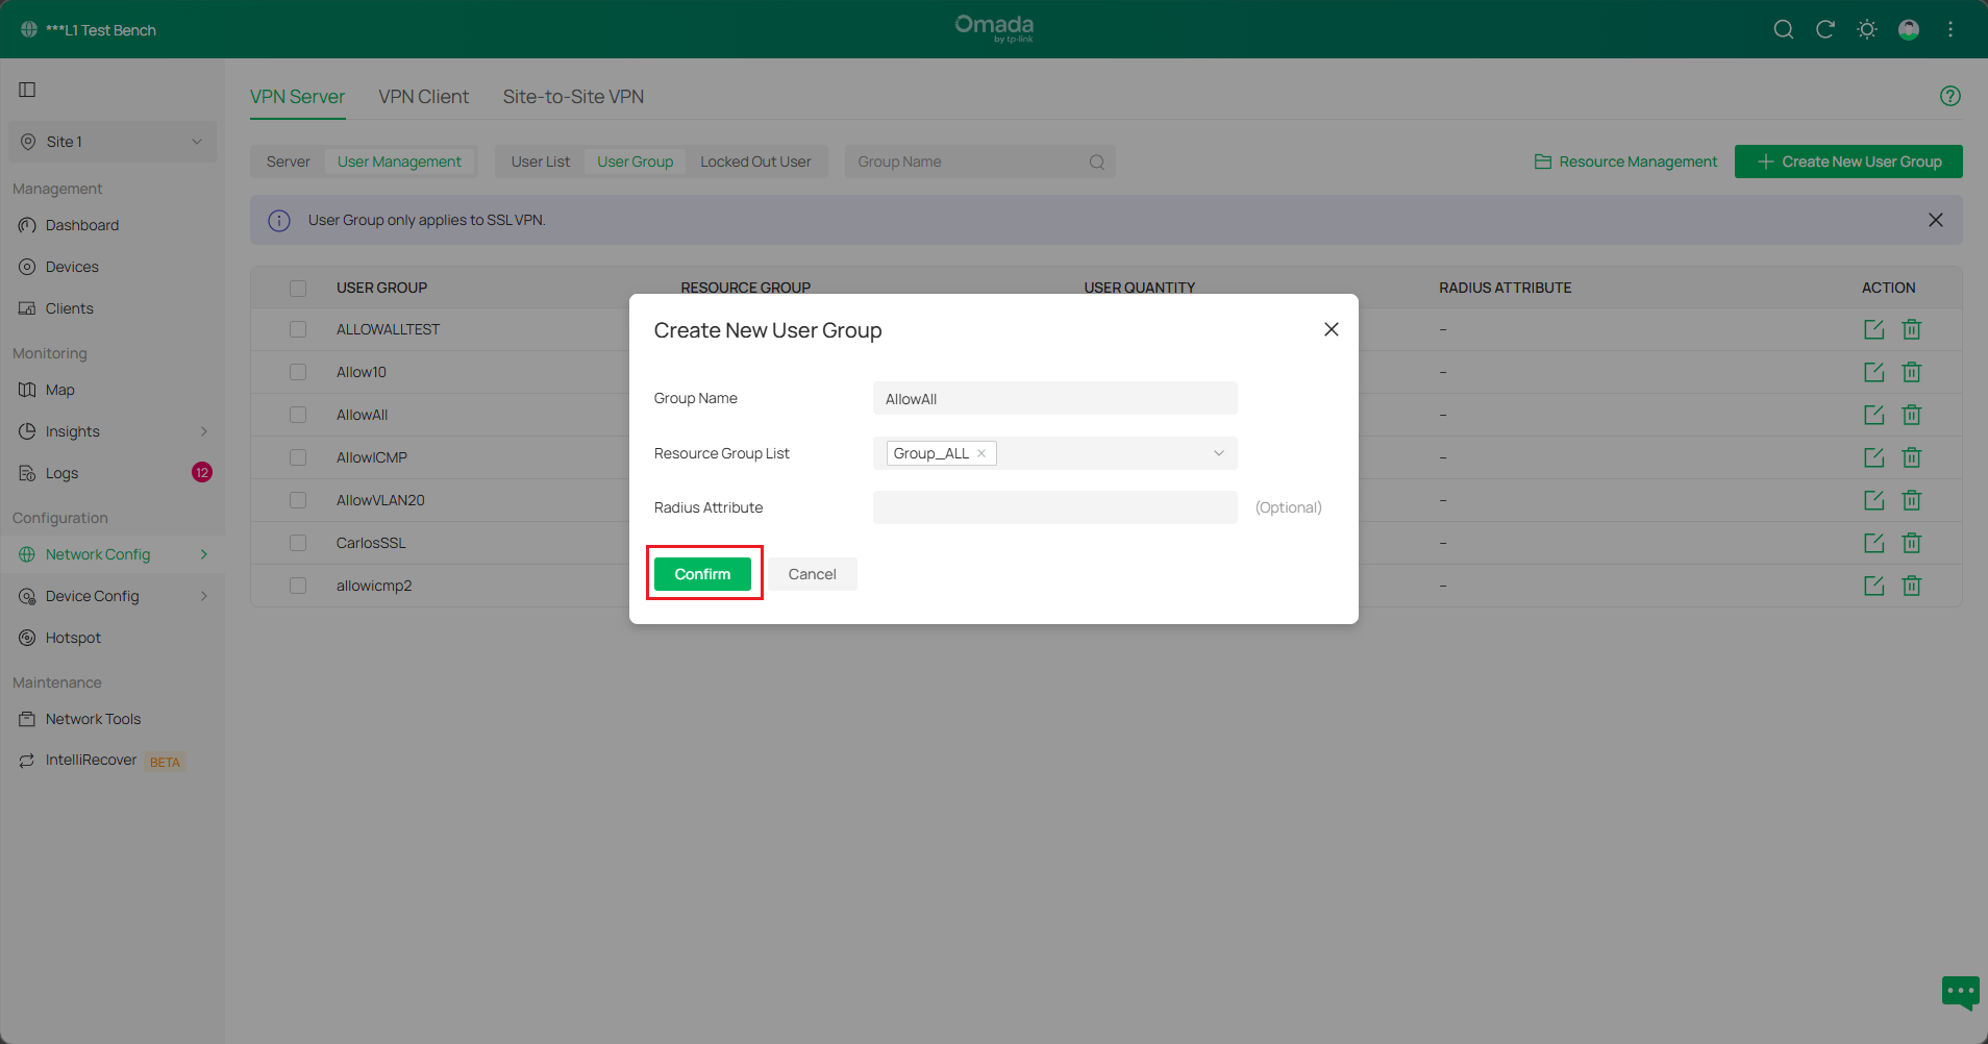
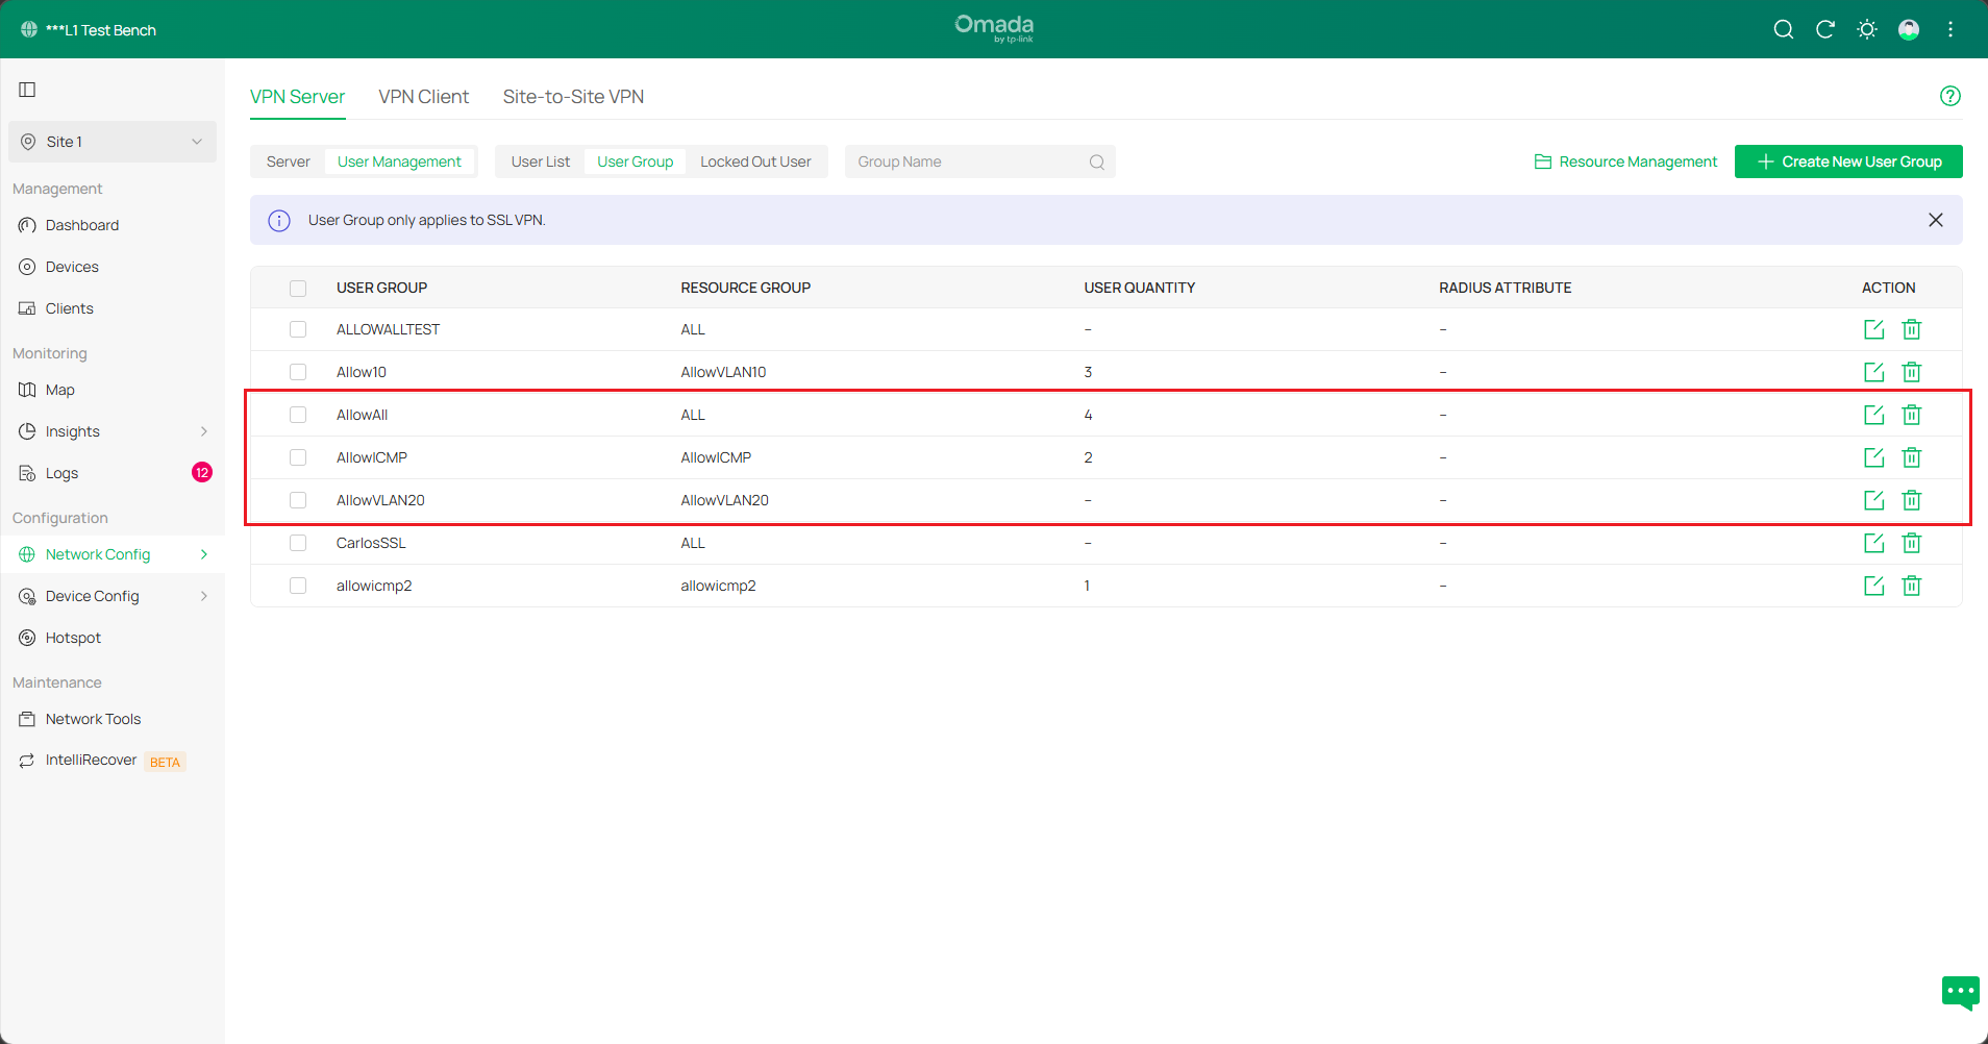
Assurez-vous d’associer le groupe de ressources correspondant au groupe d’utilisateurs approprié.
Étape 6. Accédez à VPN > Serveur VPN > Gestion des utilisateurs, puis cliquez sur Créer un nouvel utilisateur afin de créer trois comptes utilisateurs. Chaque compte correspond à un groupe d’utilisateurs différent. Vous pouvez définir le nom d’utilisateur et le mot de passe selon vos besoins.
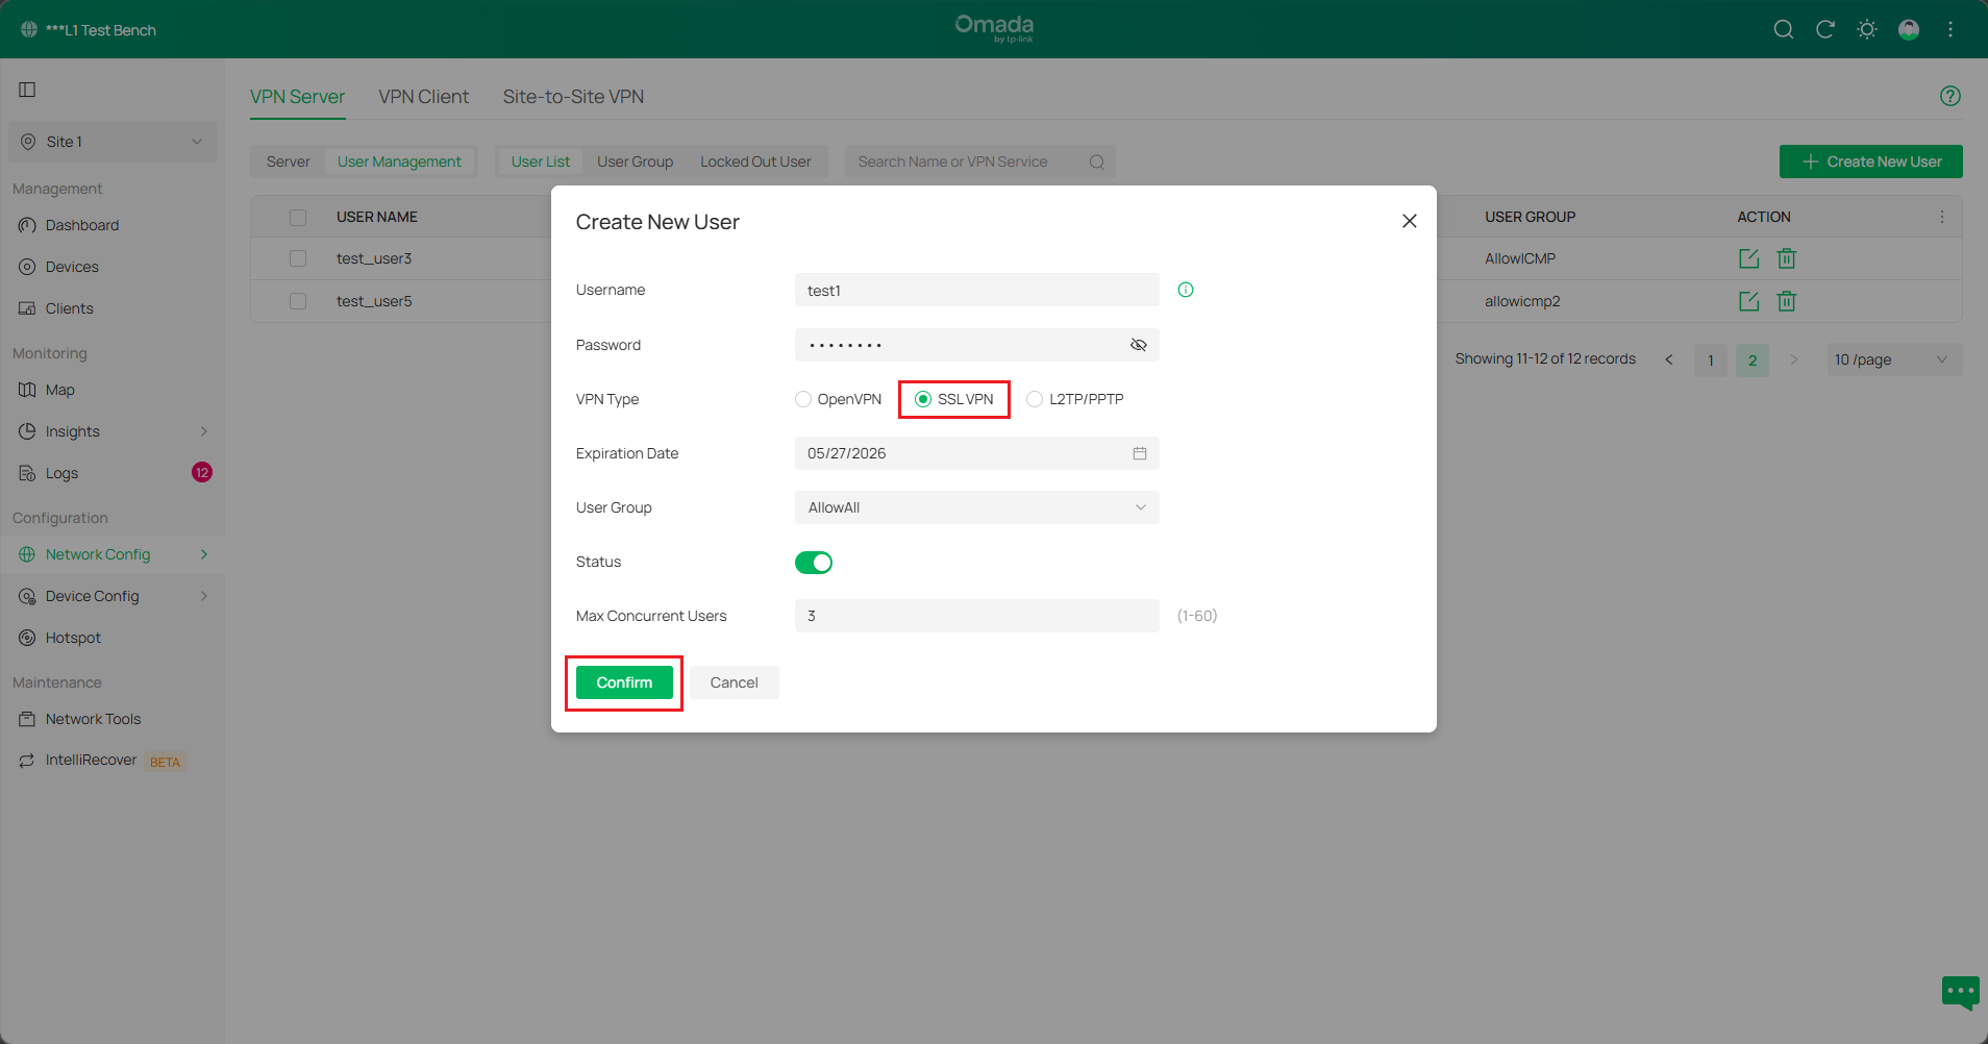
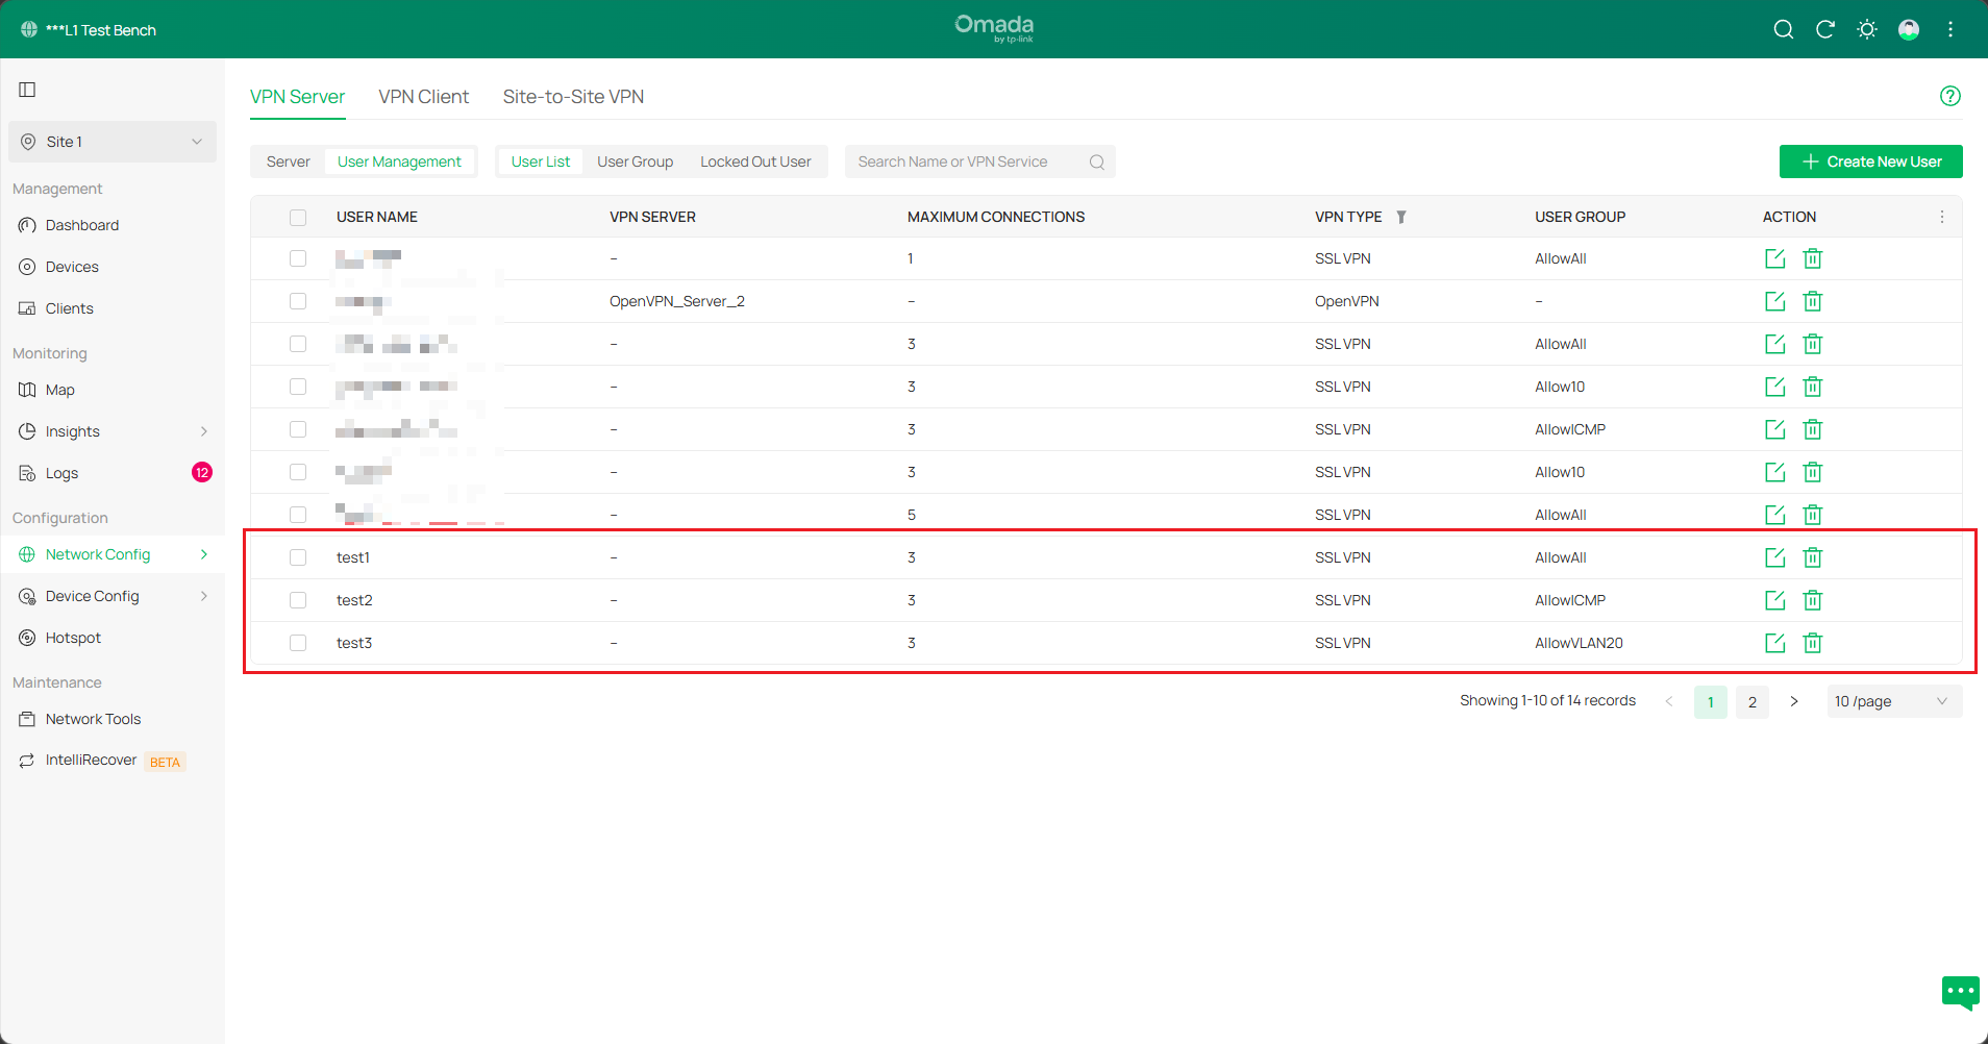
Assurez-vous d’associer le groupe d’utilisateurs correspondant à l’utilisateur approprié.
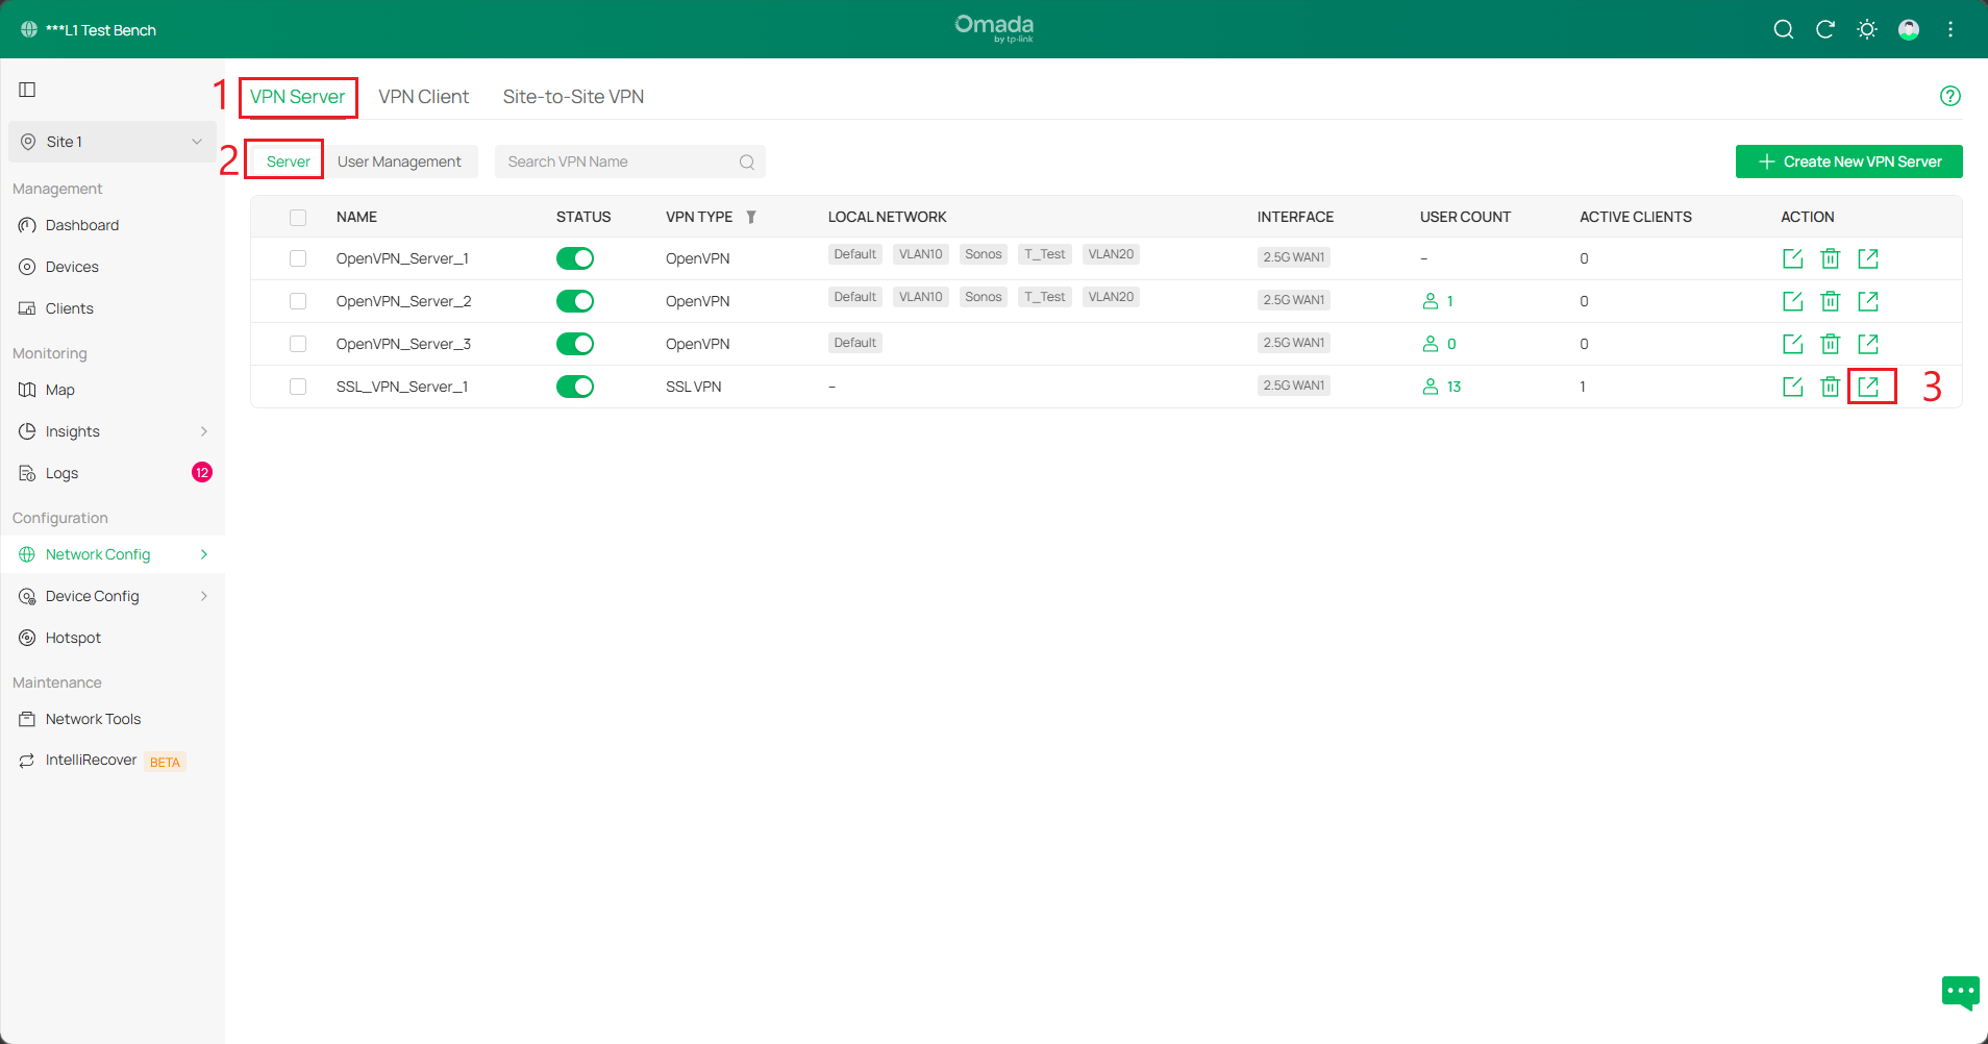
Étape 7. Exporter le certificat. Accédez à VPN > Serveur VPN, puis cliquez sur Exporter pour exporter le fichier de configuration. Le client pourra utiliser ce fichier pour se connecter au serveur.
Configuration
Étape 1. Créer le serveur SSL VPN.
Accédez à Configuration réseau > VPN > Serveur VPN, puis cliquez sur Créer un nouveau serveur VPN. Sélectionnez SSL VPN. Dans cet exemple, nous nommons le serveur SSL_VPN_Server_1, configurons l’adresse IP de début sur 10.10.10.10 et l’adresse IP de fin sur 10.10.10.100, puis cliquons sur Appliquer pour enregistrer les paramètres. Vous pouvez définir ces valeurs selon votre configuration réseau.
Assurez-vous que la plage du pool d’adresses IP ne chevauche aucune des LAN créées.
Le DNS principal est une préférence. Dans cet exemple, nous utilisons le serveur DNS public de Google.
Étape 2. Activer le serveur SSL VPN. Accédez à Configuration réseau > Serveur VPN, puis cochez Activer.
Étape 3. Créer les ressources de tunnel. Accédez à VPN > Gestion des utilisateurs > Groupe d’utilisateurs > Gestion des ressources > Ressources de tunnel, puis cliquez sur Créer une nouvelle ressource de tunnel afin de créer les deux groupes de ressources suivants. Dans la fenêtre contextuelle, Autoriser VLAN20 ; Autoriser ICMP utilise le protocole ICMP pour limiter les ressources.
Étape 4. Accédez à VPN > Gestion des utilisateurs > Groupe d’utilisateurs > Gestion des ressources > Groupe de ressources, puis cliquez sur Créer une nouvelle ressource de tunnel afin d’appliquer les deux ressources de tunnel créées à l’étape 3 à deux groupes de ressources différents.
Assurez-vous d’associer la ressource correspondante au groupe de ressources approprié.
Étape 5. Créer un groupe d’utilisateurs. Accédez à VPN > Serveur VPN > Gestion des utilisateurs > Groupe d’utilisateurs, puis cliquez sur Créer un nouveau groupe d’utilisateurs afin de créer trois groupes d’utilisateurs. Appliquez différents groupes de ressources aux trois groupes d’utilisateurs selon les différentes autorisations requises par les trois comptes. Notez que si vous souhaitez permettre au client d’utiliser un accès Internet via proxy, sélectionnez le groupe de ressources Groupe ALL.
Assurez-vous d’associer le groupe de ressources correspondant au groupe d’utilisateurs approprié.
Étape 6. Accédez à VPN > Serveur VPN > Gestion des utilisateurs, puis cliquez sur Créer un nouvel utilisateur afin de créer trois comptes utilisateurs. Chaque compte correspond à un groupe d’utilisateurs différent. Vous pouvez définir le nom d’utilisateur et le mot de passe selon vos besoins.
Assurez-vous d’associer le groupe d’utilisateurs correspondant à l’utilisateur approprié.
Étape 7. Exporter le certificat. Accédez à VPN > Serveur VPN, puis cliquez sur Exporter afin d’exporter le fichier de configuration. Le client pourra utiliser ce fichier pour se connecter au serveur.
Vérification
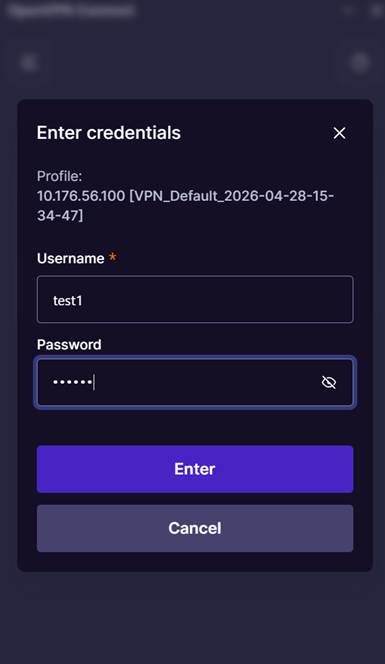
Utilisez l’interface graphique OpenVPN sur le client pour importer le fichier de configuration, puis saisissez le nom d’utilisateur et le mot de passe correspondants afin d’établir la connexion.
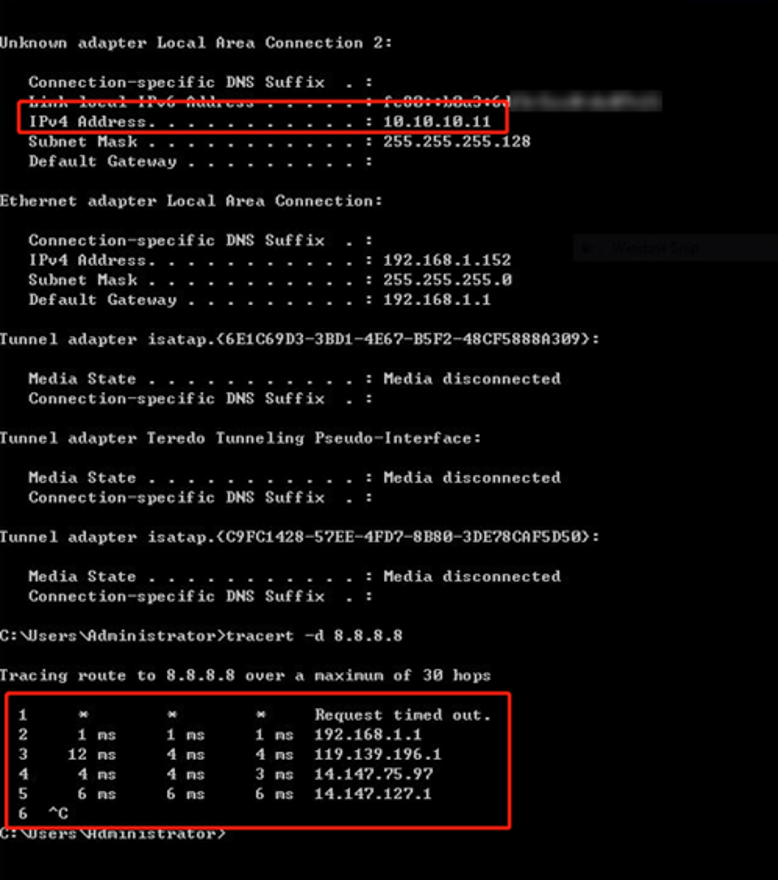
Compte 1 : le client VPN utilise le serveur VPN comme proxy pour accéder à Internet ;
Après une connexion réussie, le serveur attribue au client VPN l’adresse IP 10.10.10.11. Lorsque le client accède à 8.8.8.8, le premier saut correspond au tunnel VPN. Comme les données sont chiffrées, l’adresse IP correspondante ne peut pas être résolue. Le deuxième saut correspond à la passerelle par défaut du serveur VPN, et toutes les données du client transitent par le tunnel VPN afin de permettre l’accès Internet via proxy.
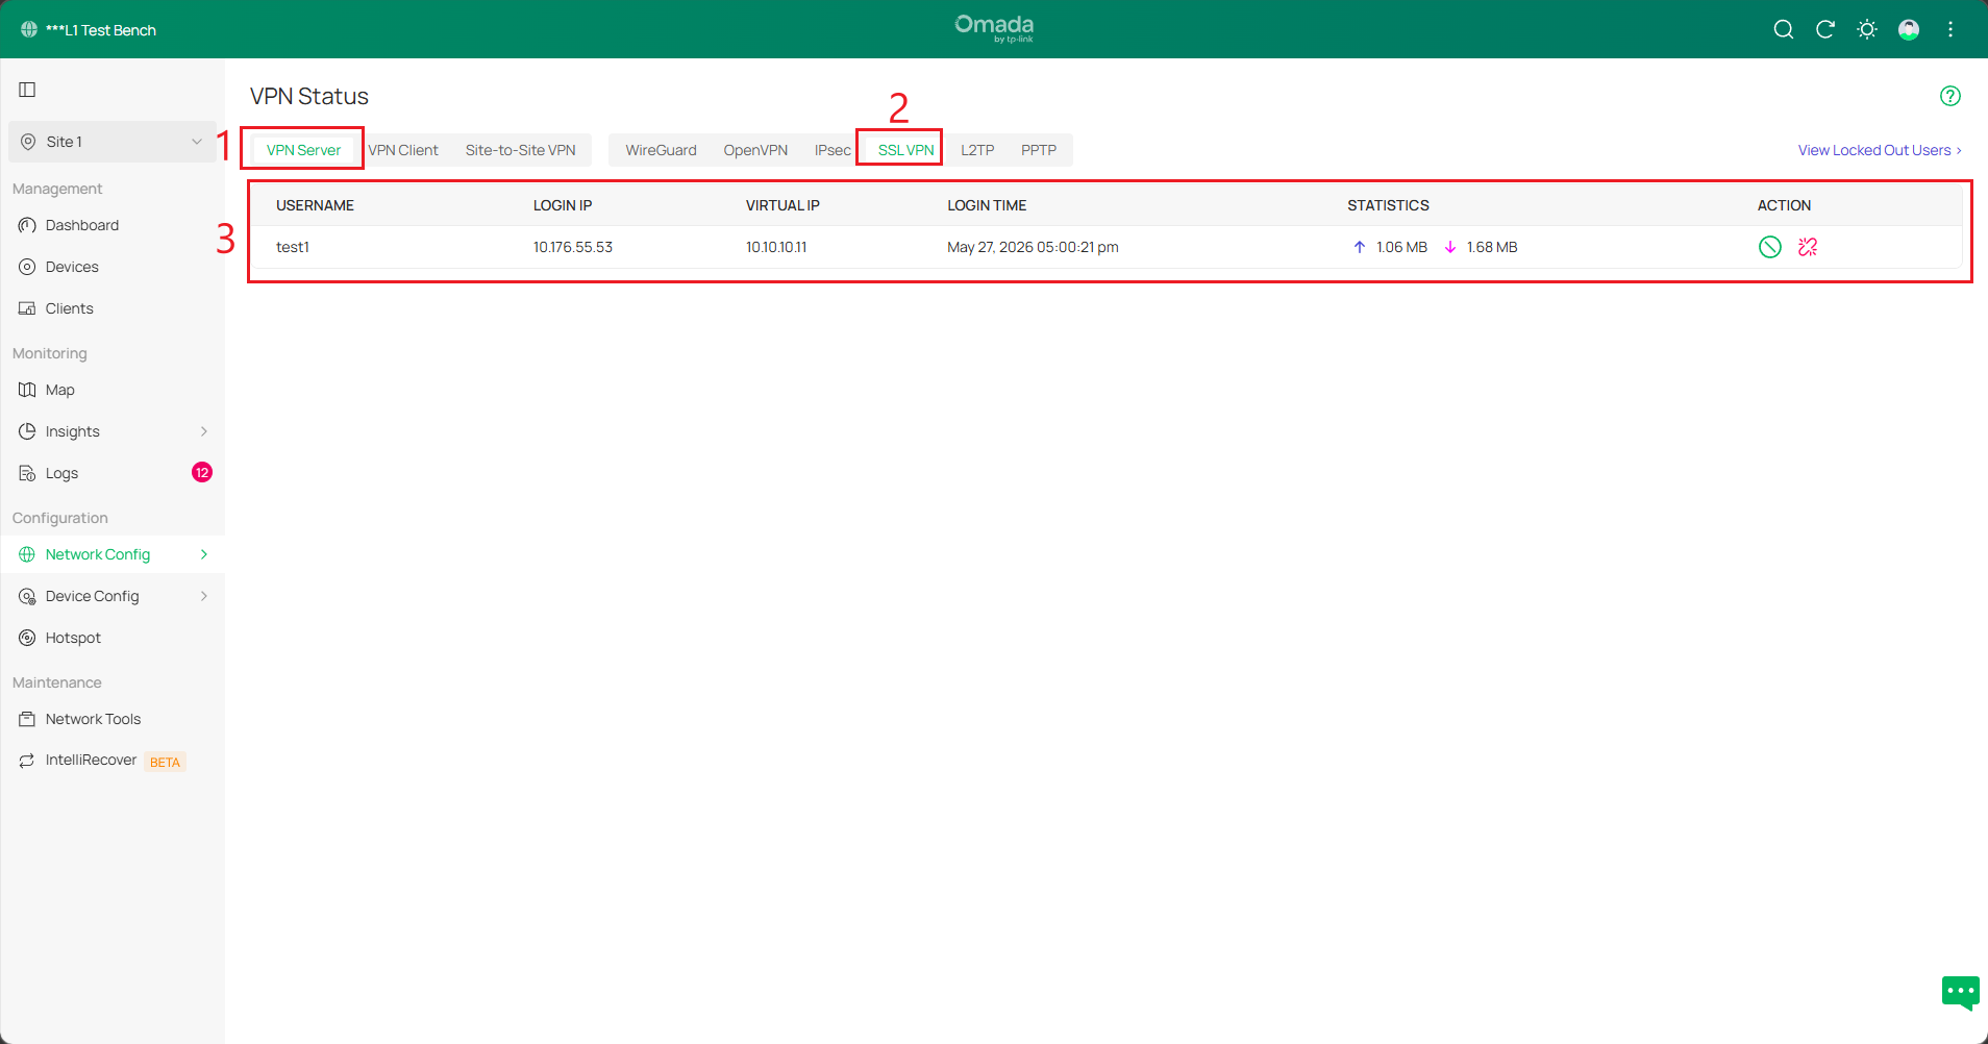
Accédez à SSL VPN > État ; les informations relatives à la connexion du client seront également affichées ici.
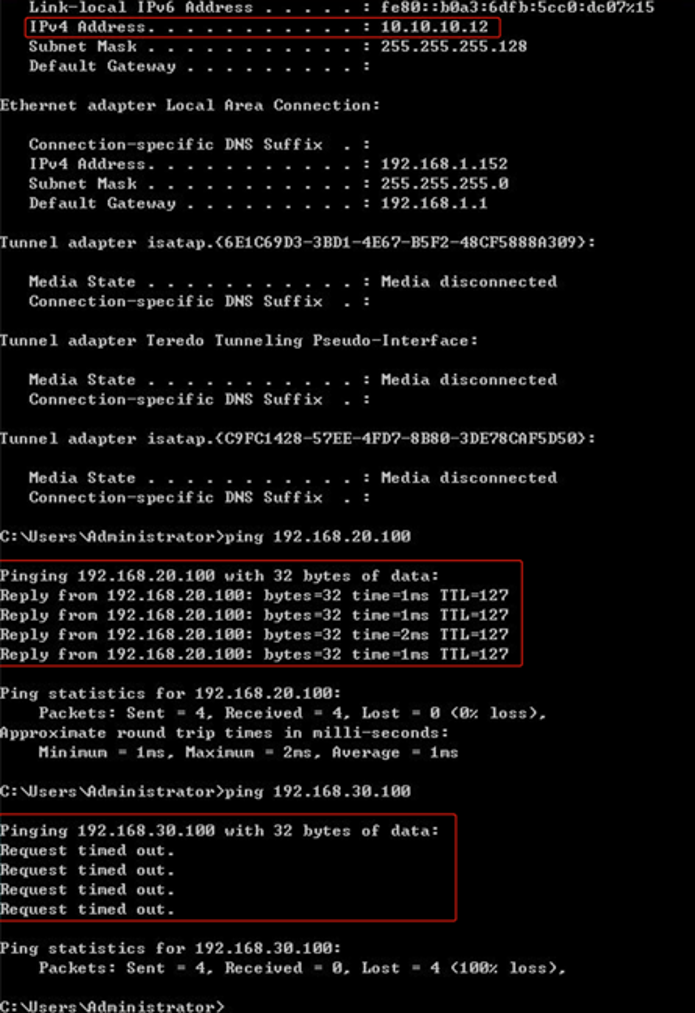
Compte 2 : le client VPN peut uniquement accéder au VLAN 20, mais ne peut pas accéder au VLAN 30
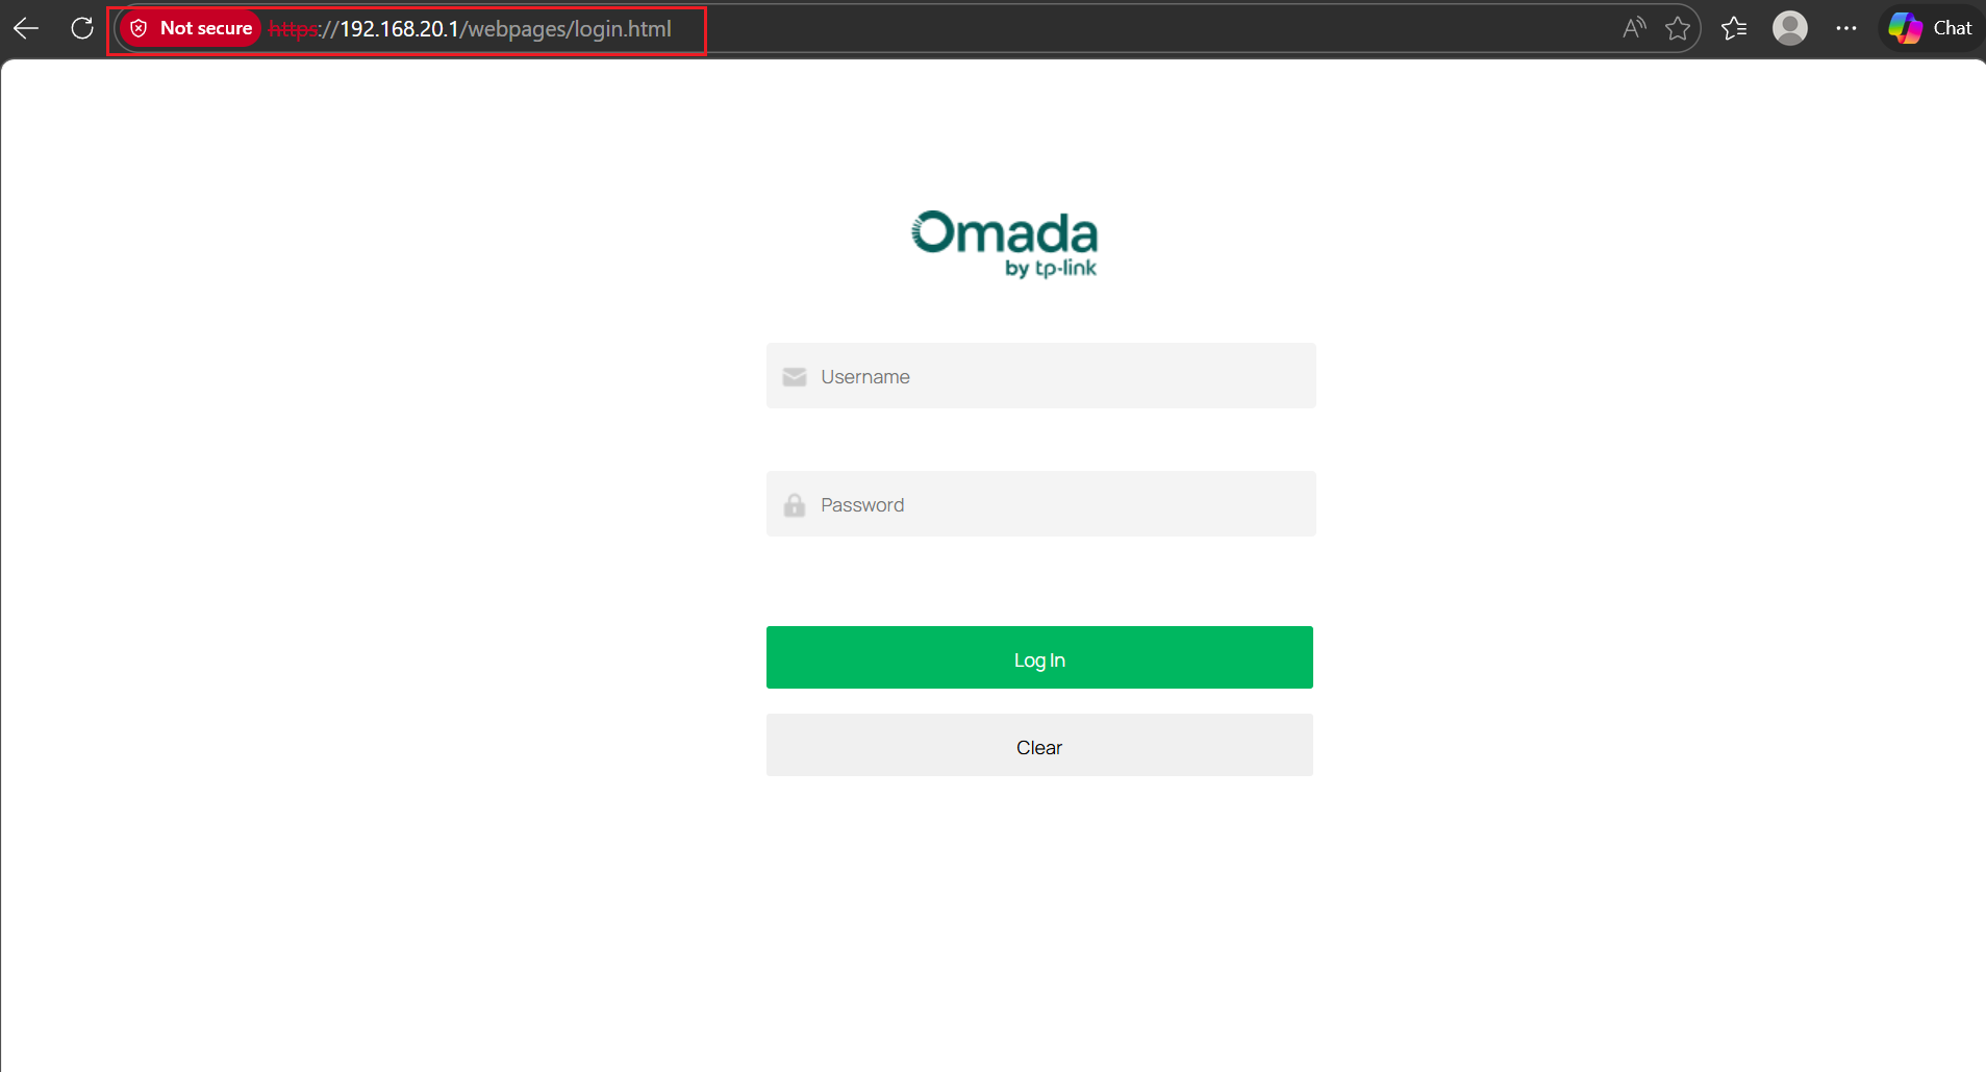
Après une connexion réussie, le serveur attribue au client VPN l’adresse IP 10.10.10.12. Le client VPN peut envoyer une requête ping vers le périphérique du VLAN 20 (192.168.20.100), mais ne peut pas envoyer de requête ping vers le périphérique du VLAN 30 (192.168.30.100). Parallèlement, l’interface de gestion du routeur est accessible via 192.168.20.1.
Compte 3 : le client VPN et les périphériques situés derrière le serveur peuvent uniquement communiquer via le protocole ICMP.
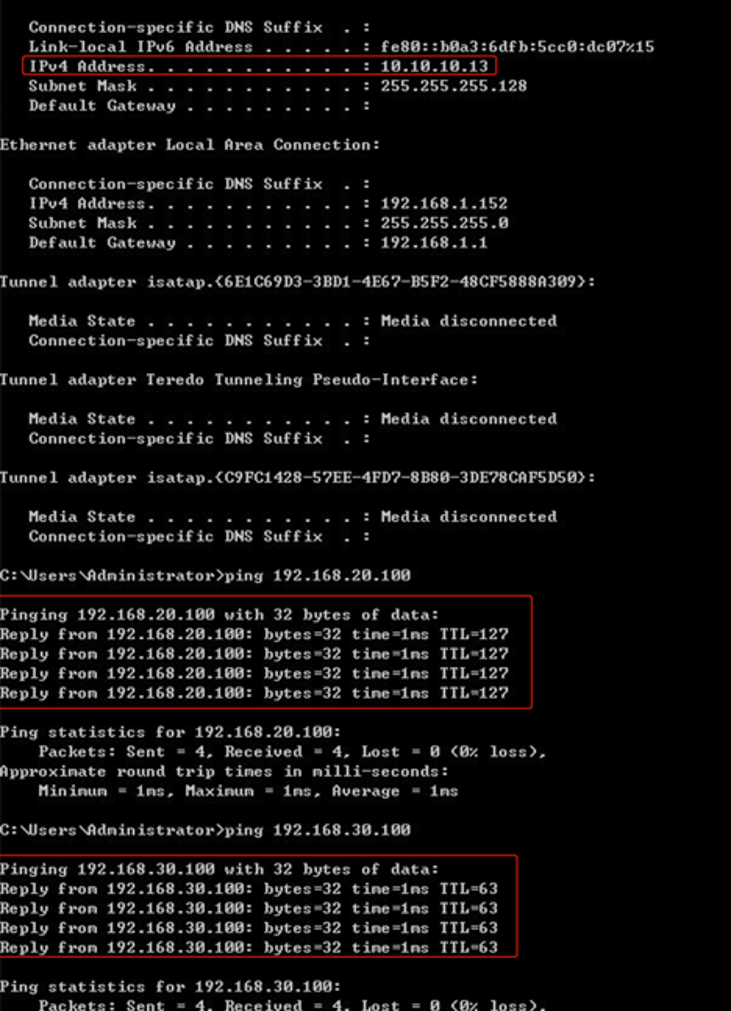
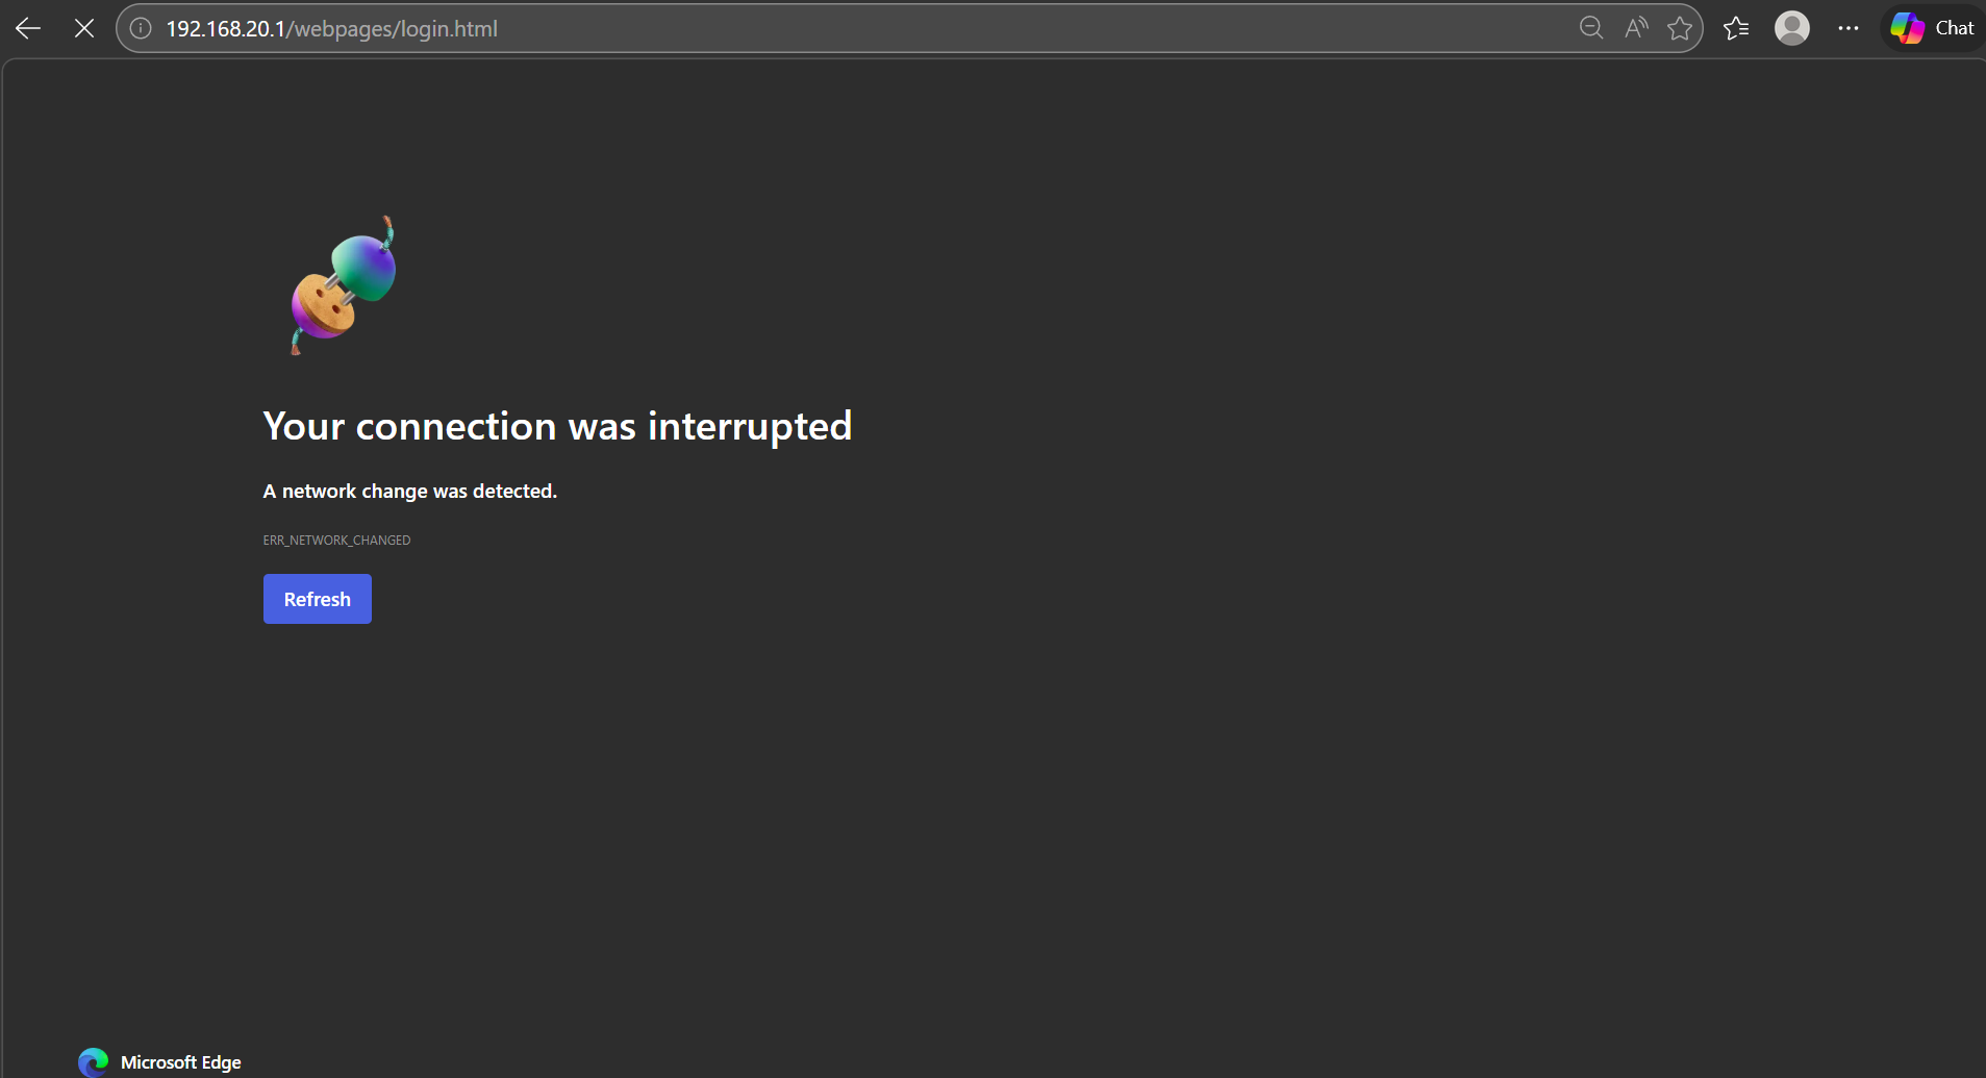
Après une connexion réussie, le serveur attribue au client VPN l’adresse IP 10.10.10.13. Le client VPN peut envoyer une requête ping vers le périphérique du VLAN 20 (192.168.20.100) et le périphérique du VLAN 30 (192.168.30.100). Cependant, l’interface de gestion du routeur ne peut pas être accessible via 192.168.20.1.
Conclusion
Cette configuration a permis de mettre en place une solution SSL VPN avec trois niveaux d’accès utilisateur distincts, adaptés à des besoins réseau spécifiques. Un compte permet un accès Internet complet via proxy à travers le serveur VPN, un autre limite l’accès uniquement au VLAN 20 tout en bloquant le VLAN 30, et le troisième impose une communication strictement limitée au protocole ICMP avec les ressources internes. En combinant l’attribution des adresses du pool IP VPN, les ressources de tunnel et les stratégies de groupes d’utilisateurs, cette configuration démontre une gestion efficace des contrôles d’accès basés sur les rôles ainsi qu’une amélioration de la sécurité et de l’administration du réseau.
FAQ
Q1 : Que dois-je faire si je ne parviens pas à me connecter au SSL VPN ?
R1 : Vérifiez que le serveur est activé, confirmez que le port de service correct est sélectionné et vérifiez que le client utilise le bon nom d’utilisateur, le bon mot de passe ainsi que le fichier de certificat importé.
Q2 : Pourquoi le client VPN ne peut-il pas accéder à certains VLAN ?
R2 : Assurez-vous que le groupe de ressources et les ressources de tunnel appropriés sont attribués au groupe d’utilisateurs. Les restrictions d’accès sont contrôlées par ces configurations.
Q3 : Que dois-je faire si j’oublie le mot de passe d’un utilisateur ?
R3 : Accédez à la section Gestion des utilisateurs, modifiez le compte utilisateur, puis consultez ou définissez un nouveau mot de passe.
Q4 : Que dois-je faire si le client VPN ne peut pas accéder à Internet ?
R4 : Vérifiez que le groupe de ressources est défini sur « ALL » pour un accès complet, contrôlez les paramètres DNS et assurez-vous que la passerelle du serveur VPN dispose d’une connexion Internet.
Q5 : Pourquoi le client VPN ne reçoit-il pas d’adresse IP ?
R5 : Vérifiez que le pool d’adresses IP VPN est correctement configuré et qu’il dispose d’adresses IP disponibles. Assurez-vous également qu’il n’existe aucun conflit avec les sous-réseaux LAN existants.
Pour en savoir plus sur chaque fonction et chaque configuration, veuillez consulter la page d’assistance afin de télécharger ou consulter le manuel de votre produit.
