


Configuration for PPTP/L2TP Server
Configuration for PPTP/L2TP Client
Introduction
This guide demonstrates how to configure a PPTP/L2TP VPN Server on an Omada Gateway in Controller Mode. PPTP/L2TP VPN allows remote users to securely connect to the local network and access internal resources from a remote location. This guide covers creating the VPN server, setting up user accounts, and verifying a successful VPN connection. This guide will also be presented primarily through L2TP policies, but the configurations are the same.
Requirements
-
Omada Gateway
- Omada Controller
Configuration

Note: The local LAN subnet and the remote VPN client subnet should not overlap. If both networks use the same IP subnet (for example, 192.168.1.0/24 on both sides), routing conflicts may occur, and clients may be unable to access resources across the VPN tunnel. It is recommended to configure unique IP subnets for the local network and VPN clients before establishing the VPN connection.
Configuration for PPTP/L2TP Server
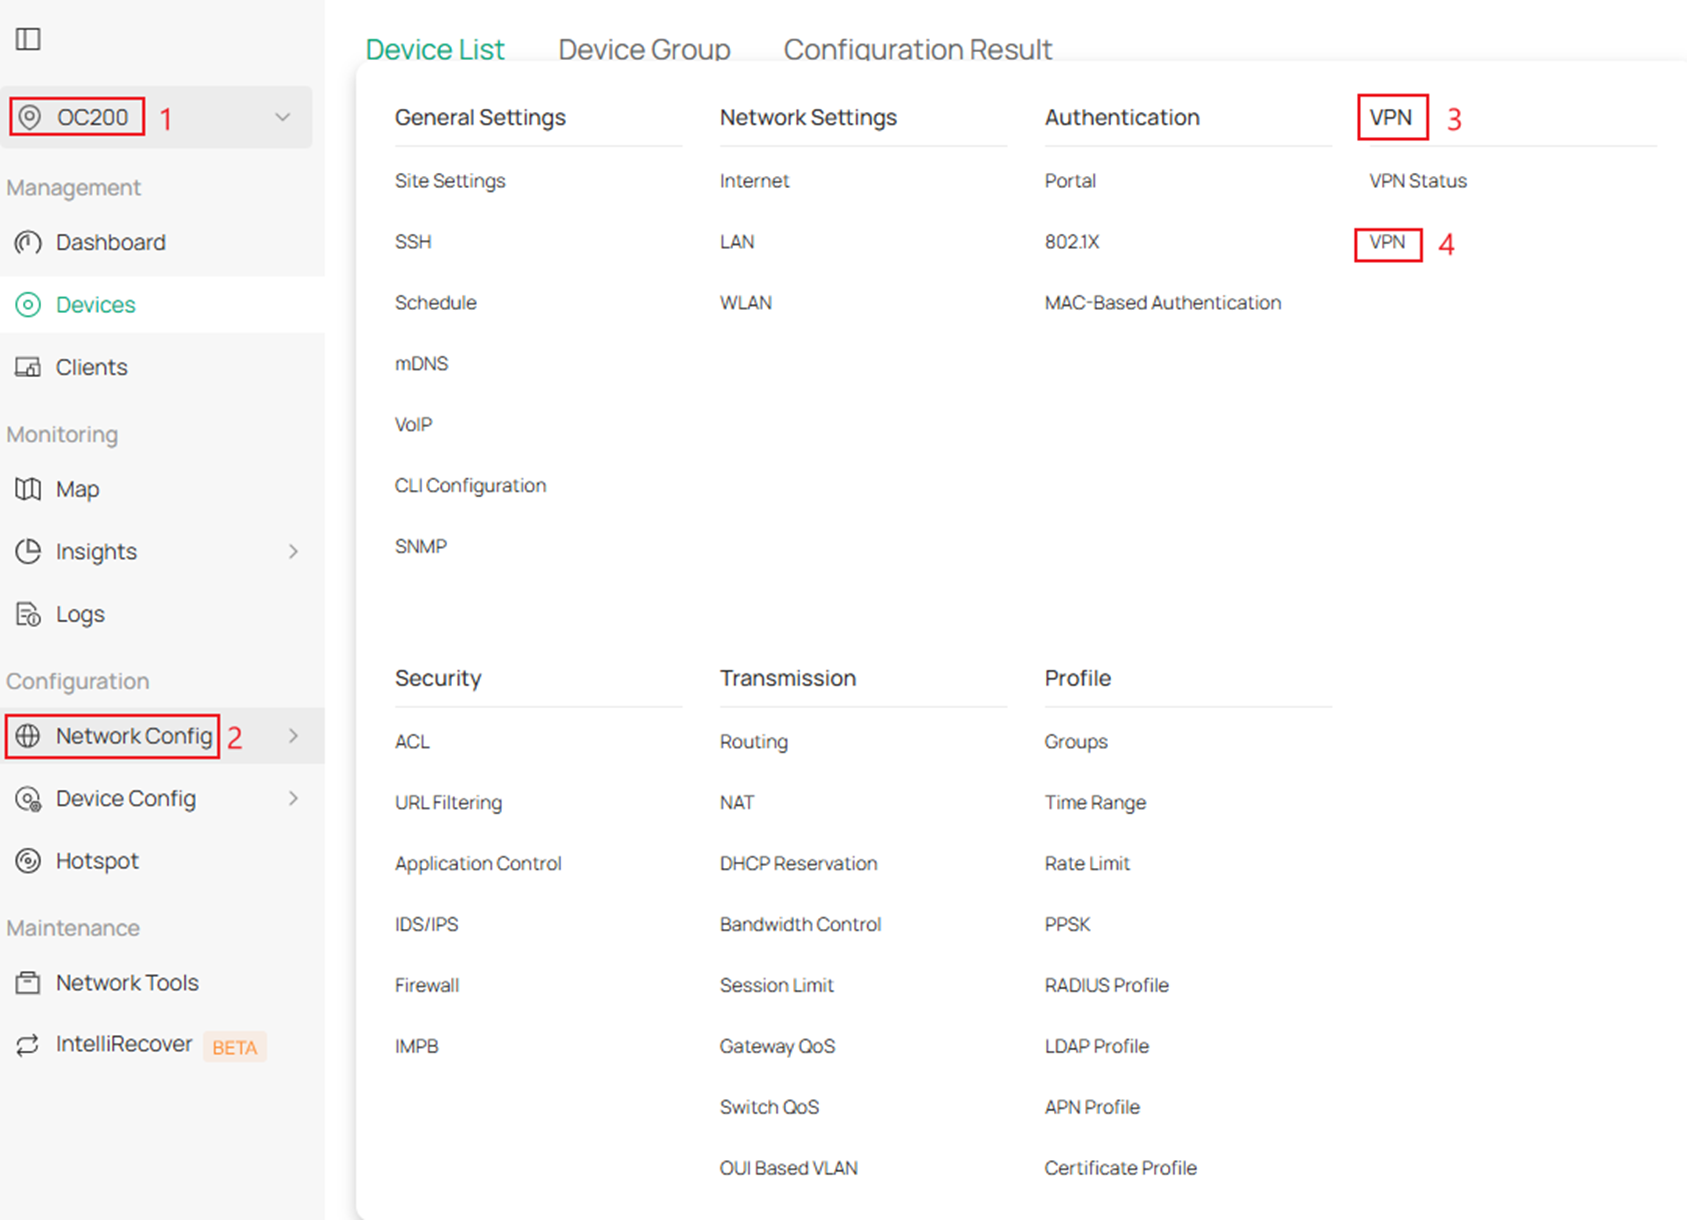
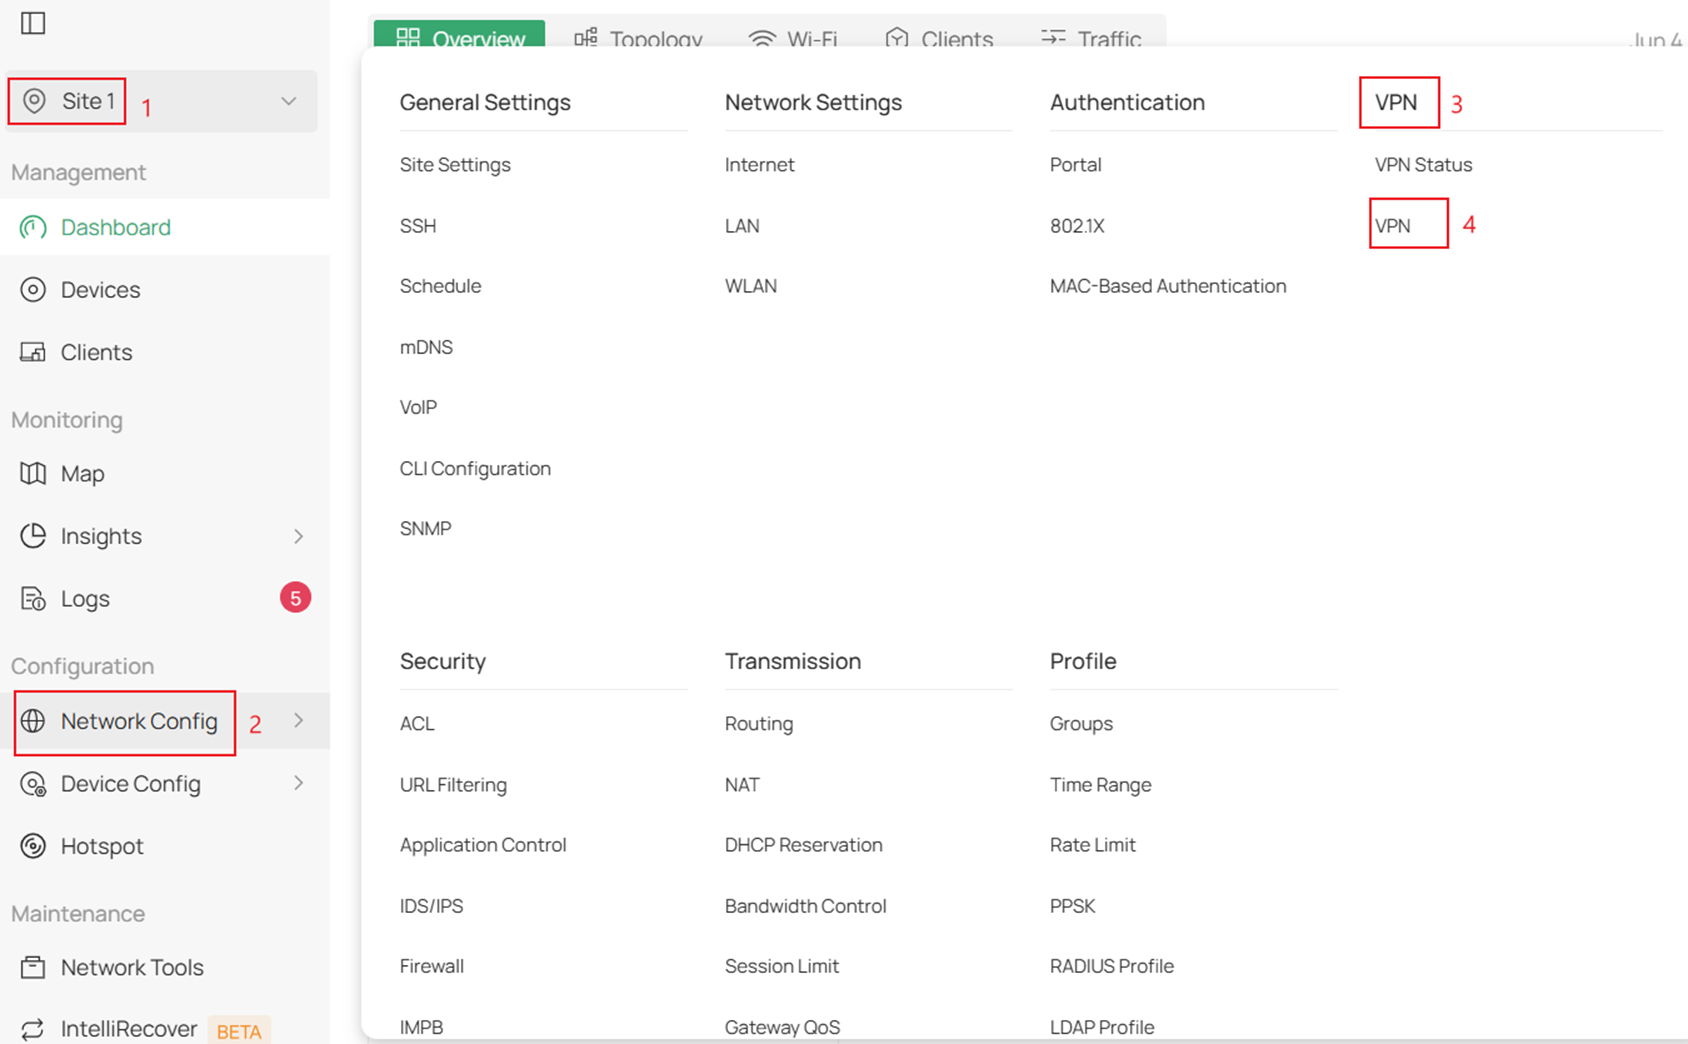
Step 1. Log into your controller > go to your Site > Network Config >VPN > and click VPN
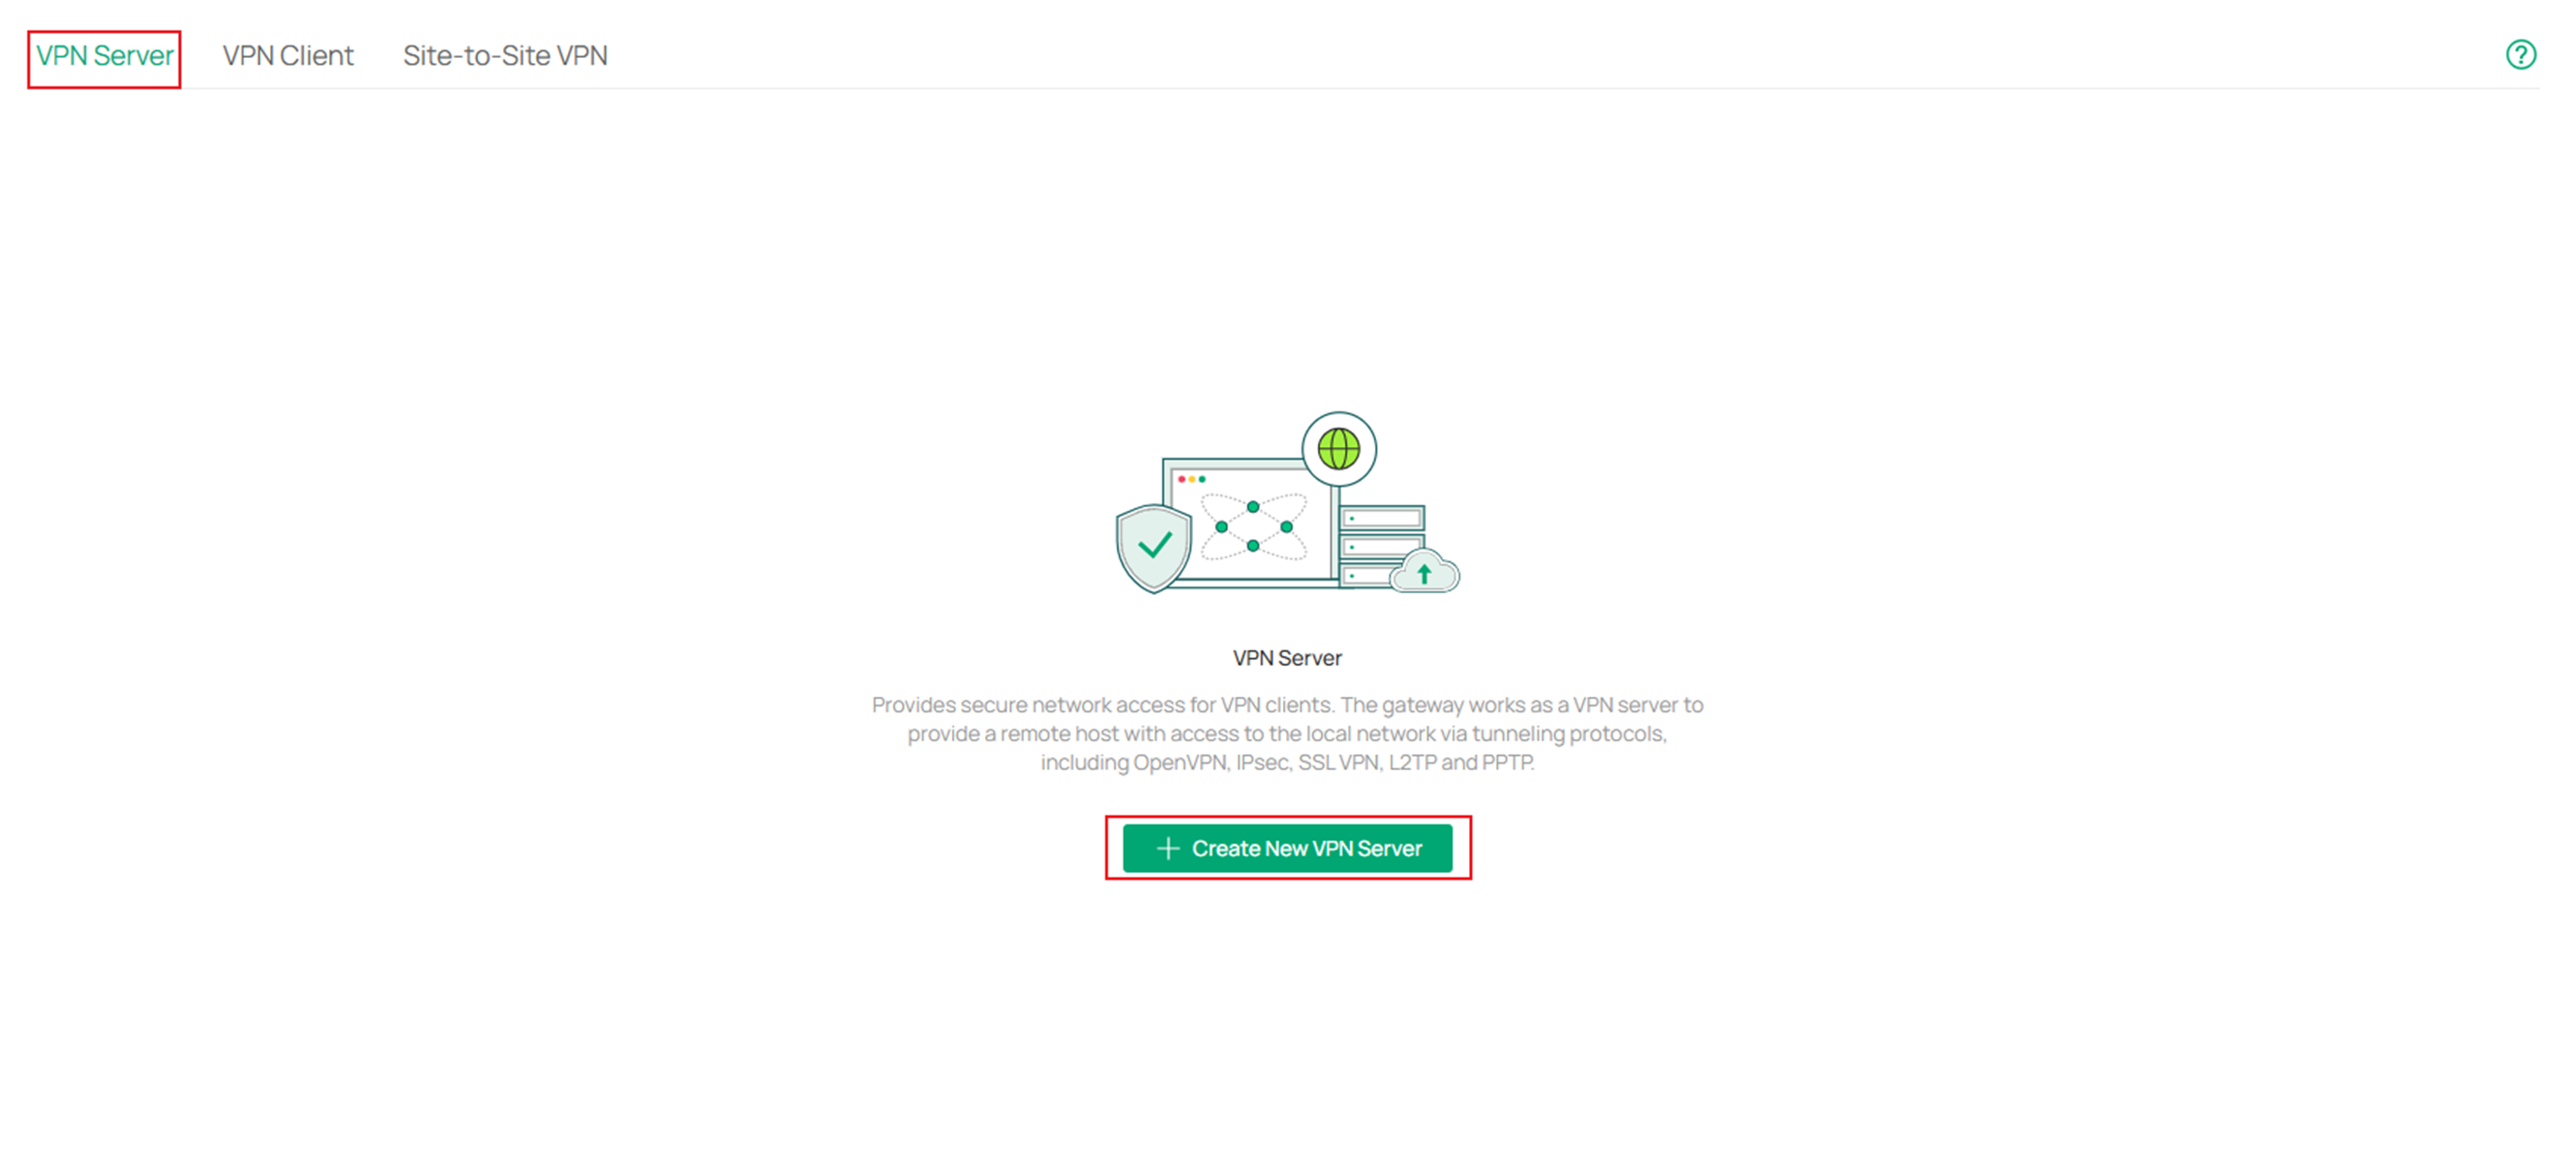
Step 2. Next stay on VPN Server and click Create New VPN Server.
Step 3. Click on L2TP and fill in the parameters.
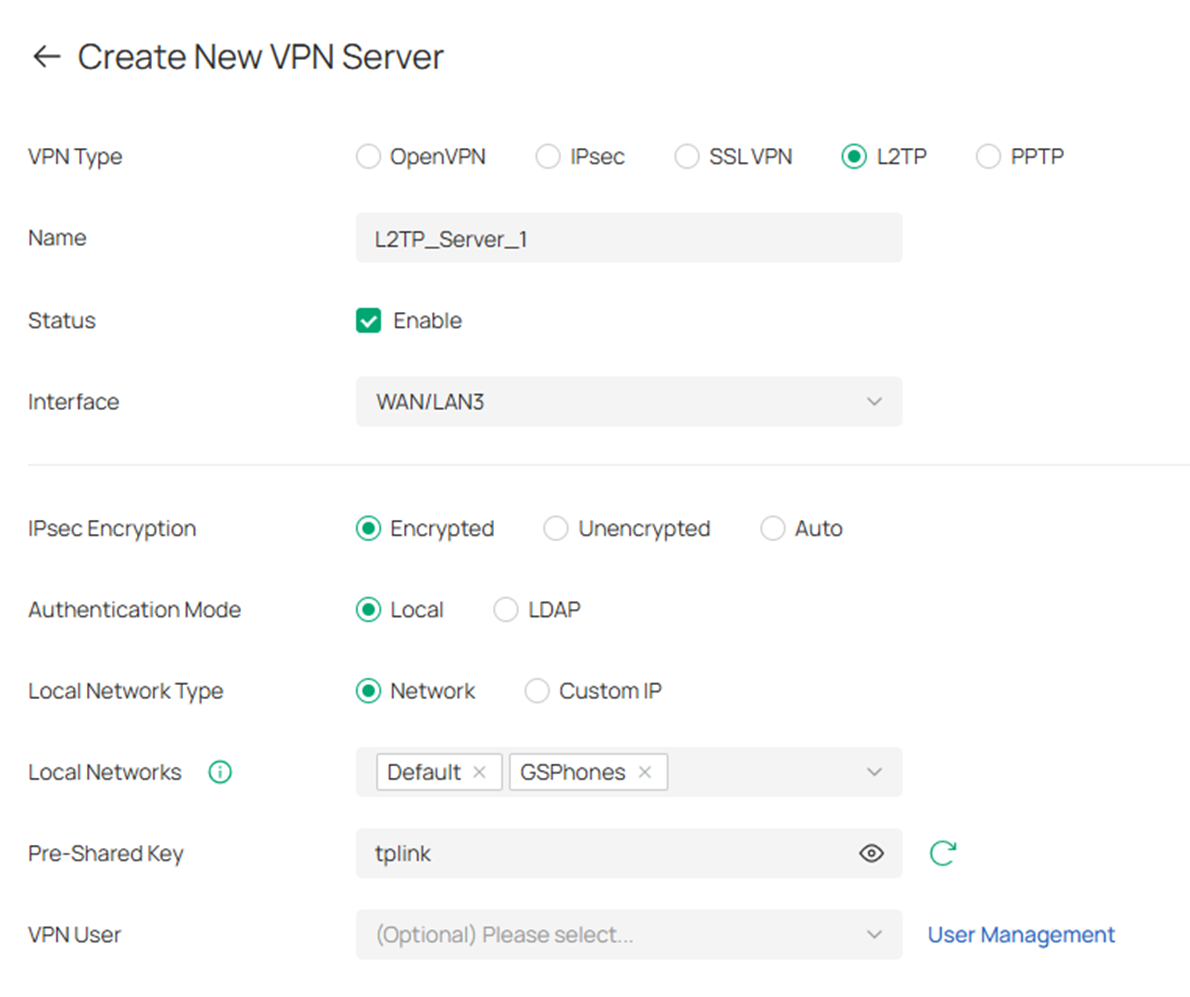
VPN Type: Select the VPN type you want to add.
Name: Enter a name to identify the VPN policy.
Status: Check the box to enable the VPN policy.
Interface: Specify the WAN port used for L2TP tunnel.
IPsec Encryption: Specify whether to enable the encryption for the tunnel. If enabled, the L2TP tunnel will be encrypted by IPsec (L2TP over IPsec). If you choose Auto, the L2TP server will determine whether to encrypt the tunnel according to the client’s encryption settings.
Authentication Mode: Specify the authentication method used by the L2TP server.
Local: Use a built-in authentication server to authenticate when the tunnel is created. If you don’t have an additional external server, you can choose local authentication.
LDAP: Use an external LDAP server to authenticate when the tunnel is created.
LDAP Profile: Specify an LDAP entry that you have configured in Profiles > LDAP Profile.
Local Network Type: Select the type to set the local network for VPN Policy, there are two types: Network and Custom IP.
Local Networks: Select the local networks to apply the VPN Policy to. The VPN Policy will only apply to the selected or filled local network.
Pre-Shared Key: When the IPsec Encryption is configured as Encrypted or Auto, specify the Pre-shared Key for IKE authentication.
VPN User: Select a user associated to the VPN server. Click Add User to add a new user.
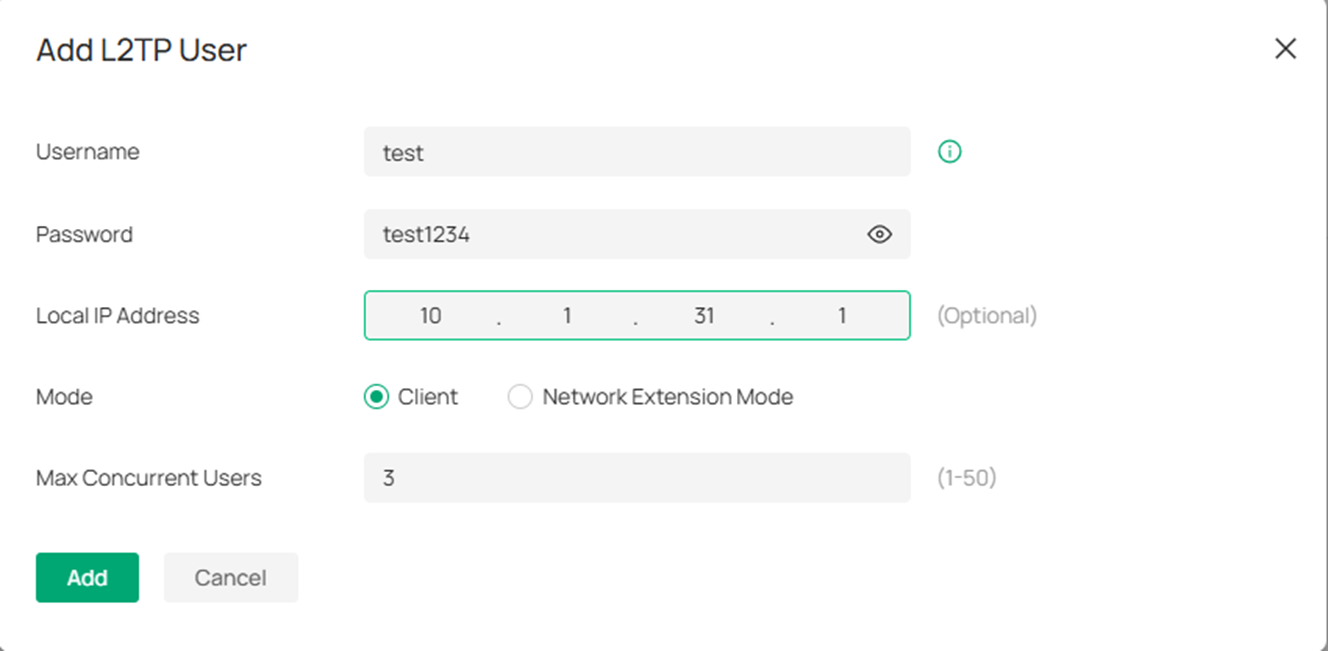
Step 4. After clicking Add User in the VPN User, fill in the parameters for the LT2P VPN user. Select Add when complete.
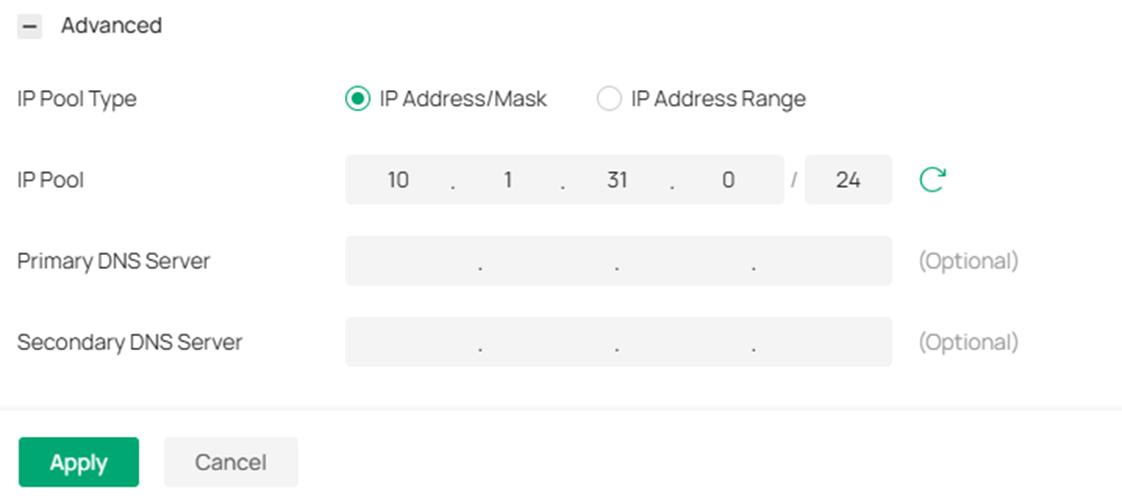
Step 5. (Optional) Expand the Advanced tab and edit the options if necessary. Hit Apply when finished.
Configuration for PPTP/L2TP Client
Step 1. Log into your controller and go to your Site > Network Config > VPN > and click VPN
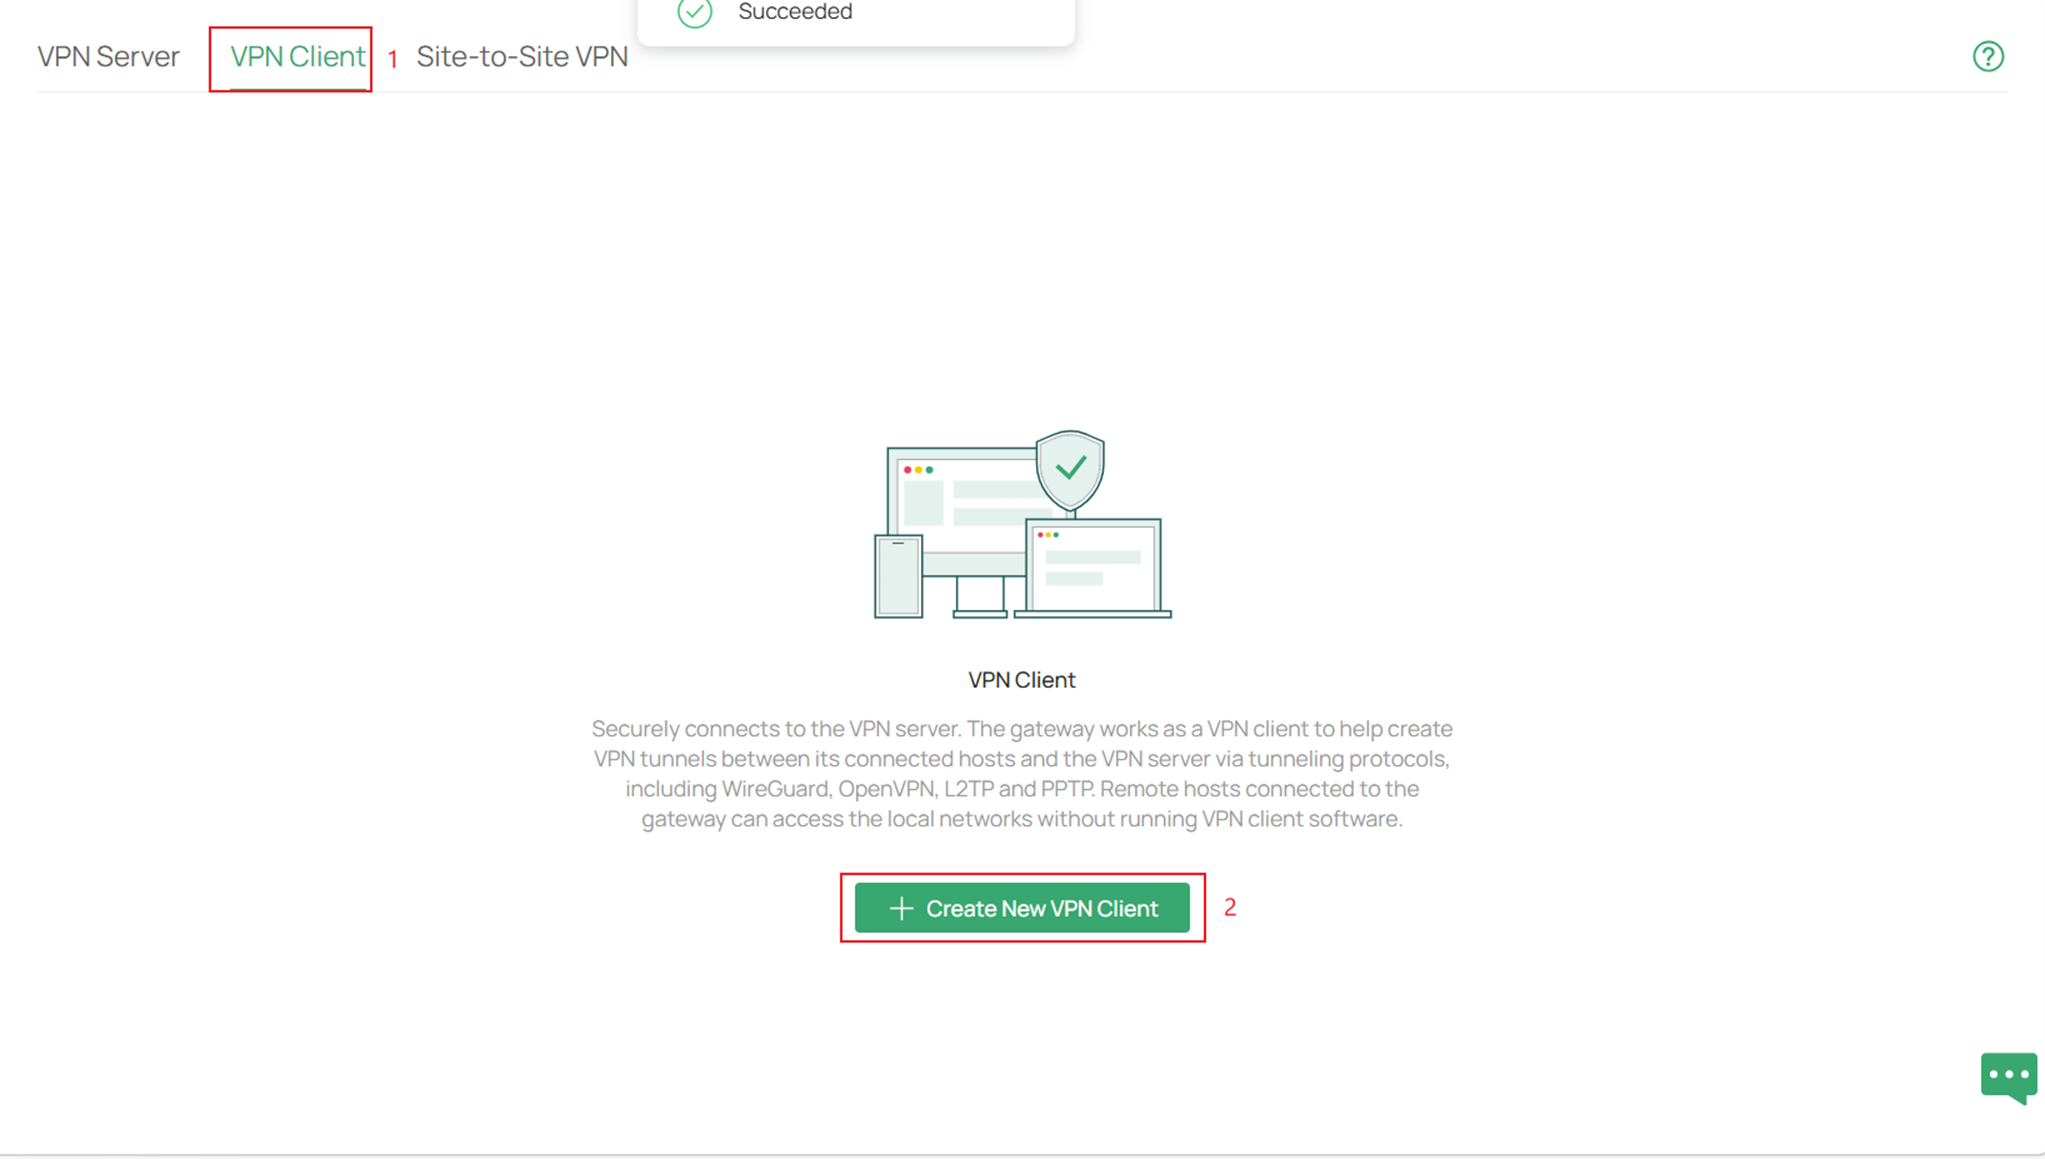
Step 2. Next go to VPN Client and click on Create New VPN Client.
Step 3. In VPN Type section make sure to select L2TP and fill in the parameters. Click Apply when complete.
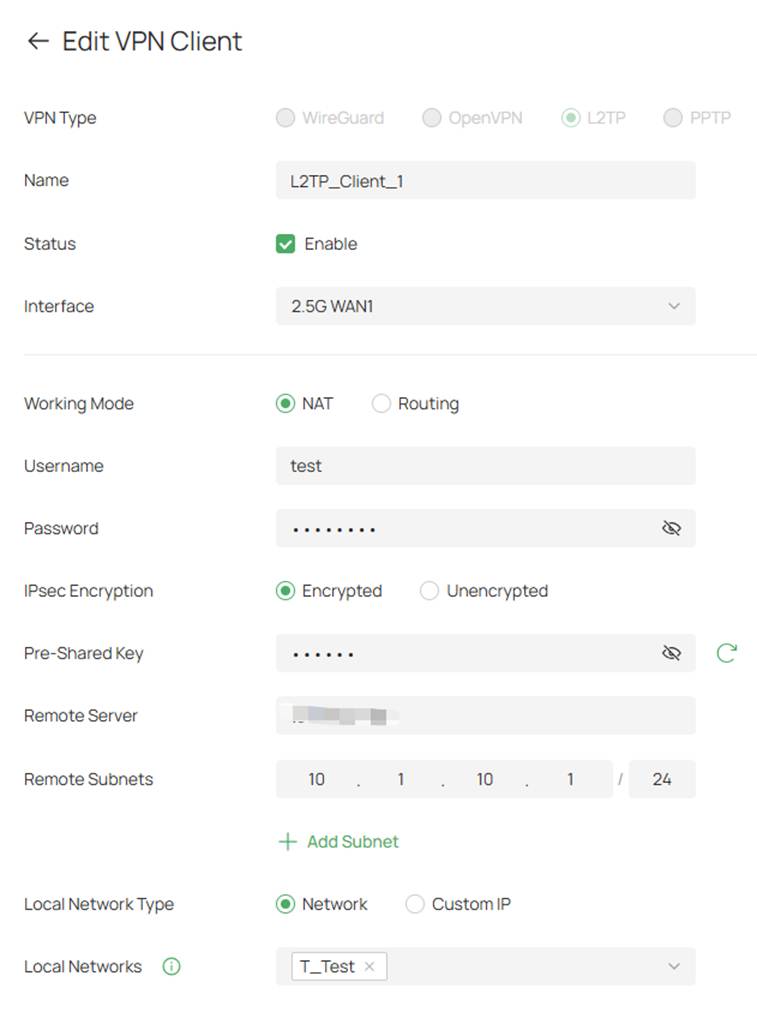
Interface: Specify the WAN port used for L2TP tunnel.
Working Mode: Specify the Working Mode as NAT or Routing.
NAT: NAT (Network Address Translation) mode allows the router to translate source IP address of L2TP packets to its WAN IP when forwarding L2TP packets. This working mode is recommended when the network mode is configured as Client-to-LAN.
Routing: Route mode allows the router to forward L2TP packets via routing protocol.
Username: Specify the account name of L2TP tunnel. It should be configured identically on server and client.
Password: Specify the password of L2TP tunnel. It should be configured identically on server and client.
IPsec Encryption: Specify whether to enable the encryption for the tunnel. If enabled, the L2TP tunnel will be encrypted by IPSec (L2TP over IPSec). Please follow the configuration of L2TP Server.
Pre-Shared Key: When the IPsec Encryption is configured as Encrypted, specify the Pre-shared Key for IKE authentication.
Remote Server: Specify the IP address or domain name of L2TP server.
Remote Subnets: The LAN Subnets of VPN Server which you can access via VPN connection.
Local Network Type: Select the type to set the local network for VPN Policy, there are two types: Network and Custom IP.
Local Networks: Select the local networks to apply the VPN Policy. The VPN Policy will only apply to the selected or filled local network.
Verification
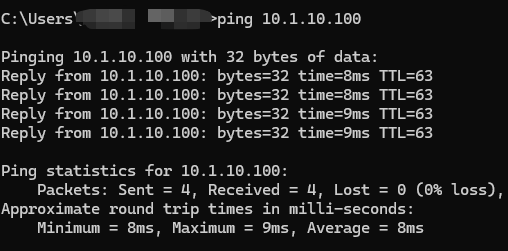
Ping from that Windows device to a device on the remote LAN:
Below is a screenshot of the VPN status from the VPN Server on Omada:

Below is a screenshot of VPN status from the VPN Client:

Conclusion
By following this guide, you have successfully configured a PPTP/L2TP VPN Server and a PPTP/L2TP VPN Client on an Omada Gateway in Controller Mode and created VPN user accounts for remote access. Remote users can now securely connect to the network and access permitted resources through the VPN tunnel.
Get to know more details of each function and configuration please go to Download Center to download the manual of your product.
QA
Q1: What should I do if fail to connect to the server.
A1: See if the router has a public IP address on its WAN port. If it does not, put the modem router in bridge mode or set port forwarding rules.
