


Contents
Error on kernel – Single image damaged
Error on kernel – Dual image damaged
Errors on Sx6xxx, S6500 and S7500 Switches
Error on kernel – Single image damaged
Error on kernel – Dual image damaged
Introduction
If power outage happens in the middle of firmware upgrade, the switch may show some error message during boot up process or not be able to boot up normally.
During a firmware upgrade, there are three essential parts: uboot, kernel and usrlmg, the phenomenon are different if the different parts are damaged. In this article, we will briefly introduce the possible errors user may encounter during boot up and the procedure of recovering damaged firmware if unable to boot normally on Omada Campus switches, please check each section follow the corresponding guide to recover according to the error you are seeing on the device.
Requirements
- Omada Campus Switches
Errors on SG5xxx Switches
Error on uboot
If the uboot is damaged due to abnormal firmware upgrade, the spare uboot will be automatically applied, the device could boot up normally, no error message will be displayed.
After device boot up, perform another firmware upgrade to fix the damaged image.
Error on kernel – Single image damaged
If the kernel is damaged due to abnormal firmware upgrade, it’s possible that only one image is damaged or both the images are damaged.
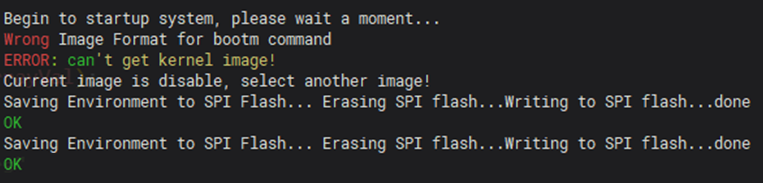
If only one image is damaged, the device will automatically switch to backup image after the current image is detected as damaged. The “Current image is disable, select another image!” message will be printed through console and the device will boot up later using backup image:
After device boot up, perform another firmware upgrade to fix the damaged image.
Error on kernel – Dual image damaged
If the kernel is damaged due to abnormal firmware upgrade, it’s possible that only one image is damaged or both the images are damaged.
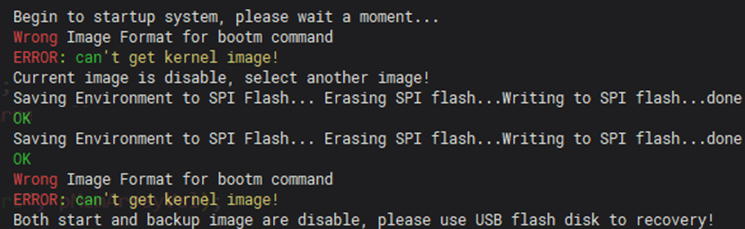
If both the two images are damaged, the device will still try to switch to backup image and boot up, after the backup image damage also detected, the error message “Both start and backup image are disable, please use USB flash disk to recovery!” will be printed.
The switch cannot boot up normally, traffic unable to pass through, “SYS” LED will not blink once per second. In this scenario, manual firmware recovery via USB flash disk is required, steps as follows:
Step 1. Download the device upgrade firmware from Omada Download Center.
Step 2. Place the device upgrade firmware (.bin format) in the USB flash disk menu.
Step 3. Insert the USB flash disk to the USB port on switch panel.
Step 4. Unplug the power, connect to the console port (RJ45 console recommended) and open a console session.
Step 5. Power on the switch, there will be a countdown of 3 seconds at the beginning, press any key to interrupt normal boot up and enter uboot menu.
Step 6. In the uboot menu, enter the corresponding number to select option “Load image from USB flash disk to recovery”.
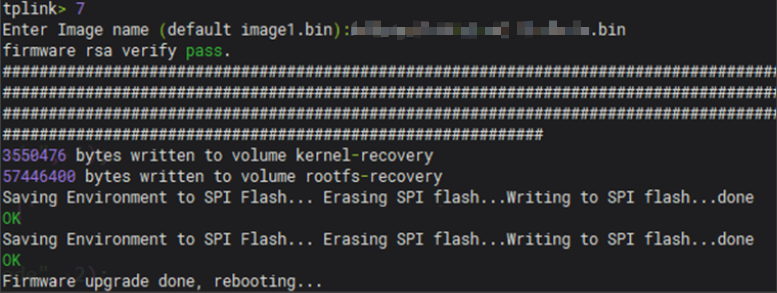
Step 7. When the notification “Enter Image name (default image1.bin)” is printed, input the file name of downloaded firmware (include .bin suffix) and press enter.
Step 8. Recovery will start and fix the current image using the firmware from USB flash disk. After the fix is finished, the device could boot up normally using the fixed image.
After device boot up, perform another firmware upgrade to fix the another damaged image.
Error on usrlmg
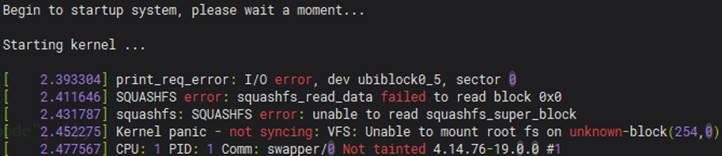
If the usrlmg is damaged, there will be error messages printed from console after “Starting kernel …”, which indicates the kernel is complete and started, error is on the last part usrlmg.
The switch cannot boot up normally, traffic unable to pass through, “SYS” LED will not blink once per second. In this scenario, manually switch to backup image and start is required. Steps as follows:
Step 1. Unplug the power, connect to the console port (RJ45 console recommended) and open a console session.
Step 2. Power on the switch, there will be a countdown of 3 seconds at the beginning, press any key to interrupt normal boot up and enter uboot menu.
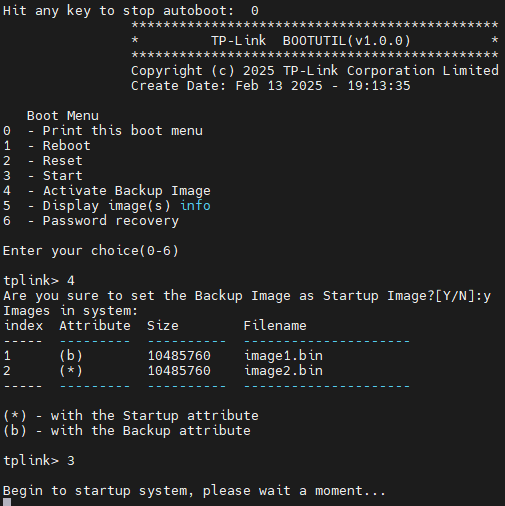
Step 3. In the uboot menu, enter the corresponding number to select option “Activate Backup Image”.
Step 4. After the message “Are you sure to set the Backup Image as Startup Image?[Y/N]”, input “y” and press enter.
Step 5. After the current startup and backup image info is printed, enter the corresponding number to select option “Start”, the switch will then be able to boot up using the backup image normally.

After device boot up, perform another firmware upgrade to fix the another damaged image.
Errors on Sx6xxx, S6500 and S7500 Switches
Error on uboot
If the uboot is damaged due to abnormal firmware upgrade, the following warning messages will be printed in console:

As there is a backup uboot stored in the device, user could simply wait for 20 seconds without any operation, and the switch will automatically apply the backup uboot to finish booting up normally. After device boot up, perform another firmware upgrade to fix the damaged image.
If you would like to use recovery mode to fix the damaged image immediately, press any key when the warning message is printed, after that, follow the steps below:
Step 1. Download the device upgrade firmware from Omada Download Center to your PC.
Step 2. Configure static IPv4 address for your PC network adapter, the address needs to be in the subnet 192.168.0.0/24 while excluding 192.168.0.30 as this address is used by recovery UI.
Step 3. Connect the PC network adapter to MGMT port of the switch.
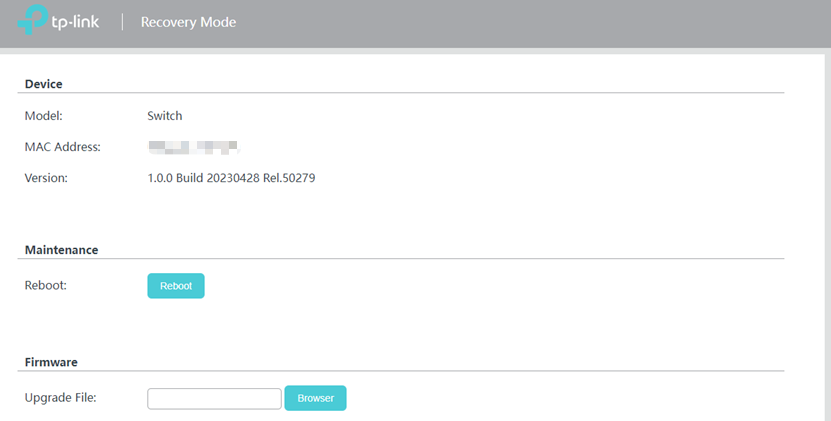
Step 4. Access 192.168.0.30 to enter the recovery mode UI.

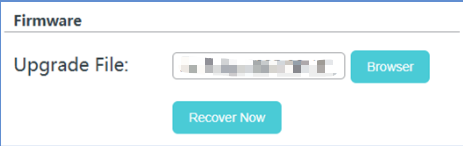
Step 5. Click Browser button in the Firmware section and manually select the upgrade file (.bin format).
Step 6. Click Recover Now to proceed the firmware upgrade.
Step 7. “Rebooting…” message will pop up, the damaged image will be fixed and the switch could boot up normally, no additional firmware upgrade is required.
Error on kernel – Single image damaged
If the kernel is damaged due to abnormal firmware upgrade, it’s possible that only one image is damaged or both the images are damaged.
If only one image is damaged, the device will automatically switch to backup image after the current image is detected as damaged. The “Current image is disable, select another image!” message will be printed through console and the device will boot up later using backup image:

After device boot up, perform another firmware upgrade to fix the damaged image.
Error on kernel – Dual image damaged
If the kernel is damaged due to abnormal firmware upgrade, it’s possible that only one image is damaged or both the images are damaged.
If both the two images are damaged, the device will still try to switch to backup image and boot up, after the backup image damage also detected, the error message “Both start and backup image are disable, httpd start recovery!” will be printed.
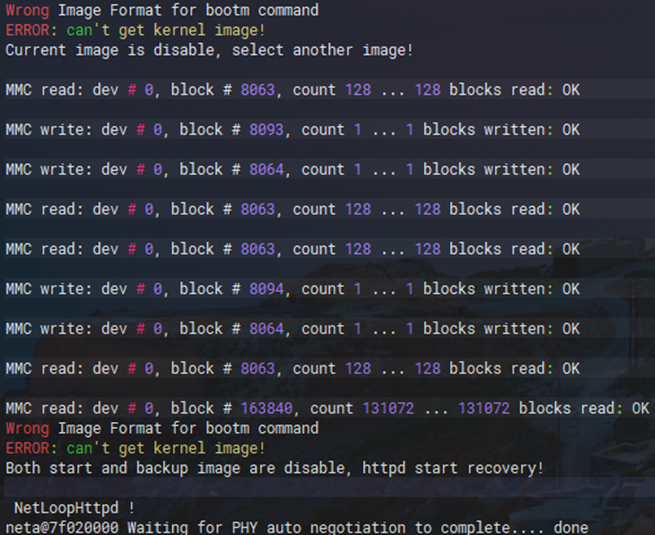
The switch cannot boot up normally, traffic unable to pass through, “SYS” LED will not blink once per second. In this scenario, the switch will automatically enter recovery mode, after that, follow the steps below to fix the image:
Step 1. Download the device upgrade firmware from Omada Download Center to your PC.
Step 2. Configure static IPv4 address for your PC network adapter, the address needs to be in the subnet 192.168.0.0/24 while excluding 192.168.0.30 as this address is used by recovery UI.
Step 3. Connect the PC network adapter to MGMT port of the switch.
Step 4. Access 192.168.0.30 to enter the recovery mode UI.
Step 5. Click Browser button in the Firmware section and manually select the upgrade file (.bin format).
Step 6. Click Recover Now to proceed the firmware upgrade.

Step 7. “Rebooting…” message will pop up, the damaged image will be fixed and the switch could boot up normally.
After device boot up, perform another firmware upgrade to fix the another damaged image.
Error on usrlmg
If the usrlmg is damaged, there will be error messages printed from console after “Starting kernel …”, which indicates the kernel is complete and started, error is on the last part usrlmg.
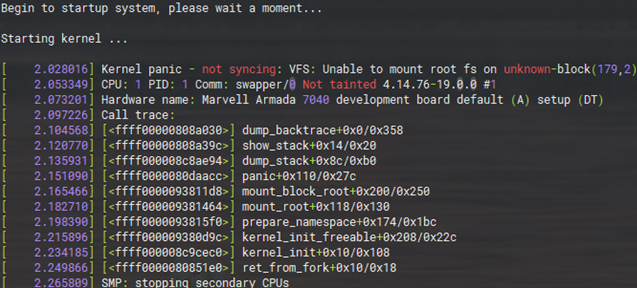
The switch cannot boot up normally, traffic unable to pass through, “SYS” LED will not blink once per second. In this scenario, manually switch to backup image and start is required. Steps as follows:
Step 1. Unplug the power, connect to the console port (RJ45 console recommended) and open a console session.
Step 2. Power on the switch, there will be a countdown of 3 seconds at the beginning, press any key to interrupt normal boot up and enter uboot menu.
Step 3. In the uboot menu, enter the corresponding number to select option “Activate Backup Image”.
Step 4. After the message “Are you sure to set the Backup Image as Startup Image?[Y/N]”, input “y” and press enter.
Step 5. After the current startup and backup image info is printed, enter the corresponding number to select option “Start”, the switch will then be able to boot up using the backup image normally.
After device boot up, perform another firmware upgrade to fix the another damaged image.
Conclusion
In this article, we introduced the firmware damage scenarios user may encounter and ways to recover in order to boot up the switch normally.
Get to know more details of each function and configuration please go to Download Center to download the manual of your product.
