


Omada Wi-Fi Roaming Troubleshooting Guide


Contents
Troubleshoot for Network Configuration
Troubleshoot for Controller Configuration
Troubleshoot for AP Deployment
Troubleshoot for Client-Side Behavior
Introduction
Wireless roaming is a foundational feature for seamless mobility in enterprise network environments. Factors such as network layout, physical AP deployment, client capabilities, and advanced system configurations heavily dictate roaming efficiency. This troubleshooting guide details how to utilize the new architecture and optimization features of the Omada ecosystem to diagnose and resolve roaming issues.
Requirements
- Omada AP
- Omada Controller
- Omada App
Troubleshooting
Troubleshoot for Network Configuration
Ensure your foundational wireless configurations are identical and optimized across the site:
Step 1. Verify that the target AP's SSID matches the source AP exactly (including the SSID name, security method, encryption, and password). Roaming fails if these attributes differ.
Step 2. Check that all participating APs are contained within the exact same logical site, as roaming profiles are strictly site-bound.
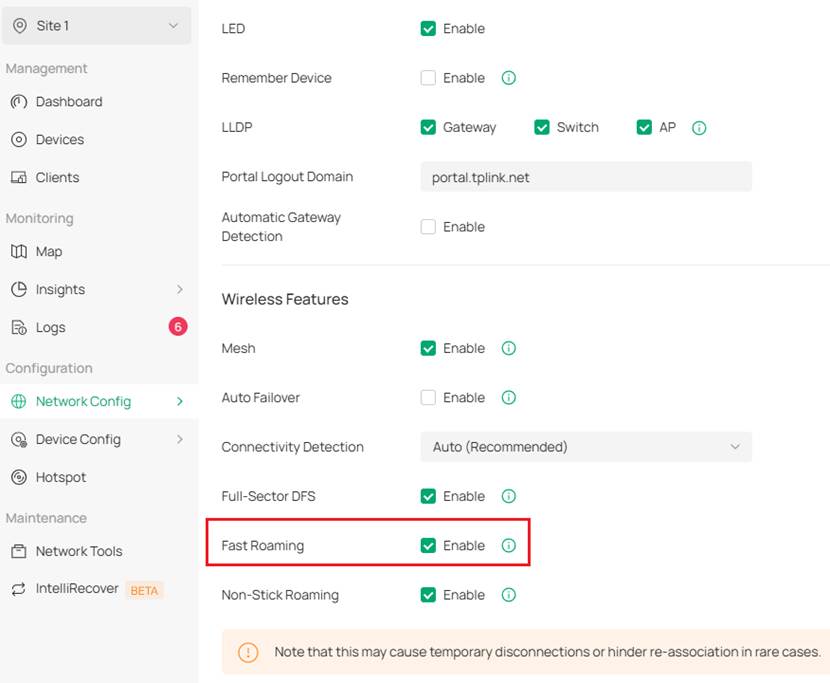
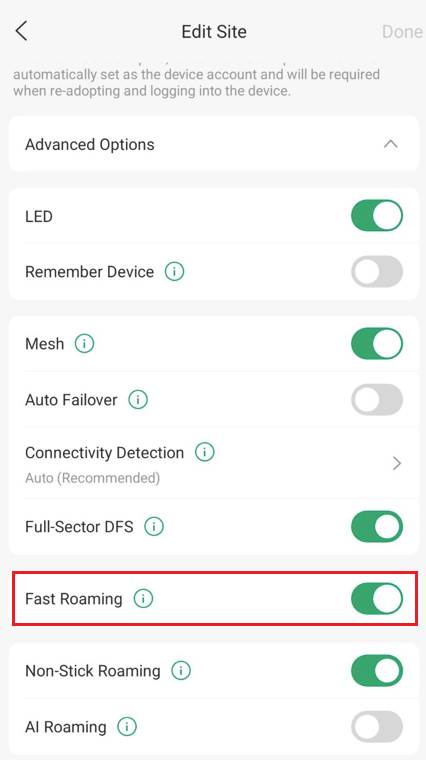
Step 3. Confirm that Fast Roaming is enabled to assist clients supporting 802.11k/v in transitioning faster between access points.
On Controller, this is found in Site > Network Config > Site Settings > Wireless Features
On Omada App, this is found in Site > Settings > Site Settings > Advanced Options.
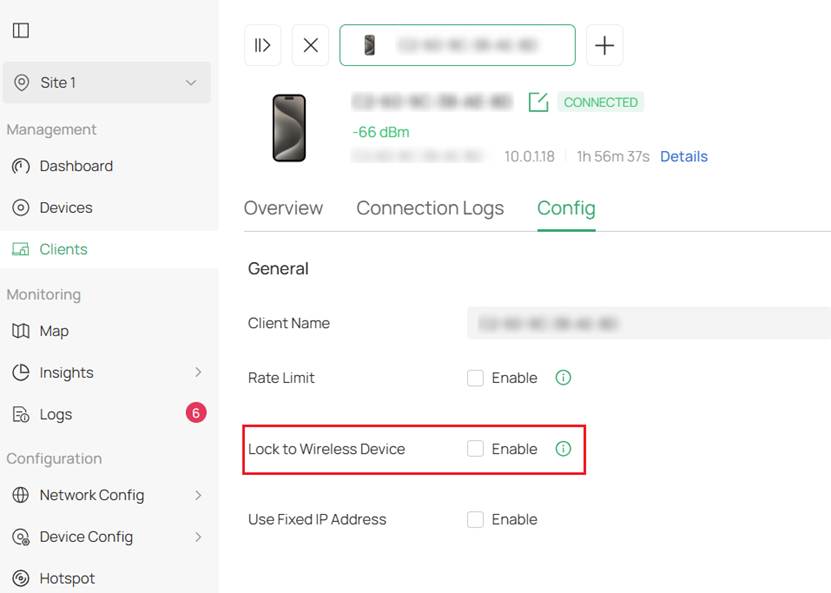
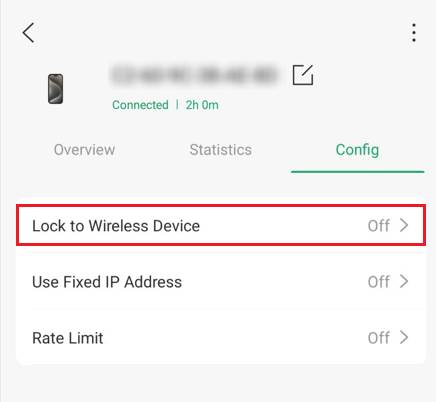
Step 4. Verify whether a problematic client has the Lock to AP feature actively enabled, which overrides roaming policies and forces connection to a single AP.
On Controller, this is found in Clients > Device > Manage Client > Config.
On Omada App, this is found in Site > Clients > Device > Config.
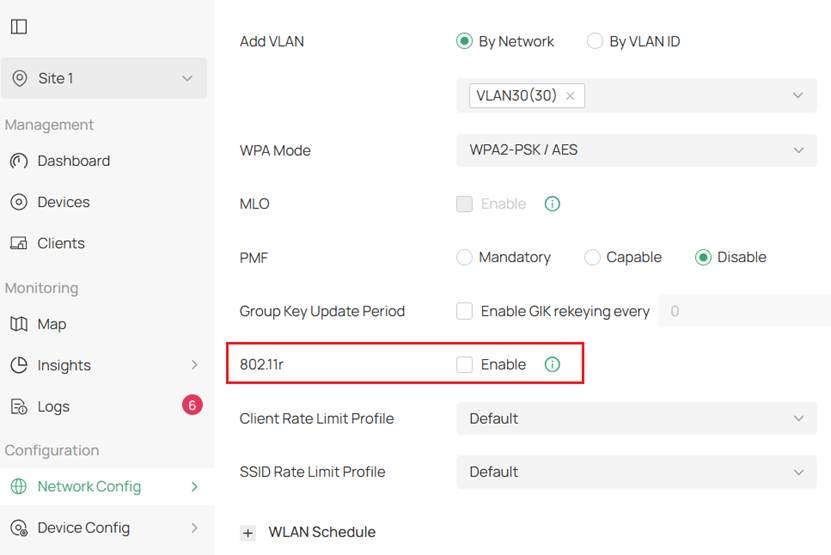
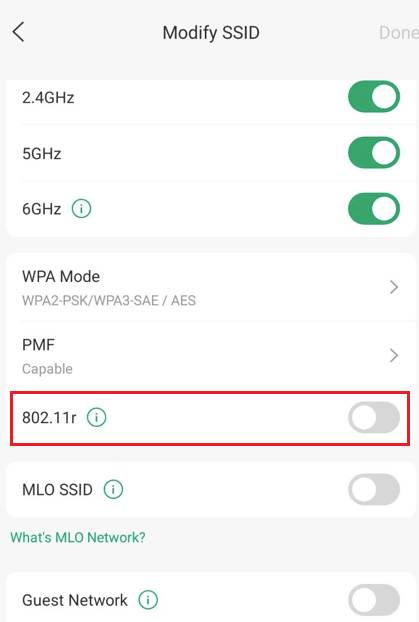
Step 5. Certain legacy client devices do not support the 802.11r protocol. Disable 802.11r globally on the SSID profile to test for improved compatibility.
On Controller, this is found in Site > Network Config > WLAN > Edit SSID > Advanced Settings.
On Omada App, this is found in Site > Settings > Wireless Networks > WLAN > SSID > Advanced Options.
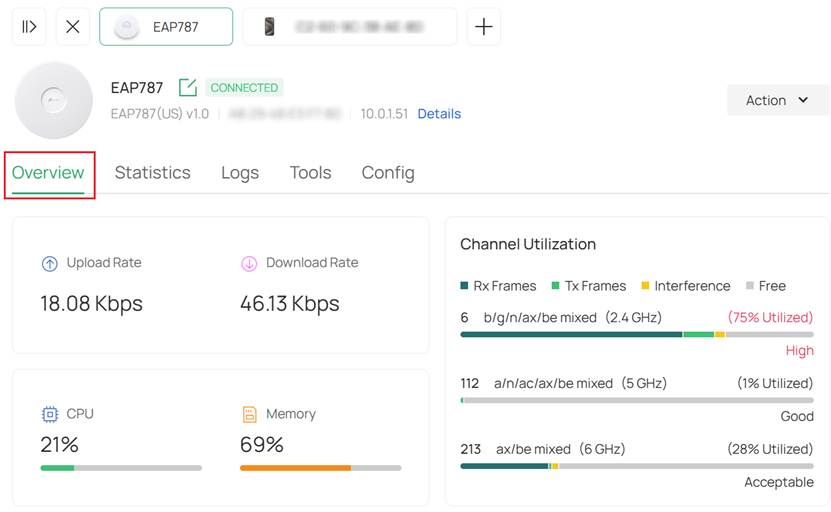
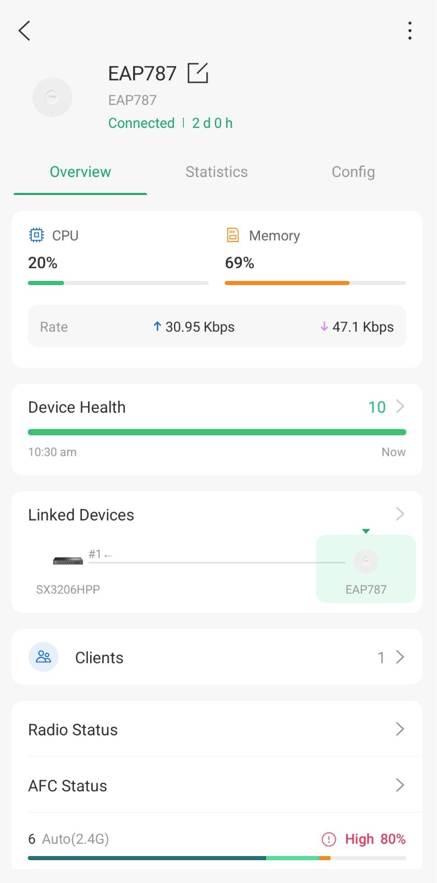
Step 6. Check the target AP's current load status. Heavily loaded or overloaded access points may reject incoming handoffs, causing roaming failures.
On Controller, this is found on AP Overview page found in Site > Devices > AP > Overview where you can find statistics related to CPU Usage, Memory Usage, Channel Utilization, Channel Interference Rate, and Number of Clients
On Omada App, this is found on Site > Devices > AP > Overview.
Step 7. Avoid broadcasting identical SSID profiles from third-party vendor networks within the same environment, as this breaks consistent client association with Omada APs.
Troubleshoot for Controller Configuration
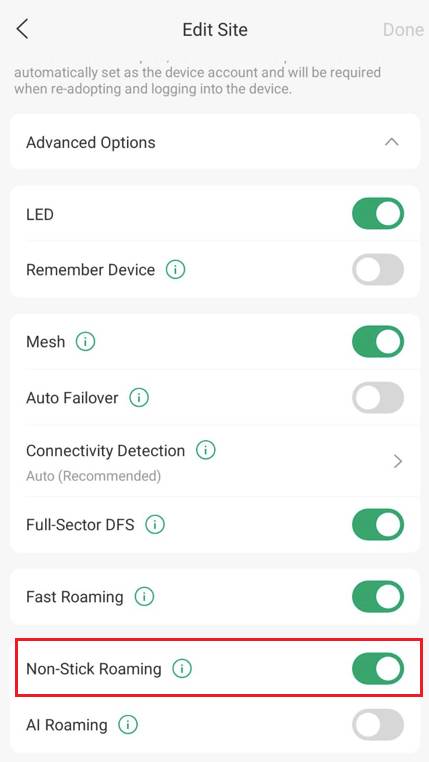
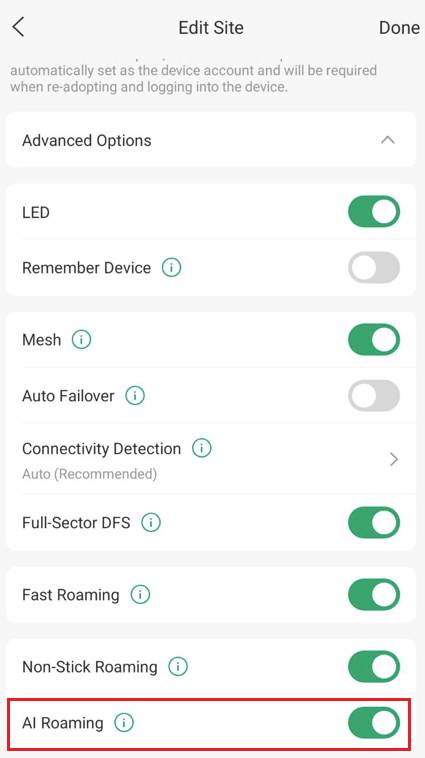
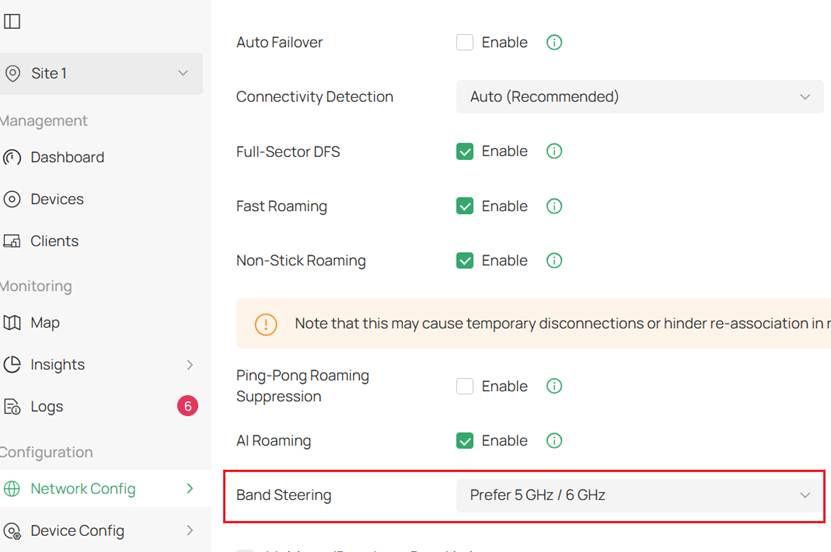
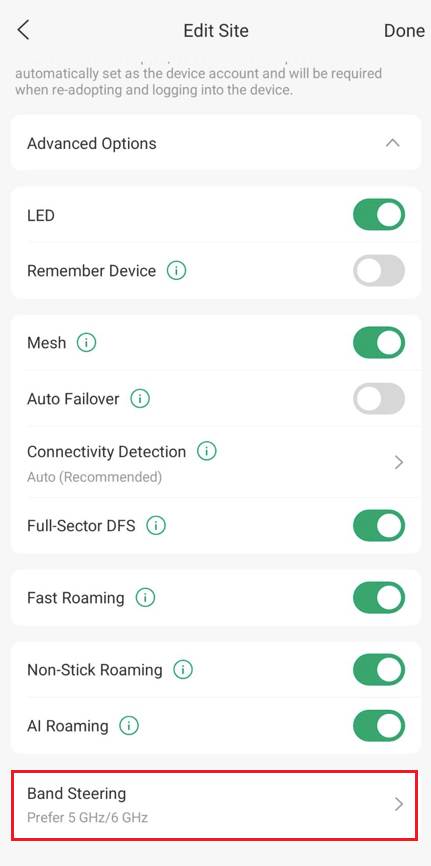
Omada Controller v6.2 introduces specific automated tuning mechanisms designed to solve complex roaming behaviors. If basic configuration is correct but clients struggle to move cleanly, optimize the following parameters under Site Settings > Wireless Features on Controller and Site Settings > Advanced Options on Omada App:
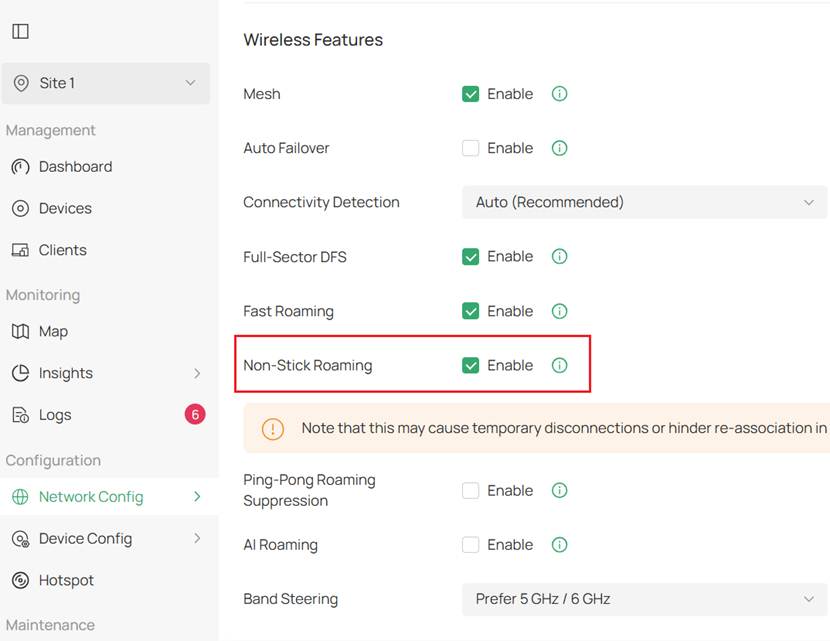
Step 1. Enable Non-Stick Roaming to forcefully disconnect "sticky clients" that maintain an association with a distant AP despite experiencing degraded signal quality. This forces the client to instantly discover and shift to a closer, superior wireless device.
Step 2. If clients are oscillating continuously between two adjacent APs, enable Ping-Pong Roaming Suppression. This stabilizes connections in weak signal overlap boundaries.
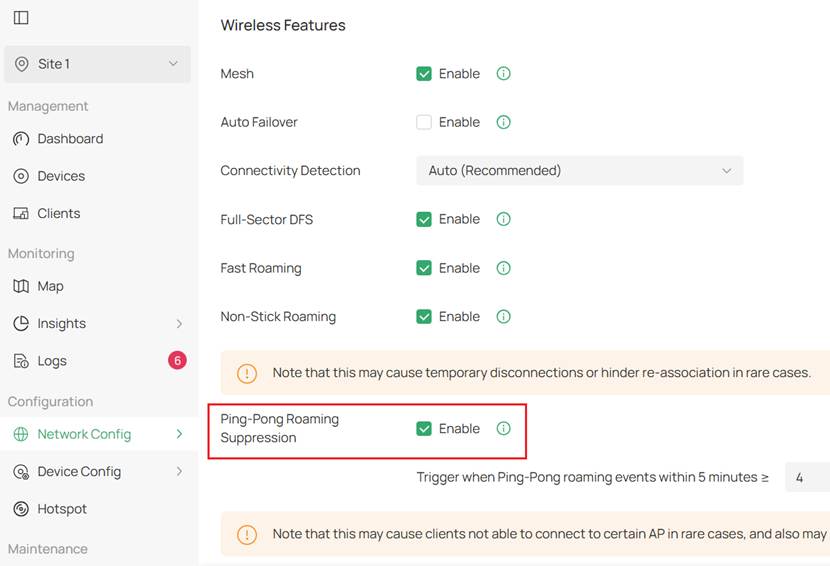
Note: This feature cannot be changed on Omada App, only on Controller.
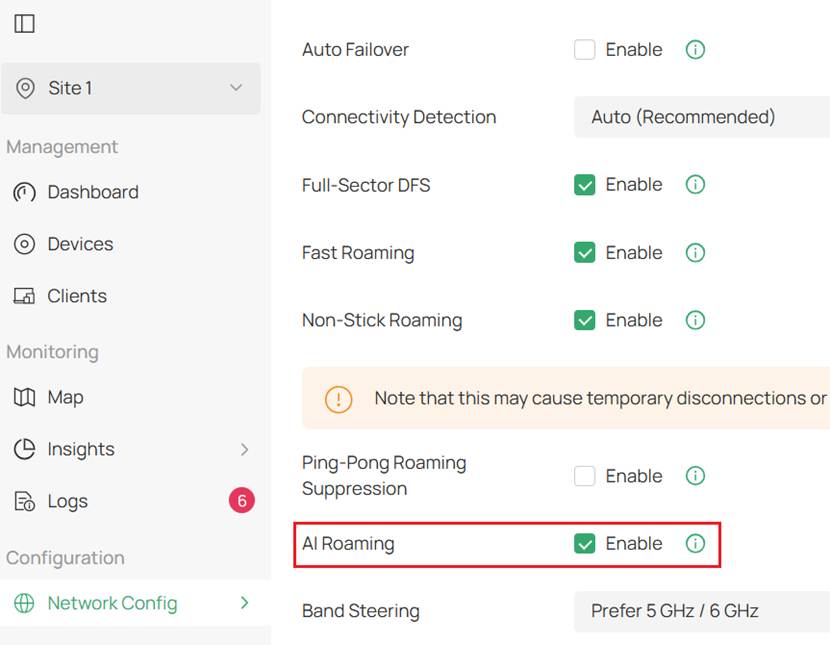
Step 3. Turn on AI Roaming alongside Fast Roaming to dynamically calculate and optimize the handoff matrices for 802.11k/v compliant devices.
Step 4. Enable Band Steering to seamlessly transition multi-band clients away from the congested 2.4 GHz spectrum onto less noisy 5 GHz and 6 GHz bands.
Troubleshoot for AP Deployment
Physical access point placement determines the structural geometry of the RF boundaries. Use the Heat Map or Network Tools configuration options within the controller interface to diagnose coverage issues:
Step 1. If adjacent APs are too far apart, this creates an overly large area of weak signal coverage or dead zones. Clients may disconnect completely or cycle rapidly in low-signal bands. Remedy this by adding intermediate AP units or adjusting the transmit power upward.
Step 2. If adjacent APs are too close together, then APs will overlap excessively, and a moving client may never drop below the necessary threshold required to trigger a roam. Lower individual AP transmit power manually to minimize aggressive AP overlap, or rely on AI Roaming mechanics to smooth out boundary handoffs.
Troubleshoot for Client-Side Behavior
Isolate whether the roaming failure is system-wide or restricted to an isolated piece of hardware:
Step 1. If a specific client experiences notable lag during roaming, confirm it explicitly supports the 802.11k/v standards. Ensure the client's network driver software is updated to the latest version.
Step 2. If a specific device successfully shifts to a target AP but immediately loses all internet access, disable the 802.11r protocol on that SSID to verify if legacy compatibility issues are interrupting its stateful reconnect.
Conclusion
This guide analyzed roaming troubleshooting from four aspects: network configuration, controller configuration, AP deployment, and client-side behavior. If the client is experiencing problems while roaming, you can troubleshoot by following the steps above.
To learn more about each function and configuration, please visit Support Home to download or check the manual for your product.
