


How to Use SightCast When Managed by Omada Guard


Contents
Set up a Public or Private View from the View section
Set up a Public or Private View from the Live View section
Set up a Public or Private View from the View section
Select an Existing View for SightCast
Verify SightCast synchronization
Introduction
Omada SightCast is an HDMI display endpoint designed for Omada Security deployments. When managed by Omada Guard on an Omada Fusion Pro Gateway, administrators can centrally manage SightCast devices, create and synchronize views, and display live camera streams on monitors or video walls.
This article explains how to adopt SightCast into Omada Guard, create a Public View, synchronize the view to SightCast, and verify the display.
Requirements
- Omada Fusion Pro Gateway
- Omada IPC/SightCast with a supported firmware version
Configuration
Add SightCast in Omada Guard
Connect the Omada Security device to the same network as the Omada Fusion Pro Gateway. Then go to Omada Guard > Devices and click the Adopt button to add the device.
Note: If the SightCast device is uninitialized, it can be adopted directly without credential verification. If it has already been initialized, enter its administrator credentials when prompted.
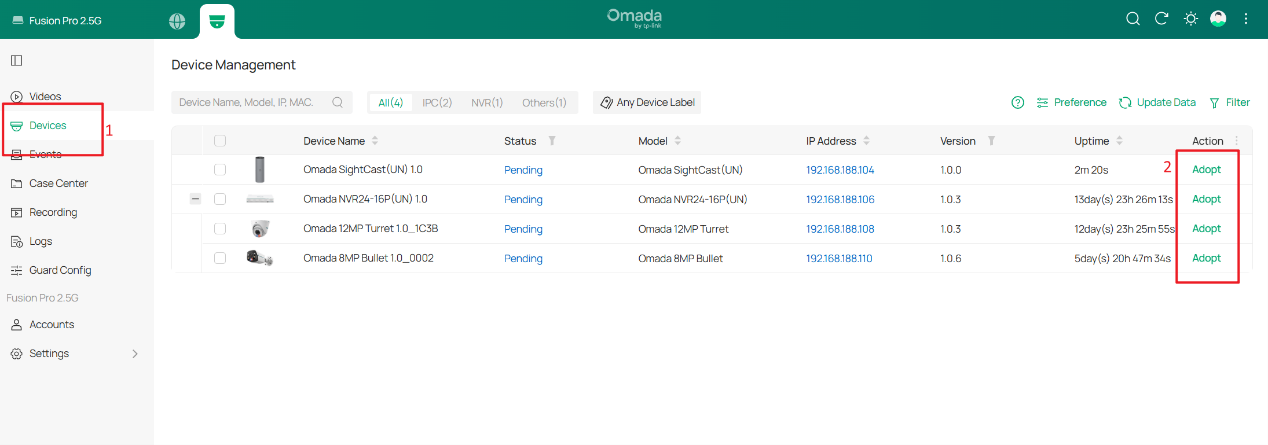
If the SightCast cannot be discovered, please check the following:
- Ensure the SightCast device is powered on and operating normally.
- Ensure the SightCast device is connected to the network and reachable by the Fusion Pro Gateway.
- Verify that the SightCast device is not already managed by another controller or platform.
- Verify that the device model and firmware version are supported.
- Ensure Omada Guard is running a supported version.
For instructions on adding devices through the Omada App, refer to How to Add Omada Security Devices to Omada Fusion Pro Gateway.
Set up a Public or Private View from the View section
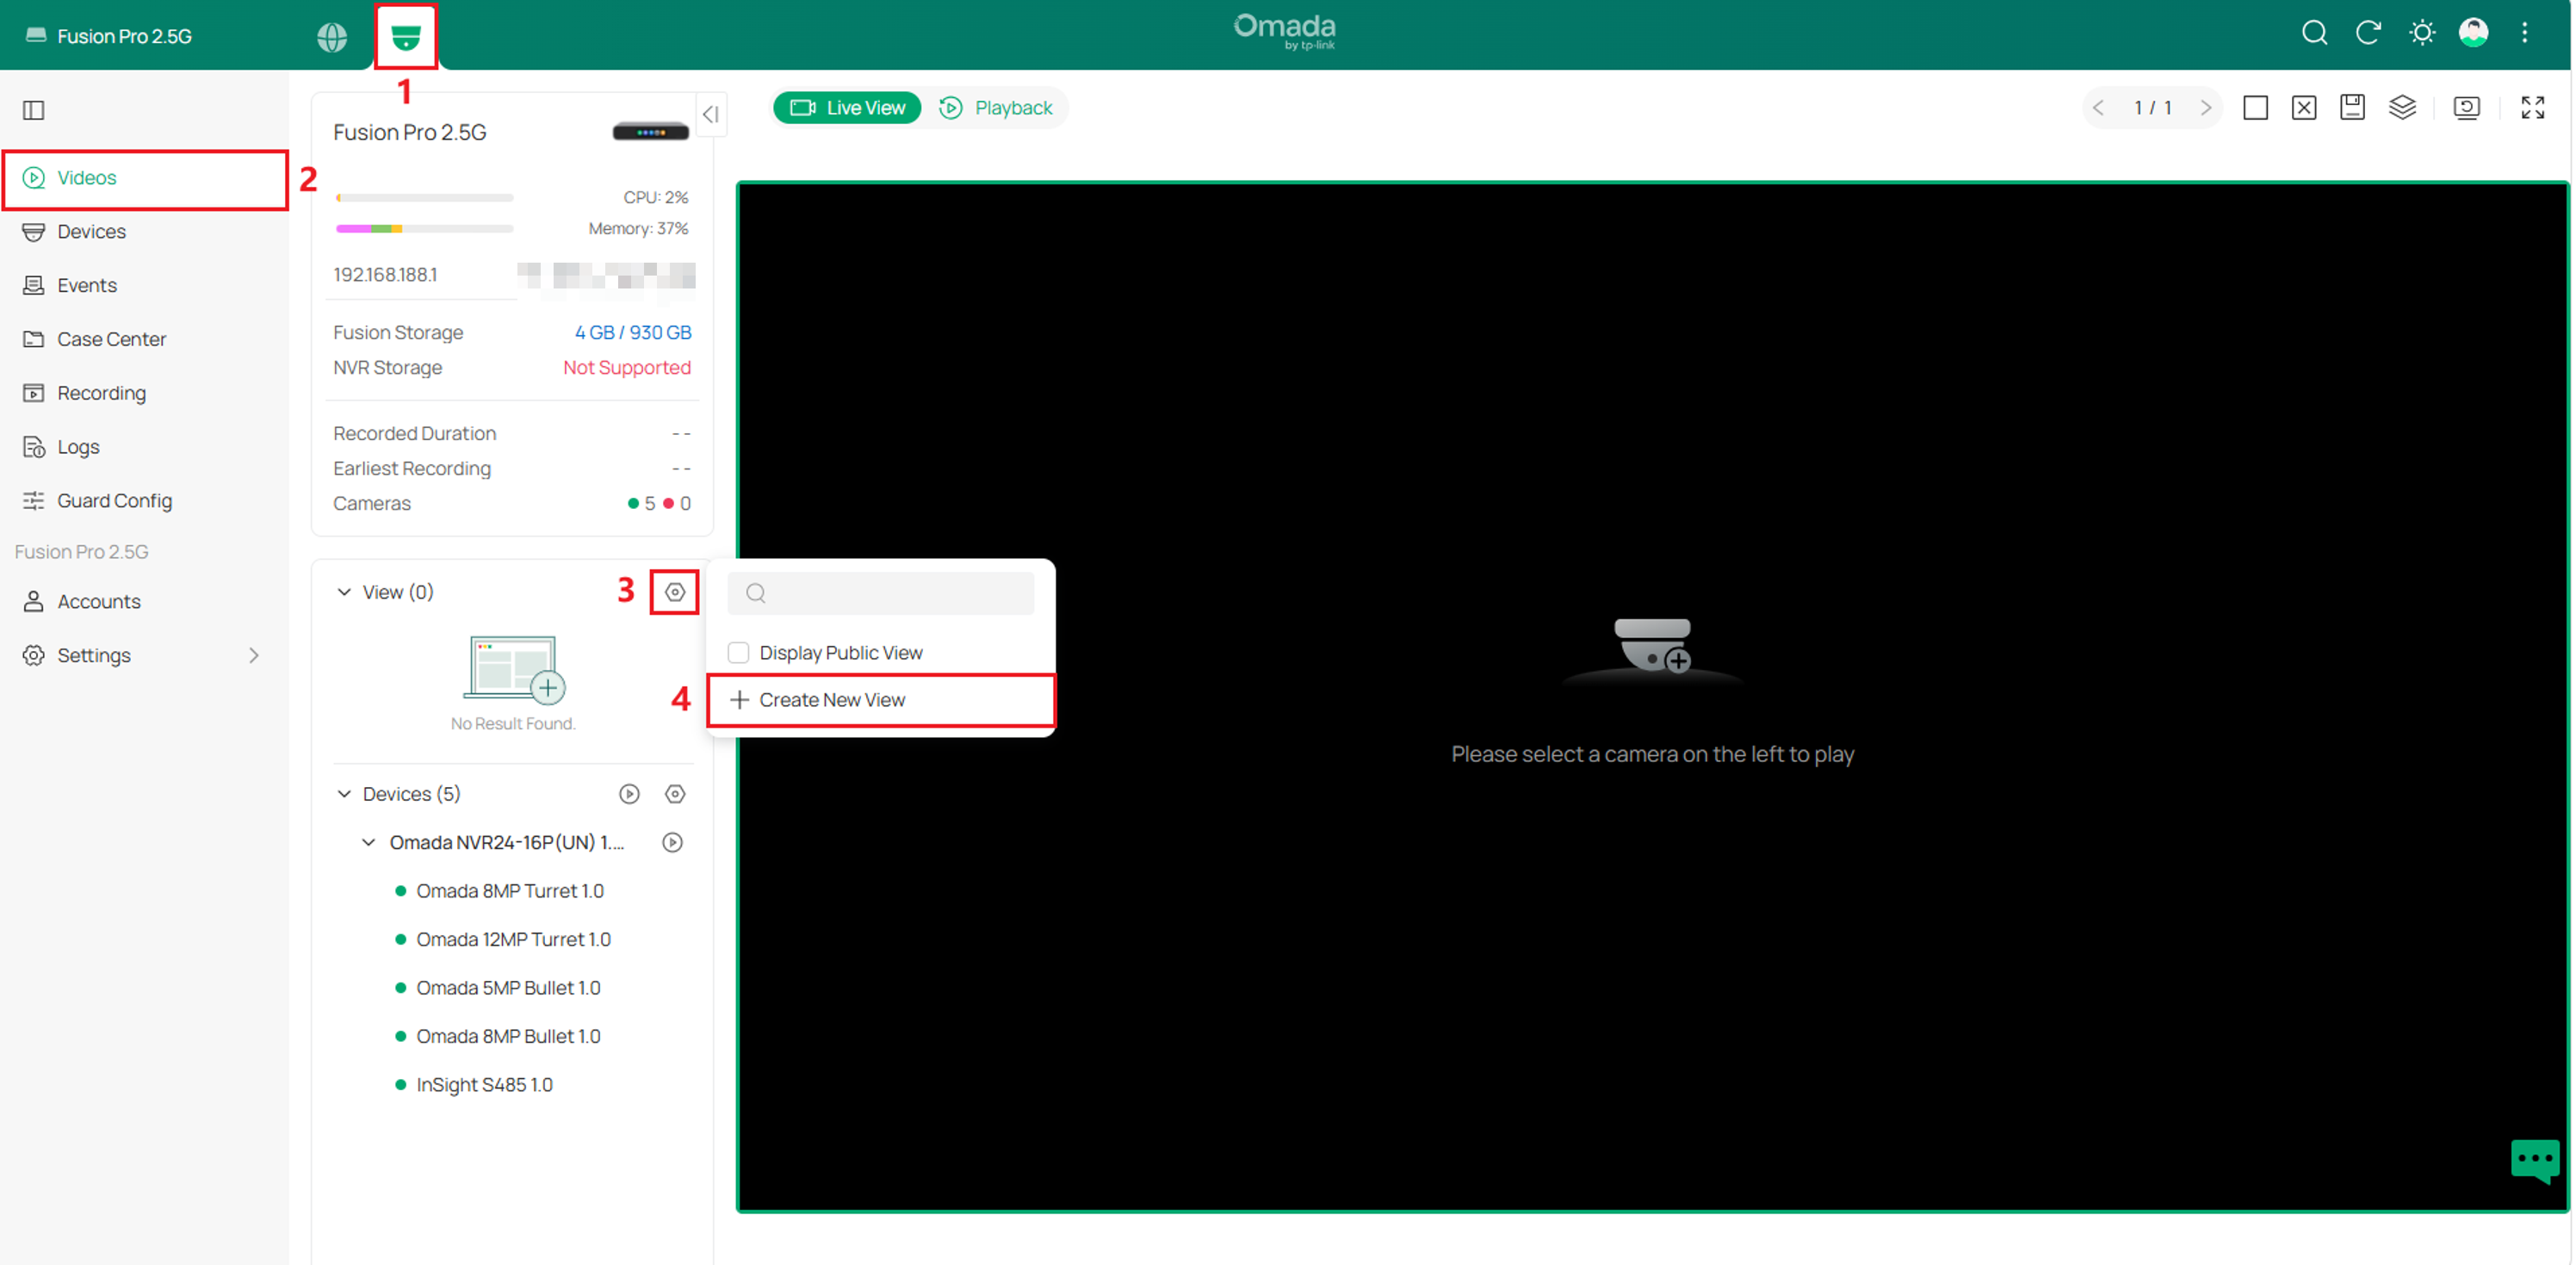
Step 1. Go to Omada Guard > Videos. In the View section, click the Settings icon and select + Create New View.
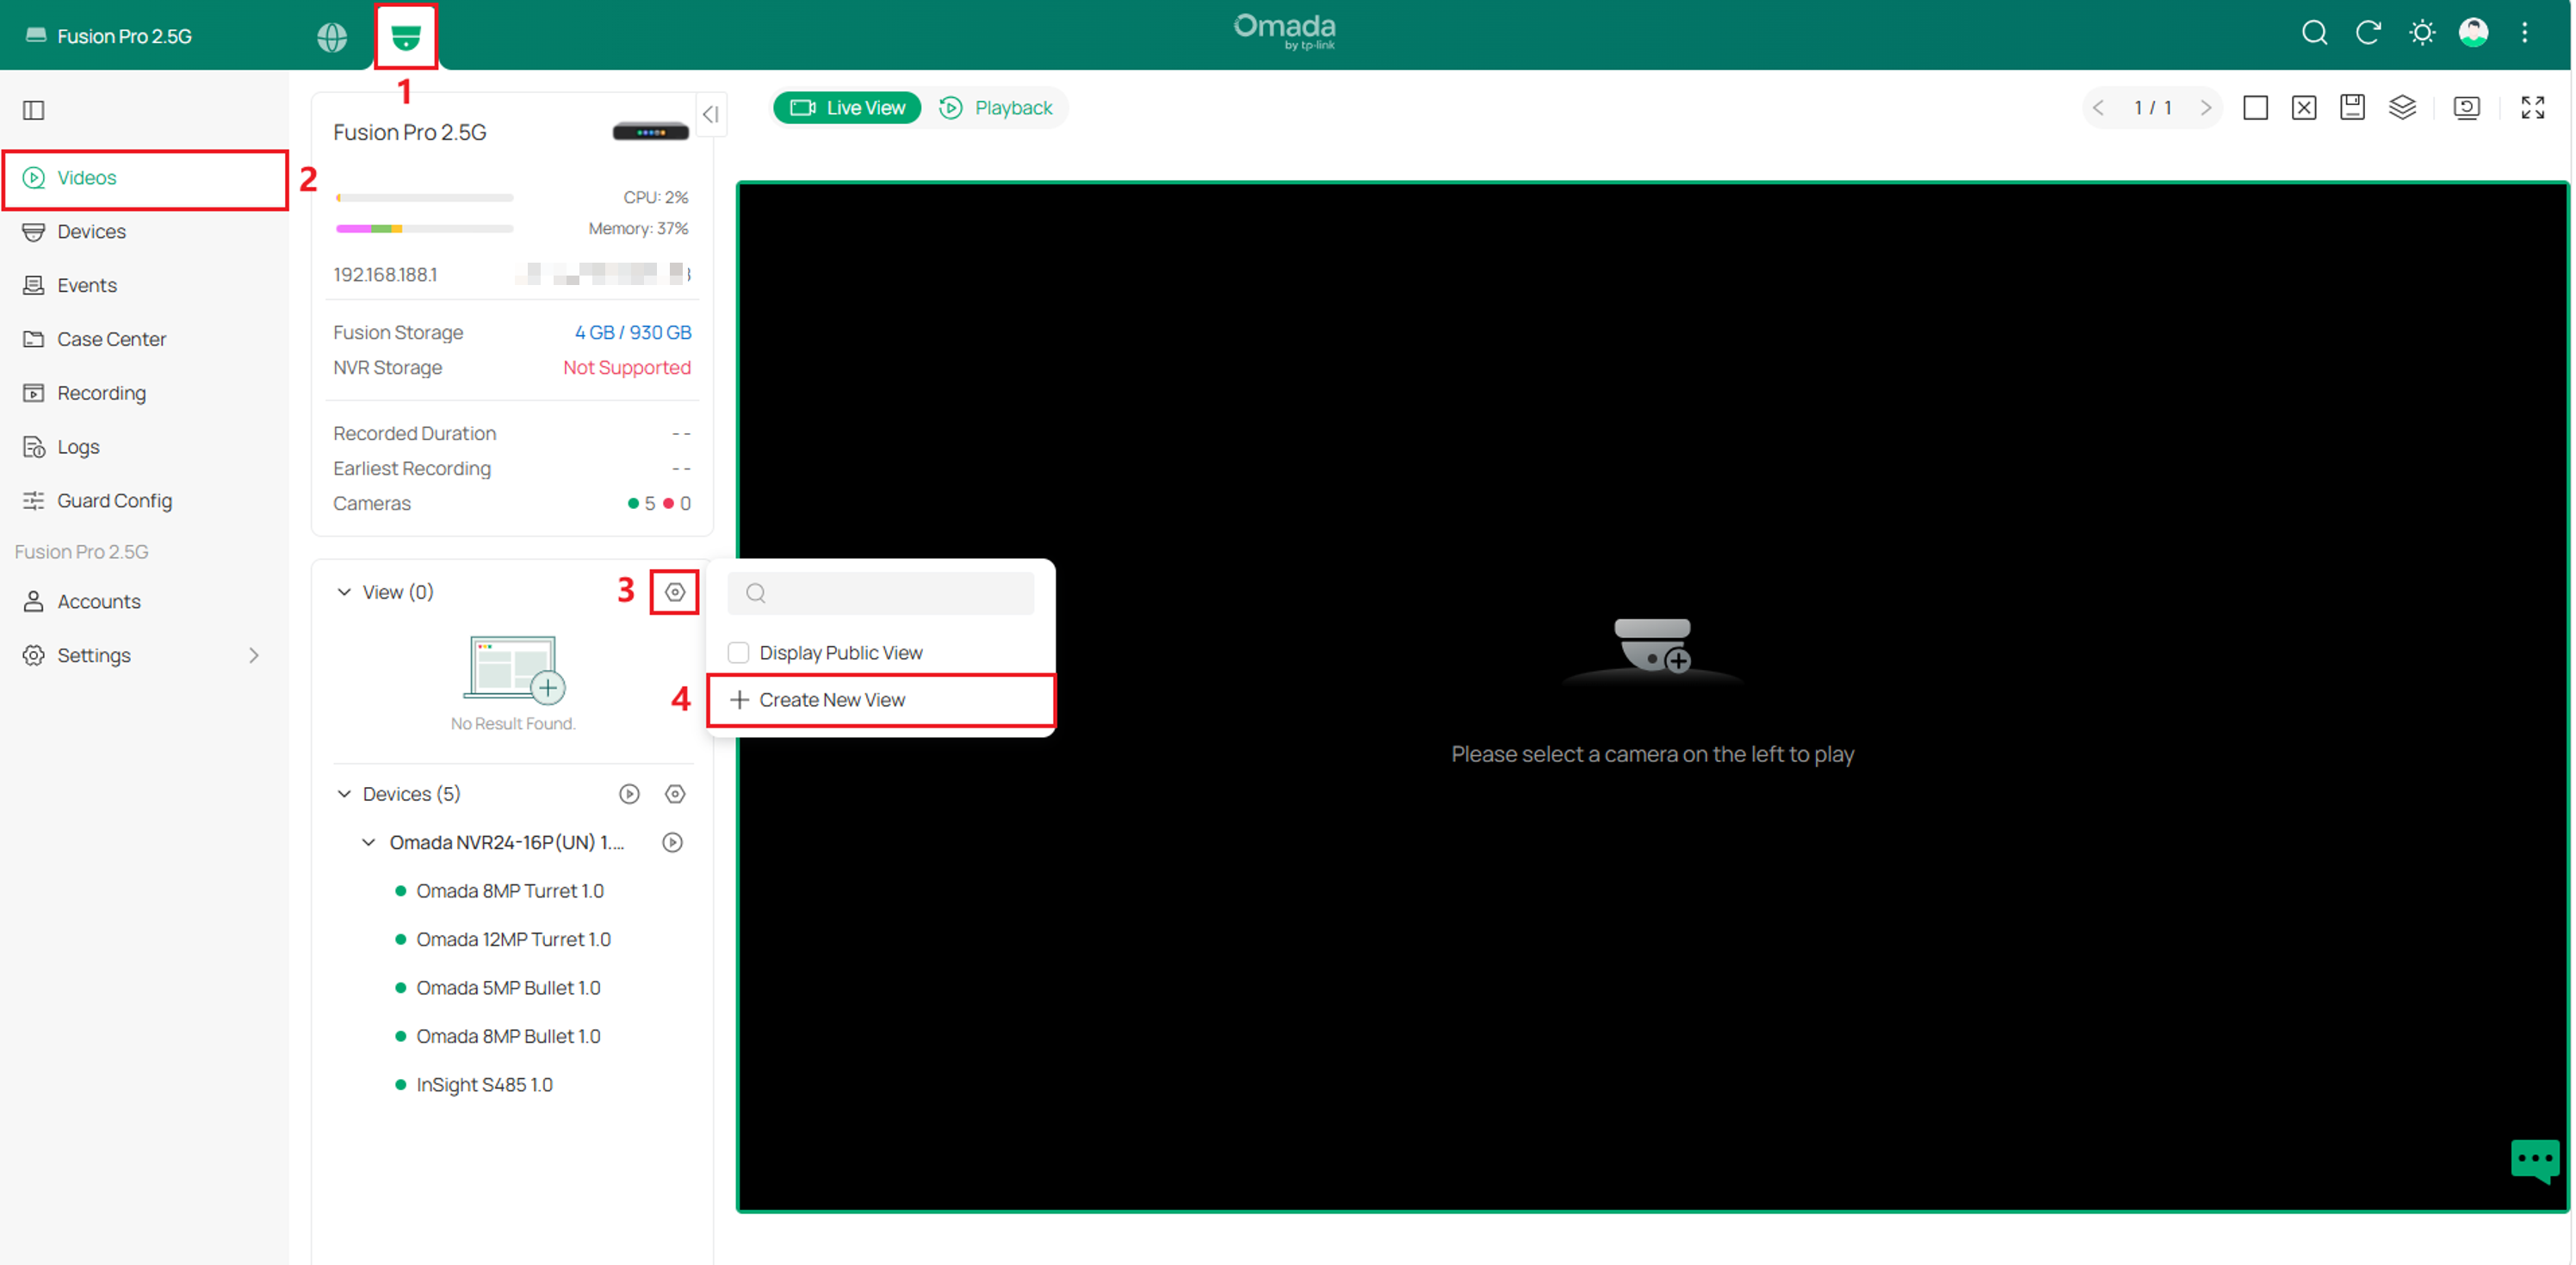
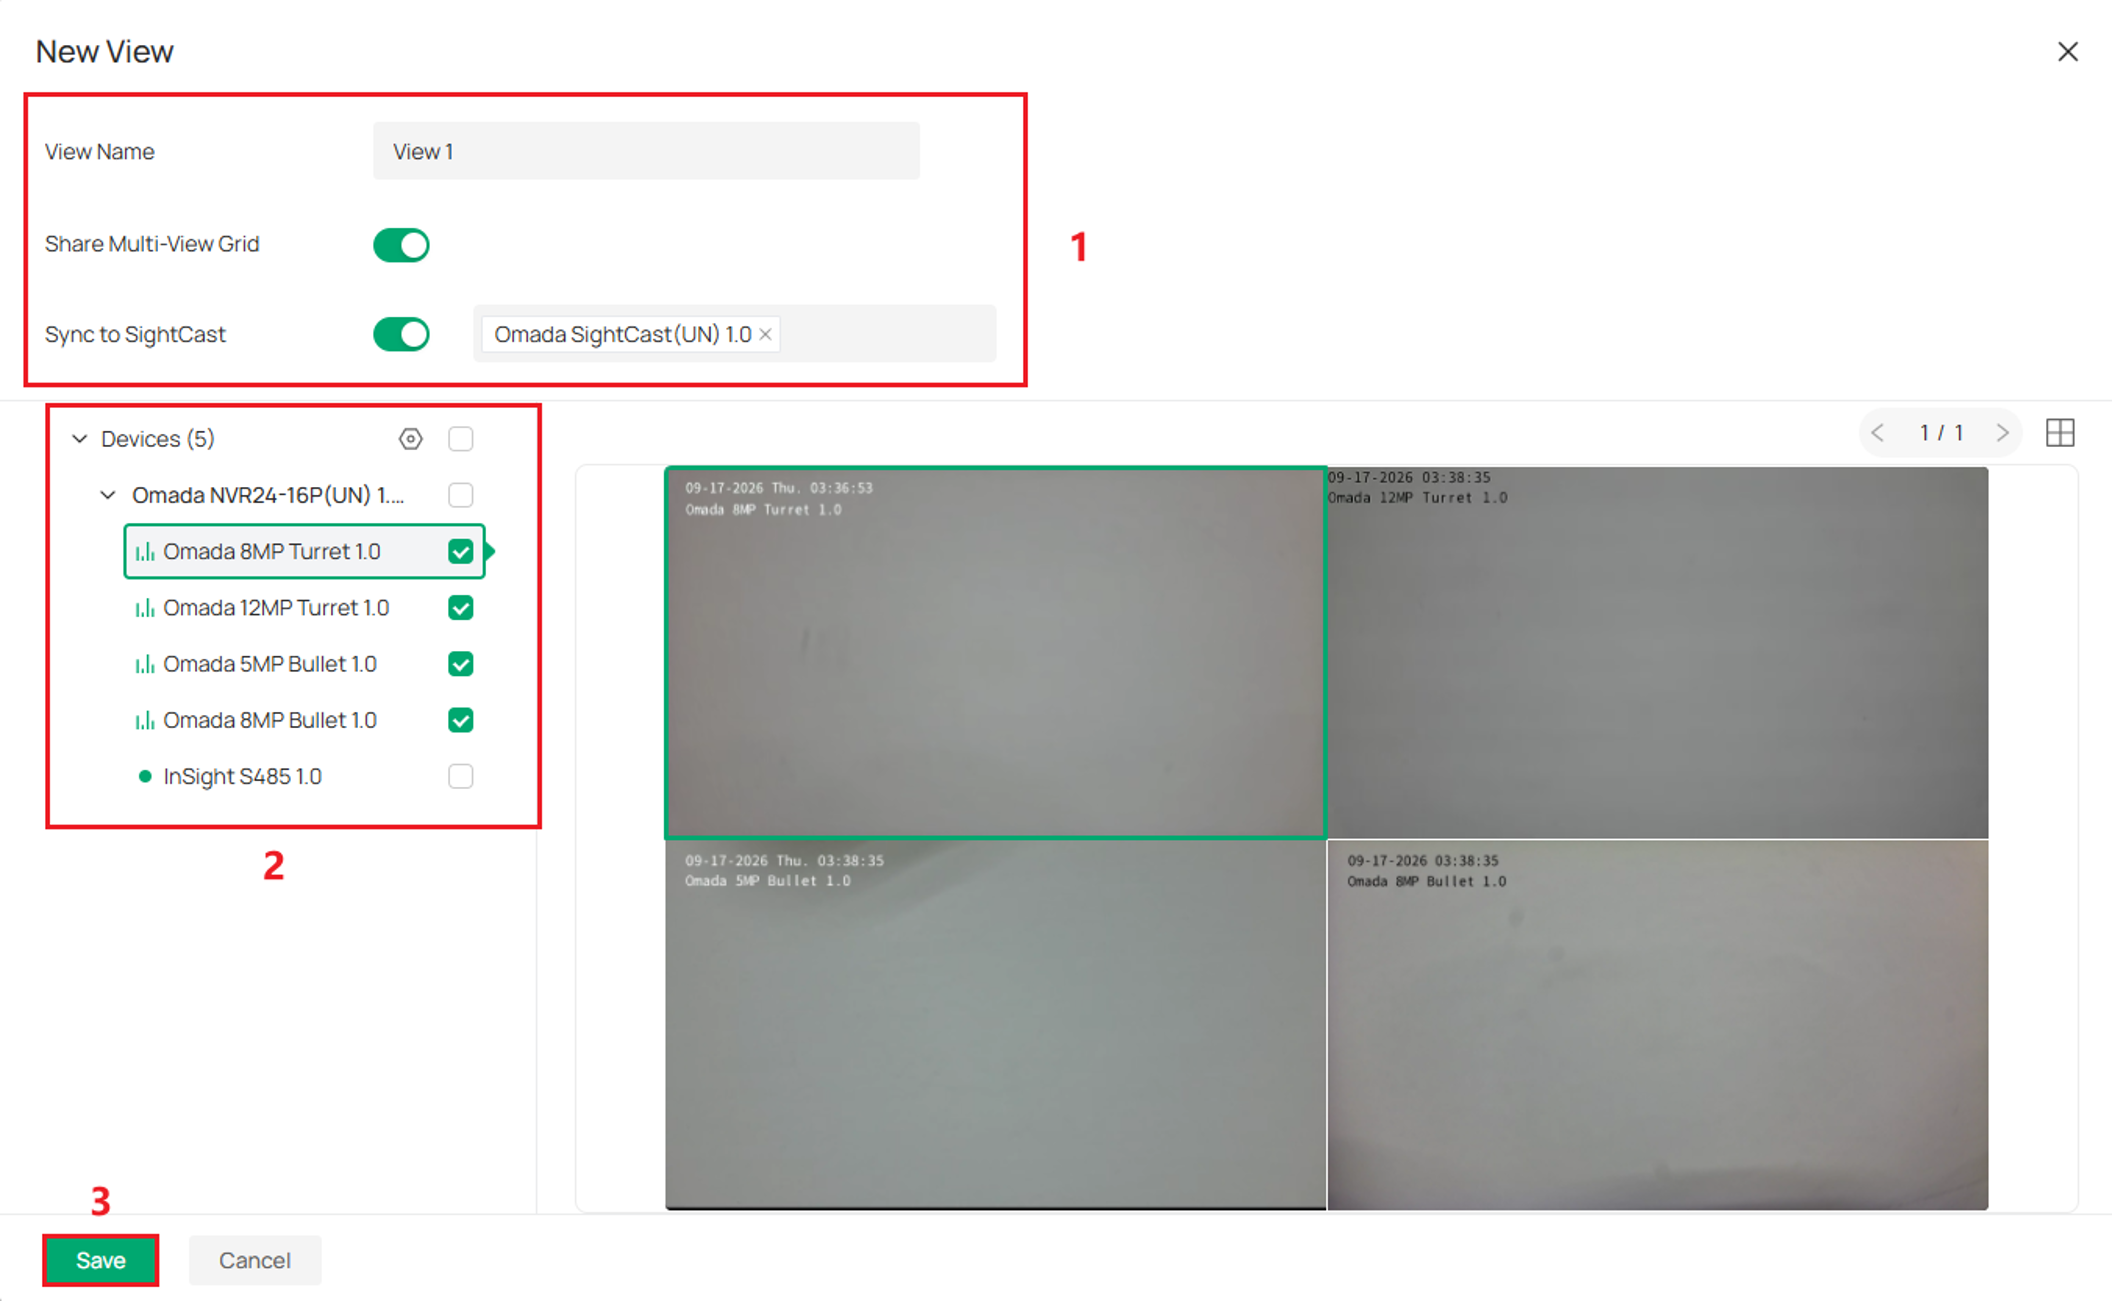
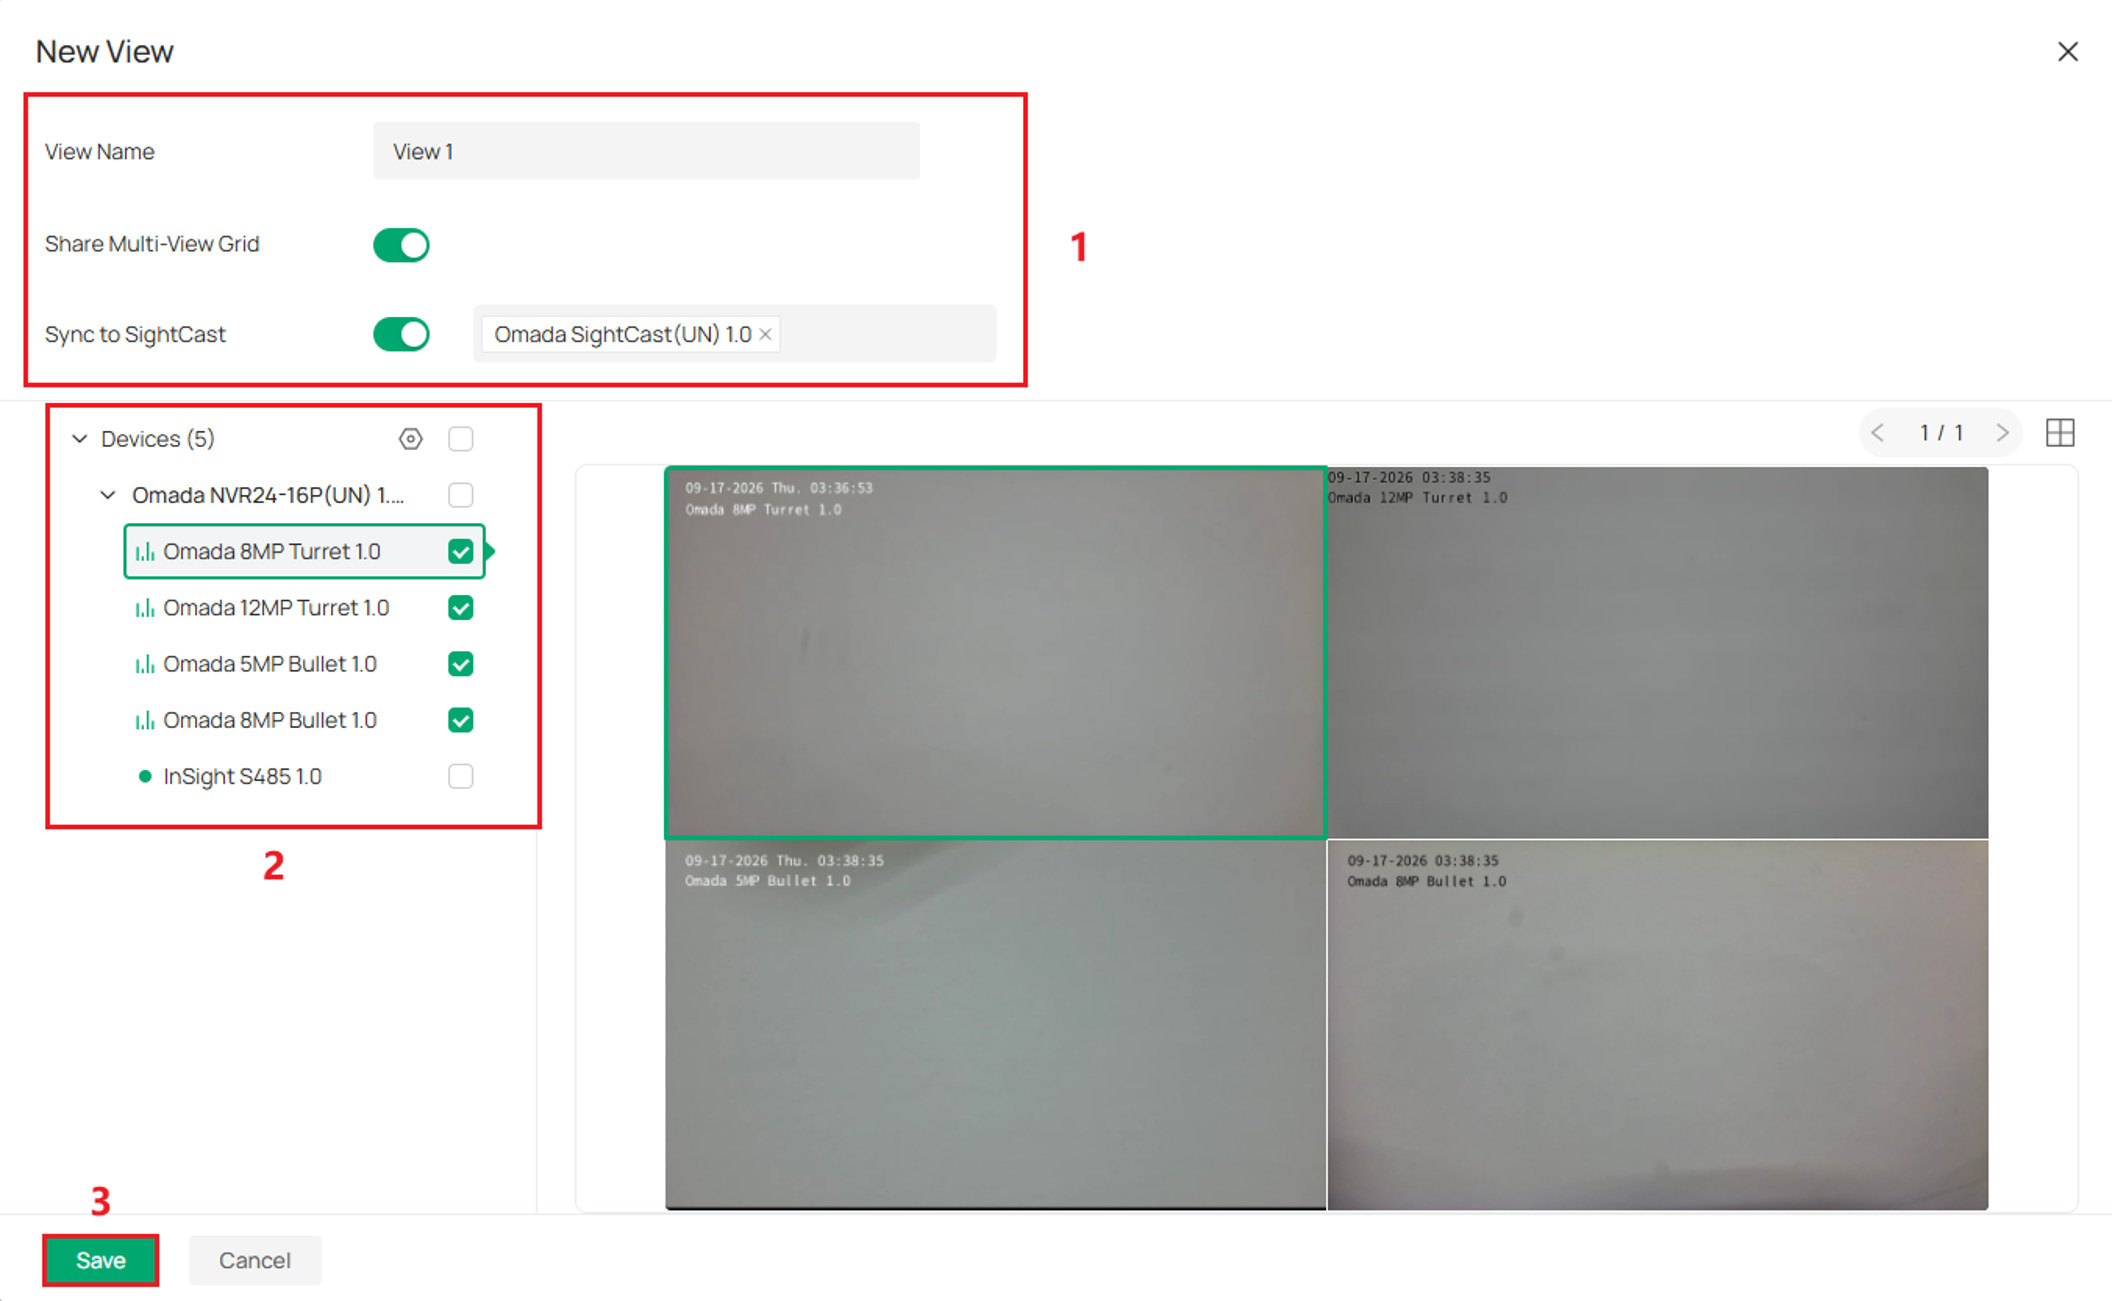
Step 2. Enter a View Name. Enable Share Multi-View Grid to create a Public View, or leave it disabled to create a Private View. If the view should also be displayed on a SightCast device, enable Sync to SightCast and select the target device.
Select the cameras to include in the view, then click Save.
Note: Only public views can be synced to SightCast.
Set up a Public or Private View from the Live View section
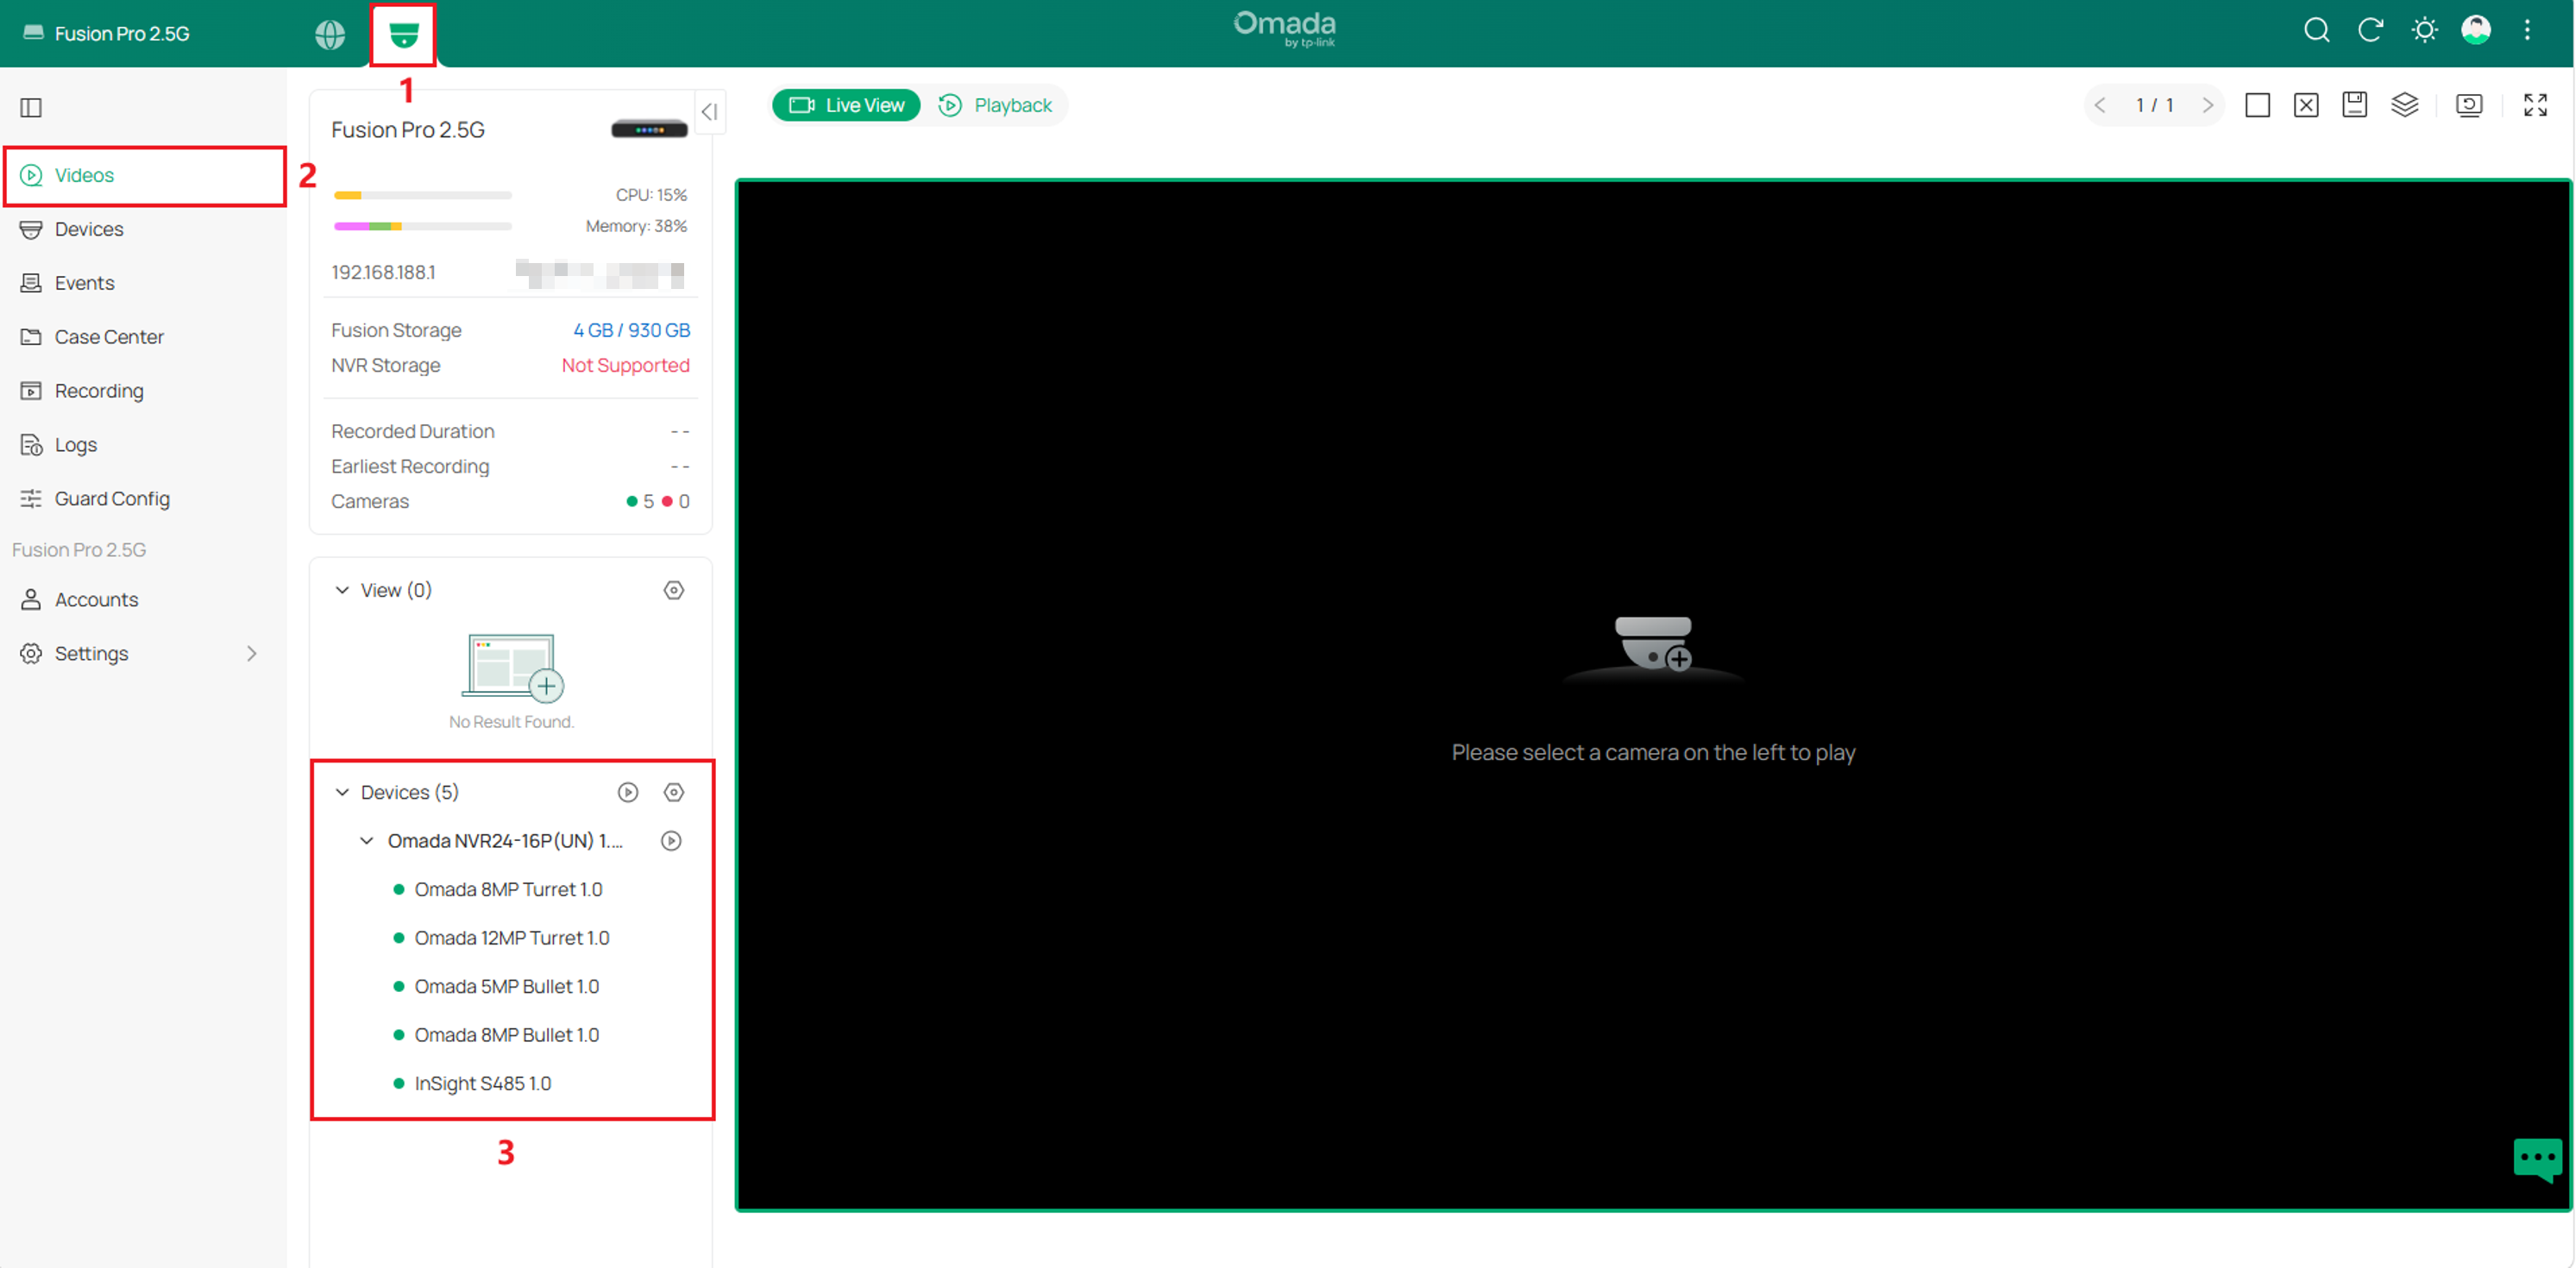
Step 1. Go to Omada Guard > Videos. In the Device section, select the cameras to display and arrange the Live View layout as needed.
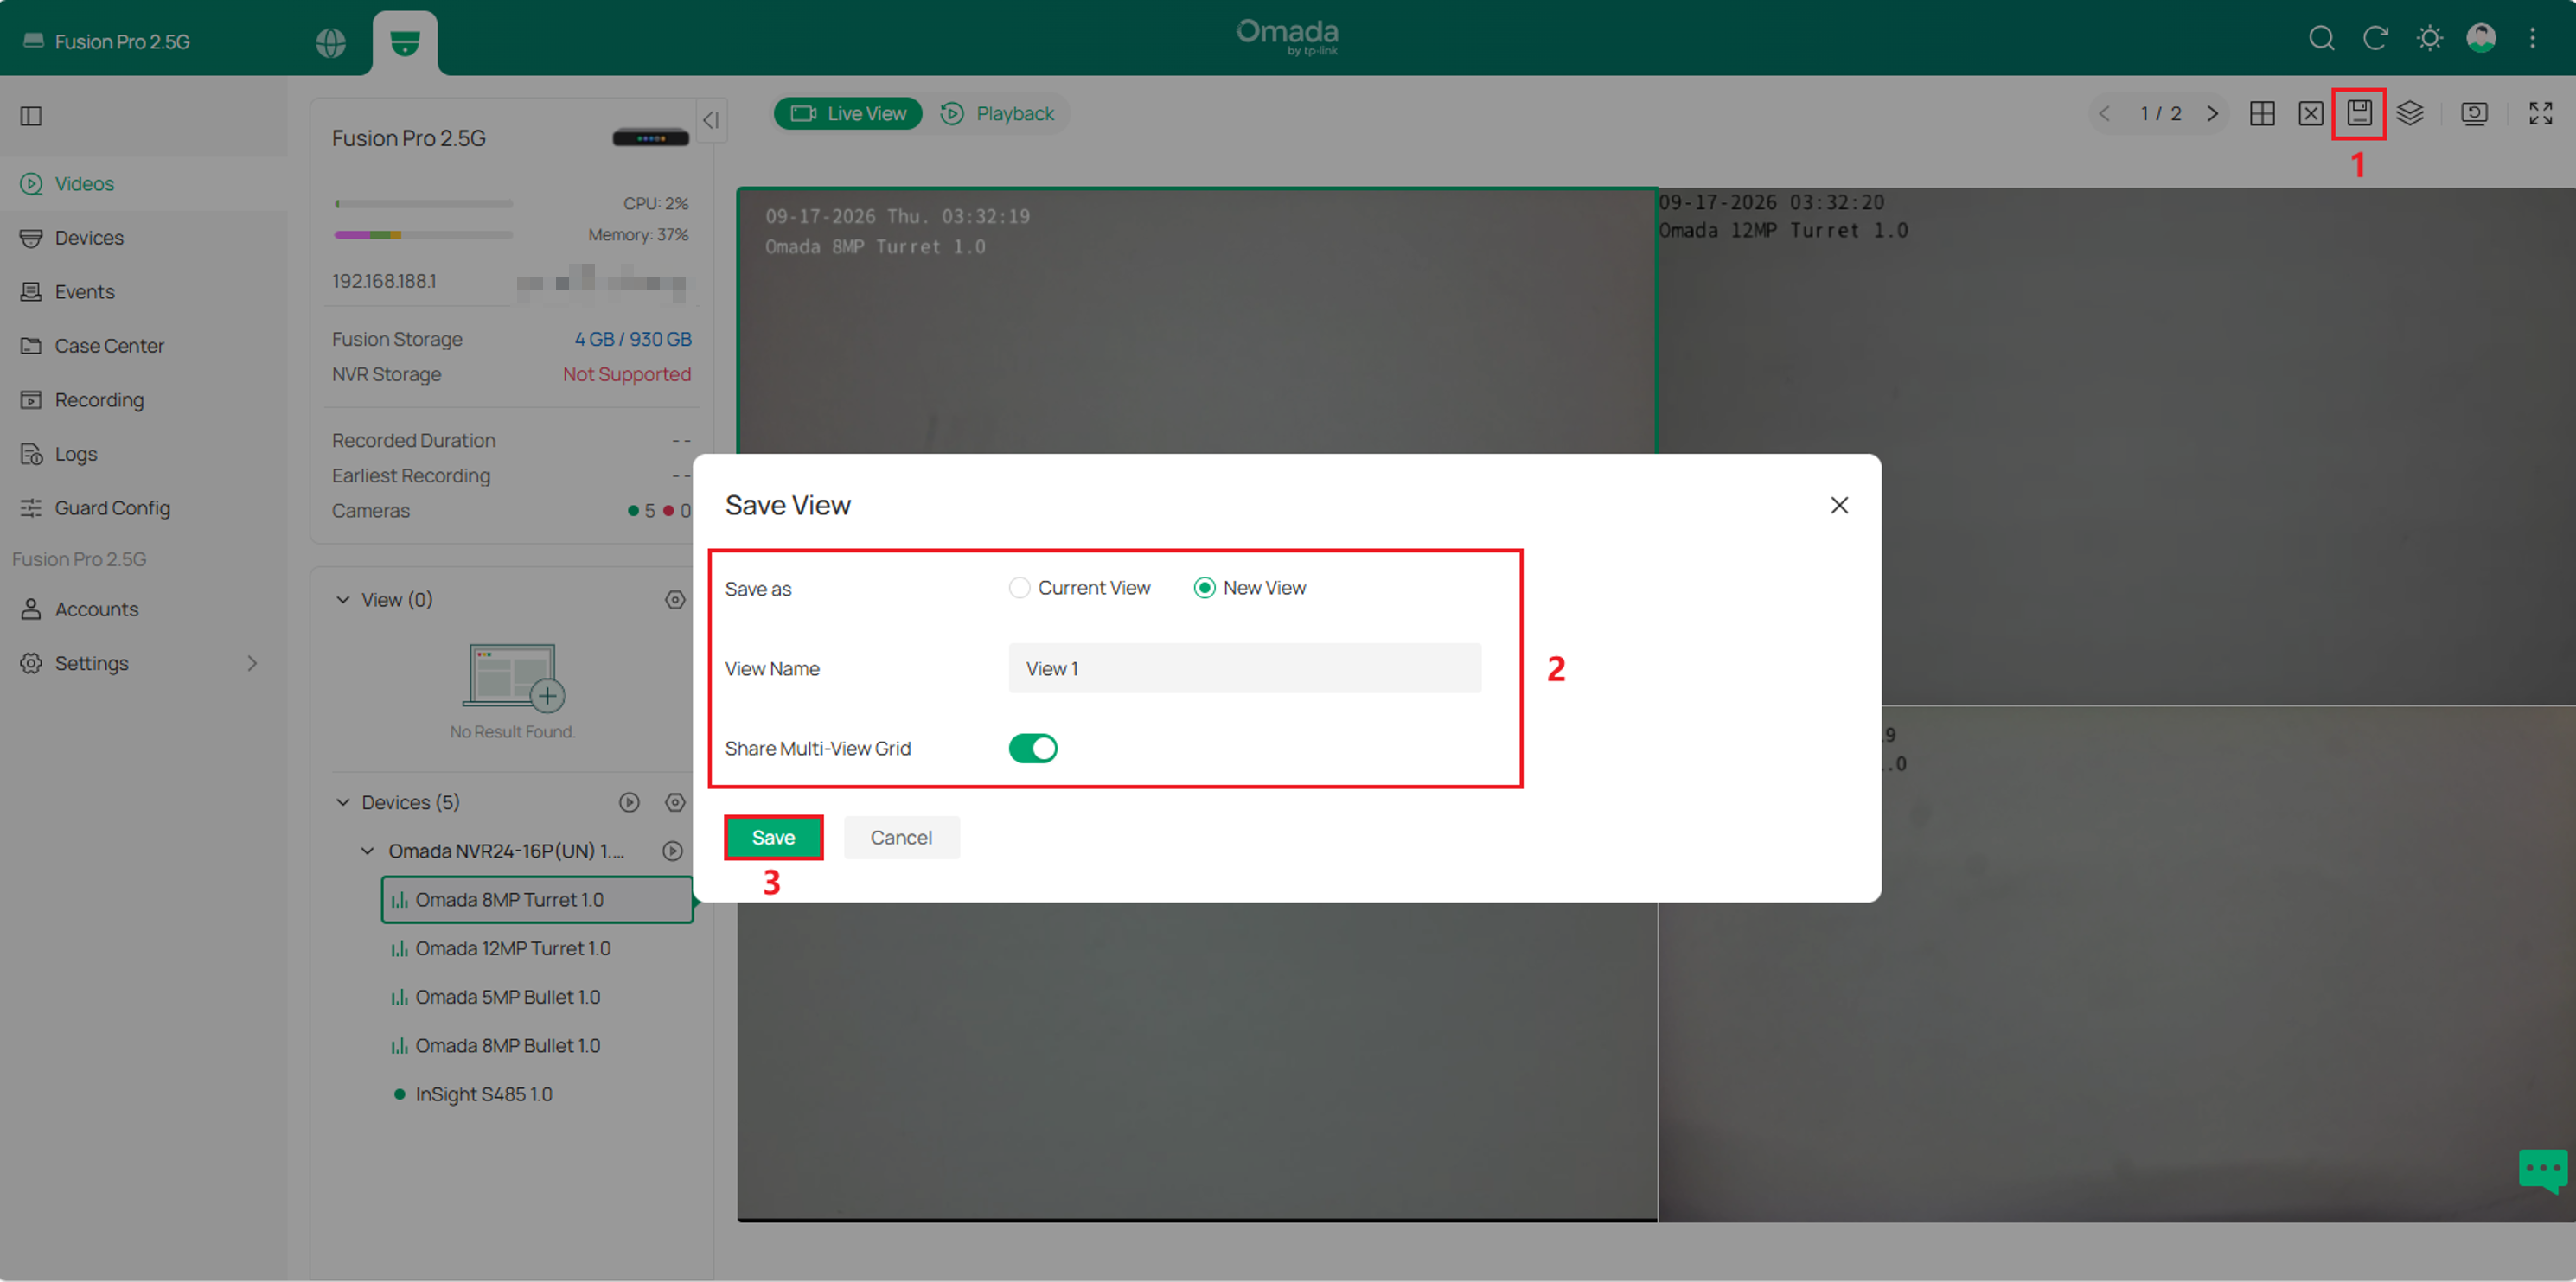
Step 2. Click the Save icon in the upper-right corner of the Live View section.
In the Save View dialog:
- Select New View.
- Enter a View Name.
- Enable Share Multi-View Grid to create a Public View, or leave it disabled to create a Private View.
- Click Save.
Set up a Public or Private View from the View section
Step 1. Go to Omada Guard > Videos. In the View section, click the Settings icon and select + Create New View.
Step 2. Enter a View Name. Enable Share Multi-View Grid to create a Public View, or leave it disabled to create a Private View. If the view should also be displayed on a SightCast device, enable Sync to SightCast and select the target device.
Select the cameras to include in the view, then click Save.
Note: Only public views can be synced to SightCast.
Select an Existing View for SightCast
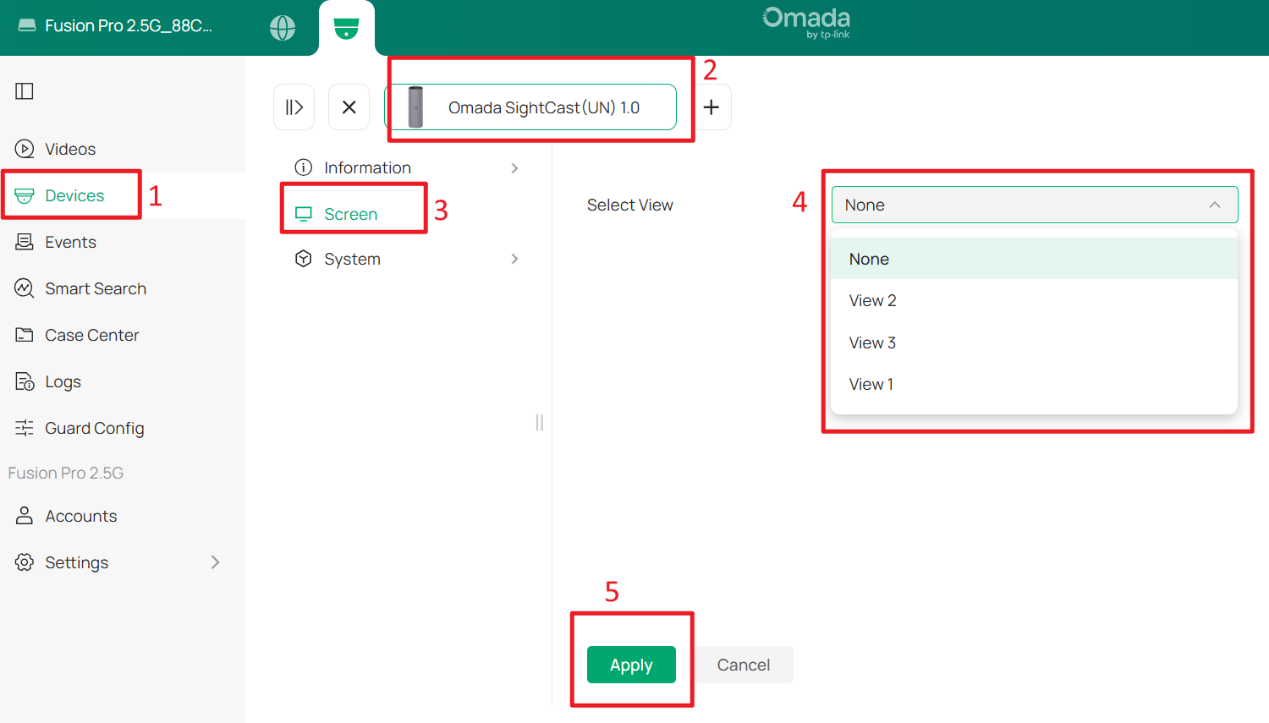
After a Public View is configured with Sync to SightCast enabled, you can select the view from the SightCast management page.
Go to Devices > SightCast Settings > Screen. From the Select View drop-down list, select the view to be displayed on SightCast. The list displays the existing Public Views that have Sync to SightCast enabled.
Verify that the selected view is displayed on the monitor connected to SightCast.
Note: Resetting Omada Fusion Pro Gateway will reset the adopted SightCast device to factory defaults.
Verification
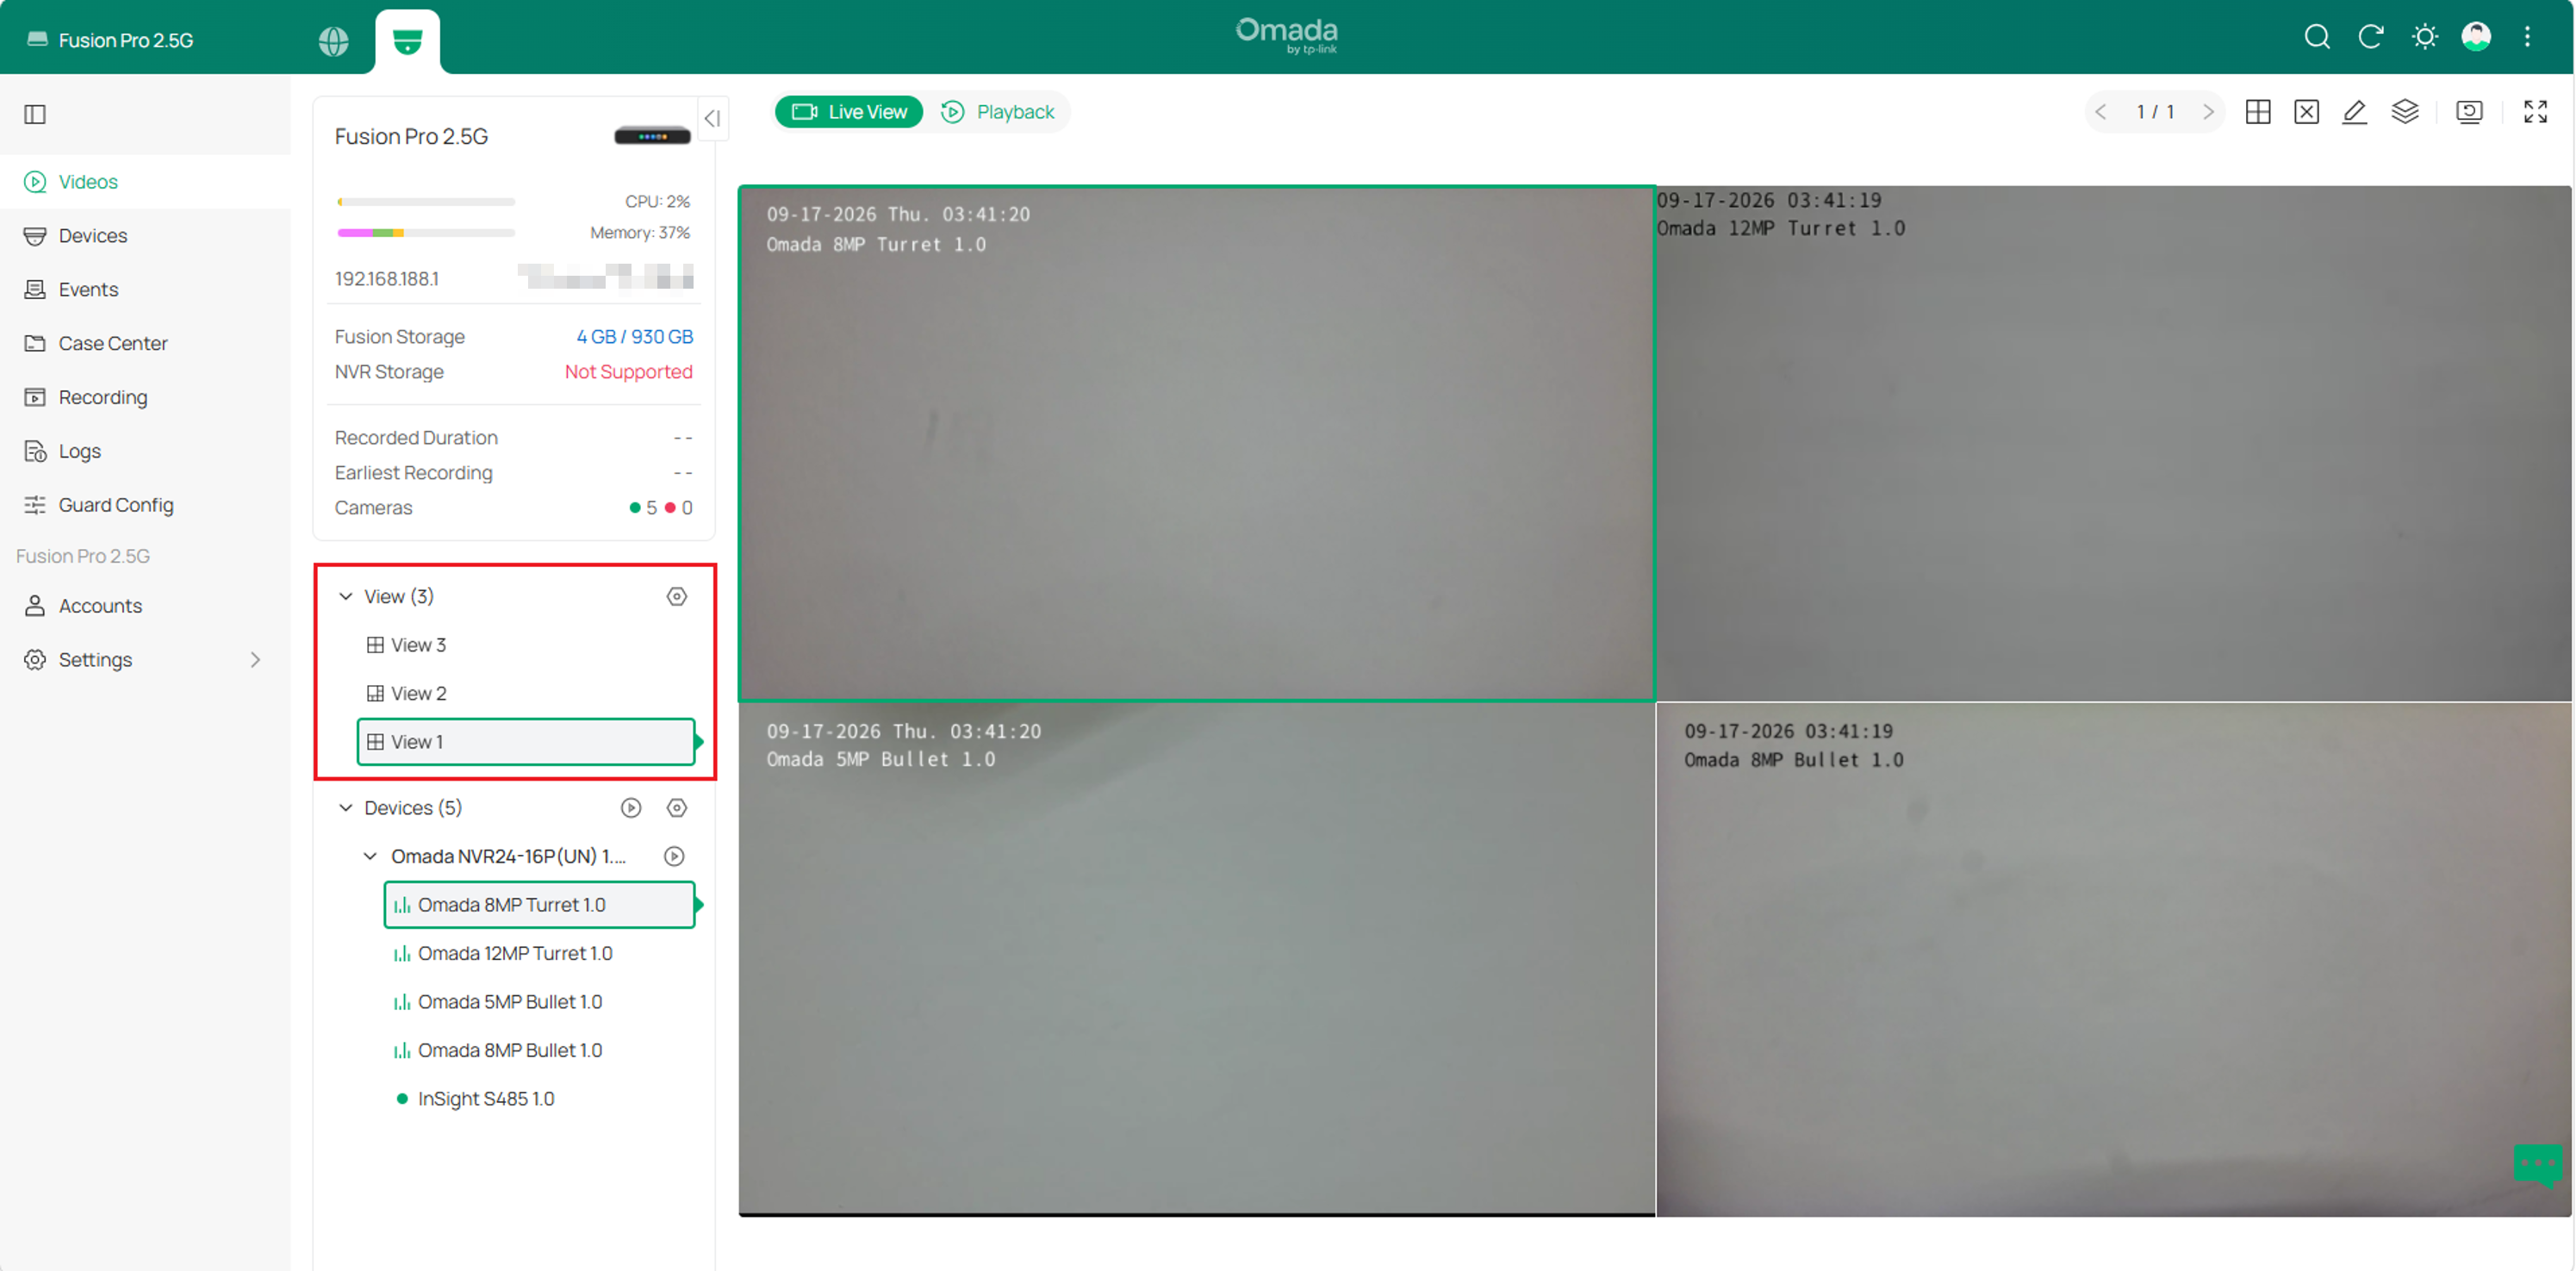
Verify the View
In the View section, confirm that the view is saved successfully. Select the view and verify that the expected cameras and layout are displayed.
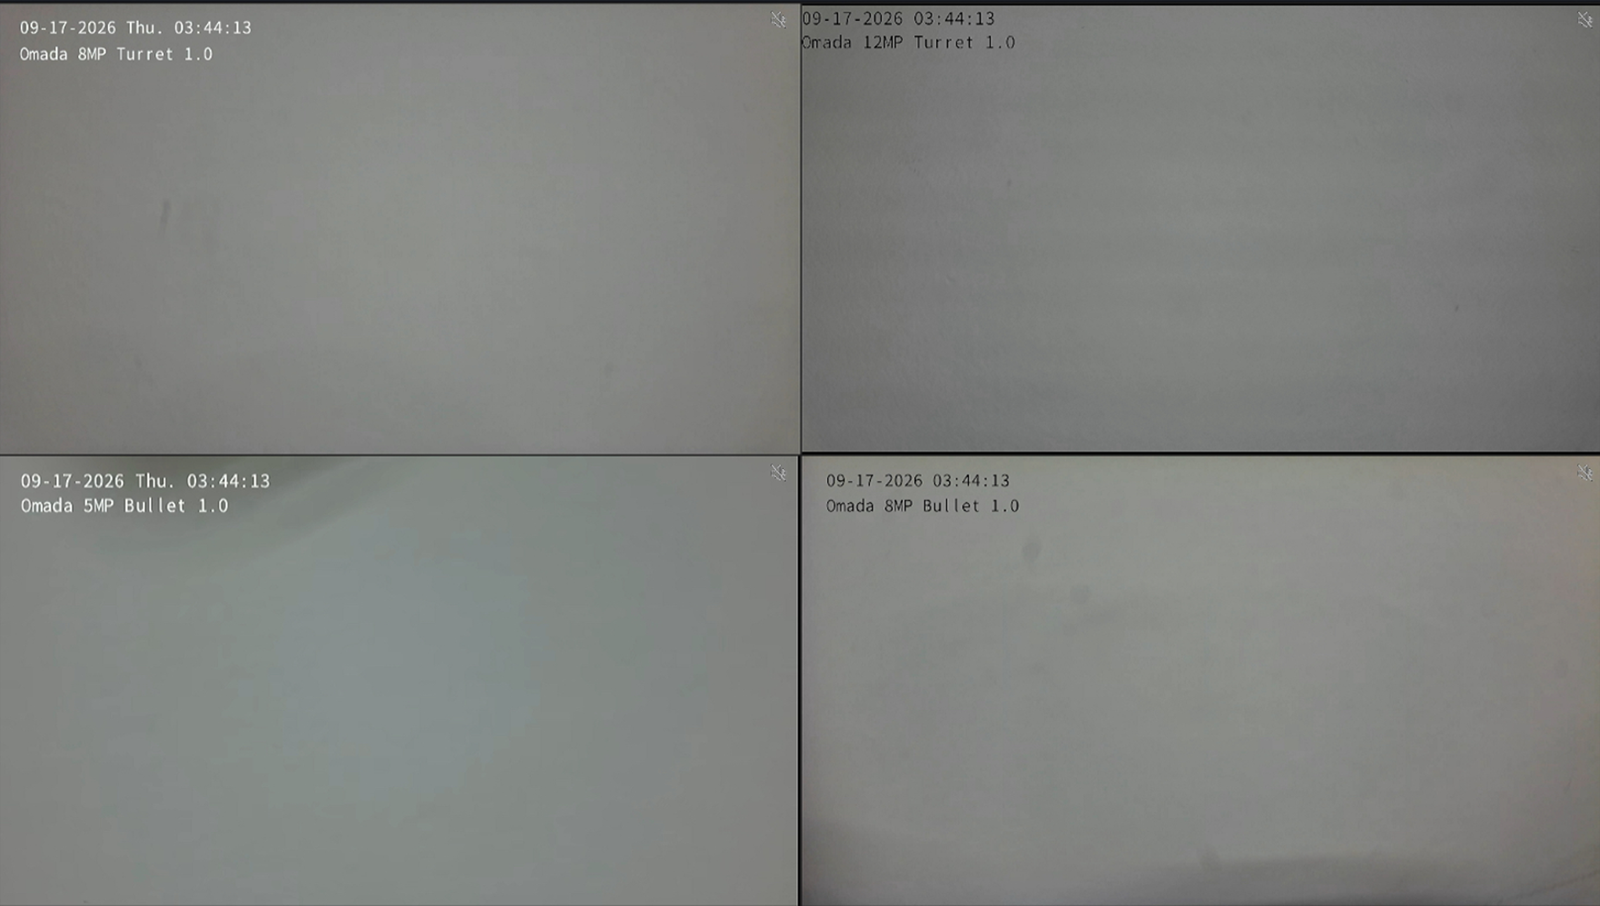
Verify SightCast synchronization
If Sync to SightCast was enabled, verify that the selected SightCast device displays the synchronized view.
Conclusion
Public and Private Views provide a convenient way to organize camera monitoring layouts in Omada Guard. Public Views enable teams to share commonly used monitoring layouts across an organization, while Private Views allow individual users to maintain personalized workspaces. For deployments using Omada SightCast, synchronized views can also be displayed on dedicated monitoring screens, ensuring a consistent viewing experience across both Omada Guard and SightCast devices.
To learn more about each function and configuration, please visit Support Home to download or check the manual for your product.
QA
Q1: Does SightCast need to be adopted by Omada Guard?
A1: Yes. SightCast must be adopted and display a Connected status before it can receive synchronized views from Omada Guard.
Q2: Can a Private View be synchronized to SightCast?
A2: No. Only Public Views can be synchronized to SightCast. To synchronize a view, configure it as a Public View, enable Sync to SightCast, and select the target SightCast device.
Q3: Can a view be synchronized to a SightCast device?
A3: Yes. When Sync to SightCast is enabled during view creation or modification, the selected camera layout is synchronized to the specified SightCast device for display. Changes made to the view are reflected on the associated SightCast device after the view is saved.
Q4: What is the difference between a Public View and a Private View?
A4: A Public View can be accessed by users within the same organization, subject to their camera permissions. A Private View can only be accessed and managed by its creator and is hidden from all other users.
Q5: Why is the camera status on SightCast different from that in Omada Guard?
A5: Omada Guard provides device information to SightCast, while SightCast obtains video streams directly from the IPC/NVR. Therefore, if SightCast cannot reach the IPC/NVR, it displays No Network.
