


How to discover and manage 5G ODU device via Omada Central


Contents
Discover device via inform URL
When the ODU is in Router mode
Objective
This article provides detailed methods for adopting the ODU into Omada Central and explains the configurations that need attention in each scenario.
Requirements
- Omada Central
- ODU device (ER701-5G-Outdoor v1.0)
Introduction
There are two modes when using a 5G ODU: IPPT (IP Passthrough) mode and Router mode.
In IPPT mode, the ODU transparently transmits the IP address obtained from the SIM card to the downstream gateway.
In Router mode, the ODU can be used as a regular gateway.
Configuration
This section describes the detailed process of adopting the ODU device by the Omada Central in the two different modes of the ODU.
When the ODU is in IPPT mode
The typical topology of ODU in IPPT mode is shown in the figure below (the switch device is omitted to simplify the topology). The ODU device is powered via PoE. The WAN port of the gateway device remains in its default DHCP dial-up mode and is connected to the LAN port of the ODU device’s PoE power supply.
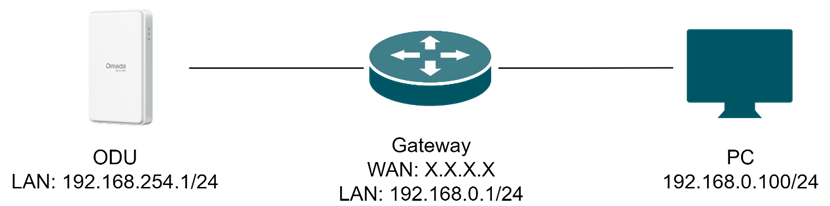
- The Gateway’s WAN port receives DHCP-assigned addressing whose default gateway is 192.168.254.1, so you can open a browser on the PC and navigate to 192.168.254.1 or mobile.omada.net to reach the ODU’s webUI.
- A gateway is optional in this setup; alternatively, you can set the PC’s wired NIC to obtain an address via DHCP and connect it directly to the LAN port on the ODU’s PoE injector.
Discover device via inform URL
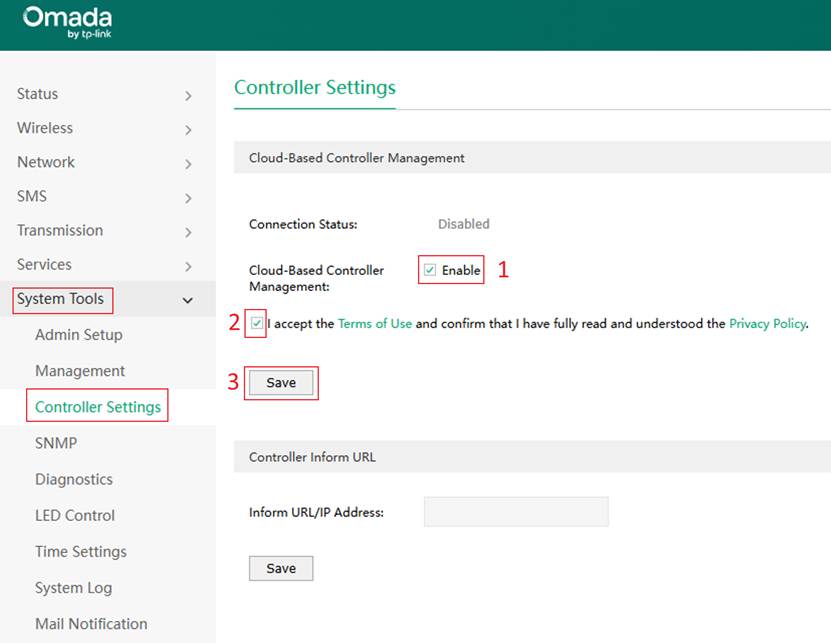
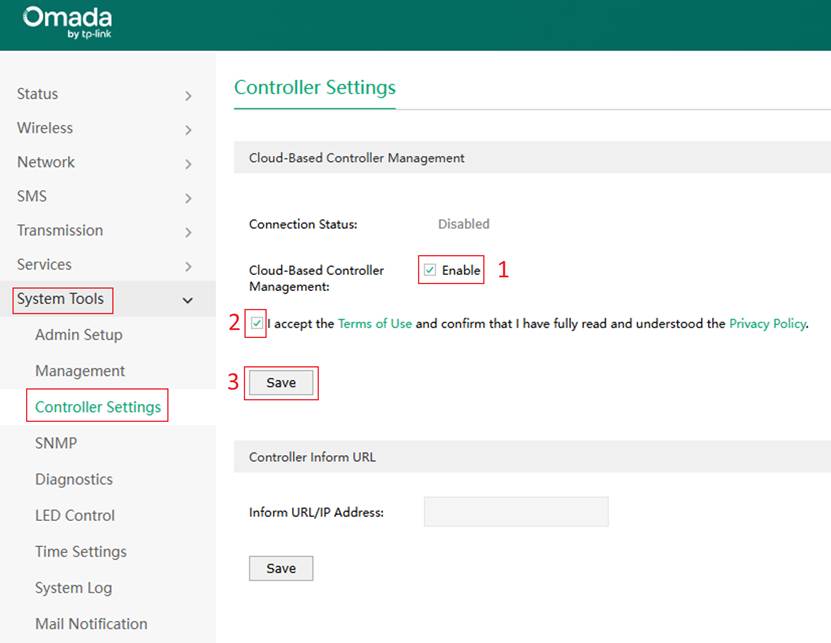
The following Steps 1–8 provide a complete guide to adopting a device to Omada Central during its initial use. If your device has already been used in standalone mode and Cloud-Based Controller Management was not enabled during the initial quick setup, you will need to access its standalone interface, navigate to System Tools > Controller Settings, enable Cloud-Based Controller Management, and accept the Privacy Policy. Ensure that the Connection Status is displayed as Online for the device to be properly adopted into Omada Central. Then you can refer to Step 5 and Step 8 in this section for further guidance.
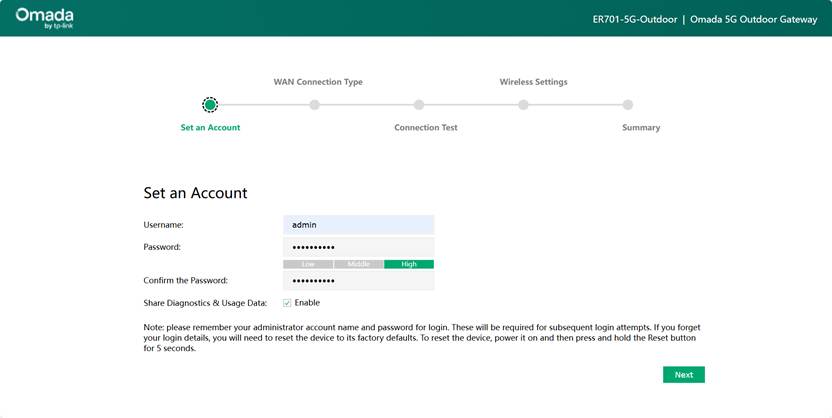
Step 1. Log in to the ODU’s web UI
With default settings, open a browser on the PC and enter 192.168.254.1 or mobile.omada.net to access the 5G ODU’s web UI, set the Username and Password, then click Next.
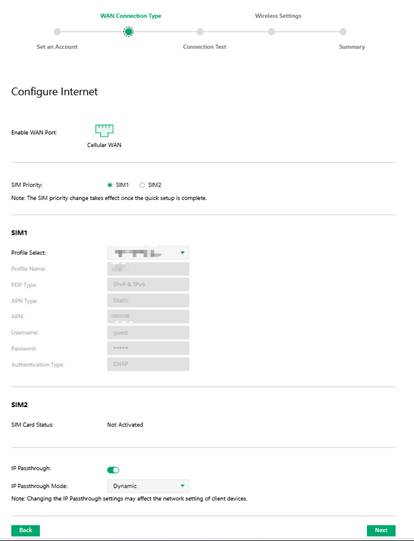
Step 2. Edit WAN Connection Type
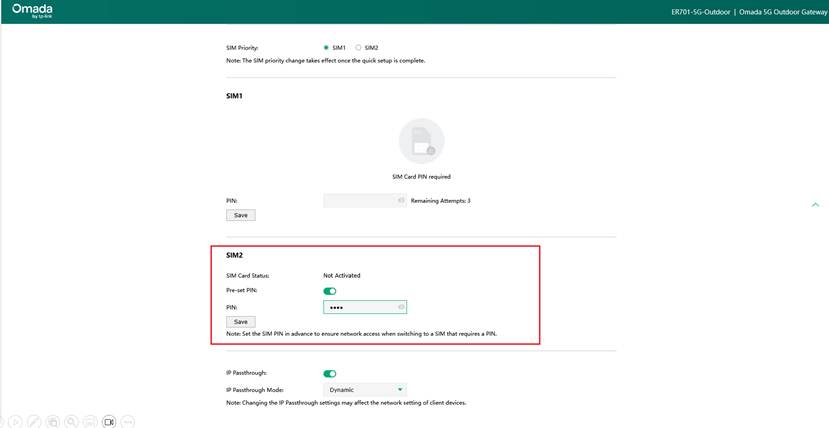
For security purposes, you may have set a PIN on each SIM card. When two PIN-protected SIMs are installed and SIM 1 is designated the priority SIM, you will be asked to enter the PIN for SIM 1 to unlock and use it. To ensure seamless failover to SIM 2 if SIM 1 become unavailable, you can pre-enter the PIN for SIM 2. For the IP Passthrough Mode, leaving it as default setting is all right.
You can check the SIM card’s network status here. If the card can connect to the internet normally, its profile will be displayed. The specific information shown depends on your carrier.
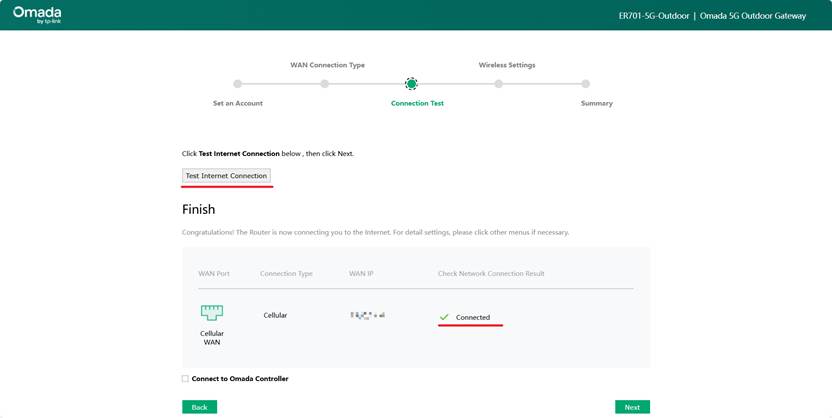
Step 3. Perform a Connection Test to verify Internet connectivity.
Within the Connection Test, execute a test for a secondary confirmation of the SIM card’s Internet status; if Connected appears in the Check Network Connection Result, the card can access the Internet successfully.
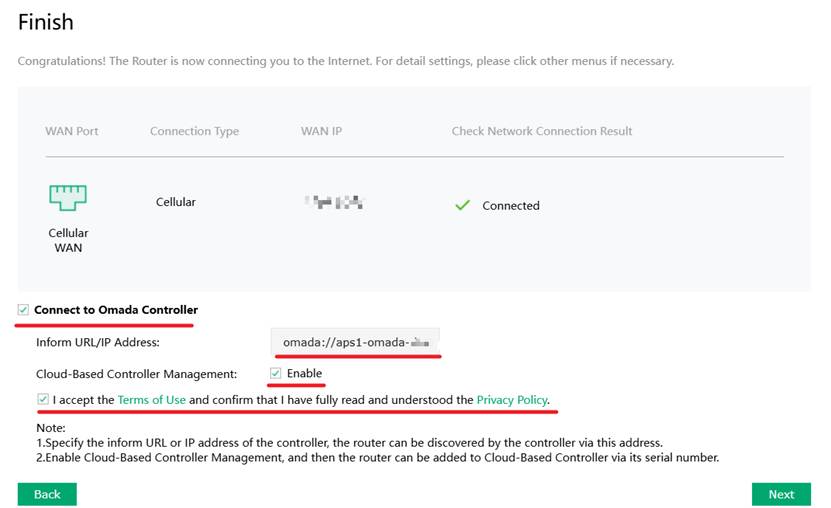
Step 4. Adopt the device to Omada Central.
After completing the SIM-based internet connectivity test, enter your Controller’s URL in the device’s Connect to Omada Controller field; refer to Step 5 for instructions on obtaining the inform URL.
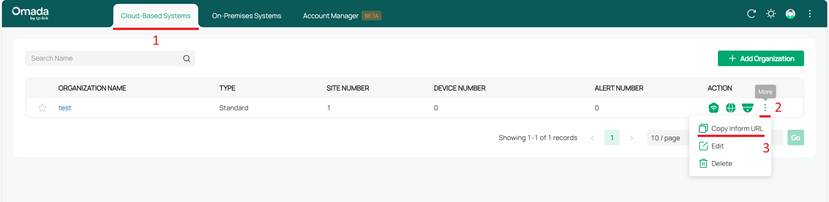
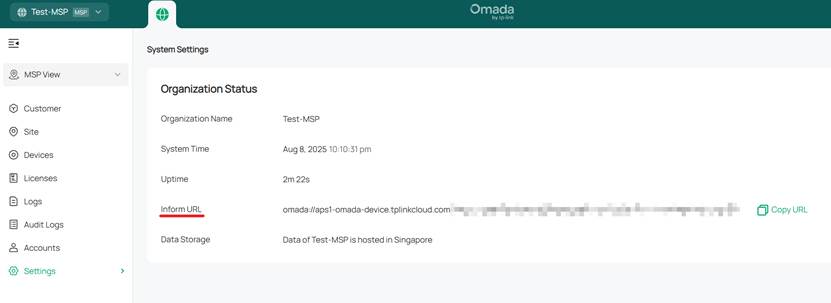
Step 5. Obtain the Inform URL.
• In non-MSP mode: Log in to the Omada Central and go to Cloud-Based Systems > More > Copy Inform URL. Click on Copy Inform URL button to copy the Controller’s URL.
• In MSP mode: In MSP View, go to Settings > System Settings and click the Copy URL button to copy the URL.
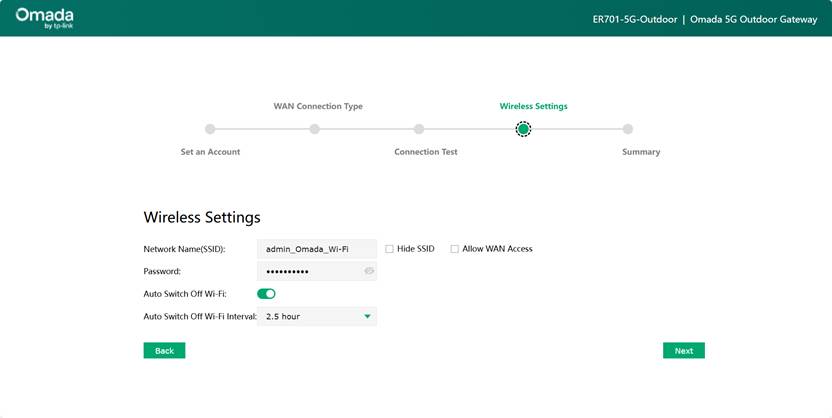
Step 6. Configure Wireless Settings (Optional)
You may configure the device’s wireless network according to your requirements.
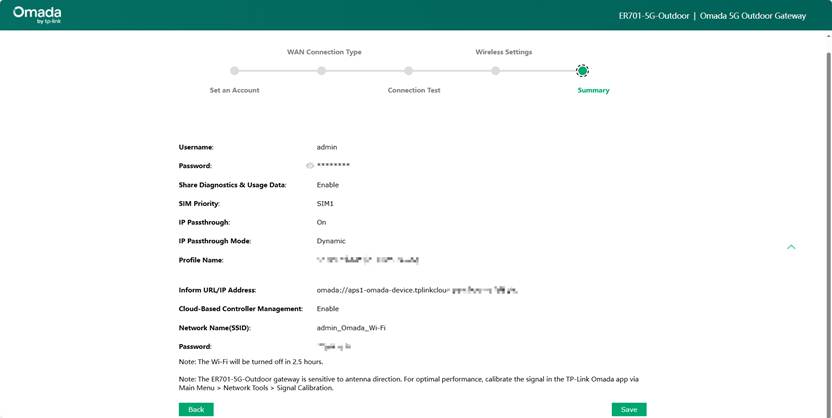
Step 7. Review the detailed configuration in the Summary section.
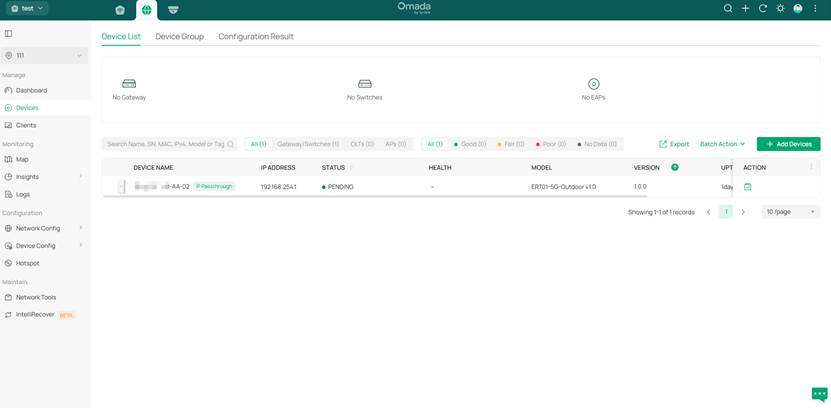
Step 8. Check the Devices Tab in the Controller
Once all configuration steps on the device are complete, navigate to the Controller, where you will see the pending-adoption ODU device. This confirms that the unit has been successfully added to the cloud. Proceed by clicking Adopt and then activate it with license.
Discover device via S/N
The current method of adopting offline devices to Omada Central via S/N code is only supported when the ODU device operates in IPPT mode. If your device has been switched to Route mode, it must be adopted to Omada Central using the Inform URL method.
If your device is a new, just-out-of-the-box unit or has been reset and has not yet been logged into the webUI, it can be directly adopted into the Omada Central cloud by entering its S/N. However, if the device has already been used in standalone mode and Cloud-Based Controller Management was not enabled during the initial quick setup, you will need to access its standalone interface, navigate to System Tools > Controller Settings, enable Cloud-Based Controller Management, and accept the Privacy Policy. Ensure that the Connection Status is displayed as Online for the device to be properly adopted into Omada Central.
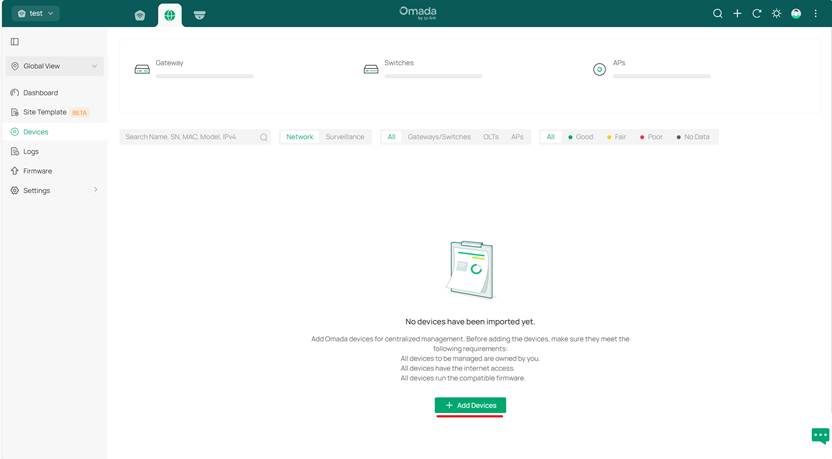
Step 1. Launch the Omada Central page, and go to Omada Network > Global View > Devices. Click Add Devices.
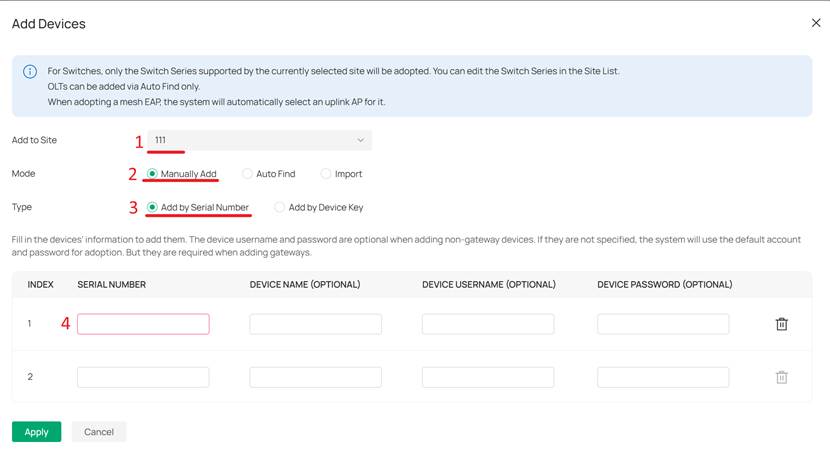
Step 2. Enter the device’s S/N code and adopt it.
Follow the steps below: after entering the device’s serial number, assign it to a specific site.
Step 3. Check the Devices Tab in the Controller
Once configuration is complete, if the device is online it will appear in the Devices tab with a Pending status. Adopt the device and activate it with a valid license; thereafter, it can be managed normally through the cloud.

When the ODU is in Router mode
When the ODU is in Router mode, it can be regarded as a common gateway device. In Router mode, under the current design, the ODU cannot be added to Omada Central via the S/N or device key method regardless of whether it is connected to the internet. In this mode, the device can only be adopted using the inform URL method, which is essentially the same as the process for adopting an ODU in IPPT mode. For specific steps and precautions, please refer to the "Discover device via inform URL" section under "When the ODU is in IPPT mode" in this article.
Conclusion
This article introduces the two modes of the ODU and provides a detailed explanation of the specific configuration steps for adopting the ODU to the Omada Central under these two different modes.
Get to know more details of each function and configuration please go to Download Center to download the manual of your product.
