


How to discover and manage 5G ODU device via on-premise controller


When the ODU is in Router mode
Objective
The article mainly provides a detailed guide on adopting the Omada 5G ODU series devices into the local Omada Controller, along with relevant precautions, to facilitate user operation.
Requirements
- Omada Controller (Software Controller V6)
- Omada 5G ODU (ER701-5G-Outdoor v1.0)
- Omada gateway (ER7206 v2.20)
Introduction
There are two modes when using a 5G ODU: IPPT (IP Passthrough) mode and Router mode.
In IPPT mode, the ODU transparently transmits the IP address obtained from the SIM card to the downstream gateway.
In Router mode, the ODU can be used as a regular gateway.
Configuration
This section describes the detailed process of adopting the ODU device by the local controller in the two different modes of the ODU.
When the ODU is in IPPT mode
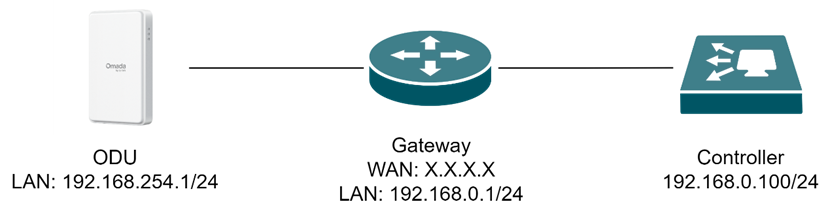
Step 1. Set up the topology.
The typical topology of ODU in IP Passthrough (IPPT) mode is shown in the figure below (the switch device is omitted to simplify the topology). The ODU device is powered via PoE. The WAN port of the gateway device remains in its default DHCP dial-up mode and is connected to the LAN port of the ODU device’s PoE power supply. The controller is connected to the LAN side of the gateway device.
Since the gateway is a Layer 3 (L3) device, with the ODU located on the WAN side and the Controller on the LAN side, they reside in different Layer 3 networks. In this case, the ODU cannot directly discover the Controller through L2/L3 discovery mechanisms. So it is necessary to configure port forwarding rules on the intermediate gateway device to enable discovery and adoption.
Step 2. Create a new site in the controller (optional).
Log in to the controller’s webUI on your PC. In the Global View, click on the Dashboard item in the left sidebar. Then, in the pop-up page, click the Add New Site button. Enter the basic information for this site according to your requirements, including the login credentials (username and password) that will be used by the devices after they are adopted into this site.
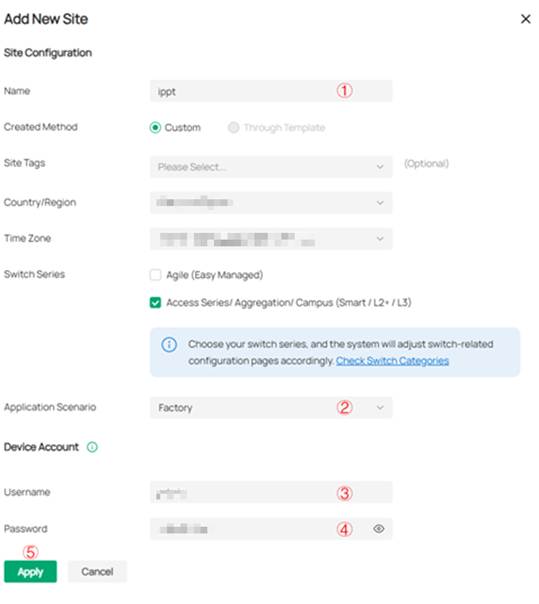
Note: If you already have an IDU (Indoor Unit) in a site, there is no need to create a new site; you can adopt the ODU in the existing site instead.
Step 3. Adopt the gateway device and configure port forwarding rules.
After entering the newly created site, you can discover the gateway device in the PENDING state. Click the adoption button under ACTION to adopt the gateway device and wait for its status to change to CONNECTED.

After the gateway device status stabilizes at CONNECTED, click on the gateway device icon in the Device List, then click the Manage Device button in the pop-out panel on the right to enter the device's private management page.

Once in the private management page of the gateway, click on Config > Transmission > NAT > Create New Rule in sequence.
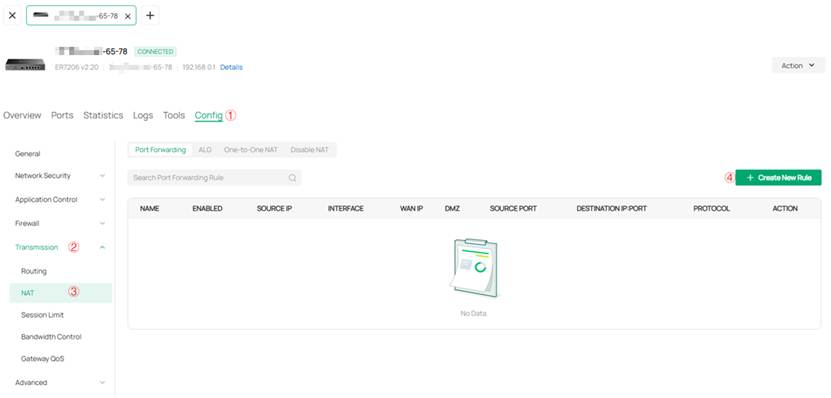
In the pop-up Create New Rule page, configure the corresponding port forwarding rules. The specific steps and explanations are as follows:
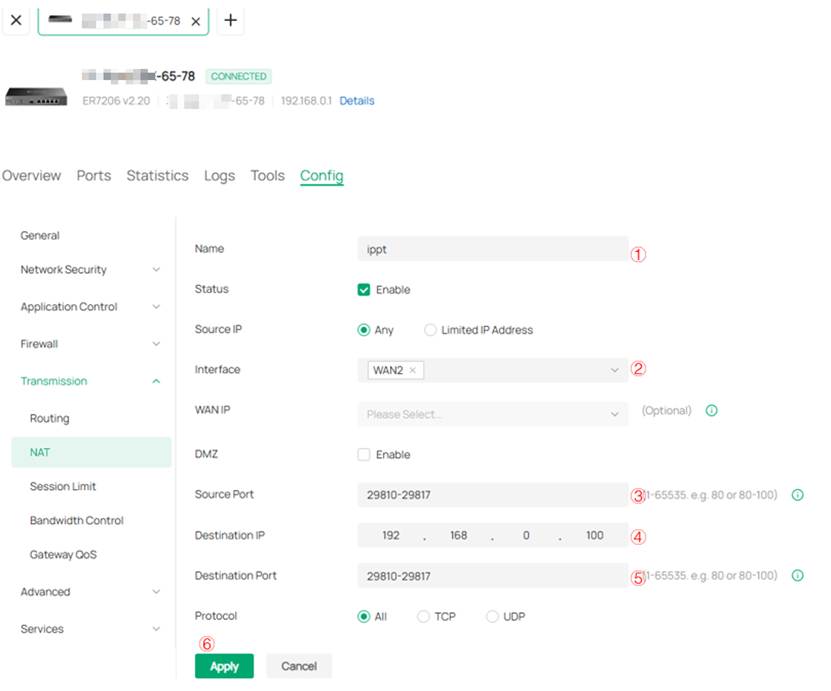
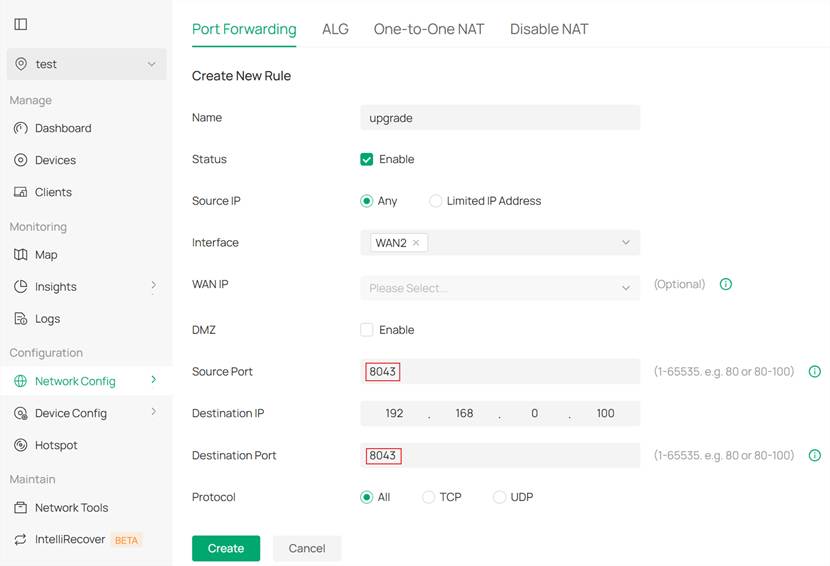
Note:
1. You will need to create two separate port forwarding rules. The rule shown in the first diagram is used to ensure proper device adoption, and the source/destination ports must be fixed within the range 29810–29817. The rule shown in the second diagram is used to ensure successful manual upgrade, and by default, the source/destination port should be set to 8043.
2. The interface in ② should be set to the WAN interface connected to the gateway and the ODU device.
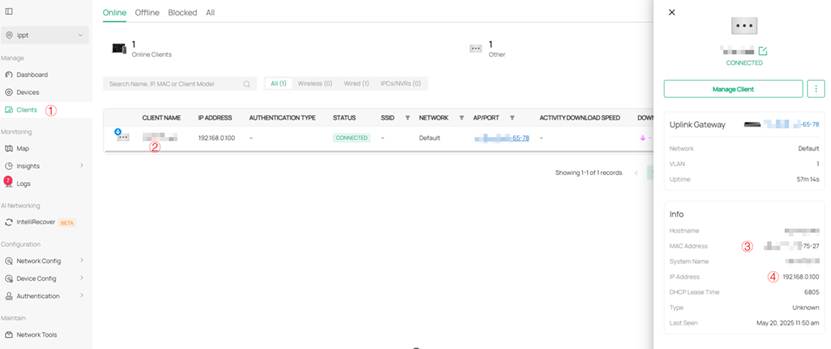
3. The destination IP address in ④ should be the IP address of the controller. The corresponding IP address can be obtained by following these steps: Enter the site view > Click on the Clients item in the left menu bar > Click on the controller device entry in the client list in the middle of the page. In the detail page that pops up on the right, you can find the IP address and MAC address of the controller device.
Step 4. Configure DHCP Reservation on the Gateway (Optional).
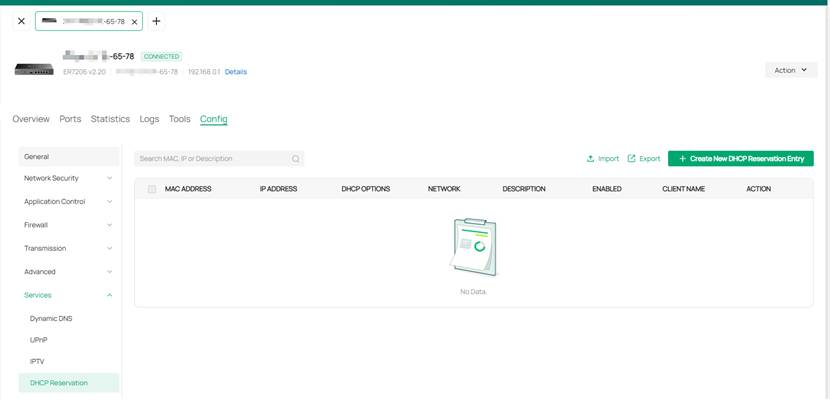
The NAT rule configured in Step 3 will become invalid if the controller’s IP address changes. To avoid this issue, it is recommended to configure DHCP Reservation on the gateway device. The specific steps are as follows: Enter the private management page of the gateway and click on Config > Service > DHCP Reservation > Create New DHCP Reservation Entry in sequence.
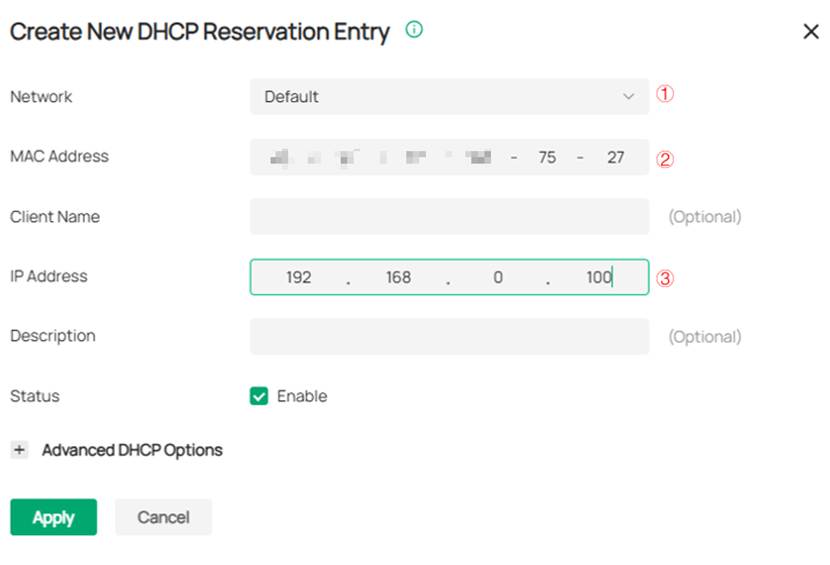
In the pop-up Create New DHCP Reservation Entry page, the Network option should be set to the LAN Network of the gateway to which the controller is connected. The MAC Address and IP Address should be filled in with the corresponding information of the controller device.
Step 5. Adopt the ODU.
After completing the above steps, re-enter the site view and click on the Devices item in the left menu bar. Once the device status stabilizes, you will find both the gateway in the CONNECTED state and the ODU in the PENDING state in the Device List in the middle of the page. Additionally, there will be a conspicuous green IP Passthrough mark next to the ODU device.
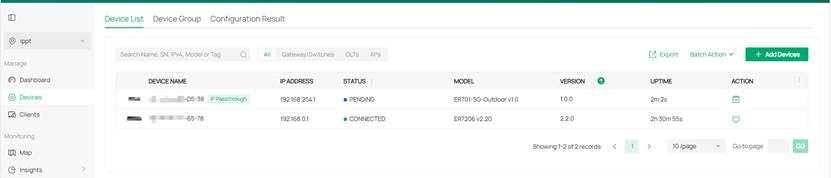
Click the adoption button under ACTION. After a while, the ODU device status stabilizes in the CONNECTED state. At this point, the entire adoption process for the ODU device in IP Passthrough mode is successfully completed.
When the ODU is in Router mode
When the ODU is in Router mode, it can be regarded as a common gateway device. For adopting a common gateway using the local controller, you may refer to the following FAQ: https://www.omadanetworks.com/support/faq/4100/. However, please note that the LAN interface IP of the ODU is 192.168.254.1/24, and in Router mode, it currently cannot be adopted using the device key method described in the referenced FAQ.
Conclusion
This article introduces the two modes of the ODU and provides a detailed explanation of the specific configuration steps for adopting the ODU to the local controller under these two different modes.
Get to know more details of each function and configuration please go to Download Center to download the manual of your product.
QA
Q1: In IPPT mode, what should I do if the ODU is not displayed in the Device List?
- Verify that the port forwarding rules in Step 3 are correctly configured.
- Ensure that the Controller’s IP address matches the port forwarding configuration.
Q2: In IPPT mode, if the ODU appears as Pending in the Controller but cannot be adopted. What should I do?
- Confirm that the link between the ODU and the gateway is functioning properly.
- Check whether ports 29810–29817 are being blocked by a firewall.
Q3: In IPPT mode, what should I do if the Controller fails to upgrade the ODU?
- Ensure that port 8043 has been properly configured for port forwarding.
- Verify whether the ODU firmware version supports adoption by the Local Controller.
Q4: Is it necessary to create a new site?
If an IDU is already part of an existing site, the ODU can be directly adopted under that same site without the need to create a new one.
