


How to add/change an Omada Gateway to an existing Omada network?


Contents
Scenario 1: Replacing a non-Omada gateway with an Omada gateway.
Scenario 2: Replacing an Omada gateway with a new gateway.
Objective
This article is a step-by-step guide for replacing a non-Omada or existing Omada gateway with a new Omada gateway.
Requirements
- Omada controller runs version 6.
- Omada Gateway.
- This article uses Omada controller v6.0 for demonstration. For instructions on v5.15, please refer to the corresponding user guide linked below:
https://www.tp-link.com/support/faq/3148/
Introduction
Replacing your existing router with an Omada Gateway on the current network may lead to potential issues, such as IP conflicts or adoption failures. This article outlines the recommended configuration process, using the network example below, to help guide you through the setup.
Configuration
Scenario 1: Replacing a non-Omada gateway with an Omada gateway.
In this case scenario, all devices currently on this network have IP addresses within the 192.168.33.0/24 subnet. However, the default LAN IP address of the Omada Gateway is 192.168.0.1, which belongs to a different subnet, leading to adoption failure.
Step 1: Connect a computer to the Omada gateway. The computer receives an IP address automatically from the gateway from the default IP Pool (192.168.0.0/24). Then, please go to the gateway’s web UI by visiting the IP address 192.168.0.1.
Note: Please ensure you take notes of the login credentials set on the gateway, as we’ll use them later when adding the gateway to the controller.
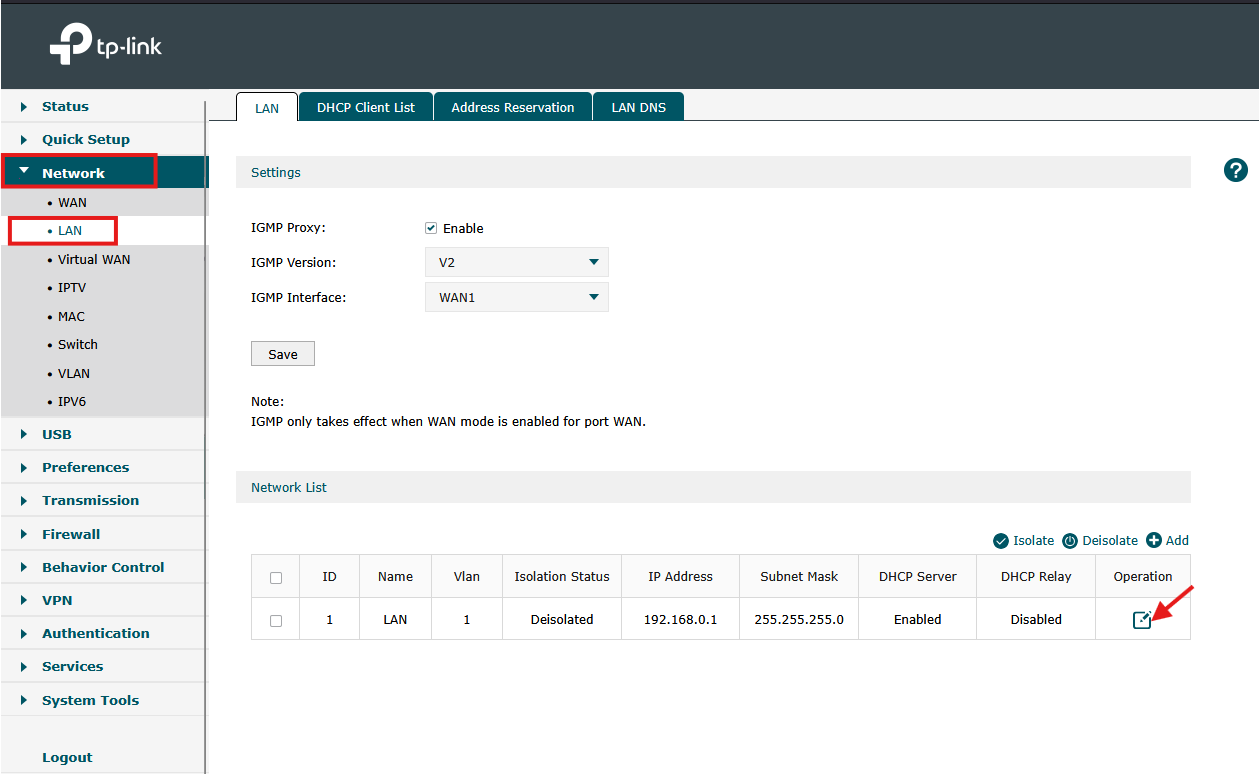
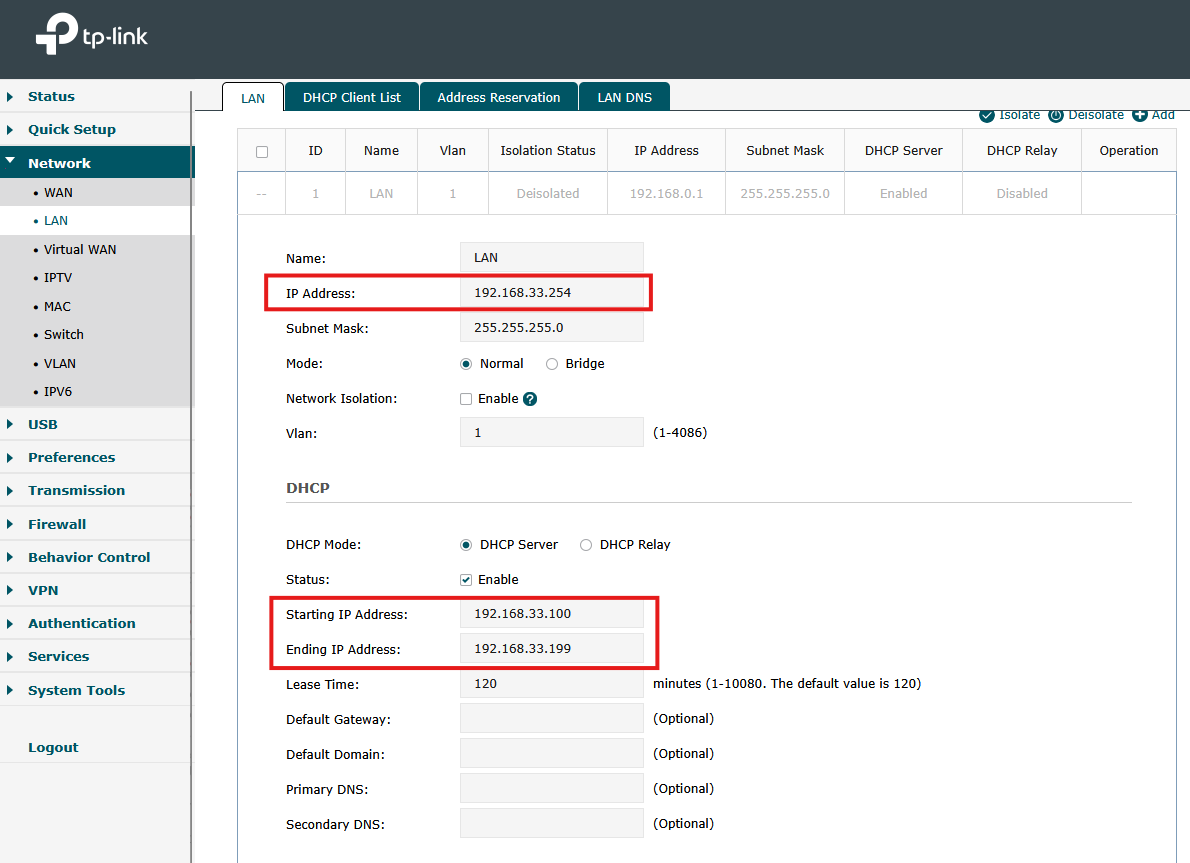
Step 2: Once logged in, go to Network > LAN, edit the default VLAN, and adjust the IP address information (such as the gateway’s IP address, starting and ending IP addresses) to match the existing subnet.
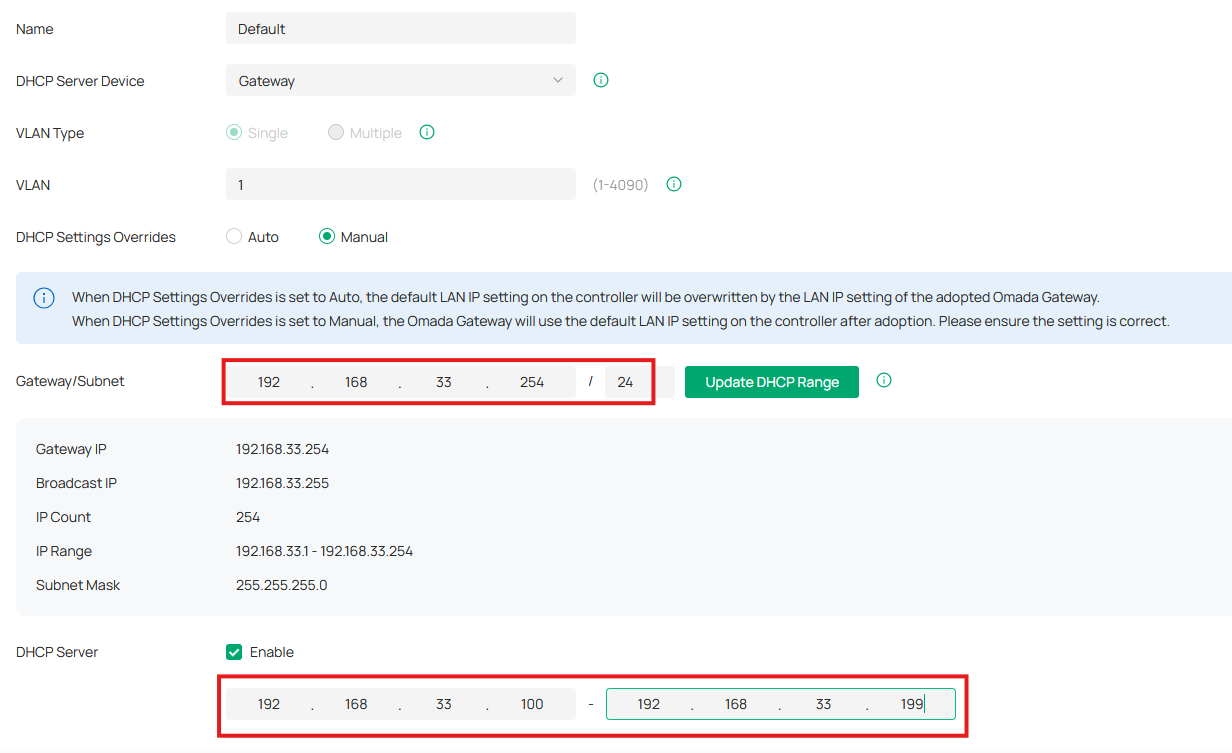
Step 3: Please log into the controller’s webpage, ensure you’re in the site view mode, and go to Network Config > Network Settings > LAN. Before adopting the Omada gateway, adjust the gateway’s IP address and DHCP Pool to match the configuration on the Omada gateway.
Note: if the legal DHCP server is enabled, please disable it and check the DHCP server checkbox to allow the Omada gateway to act as the DHCP server for devices in the network.
Step 4: Connect the Omada gateway to the existing network (including WAN and LAN connections) and disconnect the current non-Omada router. On the controller’s web interface, go to Devices and start adopting the Omada gateway.
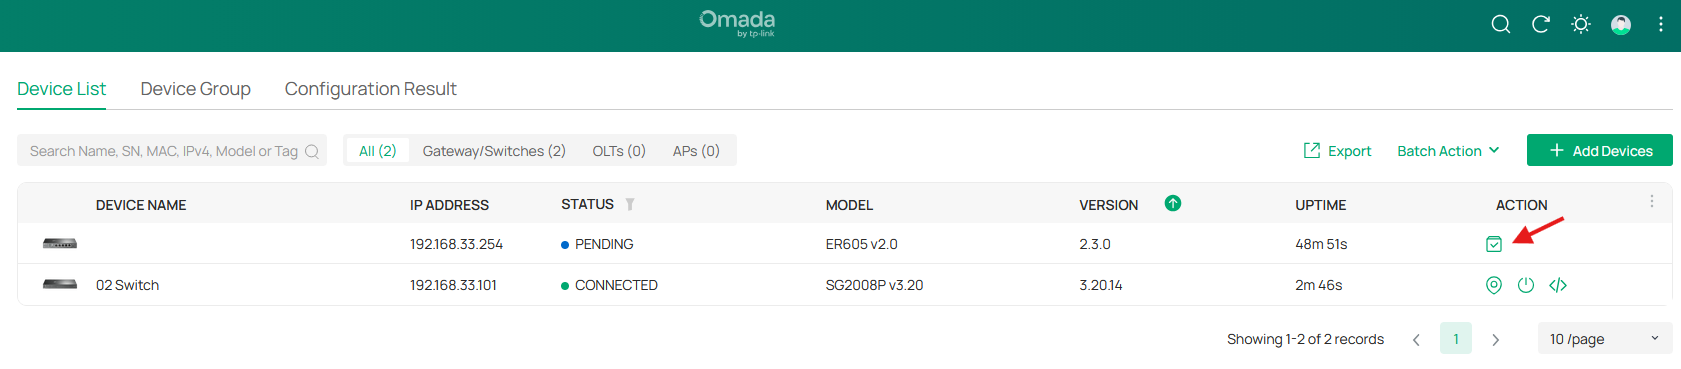
By default, the controller adopts any new Omada device with the default credentials (admin/admin). If the device is configured with different credentials, the controller will fail to adopt the device.
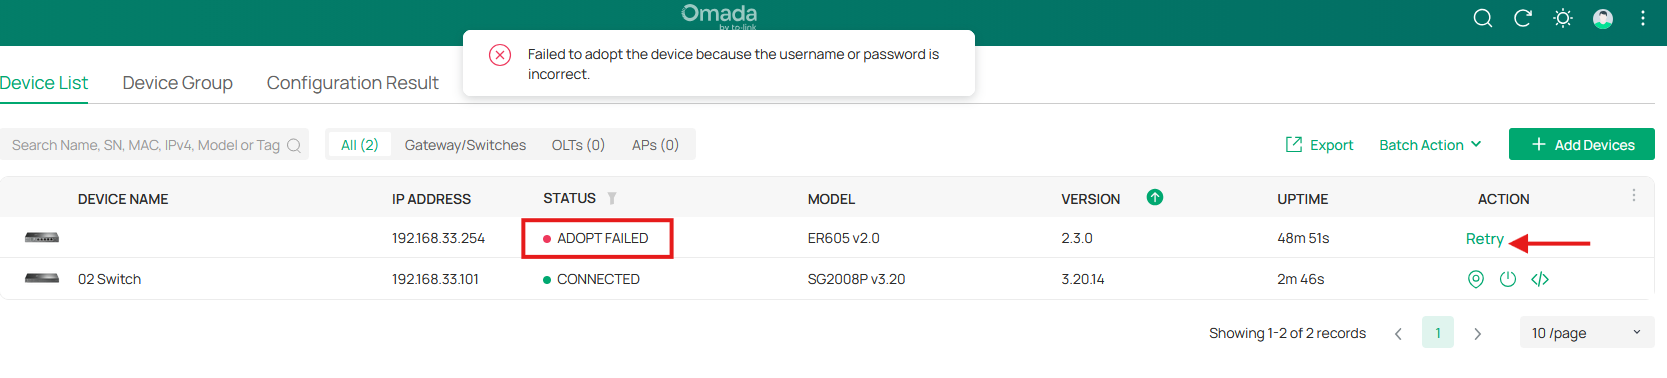
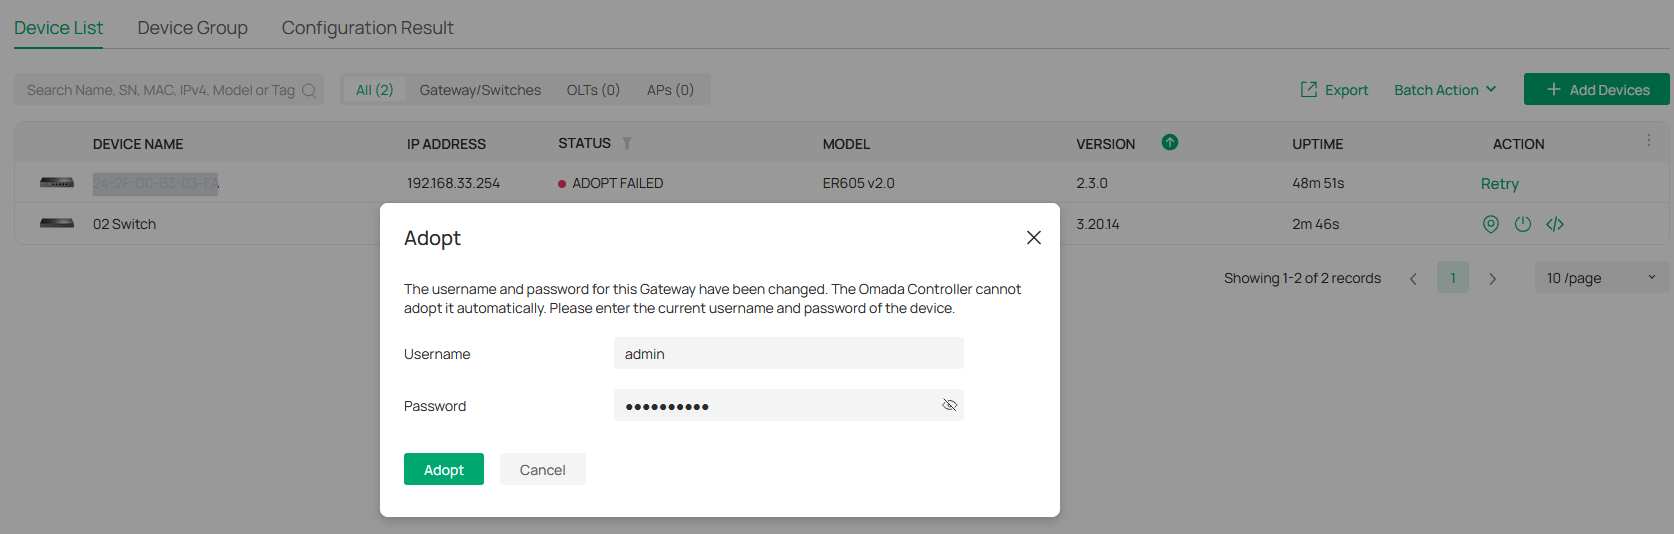
By pressing the retry button, you’ll be able to enter the correct credentials of the Omada gateway.
The Omada gateway is now managed by the controller.

Step 5: Renew the IP Address of devices or set a Static IP address.
Since the gateway has been changed in the network, the IP addresses of the switch and other devices may change once the DHCP lease expires. Alternatively, you can manually refresh the IP address by unplugging and re-plugging the Ethernet cables of these devices, then use the Omada Controller to manage them again.
Scenario 2: Replacing an Omada gateway with a different Omada gateway.
In this case scenario, the new gateway will inherit the existing settings from the controller. It’s not required to adjust any configuration on the new gateway.
Note: Please take a backup of the controller’s existing configuration before starting to replace the gateway.
Step 1: Disconnect the existing Omada gateway.
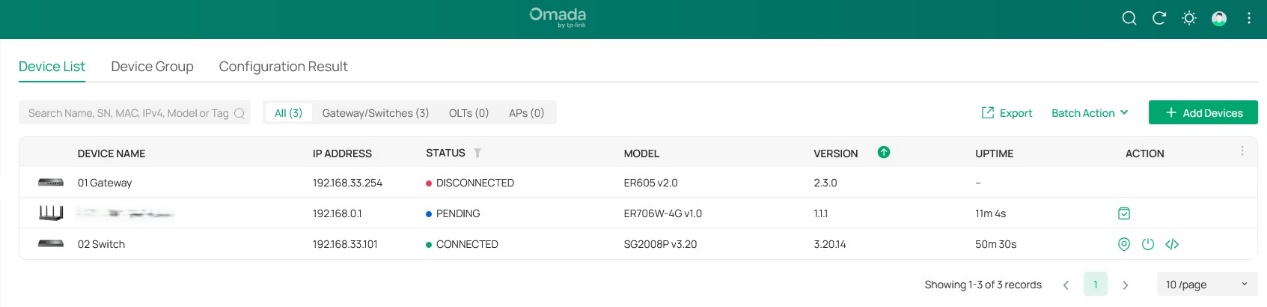
Step 2: Connect the new Omada gateway to the existing network. The controller shows the gateway in the devices list in pending status.
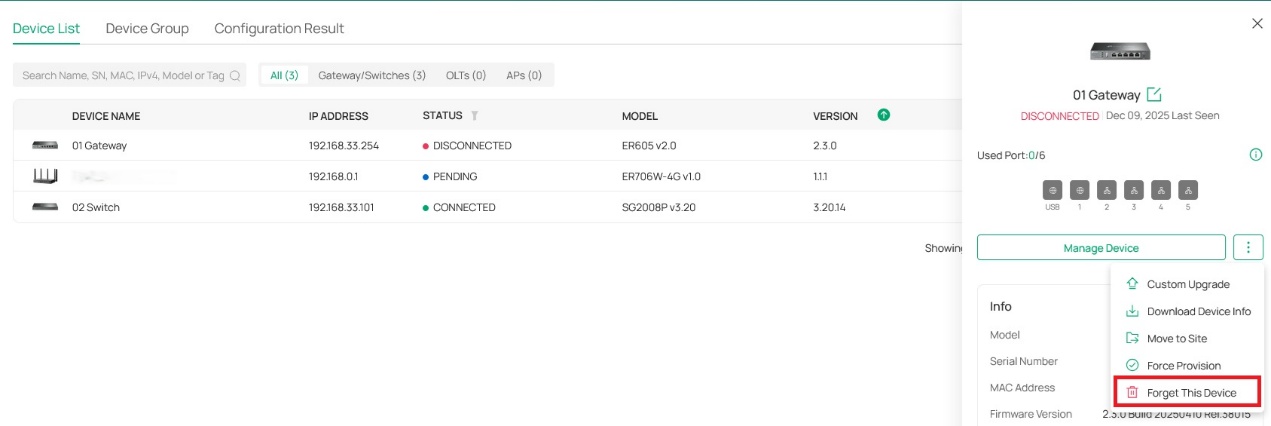
Step 3: Forget the existing Omada gateway from the controller. Click on the gateway, press the three dots next to Manage Device, and click on Forget this device.
Step 4: Connect a computer to the Omada gateway. The computer receives an IP address automatically from the gateway from the default IP Pool (192.168.0.0/24). Then, please go to the gateway’s web UI by visiting the IP address 192.168.0.1.
Note: Please ensure you take notes of the login credentials set on the gateway, as we’ll use them later when adding the gateway to the controller.

Once logged in, go to Network > LAN, edit the default VLAN, and adjust the IP address information (such as the gateway’s IP address, starting and ending IP addresses) to match the existing subnet.

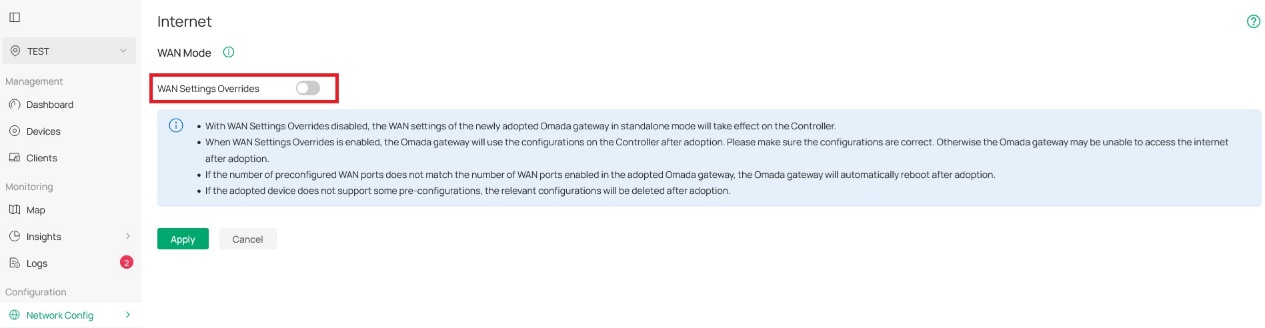
Step 5: Before adopting the new gateway, please ensure adjusting the WAN settings on the controller by clicking on Network Config > Network Settings > Internet. Enable the WAN settings overrides button (if it isn’t enabled) and select the model number of the new gateway.
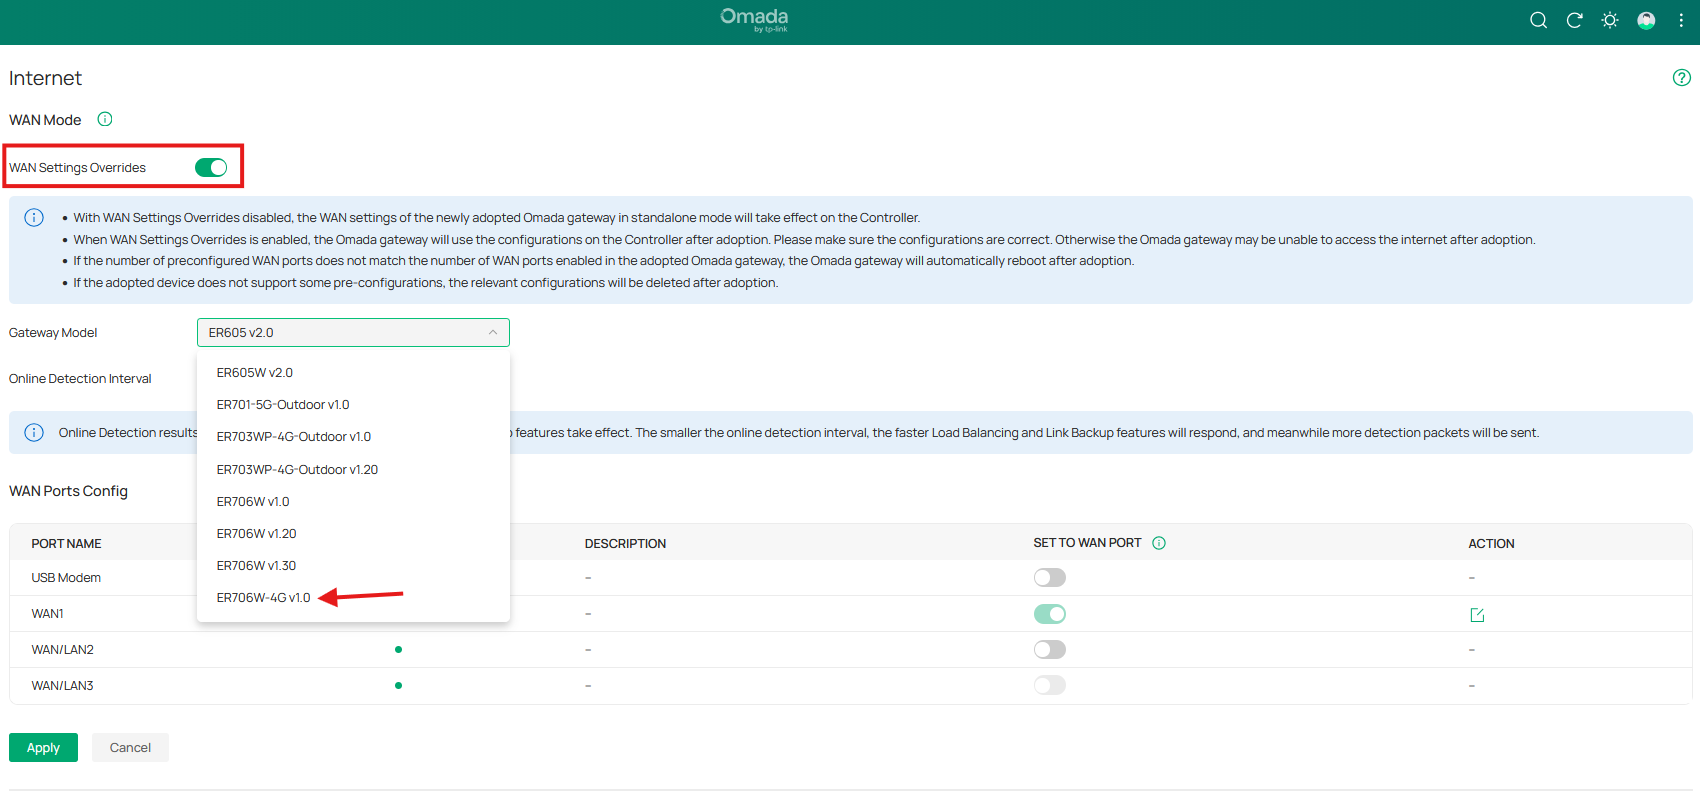
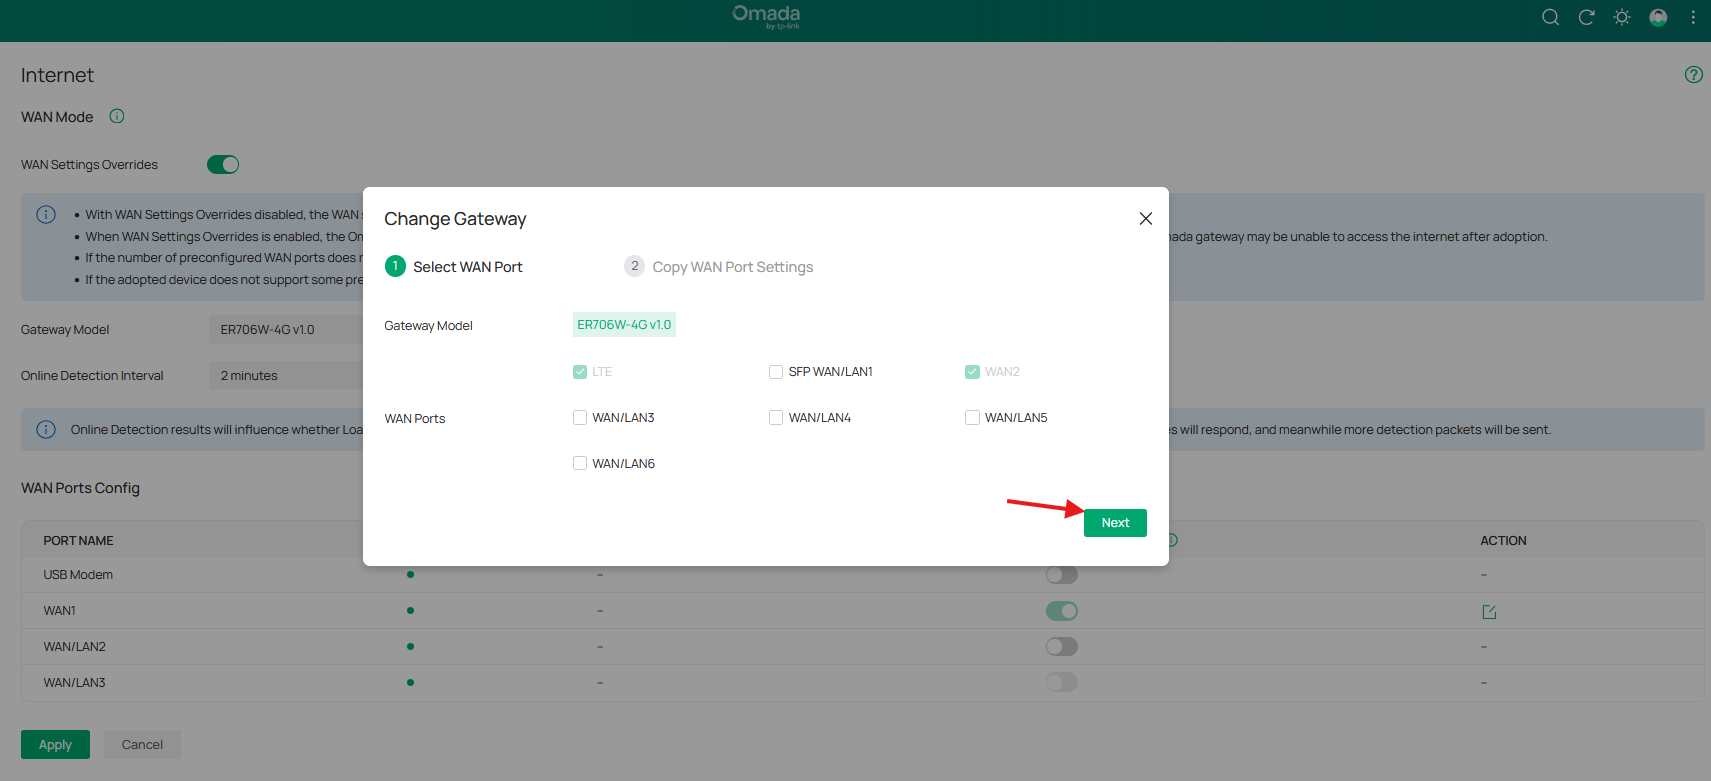
Step 6: After selecting the gateway’s model number, please select the desired WAN ports you want to use on this new gateway. By default, the controller designates the ports with the factory settings as WAN ports.
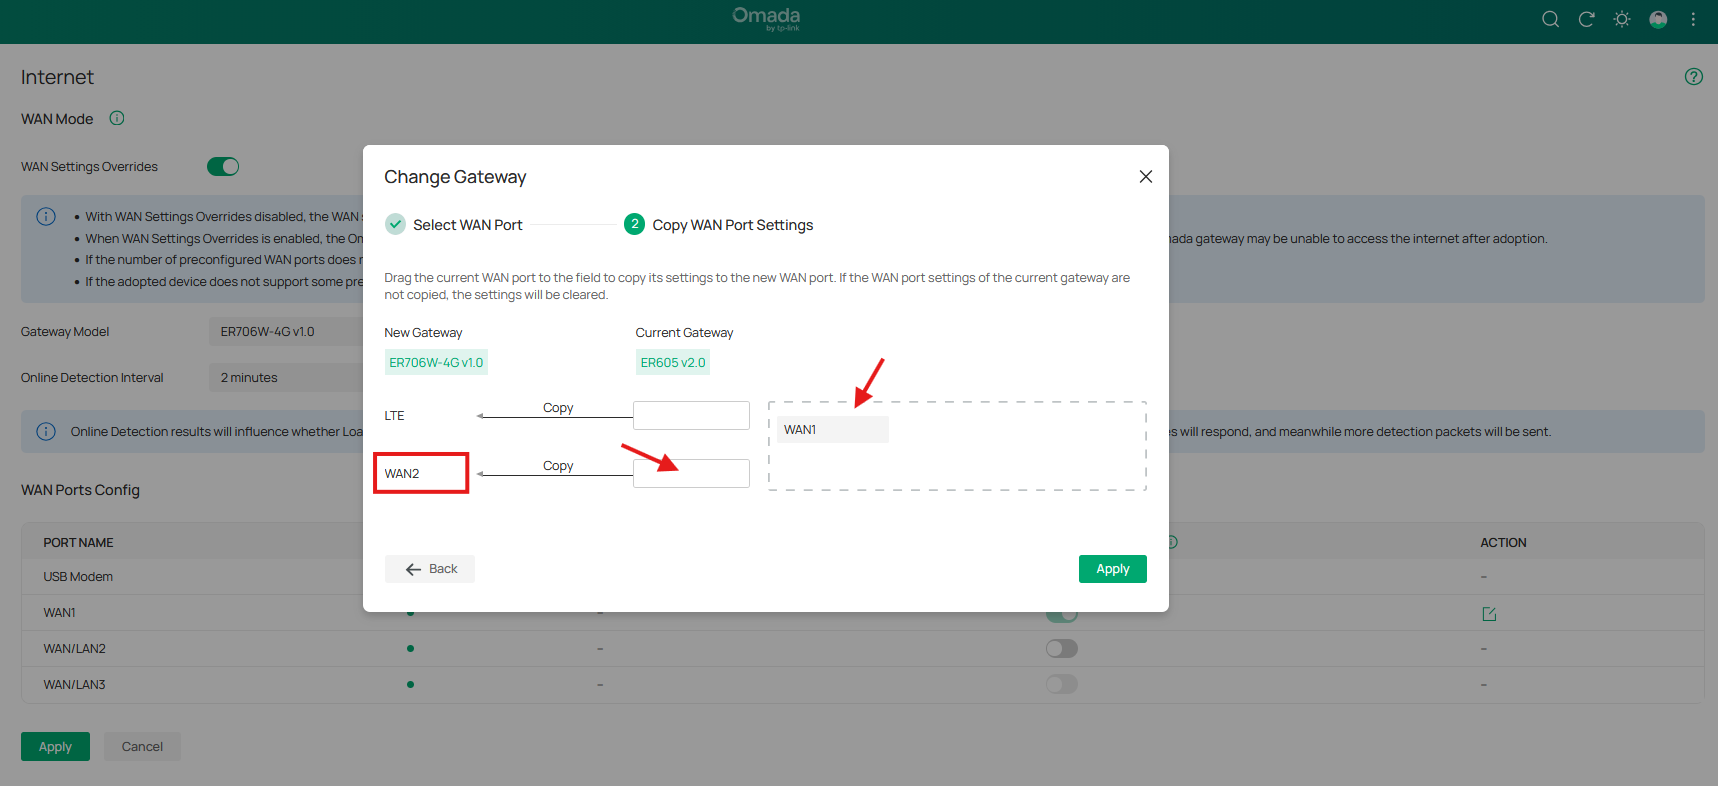
The next step would be copying the WAN settings from the old gateway to the new gateway.
In this example, drag the ER605’s WAN1 to the ER706W-4G’s WAN2 port and press the Apply button.
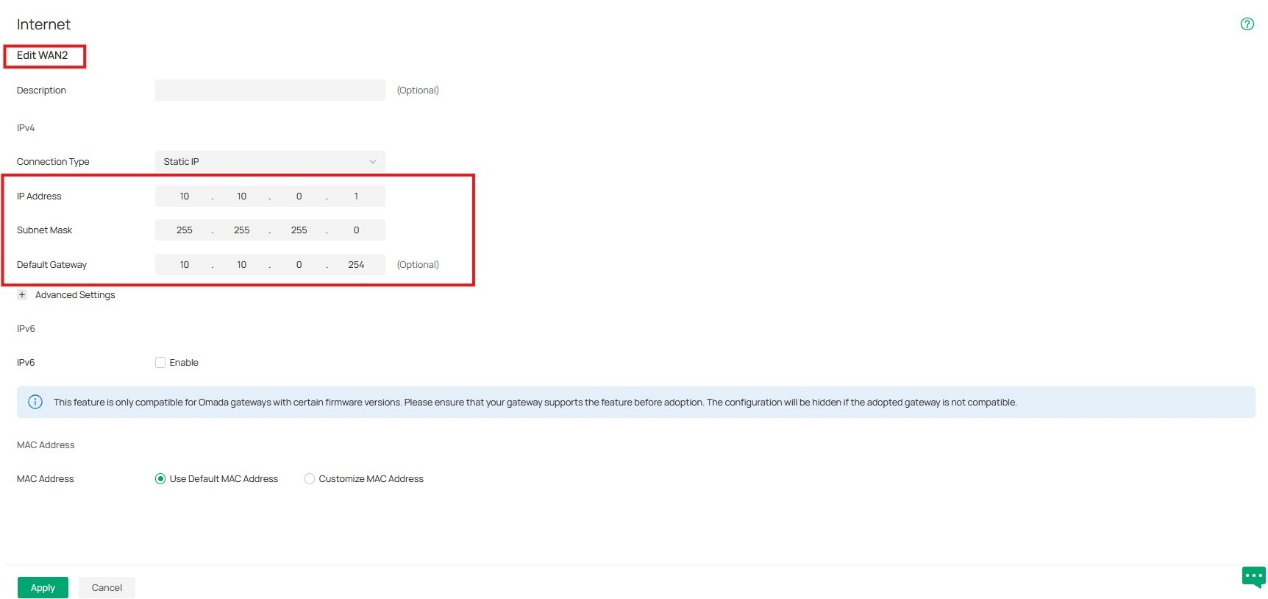
To confirm, please check the settings on the WAN port you select in the step above.
In case there is a static IP address on the old gateway, the controller copied these settings to the new gateway’s WAN port in preparation for the adoption process.
Step 7: Go to Devices and start adopting the new gateway.
Verification
The controller is showing the new gateway as connected with the existing network configuration.

Conclusion
By following the outlined steps—such as preparing the new gateway, ensuring proper IP address configurations, and using the Omada Controller for seamless adoption, you can ensure a smooth transition and minimize downtime.
FAQ
What if I have a public IP address on my gateway and want to transfer this IP information to the new gateway?
A. It’s based on the current gateway being used in the network. If it’s an Omada gateway, you can refer to scenario 2 in this article for more information. But, replacing a non-Omada gateway with an Omada gateway requires adding the public IP address to the WAN settings on the controller side before adopting the gateway.
Here are the required steps to add the public IP address:
- While you’re in the site view mode, go to Network Config > Network Settings > Internet. We’re going to enable the WAN settings overrides and select the Omada gateway’s model.
- Select the desired WAN port, or you may proceed with the default selection based on the gateway’s model, and click the Next button.
- Drag and drop the suggested WAN port under the current gateway, and click Apply.
- The last step would be to click on the edit button next to the desired WAN port, select the connection type as Static, and add the public IP address of the existing gateway.
By following these steps, the new Omada gateway will inherit the IP address once it’s fully managed by the controller.
Some devices lost internet connection or still use the old gateway’s IP address after replacing the router. What would be the next step to resolve this issue?
- You may consider disconnecting or power cycling these devices, so they receive the correct IP address information of the new gateway.
This article applies to Omada controller v6 or above. Omada Gateway with firmware compatible with Omada v5.15 or higher.
