


What is Management Port on Omada Campus Switch and How to Use It


Contents
Introduction
On Omada Campus switches (Excluding SG5 series), apart from the console port, there is a RJ45 management port equipped.
This management port is dedicated to being used for the management of a switch, it has a different MAC address as the service ports. There is also a dedicated layer 3 interface bound to this physical management port, separate from other interfaces including the SVIs on the switch.
By default, the traffic on management port is isolated from that of the service ports. The reason is to keep the management network from being affected by the service network, when incidents such as network storm or attack happening in the service network, the management network is isolated to ensure the user still able to manage the devices normally.
Currently, the management port could not be used to adopt the switch on Omada Controller, thus, this article will only introduce the usage and configuration of management port in standalone mode.
The configuration of management port could only be conducted through CLI, you could either access via SSH/Telnet or the console port. By default, the management interface will obtain IP address through DHCP, which means if you do not connect the management port to a valid DHCP server, it won’t get a valid IP address for you to access. You could also configure a static IP address for the management interface.
Requirements
- Omada Campus Switch (Excluding SG5 Series)
Configuration
The following section will introduce the steps for configuring the IP address on management port.
Configuration for DHCP
By default, the management interface is configured as DHCP, if you have changed it to static IP, you could configure it back to DHCP as follows:
Step 1. Enter the switch CLI and proceed to global config view.
Step 2. Use the command below to change the IP address mode to DHCP, this will work for both IPv4 and IPv6:
management-port protocol dhcp
Note: As introduced above, the management interface is separate from other interfaces, thus, the subnet between these interfaces could not be conflicted. If there’s a conflict in the IP address allocated by DHCP server, the switch will decline this address and keeps looking for a new IP address.
Configuration for Static IP
Step 1. Enter the switch CLI and proceed to global config view.
Step 2. Disable the DHCP configuration on management interface, command as follows:
management-port protocol none
Step 3. Configure the IP address and subnet mask for management interface, command as follows:
management-port ip <ip address> <subnet mask>
To delete the IP address, use:
no management-port ip
Step 4. Enable IPv6 address management on the management interface, command as follows:
management-port ipv6 enable
management-port ipv6 address <ip address+mask>
To disable IPv6 management on the management interface, use:
no management-port ipv6 enable
Step 5. Configure the static IPv6 address on the management interface, if you specify the complete address, command as follows:
management-port ipv6 address <ip address+mask>
such as:
management-port ipv6 address fd12:3456:789a:0001::1/64
If you would like to specify the prefix only and use eui64 to fill out the complete address, command as follows:
management-port ipv6 address <ip address+mask> eui64
such as:
management-port ipv6 address fd12::/16 eui64
To delete the IPv6 address, use:
no management-port ipv6 address <ip address+mask>
or
no management-port ipv6 address <ip address+mask> eui64
Verification
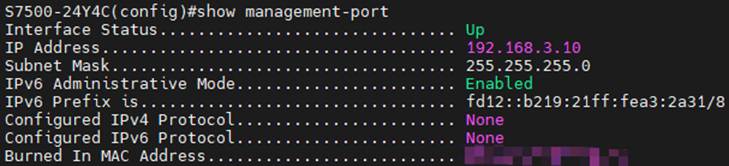
To check the current status of the management port and interface, use the command:
show management-port
You could check the current link status, IP address, protocol and MAC address of the management port.
Conclusion
In this article, we have introduced what is management port on Omada Campus switches and how to configure it.
Get to know more details of each function and configuration please go to Download Center to download the manual of your product.
This article applies to: All Omada Campus Switches (Excluding SG5 Series)
