


Contents
Introduction
Gateway QoS (Quality of Service) refers to a set of mechanisms implemented on a network gateway (such as a router or firewall) to manage, prioritize, and control traffic flows across the network. Its primary objective is to ensure predictable performance for critical applications while optimizing overall bandwidth utilization.
This feature has been significantly reworked and modified on Omada Fusion Gateway to provide application-aware and device-aware traffic prioritization and support matching by application, device, IP, domain, which offers more smooth experience for small and medium businesses.
Requirements
- Omada Fusion Gateway
Configuration
We offer a few QoS default templates for quick set up. On the QoS page, you will see default templates such as:
- IM (Instant Messaging)
- Gaming Acceleration
You can enable these templates directly to prioritize common applications like Zoom, Teams, or online games without manual configuration. You can further customize these templates if needed. Then we will show you how to set up a new QoS entry from none.
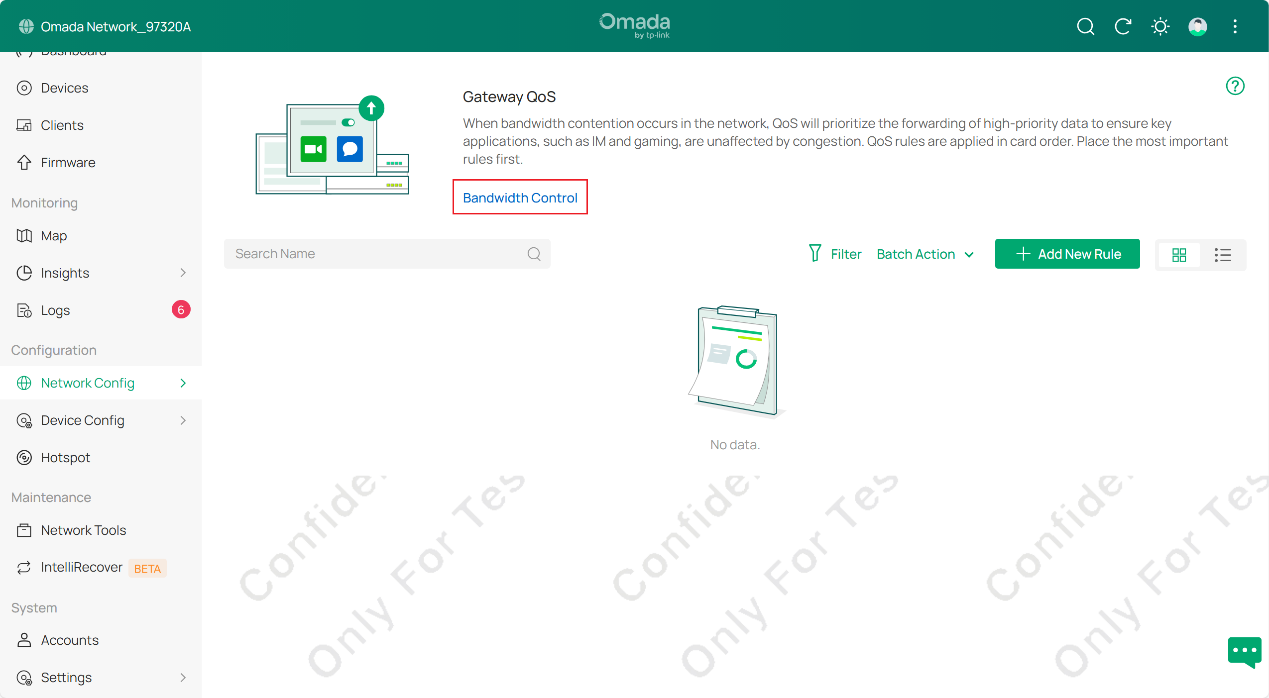
Step 1. Log in to the management interface of fusion gateway via web browser, go to Configuration > Network Config > Traffic Management > Gateway QoS to enter QoS configuration page, as shown in the picture below.

Step 2. First, we will set a bandwidth limit in Bandwidth Control for restriction. Be aware that QoS feature works when the traffic throughput exceeds the configured ratio.
In this FAQ, we limit the bandwidth to 100 Mbps for both upstream and downstream and set QoS ratio to 50%, which means the QoS feature will take effect when the traffic throughput exceeds 50 Mbps.

For demonstration purposes, assume that we have three kinds of traffic in our network, office traffic, guest traffic and voice traffic. We intend to increase the priority of this three traffic and want the voice traffic to be equipped with the highest priority. Based on this purpose, we will do the following.
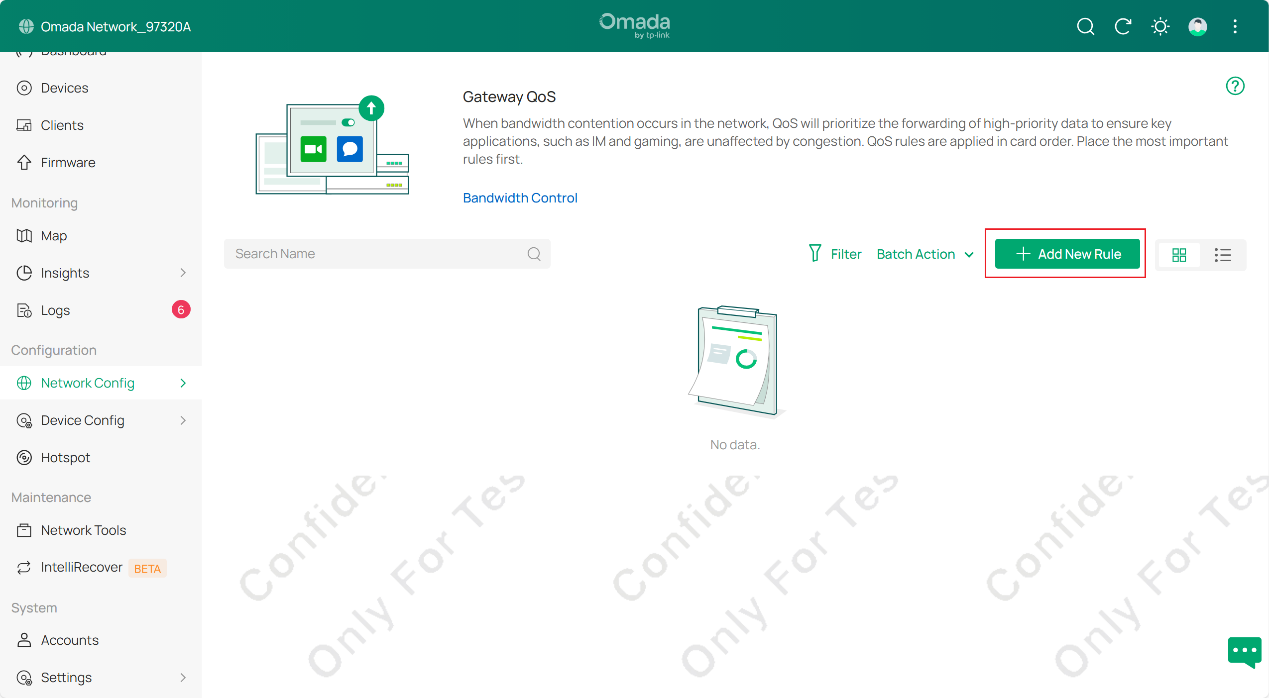
Step 3. Click Add New Rule to create a new QoS rule. Before we go deeper, a brief introduction about rule details will go first.
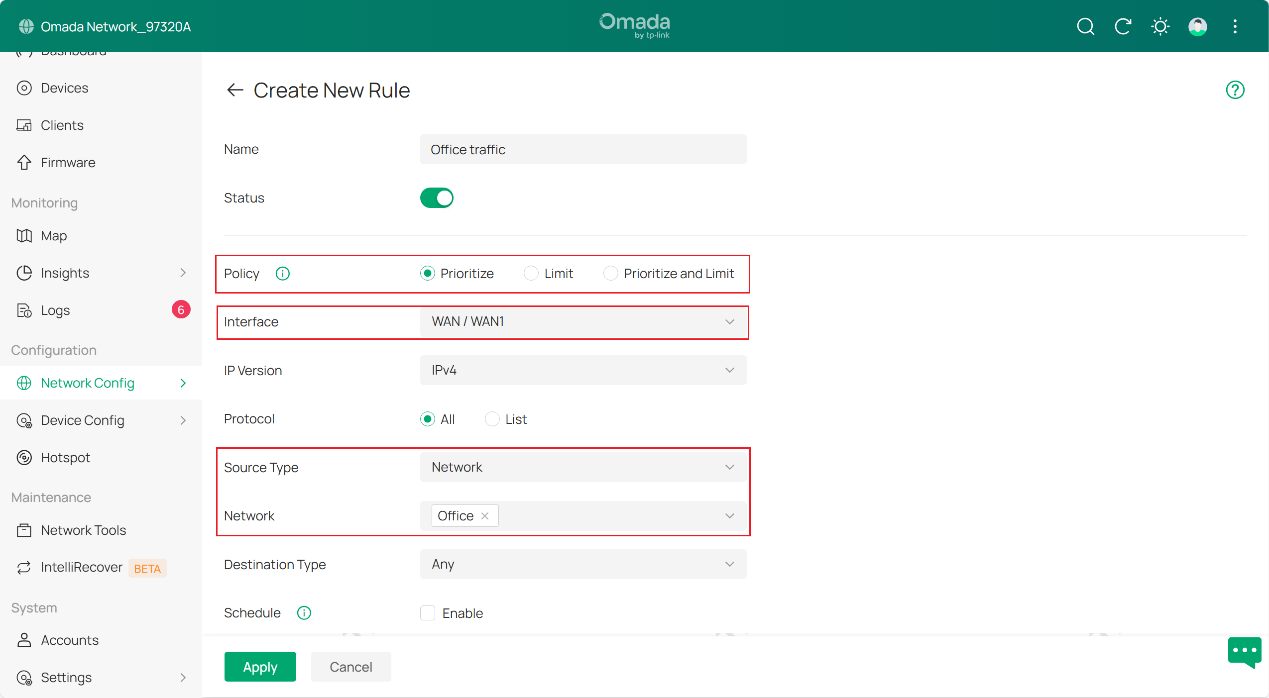
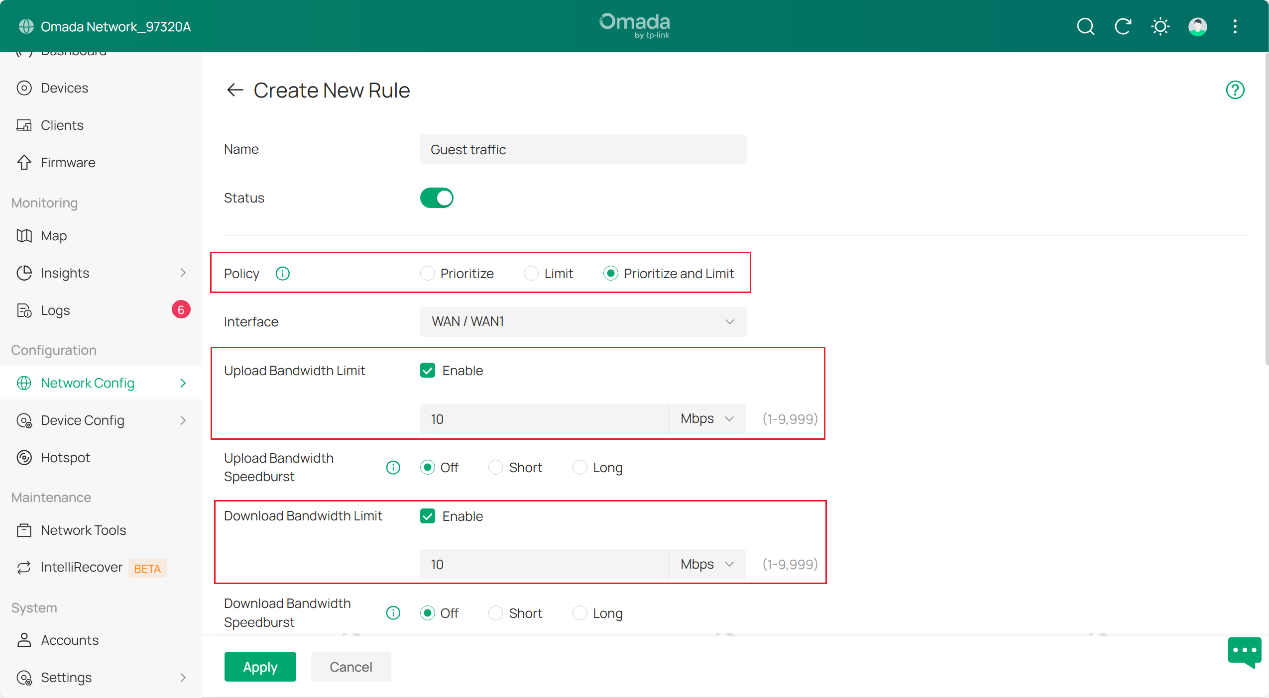
QoS policy: It can be selected as Prioritize/ Limit/ Prioritize and Limit.
Prioritize: it gives selected traffic higher forwarding priority during network congestion. It is suitable for latency-sensitive applications such as VoIP, video conferencing, online gaming, and remote desktop, helping ensure a smoother user experience.
Limit: it restricts the maximum bandwidth that selected traffic can be used. It is suitable for bandwidth-intensive or non-critical applications such as large downloads, software updates, cloud synchronization, and guest network traffic, helping prevent them from occupying excessive bandwidth.
Prioritize and Limit: it applies both higher priority and bandwidth restrictions to selected traffic. It is suitable for important services that require stable performance but should not consume unlimited bandwidth, such as video conferencing, surveillance traffic, and business-critical applications.
Aside from QoS policy, A QoS rule can match traffic using multiple dimensions, including:
Source: Device, Network, or IP
Destination: Application, App Category, IP, Domain
Protocol and Port
This allows flexible and precise traffic control based on real-world scenarios.
In this example we choose the policy as Prioritze. Select the interface, which regulate where this QoS rule takes effect, to be WAN1. Then we make the source to be our Office network (assuming that you have already finished separate different traffic for different networks/VLANs, if you don’t know how to divide a new network/VLAN, please refer to our FAQ How to configure VLAN with Omada Network v6 | Omada Network Support) by selecting the Source type as Network and confirm the specific network Office to be the source. Click Apply to finish configurating this entry.
Step 4. Then for the rest entries guest traffic and voice traffic, we basically do the same thing as we did in step 3. Creating a new rule and adjusting its correponding parameters according to the need. To show you some of these parameters, follow example has been set to grant you a better understanding about them.
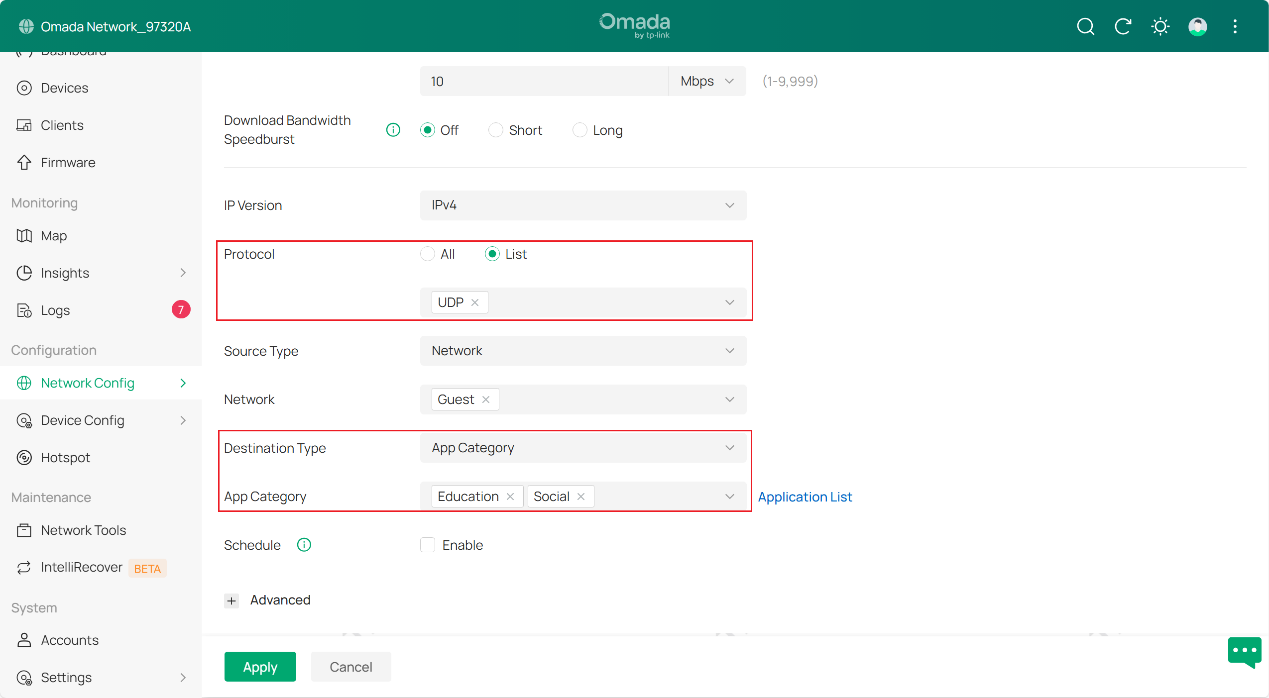
We use Prioritize and Limit policy for guest traffic, set the limit for upload bandwidth and download bandwidth to 10 Mbps regarding this section.
After that, protocol has been set as list mode, with UDP packets marked on the list. Destination type has been selected as App Category, targeting education and social applications. As a result, traffic under guest VLAN with mentioned attributes will be included in this QoS entry.
Next we create a third entry for voice traffic, fill in the parameters according to the need.
Note that QoS rules are processed in order. When multiple rules match the same traffic, the system applies them based on rule priority (top to bottom).
So, assuming that you wish to raise the priorty of voice traffic to the highest above all three QoS entries. To do this, you can simply drag this entry to the first place, like the picture shown below. Be aware that when a traffic matches multiple rules, it will always apply to the first rule it detects and ignore the rest.
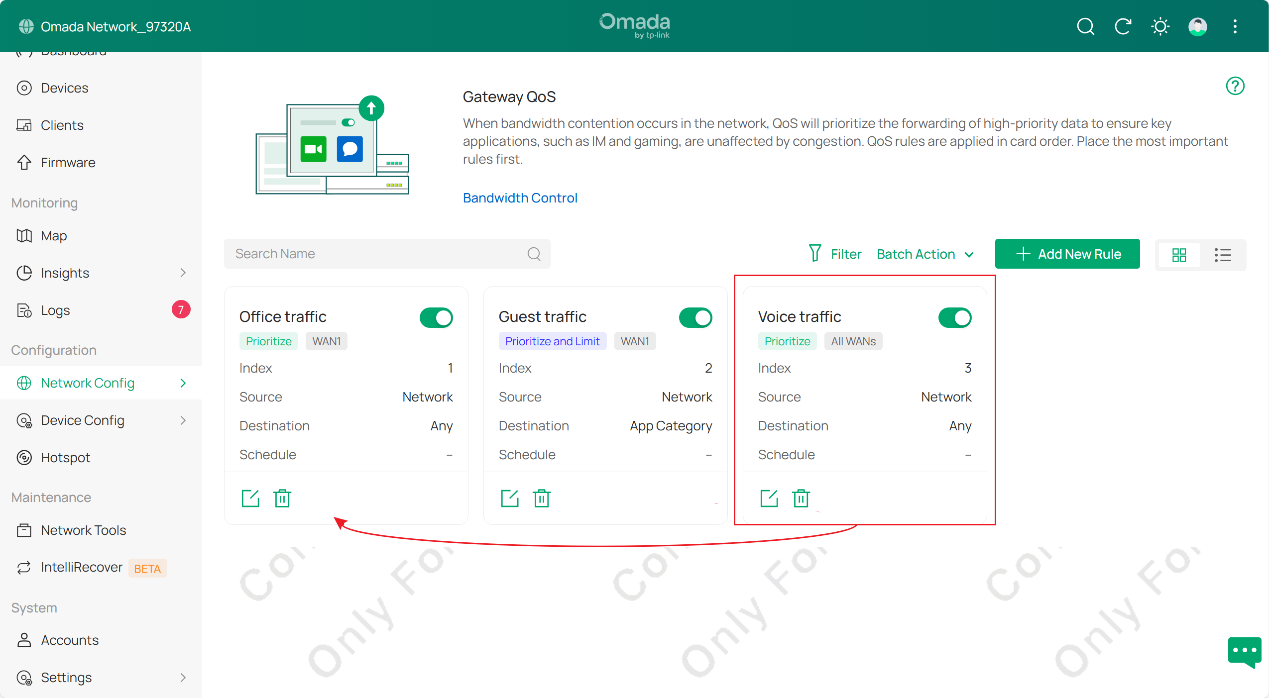
After that, we get our job done. We have finished gateway QoS entry setup in this example.
Conclusion
You have now learnt how to configure Quality of Service on Omada Fusion Gateway.
Get to know more details of each function and configuration, please go to Download Center to download the manual of your product.
QA
Q1: Why is there no explicit improvement after a QoS policy is set and put into use?
A1: Gateway QoS prioritizes important application traffic when the network becomes congested. QoS rules take effect after the bandwidth thresholds configured in Bandwidth Control are reached. If bandwidth is sufficient, QoS effects may be less noticeable.
Q2: Why does CPU usage increase after QoS is enabled?
A2: QoS requires the gateway to inspect, classify, queue, and schedule traffic based on configured rules, which increases CPU workload. Hardware acceleration may also be reduced, resulting in higher CPU usage.
Q3: What is the relationship between QoS and Bandwidth Control?
A3: QoS is used to prioritize and manage traffic behavior, while Bandwidth Control is used to limit bandwidth usage. They are often used together to improve network performance and prevent bandwidth abuse.
Q4: Why is high-priority traffic still lagging?
A4: High priority improves traffic handling during congestion, but it does not guarantee unlimited bandwidth or eliminate external bottlenecks. Lag may still occur if bandwidth is saturated, too much traffic is prioritized, or the bottleneck exists outside the gateway.
