


Contents
Introduction
Software-Defined Wide Area Network (SD-WAN) revolutionizes traditional WAN architectures by leveraging centralized control and automation to dynamically route traffic across multiple connections (e.g., MPLS, broadband, LTE). The key benefit of SD-WAN is centralized Policy Management, allowing users to define and manage network policy across different Fusion Gateway systems.
There are two SD-WAN models designed for Fusion Gateways:
- Full Mesh: Connect all sites directly and securely (Up to 20 sites).
- Hub-Spoke: Connect multiple sites through a central hub (Up to 1000 sites).
Here are some important info for users of Fusion Gateway SD-WAN system:
- Currently, the Hub-Spoke model is not yet supported on Fusion Gateway SD-WAN, it will be available in the future version.
- The network segments participating in SD-WAN cannot be overlapped across all sites, the virtual NAT for overlapped network segments will be supported in Hub-Spoke model in the future.
- For Full Mesh model, no public IP is required. Our SD-WAN uses P2P NAT Traversal to allow the connection of sites without public IP. However, for sites where only NAT8 (Symmetric NAT) or NAT6 (Port-restricted cone NAT)- NAT8 is present, the NAT Traversal process may fail, resulting in connection establishment failure between some of the sites, in this situation, the traffic between these sites will be forwarded by other tunnels established successfully.
- To configure SD-WAN between Fusion Gateways, all the Fusion Gateways must have Cloud Access enabled, the cloud access account needs to own Superadmin or Owner privilege to gain access to SD-WAN feature for the Fusion Gateways bound.
Requirements
- Fusion Gateway with Cloud Access Enabled
- Omada Cloud Portal
Configuration
We will introduce how to configure SD-WAN on Fusion Gateways using three Fusion Gateways on the Omada Cloud Portal as example.
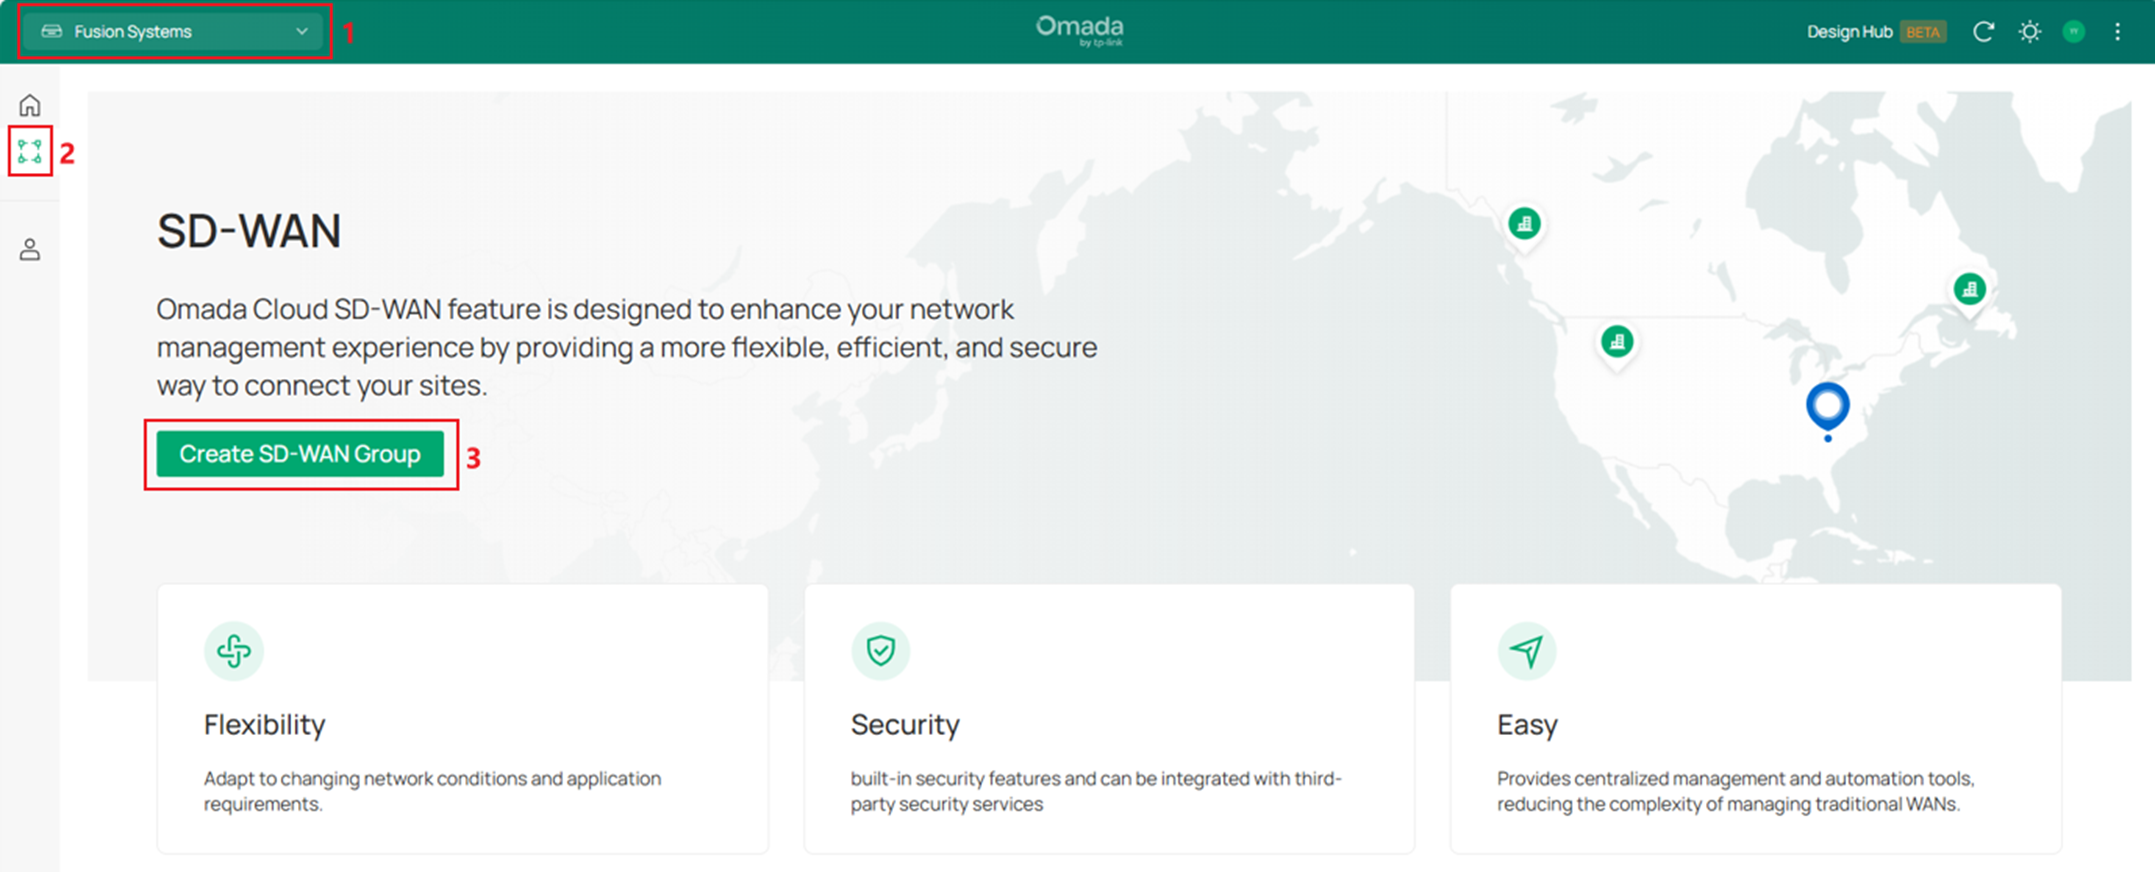
Step 1. Login to your account on Omada Cloud Portal and select Fusion Systems on the upper left, then go to SD-WAN panel, click the Create SD-WAN Group button to create a new SD-WAN group.
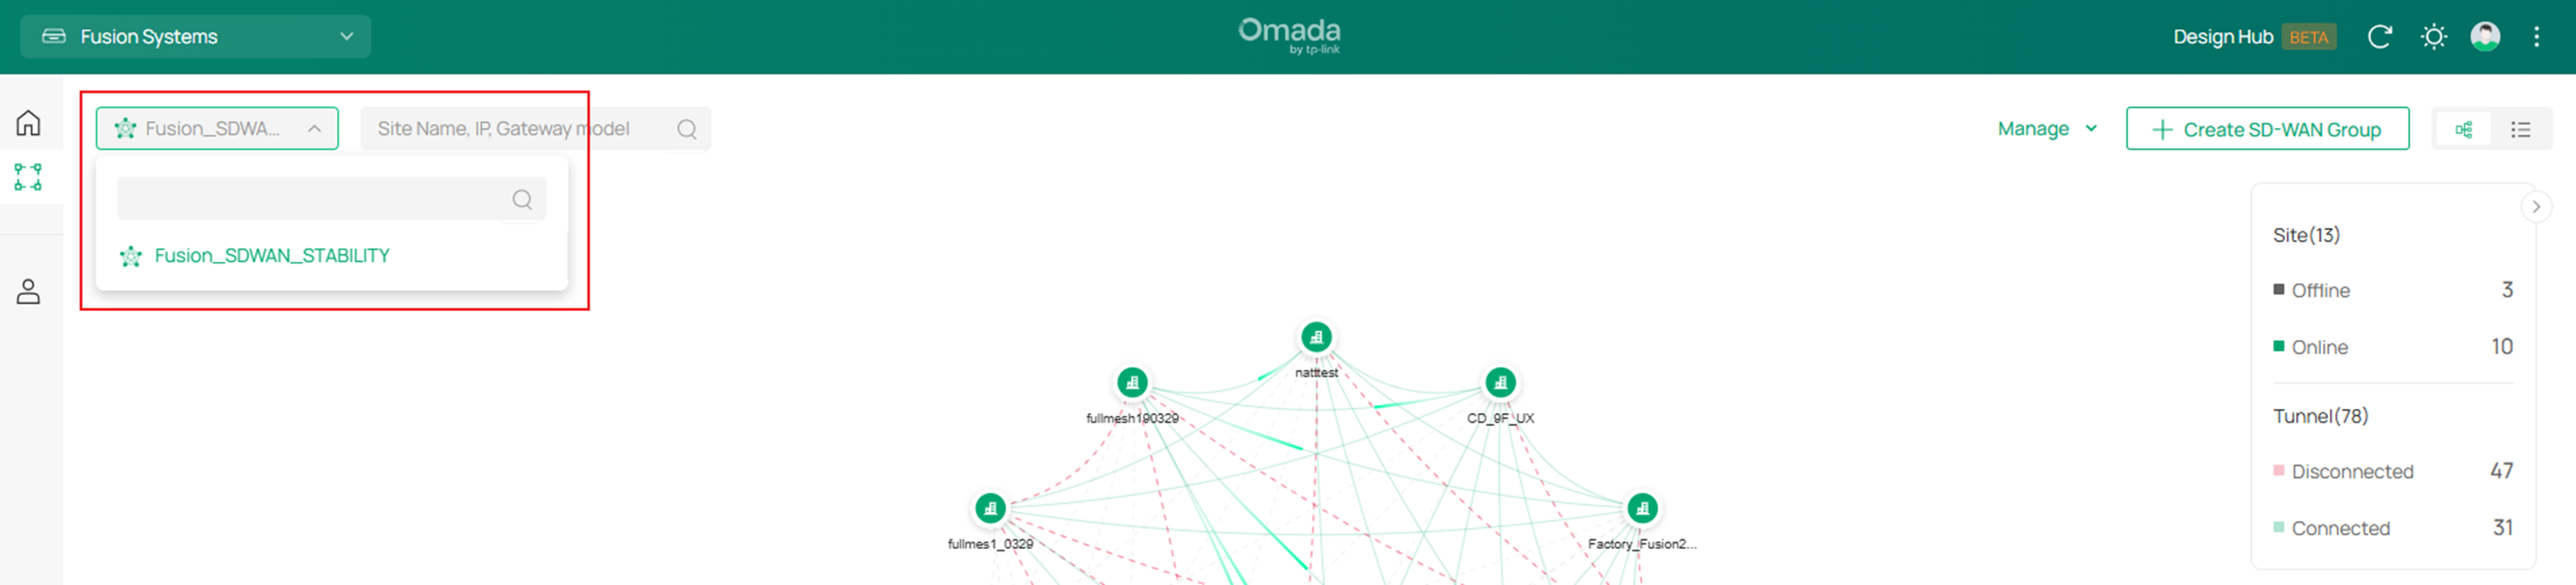
To check the existed SD-WAN group, click the drag down panel on the upper left side. Please note that currently a Fusion Gateway could only be added to a single SD-WAN group, the Fusion Gateways in different SD-WAN groups cannot be duplicated.
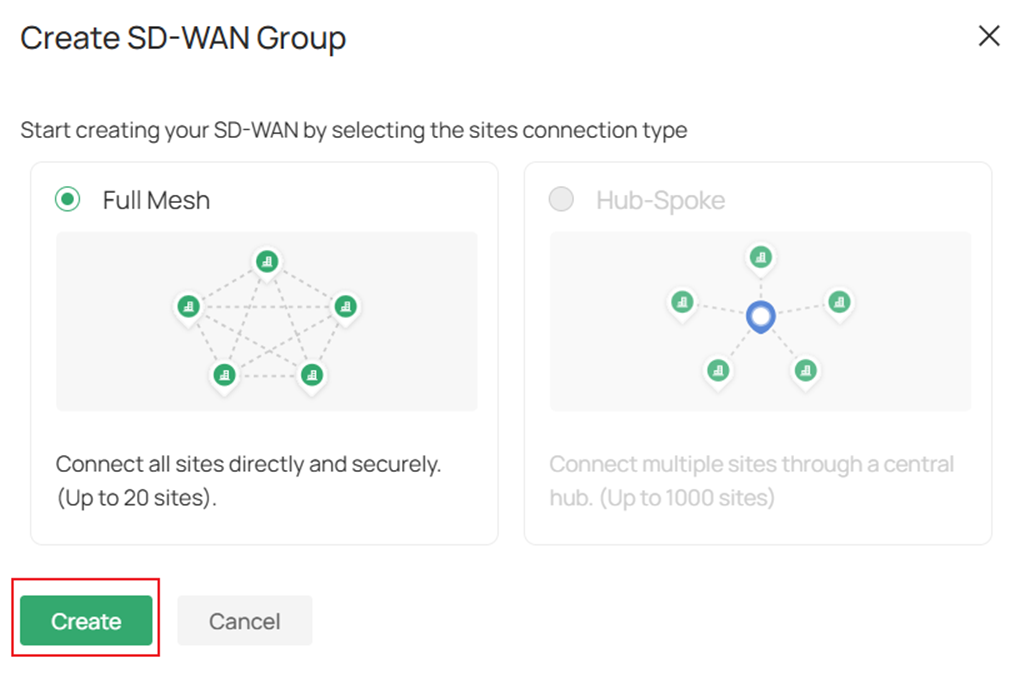
Step 2. Currently, only Full Mesh model is supported, click Create button.
Step 3. In the SD-WAN Group creation panel, name the group, then click Sites, choose the sites you wish to form the SD-WAN group together and click Apply. 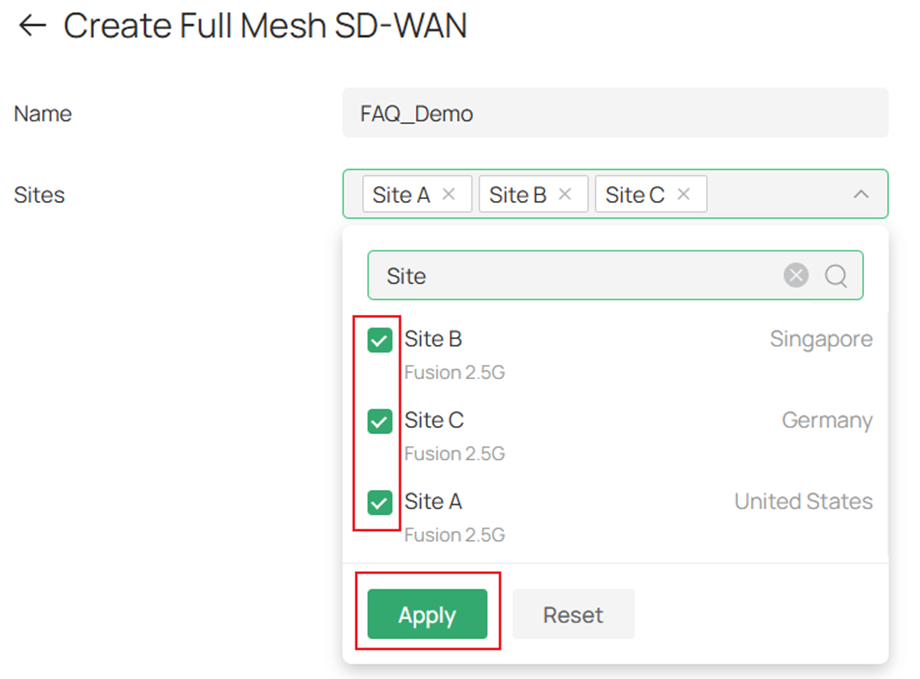
Step 4. Tick to choose the LAN networks across sites you wish to add in this SD-WAN group, on the left side Site panel, WAN port participating in the SD-WAN group could be selected, by default it will be chosen automatically (WAN port with public IP first. The user could also select WAN ports manually. If set as Auto, the auto failover will be enabled while using; if the WAN goes down, it will automatically choose another WAN as failover. If the WAN is set manually, the auto failover will not take effect. After finishing selecting, click Save. 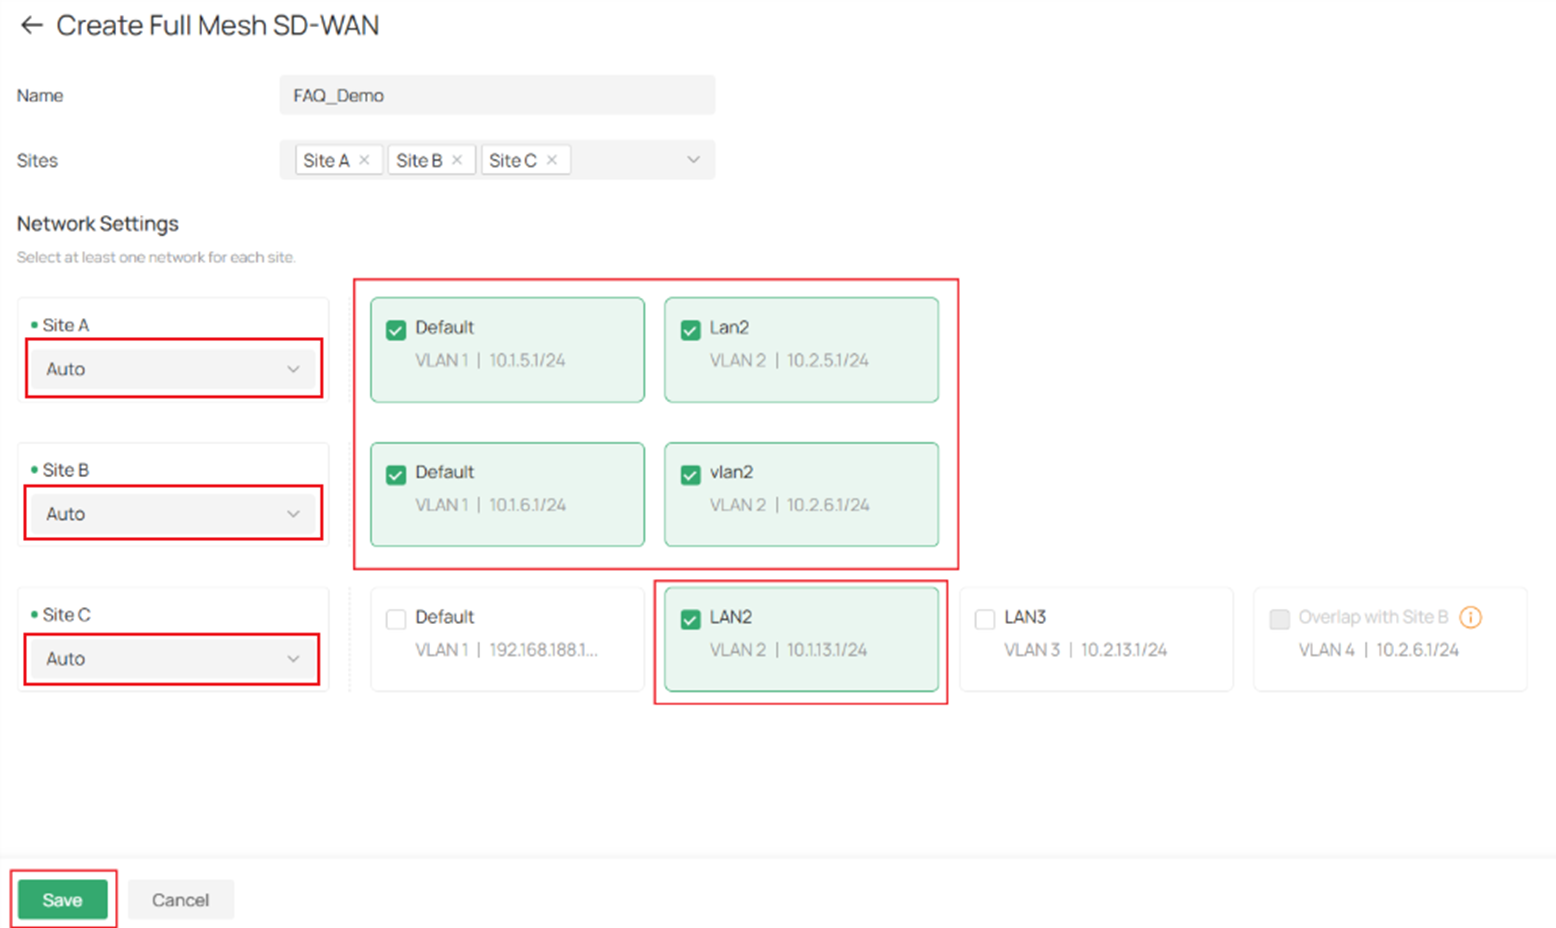
The LAN segment conflict auto detection is enabled, so when there’s an unselected segment IP conflicting with a selected one, it will be grayed out and notifying the conflict. When there are conflicting network segments and one of the segments is selected to join the SD-WAN, the routing priority order is LAN Network > SD-WAN. 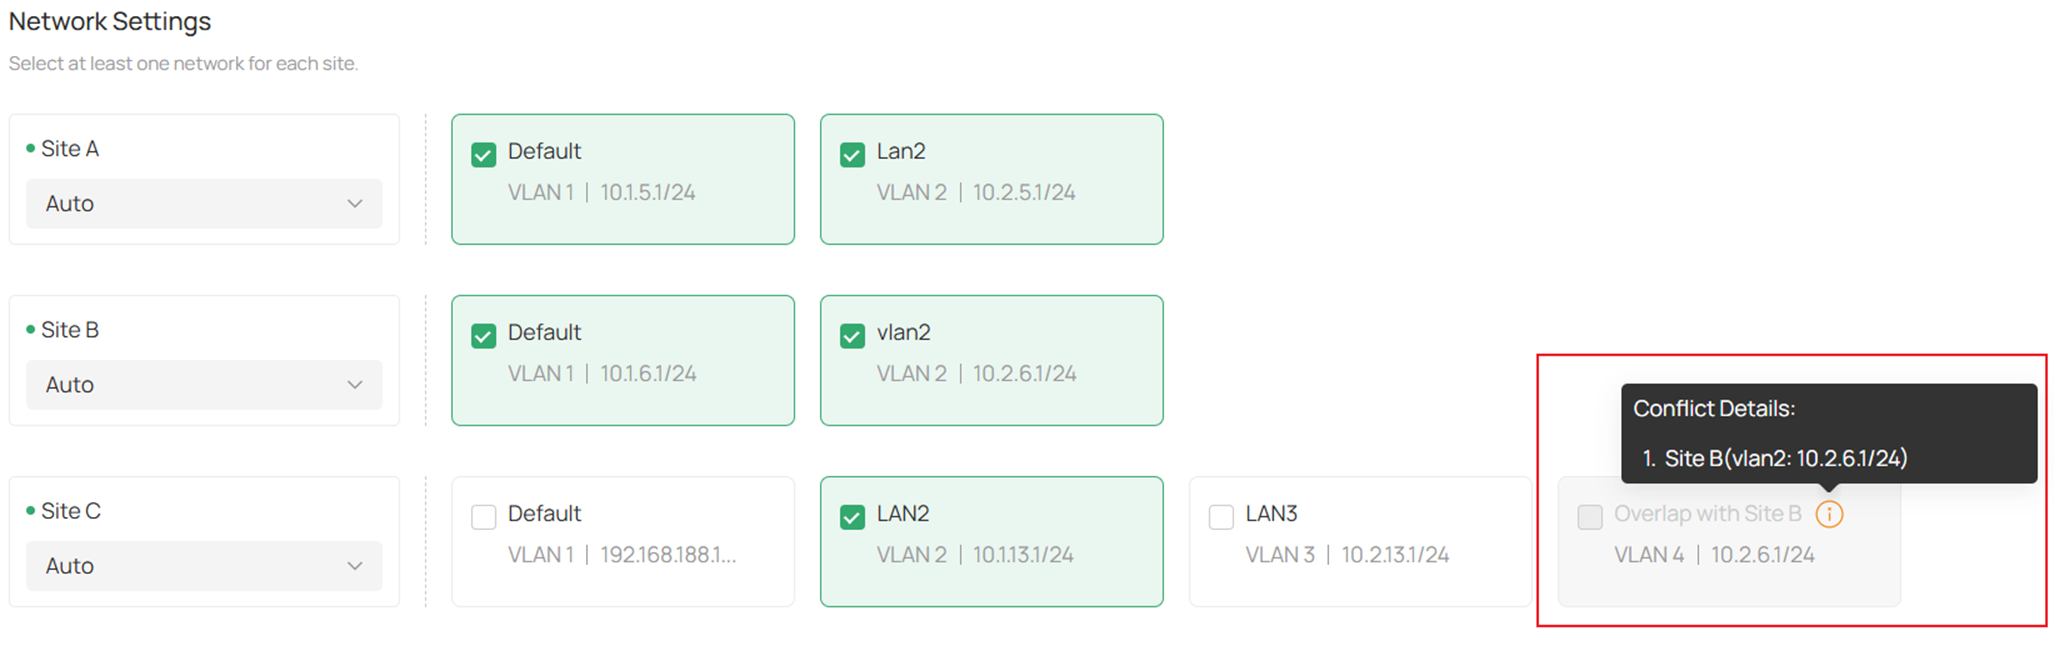
Step 5. After choosing the LAN networks and click Save, the configuration is finished and tunnels between each Fusion Gateways will begin to establish. Users will be able to check the SD-WAN group status. 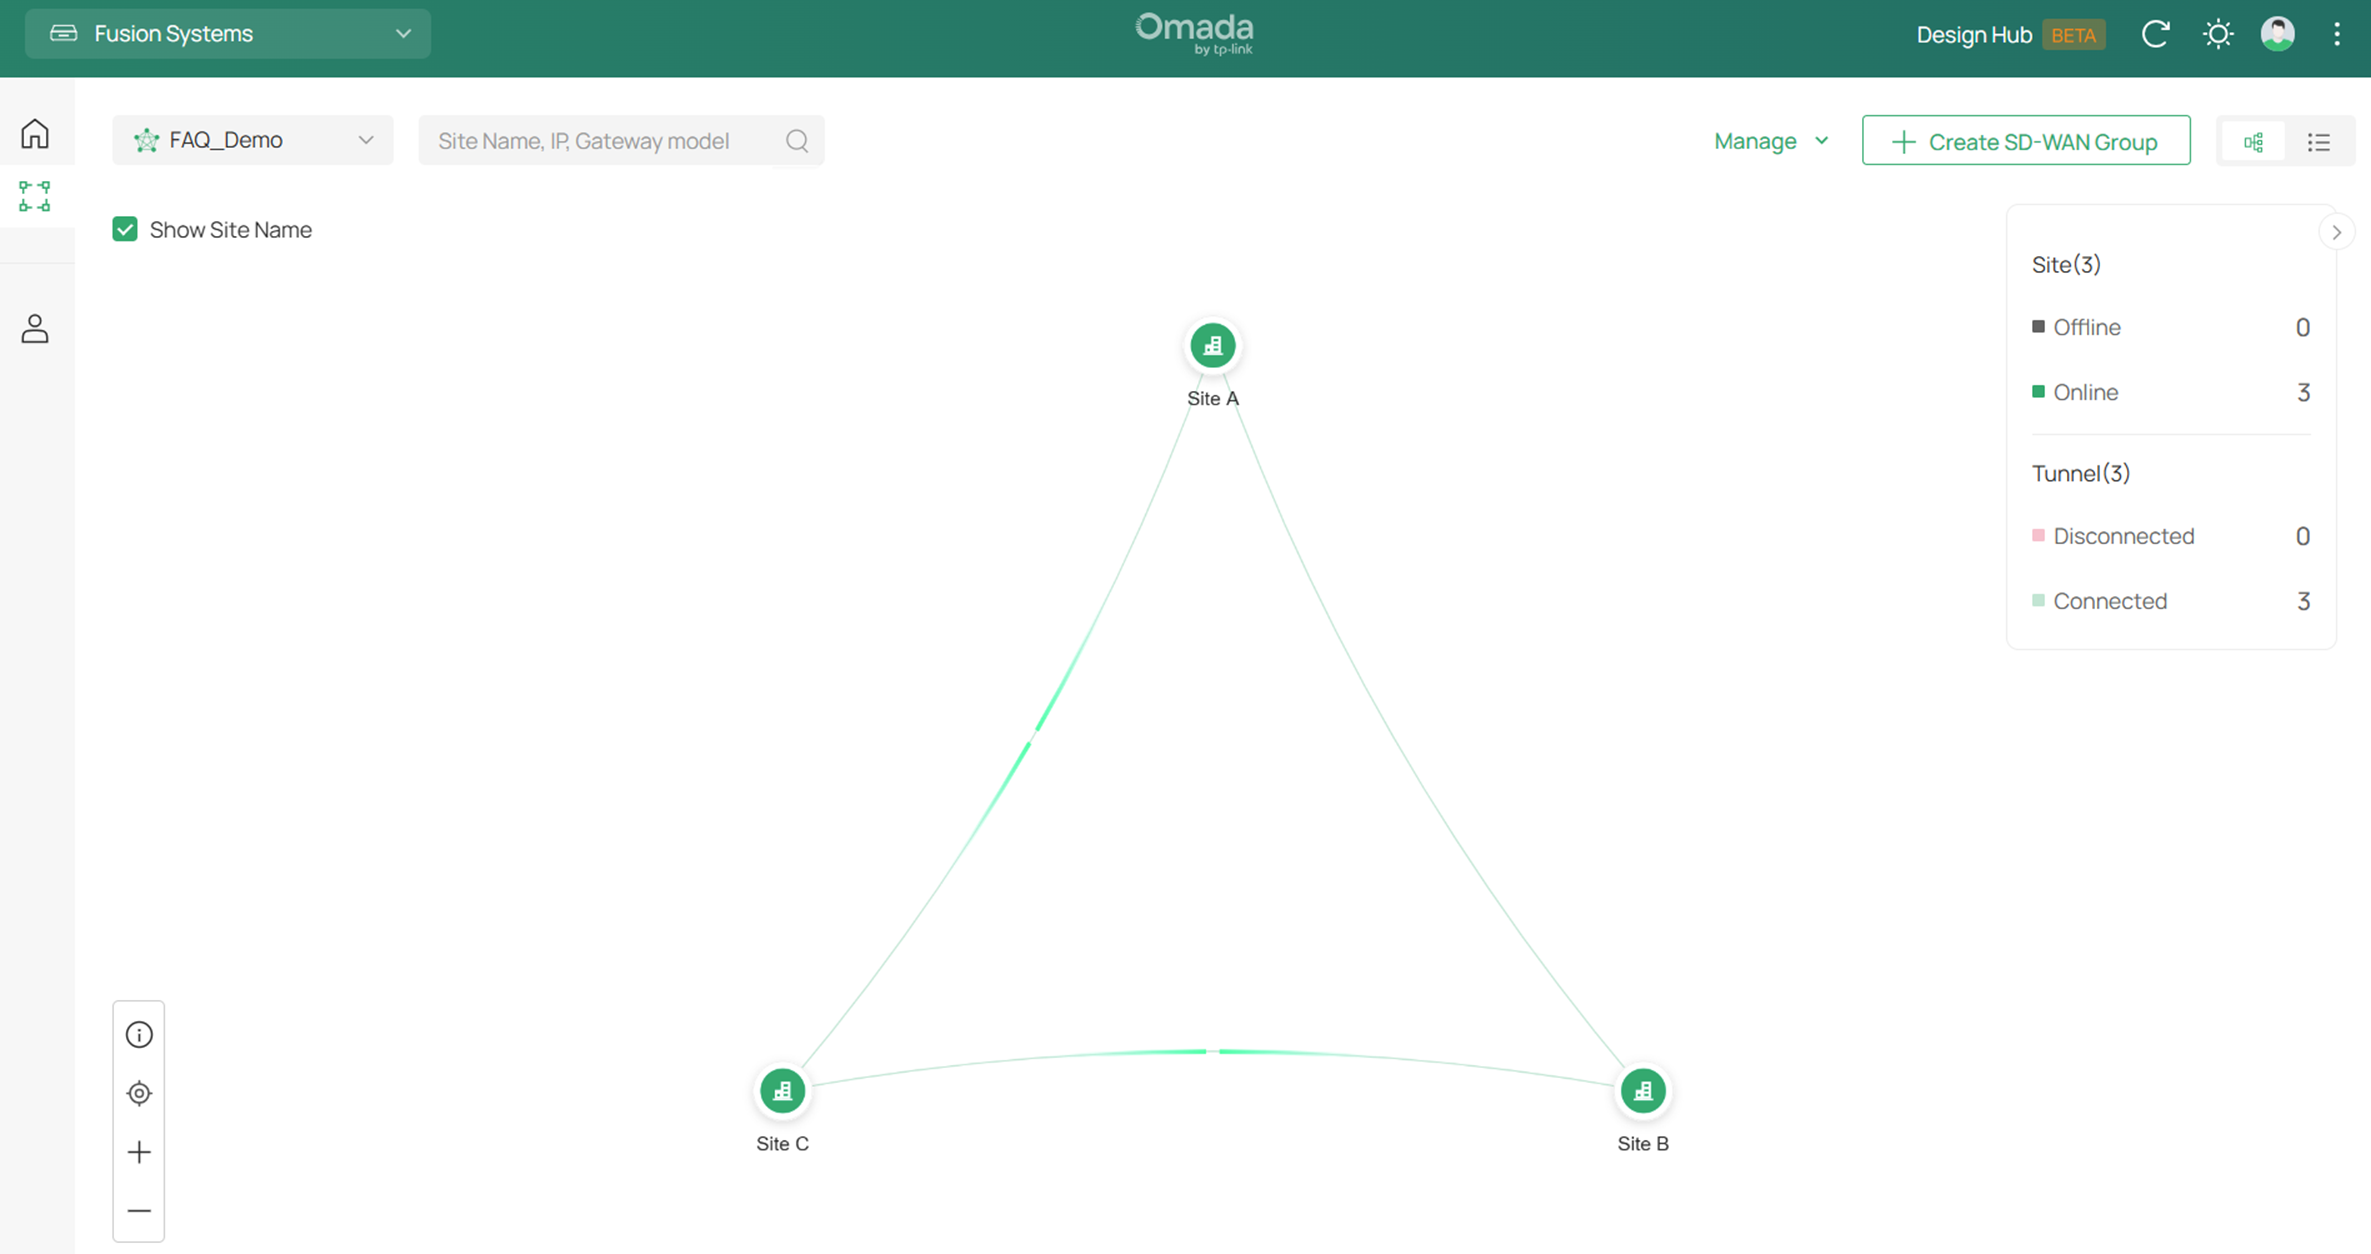
Step 6. To edit or delete the SD-WAN Group, click the Manage button on the upper right and choose Edit or Delete. 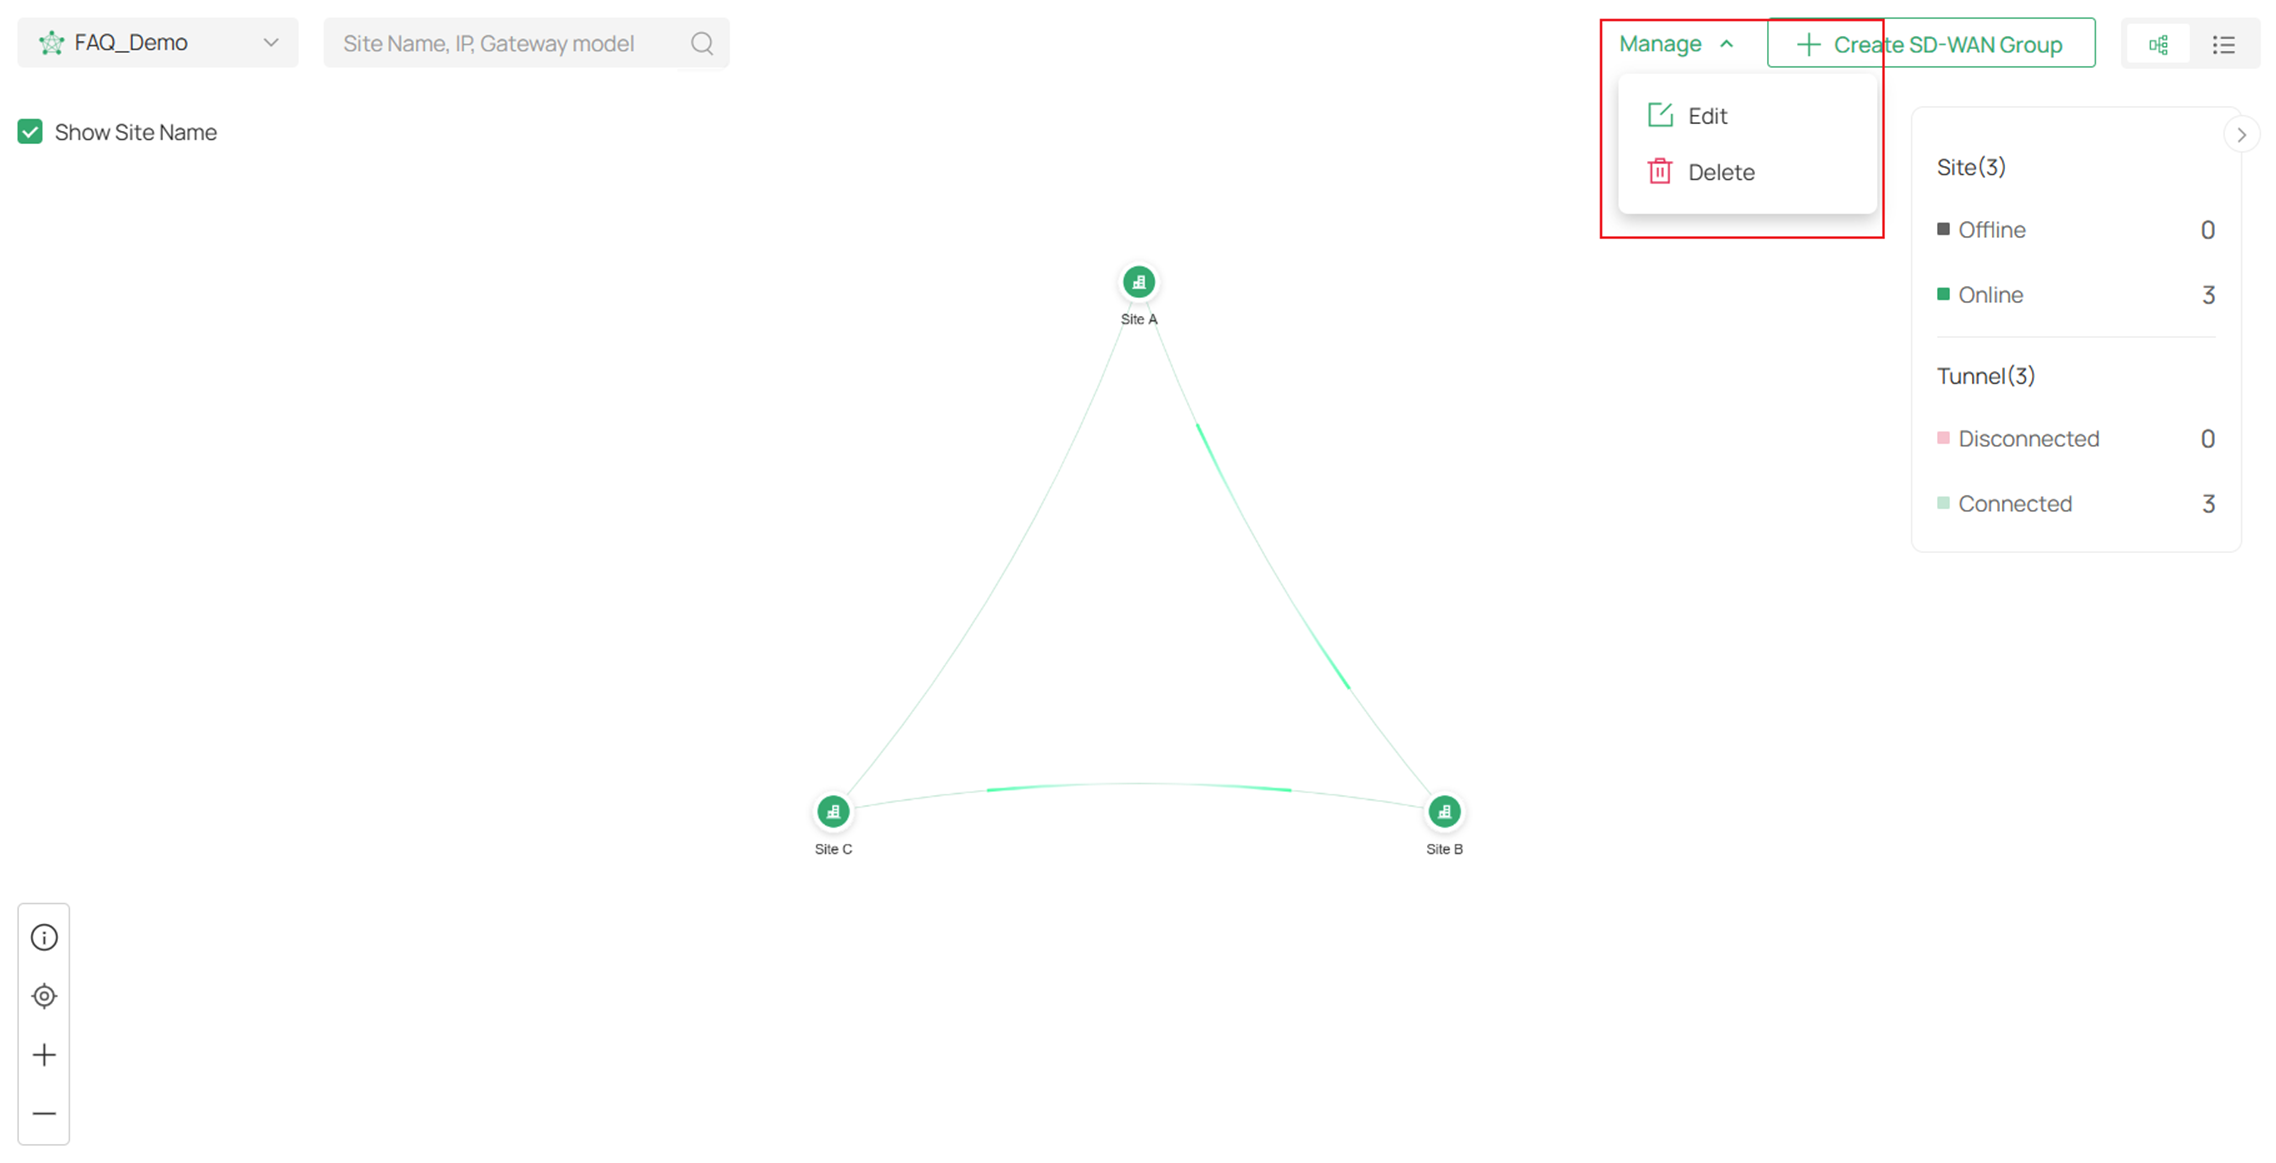
By clicking Edit, you could go back to SD-WAN group configuration page and edit the sites/LAN networks participating in this SD-WAN group. 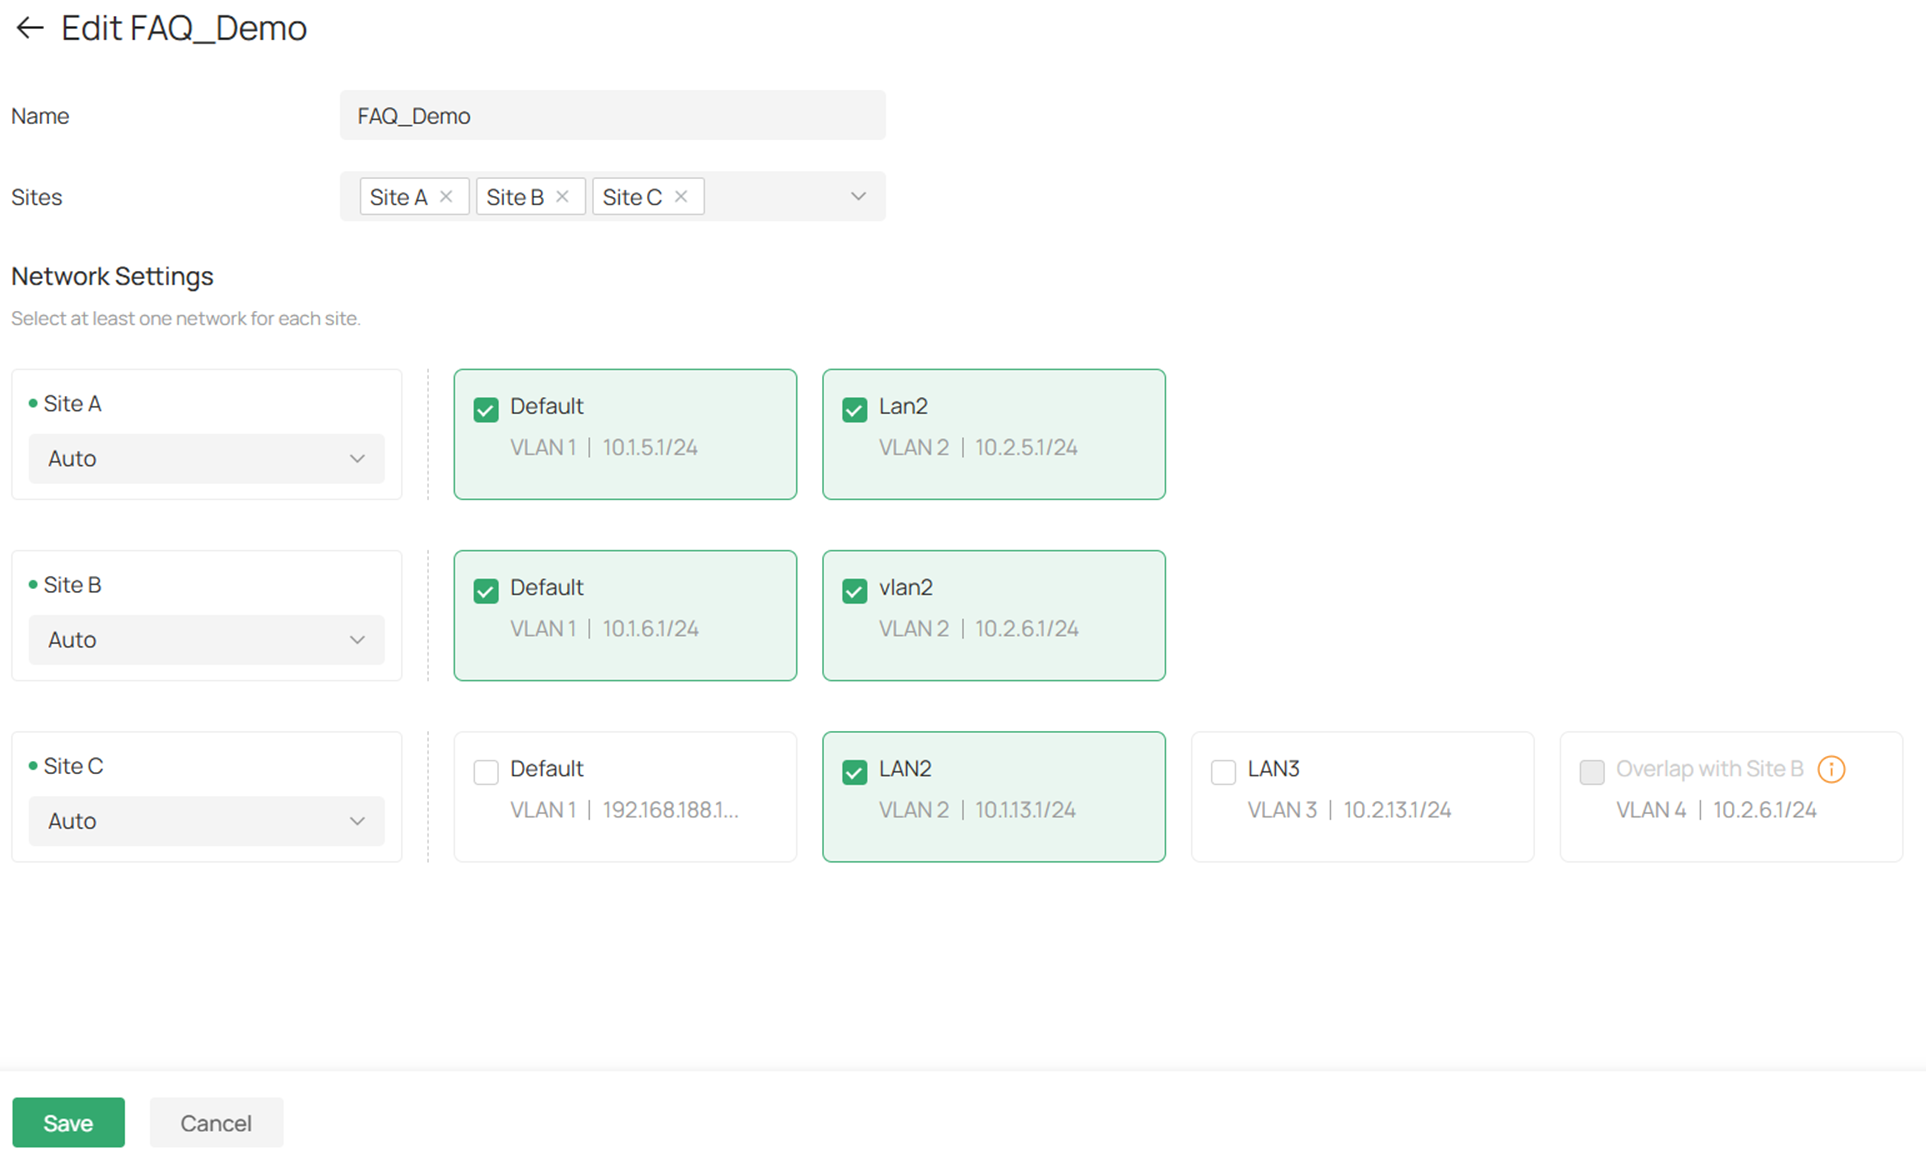
By clicking Delete, you will be required to confirm whether you will delete this SD-WAN group.

Verification
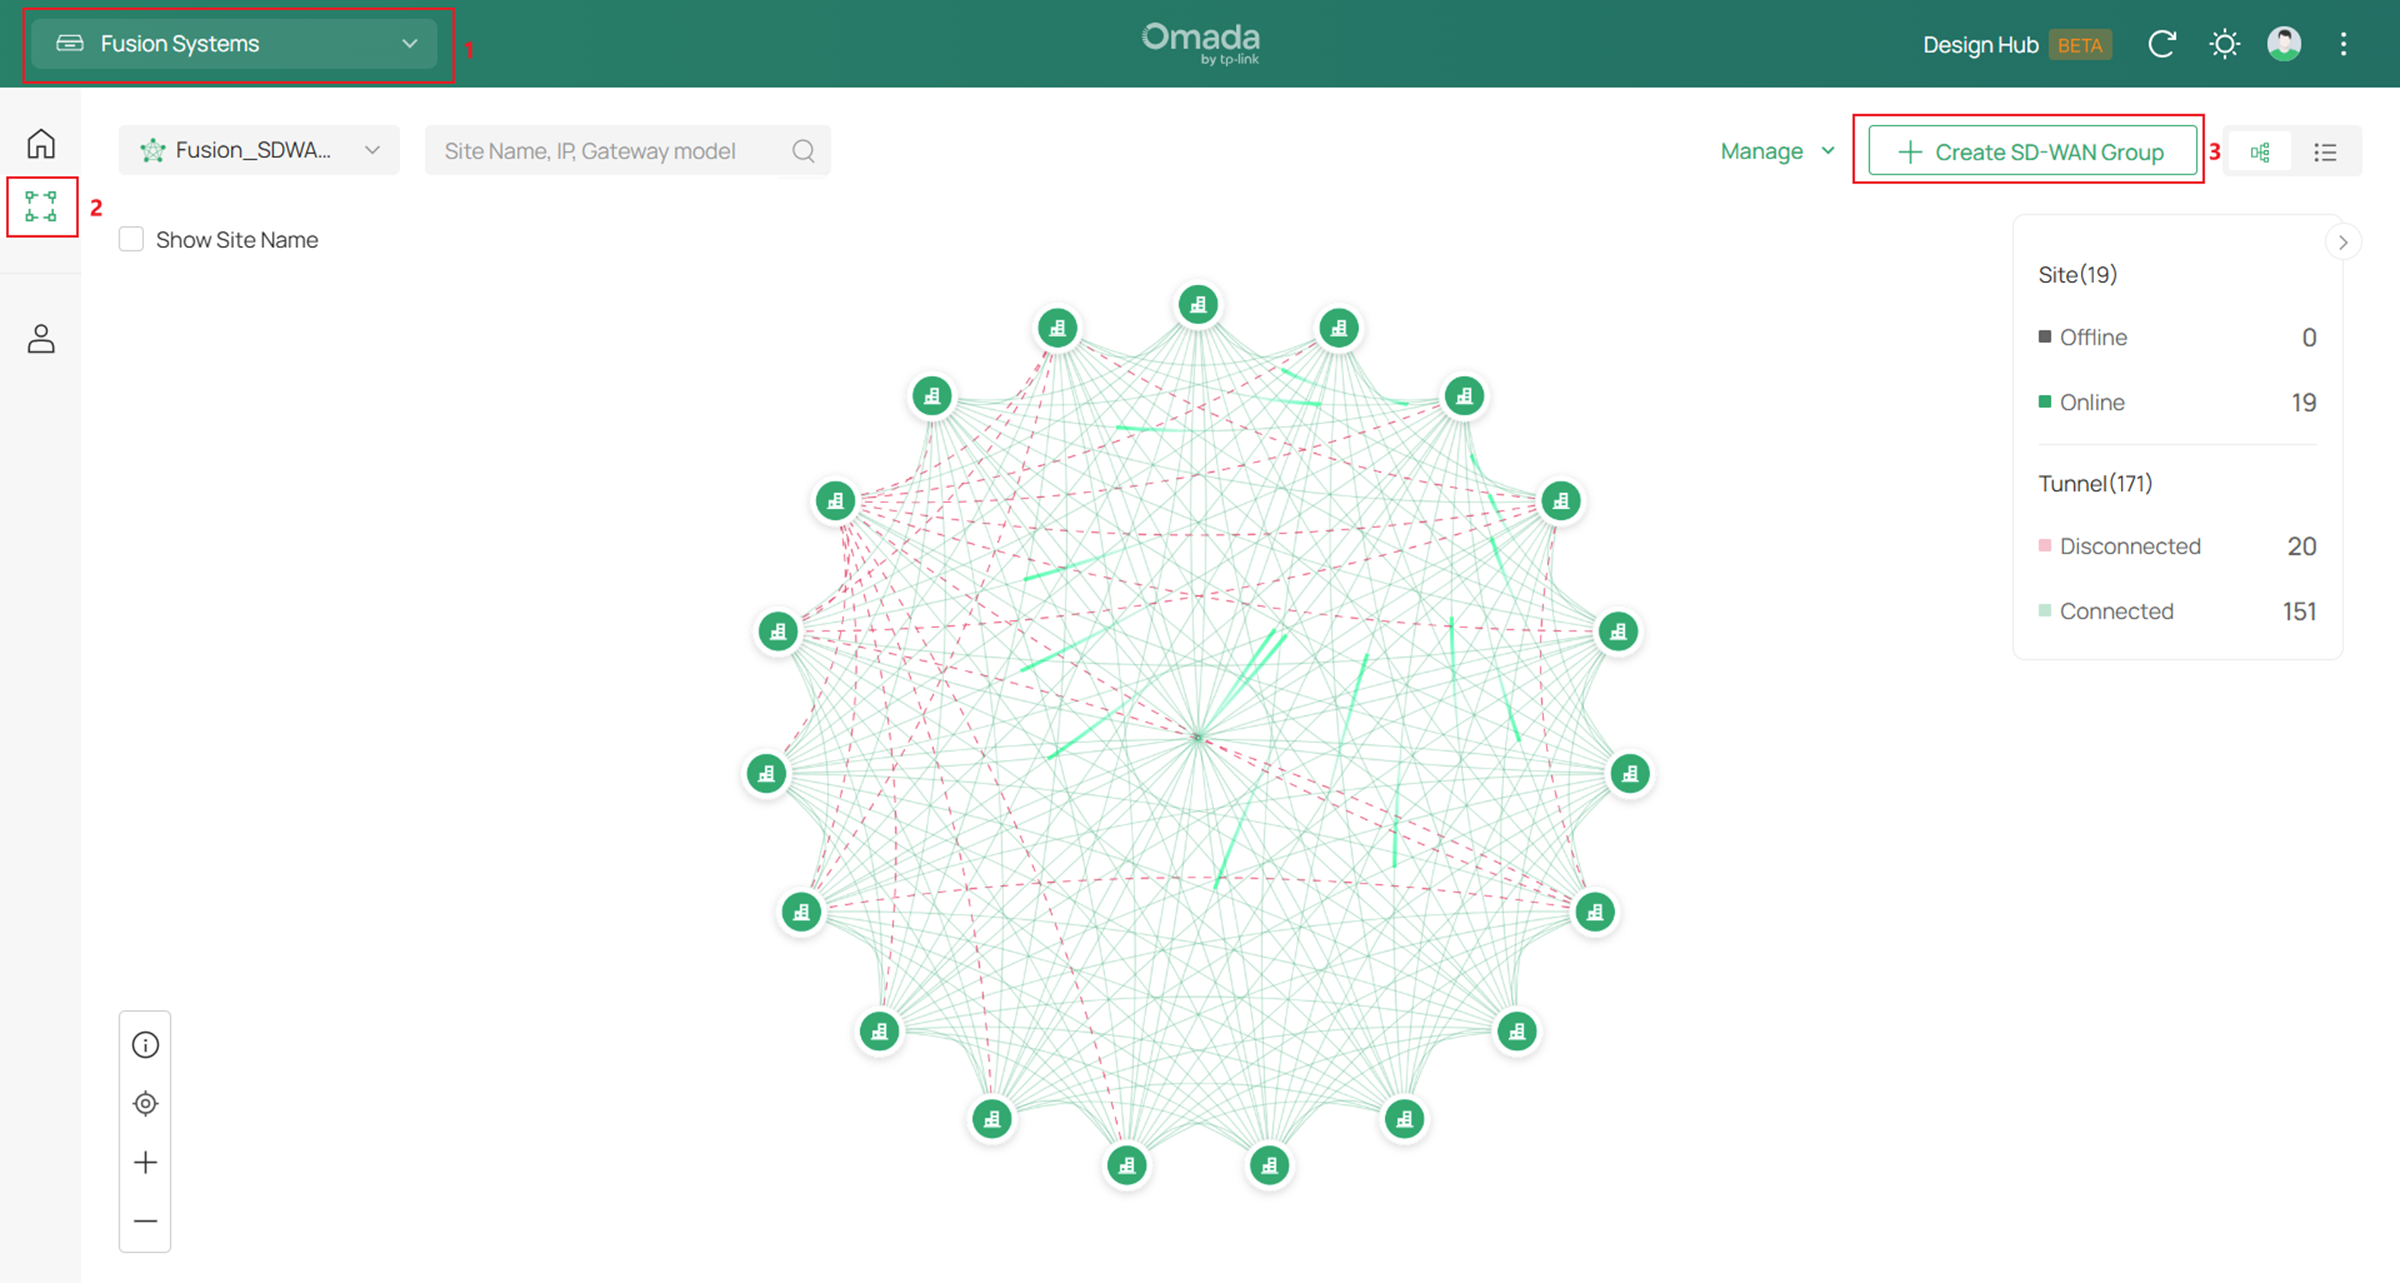
After finishing creating a SD-WAN group, its status could be checked on the panel using icons or statistics. Here we could see, all the three sites are online and all the tunnels among them are established. 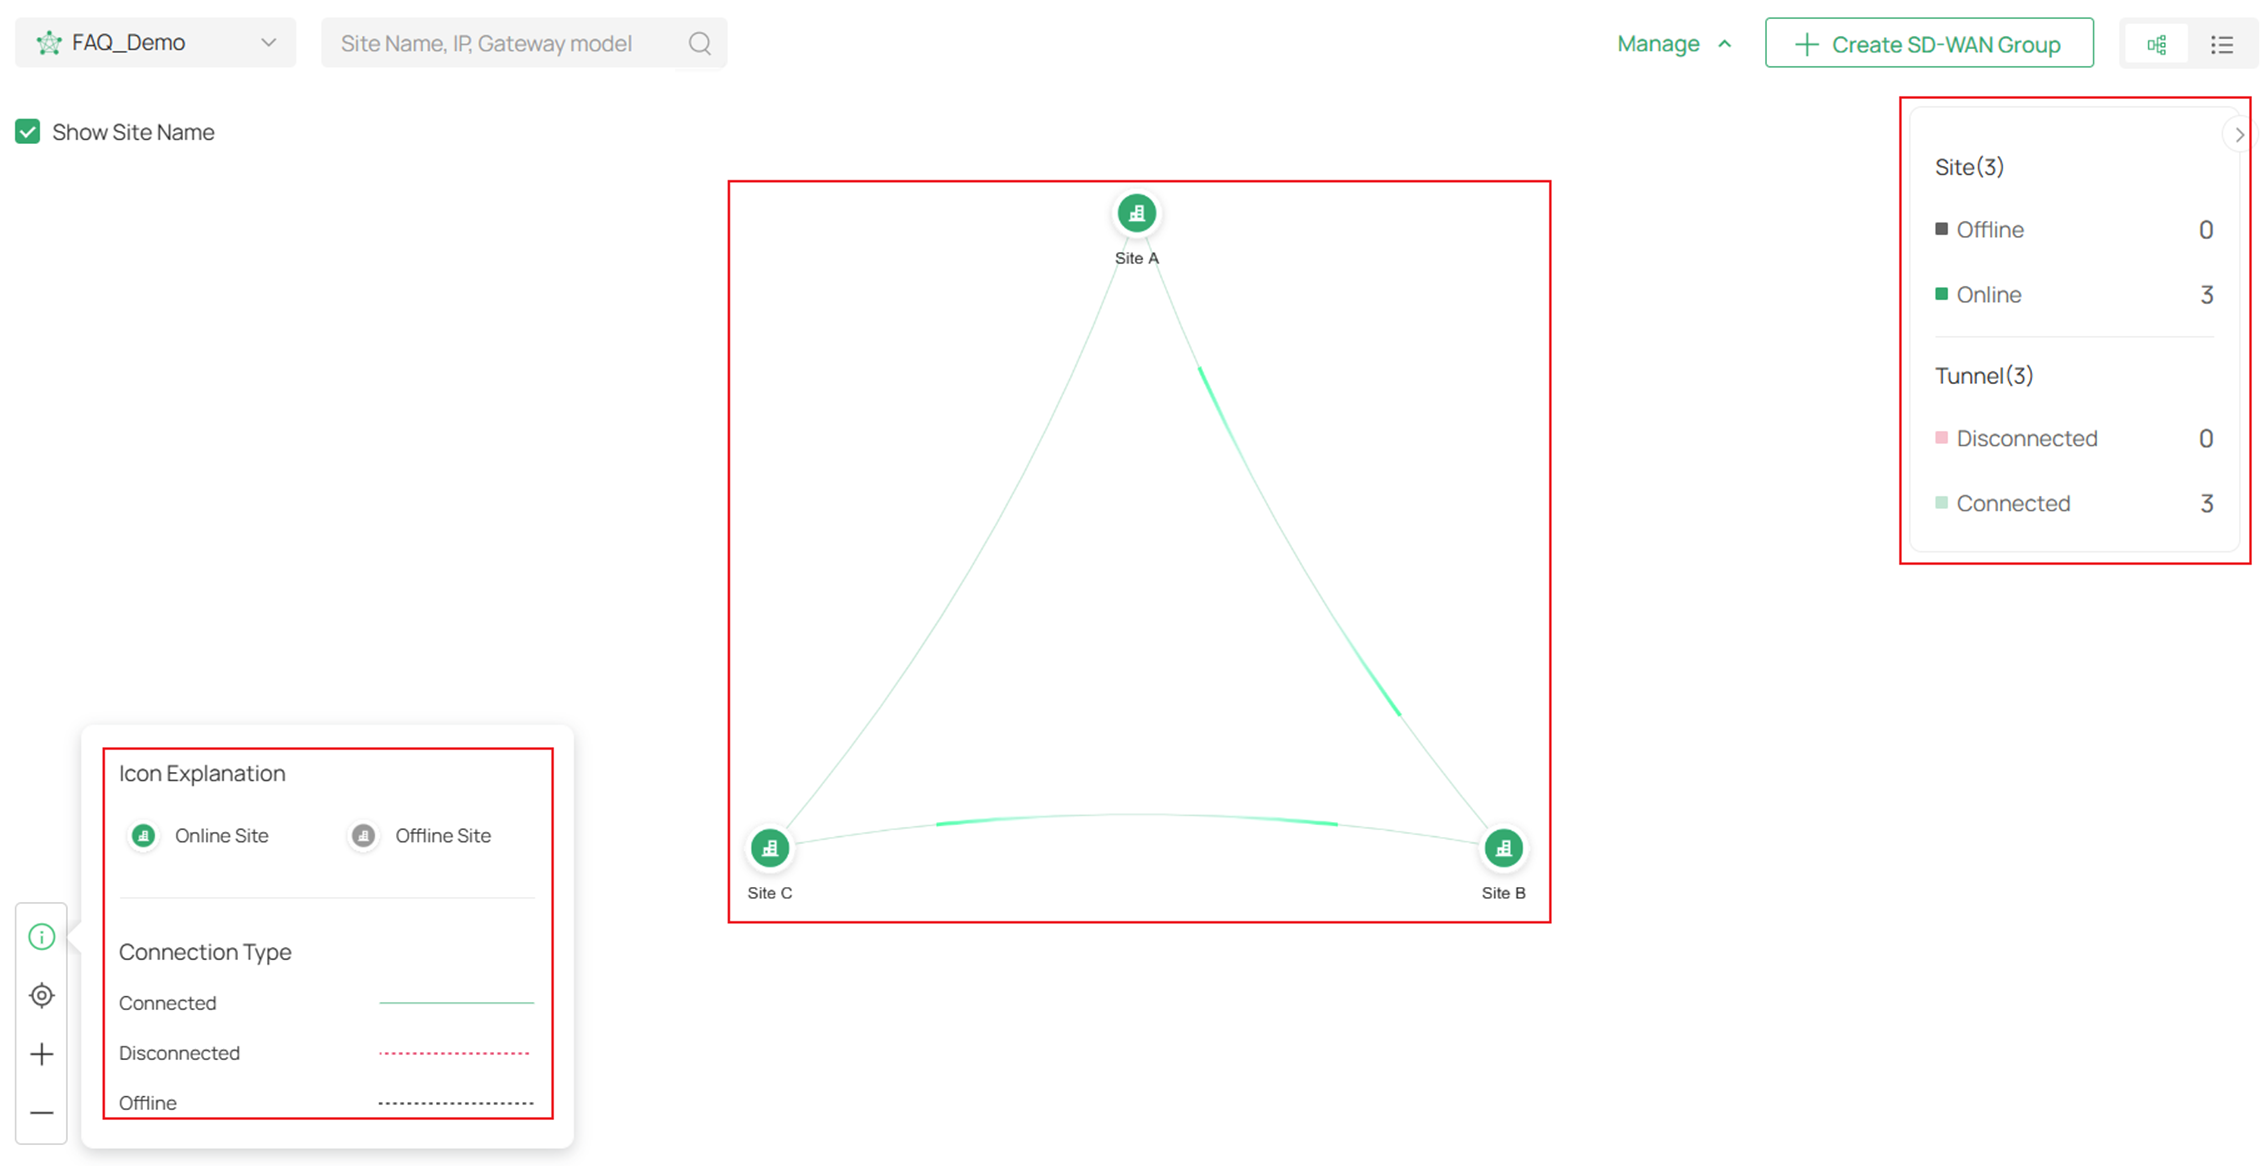
Clicking on a site icon could also display the detailed info about the site configuration related to this SD-WAN group. 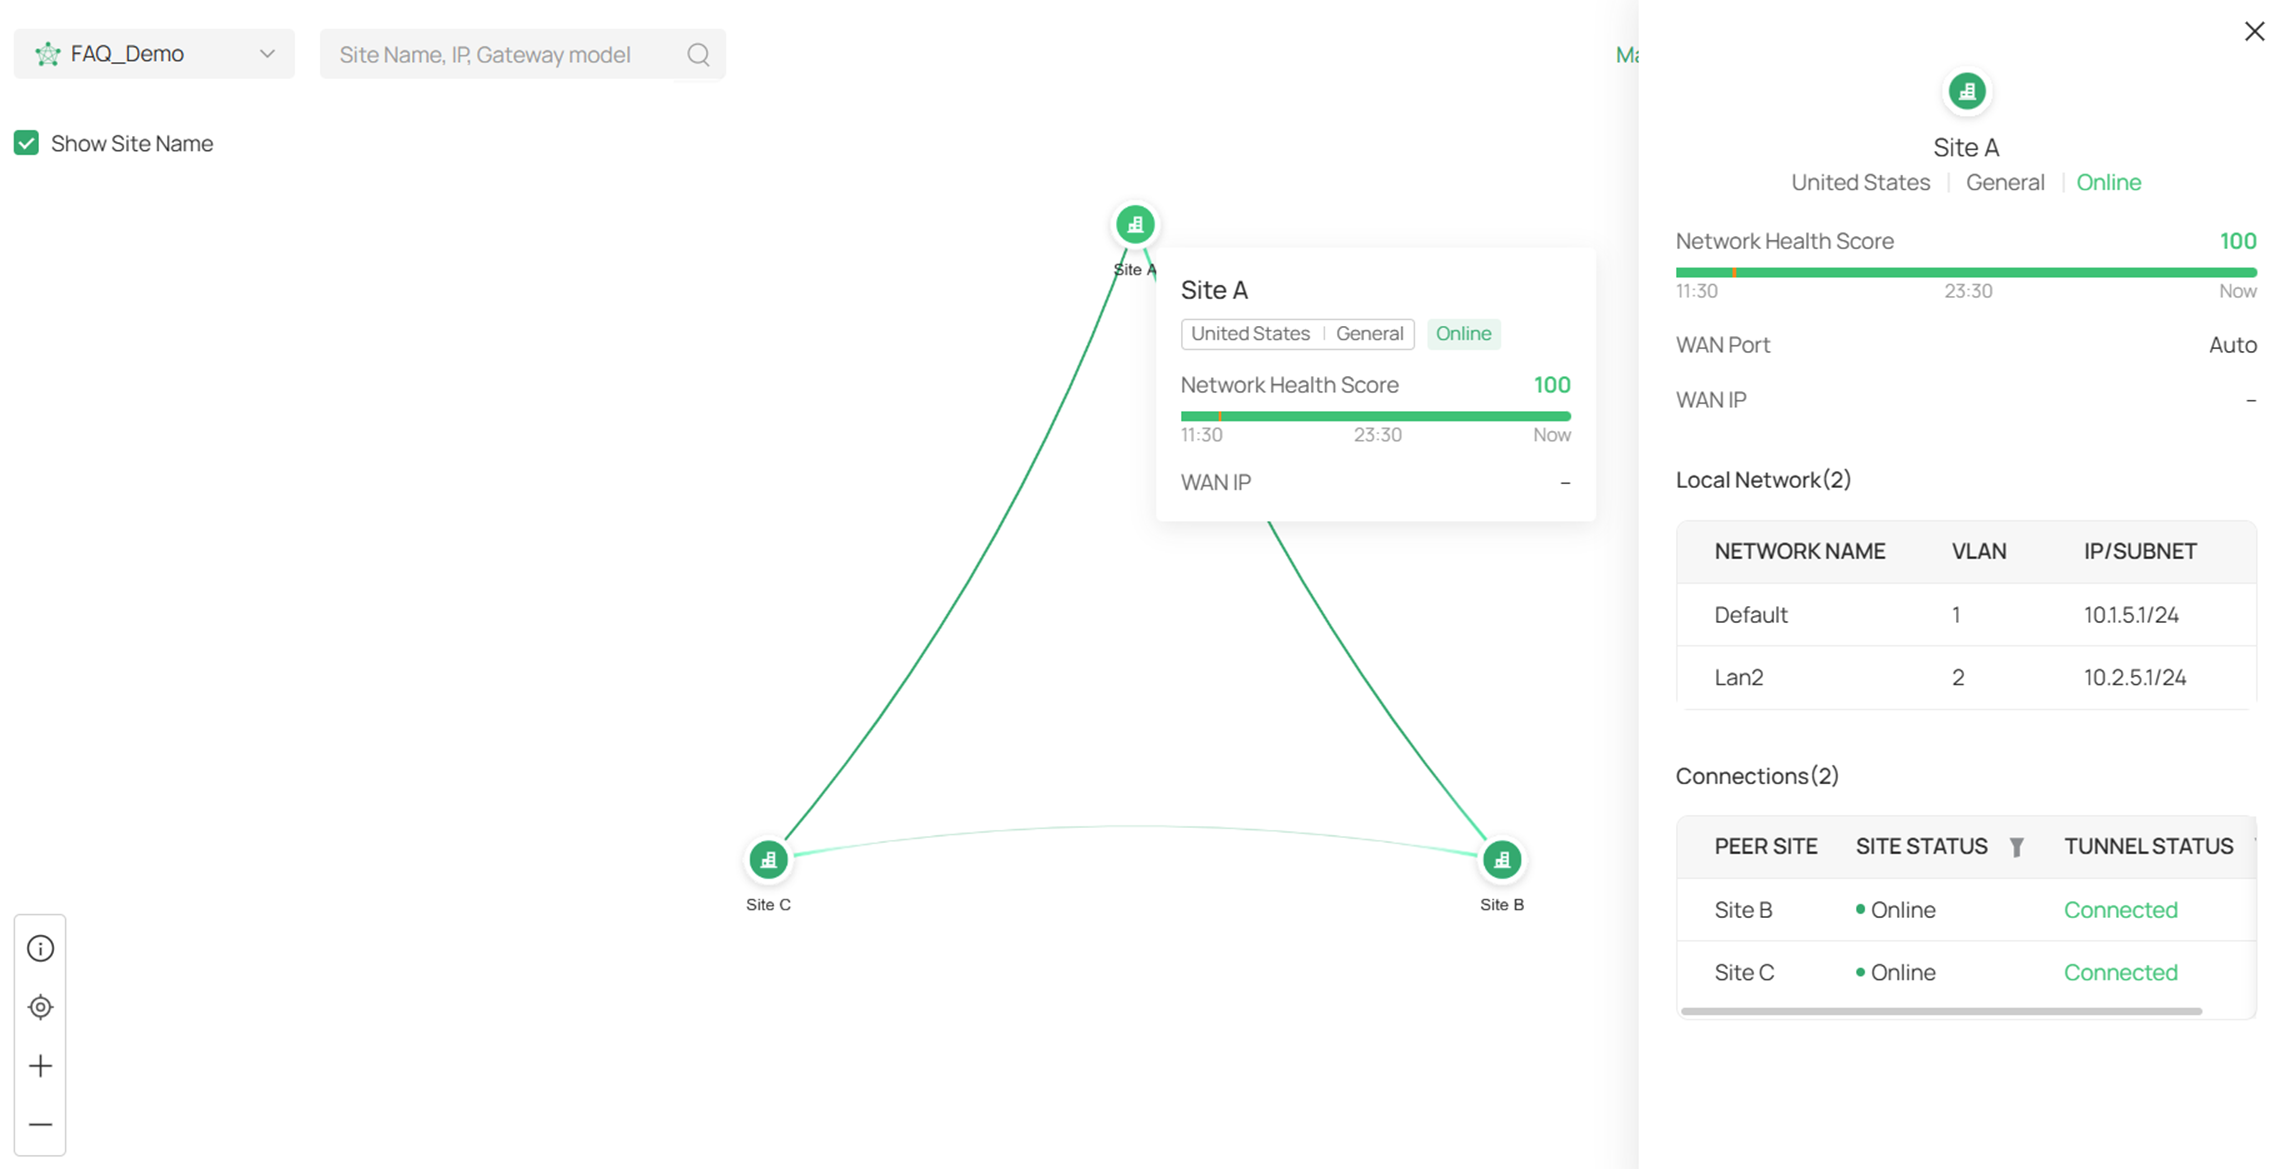
Launch the site and go to the Routing Table of this Fusion Gateway, the routes formed by SD-WAN will be displayed. 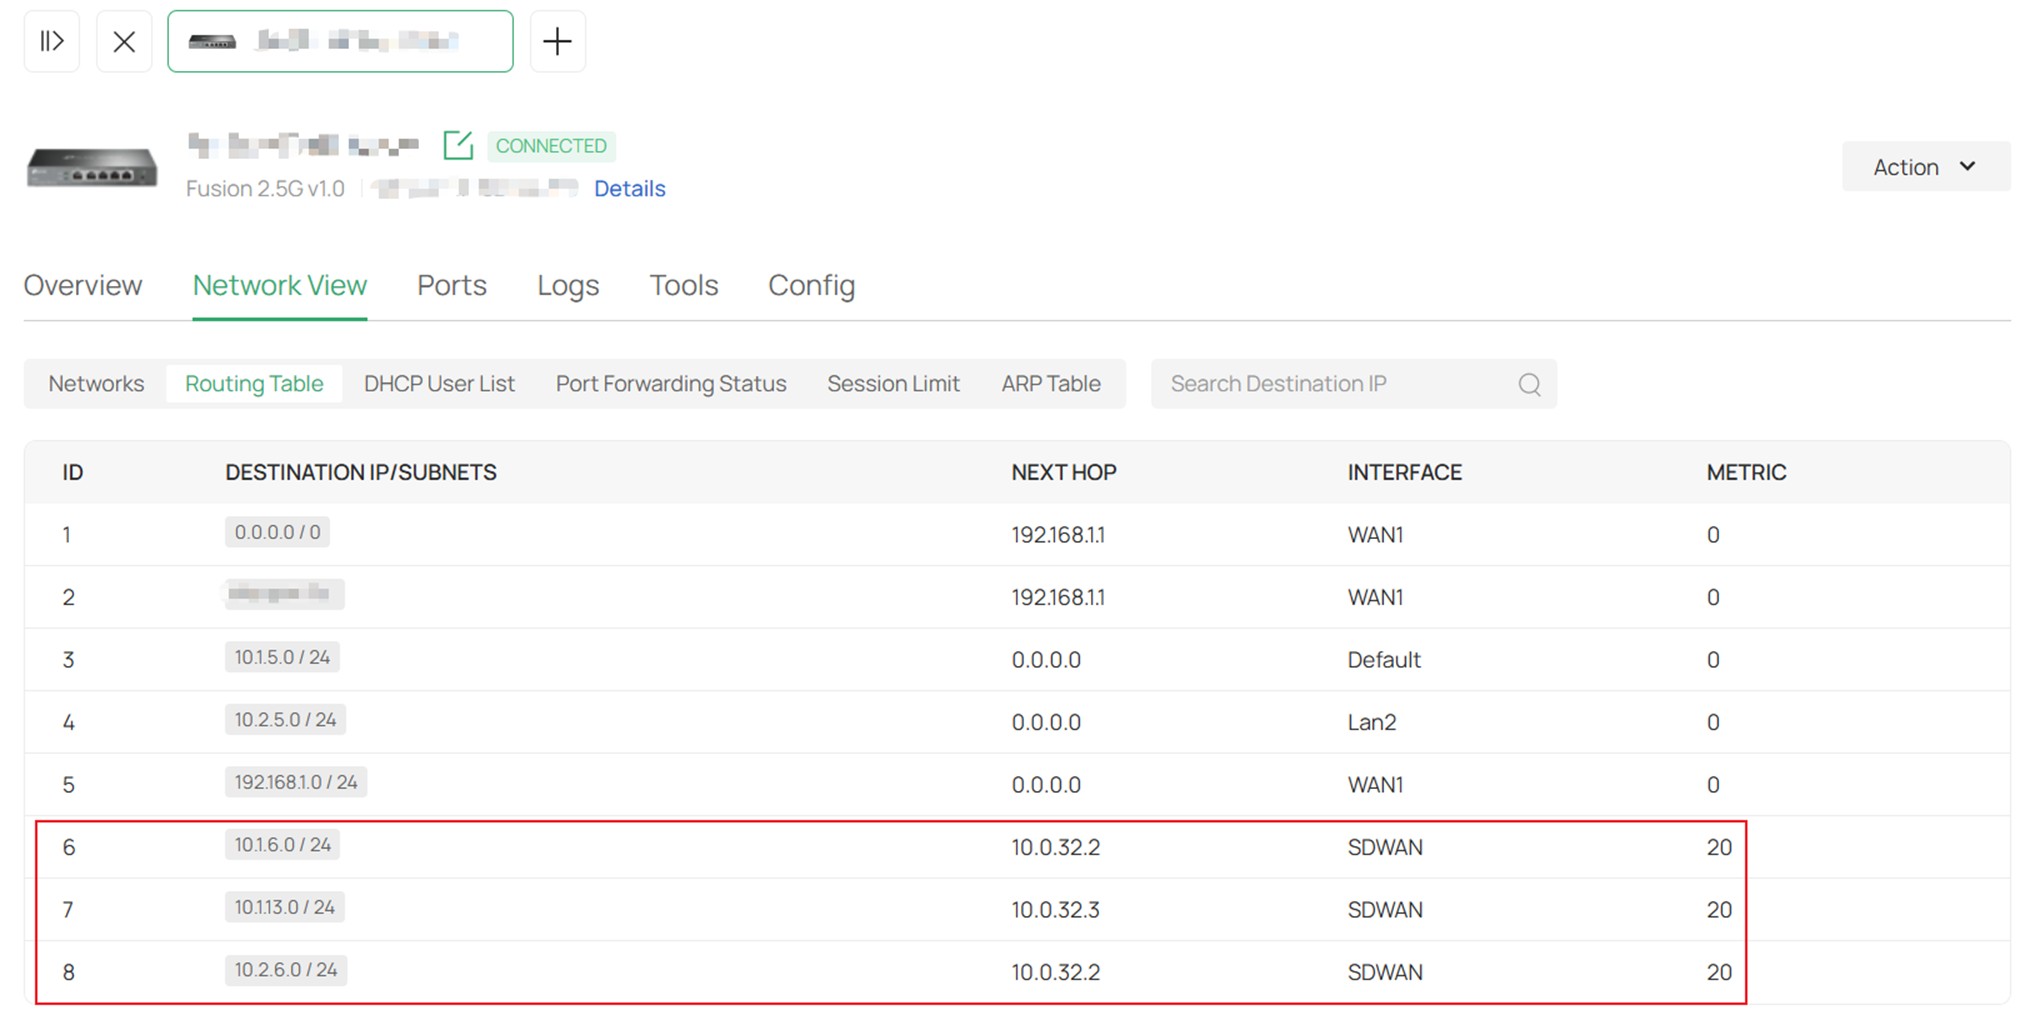
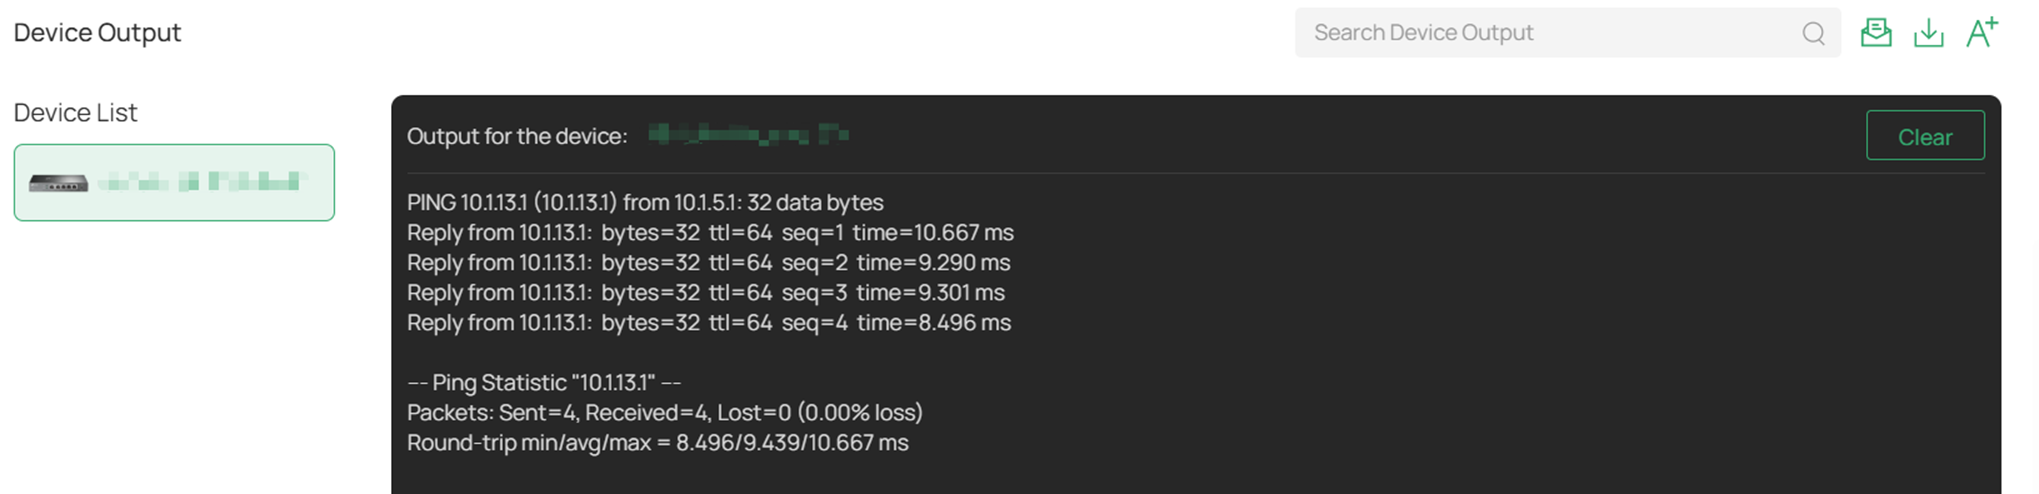
Ping between the LAN of different Fusion Gateways, for example, use the ping tool to ping from Default LAN interface of Site A to LAN2 interface of Site C:
Conclusion
This article introduces how to configure SD-WAN on Fusion Gateways.
QA
Q1: Why some of the tunnels between sites fail to establish?
A1: For Full Mesh model, no public IP is required. Our SD-WAN uses P2P NAT Traversal to allow the connection of sites without public IP. However, for sites where only NAT8 (Symmetric NAT) or NAT6 (Port-restricted NAT) - NAT8 is present, the NAT Traversal process may fail, resulting in connection establishment failure between some of the sites, in this situation, the traffic between these sites will be forwarded by other tunnels established successfully.
Q2: Why there’s no need to configure virtual SD-WAN interface IPs?
A2: The virtual interface IPs for SD-WAN of each site will be automatically created and assigned, as this is a virtual IP only used in the logical forwarding within SD-WAN system, it was also hidden in the traceroute result. The virtual interface IP is shown as Next Hop in the related routes in the Routing Table of Fusion Gateway, please avoid conflicts between the local LAN network segment and virtual interface IP address.
Q3: What will happen if the WAN port in SD-WAN group fails?
A3: After selected WAN port as auto when establishing the SD-WAN group, auto failover will be enabled. If the original WAN port fails, the tunnel will be automatically established on another available WAN to ensure the service recovery within a short time. Please note that it may take some time for the tunnel to re-establish on another WAN.
