


Contents
Objective
This article introduces how to manage the network by configuring Gateway ACL on Fusion Gateway.
Requirements
- Fusion Gateway
Introduction
ACL (Access Control List) allows a network administrator to create rules to restrict access to network resources. ACL rules filter traffic based on specified criteria such as IP Subnet, Network, Device, specific Application and special Port, and determine whether to forward the matched packets. These rules can be applied to specific clients or groups whose traffic passes through the gateway.
The system filters traffic against the rules in the list sequentially. The first match determines whether the packet is accepted or dropped, and other rules are not checked after the first match. Therefore, the order of rules is critical.
- By default, the rules are prioritized by their creation time. The rule created earlier is checked for a match with higher priority.
- The ACL rule priority supports both drag-and-drop adjustment and custom index assignment.
- If no rules match, the device forwards the packet because of an implicit Permit All clause.
Configuration
Gateway ACLs (Access Control Lists) on Omada gateways allow you to control traffic passing between different networks or based on specific applications. This guide covers two common scenarios:
- Deny traffic between networks – Block all communication between two subnets (e.g., between VLAN1 and VLAN10).
- Application‑based ACL – Deny traffic for specific applications (e.g., block social media or file‑sharing apps).
Configuration of an ACL to Deny traffic between networks
The following will share how to use ACL features. We focus on how to realize the settings on the Omada Fusion Gateway. Refer to the simple network topology shown below. There are two departments connected to the Fusion Gateway with Omada switches. The computers need access to the Internet, but not to the computers in different departments.
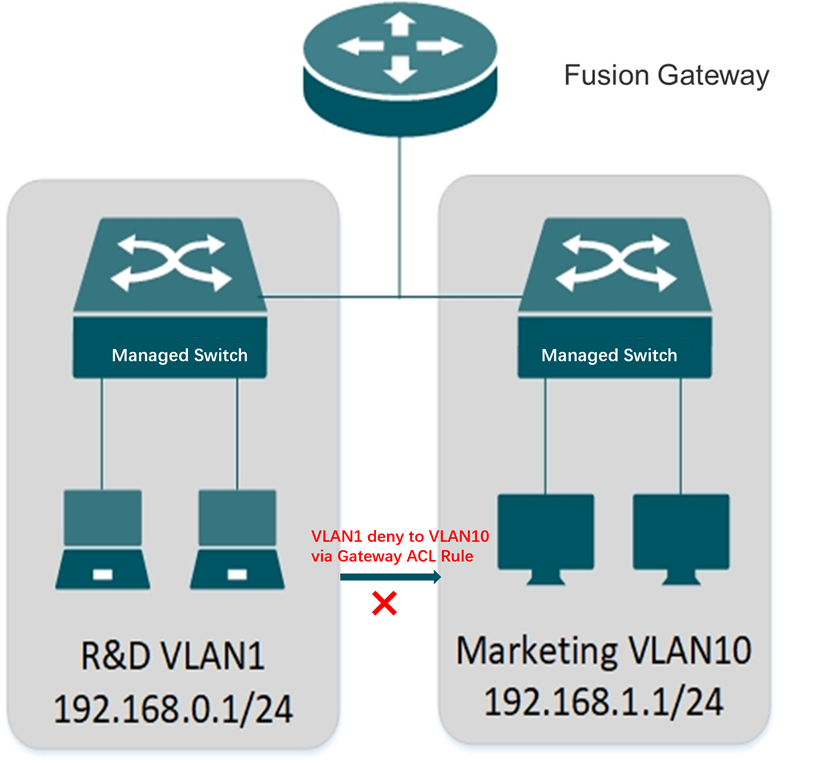
Step 1. Set up the above topology and completed the configuration of VLAN 10(192.168.1.1/24) for Marketing department and VLAN1(192.168.0.1/24) for R&D department.

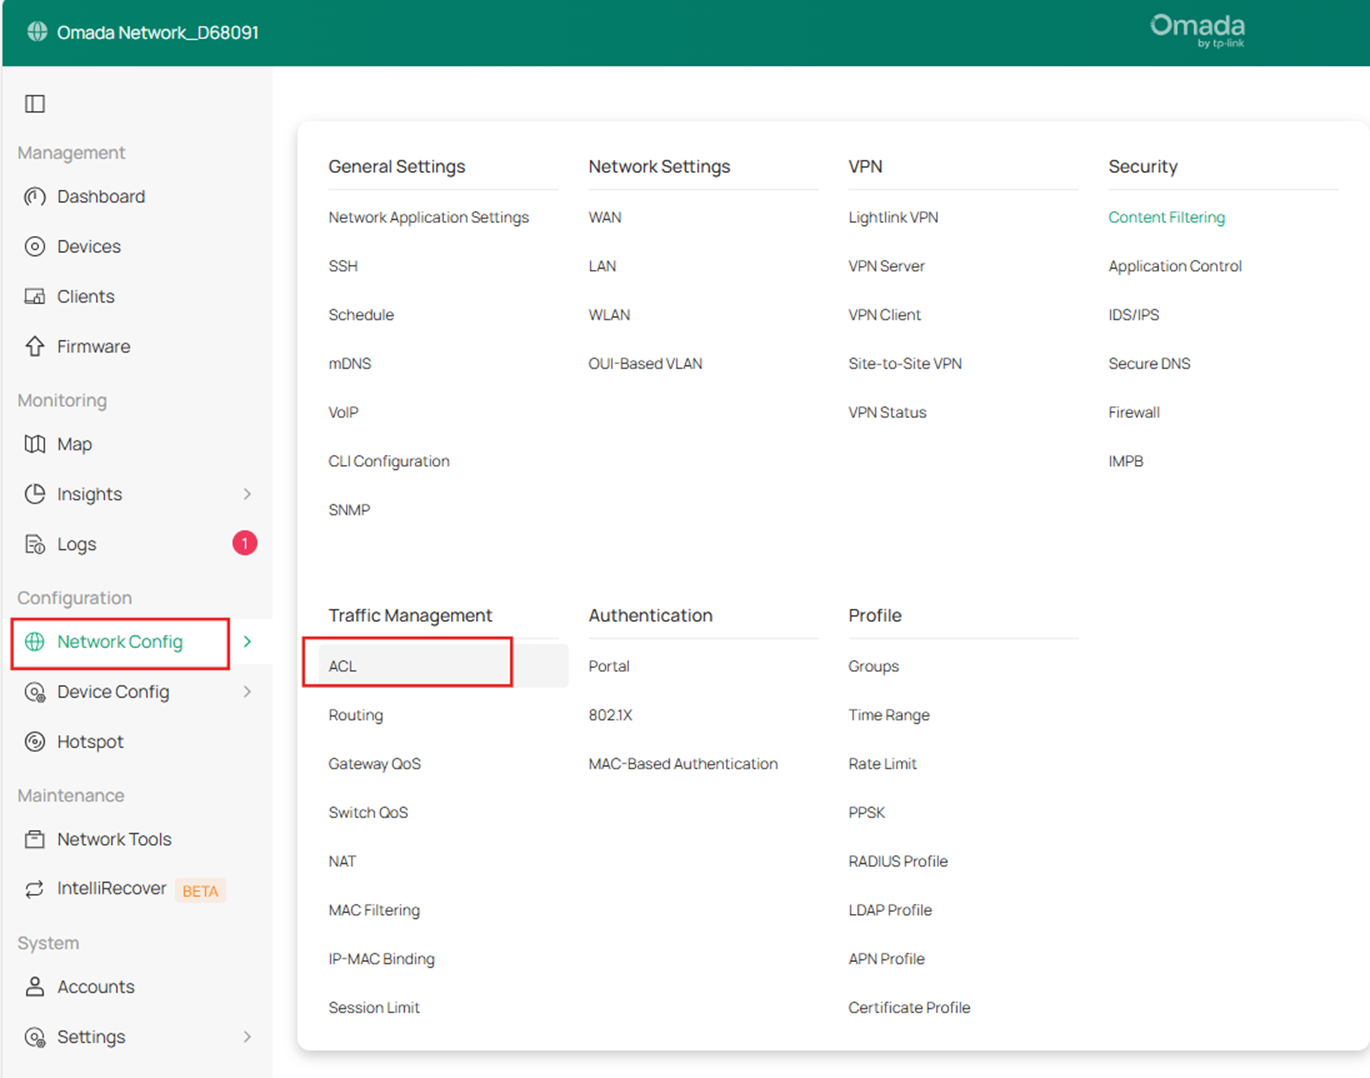
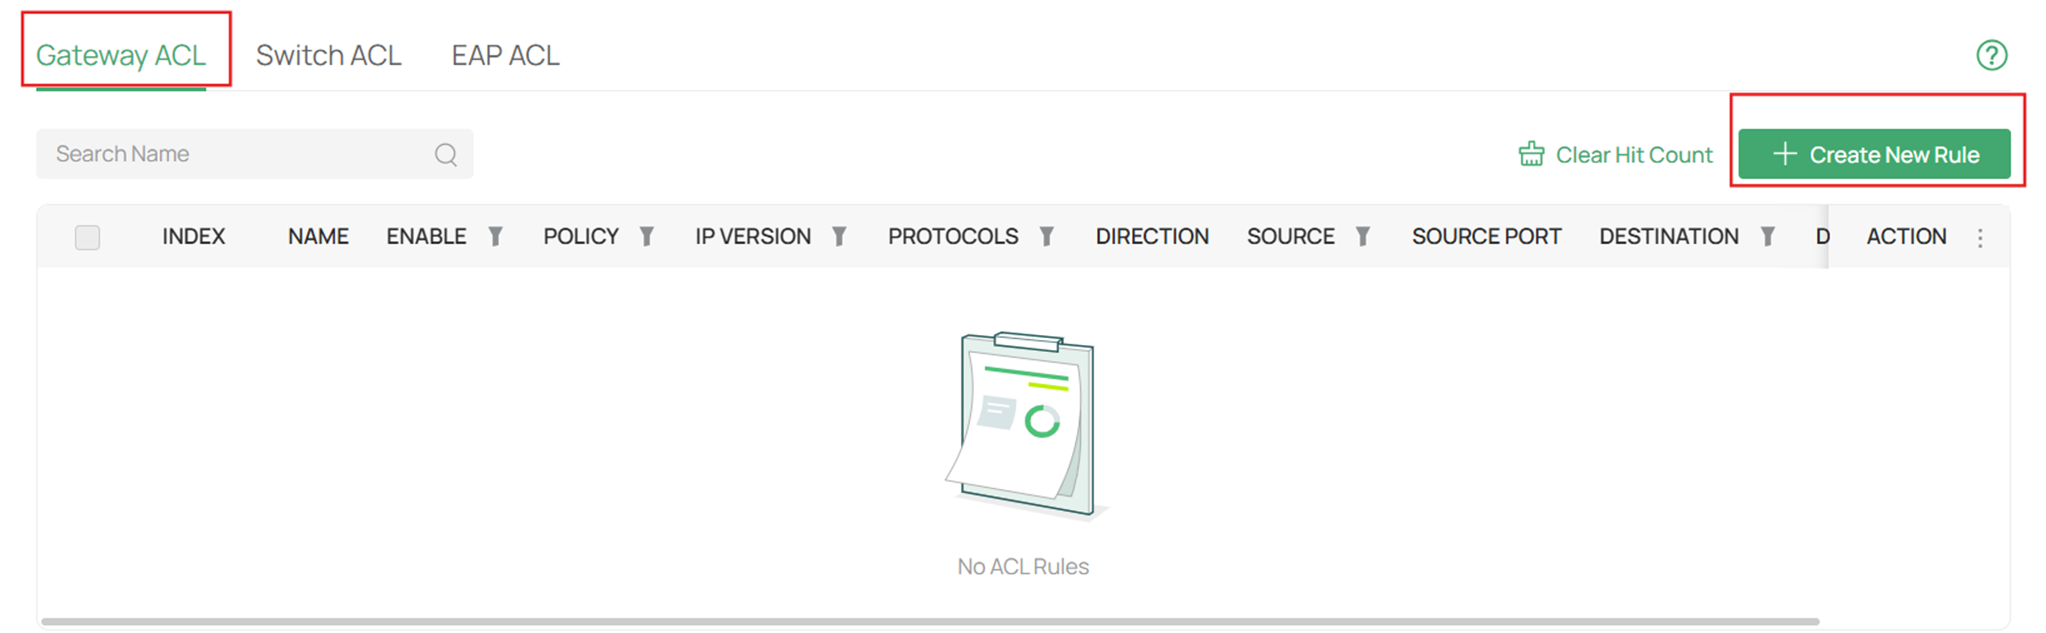
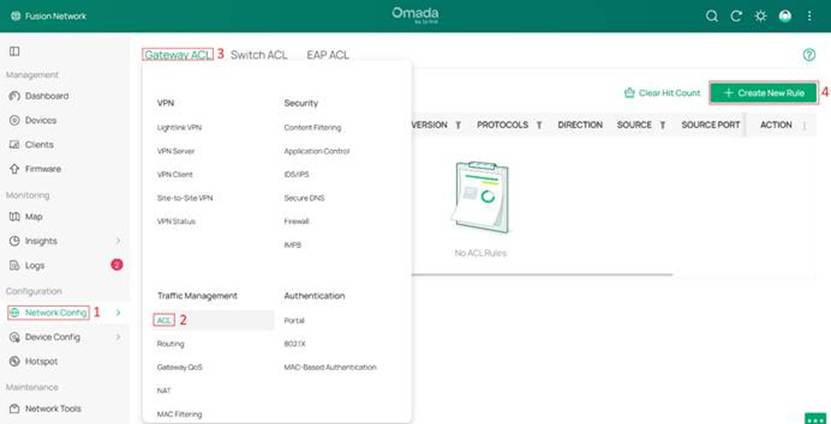
Step 2. Go to Network Config > Traffic Management > ACL and enter Gateway ACL page.
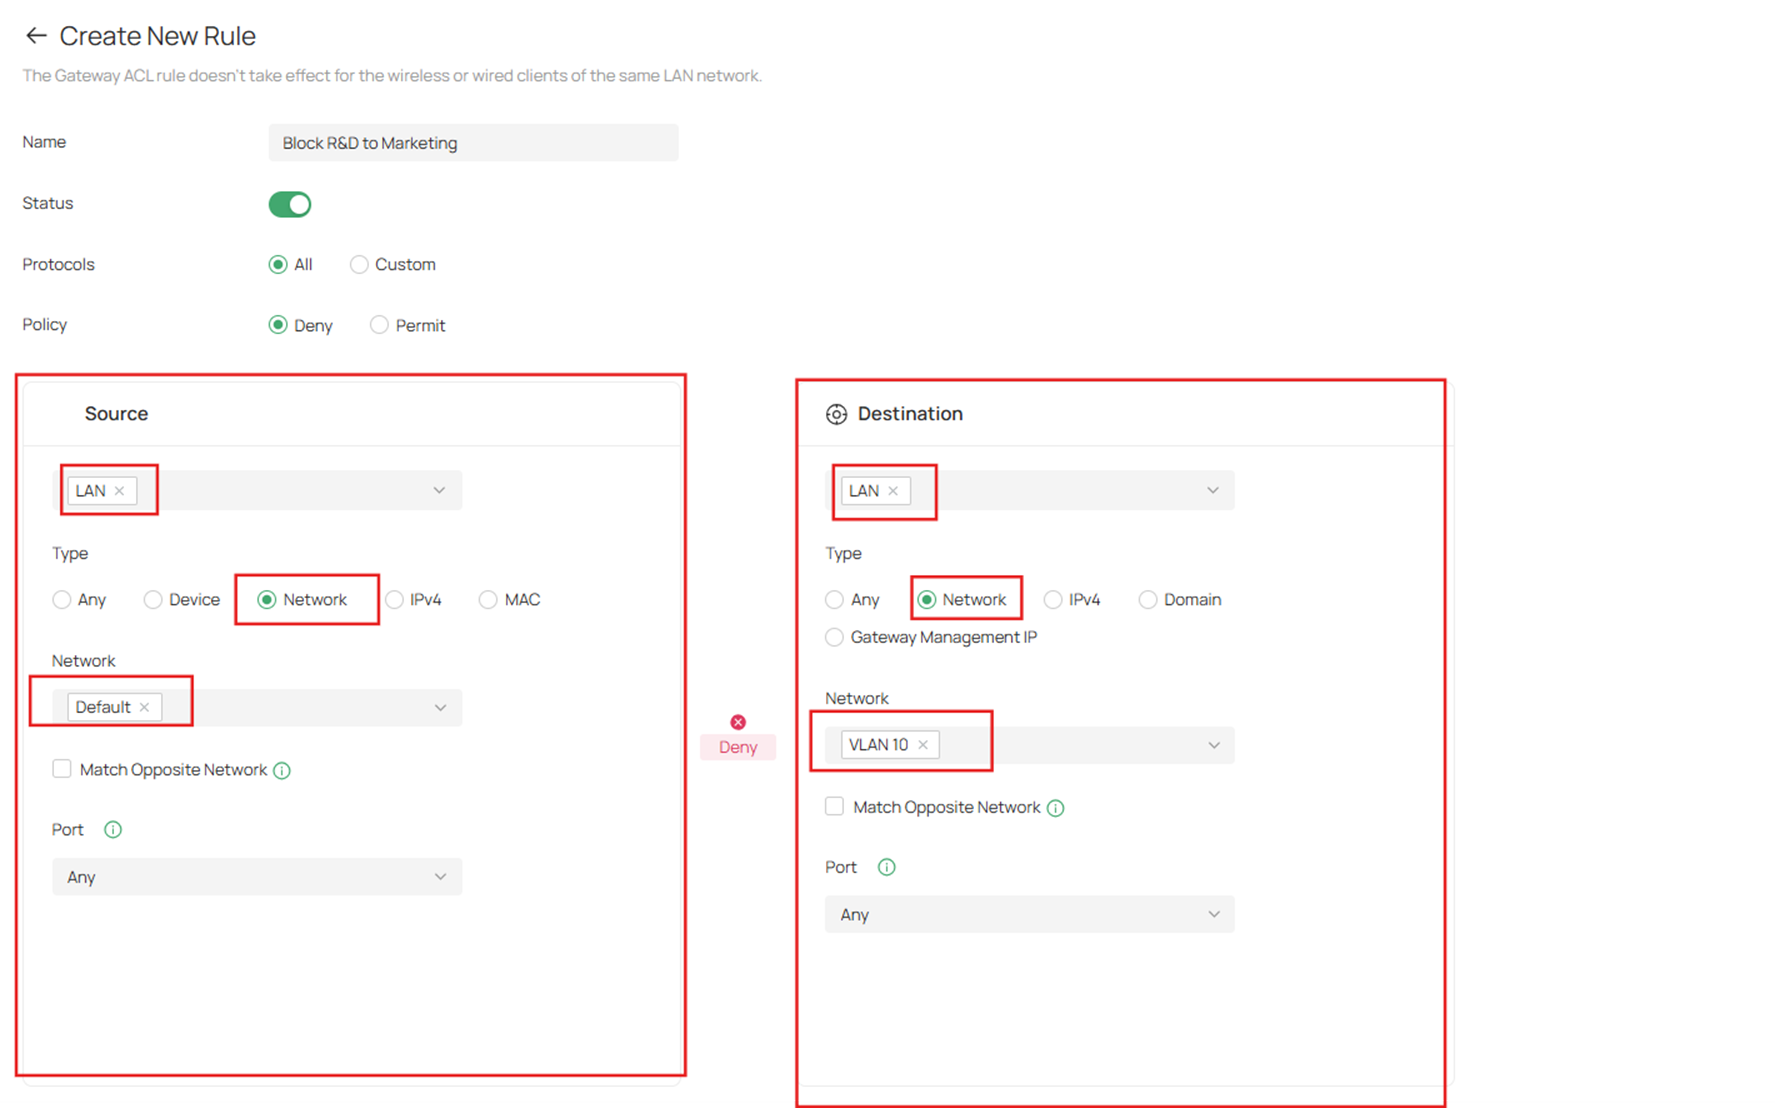
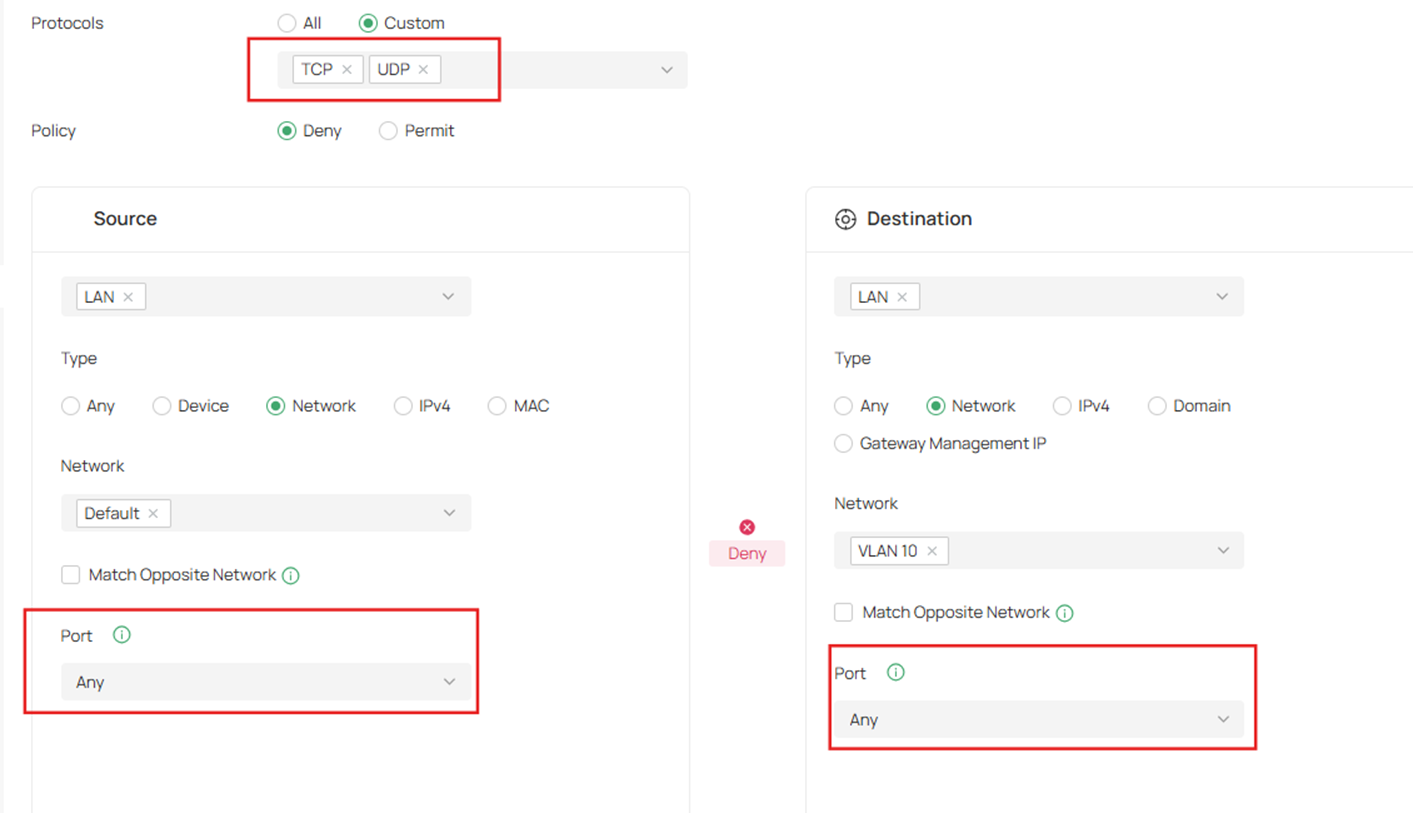
Step 3. Click Create New Rule. Define packet-filtering criteria of the rule, including protocols, source, and destination, and determine whether to forward the matched packets.
The first rule is to prevent the marketing department from accessing the R&D department. You can set Default Network (R&D VLAN1) deny to VLAN10 Network for all protocols packets.
Notes:
Name: Enter a name to identify the ACL.
Status: Toggle on to enable the ACL.
Protocols: Select one or more protocol types to which the rule applies from the drop-down list.
- The default is All, indicating that packets of all protocols will be matched.
- You can click +Custom to customize protocols.

- When you select TCP/UDP, All, you can set the port number of a packet as packet-filtering criteria in the rule.
- When you select ICMP/ICMPv6, you can set the ICMP Type and ICMP Code of a packet as packet-filtering criteria in the rule.

ICMP Type: Match the traffic with the specific ICMP Type. 255 means all types are included. ICMP packets with both the type and code fields matched are considered as the target packets.
ICMP Code: Match the traffic with the specific ICMP Code. 255 means all codes are included. ICMP packets with both the type and code fields matched are considered as the target packets
- Policy: Select the action to be taken when a packet matches the rule.
- Deny: Discard the matched packet.
- Permit: Forward the matched packet.
- Direction: Specify the source/destination interface for the rule. You can select LAN, WAN and VPN.
- LAN: Match the traffic from/to LAN.
- WAN: Match the traffic from/to the specific WAN.
- VPN: Match the traffic from/to the specific VPN.
- Source/Destination Type: Select the source/destination type of the created rule.
- Any: Match all traffic.
- Device: Match the traffic from the specific Device.
- Network: Match the traffic from/to the specific network. If no networks have been created, you can select the default network (LAN), or go to Network Config > Network Settings > LAN to create one.
- IPv4/v6: Match the traffic from/to the specific IP/IP Group. If no IP Groups have been created, click + Add IP Group on this page or go to Network Config > Profile > Groups to create one.
- MAC: Match the traffic from the specific MAC/OUI/MAC Group. If no MAC Groups have been created, click + Add MAC Group on this page or go to Network Config > Profile > Groups to create one.
- Domain: Match the traffic from the specific Domain/Domain Group. If no Domain Groups have been created, click + Add Domain Group on this page or go to Network Config > Profile > Groups to create one.
- Gateway Management IP: Match the traffic to the gateway’s WAN and LAN interface IP.
- Source/Destination Port:
Port setting is only supported for TCP and UDP traffic.
You may specify a TCP/UDP port, or select Any.
- If you select "Any":
The rule will match all TCP/UDP traffic regardless of port, while still excluding non‑TCP/UDP traffic. - If you select a specific port:
The rule will only match TCP/UDP traffic that uses that specific port. Traffic using other protocols (e.g., ICMP) will not be matched.
When you seletc a specific port, you can see a Match Opposite Port function.
- If "Match Opposite Port" is enabled:
The rule applies to: Match all ports except the selected port.
 Step 4. Expand Advanced Settings, you can enable the Bi-Directional feature to create the other ACL Rule with the opposite direction simultaneously.
Note: Only the direction is opposite; all other configurations remain the same.
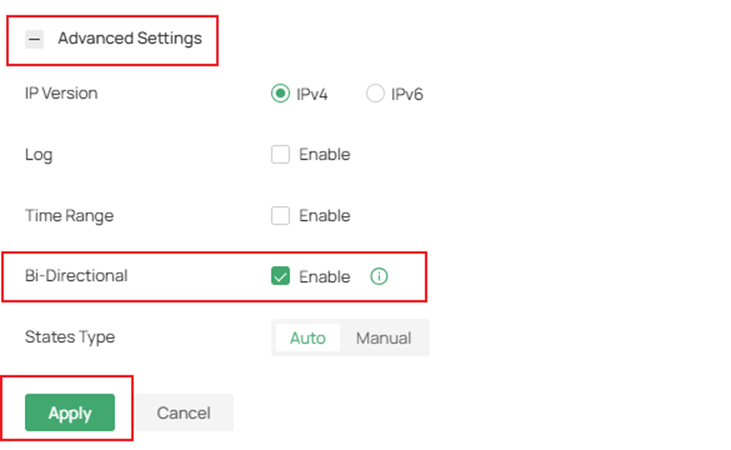
- IP Version: Specify the IP type to apply the rule, IPv4 or IPv6.
- Log: When enabled, the system can collect an ACL entry's effective log. To use this function, please configure the remote logging function first.
- Time Range: Create the time range or select an existing time range for the ACL rule to take effect.
- Bi-Directional: In the LAN-LAN direction, click the checkbox to enable the gateway to create another symmetric ACL with the name “xxx_reverse”, where “xxx” is the name of the current ACL. The two ACLs target packets with opposite directions.
- States Type: Determine the type of stateful ACL rule. It is recommended to use the default Auto type.

- Auto: Match the new, established, and related connection states.
- Manual: If selected, you can manually specify the connection states to match.
- Match State New: Match the connections of the initial state. For example, a SYN packet arrives in a TCP connection, or the router only receives traffic in one direction.
- Match State Established: Match the connections that have been established. In other words, the firewall has seen the bidirectional communication of this connection.
- Match State Related: Match the associated sub-connections of a main connection, such as a connection to a FTP data channel.
- Match State Invalid: Match the connections that do not behave as expected.
Step 5. Click Apply to finish the above Gateway ACL rule entry.
Note:
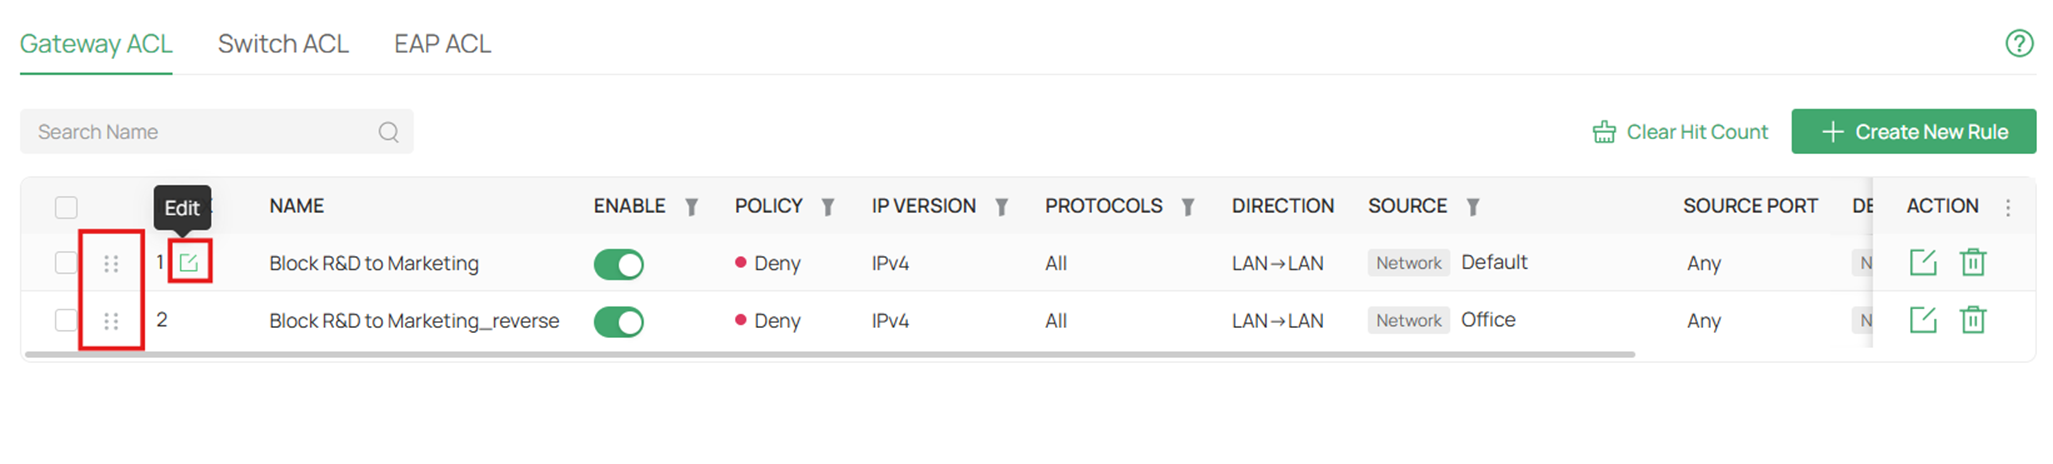
- You can drag entries to adjust the order in which rules take effect.
- Meanwhile, you can edit the index to adjust the order.
The system filters traffic against the rules in the list sequentially. The first entry match determines whether the packet is accepted or dropped, and other rules are not checked after the first match.
Therefore, the order of rules is critical.
- By default, the rules are prioritized by their created time. The rule created earlier is checked for a match with higher priority.
- The ACL rule priority supports both drag-and-drop adjustment and custom index assignment.
- If no rules match, the device forwards the packet because of an implicit Permit All clause.
Step 6. Verification
The computer1 of R&D department is connecting the VLAN1 with the IP address 192.168.0.100, while the computer2 of Marketing department is connecting the VLAN10 with the IP address 192.168.10.101. The computer1 is unable to ping the computer2, meanwhile the computer2 cannot ping the computer1.

Configuration of an APP-based ACL
Omada Fusion Gateway provides an APP Based Access Control Lists (ACL) feature, allowing users to control network traffic based on applications. This feature supports controlling traffic by specific applications or application categories. By default, the device allows access to all applications. You can configure ACL rules to block access to specific applications from designated networks. Application-based ACL rules do not support the “permit” policy.
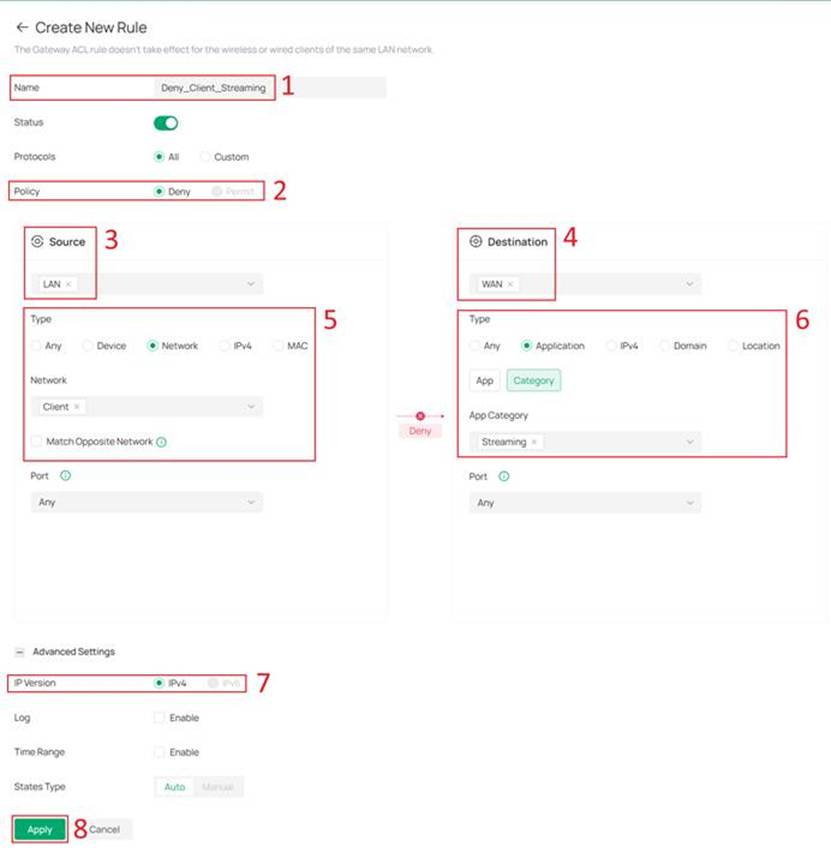
Step 1. Navigate to Network Config > Traffic Management > ACL, and go to Gateway ACL. Click + Create New Rule to create a new Gateway ACL rule.
Step 2. On the Create New Rule page, configure the rule parameters to define how the ACL controls network traffic.
To configure an APP Based ACL, you have to set Policy to Deny, Source to LAN, Destination to WAN and IP Version to IPv4.
Note: APP Based ACL currently supports Deny Policy, LAN to WAN Direction , IP version 4 only and States Type Auto only.
Then set Type of Destination to Application, and select the matching application:
- App: Matches specific application(s), suitable for precise control.
- Category: Matches application types, suitable for category-based control.
In this article, we configure a rule to deny Client Network from accessing applications in the Streaming category.
After completing the configuration, click Apply to save the rule.
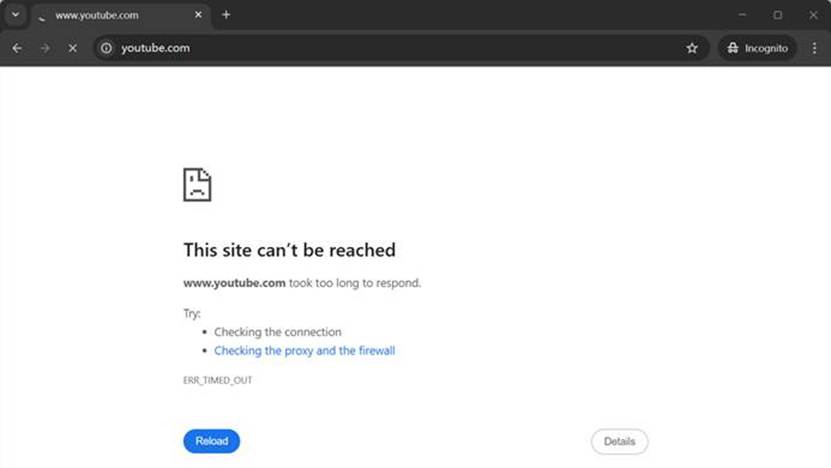
Step 3. Verification
Use a PC within the Client Network to attempt to access YouTube.
Conclusion
Following the steps above, we have successfully configured the Gateway ACL on Omada Fusion Gateway. You can set up this feature to suit your needs.
QA
Q1: What is Gateway ACL?
A: Gateway ACL (Access Control List) allows administrators to create rules that filter traffic passing through the gateway based on criteria such as IP subnet, network, device, application, or port. It decides whether to permit or deny the matched packets, helping to manage network access and security.
Q2: How does rule priority work in Gateway ACL?
A: The system checks rules sequentially from top to bottom. The first rule that matches the traffic determines the action (permit or deny), and no further rules are evaluated. By default, rules are prioritized by creation time (older rules have higher priority). You can also drag and drop rules or assign custom indices to reorder them.
Q3: How can I block communication between two VLANs using Gateway ACL?
A: Create a rule with the source network as one VLAN (e.g., Marketing VLAN10) and the destination network as the other VLAN (e.g., R&D VLAN1), set the policy to "Deny", and apply it in the LAN direction. This will prevent traffic between the two VLANs. For bidirectional blocking, enable the Bi-Directional feature.
Q4: Why is my ACL rule not working as expected?
A: Possible reasons include:
- The rule order is incorrect (a higher‑priority rule may be matching first).
- The source/destination type or port settings are not properly configured.
- The rule is disabled (Status toggle disabled).
- The time range is not active.
- There is an implicit "Permit All" at the end – if no rule matches, traffic is allowed. Check your rule criteria and rule order.
- Special scenario: The current ACL Rule with Device Type is based on MAC address matching. In scenarios involving Layer 3 forwarding, the source and destination MAC addresses do not match as expected. Specifically, for clients connected to switches across different subnets, device-based access control does not take effect, resulting in abnormal behavior of the relevant functions.
Q5: What is the "Match Opposite Port" function in ACL?
A: When you select a specific TCP/UDP port and enable "Match Opposite Port", the rule applies to all traffic except the selected port. This includes TCP/UDP traffic on other ports and all non‑TCP/UDP traffic (e.g., ICMP). The selected port itself is excluded from matching.
Q6: What does the Bi‑Directional feature do?
A: When enabled, the gateway automatically creates a second ACL rule with the opposite direction (e.g., from destination to source), using the same configuration parameters. The reverse rule is named "xxx_reverse". This is useful for blocking or allowing two‑way communication with a single rule setup. Note: The Bi‑Directional option is available only in the LAN‑to‑LAN direction
Q7: What should I do if clients can still access a specific website after configuring a Deny APP Based ACL rule?
A: The domain may not be included in the current application database. In this case, it is recommended to use Content Filtering together with App-Based ACL. Block List of Category Filtering can be used to block specific websites that are not included in the category database. For more information about Content Filtering, please refer to the Related Articles.
Q8: After configuring a Deny ACL, why can parts of the webpage or icons still load?
A: This may be caused by browser cache. You can try clearing the browser cache or testing in incognito/private mode.
Q9: How can I know which applications are included in an Application Category?
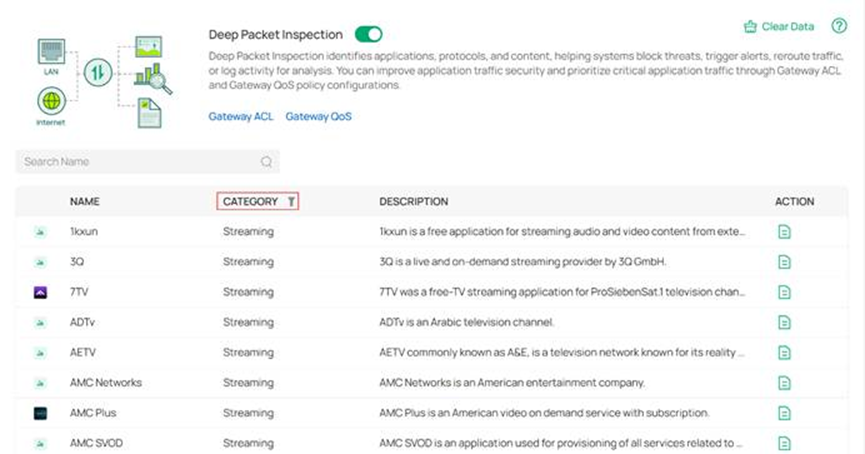
A: You can check this under Network Config > Security > Application Control.
Q10: Do I need to enable Deep Packet Inspection to use APP Based ACL?
A: No, it is not required to enable Deep Packet Inspection under Network Config > Security > Application Control.
Q11: Can Gateway ACL be applied to VPN clients (e.g., L2TP/PPTP)?
A: Yes. Gateway ACL supports selecting L2TP Client or PPTP Client as the source type. However, this option is available only after you have successfully created the corresponding L2TP or PPTP client connection on the Fusion Gateway. Once the VPN client is established, you can create ACL rules to permit or deny traffic from/to that VPN interface.
Get to know more details of each function and configuration please go to Download Center to download the manual of your product.
