


目錄
介紹
本文介紹了 Sector Bridge 5 和 Flex Bridge 5 在獨立模式下以及透過電腦和 Omada App 在 Omada 控制器上的基本設定、使用方法和 DIP 開關配對。
需求
- Sector Bridge 5
- Flex Bridge 5
- Omada Network ( 軟體控制器 / 硬體控制器 / CBC(雲端控制器), v6.2 以上版本)
- Omada App (版本 5.1 或更高版本)
設定
在獨立管理模式下透過電腦設定
網路拓樸
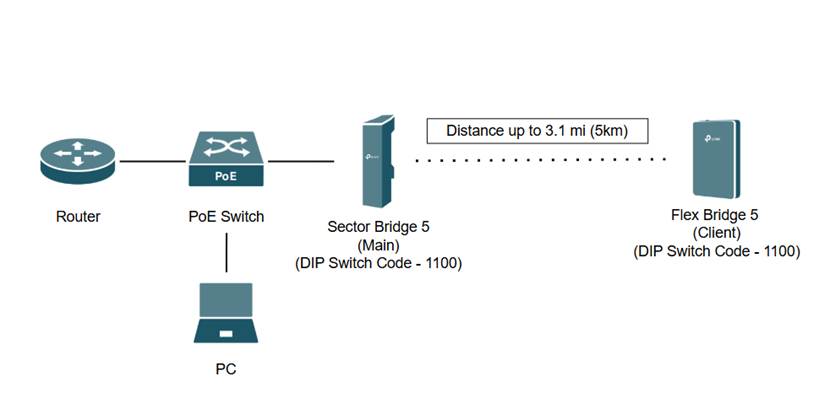
備註:本部分使用 Windows 11 筆記型電腦以及路由器、PoE 交換器、Sector Bridge 5 和 Flex Bridge 5。
備註:Sector Bridge 5 和 Flex Bridge 5 上的配對 DIP 配對碼為 1100。 Flex Bridge 5 上的角色開關設定為 “Client”.
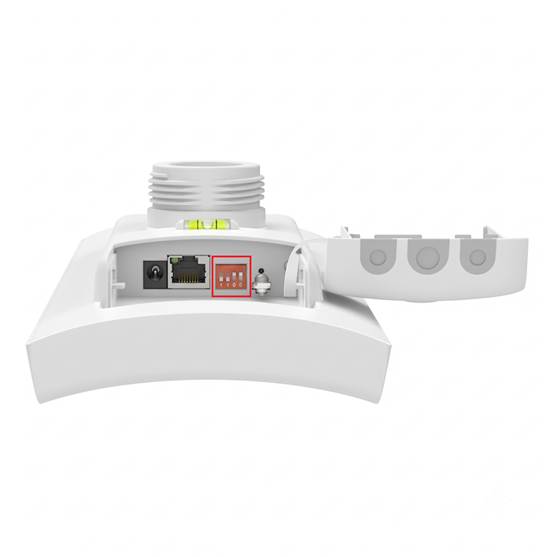
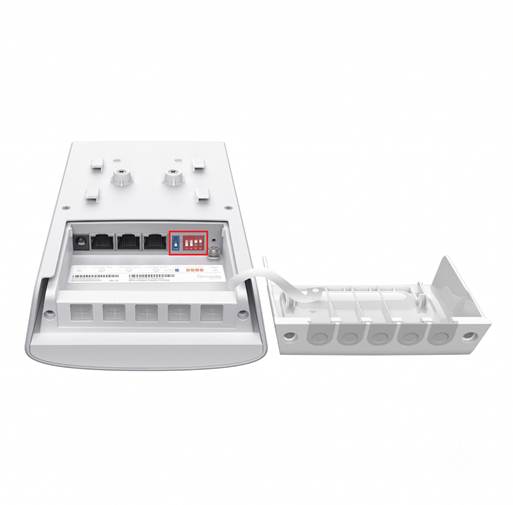
步驟 1. 安裝並啟動 Sector Bridge 5 和 Flex Bridge 5,然後在電腦上登入Main AP 的獨立 Web 管理介面。確保所有裝置使用相同的DIP配對碼。
例如,Main AP透過DHCP取得的IP位址是192.168.0.103,所以您需要輸入 https://192.168.0.103 在網頁瀏覽器網址列中輸入「登入 Web GUI」。
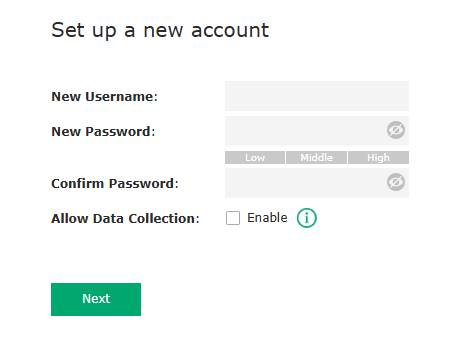
首先,先建立帳戶後登入帳戶
步驟 2. 依步驟先設定管理WLAN。
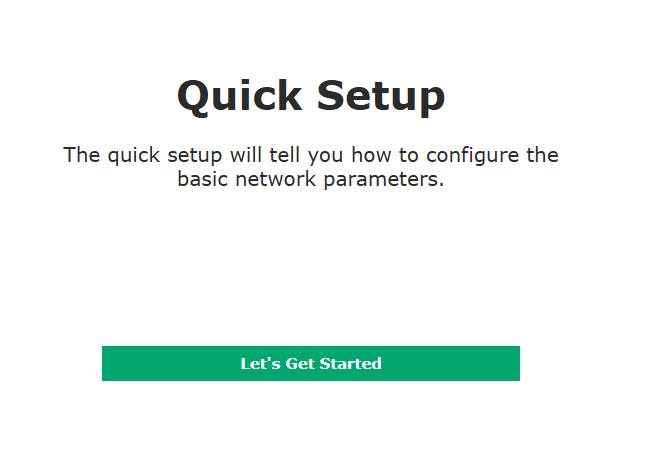
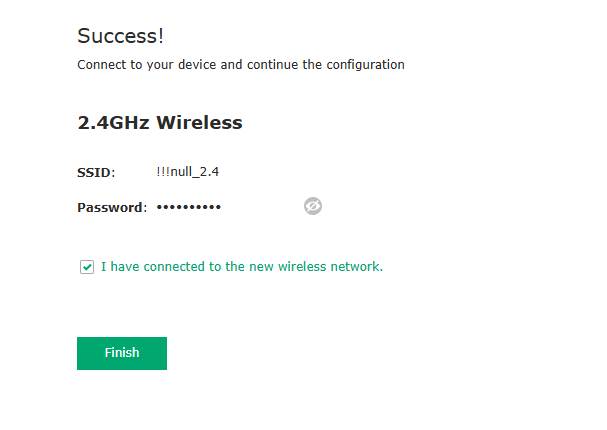
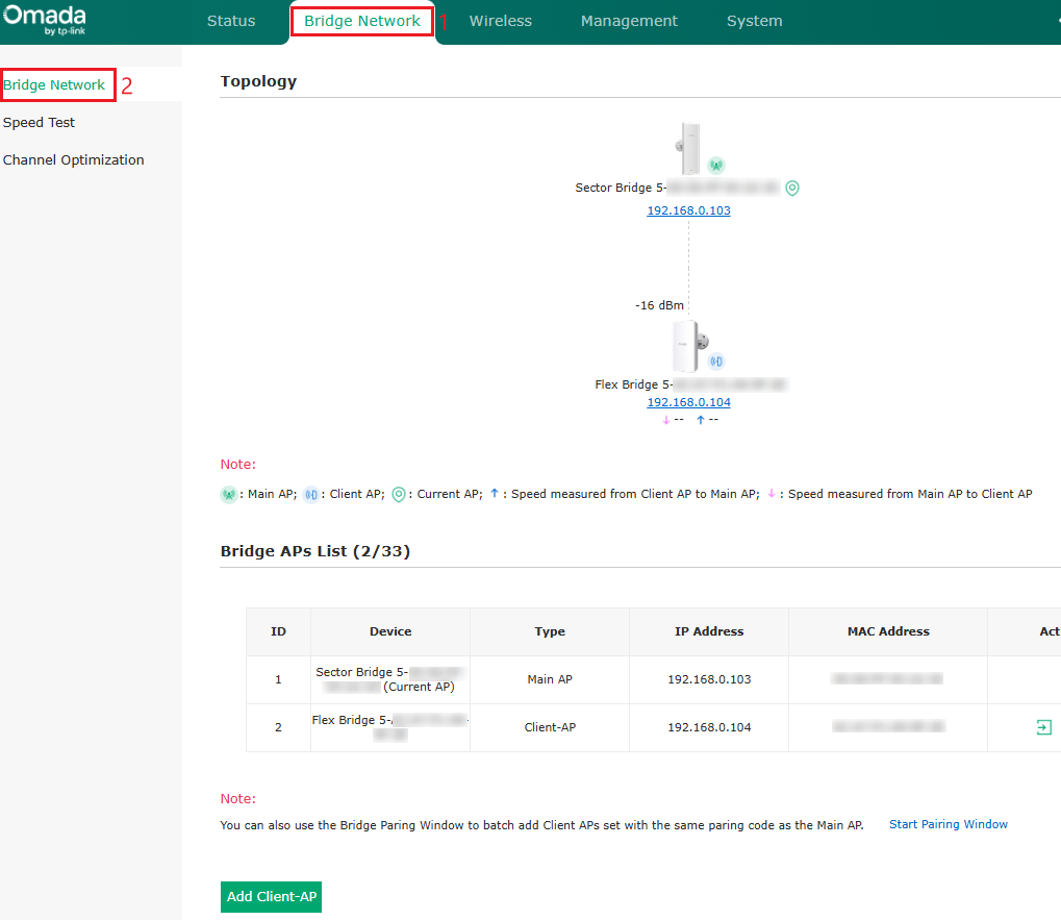
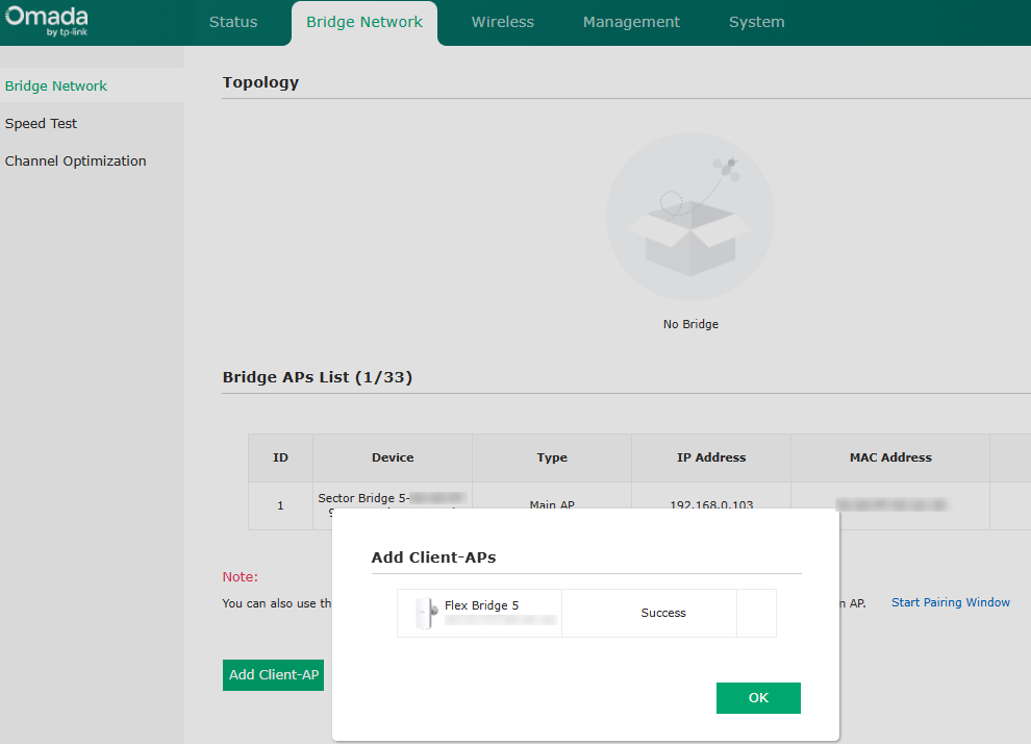
步驟 3. 如果設定正確,且DIP配對碼正確,Sector Bridge 5 將自動與 Flex Bridge 5 配對。 可在 Bridge Network 查看網橋拓樸連線情況 。此外,您還可以新增另一個Client AP。
在 Management > Bridge AP Management 頁面中,您可以查看 Sector Bridge 5 剩餘配對時間或停止自動配對。
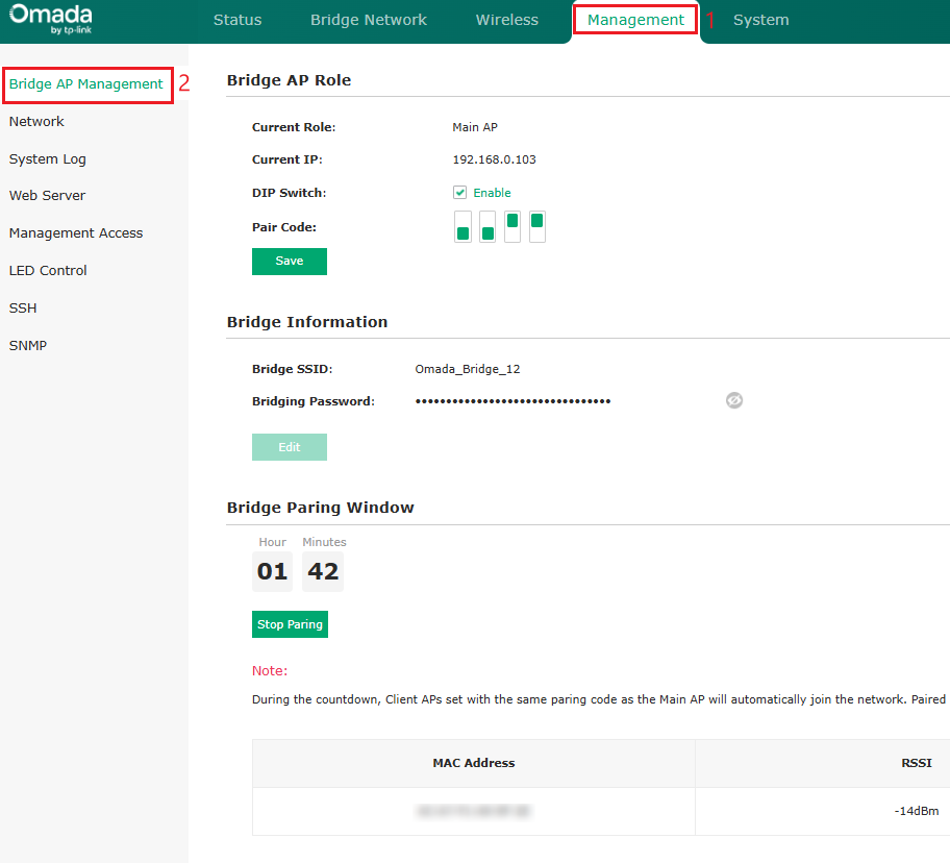
備註:從Client AP 透過配對和密碼建立網路連線的那一刻開始計算為期 2 小時,。
步驟 4. 在Bridge AP Management 下,您也可以變更橋接設備的管理方式。
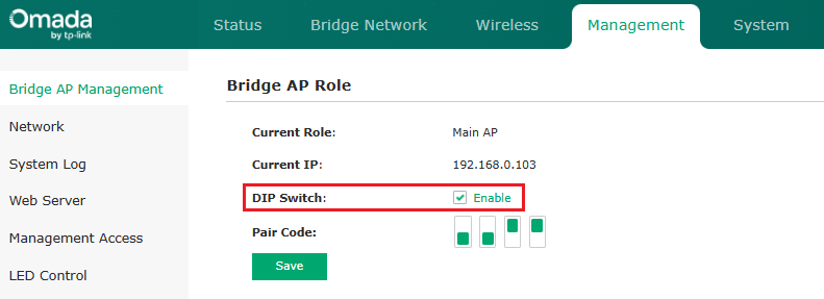
DIP 開關 為預設啟用,且只有當Client AP 的配對碼與Main AP 的配對碼一致時,Client AP 才能被採用。
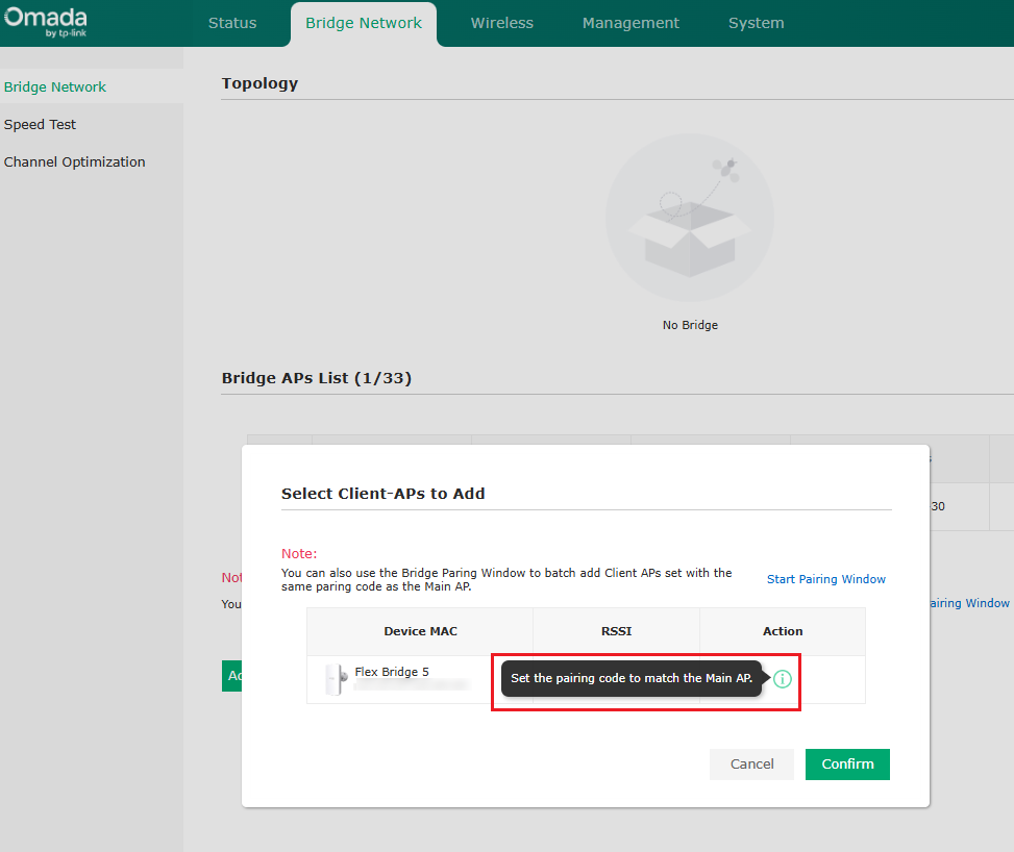
在設定網橋時,如果 DIP 開關已啟用,但 Flex Bridge 5 的配對碼不匹配,則不會形成網橋網路拓撲,並且會出現以下警告訊息:
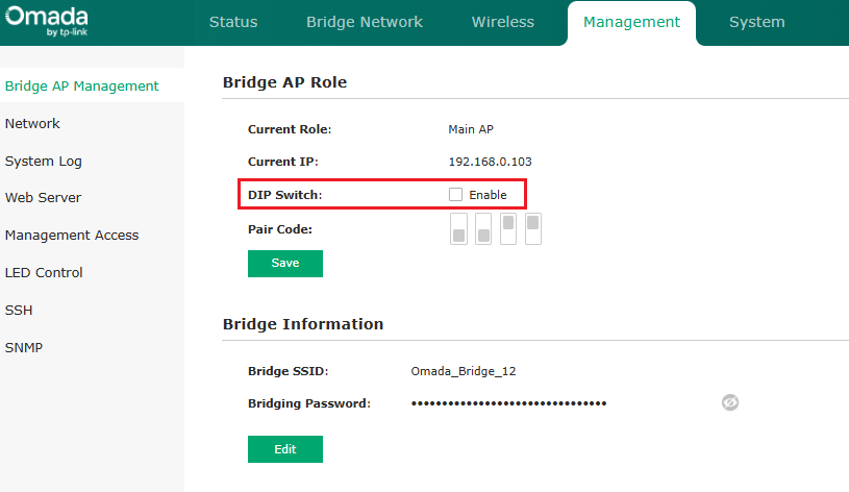
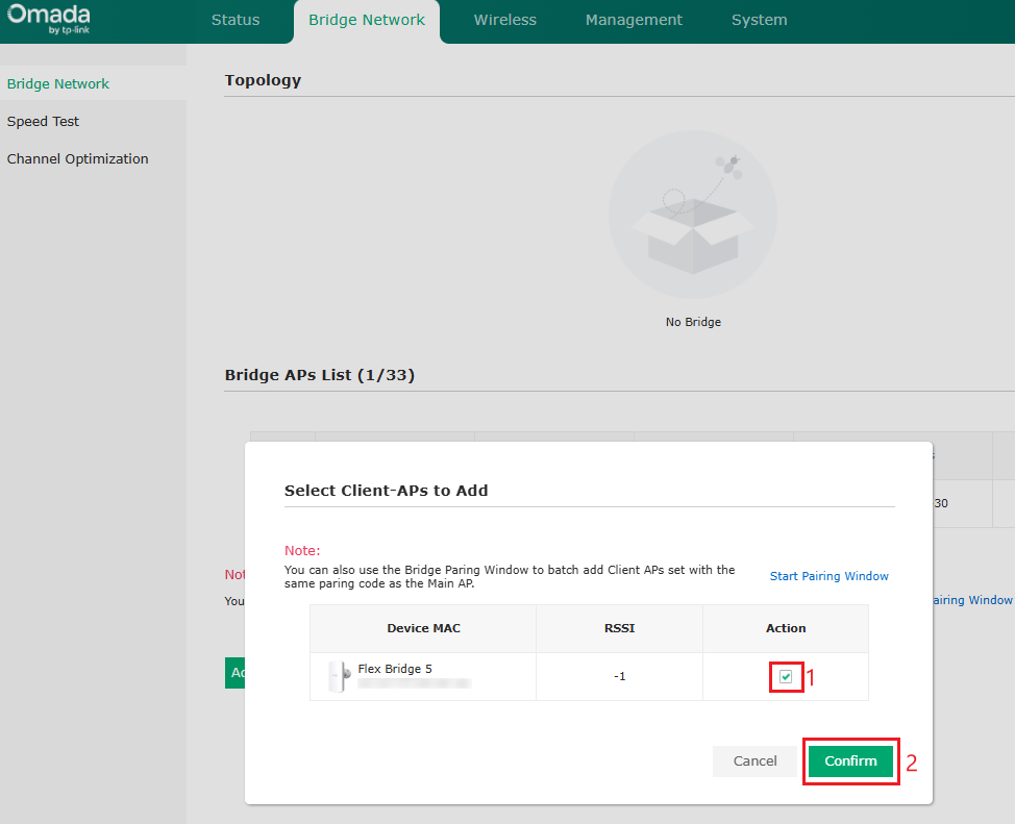
如果 DIP 開關設定為“停用”,則基於硬體的配對功能將被停用。若要連接 Sector Bridge 5 和 Flex Bridge 5,您必須手動設定它們的角色(Main AP/Client AP),並透過軟體掃描進行配對。
在獨立管理模式下透過Omada APP設定
網路拓樸
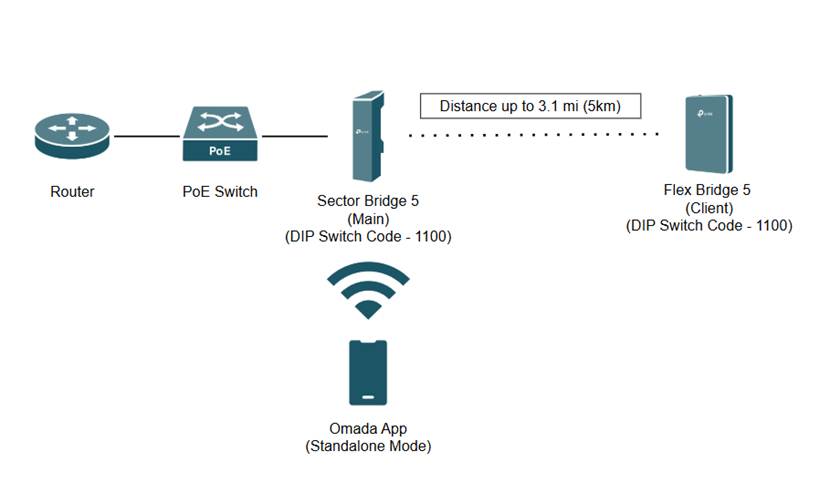
備註:本節使用一台運行獨立管理模式 Omada 應用的 Android 行動設備,以及路由器、PoE 交換器、Sector Bridge 5 和 Flex Bridge 5。
備註:Sector Bridge 5 和 Flex Bridge 5 上的配對 DIP 配對碼設定為 1100。 Flex Bridge 5 上的角色切換設定為 Client ”.
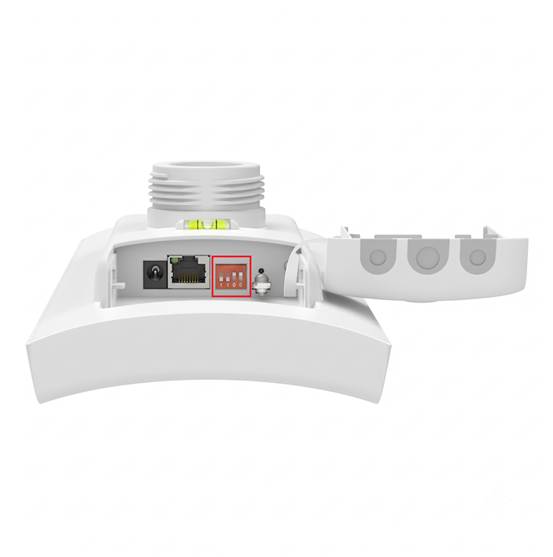
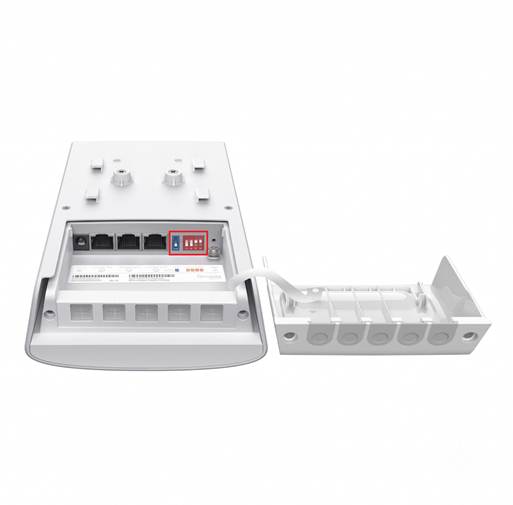
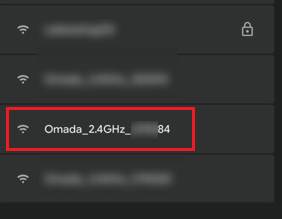
步驟 1. 安裝後啟動 Sector Bridge 5 與 Flex Bridge 5,並確保兩台裝置設有相同的 DIP 配對碼。接著,請連接 Sector Bridge 5 背面標籤上的 SSID。
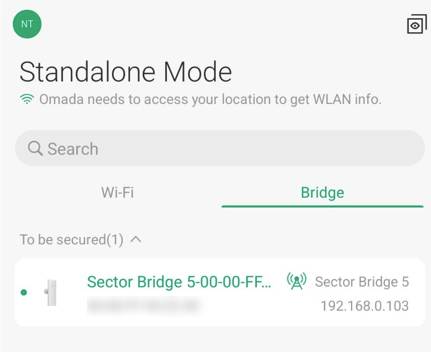
步驟 2. 開啟 Omada App 並切換至「獨立管理模式」,接著在 Bridge 頁面點選 Sector Bridge 5 。
步驟 3. 請依照螢幕上的指示設定裝置帳戶、橋接名稱和管理 SSID。
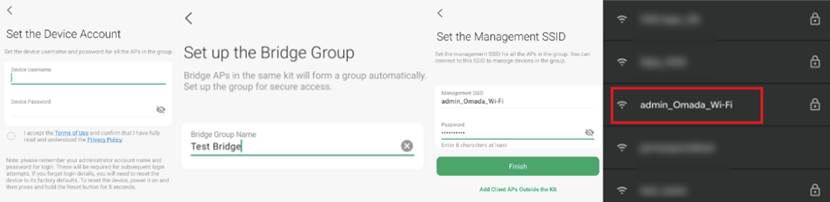
步驟 4. 連線至剛建立的管理 SSID 後,返回 Omada App,Sector Bridge 5 便會自動與 Bridge 群組中的 Flex Bridge 5 完成配對。
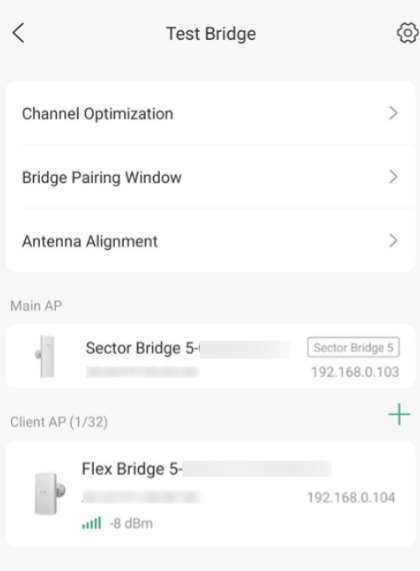
在 「 Bridge Group > Bridge Pairing Window 」頁面中,您可以查看剩餘的配對時間,或是手動停止自動配對。
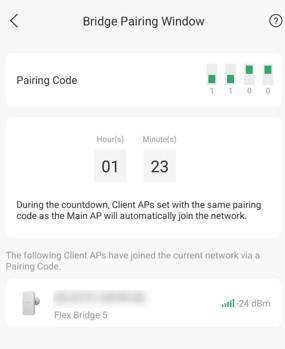
備註:配對時限為 2 小時,從 Client AP 完成配對並建立網路連線後開始計算。
步驟 5. 您可以在 「 Device 」 頁面上變更橋接設備的管理方式。
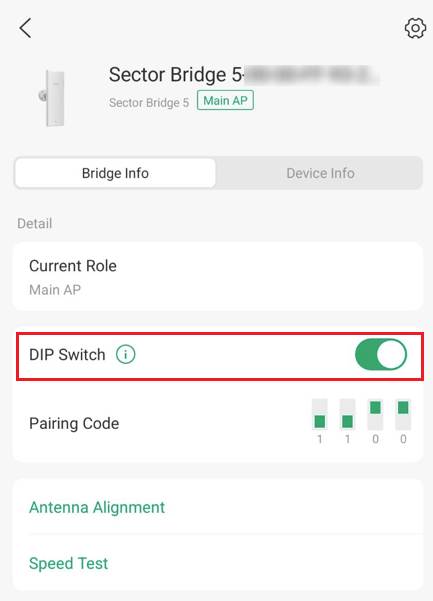
DIP Switch: 預設啟用。本功能預設為開啟,請確保 Client AP 與Main AP 的配對碼完全一致,系統才能順利新增並管理該 Client AP。
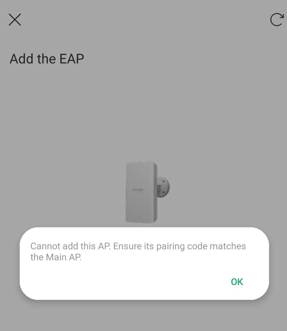
在新增裝置時,如果 DIP 配對碼已啟用,但Clinet AP 的配對碼不符:
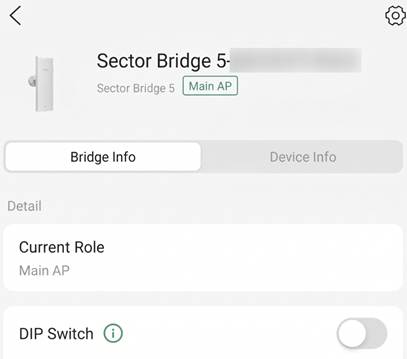
若將 DIP 配對碼設為「停用」,則硬體配對功能將隨之關閉。如需連接 Sector Bridge 5 與 Flex Bridge 5,您必須手動設定各自的角色(Main AP/Client AP),並透過軟體掃描進行配對。
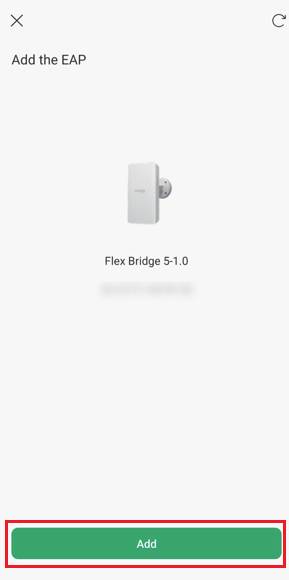
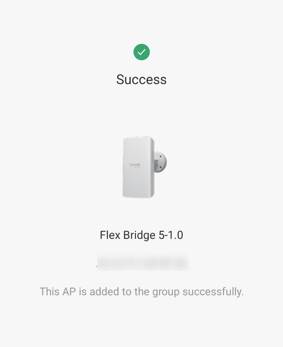
在控制器模式下透過電腦設定
網路拓樸
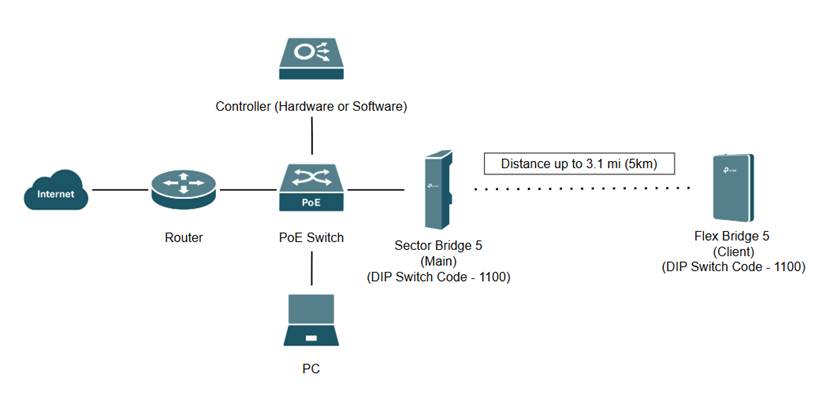
備註:本章節的範例設定係採用 Windows 11 筆電,並搭配硬體控制器、路由器、PoE 交換器、Sector Bridge 5 與 Flex Bridge 5 進行示範。
備註:Sector Bridge 5 與 Flex Bridge 5 的 DIP 配對碼皆設定為 1100;Flex Bridge 5 的角色切換開關(Role Switch)則切換至 “Client” 模式。
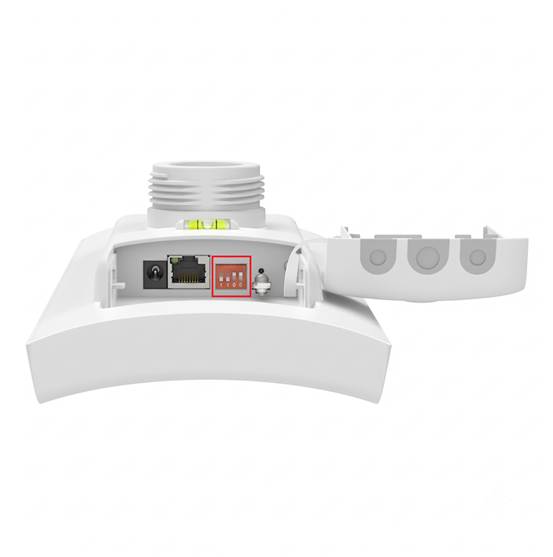
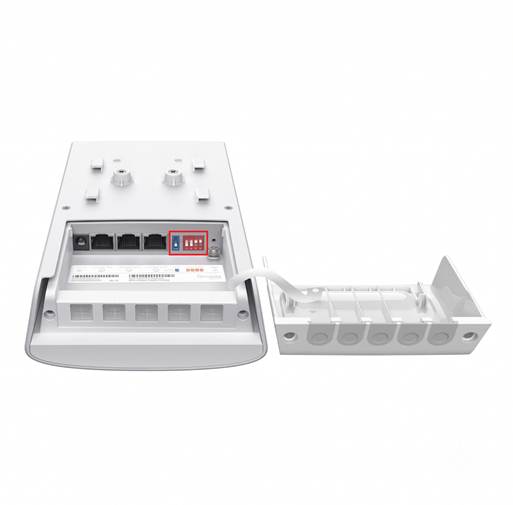
步驟 1. 安裝並啟動 Sector Bridge 5 與 Flex Bridge 5,接著登入控制器。請確保兩台裝置設有相同的 DIP 配對碼。
當 Sector Bridge 5 完成納管後,同群組中配對碼相同的 Flex Bridge 5(Client AP),也會在 2 小時的配對時間視窗內自動被系統納管。
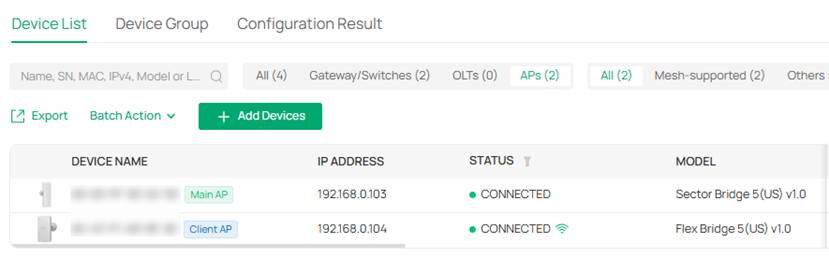
您可以在Main AP 的「Device > Manage Device > Overview > Pairing Window 」頁面上查看剩餘配對時間或停止自動配對。

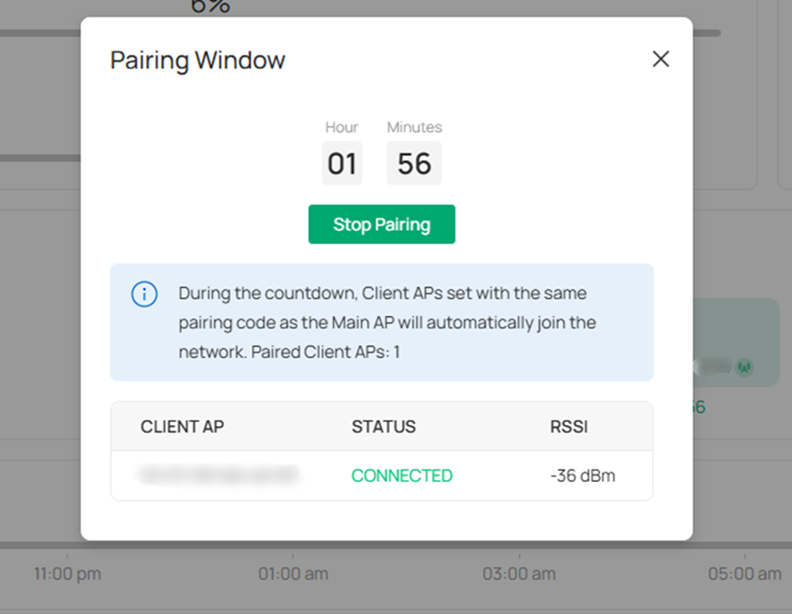
備註:配對時間視窗為 2 小時,自 Client AP 透過配對與密碼成功建立網路連線時起算。
步驟 2. 裝置完成辨識後,系統將會自動建立一個管理用的 WLAN。該 WLAN 的 SSID 為未加密狀態,僅供裝置管理使用,不建議用於存取網際網路。
備註:停用管理用 Wi-Fi(Management WLAN)將會終止無線管理權限;屆時僅能透過有線裝置管理該裝置。
備註:當控制器連線至 Flex Bridge 5 或 Sector Bridge 5 後,系統自動產生的管理用 WLAN 將於 2 小時後關閉且不再提供連線。強烈建議您在初始設定時,手動建立專用的管理用 WLAN 並設定無線加密。
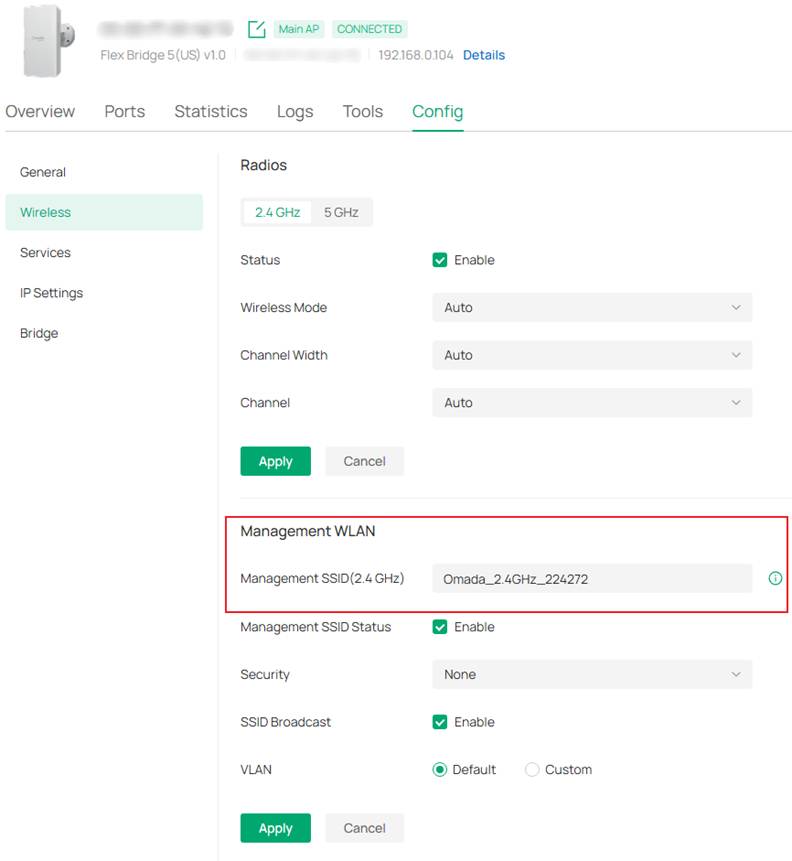
步驟 3. 您可以在 Bridge 頁面中,變更 Bridge 設備的管理模式。
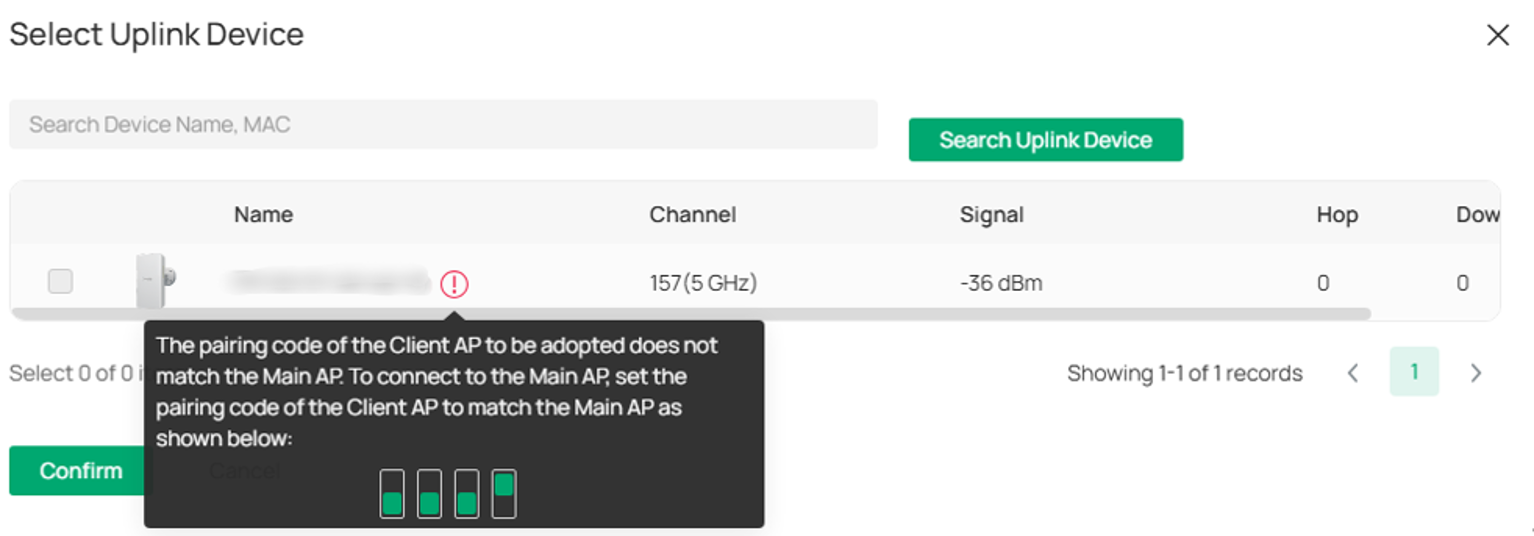
DIP 配對碼切換:預設啟用。Client AP 的配對碼必須與Main AP 一致,才能被系統納管。
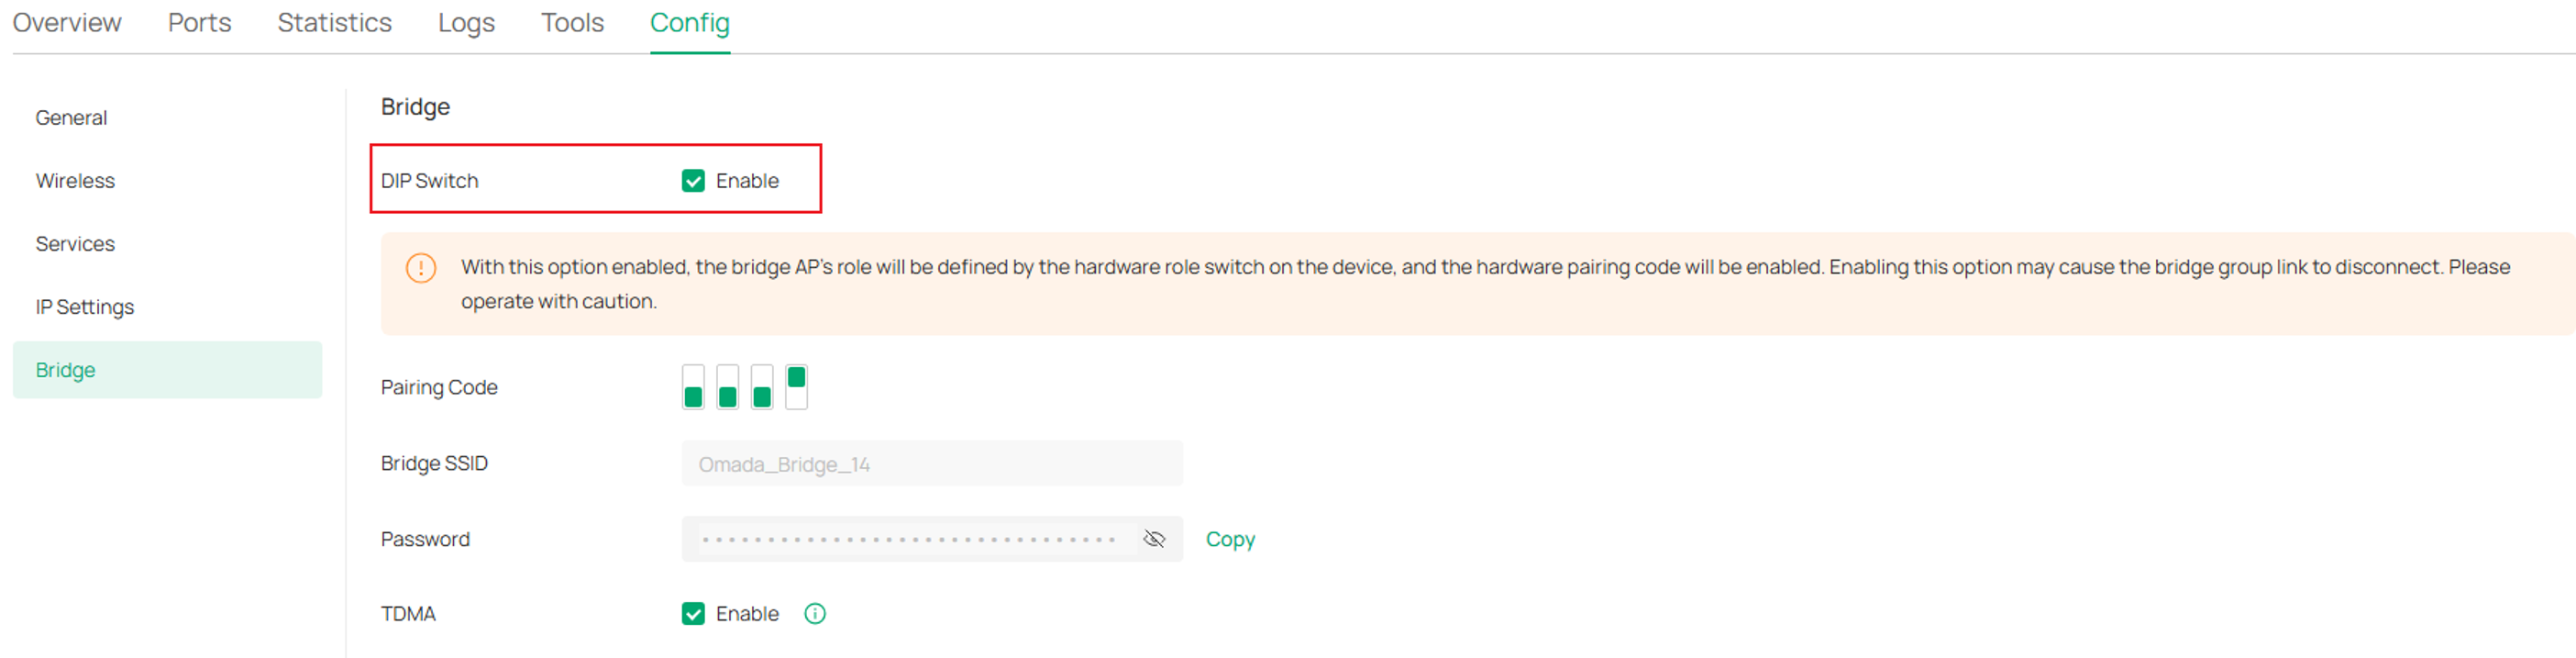
在新增裝置時,如果 DIP 配對碼切換已啟用,但用戶端 AP 的配對碼不符:
若將 DIP 配對碼設為「停用」,則硬體配對功能將隨之關閉。如需連接 Sector Bridge 5 與 Flex Bridge 5,您必須手動設定各自的角色(Main AP/Client AP),並透過軟體掃描進行配對。
TDMA: TDMA 專為 P2MP 橋接情境設計,能有效調度各個 Client AP 依序與Main AP 連線,發揮最佳的資源利用效率。
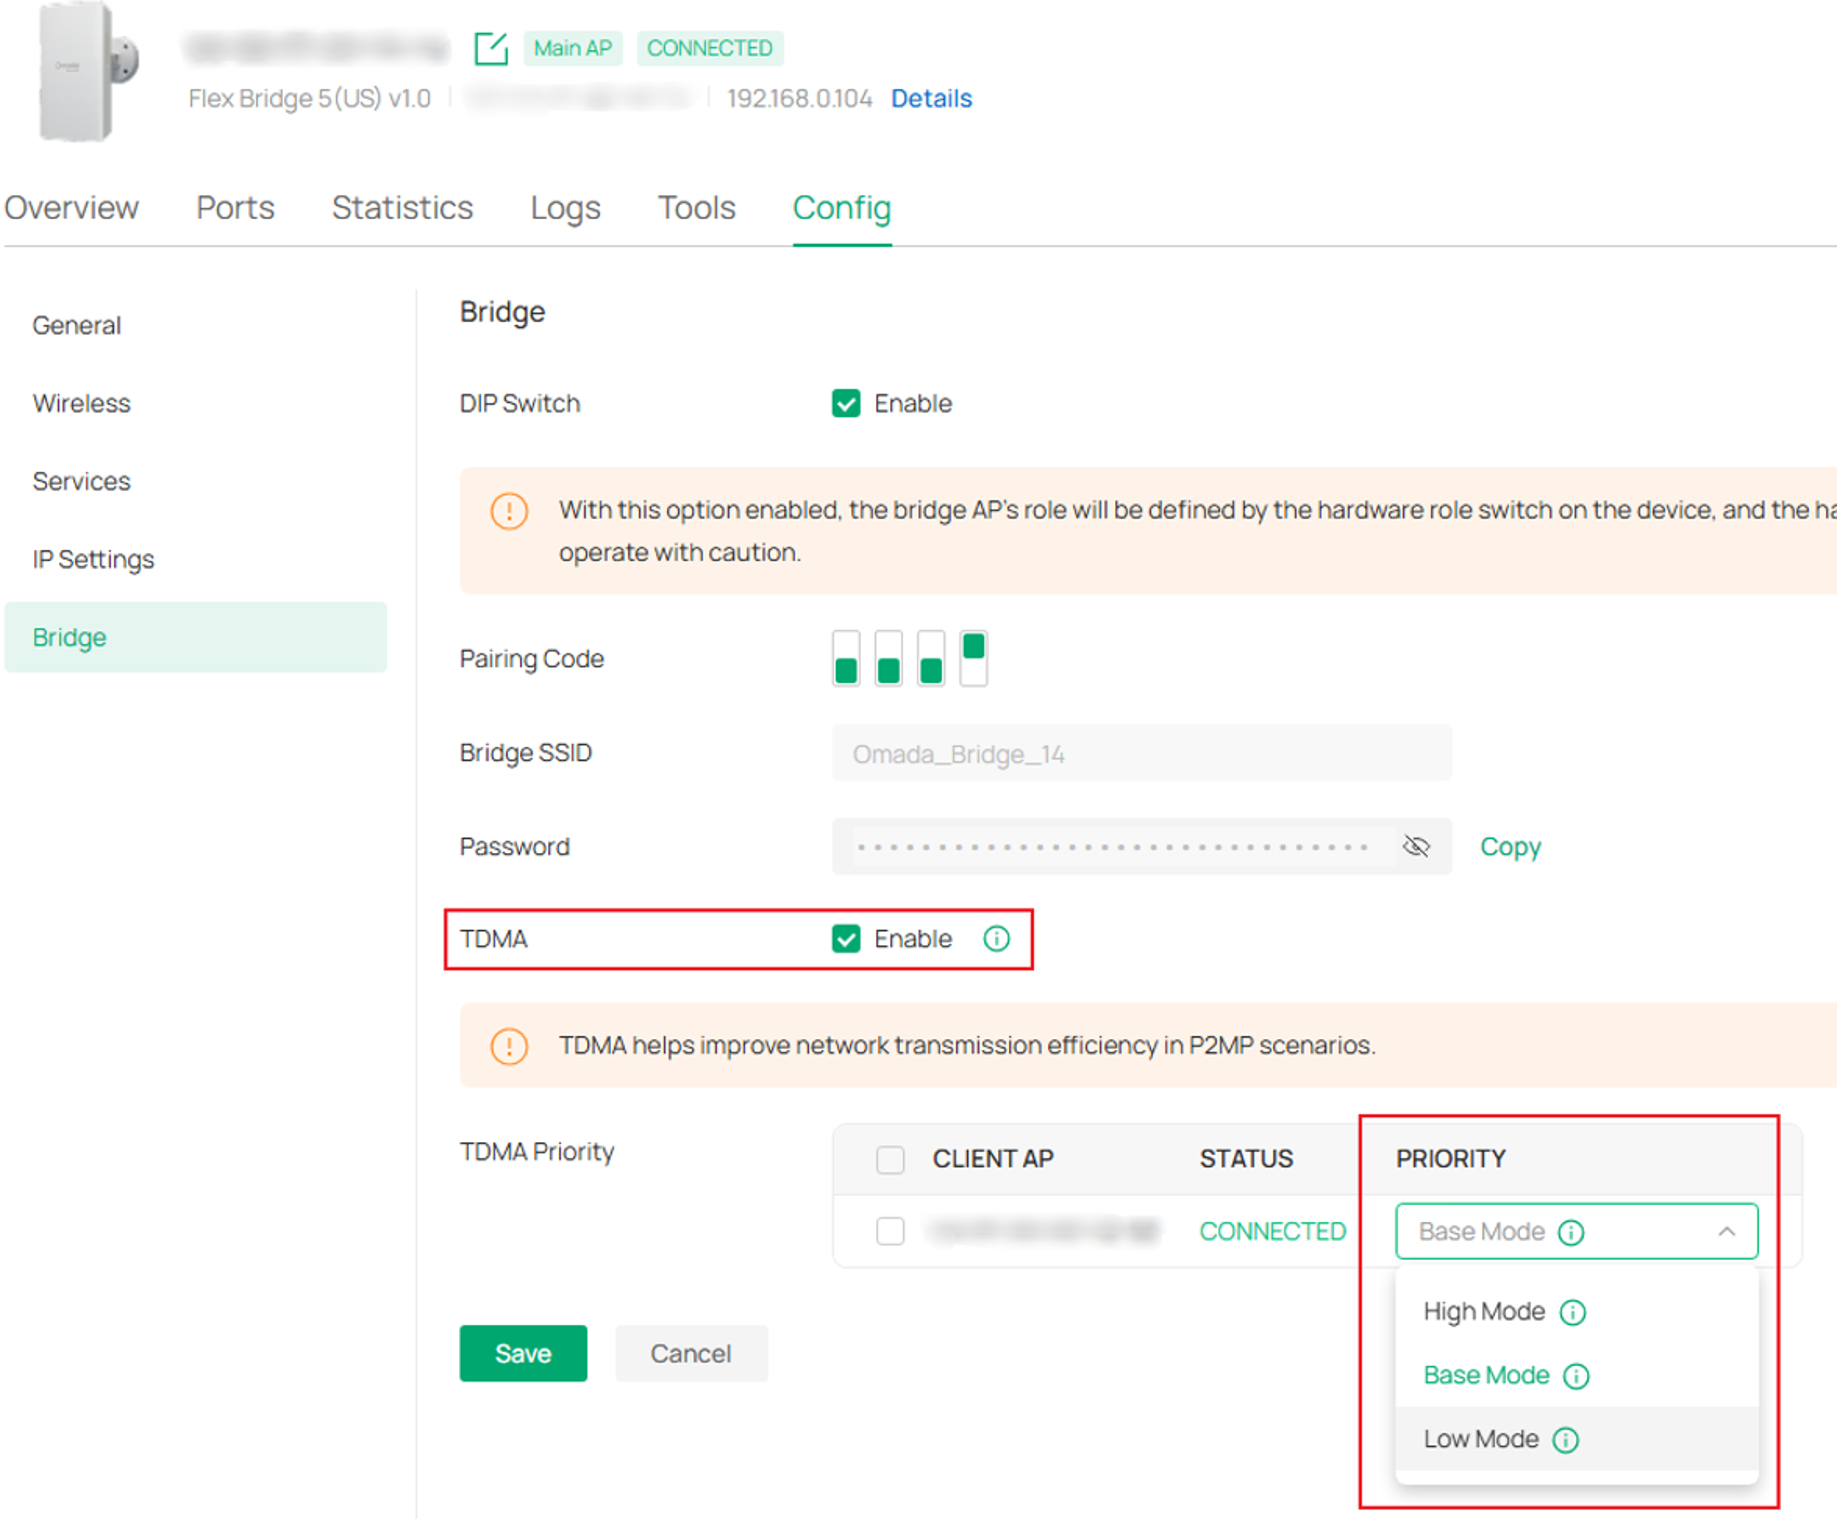
每個 Client AP 可設定三種優先級:低(Low)、一般(Basic)、高(High)。
優先級越高,Client AP 的平均傳輸量(Throughput)就越高,平均延遲時間也越低。
在控制器模式下透過Omada App設定
網路拓樸
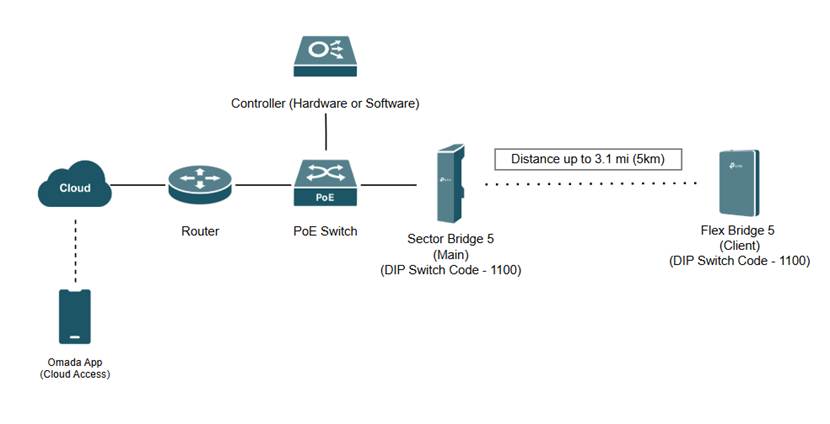
備註:請確保運行 Omada App 的 Android 行動裝置處於「控制器模式」,並透過雲端存取連線至硬體控制器;同時,該裝置亦需連至包含路由器、PoE 交換器、Sector Bridge 5 與 Flex Bridge 5 的同一網路環境。
備註:Sector Bridge 5 與 Flex Bridge 5 的 DIP 配對碼皆設定為 1100;Flex Bridge 5 的角色切換開關則切換至 “Client&rdquo 模式。
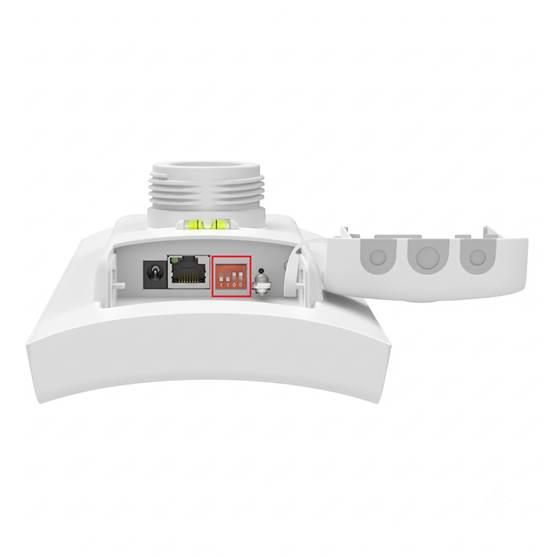
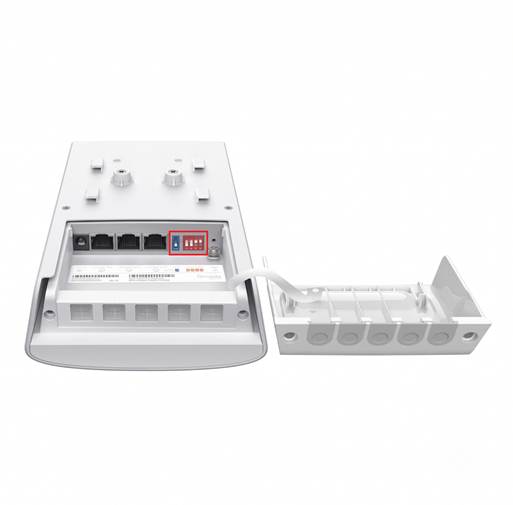
步驟 1. 安裝並開啟 Sector Bridge 5 與 Flex Bridge 5 的電源。請確保兩台裝置設有相同的 DIP 配對碼。
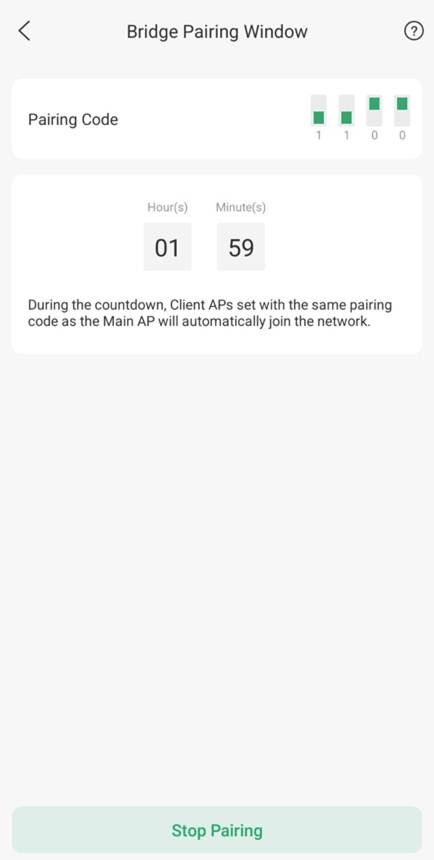
當 Main AP 完成納管後,同群組中配對碼相同的 Client AP,也會在 2 小時的配對時間視窗內自動被系統納管。
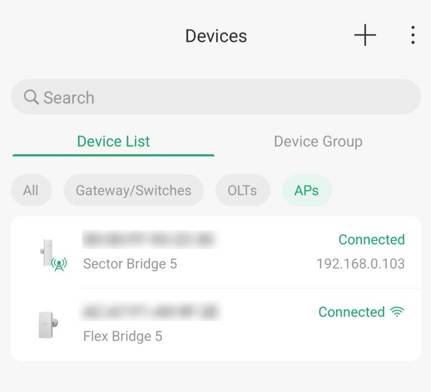
您可以前往 Main AP 的 「 Device > Overview > Bridge Pairing Window 」 頁面,查看剩餘配對時間,或是手動停止自動配對。
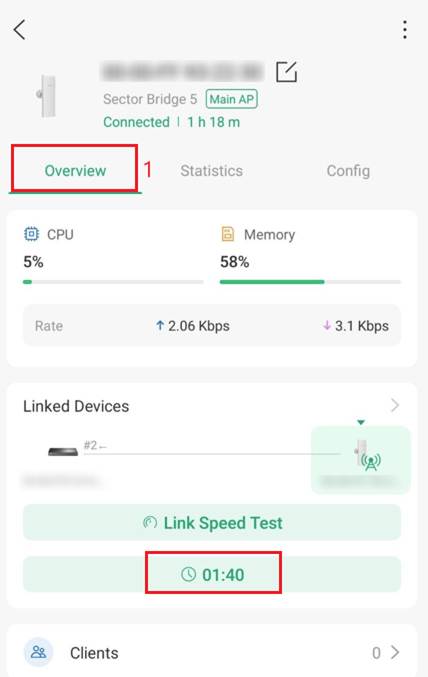
備註:配對時間視窗為 2 小時,自 Client AP 透過配對與密碼成功建立網路連線時起算。
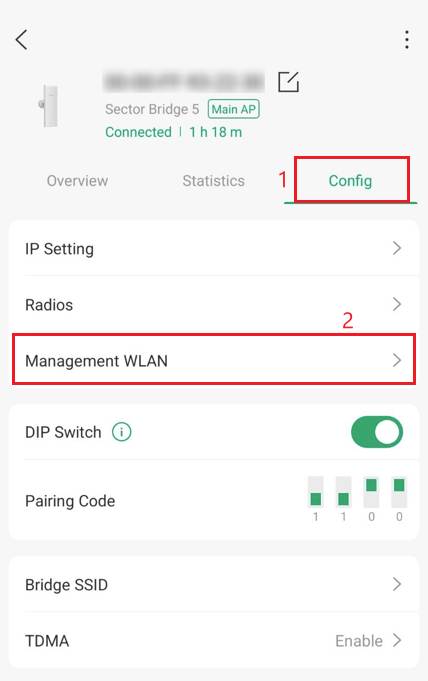
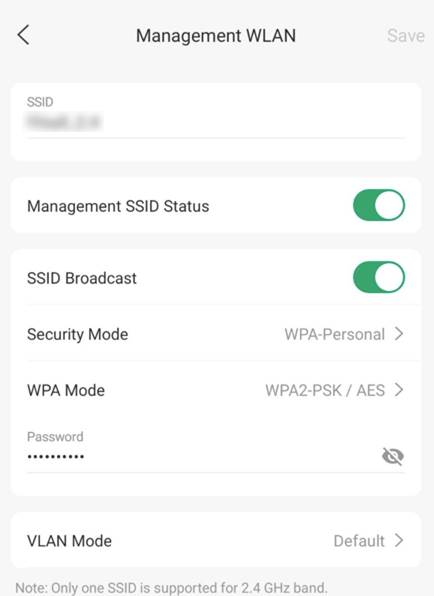
步驟 2. 裝置經識別後,系統將會自動建立一組管理用 WLAN。該 WLAN 的 SSID 尚未加密,僅供設備管理使用,不建議用於存取網際網路。
您可以前往 Config > Management WLAN 調整管理用 WLAN 的設定。
備註:停用管理用無線射頻(Management Radio)將會終止透過無線網路進行管理的權限;屆時僅能透過有線 Client 端管理此裝置。
備註:當 Sector Bridge 5 或 Flex Bridge 5 被控制器納管後,系統自動產生的「管理用 WLAN」將會在 2 小時後自動關閉且不再接受連線。強烈建議您在初次設定時,手動新增一組專用的管理用 WLAN 並設定無線加密。
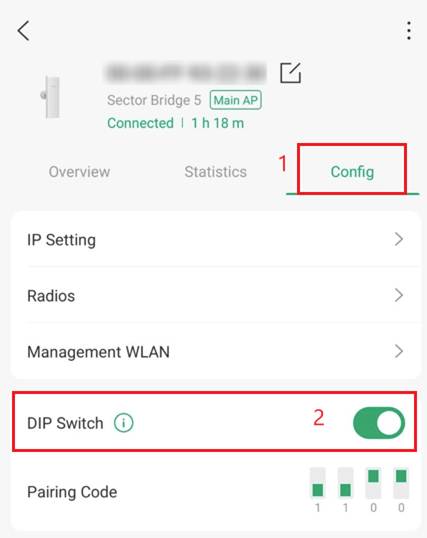
步驟 3. 您可以前往 Device > Config 頁面,變更該橋接裝置的管理方式。
DIP 配對碼切換:預設為開啟。Flex Bridge 5(Client AP)的配對碼必須與 Main AP 完全一致,方能進行納管。
納管裝置時,若已啟用 DIP 配對碼切換,且 Client AP 的配對碼與 Main AP 不一致:
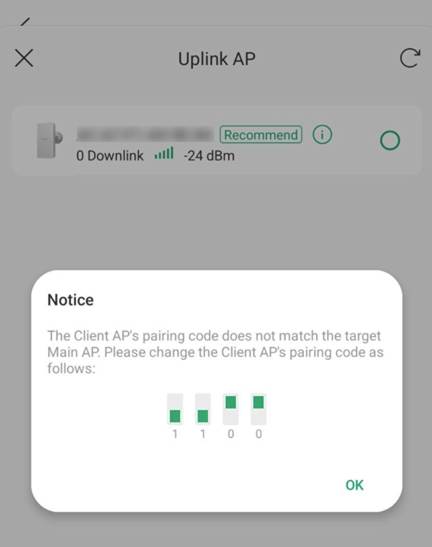
若將 DIP 配對切換設為「停用(Disable)」,硬體自動配對功能即會關閉。如需連線 Sector Bridge 5 與 Flex Bridge 5,您必須手動設定各自的角色(Main AP / Client AP),並透過軟體掃瞄進行配對。
TDMA:TDMA 技術能滿足橋接器 P2MP(點對多點)情境的需求,有效排程並引導各個 Client AP 依序存取 Main AP,從而實現最佳的資源利用率。
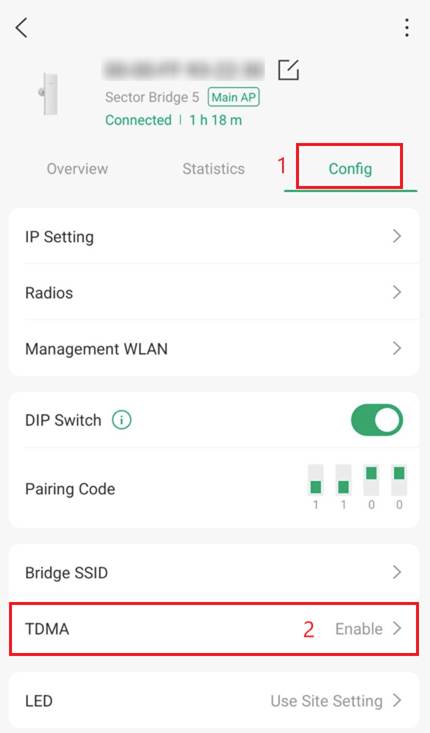
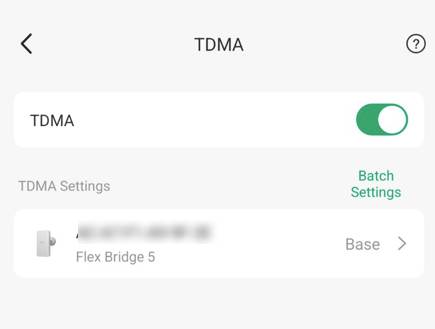
每個 Client AP 皆可選擇三種優先權等級:低模式(Low Mode)、基本模式(Base Mode)與高模式(High Mode)。
優先權等級越高,Client AP 的平均吞吐量(Throughput)就越高,平均延遲也越低。
結論
我們已成功於單機模式(Standalone Mode),以及透過 PC 和 Omada App 在 Omada 控制器上完成 Sector Bridge 5 與 Flex Bridge 5 的 DIP 配對碼切換設定。
若要瞭解更多功能細節與詳細設定,請造訪支援首頁 下載或查閱您產品的使用手冊。
QA
Q1: 如果 DIP 開關的配對碼不相符,會發生什麼事?
A1: 當啟用 DIP 開關功能時,若配對碼不相符,裝置將無法建立橋接網路拓撲,並會顯示錯誤訊息。
Q2: 若停用 DIP 開關功能,Flex Bridge 5 仍可與 Sector Bridge 5 進行配對嗎?
A2: 是的,即使無法使用自動化的橋接配對時間視窗(Bridge Pairing Window),您仍可透過手動設定 Flex Bridge 5 硬體上的 Client 開關角色來完成裝置配對。
Q3: 在控制器模式下部署時,自動納管的時間視窗是多久?
A3: 當 Main AP 被控制器納管後,只有在第一個 Client AP 利用配對碼成功加入網路時,2 小時的倒數計時才會正式開始。
Q4: 自動產生的管理用 WLAN(Management WLAN)是否可用於日常的一般網路流量?
A4: 不建議。此未加密的 SSID 僅專為裝置管理所設計,不建議用於存取網際網路。請注意:若關閉Management WLAN,將會終止所有無線管理功能。
Q5: TDMA 功能如何提升點對多點(P2MP)部署的效能?
A5: TDMA 能精準排程各 Client AP 與 Main AP 溝通的時間,以最佳化資源利用。您可針對個別 Client AP 指定低(Low)、基本(Base)或高(High)優先權等級,藉此提升吞吐量並降低延遲。
Q6: Sector Bridge 5 可以設定為 Client 模式嗎?
A6: Sector Bridge 5 只能作為 Flex Bridge 5 及其他 Omada 橋接套件(Bridge Kit)裝置的 Main AP;因為 Sector Bridge 5 上僅配有配對用(Pairing)的 DIP 開關,並沒有 Main/Client 角色切換開關。
