Apply to: Omada SDN Controller v5.13.30.8 and above, Omada L3 Switches.
This article will introduce how to configure OSPF on Omada Switches through Omada SDN Controller.
1. What is OSPF?
OSPF (Open Shortest Path First) is a link-state based interior gateway protocol developed by the IETF (Internet Engineering Task Force) organization. Currently, OSPF Version 2 is used for the IPv4 protocol, and the version supported by the Controller is OSPFv2.
2. Networking Requirements.
As shown in the following topology, four switches are required to achieve routing interoperability using OSPF, of which Switch B and Switch C are the OSPF backbone areas, and the two switches can be subsequently used as the main devices to extend the OSPF network.

3. Steps of configuration.
In order to complete this networking requirement, all four switches need four configurations: creating VLANs, configuring the VLAN to which each interface belongs, creating VLAN interfaces and configuring OSPF. The following describes the relevant configurations using only Switch B as an example.
3.1 Creating VLAN
Go to Settings – Wired Networks – LAN – Networks, Click Create New LAN.
Create VLAN 2 and 3 referring to the following figure.

3.2 Configuring Port Profile
Create a Port Profile and apply it to the interface. you can change the VLAN to which the interface belongs as needed.
Go to Settings – Wired Networks – LAN – Profiles, click Create New Port Profile.
Create Profile: SwitchB_P2, leave Native Network and Untagged Networks as deafult. Configure the Tagged Networks as VLAN 2.

Then create the profile: SwitchB_P1, leave Native Network and Untagged Networks as deafult. Configure the Tagged Networks as VLAN 3.
Go to Devices – Device List, click Switch B, in the pop-up private configuration page, go to Ports, click the edit button of port 2.

Change its profile to SwitchB_P2.

After that, change the profile of port 1 to SwitchB_P1.
3.3 Creating VLAN Interface
In the private configuration page of Switch B, go to Config – VLAN Interface, turn on the enable switch to the right of VLAN 2 and click Apply.

Click the edit button of VLAN 2.

Configure the IP address and subnet mask of VLAN Interface 2 as 10.2.1.2/255.255.255.0.

Then create VLAN Interface 3 as the same method.
3.4 Configuring OSPF
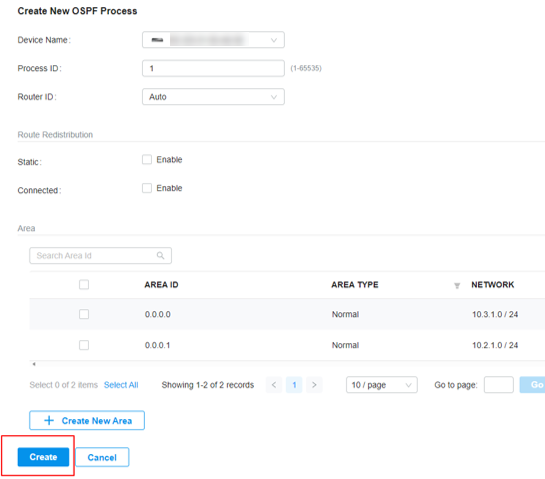
Go to Settings – Transmission – Switch OSPF – OSPF Process, click Create New OSPF Process to create an OSPF process.

Select Switch B in Device Name, enter Process ID and Router ID, the Router ID can be set automatically or configured manually.

Click Create New Area, fill in 0.0.0.0 for Area ID, select Normal for Area Type, click Add Network, enter 10.3.1.0/24, and click Confirm to create OSPF Area 0 and network 10.3.1.0/24 subnet.
Please note that the controller supports configuration of Stub Area and NSSA Area on demand, and the area type of the backbone area (area 0) must be Normal.

Click Create New Area again, fill in 0.0.0.1 for Area ID, select Normal for Area Type, click Add Network, enter 10.2.1.0/24, and click Confirm to create OSPF Area 1 and network 10.2.1.0/24 sunbet.
Then click Create to complete the configuration distribution.

Configure the other three swithes according to your topology referring to the previous configuration process.
4. Optional Features.
The above example can already meet the basic needs of OSPF, the controller can also configure the following OSPF options.
- Option 1—Route Redistribution
On the Create New OSPF Process or Edit OSPF Process page, you can configure Route Redistribution to add static or directly connected routes.

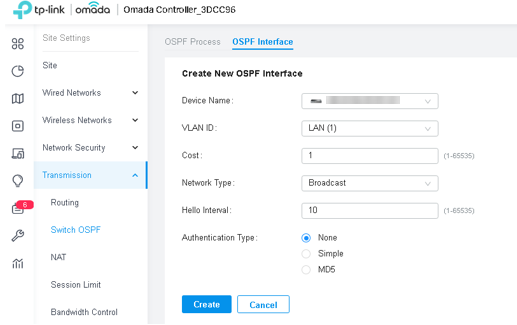
- Option 2—OSPF Interface parameters
In the OSPF Interface page, you can configure the interface parameters of OSPF, such as Cost, Network Type, Hello Interval, Authentication Type, etc. If not necessary, it is recommended to keep the default configuration, otherwise it may lead to network failure.

For more detailed information on features and CLIs, check the CLI Guide and User Guide.


