Hướng dẫn cấu hình Optical Line Terminal (OLT) và Switch Omada với thiết bị XM60A
Bài viết này áp dụng cho tất cả các sản phẩm GPON OLT và tất cả các Switch Omada có cổng quang.
1. Kịch bản ứng dụng
Một khu căn hộ muốn sử dụng thiết bị XM60A để cho phép các thiết bị Omada truy cập vào OLT nhằm thiết lập mạng và triển khai linh hoạt.
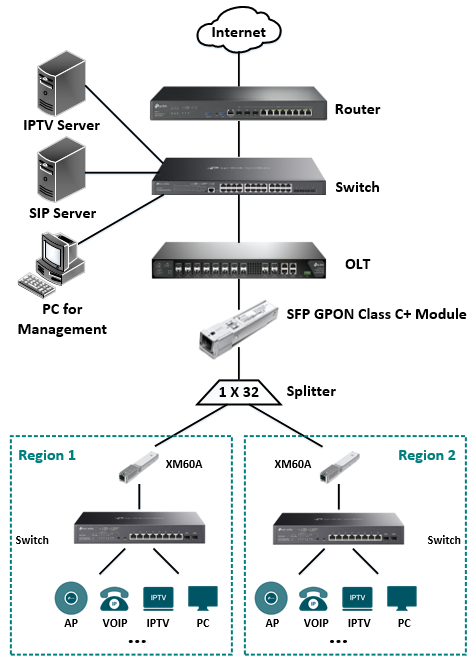
Họ có các yêu cầu sau trong ví dụ này:
- Các switch kết nối với XM60A được triển khai ở từng khu vực và kết nối vào mạng GPON. Sau khi đăng ký thành công, các switch này cần có khả năng giao tiếp với OLT thông qua mạng GPON.
- Người dùng có nhiều dịch vụ bao gồm: dịch vụ Internet, dịch vụ VOIP và dịch vụ IPTV. Các loại lưu lượng khác nhau cần được quản lý riêng biệt bằng các VLAN khác nhau.
2. Phương án cấu hình
2.1 Định nghĩa các VLAN
- VLAN 01: Dùng cho quản lý
- VLAN 10: Dùng cho Internet
- VLAN 20: Dùng cho VOIP
- VLAN 30: Dùng cho IPTV
2.2 Ý tưởng cấu hình
Để đáp ứng các yêu cầu trên, chúng tôi đưa ra các bước cấu hình sau:
- Cấu hình hồ sơ DBA (DBA Profile)
- Cấu hình hồ sơ tuyến (Line Profile)
- Đăng ký ONU
- Cấu hình các cổng dịch vụ (Service Port) để phân luồng dịch vụ
- Cấu hình VLAN
- Cấu hình IGMP Snooping cho dịch vụ IPTV
Trong ví dụ minh họa này, chúng tôi sẽ sử dụng một ONU (XM60A) được kết nối vào cổng PON số 1 của OLT để làm ví dụ cấu hình. Các bước cấu hình cho những ONU khác cũng sẽ tương tự.
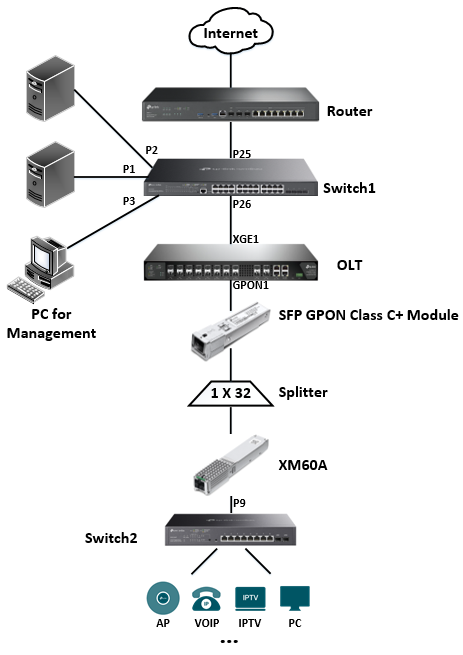
3. Cấu hình OLT & Switch ở chế độ Standalone
3.1 Cấu hình hồ sơ DBA
Hồ sơ DBA (Phân bổ băng thông động – Dynamically Bandwidth Allocation) mô tả các tham số lưu lượng upstream (chiều lên) trong mạng GPON.
Một T-Cont sẽ được gán với một hồ sơ DBA để phân bổ băng thông động, giúp tối ưu hóa hiệu suất sử dụng băng thông chiều lên. Chúng ta sẽ tạo hồ sơ DBA này trong phần cấu hình hồ sơ tuyến (line profile) ở bước sau. Thông tin chi tiết hơn về T-Cont sẽ được trình bày ở mục 3.2.
Dưới đây là mô tả chi tiết về một số loại hồ sơ DBA:
|
Loại |
Mô tả |
|
Fix |
Hồ sơ DBA này thuộc loại băng thông cố định (fixed bandwidth). Băng thông cố định này được dành riêng cho một ONU cụ thể hoặc một số dịch vụ nhất định trên ONU đó. Băng thông này sẽ không thể được sử dụng cho các ONU khác, ngay cả khi ONU đó không truyền lưu lượng chiều lên. Loại băng thông này chủ yếu được sử dụng cho các dịch vụ yêu cầu QoS cao, chẳng hạn như TDM và VoIP. |
|
Assure |
Hồ sơ DBA này thuộc loại băng thông đảm bảo (assured bandwidth). Băng thông đảm bảo là phần băng thông sẵn có dành cho một ONU khi ONU đó có nhu cầu sử dụng. Khi lưu lượng dịch vụ thực tế không sử dụng hết băng thông đảm bảo, cơ chế DBA trên thiết bị sẽ được sử dụng để phân bổ phần băng thông còn lại cho các dịch vụ của những ONU khác. Do cơ chế DBA cho phép chia sẻ băng thông còn lại giữa các ONU, băng thông đảm bảo có hiệu suất thời gian thực kém hơn so với băng thông cố định. |
|
Assure+Max |
Hồ sơ DBA này thuộc loại băng thông đảm bảo + băng thông tối đa (assured bandwidth + maximum bandwidth). Đây là loại băng thông kết hợp. Khi sử dụng loại này, người dùng sẽ được cấp một phần băng thông cố định và đồng thời có thể sử dụng thêm một phần băng thông chia sẻ. Tuy nhiên, tổng băng thông sử dụng sẽ không vượt quá giới hạn băng thông tối đa đã được cấu hình cho người dùng. Loại băng thông này chủ yếu được sử dụng cho các dịch vụ VoIP và IPTV. |
|
Max |
Hồ sơ DBA này thuộc loại băng thông tối đa (maximum bandwidth). Đây là loại băng thông tối đa mà một ONU có thể sử dụng, nhằm đáp ứng nhu cầu băng thông của ONU ở mức cao nhất có thể. Loại băng thông này thường được sử dụng cho các dịch vụ như truy cập Internet. |
|
Fix+Assure+Max |
Hồ sơ DBA thuộc loại băng thông cố định + băng thông đảm bảo + băng thông tối đa (fixed bandwidth + assured bandwidth + maximum bandwidth). Đây là loại băng thông kết hợp tổng hợp. Khi sử dụng loại này:
Tuy nhiên, tổng băng thông sử dụng không được vượt quá giới hạn băng thông tối đa đã cấu hình cho người dùng. |
|
|
|
Vào PON > Profile > DBA, sau đó nhấn +Add để cấu hình các hồ sơ DBA dựa theo yêu cầu của từng dịch vụ.

3.2 Cấu hình Line Profile
Trong Line Profile, chúng ta sẽ tạo T-CONTs, các cổng GEM, và các quy tắc ánh xạ GEM.
- T-CONT (Transmission Container): Hoạt động như một "đường hầm" chứa nhiều cổng GEM.
T-CONT chủ yếu được sử dụng như một đơn vị để truyền dữ liệu chiều lên. Việc sử dụng T-CONT nhằm giải quyết bài toán phân bổ băng thông chiều lên một cách linh hoạt, giúp nâng cao hiệu suất sử dụng đường truyền. - Cổng GEM (GEM Port): Là đơn vị mang dịch vụ nhỏ nhất trong GPON (GPON Encapsulation Mode).
Các cổng GEM có thể được ánh xạ linh hoạt vào các T-CONT. Một cổng GEM có thể ánh xạ vào một T-CONT, và nhiều cổng GEM cũng có thể ánh xạ vào cùng một T-CONT. - Quy tắc ánh xạ GEM (GEM Mapping Rule): Dịch vụ sẽ được ánh xạ vào cổng GEM theo các quy tắc ánh xạ, sau đó được ánh xạ tiếp đến T-CONT để truyền dữ liệu lên mạng.
Line Profile mô tả:
- Mối liên kết giữa T-CONT và hồ sơ DBA
- Chế độ QoS của luồng dữ liệu
- Ánh xạ giữa cổng GEM và dịch vụ phía ONU
3.2.1 Thao tác cấu hình
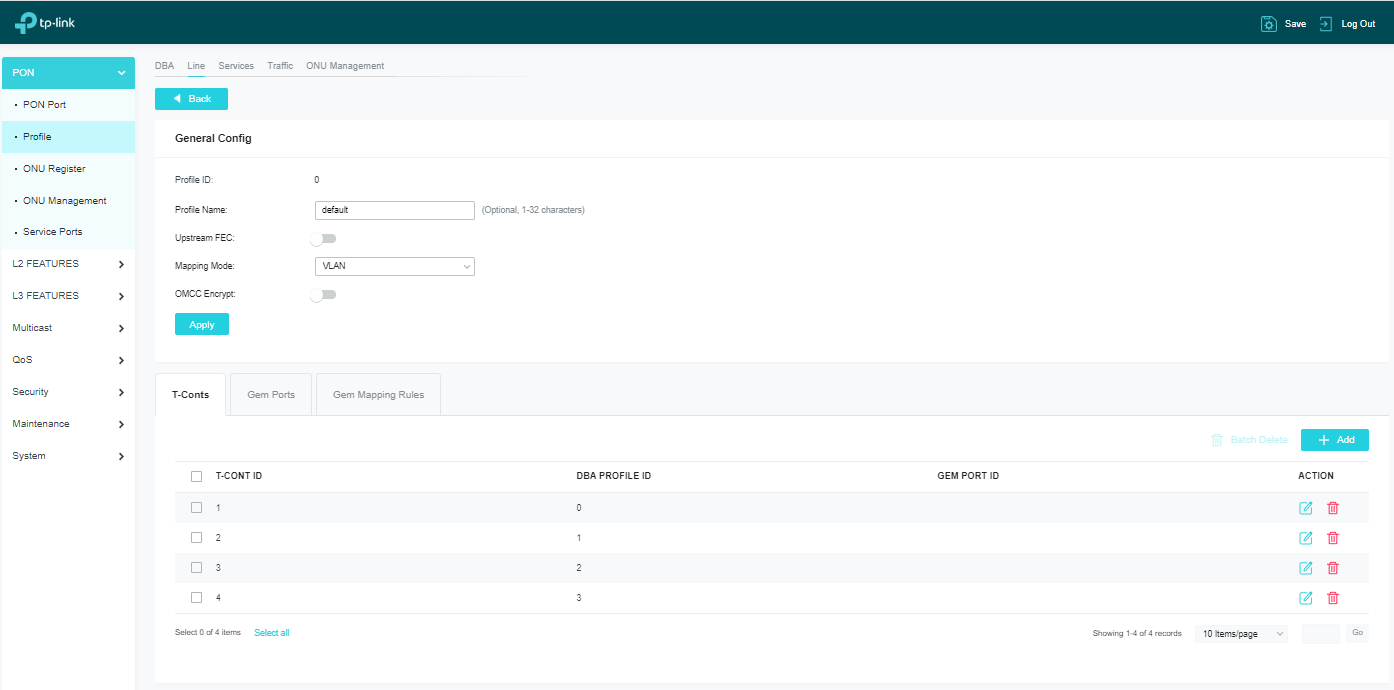
Vào PON > Profile > Line, sau đó nhấn Edit để cấu hình line profile 0.
Sau đó nhấn +Add trong mục T-Conts để tạo các T-CONT và gán chúng với các hồ sơ DBA tương ứng.
Gán T-CONT 1 với DBA profile 0, sau này chúng ta sẽ sử dụng T-CONT 1 cho VLAN quản lý (Management VLAN).
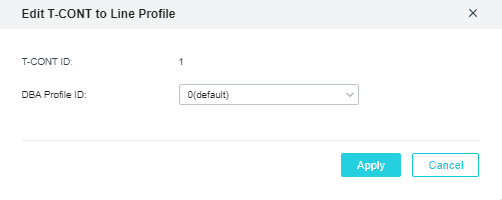
Gán T-CONT 2 với DBA profile 1, sau này chúng ta sẽ sử dụng T-CONT 2 cho VLAN Internet.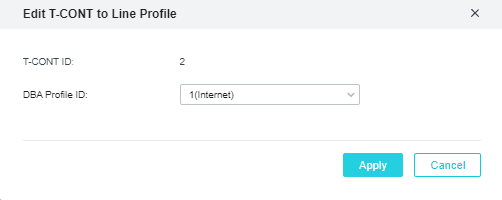
Gán T-CONT 3 với DBA profile 2, sau này chúng ta sẽ sử dụng T-CONT 3 cho VLAN VOIP.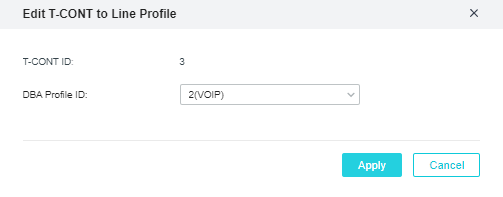
Gán T-CONT 4 với DBA profile 3, sau này chúng ta sẽ sử dụng T-CONT 4 cho VLAN IPTV.
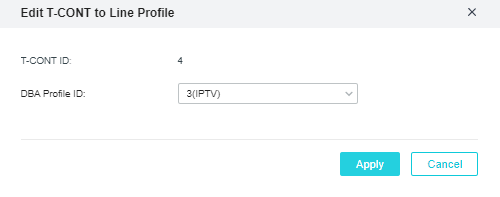
Đây là phần kết thúc của cấu hình các T-CONT.
3.2.2 Vào PON > Profile > Line > GEM Ports, sau đó nhấn +Add để tạo các cổng GEM và gán chúng với các T-CONT tương ứng.
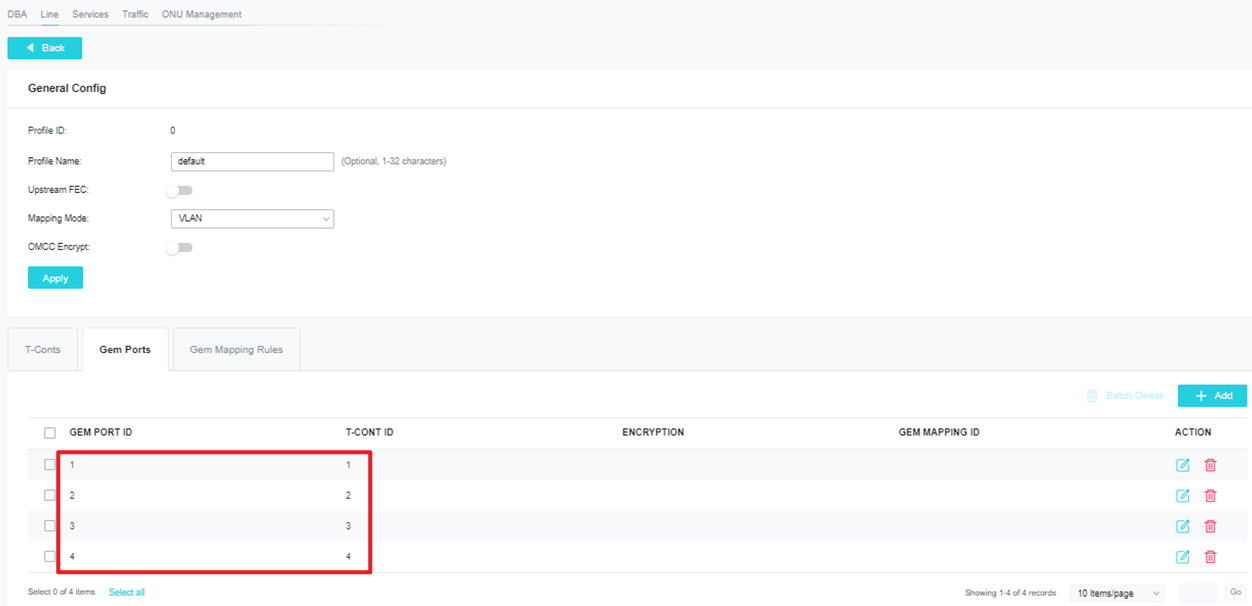
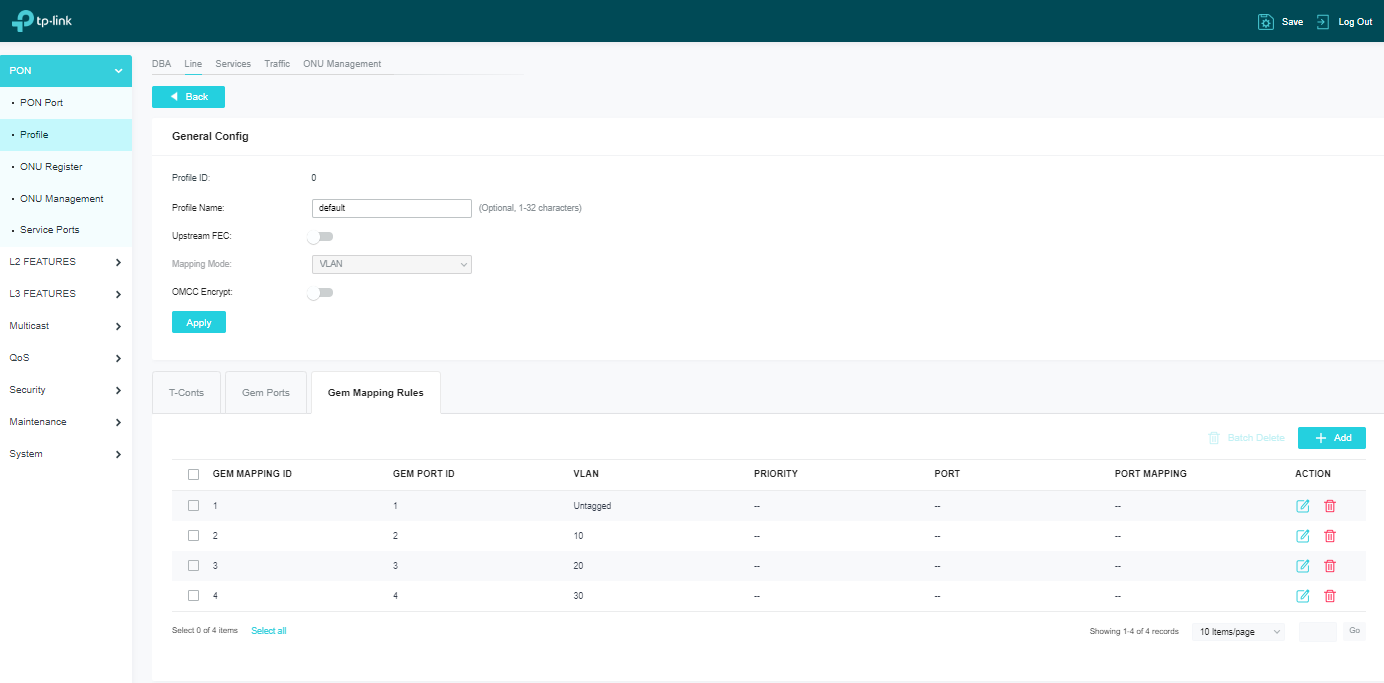
3.2.3 Vào PON > Profile > Line > GEM Mapping Rules, sau đó nhấn +Add để gán các dịch vụ với các cổng GEM tương ứng.
Gán VLAN Internet với cổng GEM số 2.
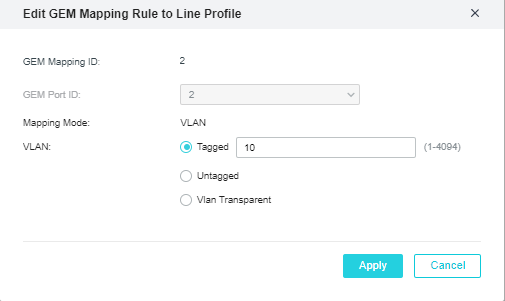
Gán VLAN VOIP với cổng GEM số 3.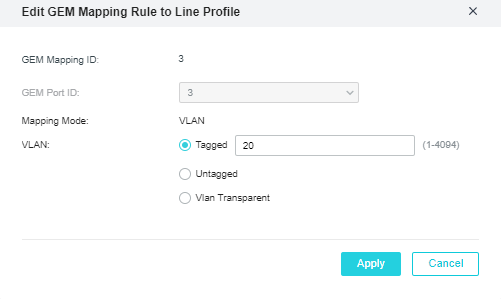
Gán VLAN IPTV với cổng GEM số 4.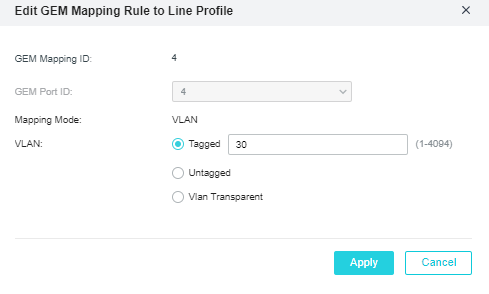
Đây là phần kết thúc của cấu hình các quy tắc ánh xạ GEM (GEM Mapping Rules).
3.3 Đăng ký ONU
Sau khi kết nối ONU vào mạng GPON, OLT sẽ tự động phát hiện ONU. Khi đó, bạn cần xác thực và đăng ký ONU. Ngoài ra, bạn cũng có thể thiết lập xác thực tự động cho các ONU.
Sau khi ONU được đăng ký, thiết bị sẽ lên tuyến (online) và có thể giao tiếp với OLT thông qua mạng GPON.
Chúng ta có ba phương pháp để xác thực và đăng ký ONU:
- Xác thực và đăng ký thủ công sau khi OLT phát hiện ONU
- Xác thực và đăng ký trước (trước khi ONU kết nối)
- Xác thực và đăng ký tự động theo lô (trước khi ONU được kết nối)
Trong bài viết này, chúng ta sử dụng phương pháp Xác thực Tự động (Auto-Authentication).
Thao tác cấu hình:
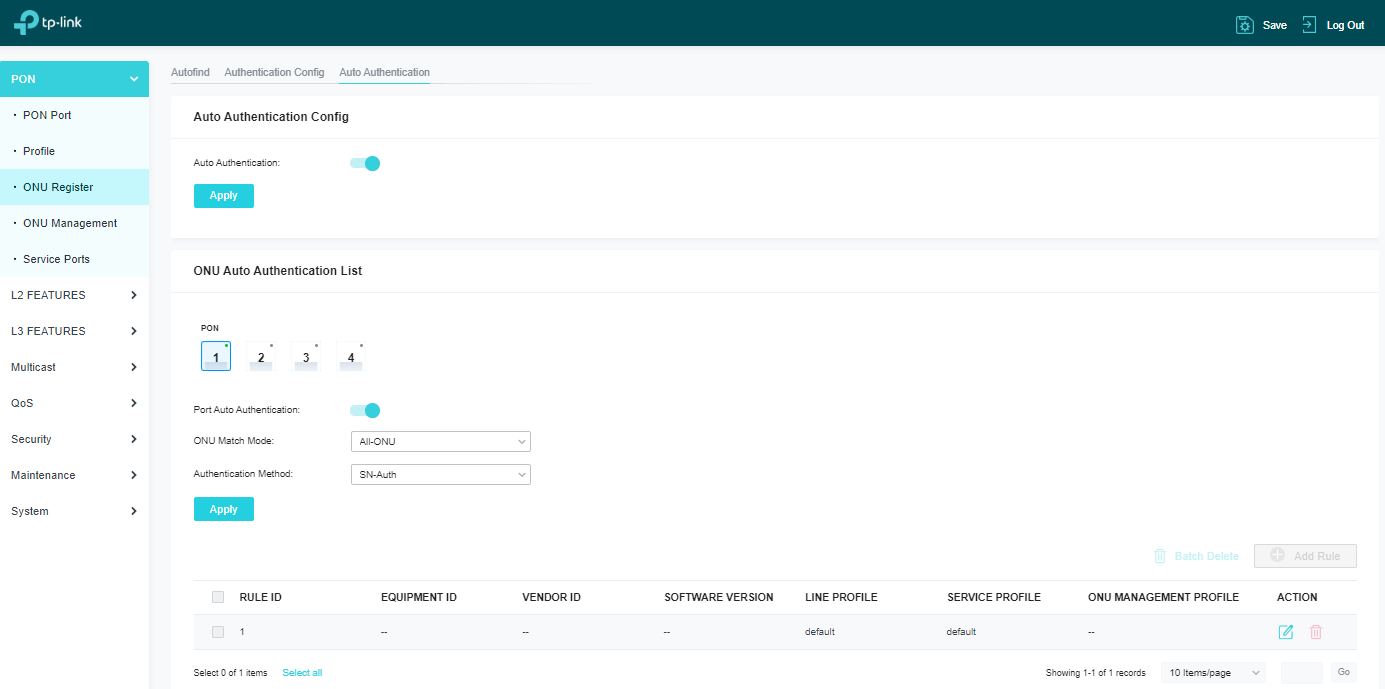
Vào PON > ONU Register > Auto Authentication, sau đó bật Auto Authentication trong mục Auto Authentication Config.
Sau đó, kích hoạt xác thực tự động cho cổng PON nơi ONU được kết nối và chọn phương thức xác thực là SN-Auth (xác thực theo số serial).
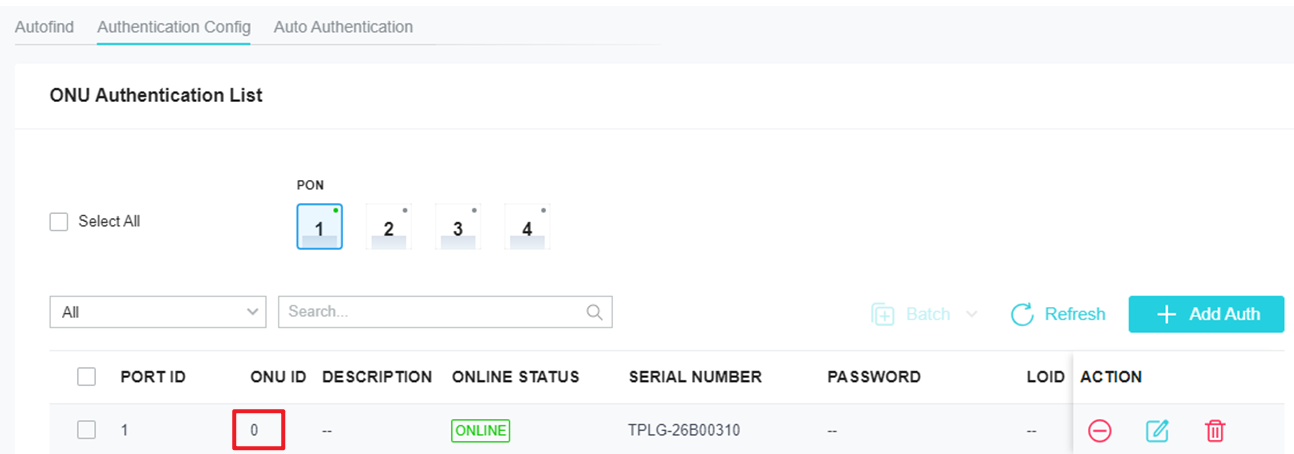
Sau khi xác thực thành công, vào PON > ONU Register > Authentication Config, kiểm tra ONU ID để phục vụ cho các bước cấu hình tiếp theo. Như bạn có thể thấy trong ví dụ này, ONU ID là 0.
3.4 Cấu hình Service Port cho luồng dịch vụ
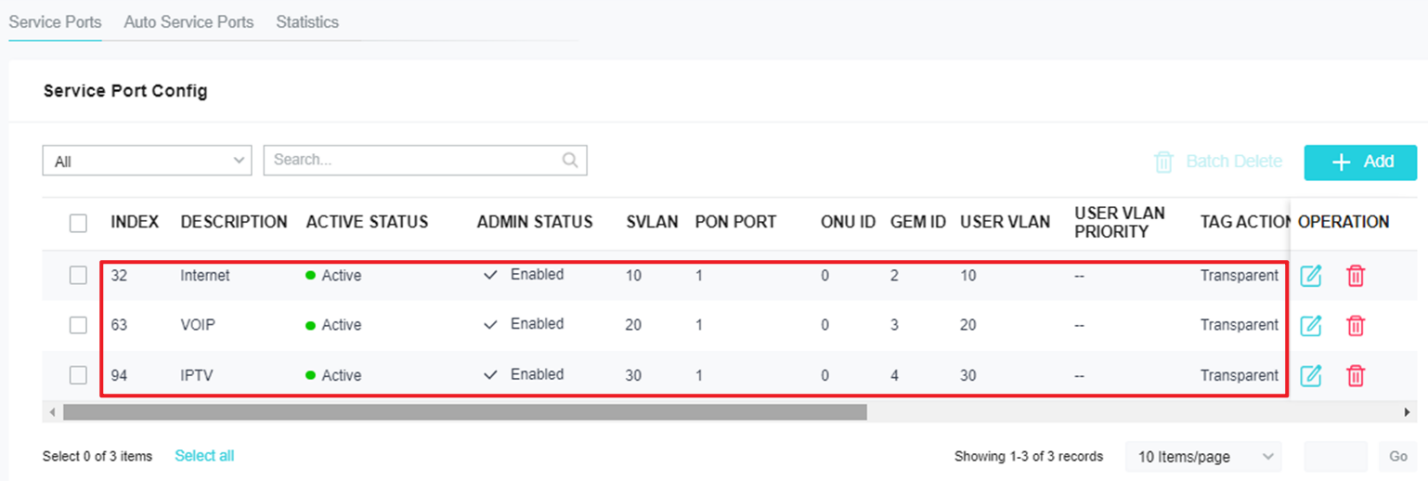
Cổng dịch vụ (Service Port) được sử dụng trên OLT để ánh xạ các loại lưu lượng khác nhau đến các SVLAN khác nhau, dựa theo cổng PON, ONU, cổng GEM và VLAN của người dùng (User VLAN), sau đó truyền tiếp lên mạng uplink.
Trong ví dụ này, chúng ta muốn:
- Lưu lượng Internet trong User VLAN 10 của GEM Port 2 được ánh xạ đến SVLAN 10
- Lưu lượng VOIP trong User VLAN 20 của GEM Port 3 được ánh xạ đến SVLAN 20
- Lưu lượng IPTV trong User VLAN 30 của GEM Port 4 được ánh xạ đến SVLAN 30
Đồng thời, chúng ta có thể áp dụng các hồ sơ lưu lượng (traffic profile) đã tạo trước đó, dựa trên loại lưu lượng tương ứng.
Thao tác cấu hình:
Vào PON > Service Ports > Service Ports, sau đó nhấn +Add để thiết lập kết nối giữa lưu lượng phía người dùng (CVLAN) và lưu lượng phía mạng trên (SVLAN).
Ở bước này, có thể để mặc định phần Traffic Profile.
Lưu ý:
Cần cấu hình TAG ACTION là "Transparent" tại đây.
Nếu giữ nguyên cấu hình mặc định, do tồn tại đồng thời cả VLAN người dùng (CVLAN) và VLAN dịch vụ (SVLAN), gói tin sẽ bị gắn 2 lớp thẻ VLAN (QinQ) khi ra cổng uplink. Điều này có thể khiến dữ liệu từ phía người dùng không đến được máy chủ.
3.5 Cấu hình VLAN
Switch 1:
Lấy ví dụ với SG3428X
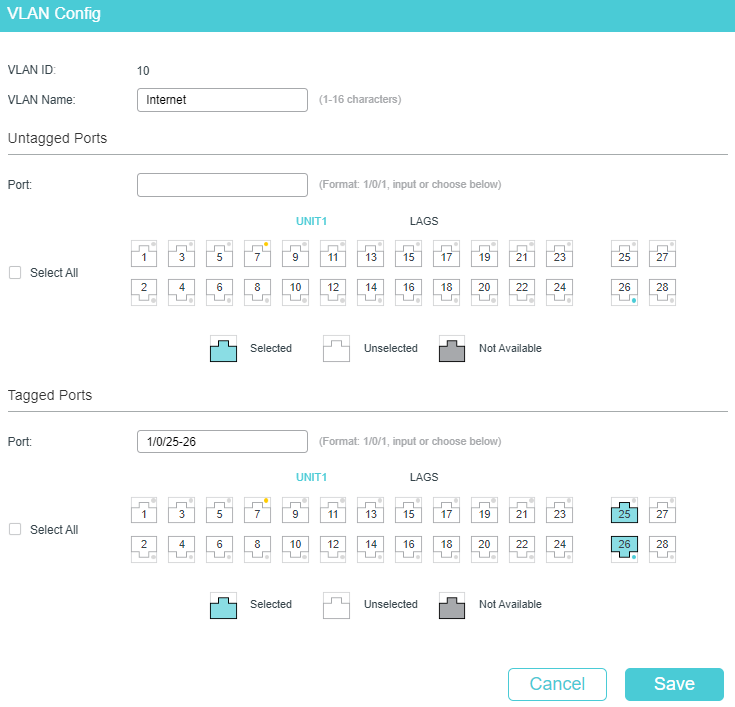
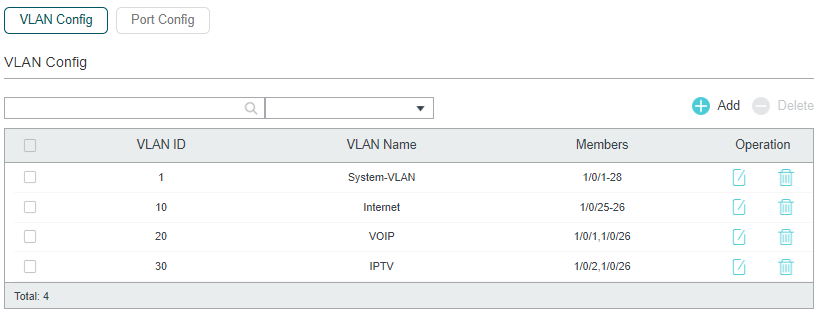
Vào L2 FEATURES > VLAN > 802.1Q VLAN, sau đó nhấn +Add để tạo VLAN 10.
Thêm các cổng kết nối với Router và OLT làm cổng tagged (trong ví dụ này là cổng 25 và cổng 26).
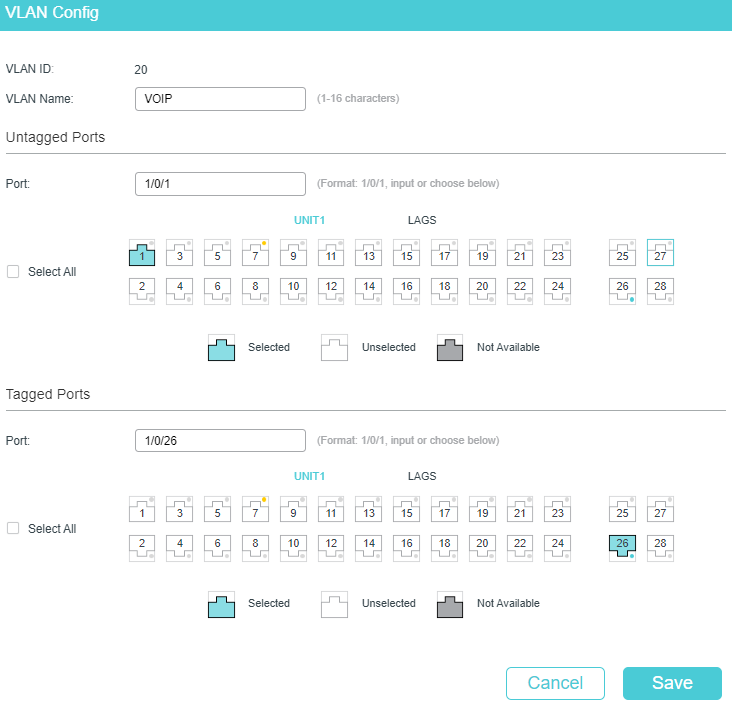
Tạo VLAN 20.
- Thêm cổng kết nối với OLT làm cổng tagged (trong ví dụ này là cổng 26)
- Thêm cổng kết nối với SIP Server làm cổng untagged (trong ví dụ này là cổng 1)
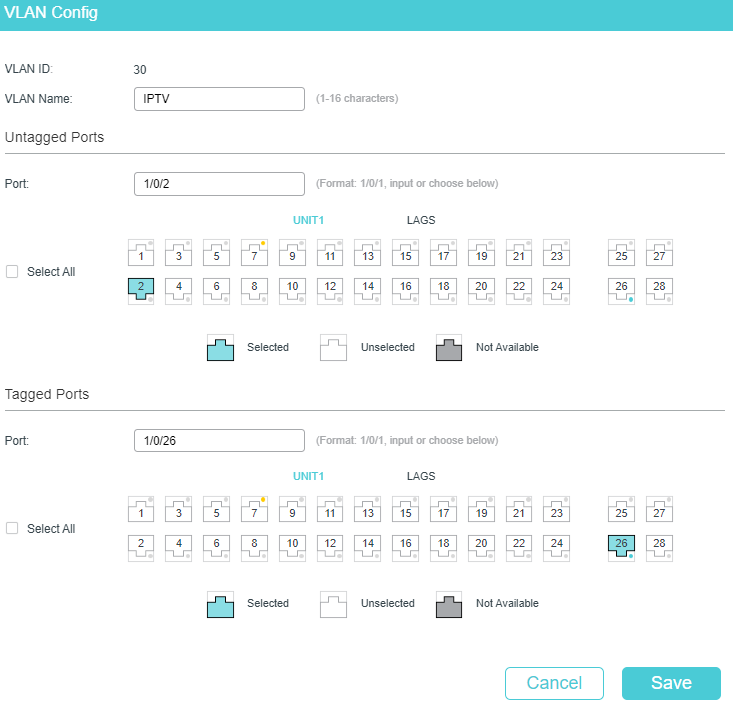
Tạo VLAN 30.
- Thêm cổng kết nối với OLT làm cổng tagged (trong ví dụ này là cổng 26)
- Thêm cổng kết nối với máy chủ IPTV làm cổng untagged (trong ví dụ này là cổng 2)
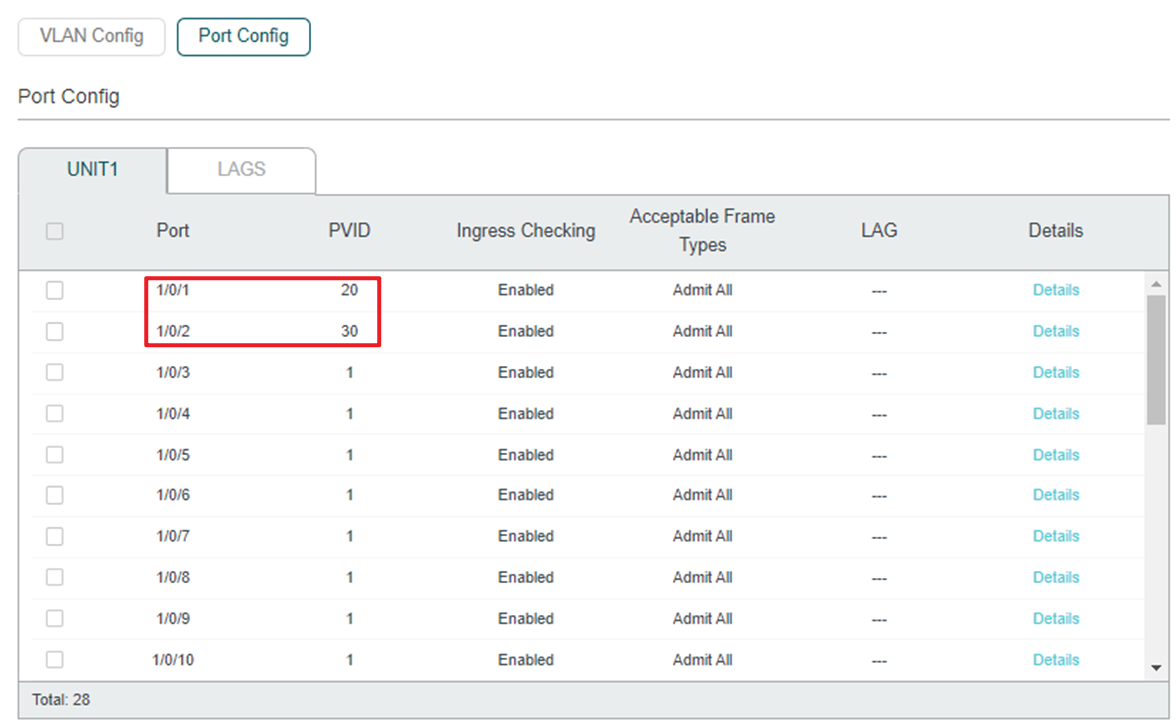
Cấu hình PVID tương ứng cho các cổng kết nối với SIP Server và IPTV Server.
- Gán PVID 20 cho cổng kết nối với SIP Server
- Gán PVID 30 cho cổng kết nối với IPTV Server
Đối với cổng 3, nơi kết nối với máy tính quản lý, không cần cấu hình đặc biệt, chỉ cần giữ nguyên cấu hình mặc định để cổng này nằm trong VLAN 1.
Đây là phần kết thúc cấu hình VLAN trên Switch 1.
OLT:
Lấy ví dụ với thiết bị DS-P7001-04.
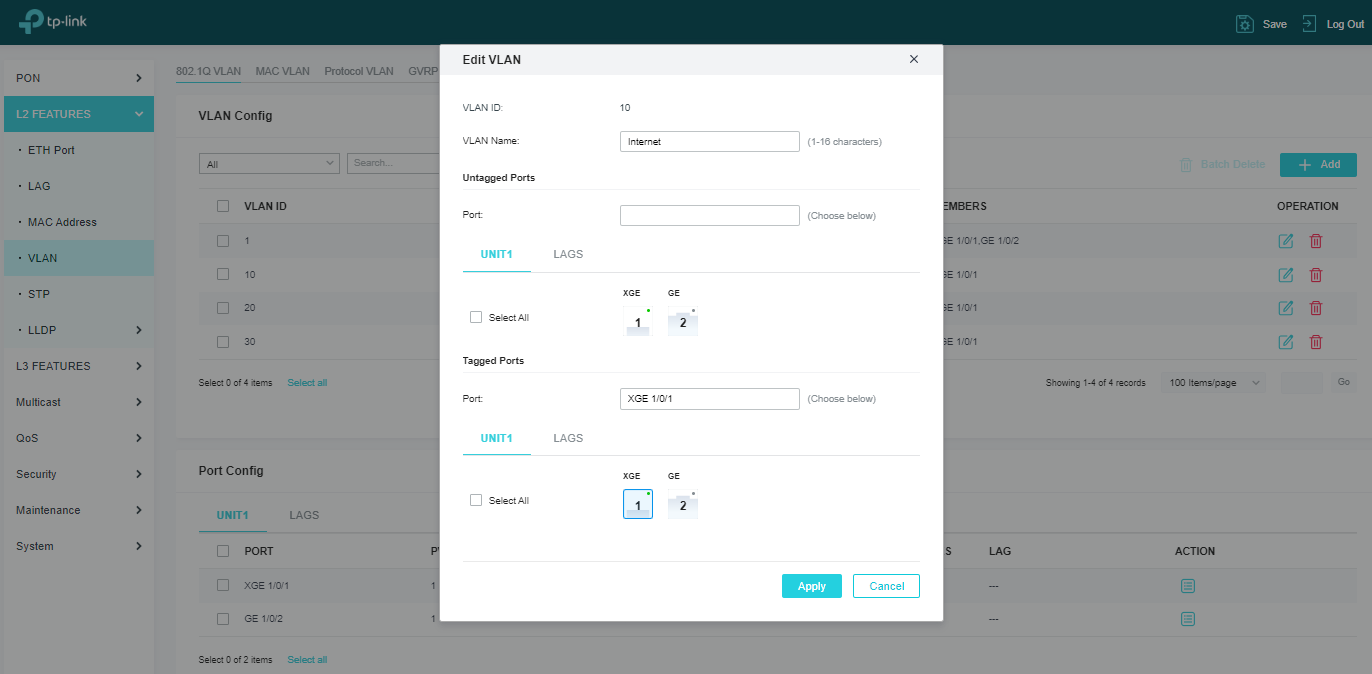
Vào L2 FEATURES > VLAN > 802.1Q VLAN.
Tại đây, VLAN tương ứng với các VLAN dịch vụ (Service VLAN), vì vậy chúng ta cần tạo số lượng VLAN tương ứng với số lượng VLAN dịch vụ hiện có.
Nhấn +Add để tạo VLAN 10, sau đó thêm cổng uplink làm cổng tagged (trong ví dụ này là cổng XGE 1).
Cấu hình VLAN 20 và thêm cổng uplink làm cổng tagged (trong ví dụ này là cổng XGE 1).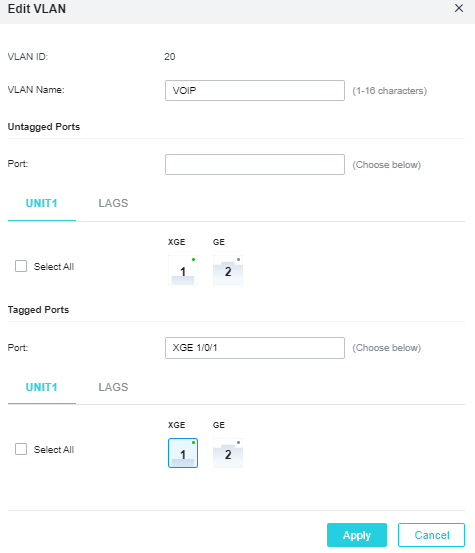
Cấu hình VLAN 30 và thêm cổng uplink làm cổng tagged (trong ví dụ này là cổng XGE 1).
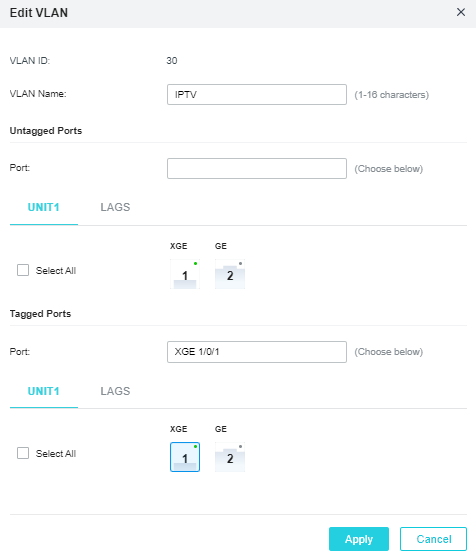
Đây là phần kết thúc cấu hình các VLAN trên OLT.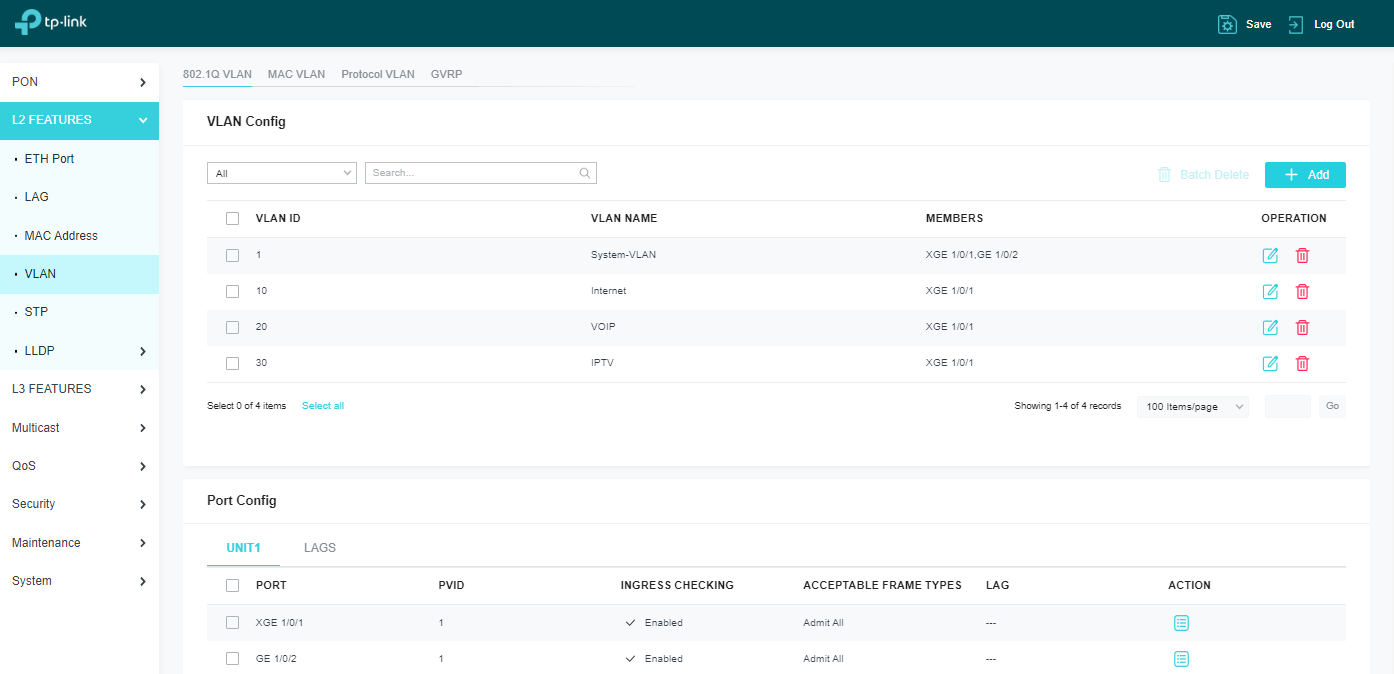
Switch 2:
Lấy ví dụ với thiết bị SG2210MP.
- Đối với EAP kết nối trực tiếp với switch, cấu hình cổng tương ứng là tagged trong VLAN, và giữ nguyên PVID mặc định.
- Đối với các thiết bị đầu cuối như VOIP/IPTV/PC… kết nối trực tiếp với switch, cấu hình cổng tương ứng là untagged trong VLAN, và gán PVID tương ứng cho cổng đó.
Vào L2 FEATURES > VLAN > 802.1Q VLAN, nhấn +Add để tạo VLAN 10.
- Thêm các cổng kết nối với EAP và OLT làm cổng tagged (trong ví dụ này là cổng 1 và cổng 9)
- Thêm cổng kết nối với máy tính (PC) làm cổng untagged (trong ví dụ này là cổng 2)
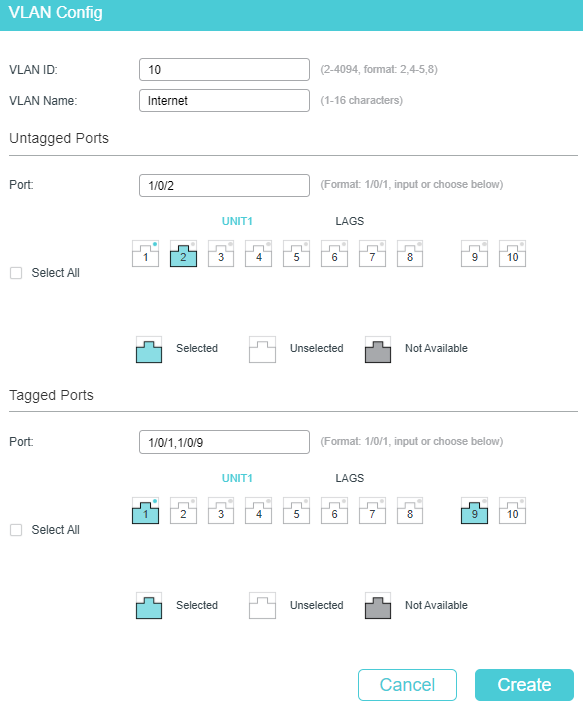
Tạo VLAN 20.
- Thêm cổng kết nối với OLT làm cổng tagged (trong ví dụ này là cổng 9)
- Thêm cổng kết nối với thiết bị VOIP làm cổng untagged (trong ví dụ này là cổng 3)
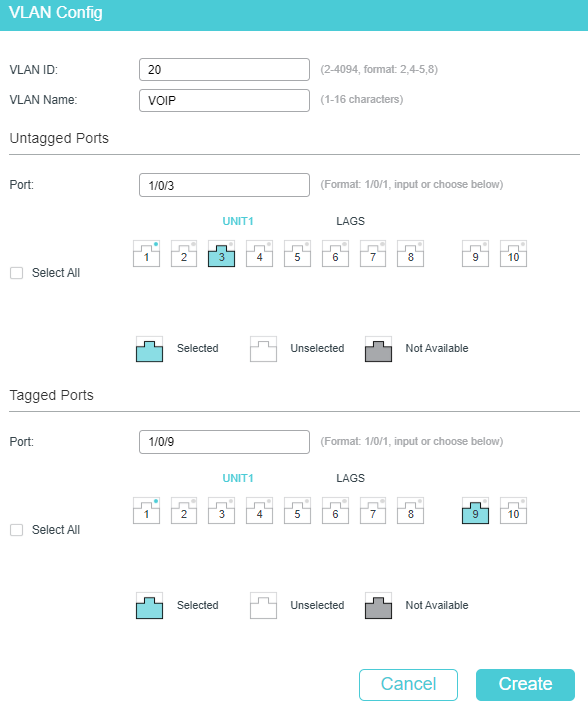
Tạo VLAN 30.
- Thêm cổng kết nối với OLT làm cổng tagged (trong ví dụ này là cổng 9)
- Thêm cổng kết nối với thiết bị IPTV làm cổng untagged (trong ví dụ này là cổng 4)
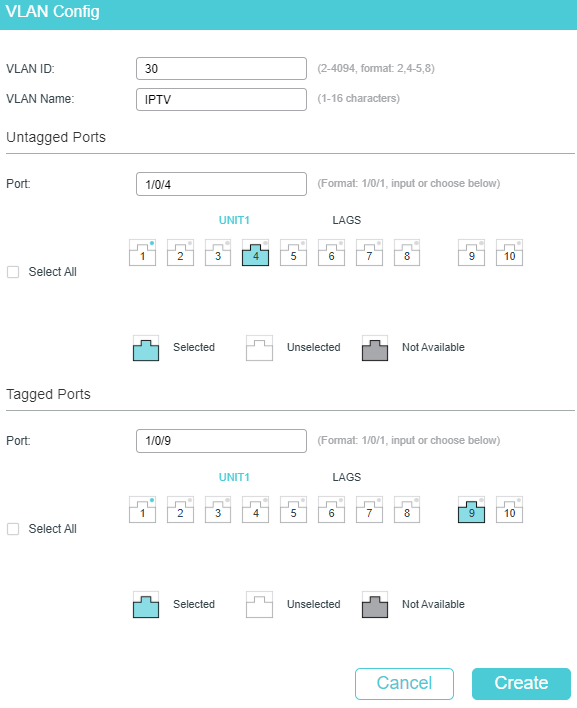
Cấu hình các PVID tương ứng cho các cổng kết nối với EAP, PC, VOIP và IPTV như sau:
- Gán PVID 10 cho cổng kết nối với EAP
- Gán PVID 10 cho cổng kết nối với PC
- Gán PVID 20 cho cổng kết nối với thiết bị VOIP
- Gán PVID 30 cho cổng kết nối với thiết bị IPTV
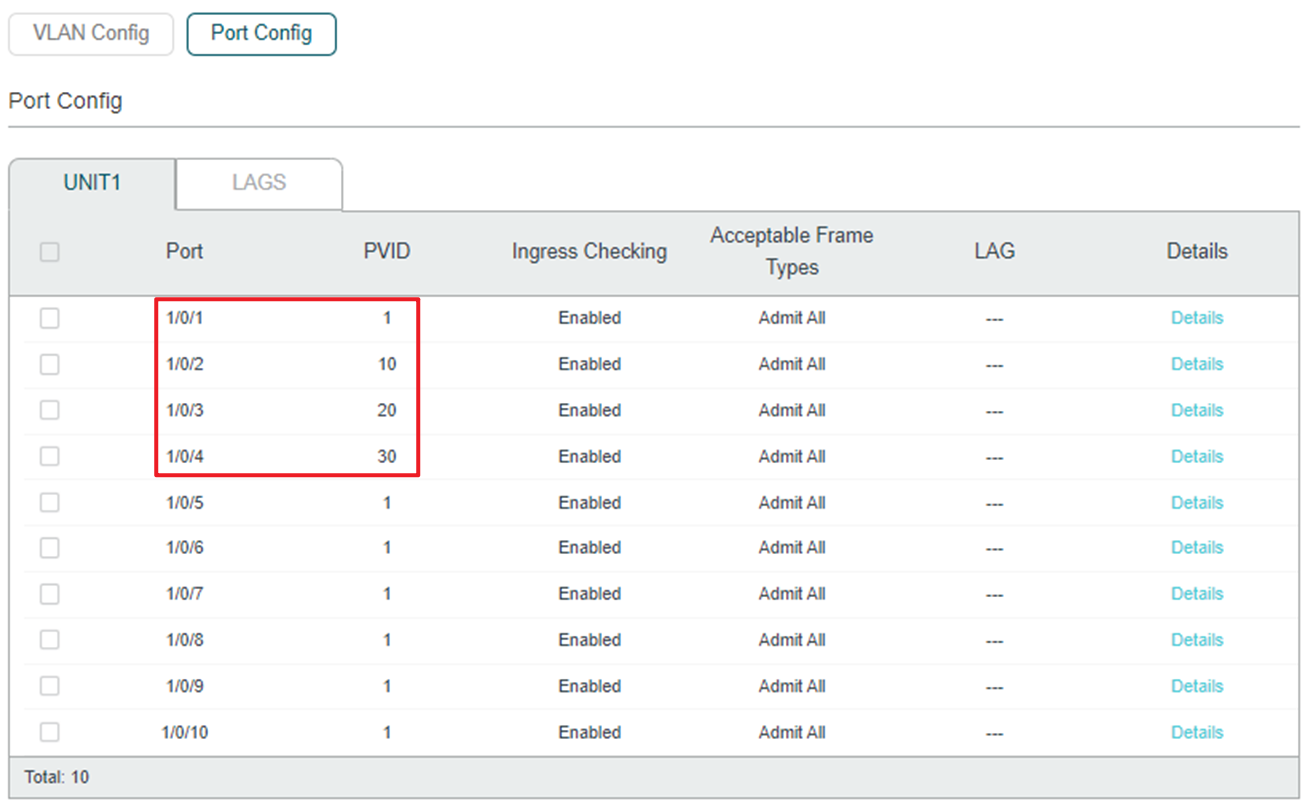
Đây là phần kết thúc cấu hình các VLAN trên Switch 2.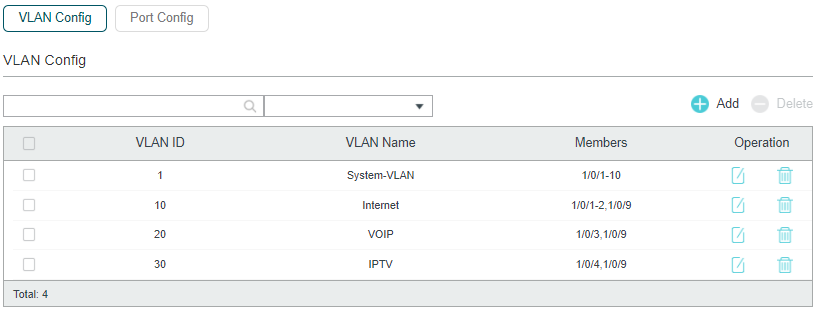
3.6 Cấu hình IGMP Snooping cho IPTV
Vào Multicast > IGMP Snooping > Global Config, sau đó bật IGMP Snooping trong phần Global Config.
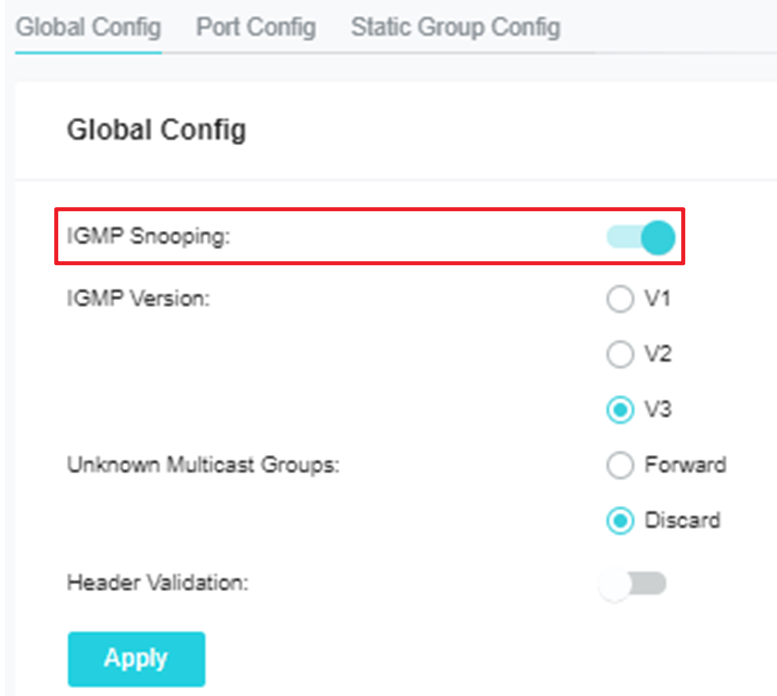
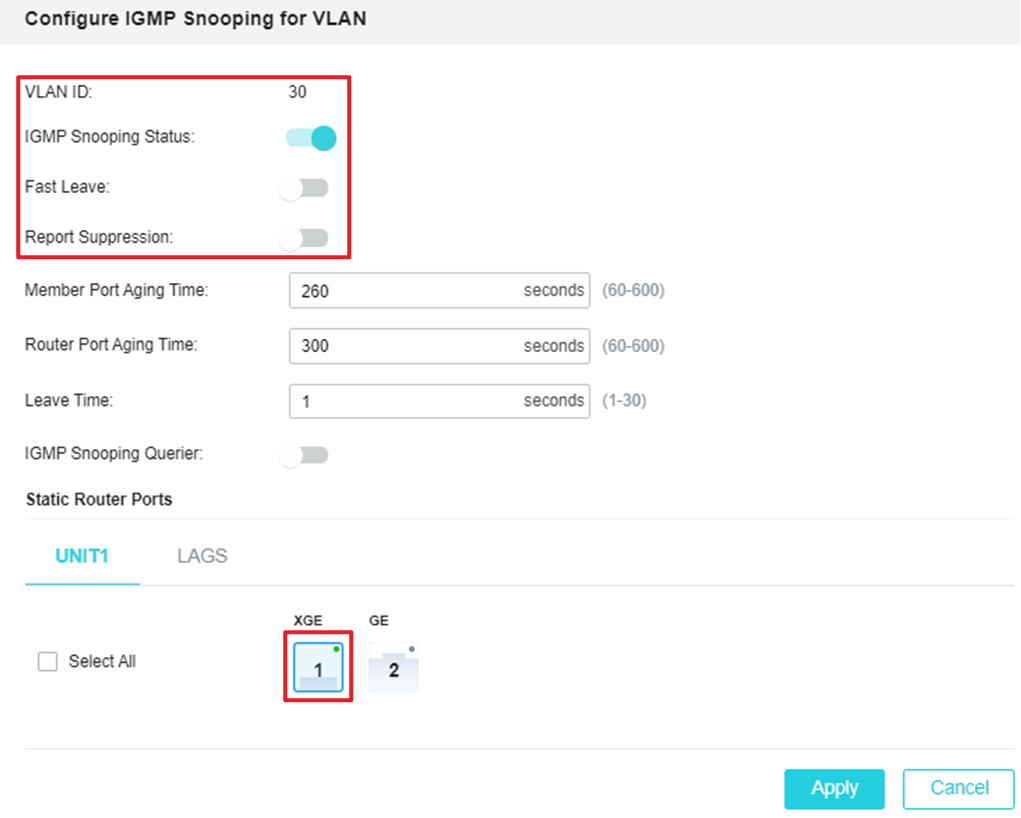
Bật IGMP Snooping cho VLAN IPTV trong mục IGMP VLAN Config và tắt cả hai tùy chọn Fast Leave và Report Suppression.
Thêm cổng uplink (trong ví dụ này là cổng XGE 1) làm cổng định tuyến tĩnh (static router port).
4. Cấu hình OLT trên Omada SDN Controller
Hỗ trợ cho một số thiết bị OLT đã được thêm vào từ phiên bản Omada SDN Controller 5.14.20 trở lên, ví dụ như DS-P7001-04 V1, DS-P7001-08 V1.10.
Lưu ý: Sau khi adopt (thêm) thiết bị OLT vào Omada Controller, cấu hình OLT sẽ không bị mất, tuy nhiên không thể cấu hình thiết bị OLT thông qua giao diện quản lý (GUI) của chính thiết bị nữa.
Các bước cấu hình:
- Xác định Site mà bạn muốn thêm thiết bị OLT vào.
Trên giao diện cấu hình Controller, chọn Site từ danh sách thả xuống trong phần Organization. - Vào mục Device, các thiết bị đã được Controller phát hiện sẽ hiển thị tại đây.
- Nhấn nút Adopt trong cột ACTION của thiết bị bạn muốn thêm vào Site.
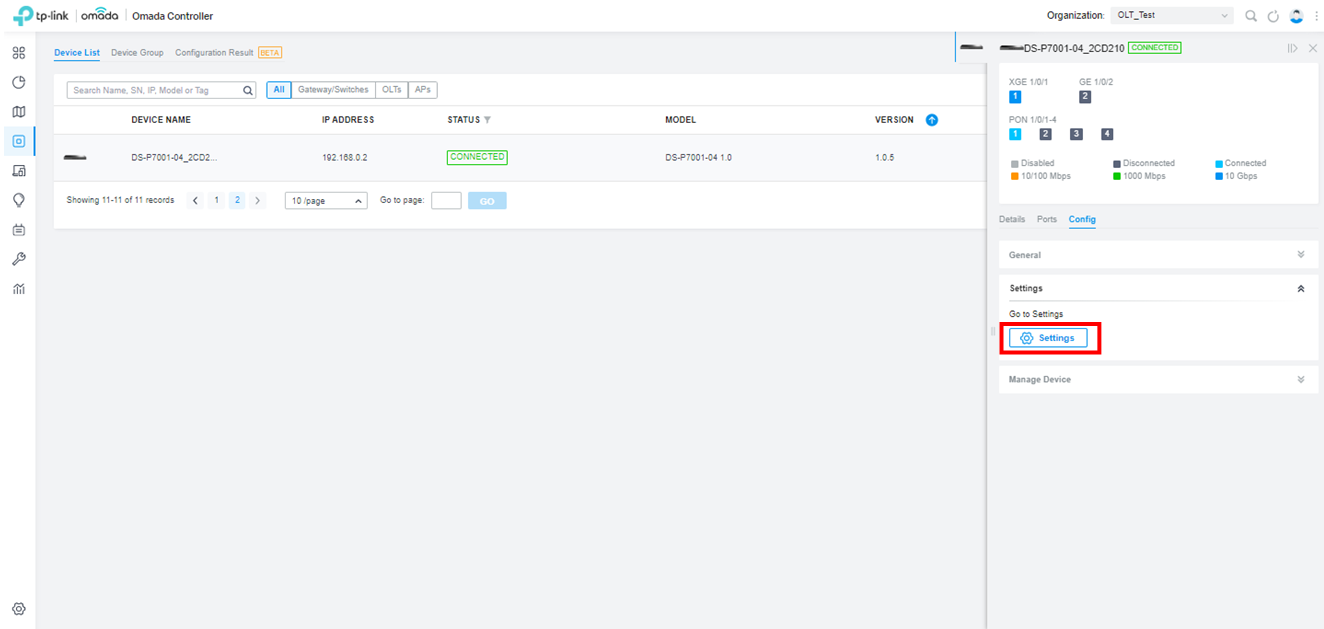
Chờ đến khi trạng thái (STATUS) chuyển sang "Connected" — khi đó thiết bị đã được Controller adopt thành công và thêm vào Site hiện tại. - Sau đó, trong cửa sổ Properties của thiết bị, nhấn Settings để cấu hình các tính năng OLT trong mục Config.
