


Contents
Introduction
Two-Factor Authentication (2FA) adds an extra layer of protection to your account by requiring a second verification step in addition to the password. Even if the password is compromised, unauthorized access can still be prevented through the additional verification process.
As a centralized network management platform, Omada Controller may be accessible through local networks, remote cloud access, or the Omada App. Enabling 2FA helps better protect your controller, devices, and network configurations from unauthorized login attempts.
Omada currently uses software token–based authentication for 2FA. After 2FA is enabled, users need to enter a time-based verification code generated by an authentication app during login.
Requirements
- Omada Software/Hardware/Cloud-Based Controller
- Omada APP
Configuration
In the Omada platform, 2FA may appear in different login scenarios. Depending on the account type and access method, the verification process can vary. This article explains the different 2FA mechanisms used in Omada and how to configure and use them properly.
Note: TOTP (Time-Based One-Time Password) generates verification codes based on the current time, and each code is only valid for a short period. Make sure the time on your mobile device is set correctly and synchronized automatically with the network. If the device time is inaccurate, the generated verification code may fail during authentication.
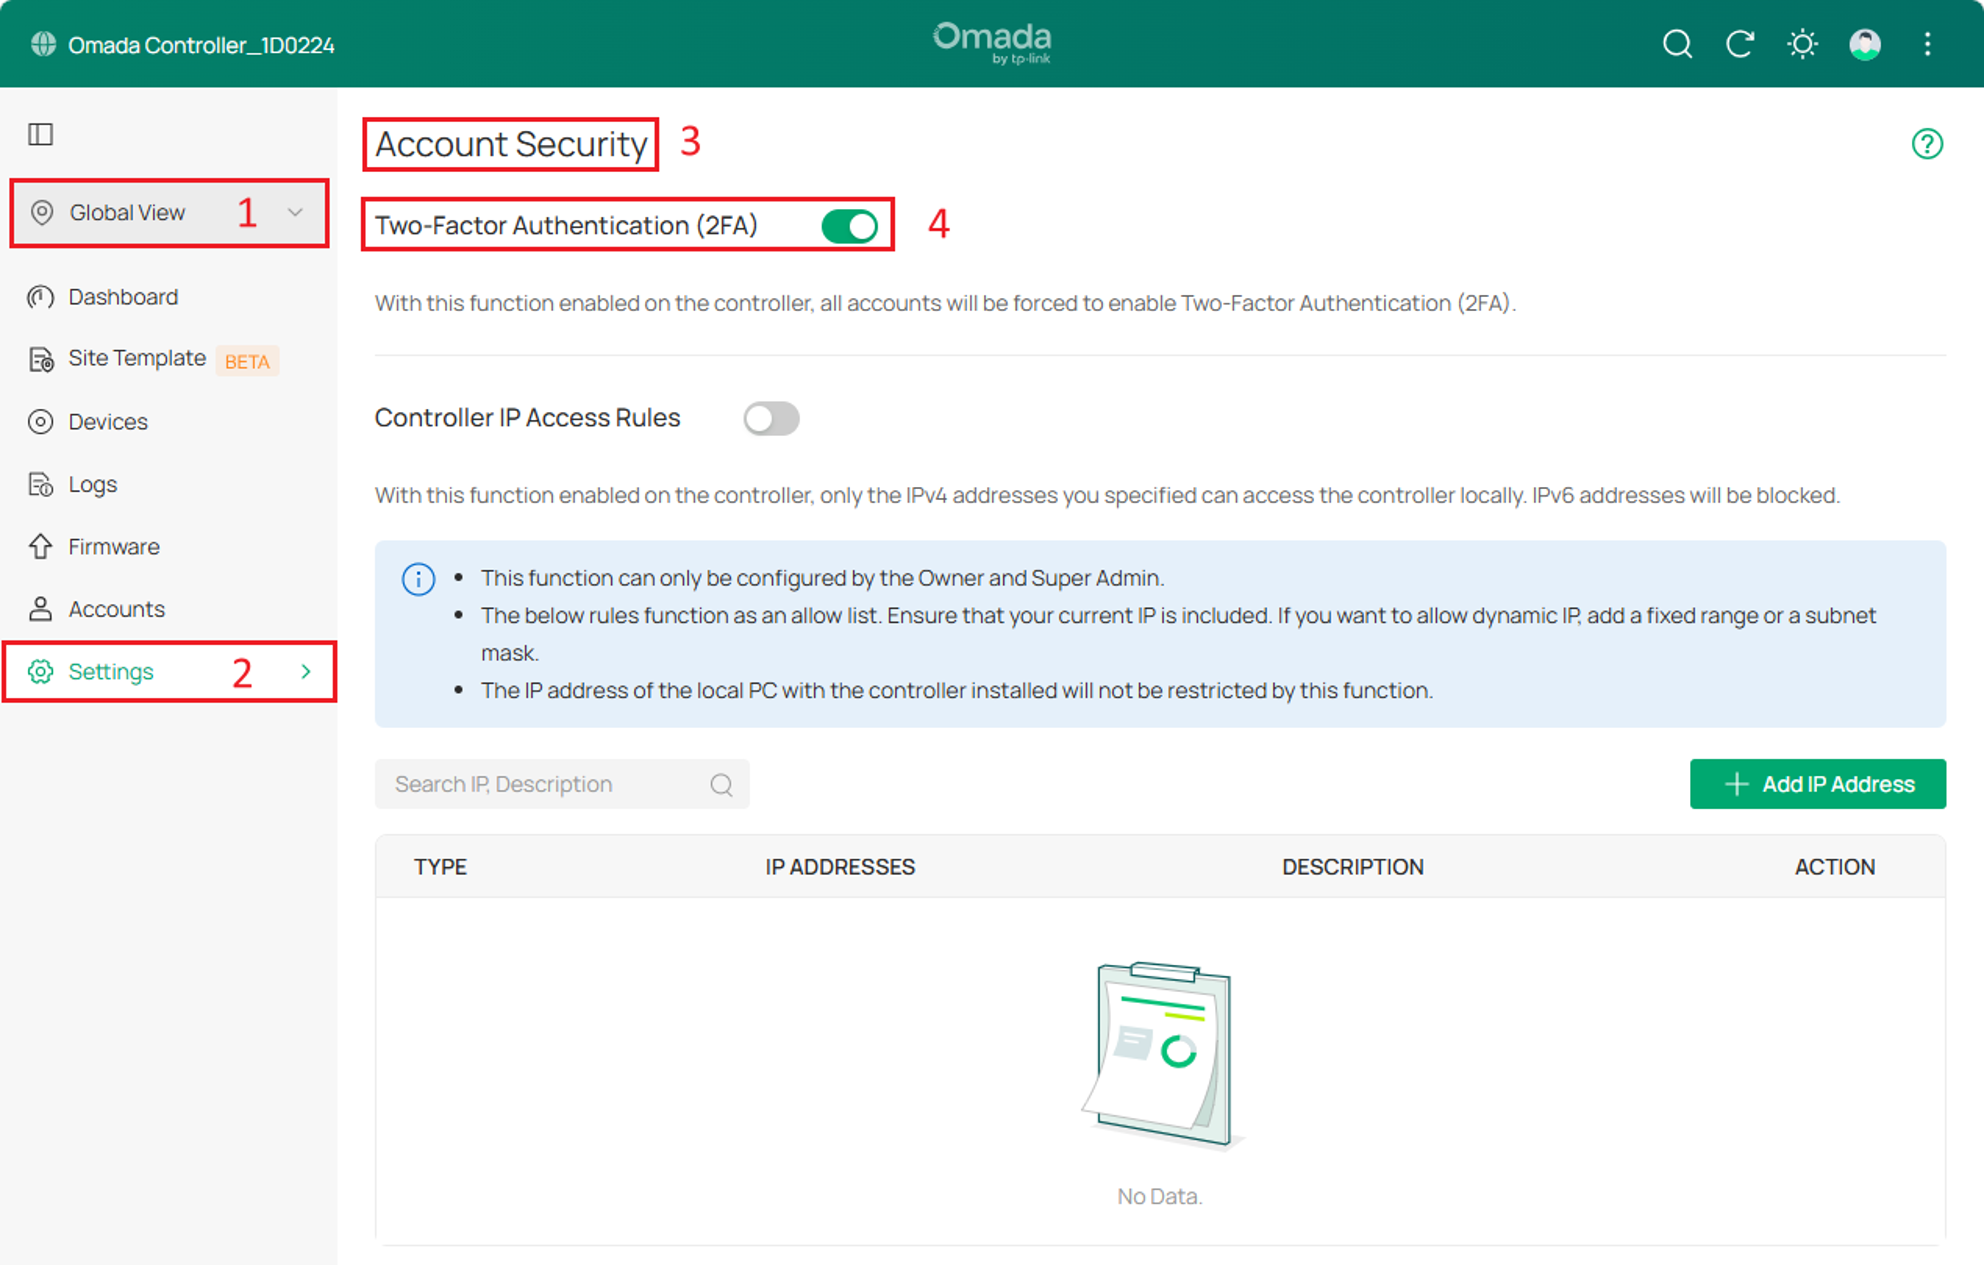
The Controller provides a 2FA option under Global View > Settings > Account Security. In general, if this option is enabled, all accounts (Includes Local User Account and Cloud User Account) must enable 2FA to log in to the Controller. Existing accounts that have not enable it will be guided through the login process.
For Local User Account
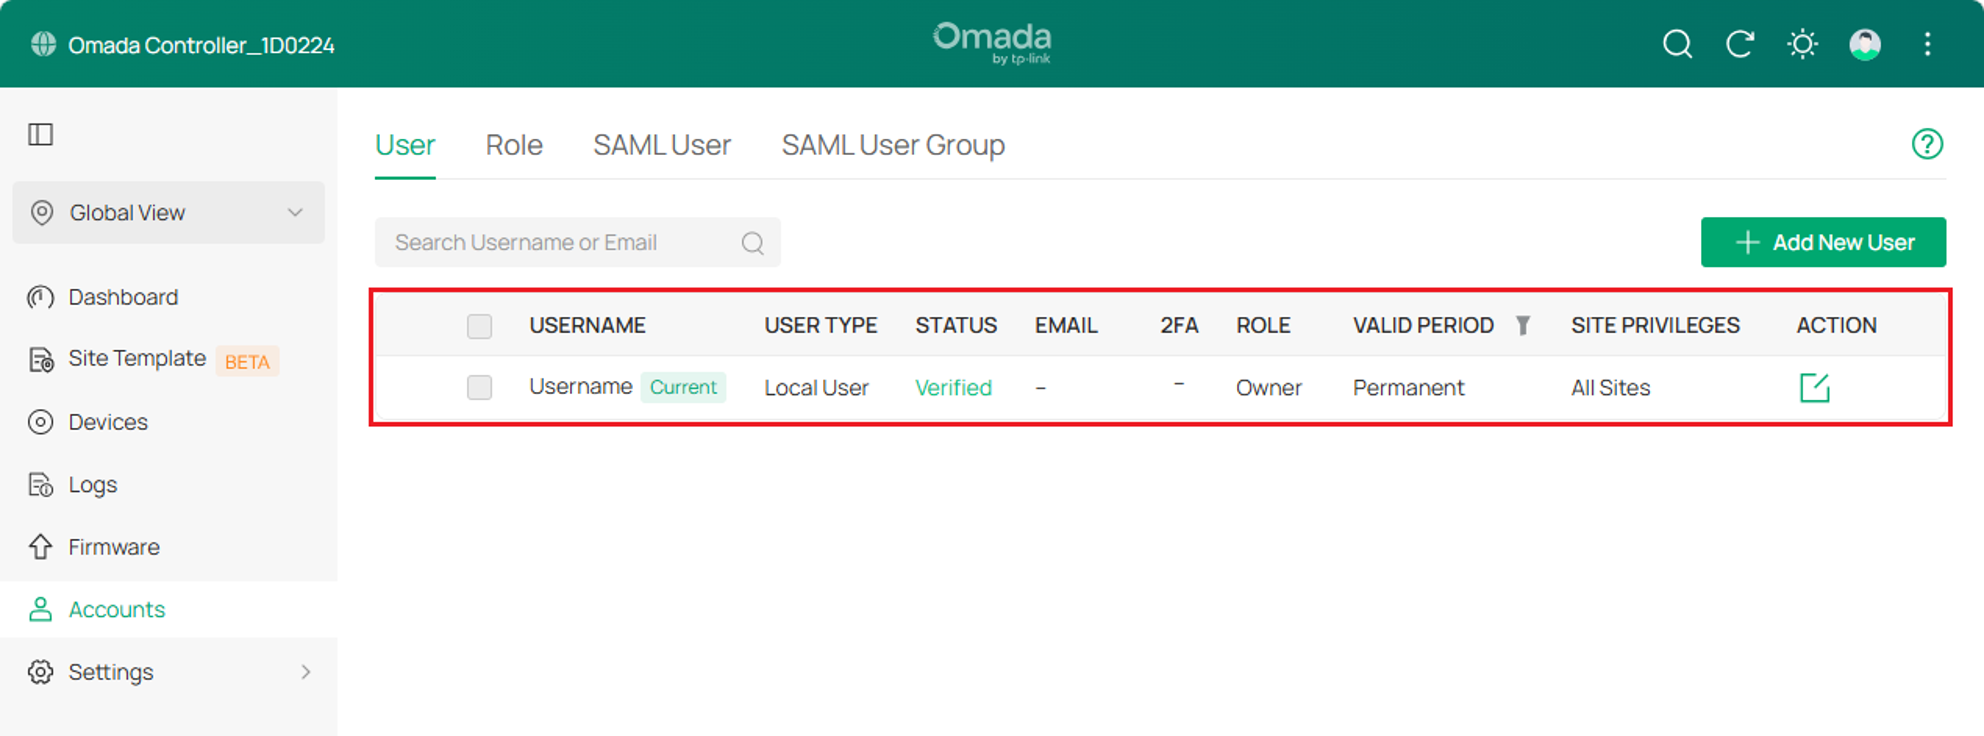
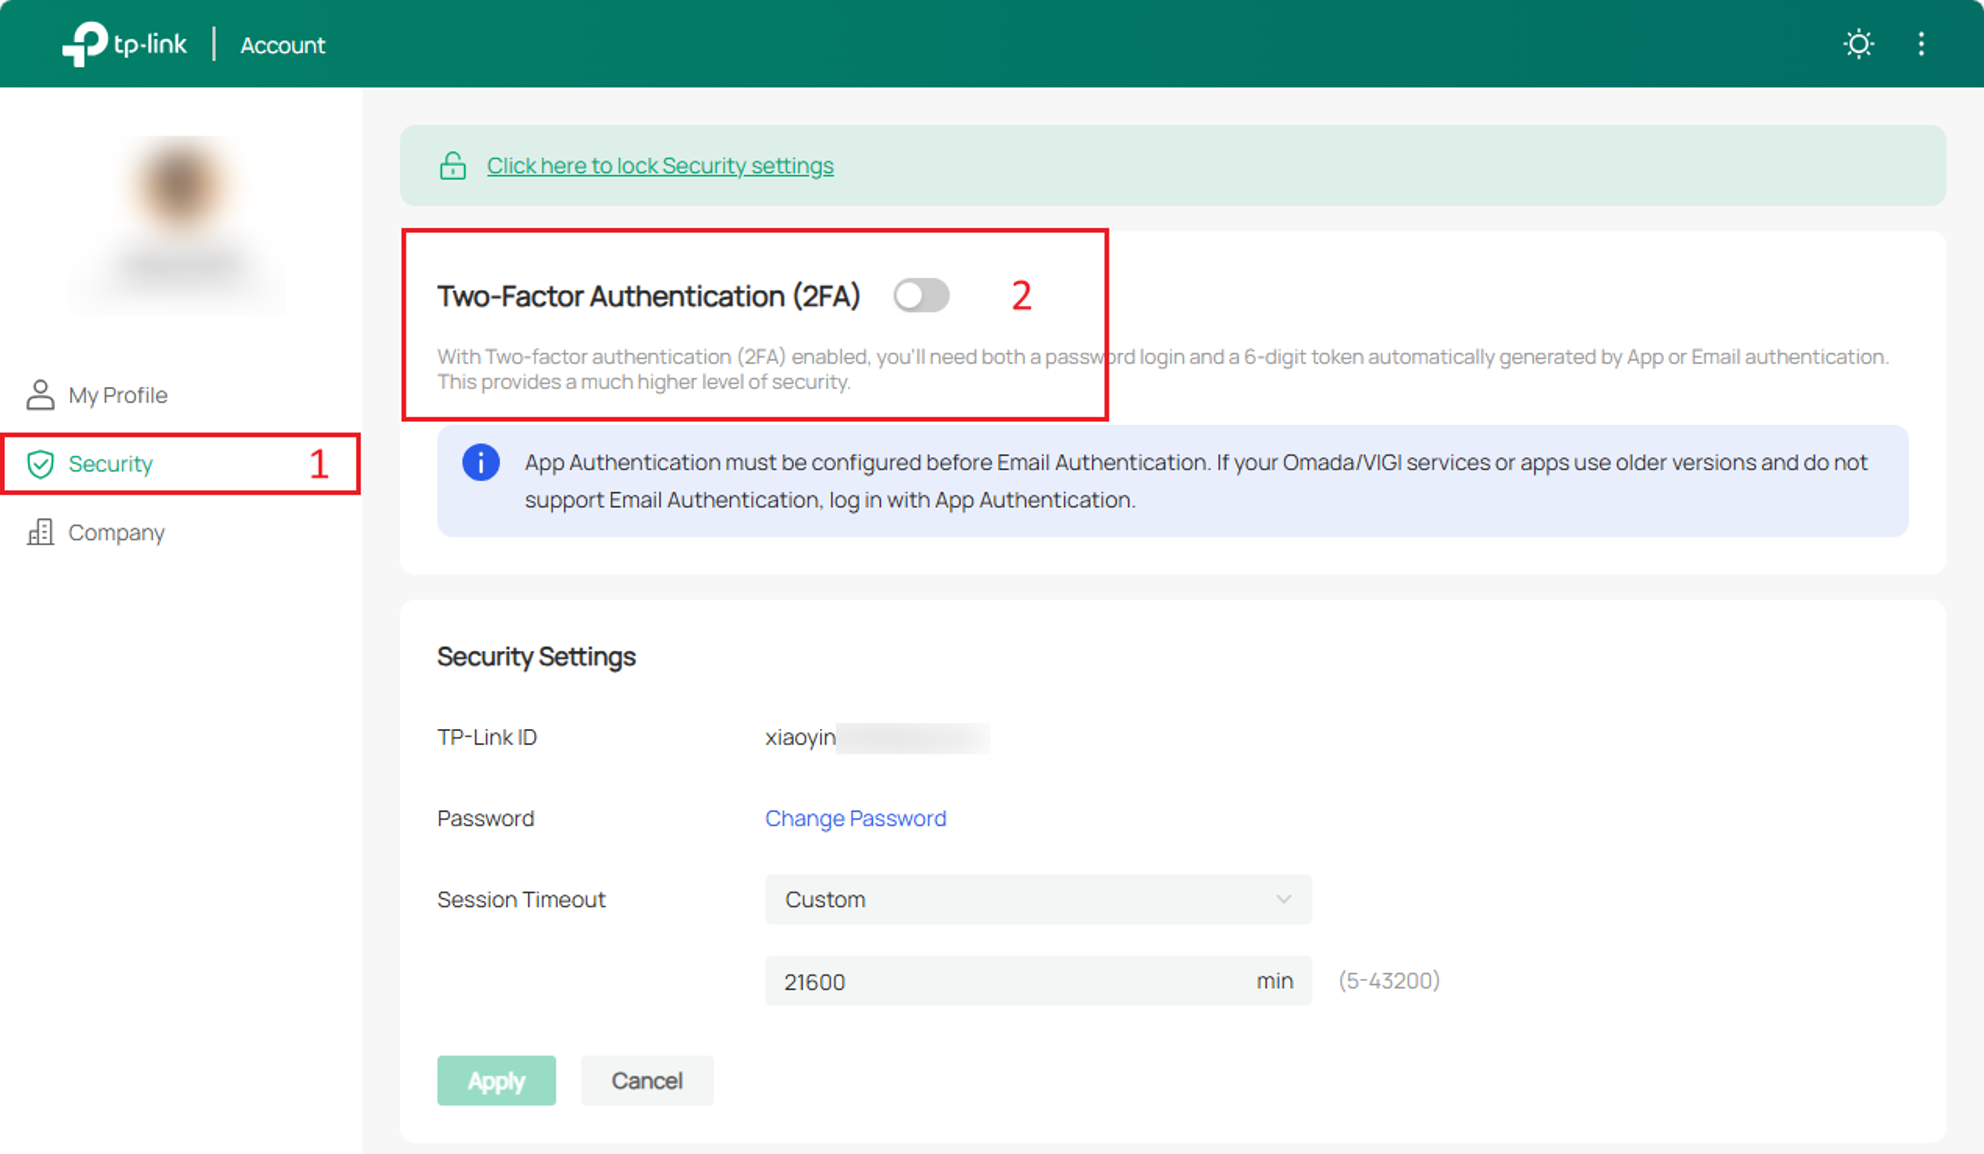
Step 1. Navigate to Global View > Settings > Account Security and enable the option.

Step 2. Before proceeding to the next step, you can see the status of my account. This is just a regular Local account.
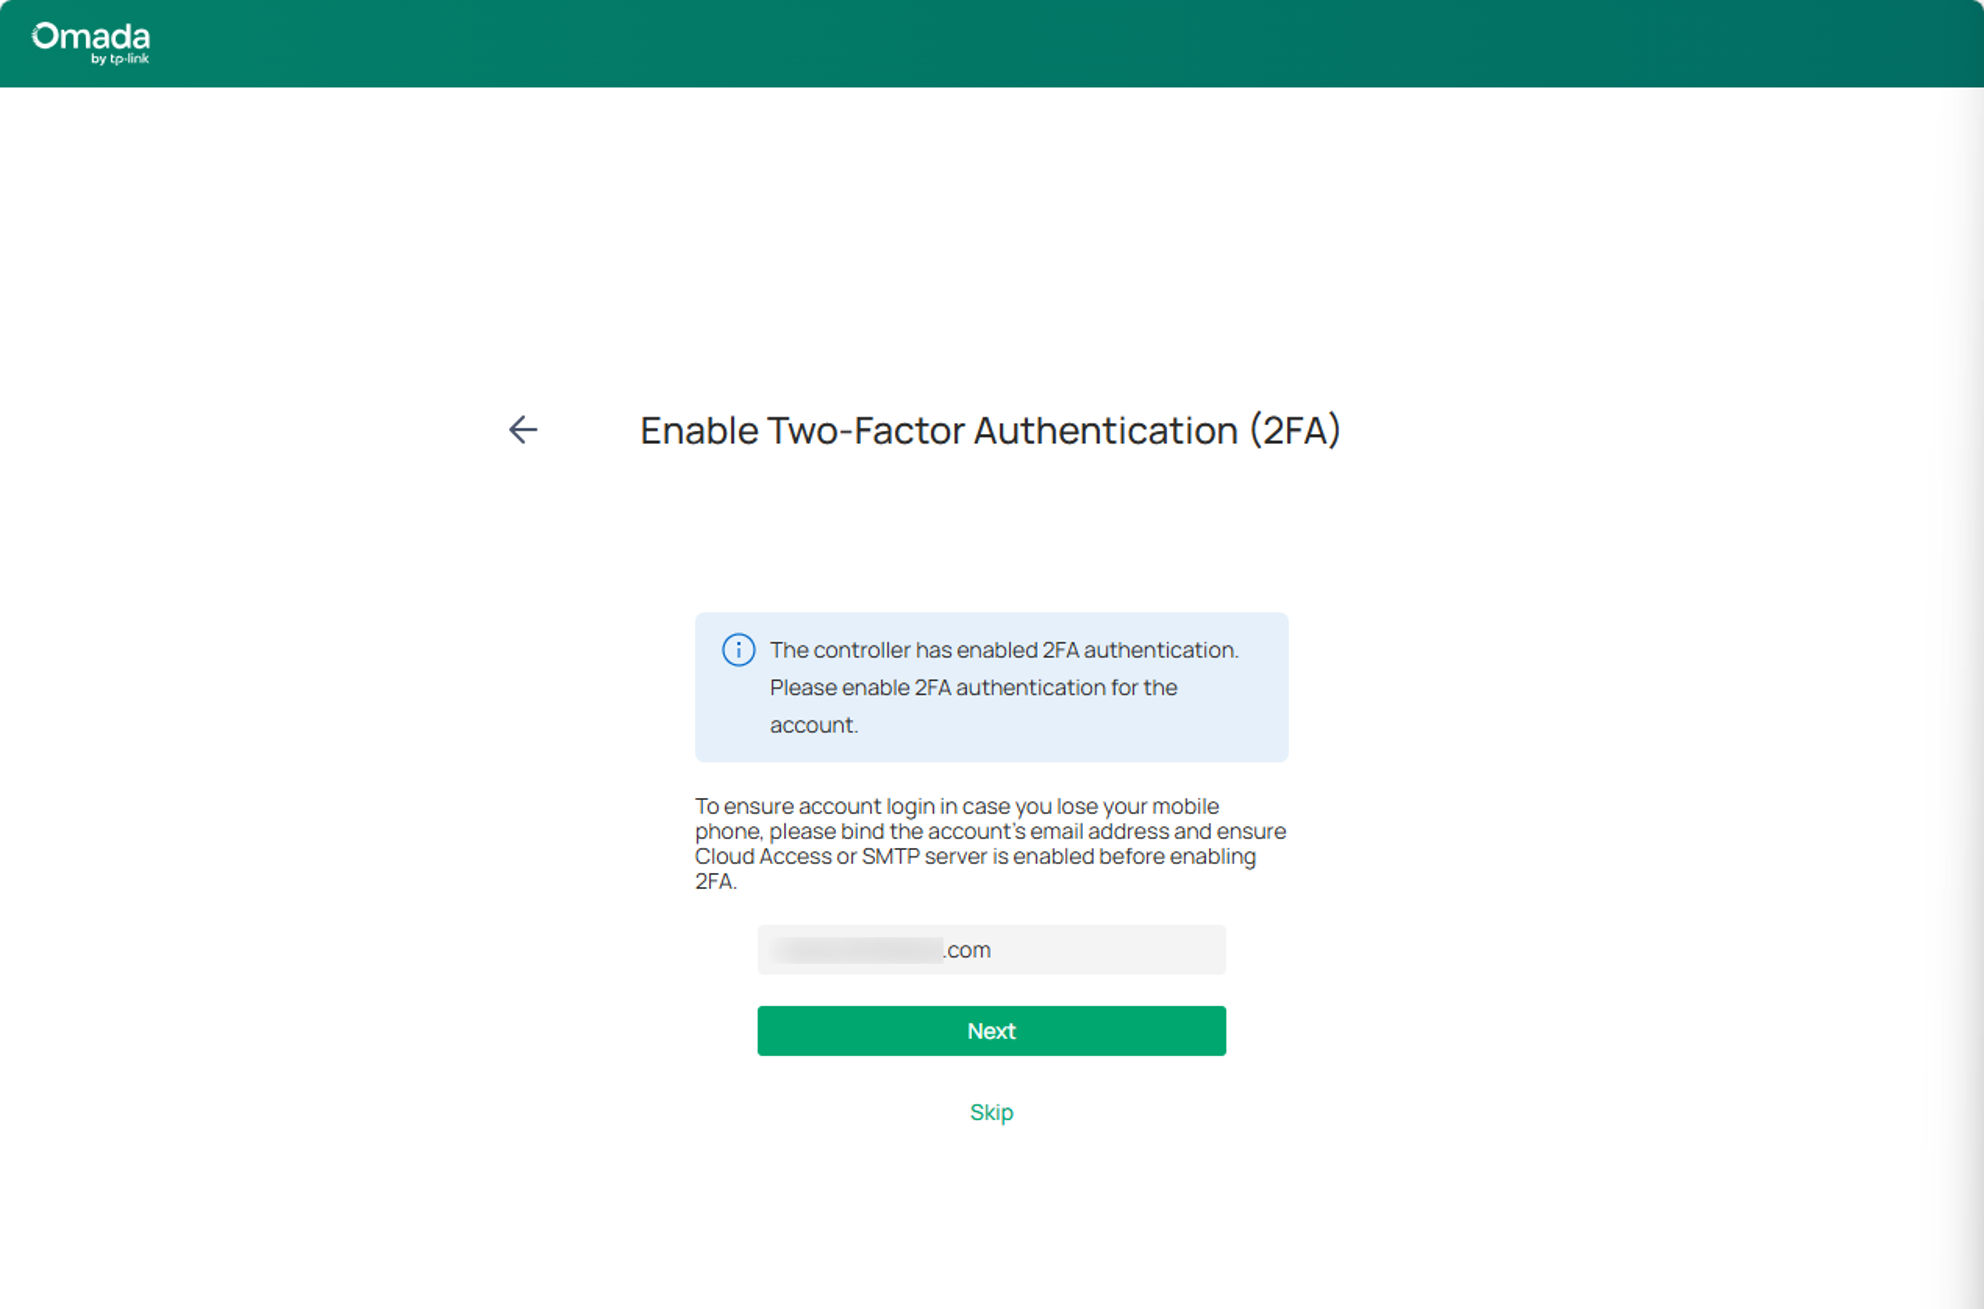
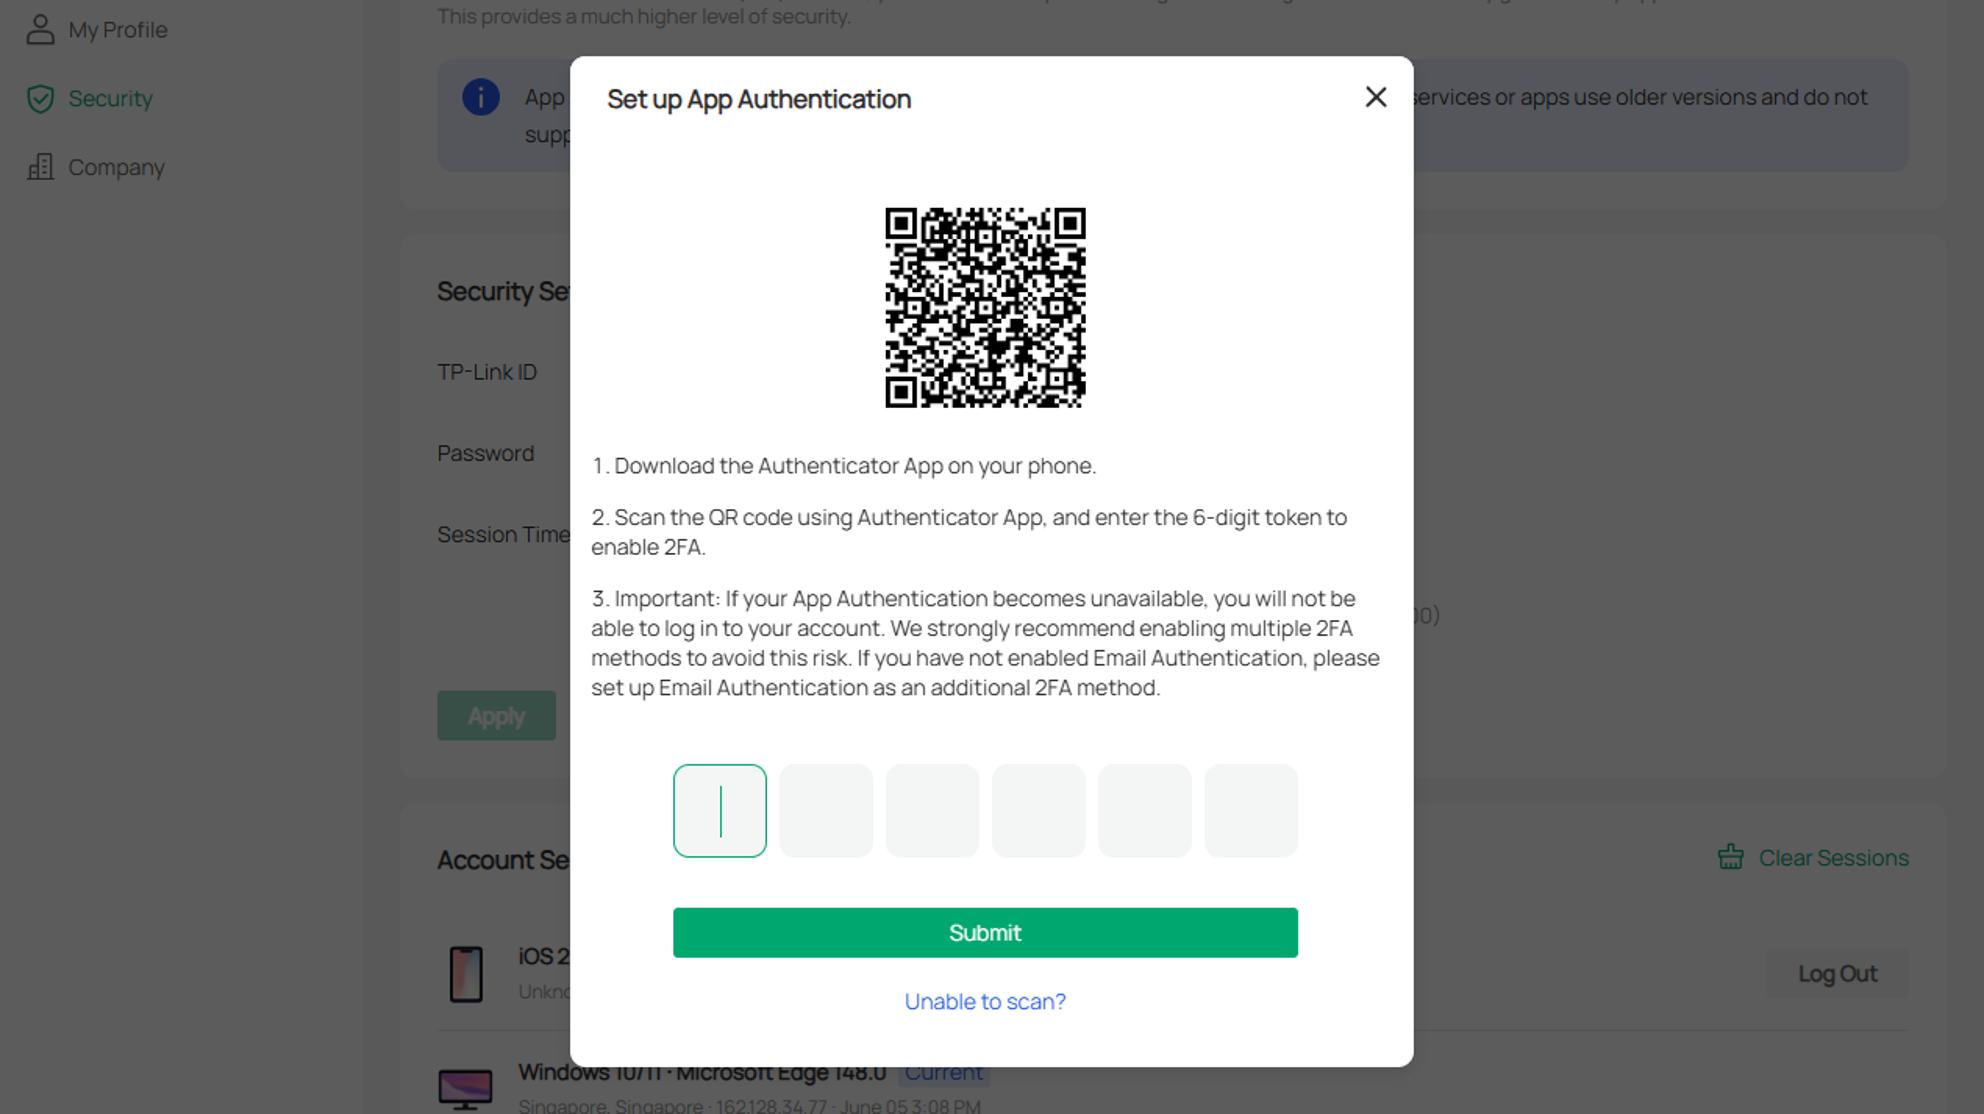
Step 3. Log out and log back in.The controller will guide you through configuring 2FA. First, please be sure to enter your email address, although this step is designed to be skipped.
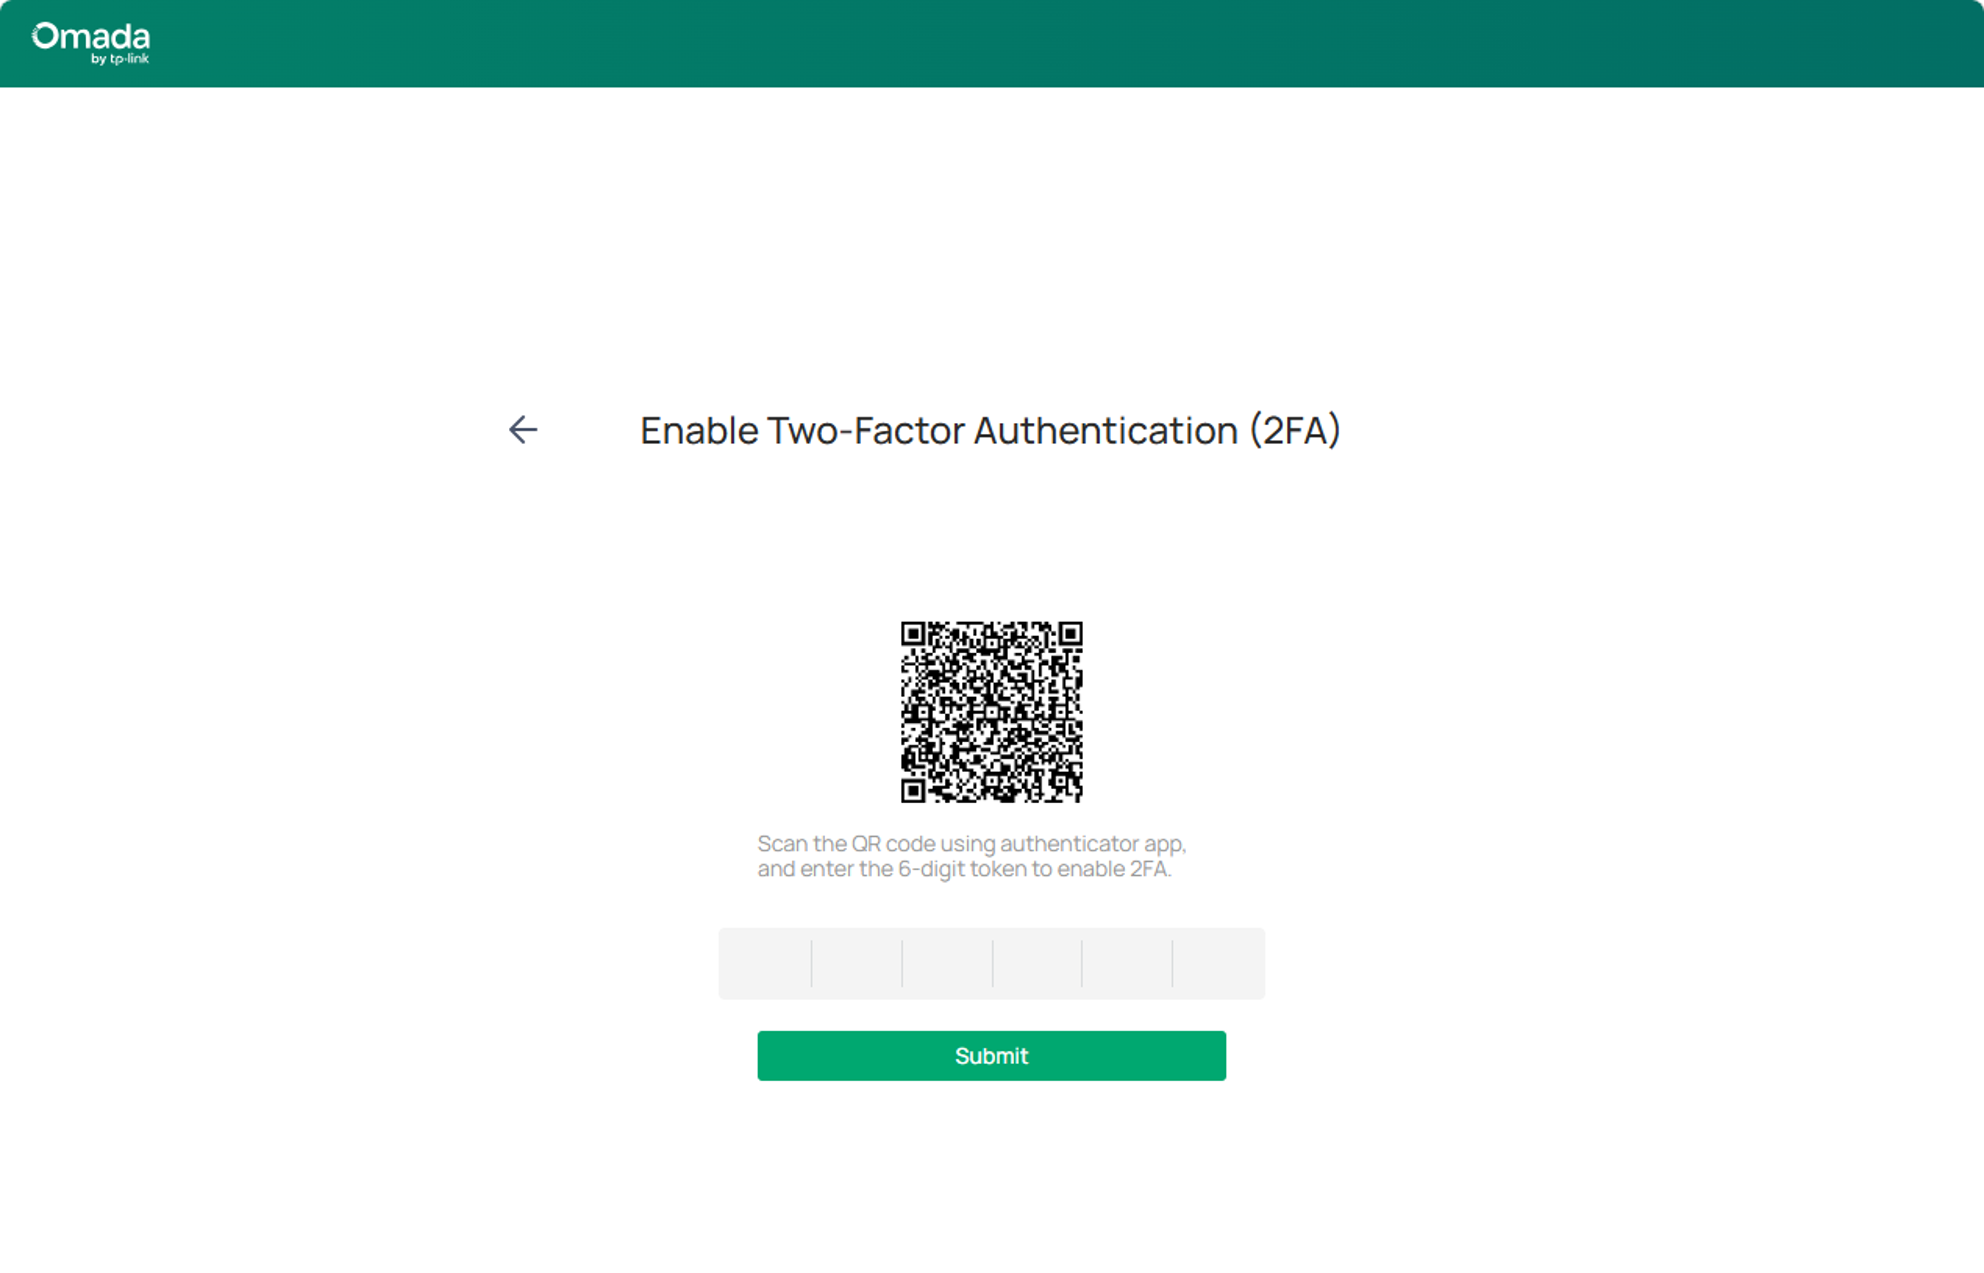
Step 4. Use any TOTP-compatible authentication app (such as Google Authenticator, Microsoft Authenticator, Apple Camera) to scan the QR code. After scanning, the app will generate a time-based verification code for future login authentication. Fill in the code here and click Submit.
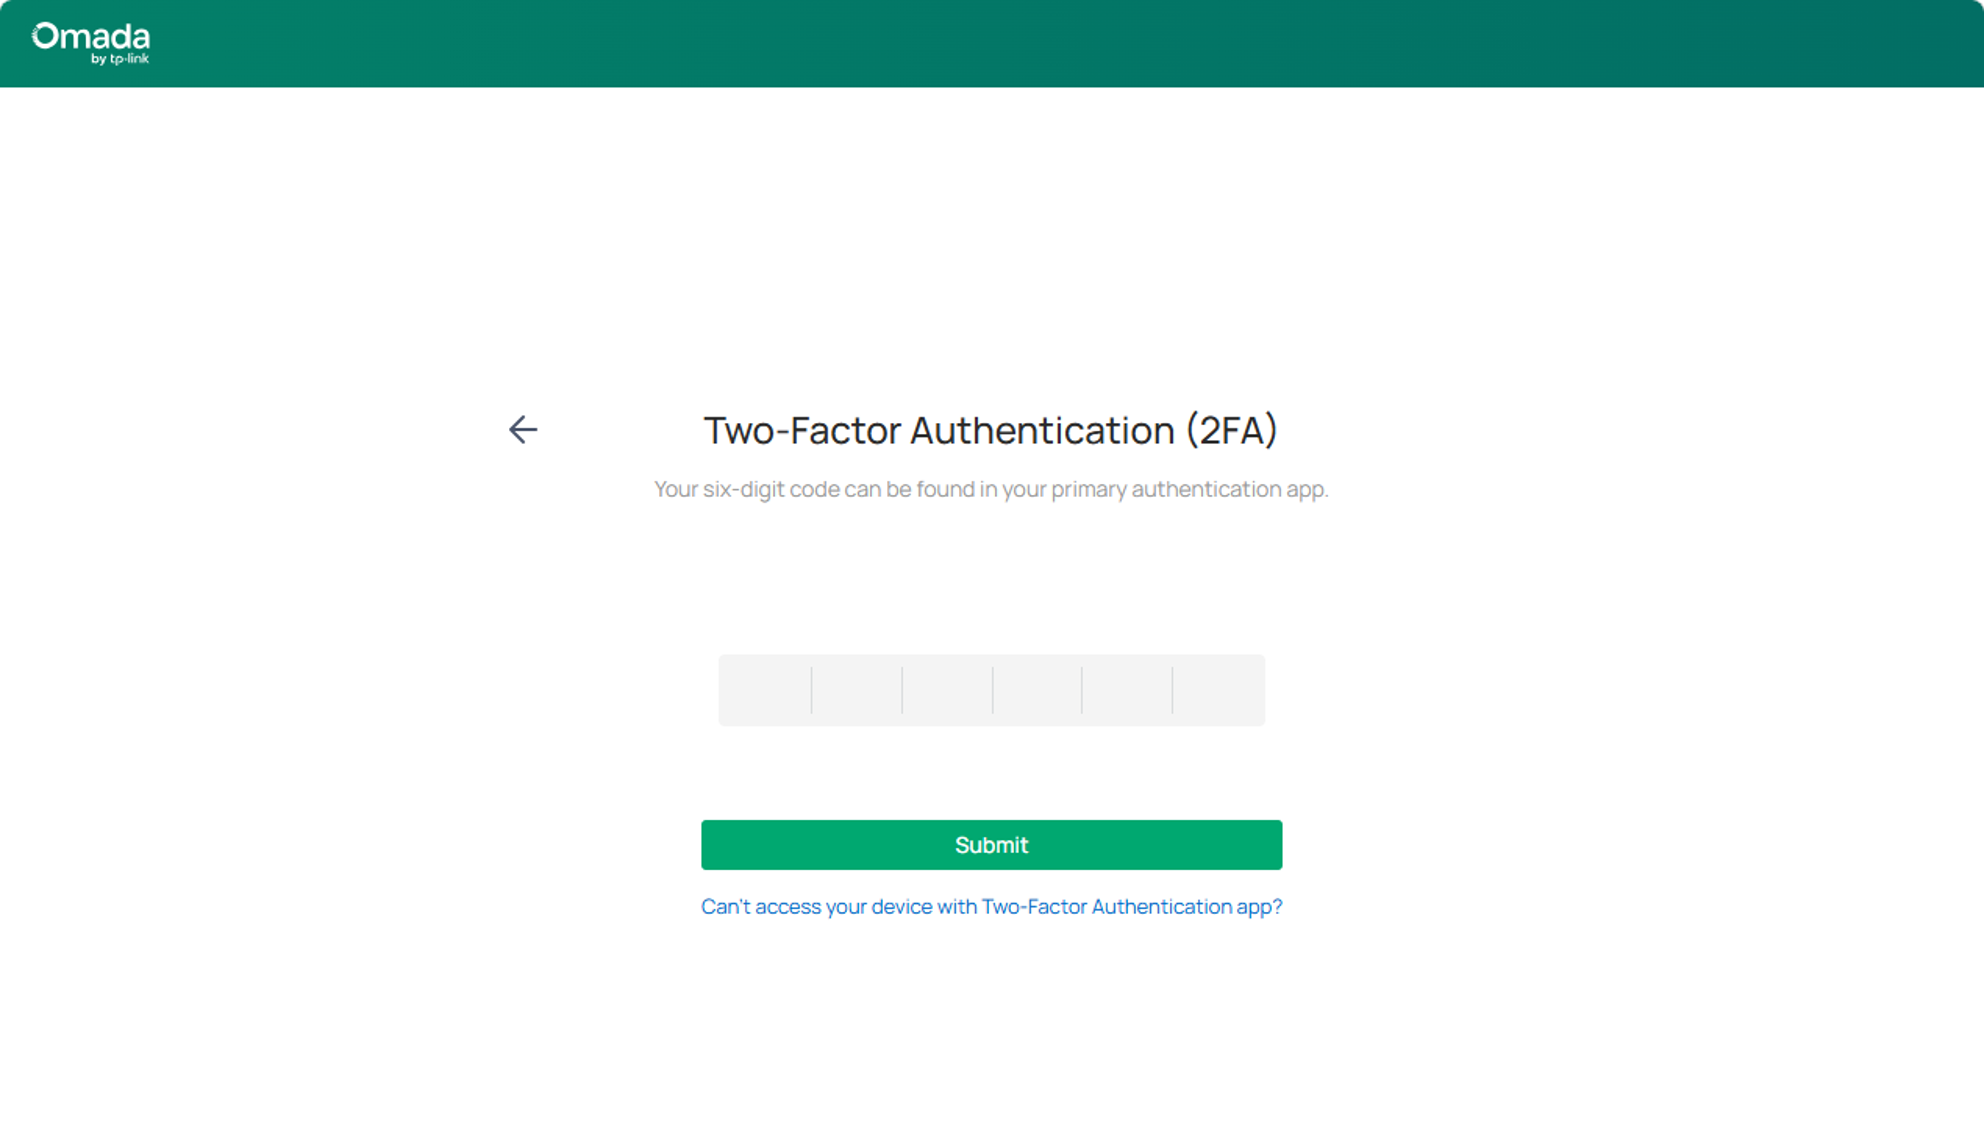
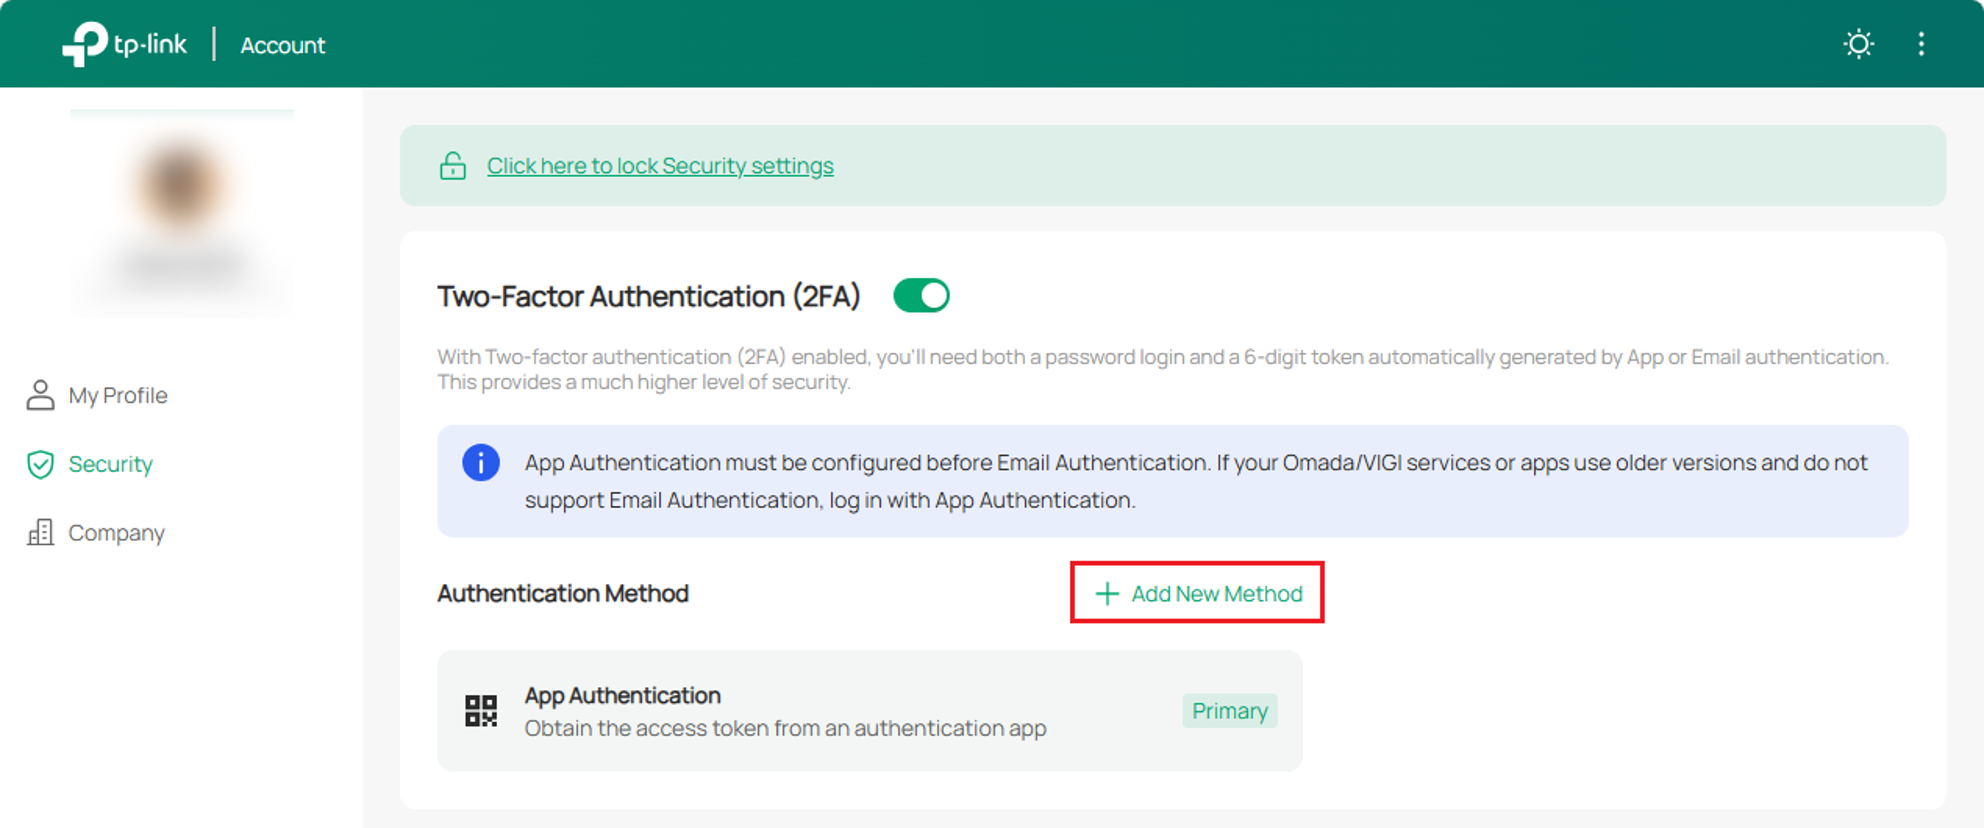
Step 5. You are seeing this page, which means you have successfully enabled 2FA for this account. This is the normal login process, you can access the Controller by entering the 6-digit code.
For Cloud User Account
Step 1. Navigate to Global View > Settings > Account Security and enable the option.
Step 2. Before proceeding to the next step, you can see that I have prepared a regular Cloud User Account.
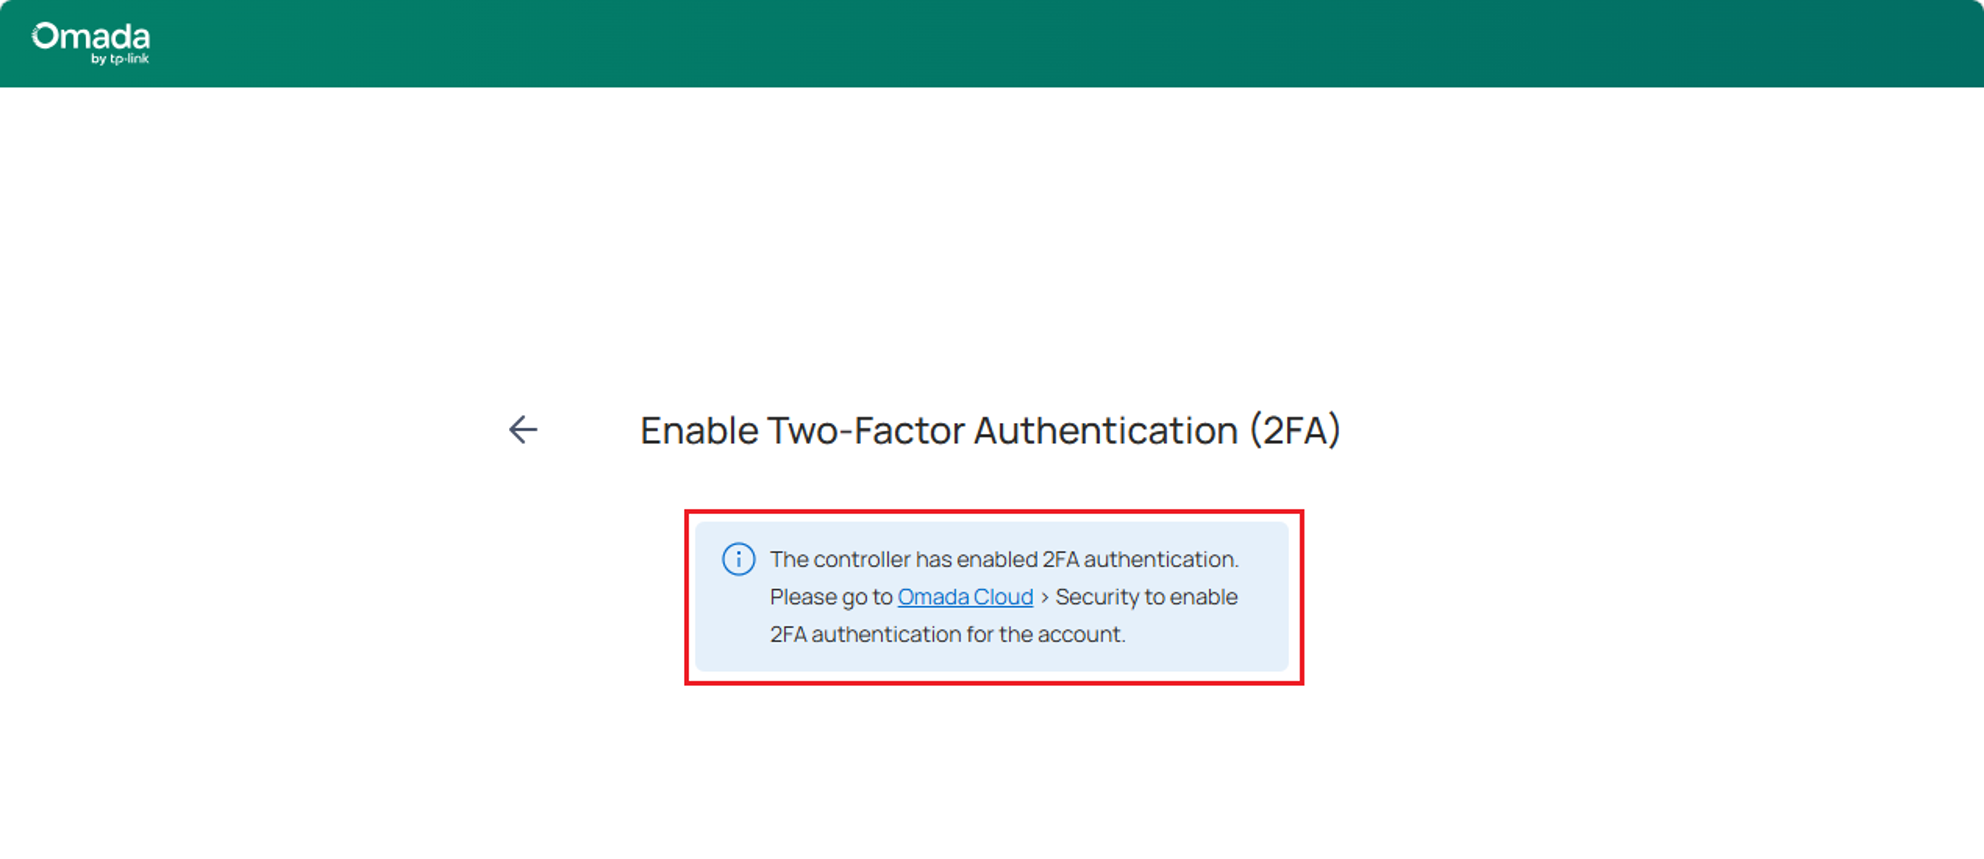
Step 3. Log out and log in using this Cloud User account. As you'll see in the image, login failed because, as I mentioned, after enabling the 2FA switch in Account Security, all accounts must have 2FA enabled to be allowed access to the Controller. Therefore, it prompts us that 2FA needs to be enabled for this account and provides instructions.
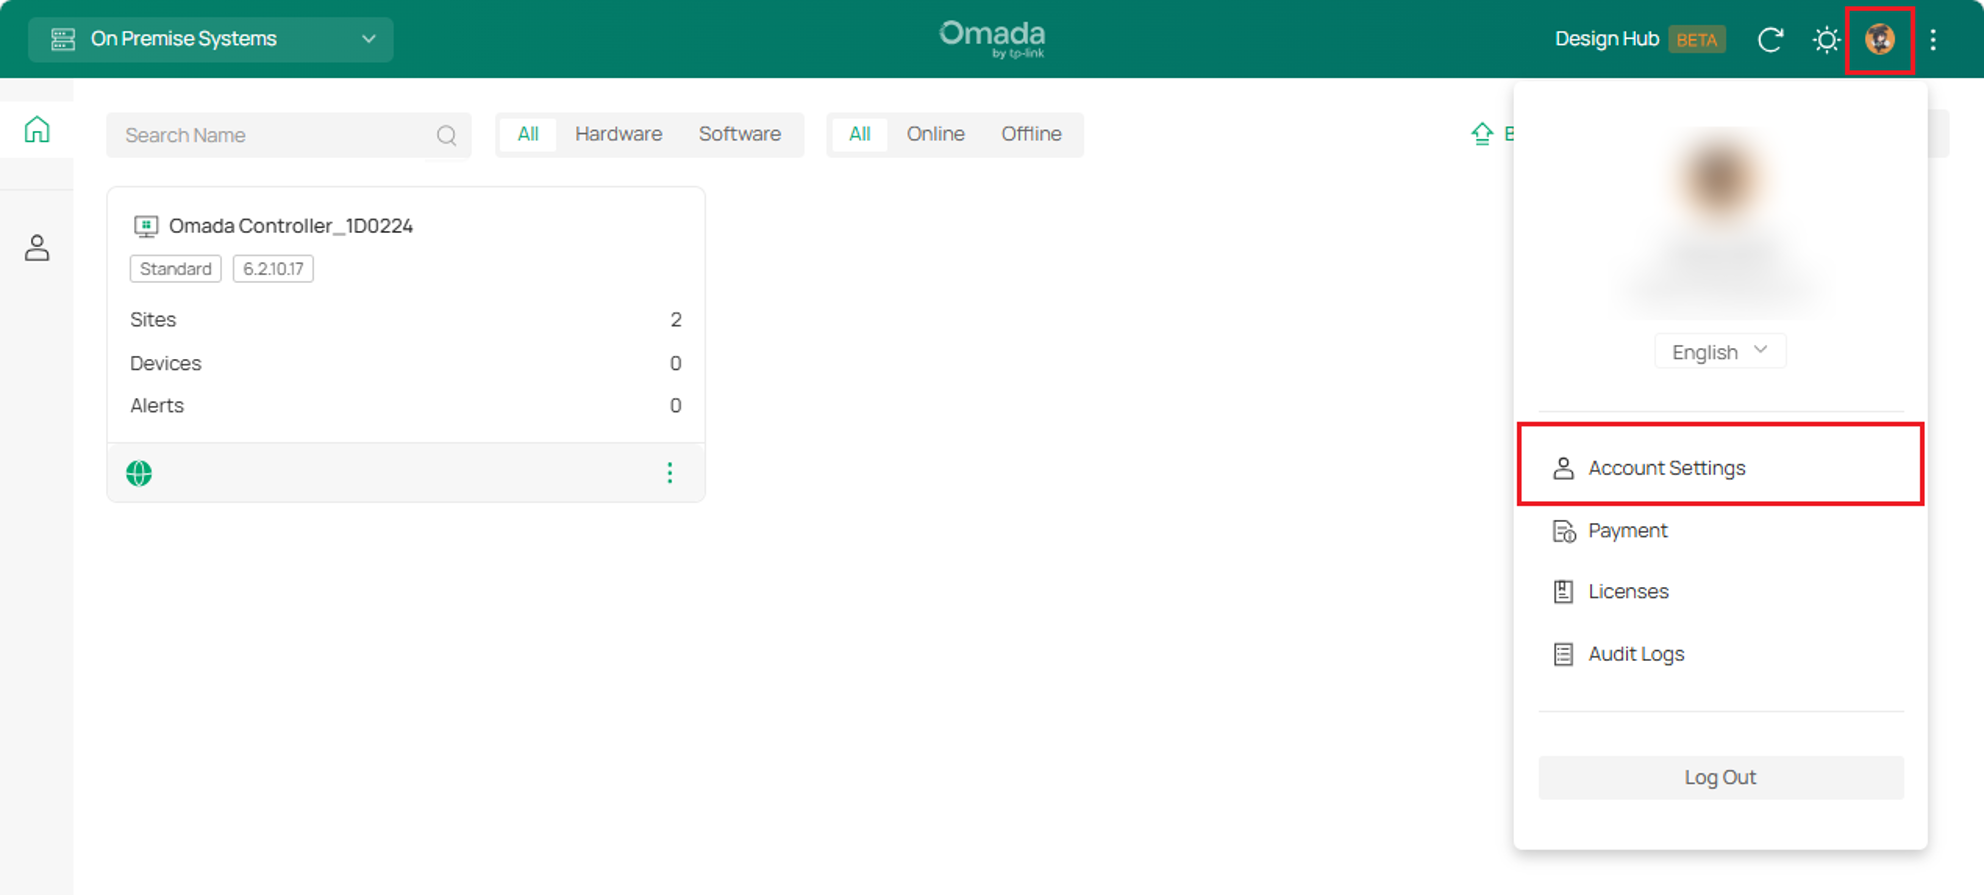
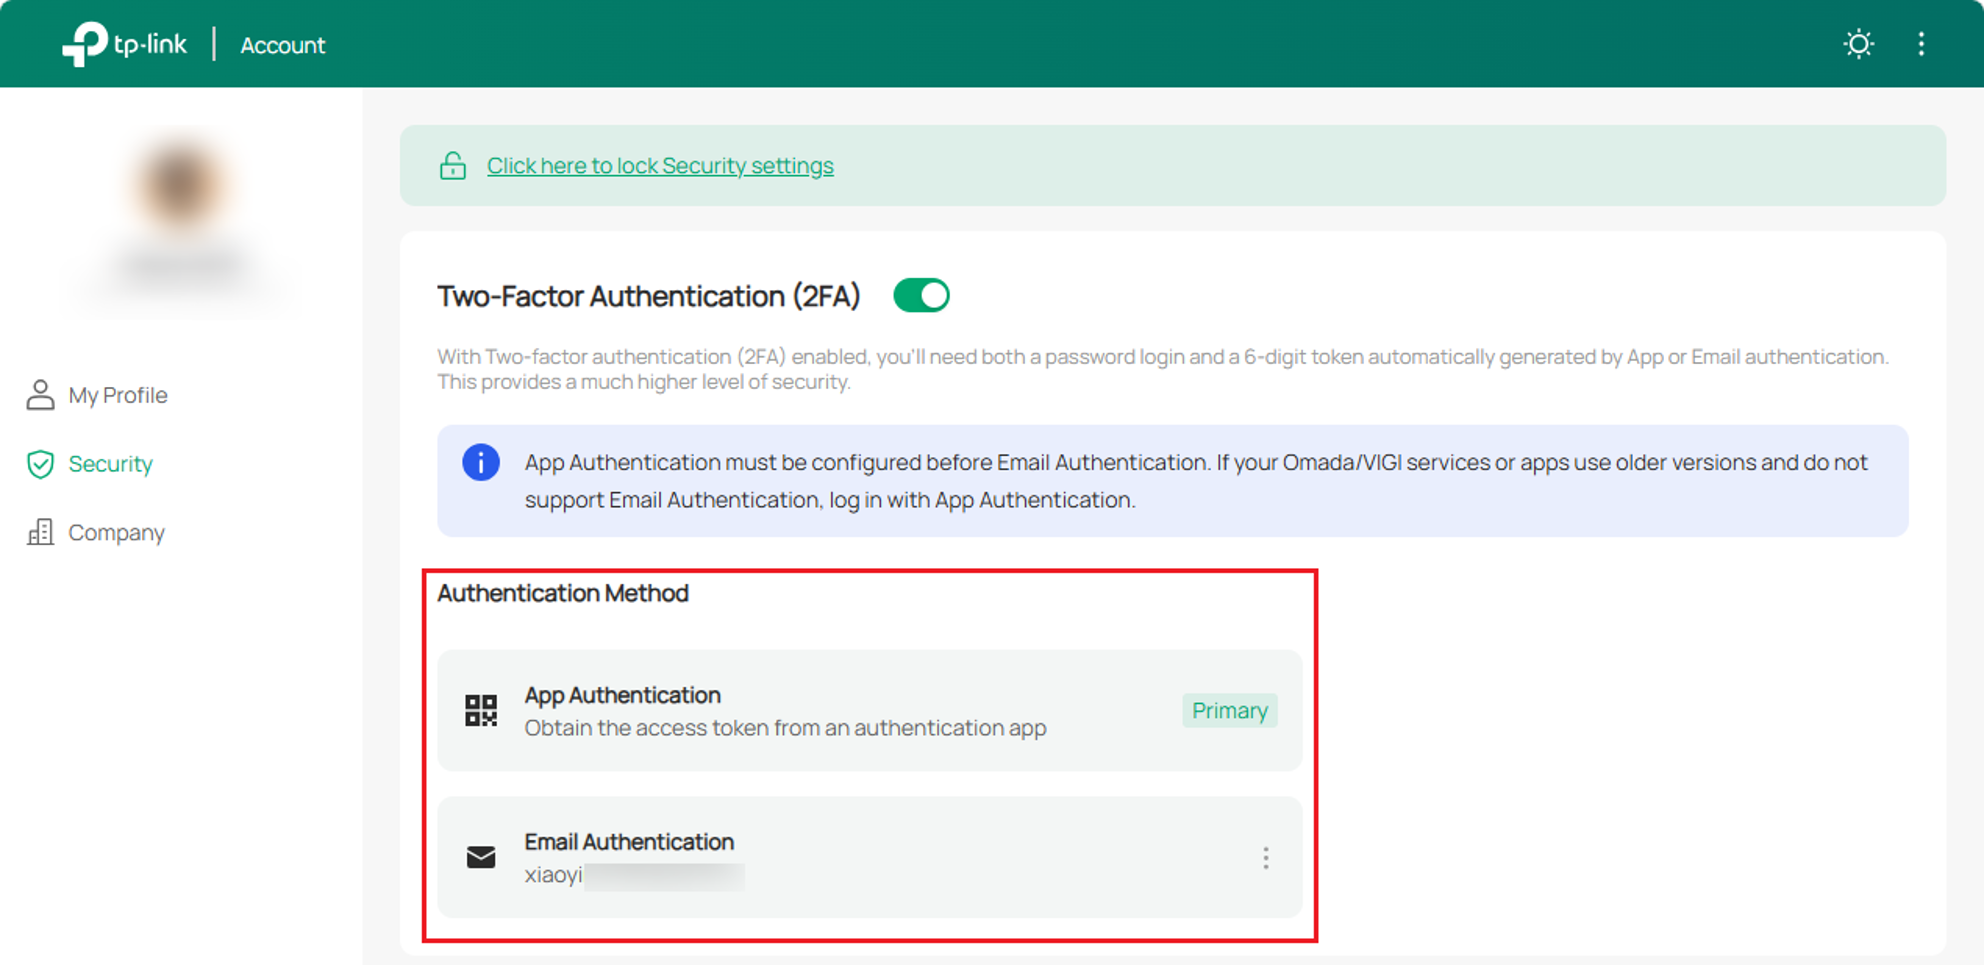
Step 4. Click the link to log in to Omada Cloud with account, navigate to Account Settings and enable 2FA.
Step 5. Use any TOTP-compatible authentication app (such as Google Authenticator, Microsoft Authenticator, Apple Camera) to scan the QR code. After scanning, the app will generate a time-based verification code for future login authentication. Fill in the code here and click Submit.
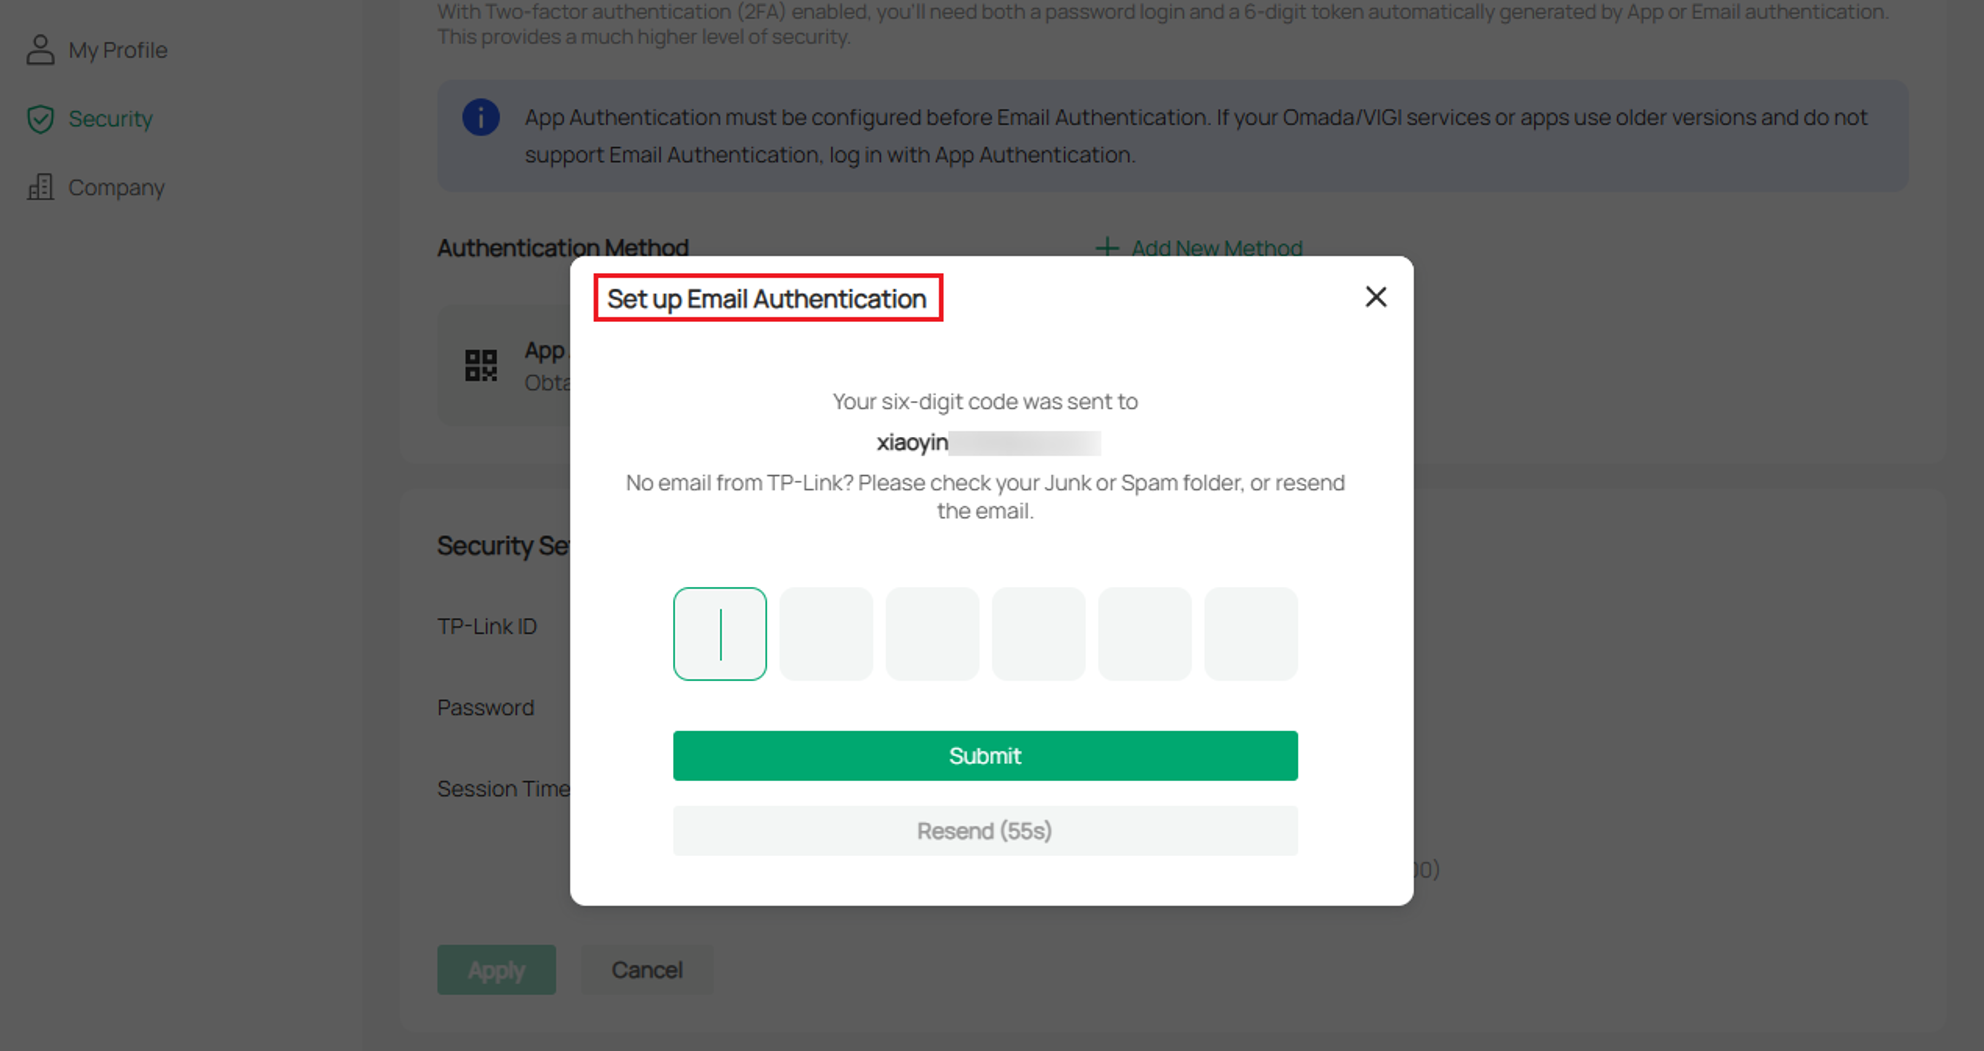
Step 6. I strongly recommend adding another authentication method, because sometimes you may not be able to use TOTP, or you may lose your TOTP code. Other methods can help you reset your TOTP. Otherwise, you will have to contact our technical support team to resolve this. For example, now add an email address.
Omada Cloud will send a verification code to your email.
Step 7. At this point, 2FA has been enabled for Cloud Account.
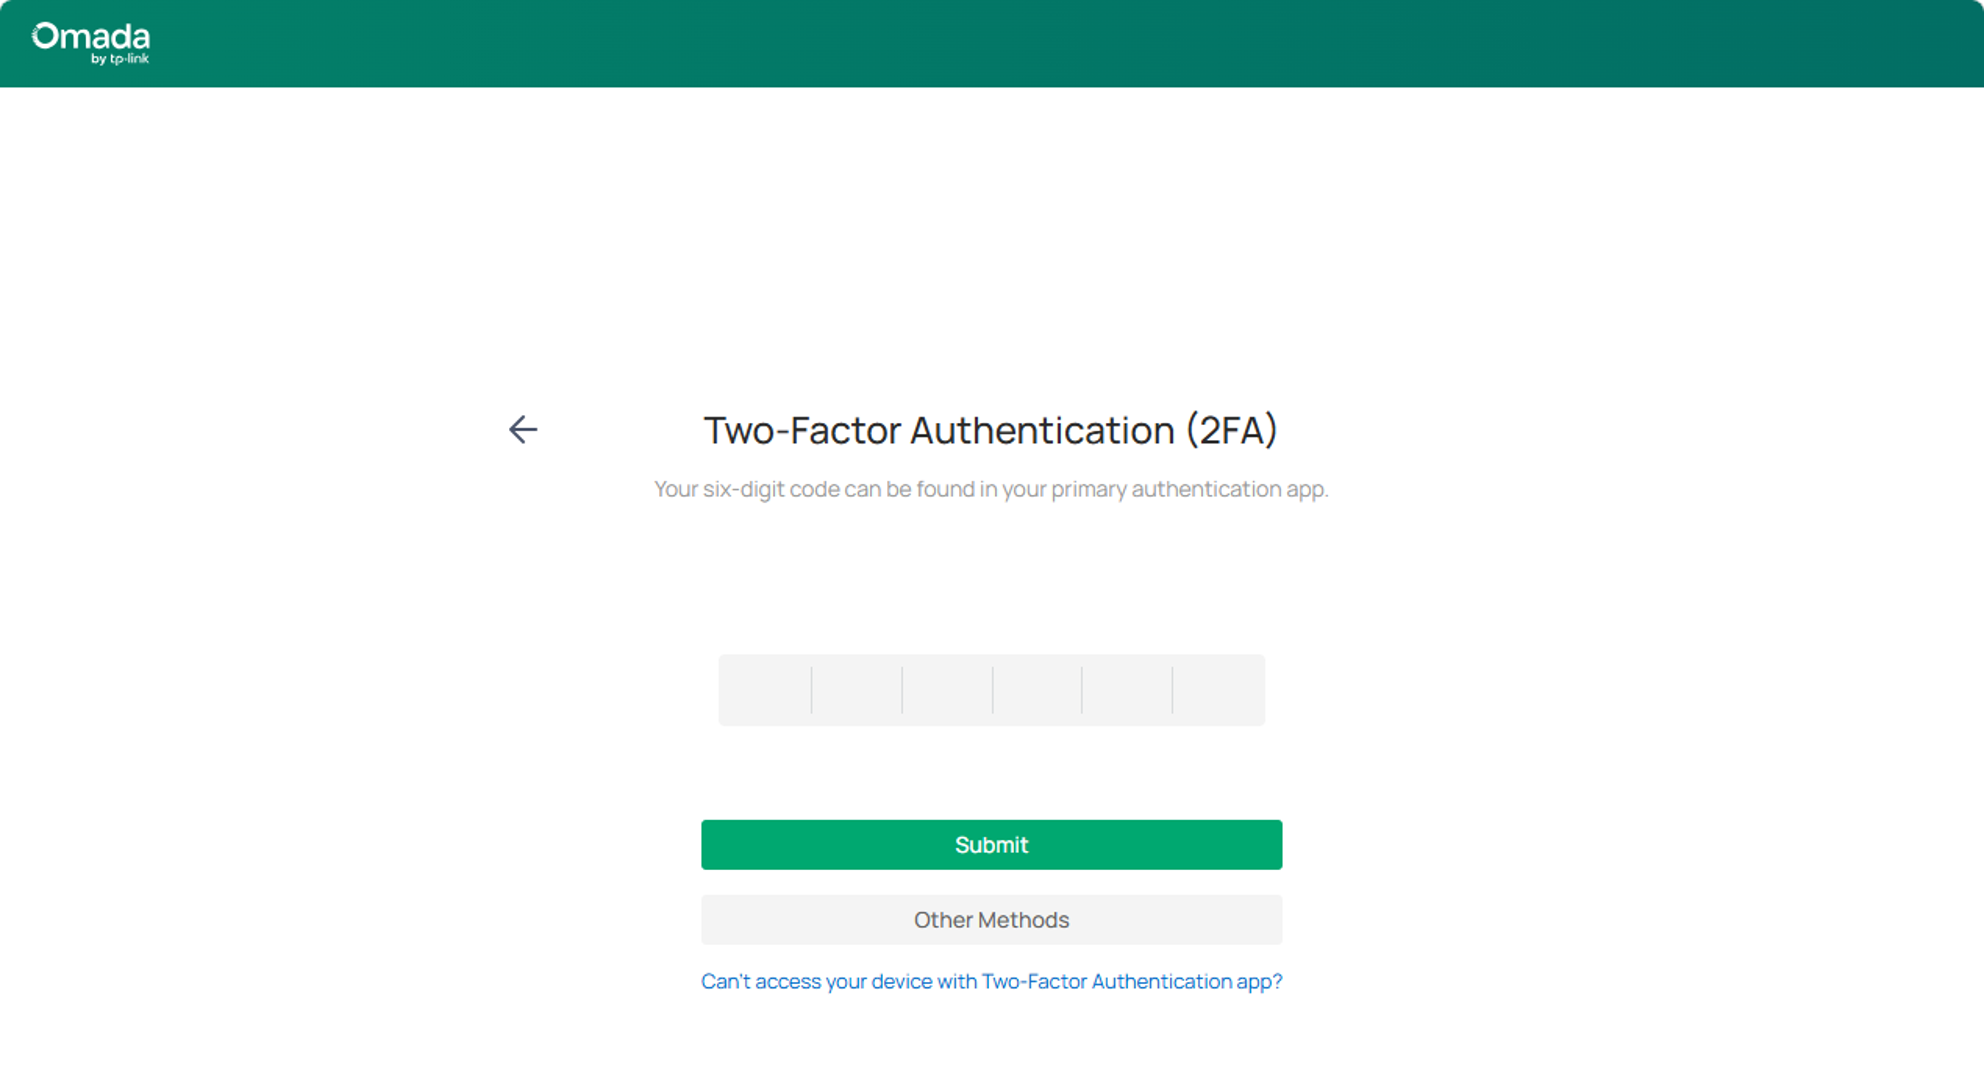
Step 8. Return to the Controller, log in again, enter the TOTP code and authentication is successful.
Other scenarios
In fact, all 2FAs in the Controller are encompassed by the two types mentioned above, corresponding to Controller-level 2FA and Account-level 2FA respectively. They all operate on the account, whether it's the Local account or the TP-Link ID.
- Enable or disable 2FA for your TP-Link ID via the Omada APP
In addition to what was mentioned earlier, you can enable or disable 2FA on the Omada Cloud website, or you can do so in the Omada APP, as long as you log in to the Omada APP with your TP-Link ID.
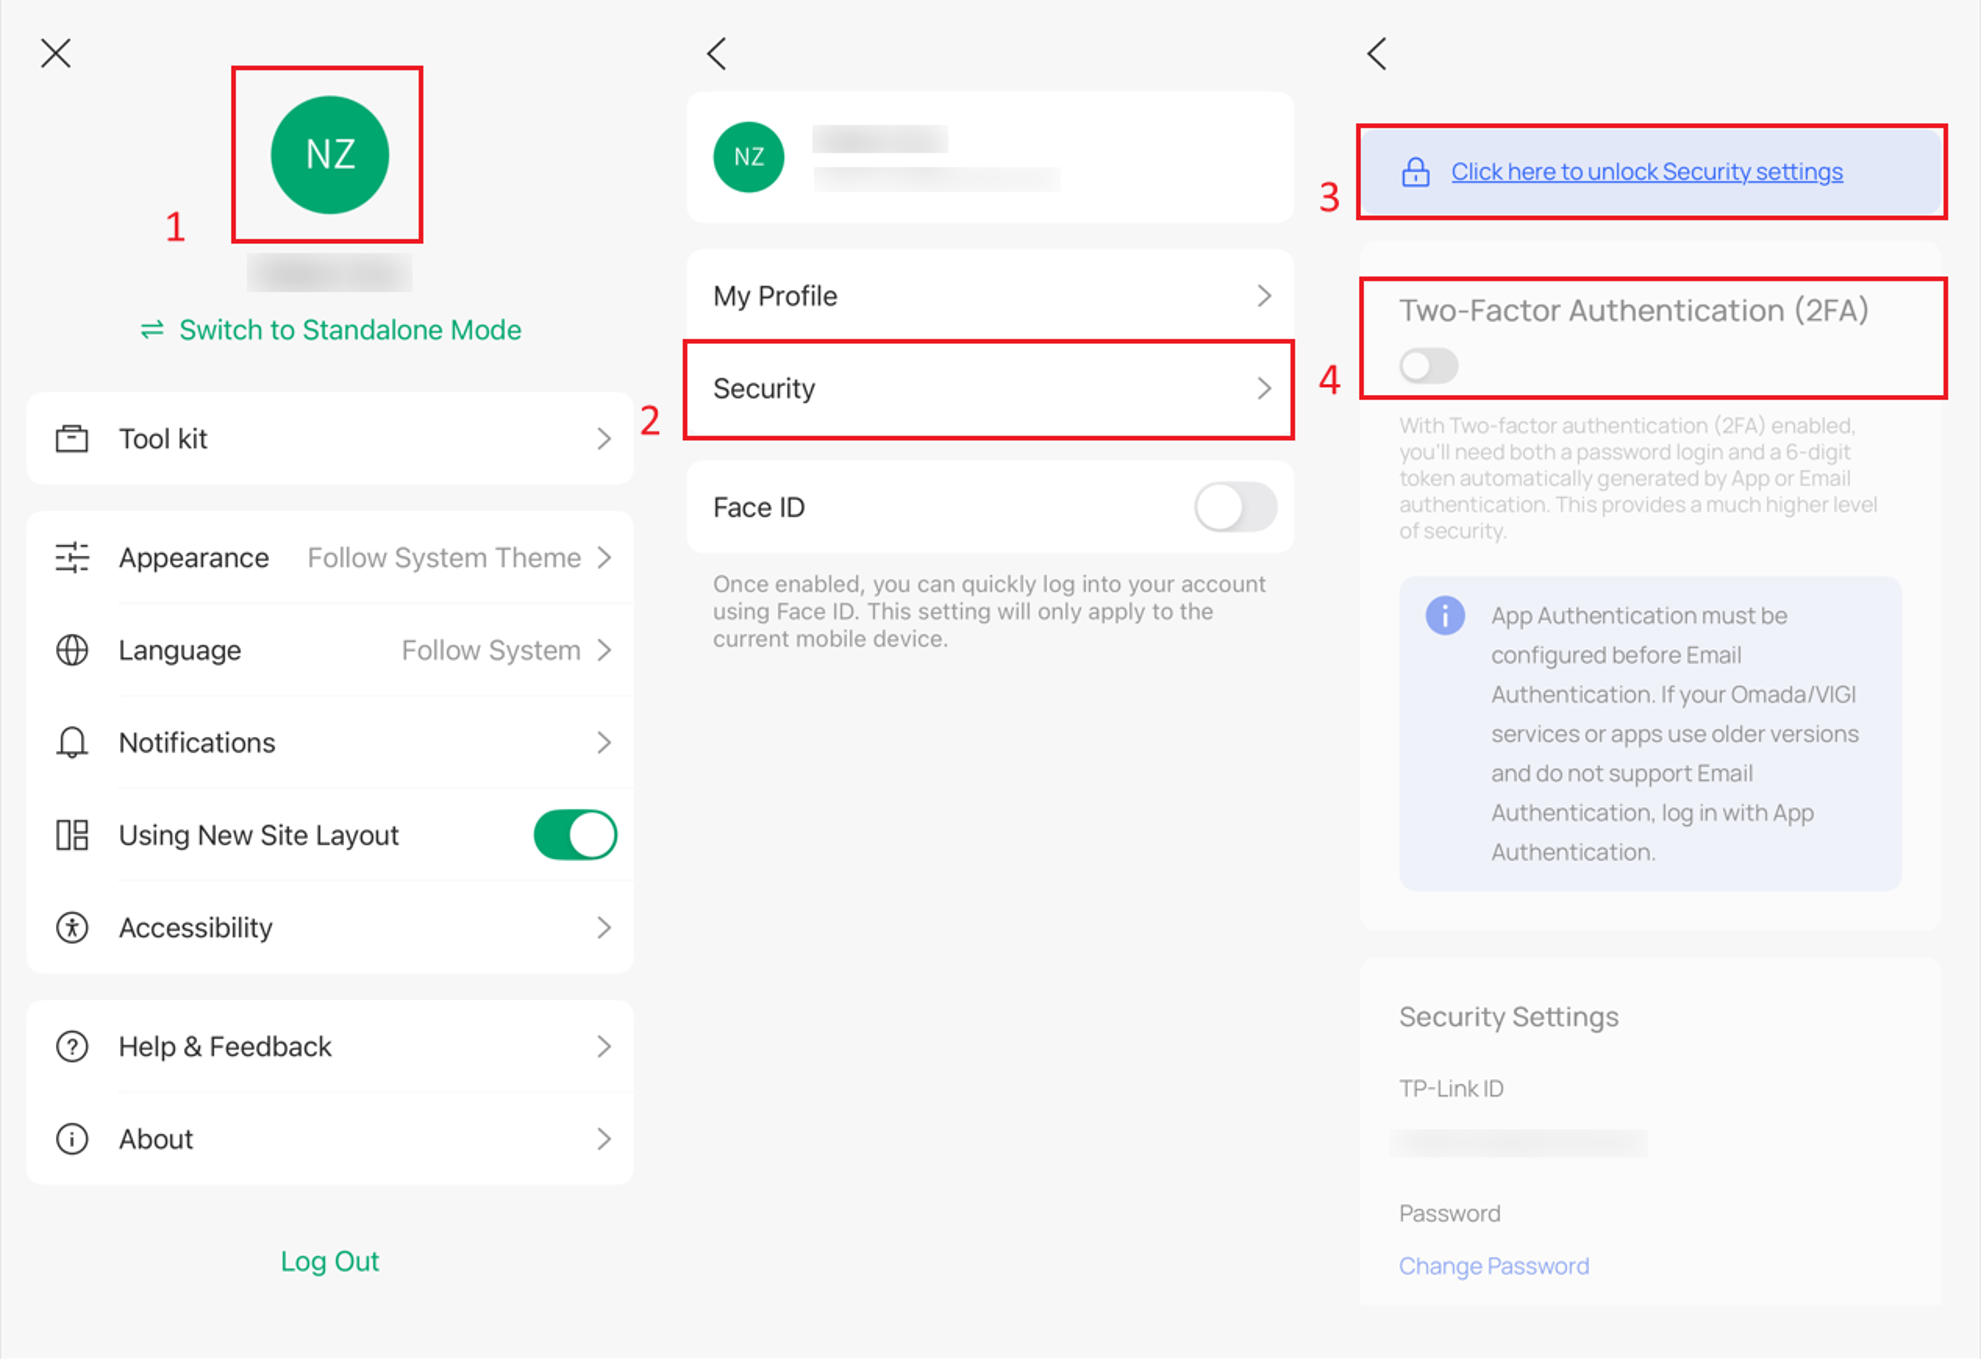
Step 1. Log in to the Omada app using your TP-Link ID.
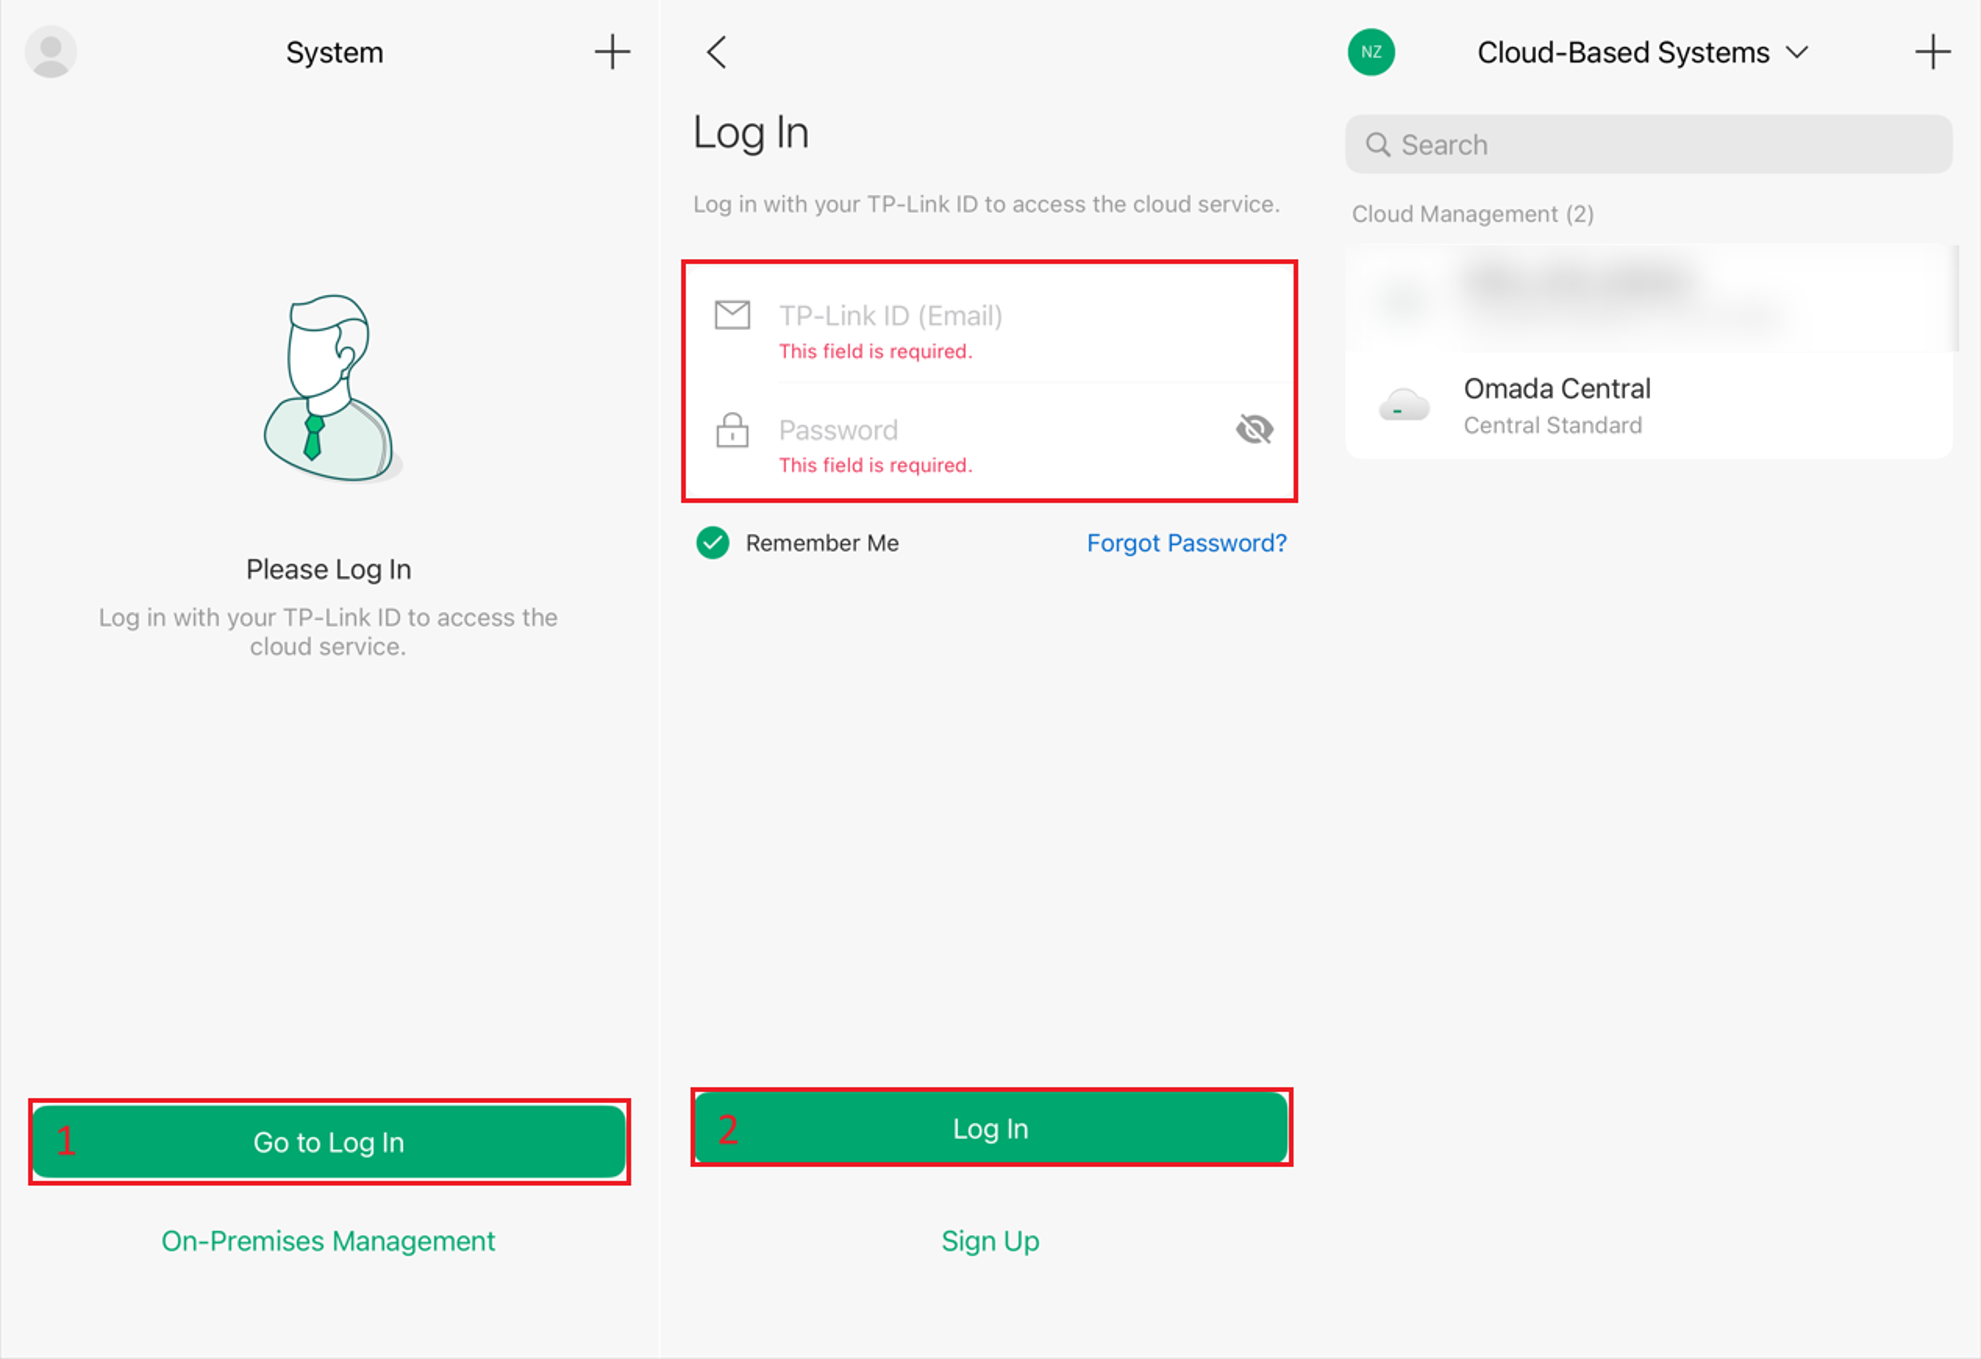
Step 2. Click on your profile picture in the top left corner > Security > Enable or Disable 2FA.
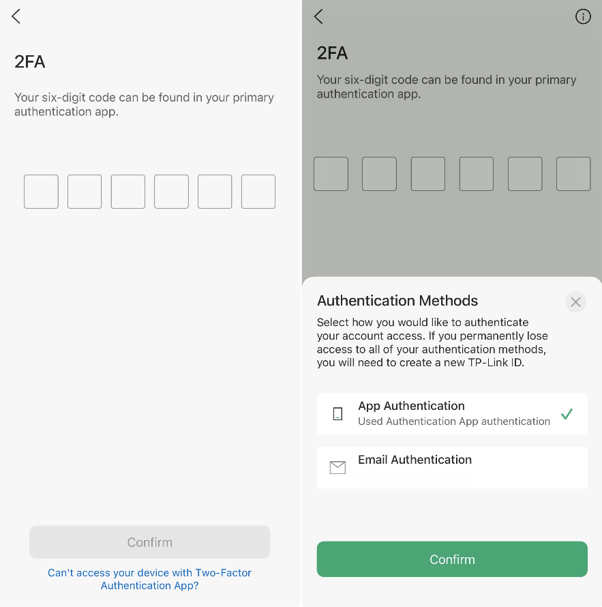
- Access Controller via Omada APP
For example, in the image below, when the Omada APP accesses the Controller. You’ll find the behavior is consistent. The Cloud User Account has two authentication methods. The Local Account can recover the code via email.
Conclusion
The preceding text explained how to enable 2FA for the Controller. Enabling 2FA on the Controller means that any login attempt to the Controller requires 2FA; this is a Controller-level requirement.
An account can also directly enable 2FA. For example, you can enable 2FA for your TP-Link ID, and any login attempt using that ID will require 2FA authentication.
Although both 2FA mechanisms affect the account, their purposes differ.
QA
Q1: Can I use any authentication app?
A1: Any TOTP-compatible authentication app can be used, such as:
- Google Authenticator
- Microsoft Authenticator
- Apple Passwords
Q2: Why is the verification code invalid?
A2: TOTP verification codes are time-based and only valid for a short period. Make sure your devices time are accurate and synchronized automatically with the network.
Q3: How to disable 2FA?
A3:
For Local User Account
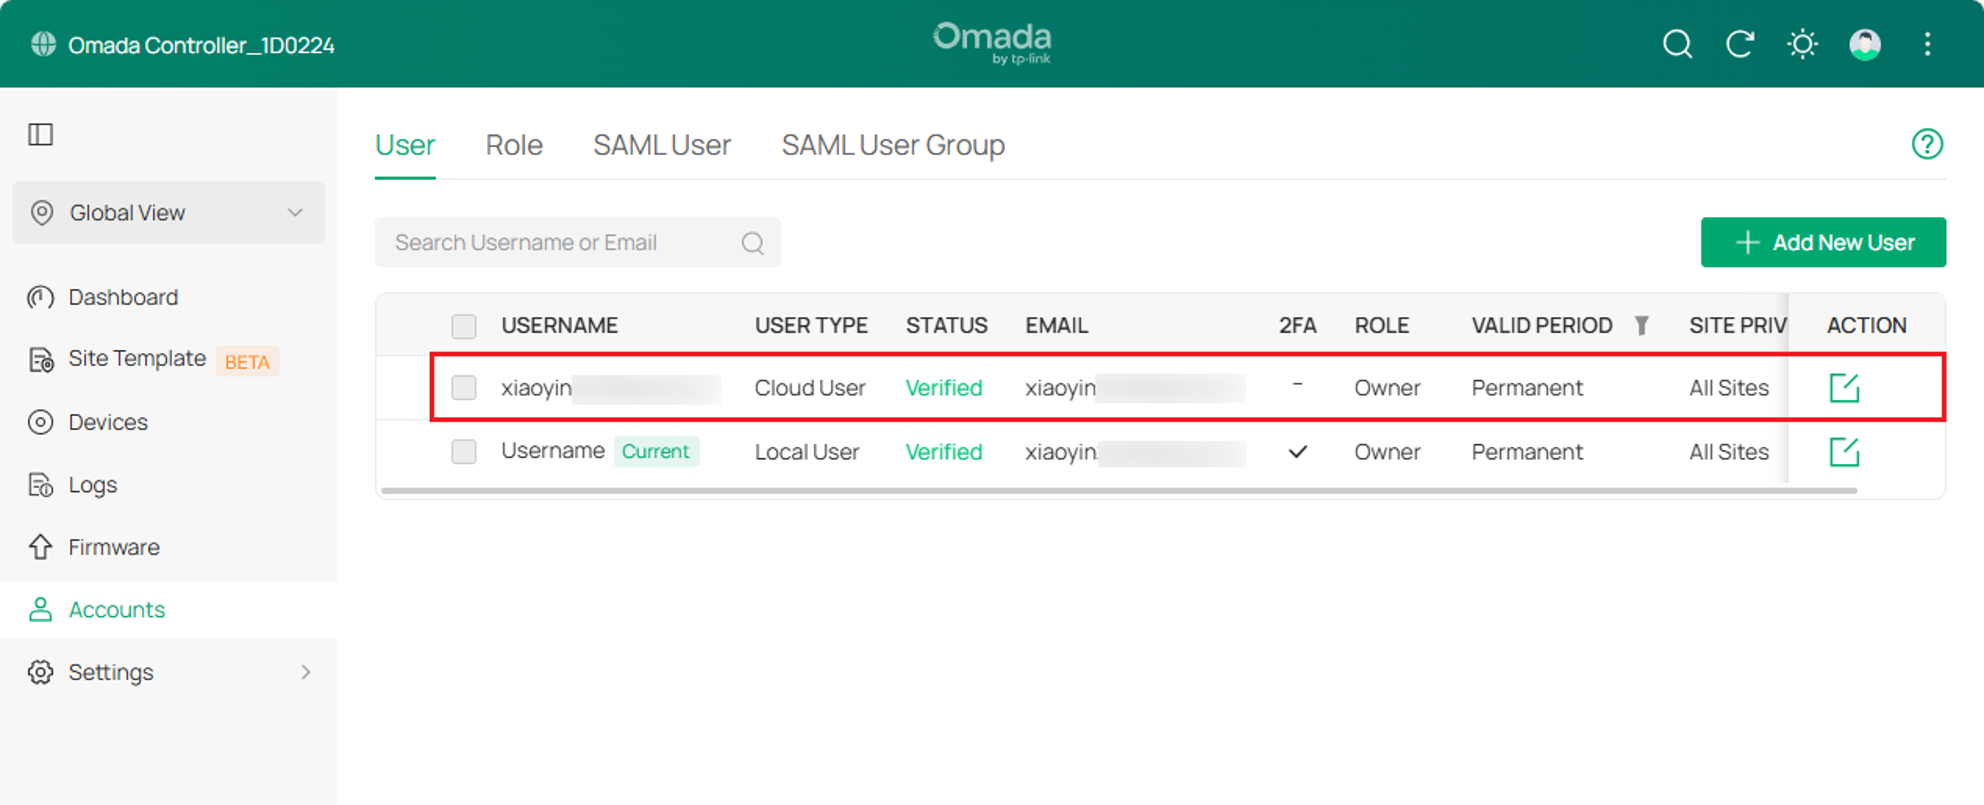
Step 1: You can log in to the Controller and disable Global View > Accounts > Edit button of the corresponding account entry > Two-Factor Authentication (2FA) option (2FA code is required to disable it, if you lose it, see Q4)
Step 2: You need to disable Global View > Settings > Account Security > Two-Factor Authentication (2FA). This option forces 2FA to be enabled upon login. If you don't disable it, you'll have to re-enable 2FA when logging into the Controller again.
For TP-Link ID (Cloud User Account)
Visit id.tplinkcloud.com and disable Security > Two-Factor Authentication (2FA). (TOTP Code is required to disable it. If you have lost it, please refer to Q4)
Q4: How can I retrieve my lost 2FA Code?
A4:
Both the 2FA of your Local Account and TP-Link ID can be recovered via email.
If no email address was linked and you are unable to log in with your TP-Link ID, please contact the support team for help. Find contact method at: support.omadanetworks.com
For Local Account 2FA:
If the Local Account 2FA code is lost, and no email address was linked beforehand. Since the account is stored locally on the Omada Controller, it cannot be recovered. We can help recover 2FA for TP-Link ID accounts, but not for local accounts. You may try logging in with another account that has higher privileges to delete or recreate the affected account.
If no such account is available, the only remaining option is to uninstall and reinstall the Omada Controller. Please note that this result in configuration loss.
Q5: Unable to log in due to 2FA.
A5: Disabling 2FA is no longer allowed during the login phase, so you need to refer to Q4 to retrieve your TOTP Code instead of looking for a way to disable 2FA.
To learn more about each function and configuration, please visit Support Home to download or check the manual for your product.
