


Comment configurer le WLAN à l'aide de groupes d'AP dans Omada Controller v6.3


Contenu
Créer des SSID sur un nouveau site
Scénarios d'application courants du groupe AP
Fusionner les SSID après la mise à jour du contrôleur Omada
Introduction
Pour améliorer la flexibilité et l'évolutivité de la configuration WLAN, l'optimisation de la configuration WLAN basée sur les groupes de points d'accès introduit une méthode plus efficace et intuitive pour gérer les SSID et les associations de périphériques.
Dans le flux de travail traditionnel, les SSID sont configurés au sein de groupes WLAN et attribués aux appareils par le biais de relations de liaison. Toutefois, cette approche peut présenter plusieurs limitations, telles que des configurations SSID isolées entre les différents groupes, un manque de visibilité globale et une complexité opérationnelle accrue lors de la gestion de déploiements à grande échelle.
Le modèle optimisé vise à relever ces défis en améliorant la logique de configuration et en clarifiant les relations entre les appareils, les groupes de points d'accès et les SSID. Vous pouvez ainsi mieux comprendre les dépendances de configuration, simplifier la maintenance et déployer efficacement des SSID communs dans divers environnements tels que les hôtels, les résidences et les campus.
De plus, l'optimisation assure la compatibilité avec le modèle de configuration existant, permettant une transition en douceur sans perturber les déploiements en cours.
Exigences
- Contrôleur Omada (Contrôleur logiciel / Contrôleur matériel / Contrôleur basé sur le cloud, v6.3 et versions ultérieures)
- Disposer d'un programme d'aide aux employés
Configuration
La section suivante explique comment ajouter un SSID et configurer le groupe AP dans Omada Controller v6.3.
Créer des SSID sur un nouveau site
Étape 1. Créez un nouveau site dans votre contrôleur .
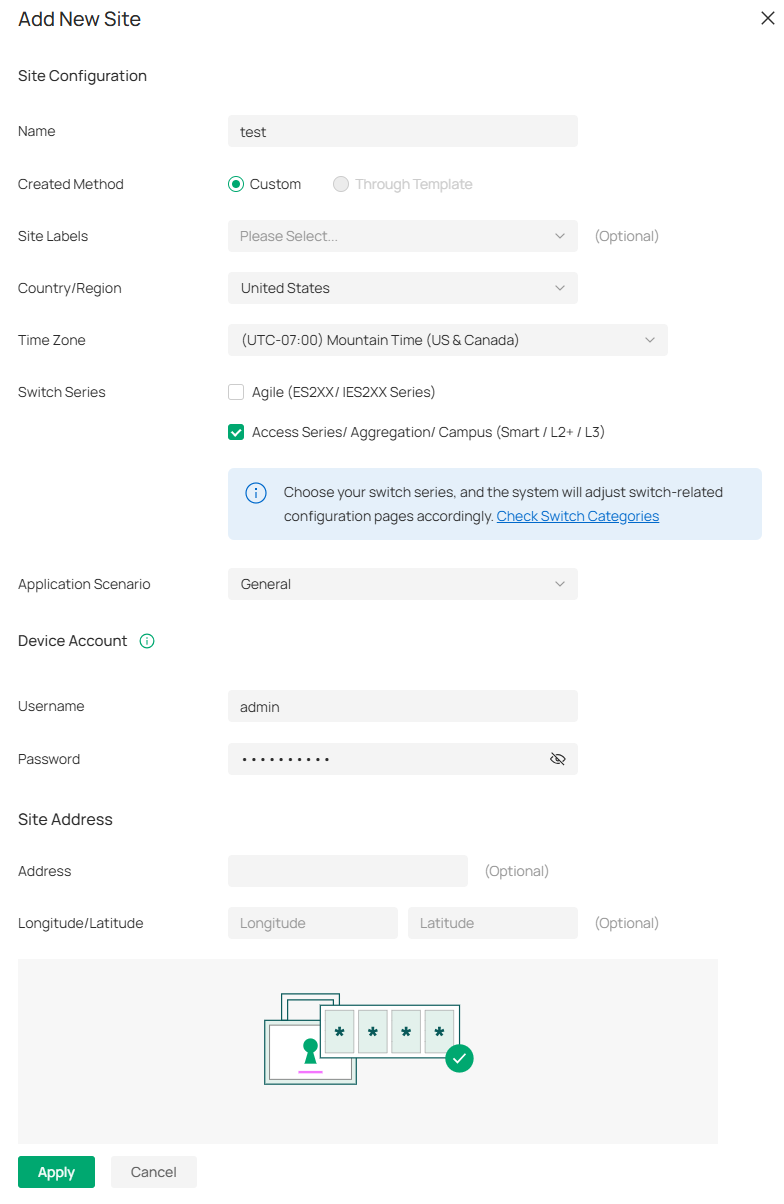
Remarque : Le système crée automatiquement le groupe de points d'accès par défaut, qui ne peut pas être supprimé.
Étape 2. Détection et adoption de l'appareil. Si vous ne trouvez pas votre appareil, vous pouvez consulter cette FAQ : Comment découvrir les appareils Omada via le contrôleur logiciel et le contrôleur matériel .
Remarque : Par défaut, un point d’accès est affecté au groupe de points d’accès par défaut après son adoption. Les passerelles et les routeurs sans fil ne sont associés à aucun groupe de points d’accès.
Étape 3. Créez votre SSID dans Configuration réseau > WLAN > Ajouter un SSID .
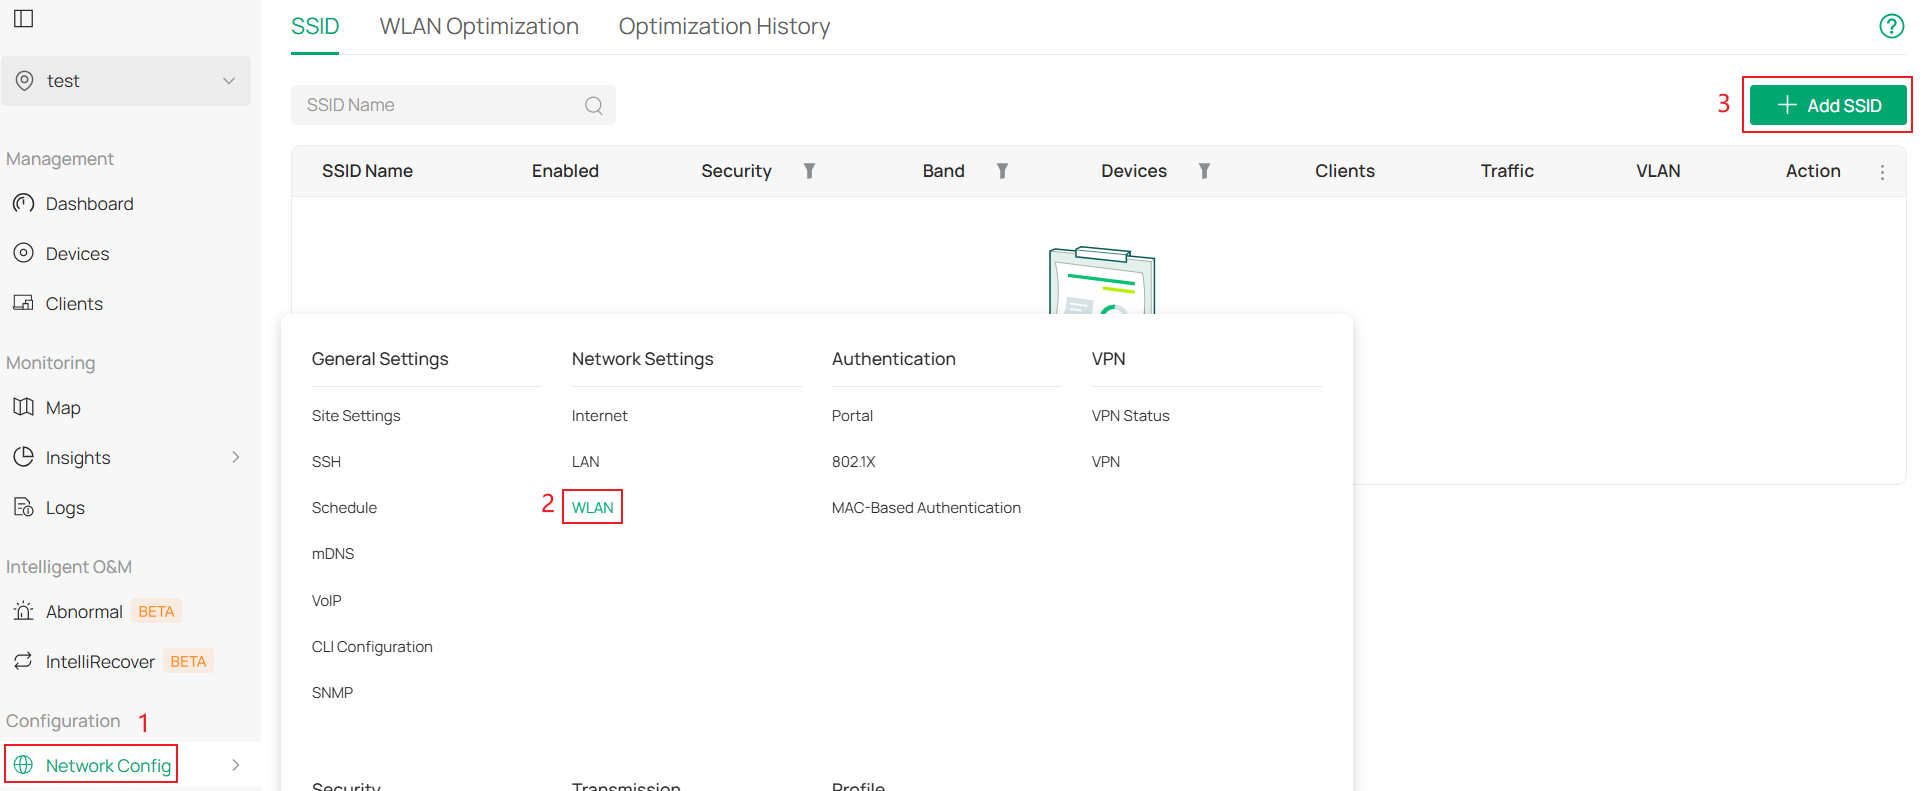
Étape 4. Configurez les paramètres de base du SSID (nom, bande, sécurité, VLAN, etc.) et sélectionnez « Choisir les périphériques ».
Tous les appareils : S'applique à tous les appareils du site prenant en charge le SSID (y compris les appareils nouvellement adoptés).
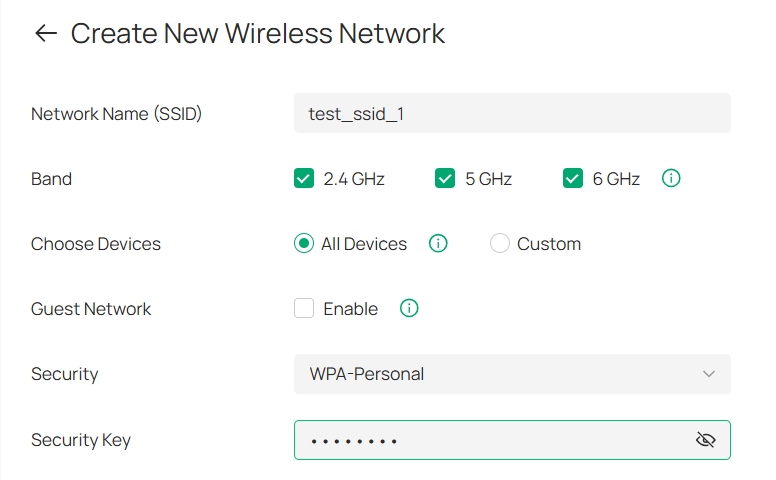
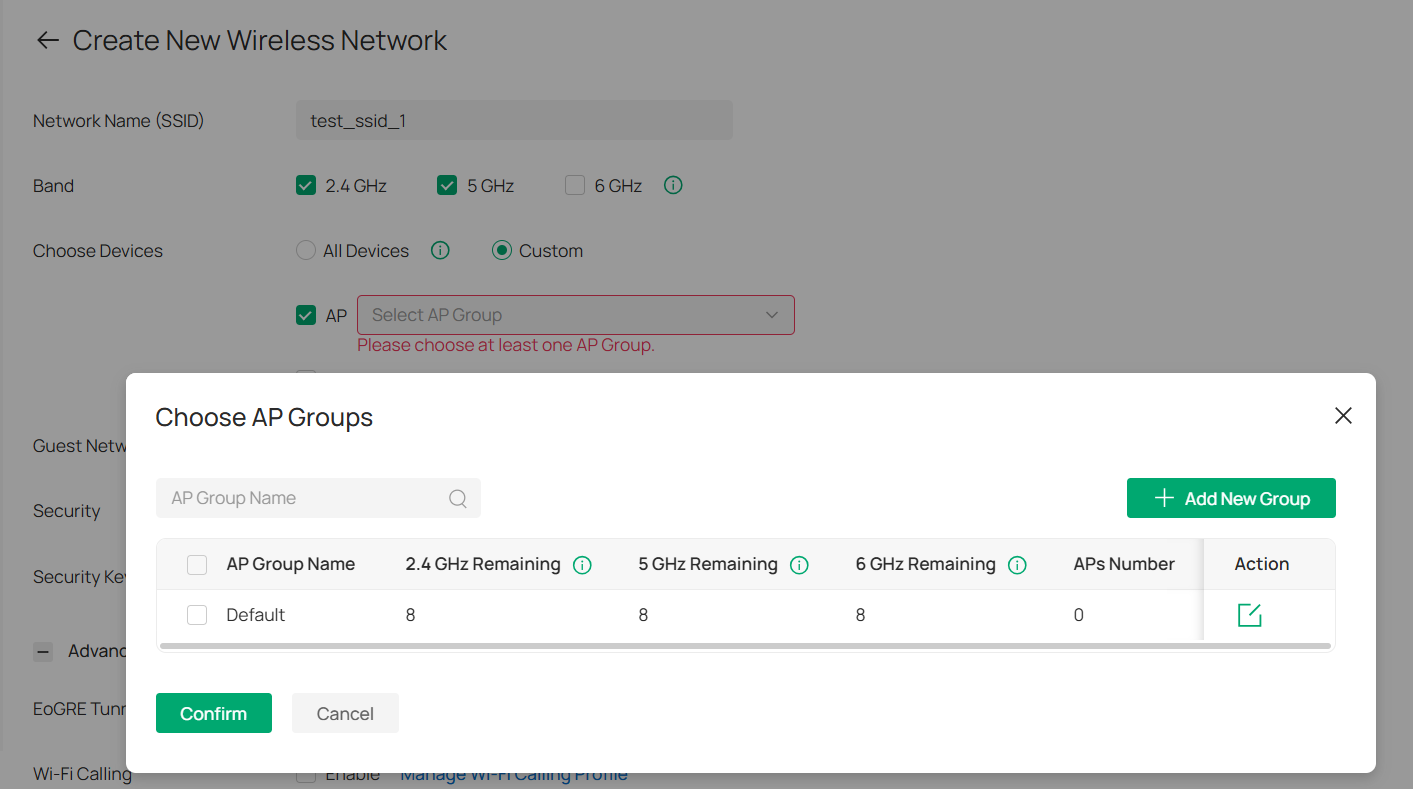
Personnalisé : Au moins une des options (AP ou Gateway) doit être sélectionnée.
- Sélection du point d'accès : sélectionnez ensuite un ou plusieurs groupes de points d'accès.
- Sélection de la passerelle : ce SSID est également valable pour les passerelles (si le type d’appareil le prend en charge).
Remarque : Une fois le SSID créé, le type de périphérique (Tous les périphériques / Personnalisé ( Passerelle / AP) ) ne peut pas être modifié.
If AP Group is selected, only switching between AP Groups is supported; changing to other types is not allowed.
Within a site, each SSID must have a unique name. Duplicate SSID names are not supported.
Step 5. Edit/Add AP groups. When choosing an AP group, you can add a new AP group or modify/delete an existing one.
Note: AP Groups bound to an SSID cannot be deleted. Deleting an AP Group that still contains APs requires additional confirmation.
When adding a new AP group, you first need to enter the name of the AP Group, then select the AP and confirm. You can choose to search for the AP by its Name, Model, IP or MAC to find the desired AP. You can also sort the entries by AP Name, IP address, etc.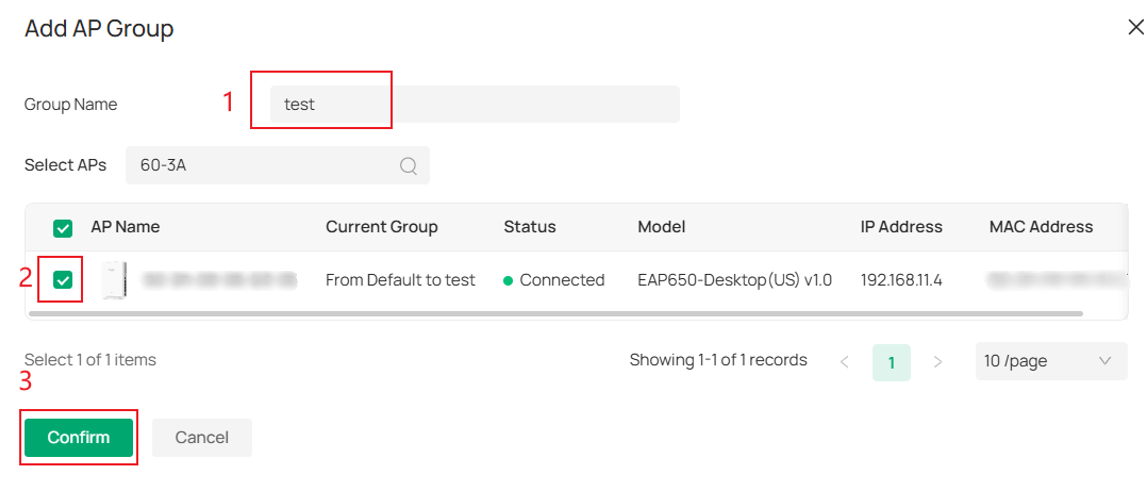
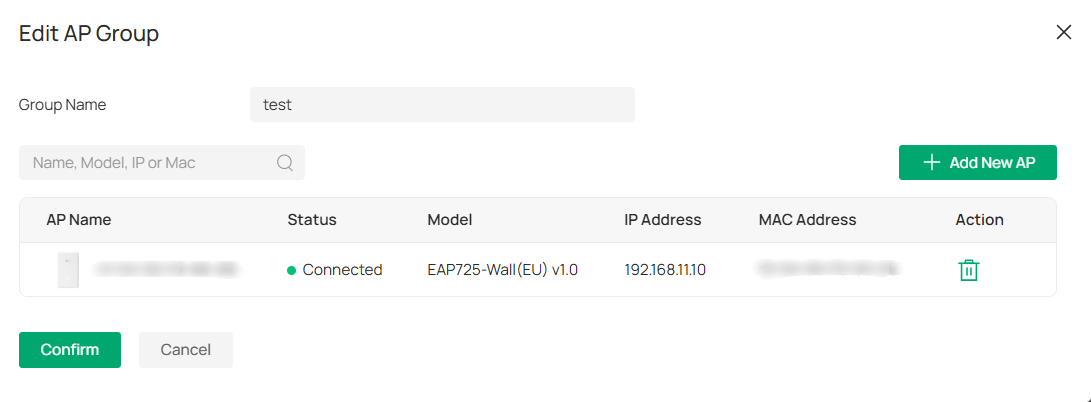
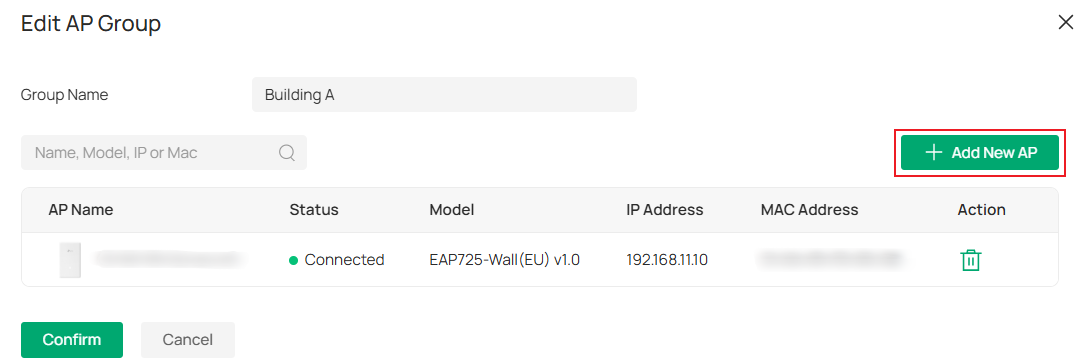
When you edit the AP group, you can perform the following basic operations on AP Groups:
- You can either delete the existing APs in the group or add the APs from other groups into it.
- The deleted AP will be returned to the default AP group, while APs assigned to the Default AP Group cannot be removed.
Note: Newly adopted APs are assigned to the Default AP Group by default.
- When editing an AP Group, you can also add APs to the group.
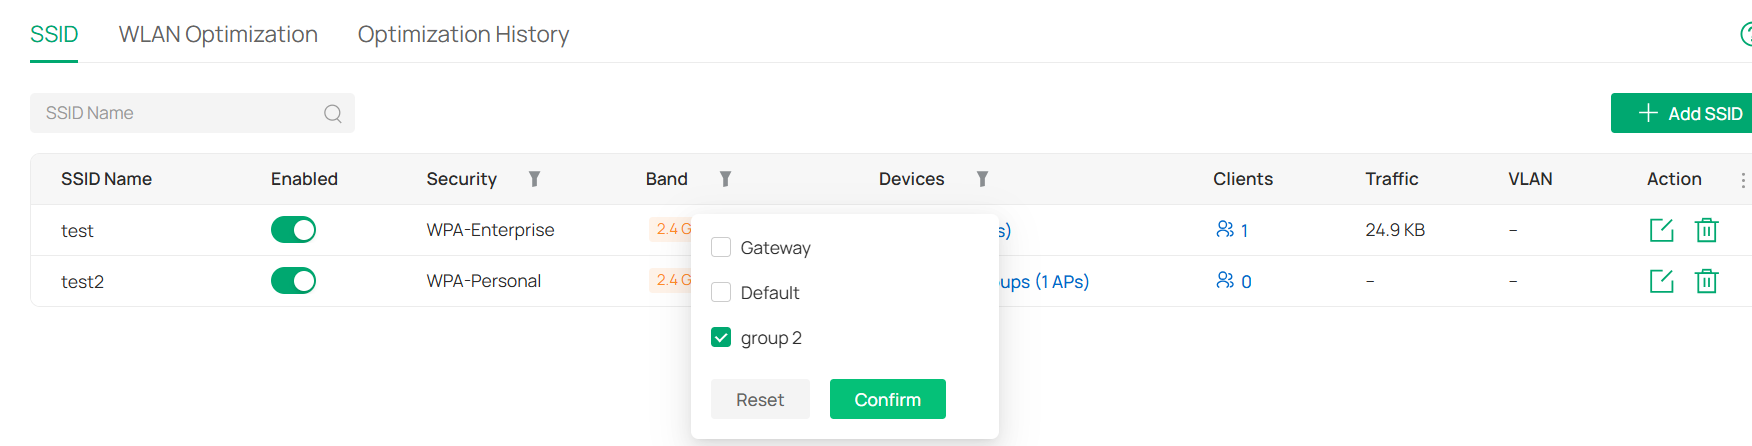
Step 6. After applying the SSID settings, you will see the SSID you created in the SSID list, and it will be in the enabled state.

You can filter SSIDs by AP Groups in the Devices column.
The new interface adds:
Enabled switch: It is enabled by default. Once it is turned off, this SSID will no longer be usable. The Override on the device private management page is equivalent to being ineffective at this time.
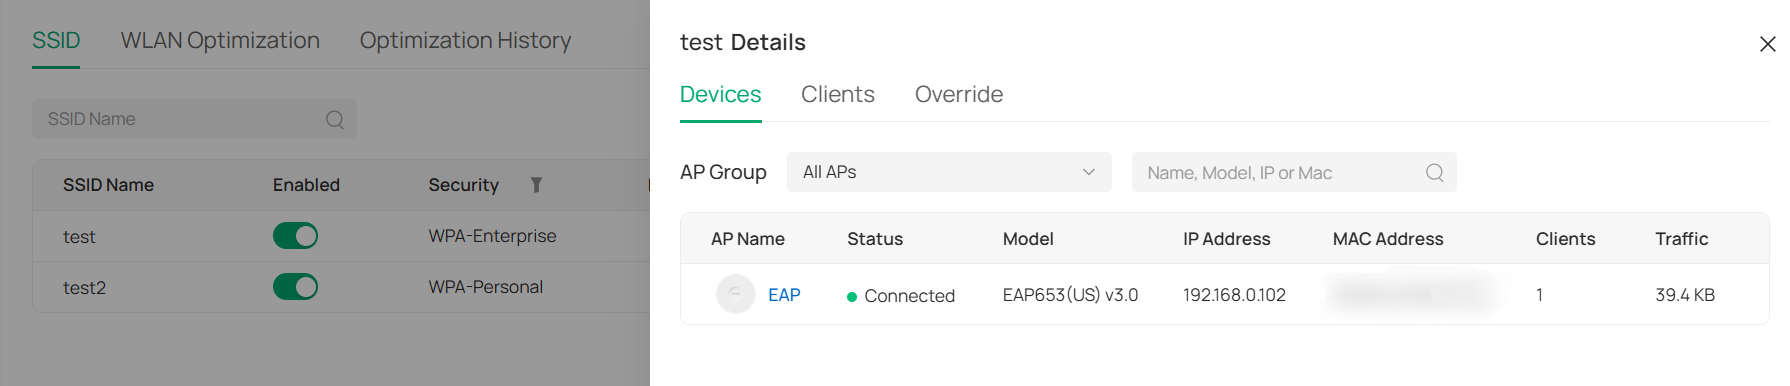
Devices: display the number of devices and AP Groups currently associated with each SSID.
By clicking this column, a side panel will appear, providing access to the SSID Detail – Devices tab, where you can view detailed information about all devices linked to the selected SSID.
In addition, clicking on a device name will open a device drawer panel. From there, you can further navigate to the device detail page to perform device management operations.
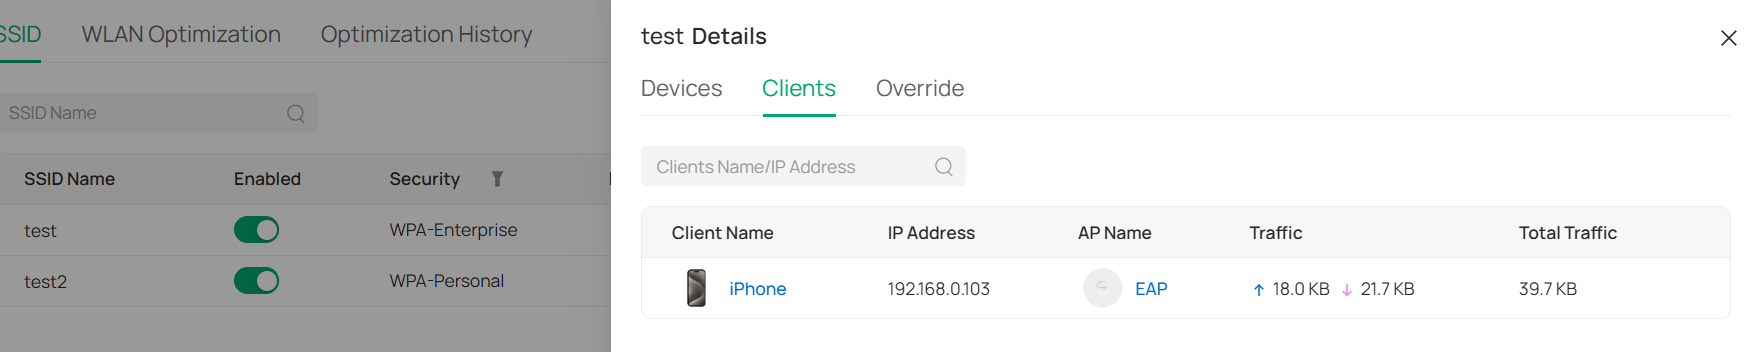
Clients: display the number of clients currently associated with each SSID.
By clicking this column, a side panel will appear, providing access to the SSID Details – Clients tab, where users can view detailed information about all clients connected to the selected SSID.
Additionally, clicking on a client name will open a client drawer panel. From there, users can further navigate to the client detail page to perform client management operations.
Traffic: the total data traffic consumed by all clients under this SSID.
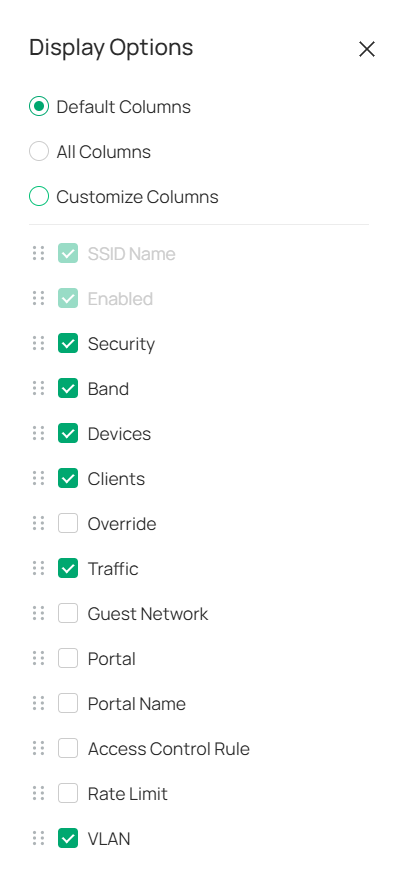
Display Options: It is located on the upper right of the SSID list.

You can customize the information displayed for the ssid. The customizable options are as follows:
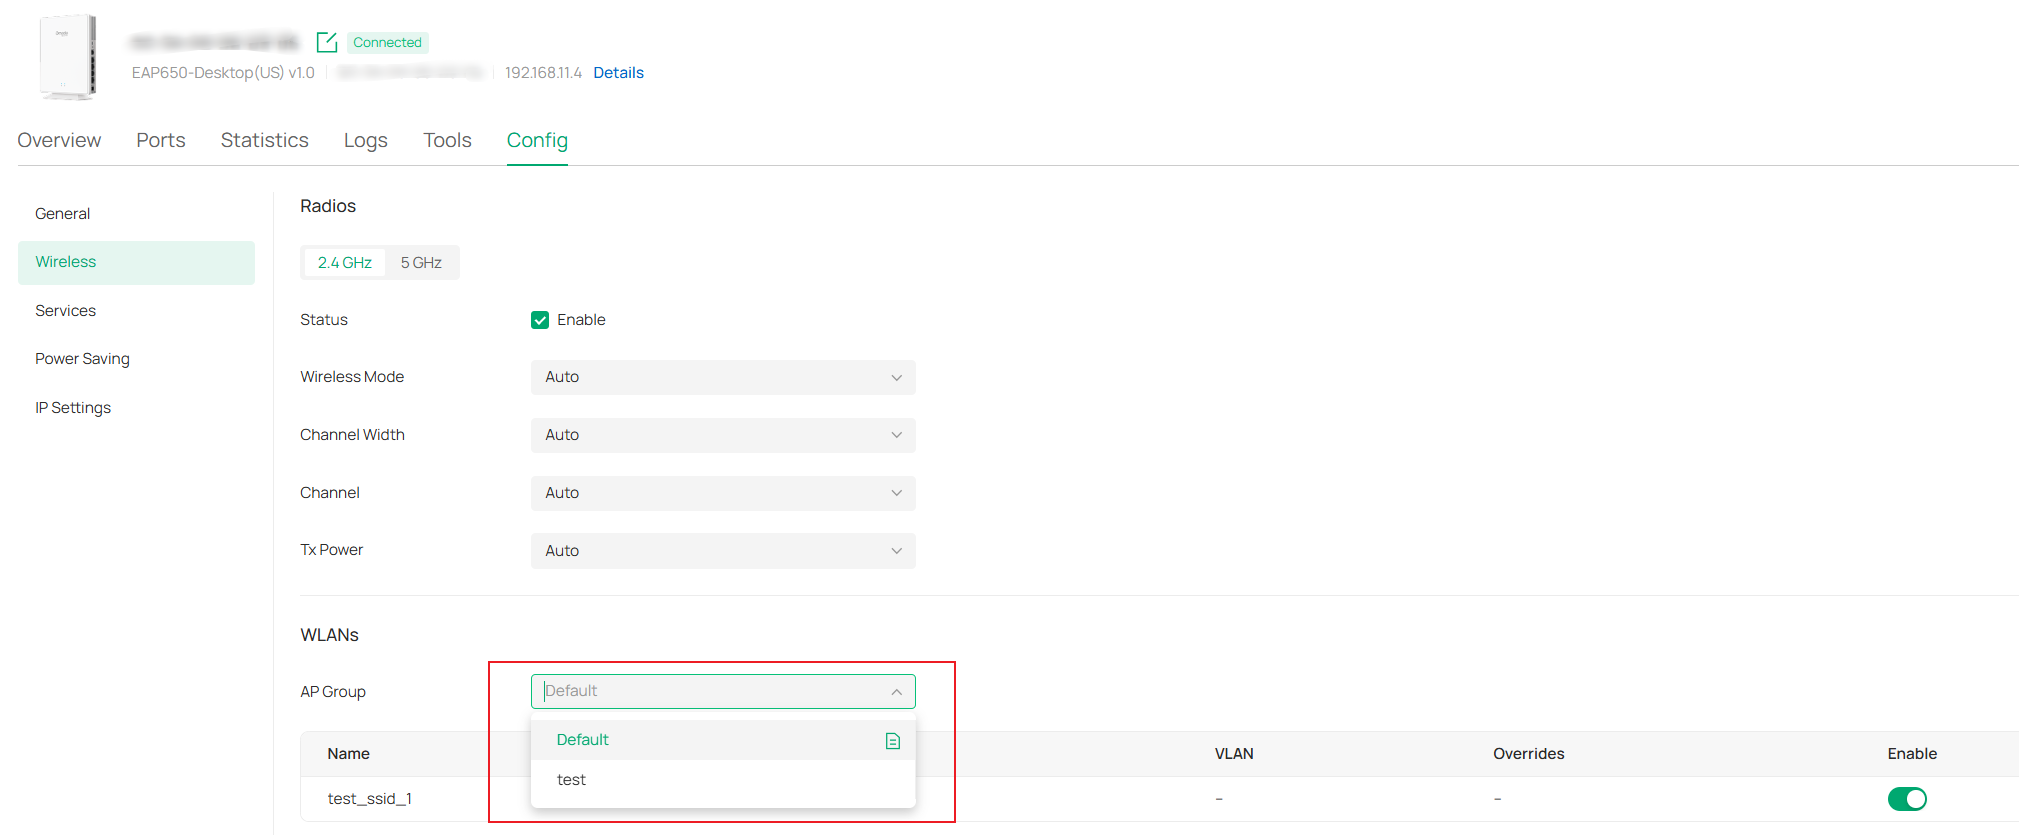
Step 7. For EAPs, Under the "Config> Wireless" section of the device's private management page, the original WLAN group has been changed to an AP Group. You can modify the AP group where the AP is located and override the SSID for that group.
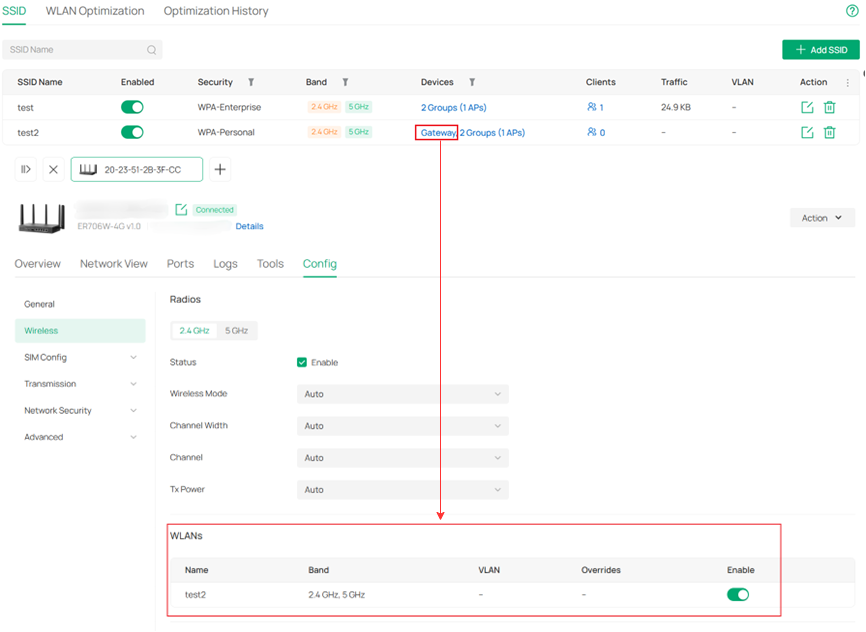
For Wi-Fi Gateways, under the "Config> Wireless" section of the device's private management page, the WLAN Groups have been removed, and the WLANs created by the gateway are now displayed directly.
Common application scenarios of AP Group
Step 1. Enter the SSID interface in the Network Config > WLAN section of the site.
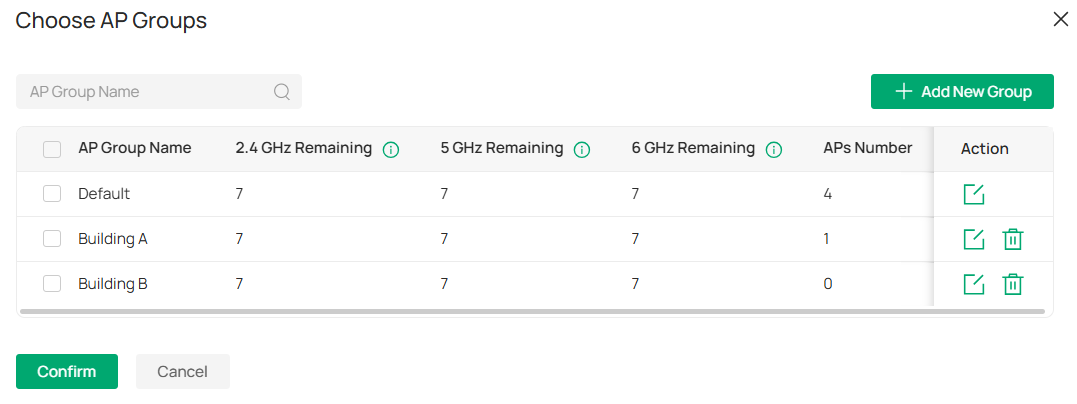
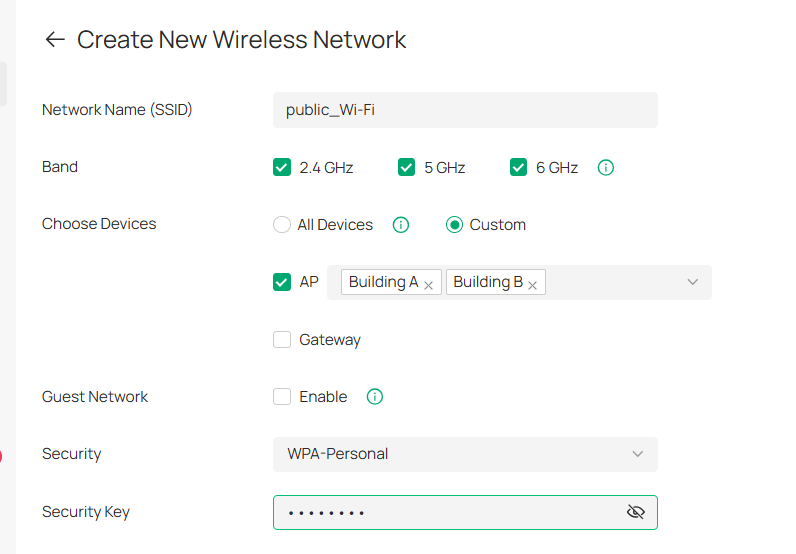
Step 2. Create a public SSID (for configuring coverage across multiple areas):
- Choose Devices > Custom (AP).
- Select multiple AP Groups (create coverage for multiple areas at once).
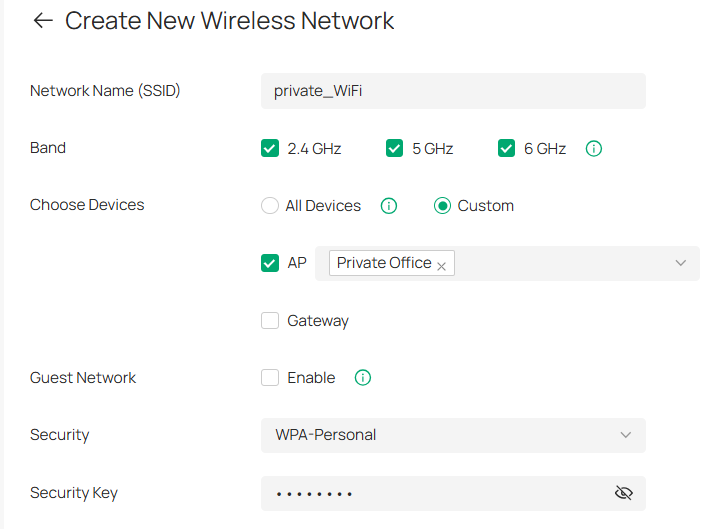
Step 3. Create a region-specific SSID, SSID names must be unique within the same site:
- Select Devices > Custom (AP).
- Only bind to a specific AP Group.
Step 4. Future Expansion
- Adding new APs: Simply assign the AP to the target AP Group to automatically inherit the SSID deployment scope associated with that AP Group.
Merge SSIDs After Omada Controller Upgrade
Prior to Omada Controller v6.3, SSIDs were managed using the WLAN Group mechanism. After upgrading to version 6.3 or later, SSID management will be migrated to the AP Group model.
SSID consolidation is not mandatory immediately after the upgrade. The following section describes how to merge SSIDs and explains how SSID configurations are applied when the merge is not performed.
How to Merge SSIDs
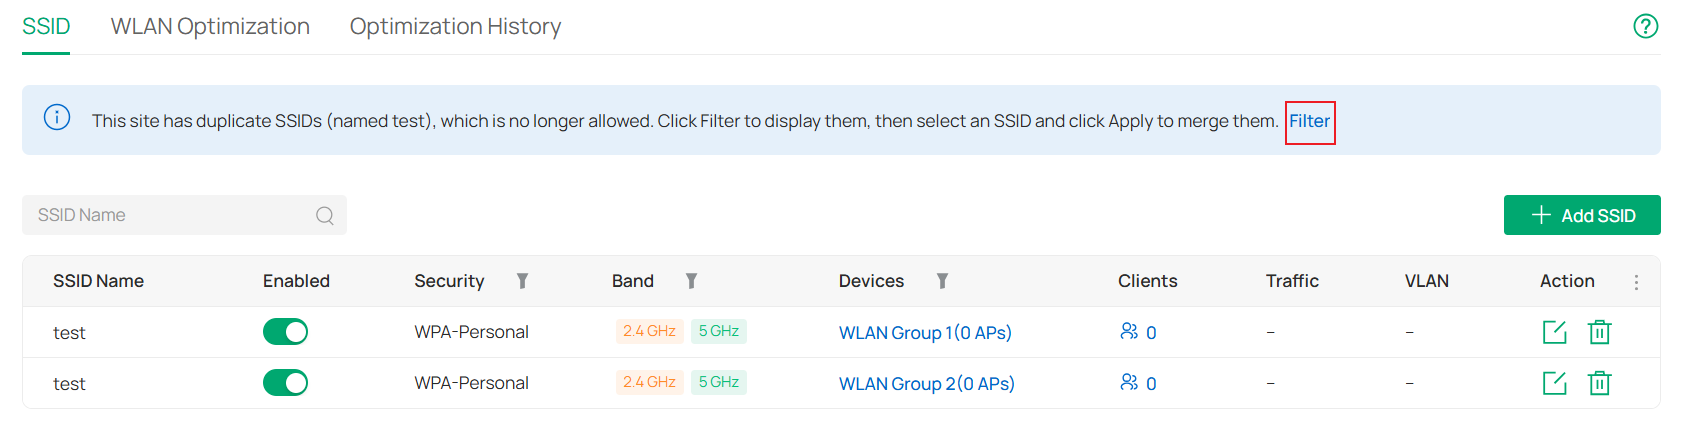
Suppose you created two SSIDs named "test" before the upgrade, with one assigned to WLAN Group 1 and the other assigned to WLAN Group 2.


After the upgrade to Omada Controller v6.3 or above, existing WLAN Groups will be converted into AP Groups with the same names. The system will perform a duplication check during this process. If duplicate SSIDs are detected, you will be notified accordingly. You can then follow the steps below to complete the SSID merge. The original SSID configurations will remain unchanged.
After reading the prompt message, click "Filter".
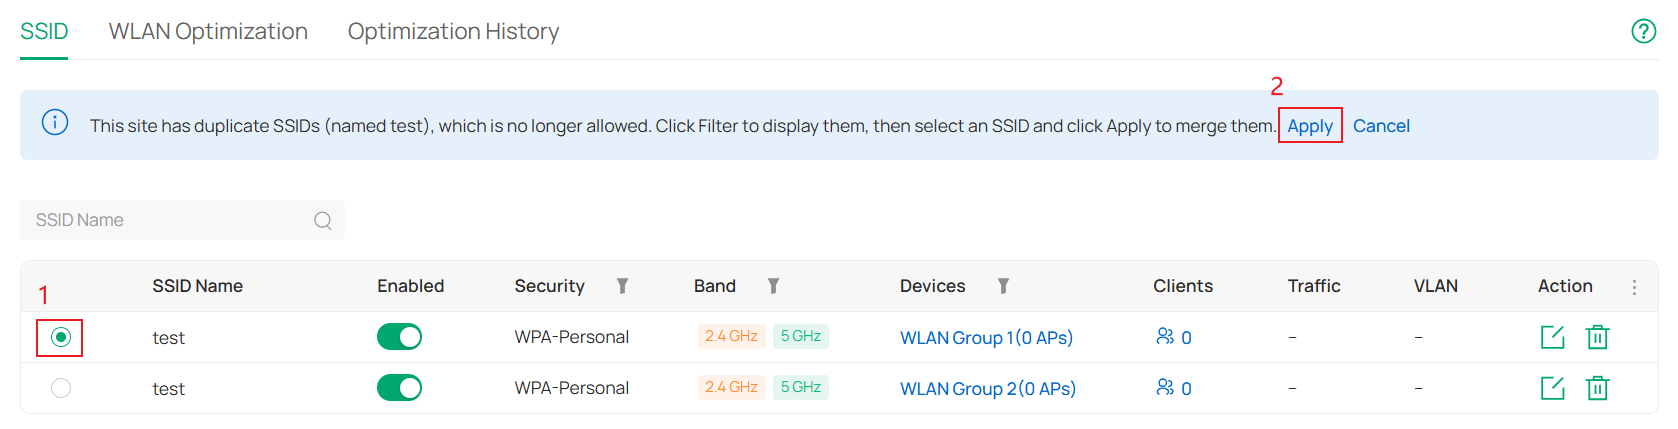
After selecting the SSID you want to keep, click "Apply".
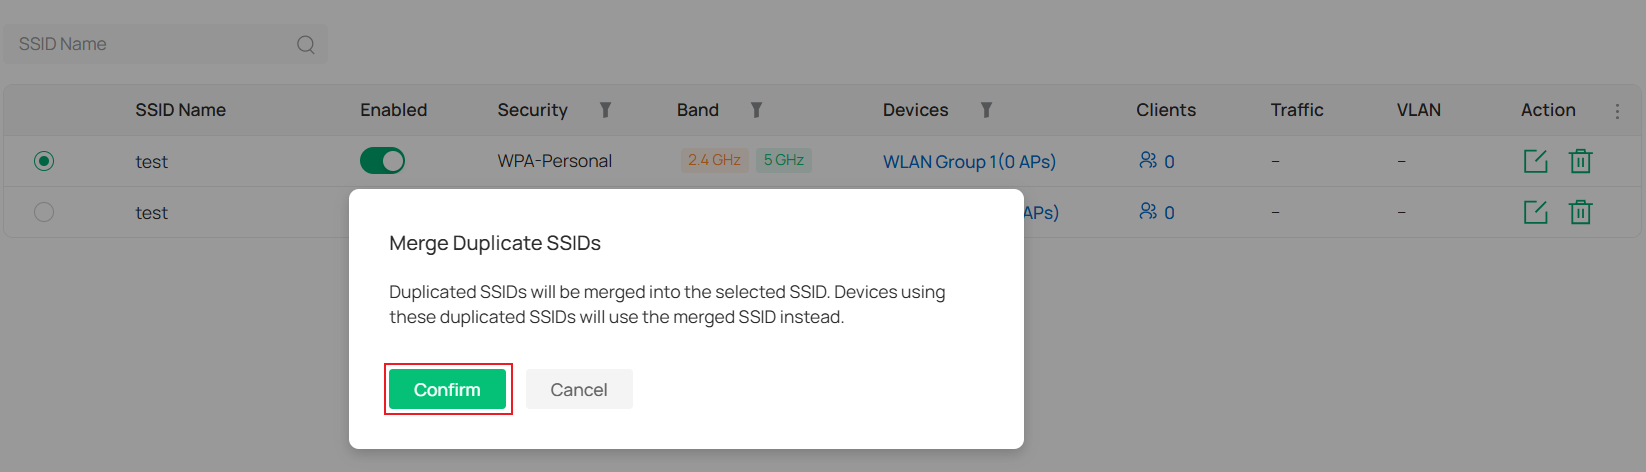
After reading the prompt text, click "Confirm".
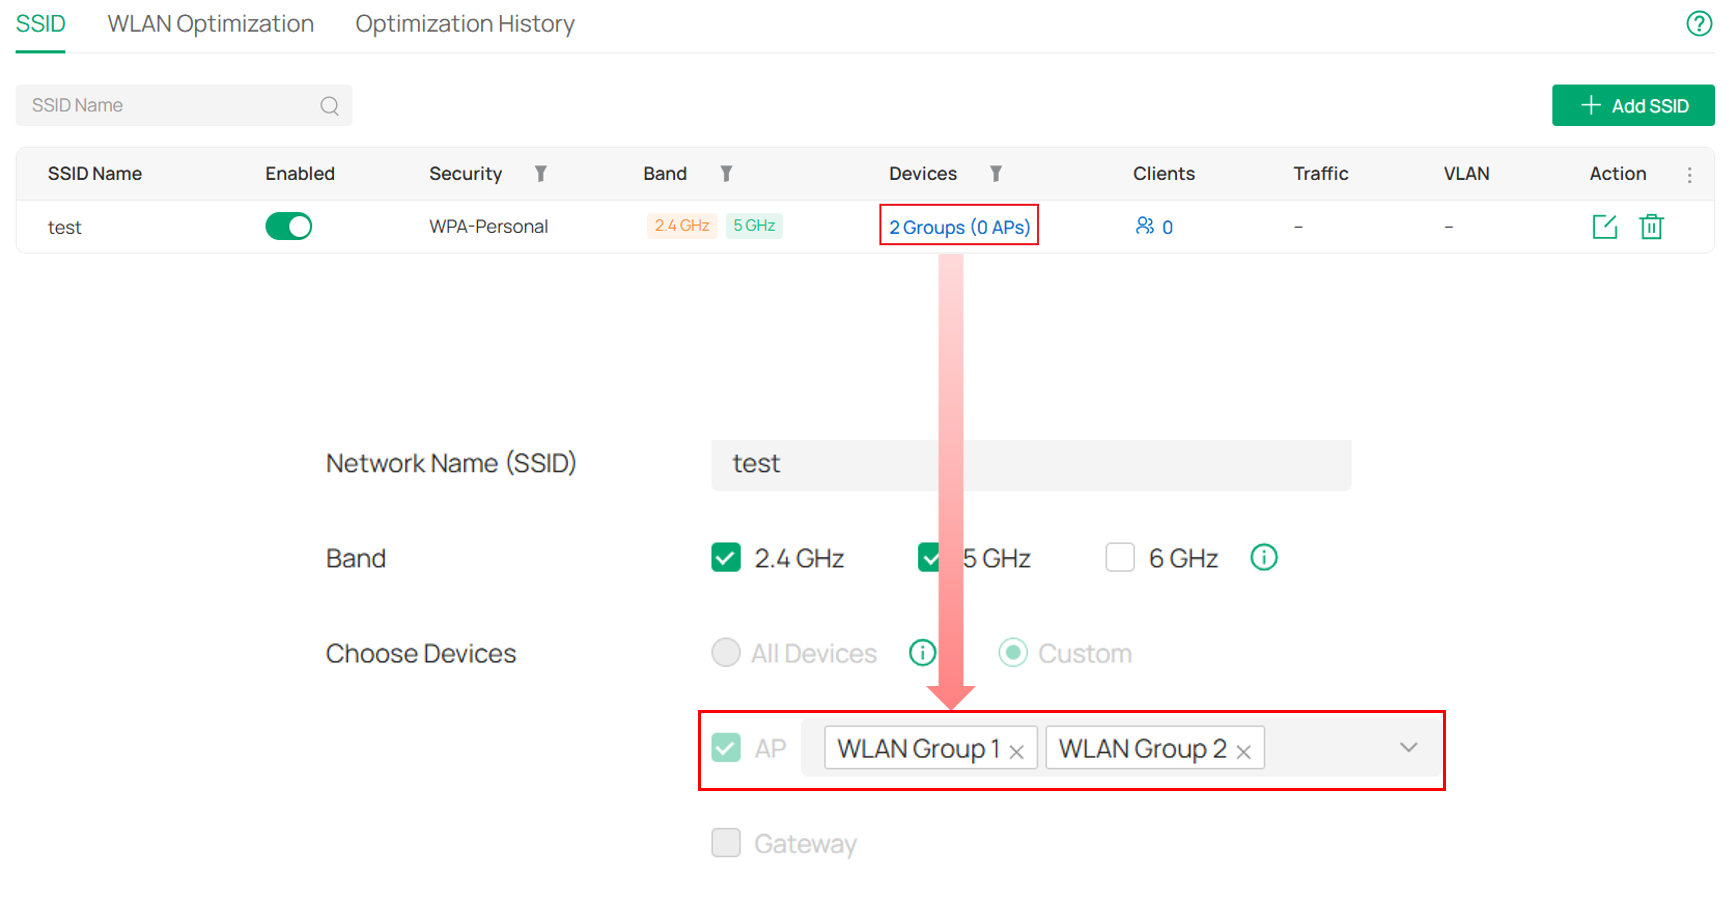
AP Groups associated with SSIDs of the same name will also be merged together. After the merge, you can continue to associate this SSID with additional AP Groups as needed.
What Happens If SSIDs Are Not Merged
Suppose you created two SSIDs named "test" before the upgrade, with one assigned to WLAN Group 1 and the other assigned to WLAN Group 2.


After the upgrade to Omada Controller v6.3 or above, you can choose not to merge duplicate SSIDs.
If SSIDs are not merged, their existing configurations will be preserved and will continue to take effect as they did before the upgrade.
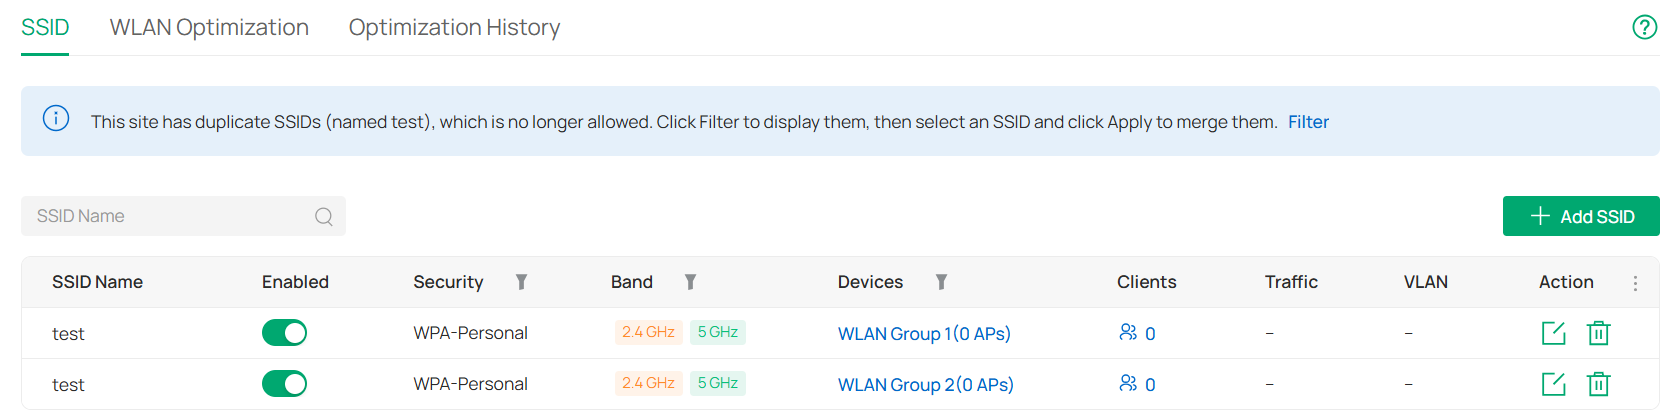
To prevent configuration conflicts caused by duplicate SSIDs with different settings being assigned to different AP Groups, the AP Group association of duplicate SSIDs cannot be modified.
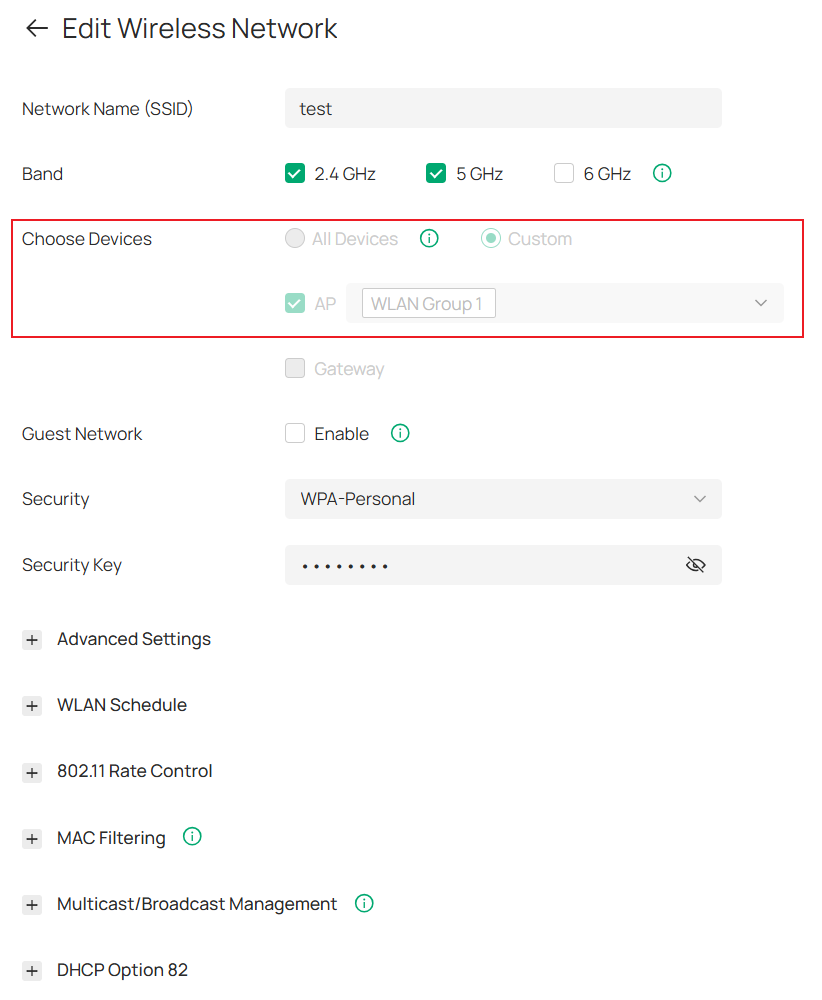
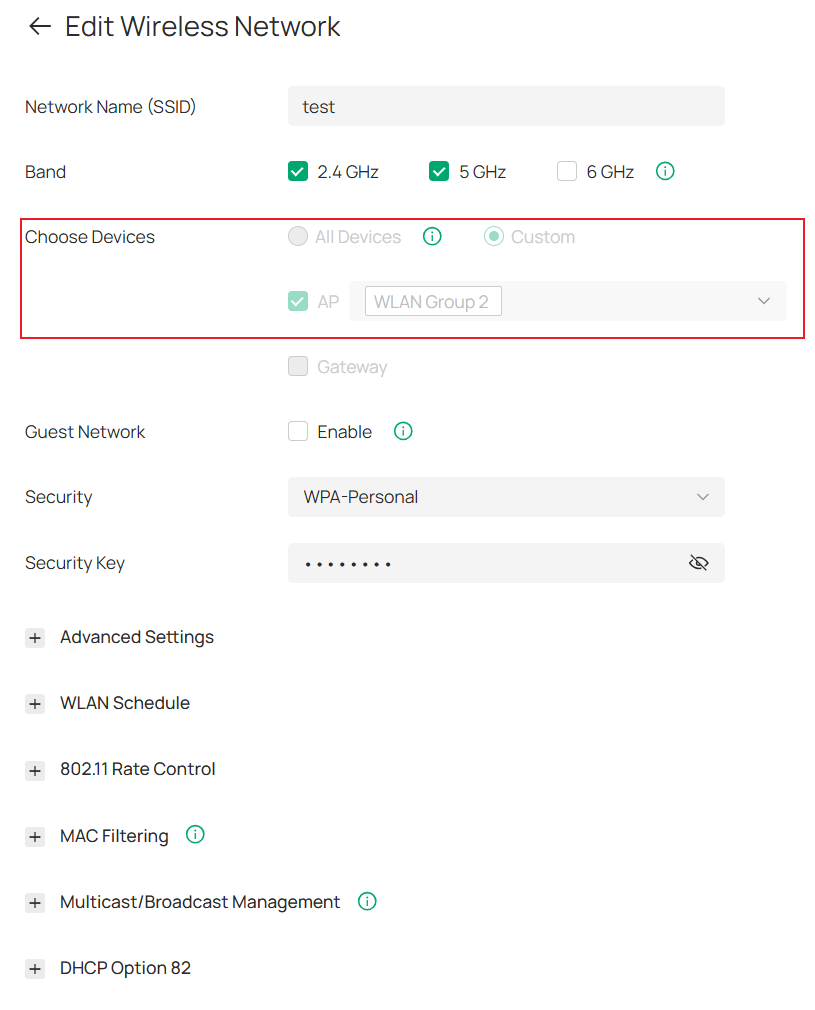
As a result, you cannot change the coverage scope of a duplicate SSID by moving it between AP Groups. Otherwise, devices could receive different configurations for SSIDs with the same name, which may lead to configuration inconsistencies and prevent the devices from operating correctly.
Apart from this AP Group restriction, all other SSID settings can be viewed, modified, and applied normally.
Conclusion
This article introduces the AP Group feature introduced in Omada Controller v6.3, which further optimizes the original WLAN configuration model. By following this guide, you will quickly understand and learn how to effectively use the AP group feature.
To learn more about each function and configuration, please visit Support Home to download or check the manual for your product.
QA
Q1: What impact will the management SSID of the Flex Bridge have?
A1: Flex Bridge 5 only supports Management SSIDs in the device private management page, while site-level SSIDs are not applied. Therefore, a clear message is provided in the SSID>Devices, as shown below:
“This SSID is not applied to the single-pack Bridge APs in the above AP group. To check their applied management SSIDs, go to the AP management page.”
Q2: What App versions are supported? Can older versions of the App still function properly?
A2: The Omada App upgrade is not mandatory. Older versions remain accessible, while version 5.3 is the officially supported release.
Viewing and query functions remain mostly unaffected:
La liste des SSID et les pages de détails se chargent normalement, permettant une inspection et un dépannage standard. Cependant, les nouveaux champs tels que les groupes de points d'accès ne sont pas visibles dans les anciennes versions de l'application et peuvent apparaître vides ou tronqués, sans que cela n'affecte la consultation de base.
Les opérations de montage comportent des risques potentiels :
Lorsqu'il existe plusieurs SSID portant le même nom au sein d'un même site, les anciennes versions de l'application ne peuvent pas distinguer leurs groupes de points d'accès. Cela peut entraîner des modifications involontaires des SSID appartenant à différents groupes de points d'accès, et certaines modifications peuvent ne pas être prises en compte correctement.
Avis de compatibilité :
La mise à jour du contrôleur vers la version 6.3 ne rendra pas les versions antérieures de l'application inutilisables. Cependant, en raison d'incohérences liées au nouveau modèle de configuration, les opérations de modification peuvent présenter des risques. Il est recommandé de mettre à jour l'application Omada vers la version 5.3 ou ultérieure pour garantir une prise en charge complète de la configuration WLAN.
Q 3 : Dois-je reconfigurer les groupes de points d'accès immédiatement après la mise à niveau ?
A3 : Non. Après la mise à niveau, il n’est pas nécessaire de reconstruire immédiatement les configurations. La priorité est d’assurer la disponibilité du réseau.
Q 4 : Que se passe-t-il si le nombre de SSID de passerelle Wi-Fi dépasse la limite après la mise à niveau ?
A4 : Dans Omada Controller v6.3, seuls 8 SSID de passerelle par site et par bande sont pris en charge. Lors d’une mise à niveau ou d’une restauration, le système ajustera automatiquement les configurations dépassant cette limite.
Si un SSID ne possède plus aucun appareil compatible après modification, il sera marqué comme invalide et pourra uniquement être supprimé.
