


Contents
Configuration – Motion Detection and Pet Detection
Introduction
Pet Detection on Omada IPC is an intelligent monitoring function powered by artificial intelligence. It captures real-time camera footage and uses advanced image recognition algorithms to accurately identify pets. This function allows users to view their pets’ real-time activities at home and receive alerts for specific pet-related behaviors. Pet Detection can also be integrated with event detection. When a pet triggers an event, the system can automatically start recording and send relevant information to the user based on the configured preferences.
Pet Detection can be found under the Motion Detection, Line Crossing Detection and Intrusion Detection configurations within an Omada IP Camera. Under each of these configurations, Pet Detection can be enabled and will follow the rules set for each configuration.
In this guide, Pet Detection will be enabled within the Motion Detection configuration. We will walk through the basic steps to set up this function and review additional customization options.
Requirements
- Omada IP Camera
Configuration – Motion Detection and Pet Detection
Step 1. Enter the camera’s IP address in a web browser to log in to the Omada Camera’s Web UI. After logging in, go to Settings > Event > Motion Detection. 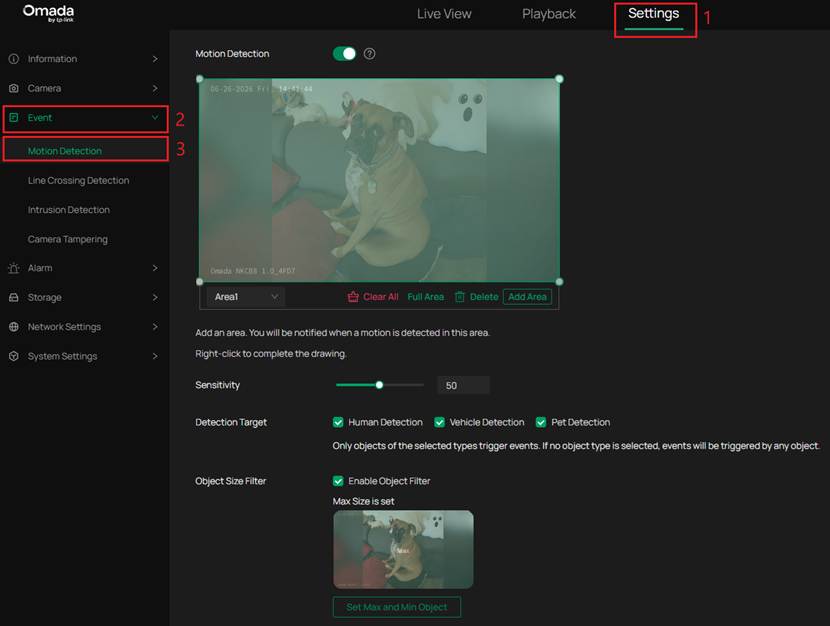
You may use the following settings to edit the detection area of the Omada Camera.
- Area Selection: In this example Area1 is selected. When other Areas have been created, this is where the Area selection can be changed.
- Clear All: This will clear all Areas. This will permanently delete all created Areas.
- Full Area: This will enlarge the currently selected Area to be the full screen of the camera view.
- Delete: Delete the selected Area. Unlike Clear All option, this will only delete the Area that is selected.
- Add Area: Add a new Area of detection. Up to 4 Areas may be created.
Step 2. Make sure Motion Detection is enabled, and Pet Detection is enabled for Detection Target. Select Apply. 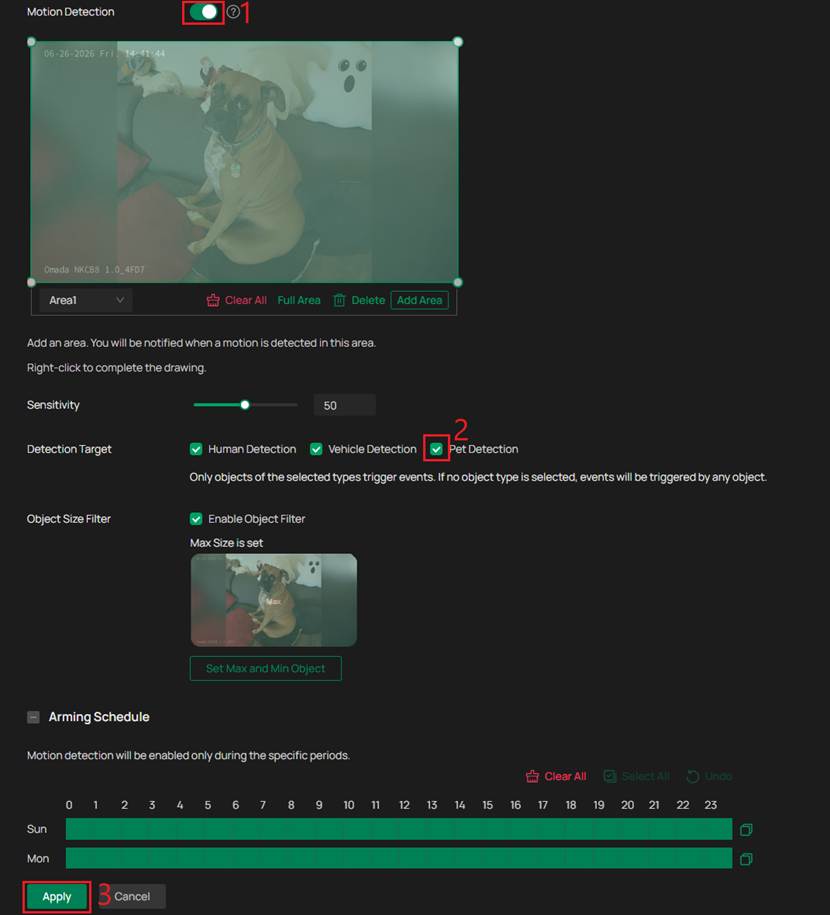
Step 3. If applicable, there are more customization options for Pet Detection. These configuration options include Sensitivity, Detection Target, Object Size Filter and Arming Schedule.
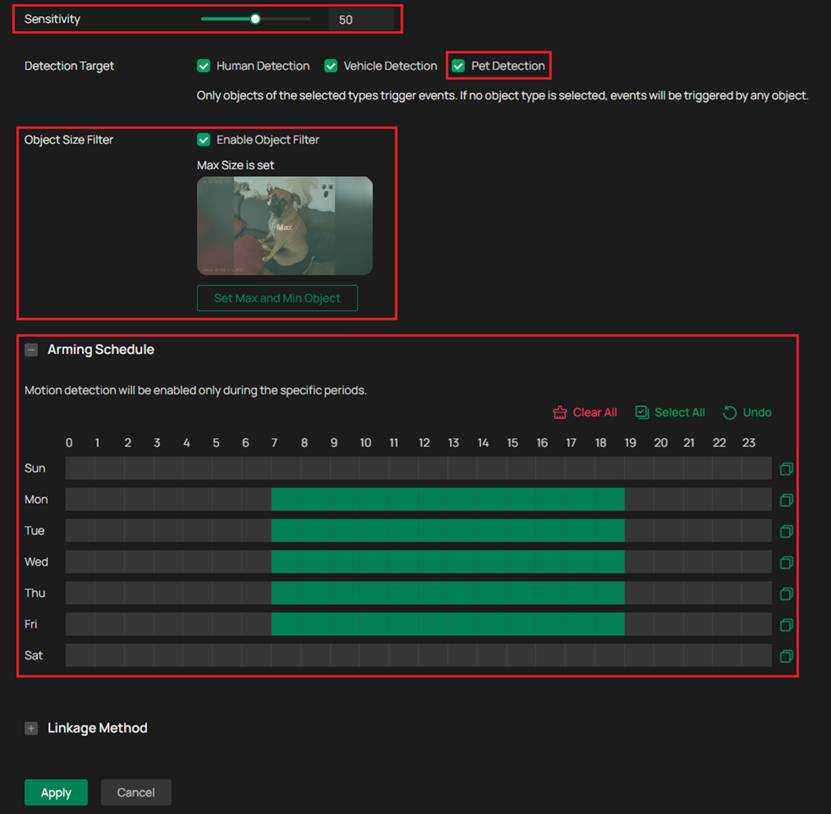
Sensitivity: Sensitivity determines the flexibility of event detection. With higher sensitivity, it would be more sensitive to report an event.
Detection Target: This setting selects what object must be detected for Motion Detection activation and record a Motion Detection Event. For Pet Detection, be sure this is enabled. If no object is selected, Motion Detection will be triggered by any object in the field of view of the camera.
Object Size Filter: Set the minimum and maximum object size thresholds for detection. Objects smaller than the minimum size or larger than the maximum size will be filtered out and will not trigger detection or recording.
Arming Schedule: This area schedule for when Pet Detection will be active. In this example, the user may wish for Pet Detection to be active while they are at work, so it has been configured to be active 7am – 7pm weekdays.
Conclusion
The Pet Detection feature of Omada IPC provides intelligent, real-time monitoring and alerts for pet activity using advanced AI technology. With flexible configuration options, users can easily define detection areas, adjust sensitivity, set schedules, and configure response actions to support effective, customized pet monitoring.
QA
Q1: I receive a warning message when accessing the camera. What do I do?
A1: This warning is normal when accessing a local device because many routers, cameras, servers, and internal tools use a self-signed certificate instead of one trusted by an internet browser.
- Chrome: Advanced > Proceed to <IP Address>
- Edge: Advanced > Continue to <IP Address>
Q2: Why is Pet Detection not triggering any events?
A2: Make sure Motion Detection is enabled and Pet is selected under Detection Target. Also check that the pet is within the configured detection area, the Arming Schedule is active at the current time, and the Object Size Filter is configured correctly. If the minimum size is set too large or the maximum size is set too small, the pet may fall outside the configured size range and will not trigger detection events.
Q3: Why am I receiving too many Pet Detection alerts?
A3: Try lowering the Sensitivity, adjusting the detection area to exclude high-traffic or background areas, and increasing the Object Size Filter so smaller objects or background movement do not trigger alerts.
Q4: Why is my pet not being detected reliably?
A4: Detection accuracy may be affected by lighting, camera angle, distance from the pet, pet size, or objects blocking the camera view. Try improving lighting, adjusting the camera angle, lowering the Object Size Filter, or increasing Sensitivity.
Q5: Can Pet Detection work only during certain hours?
A5: Yes. Use the Arming Schedule to define when Pet Detection is active. For example, users can enable detection only during work hours or overnight.
Q6: Can I use Pet Detection with Line Crossing Detection or Intrusion Detection?
A6: Yes. Pet Detection can be enabled under Motion Detection, Line Crossing Detection, and Intrusion Detection. When enabled, it follows the rules configured for the selected detection type.
To learn more about each function and configuration, please visit Support Home to download or check the manual for your product.
