


How to implement an external DHCP server with DHCP Relay in the Omada Ecosystem with Omada Switches

Configuration for Controller Mode
Configuration for Standalone Mode
Introduction
In some network environments within the Omada Ecosystem, a third-party (external) DHCP server may be required instead of using the gateway’s built-in DHCP service. This guide explains how to configure Omada Switches to ensure that client devices can correctly reach and obtain IP addresses from the designated DHCP server after connecting to the network via DHCP Relay.
Requirements
-
Omada Access, Access Plus, Access Pro, Access Max, Aggregation, Campus Switch
- Omada Controller
Configuration
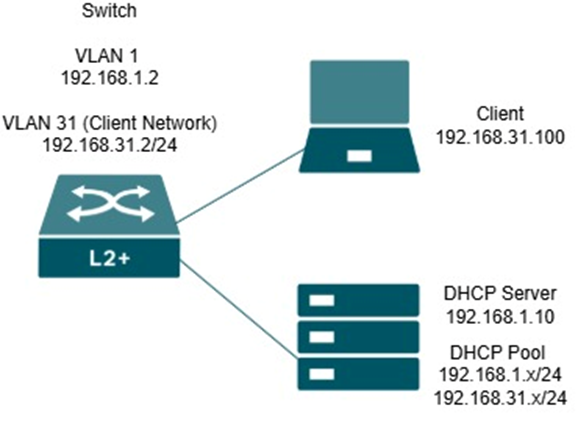
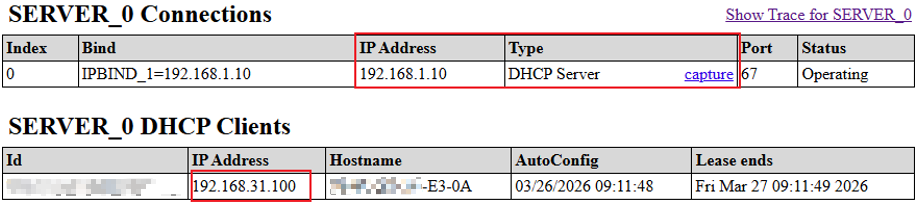
In this scenario, the DHCP server (192.168.1.10) is on a different subnet than some client devices, such as those on the 192.168.31.0/24 network.
Since DHCP requests are broadcast and cannot cross Layer 3 boundaries, the Omada L2+ switch (192.168.1.2) must act as a DHCP Relay agent for VLANs that do not share the same subnet as the DHCP server. When a client (192.168.31.100) sends a DHCP Discover message, the switch receives it on the VLAN interface and relays it as a unicast request to the DHCP server. The server then assigns an IP address from the appropriate scope (192.168.31.0/24 or 192.168.1.0/24) based on the relay information.
By configuring DHCP Relay on the interfaces of the Omada Switches, clients across different subnets can successfully obtain IP addresses from a centralized external DHCP server.
Configuration for Controller Mode
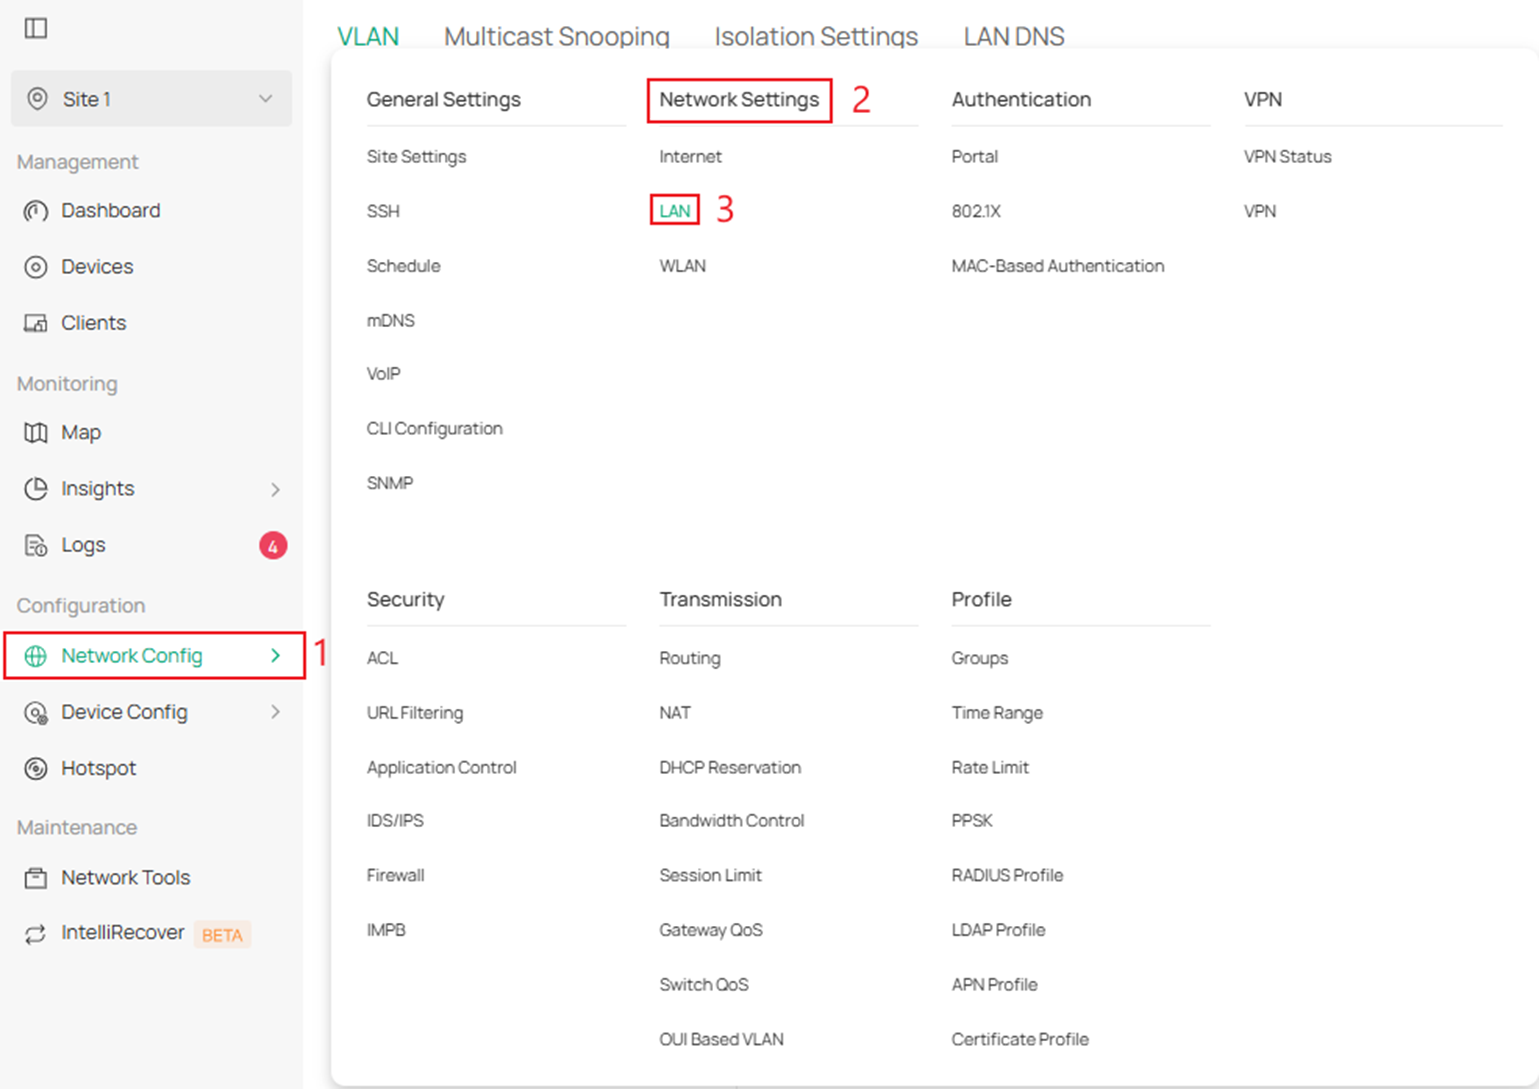
Step 1. Under Network Config navigate to Network Settings > LAN.
Step 2. Edit an existing or create a new LAN to set an external DHCP server.
If you need to edit an existing LAN click on the correct VLAN and edit it by clicking the “pencil and paper icon” on the right.

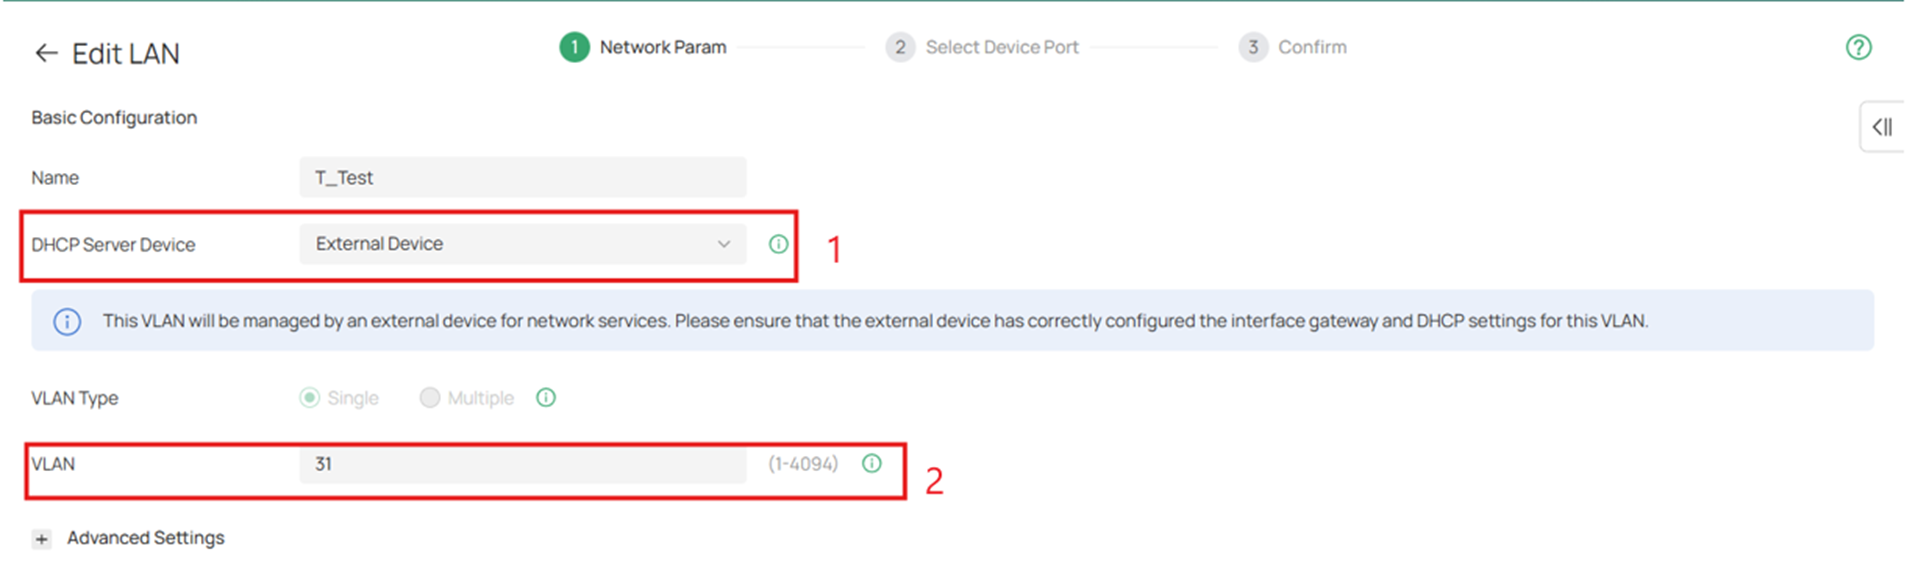
Step 3. Make sure that the DHCP Server Device is set to External Device and put the correct VLAN ID in VLAN.
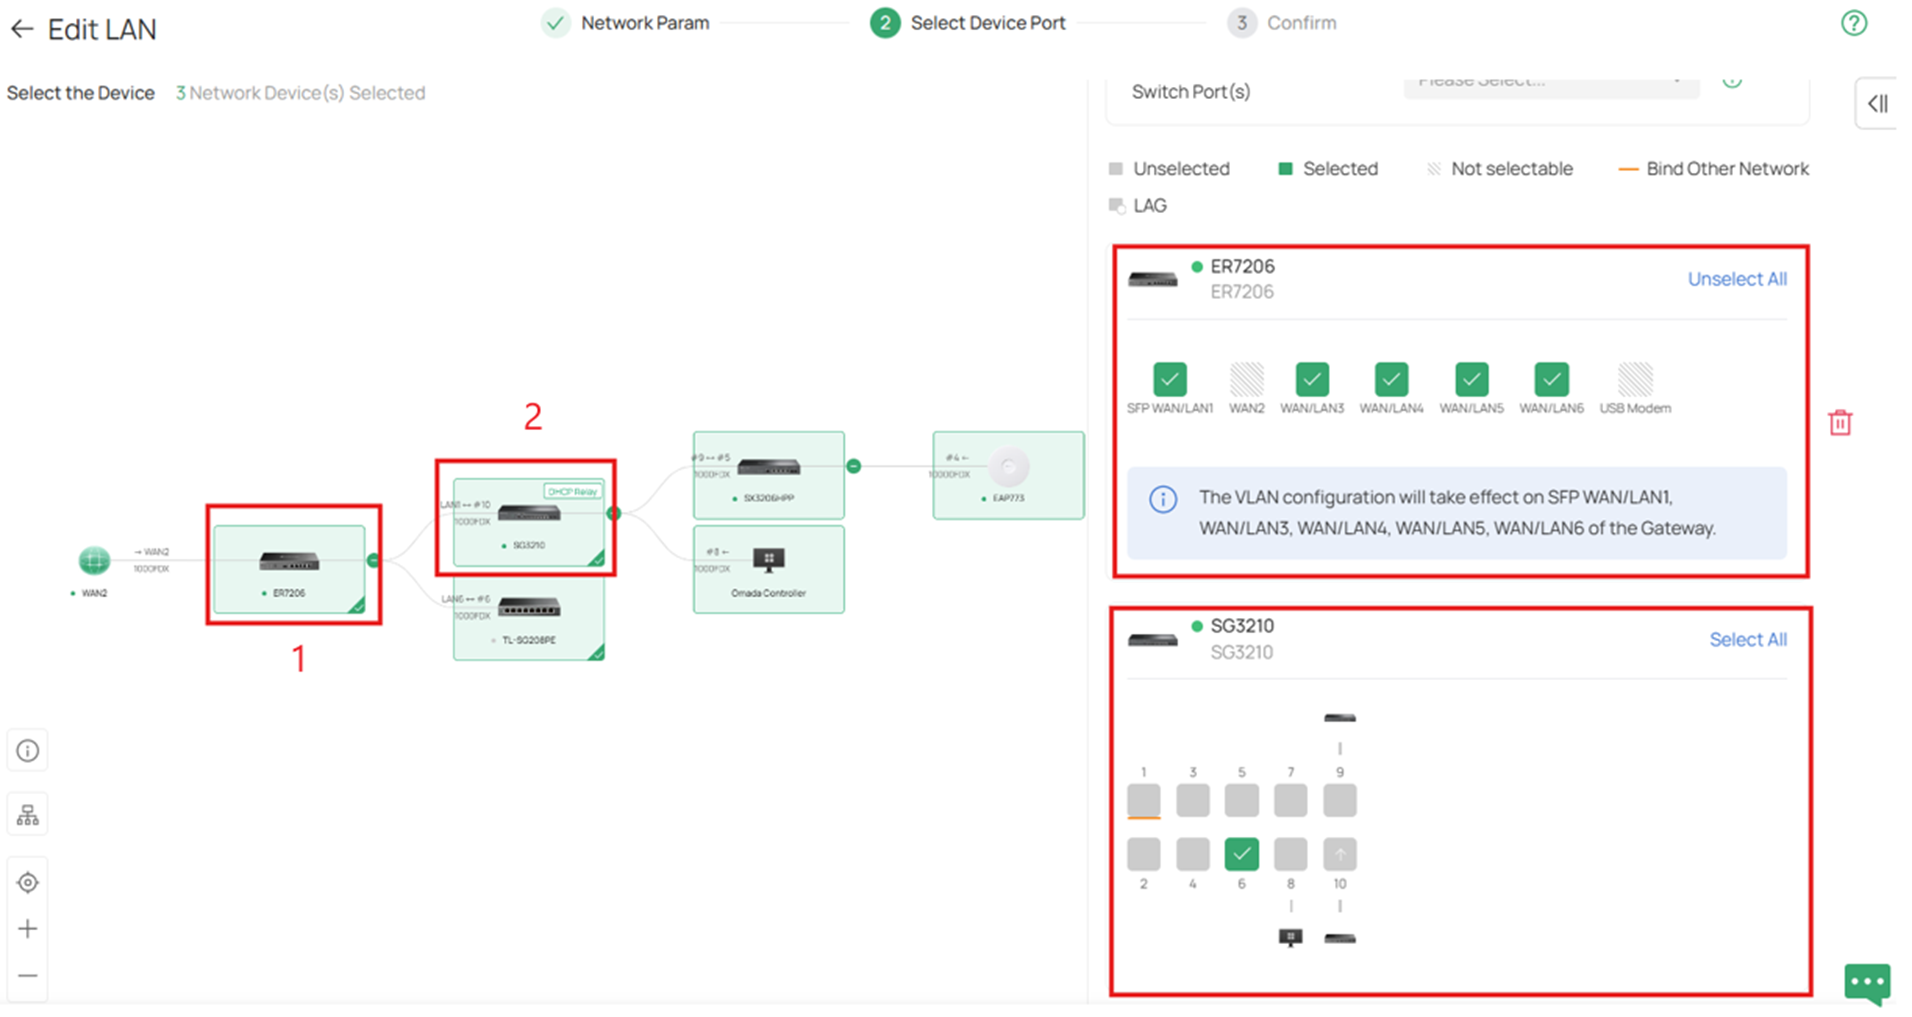
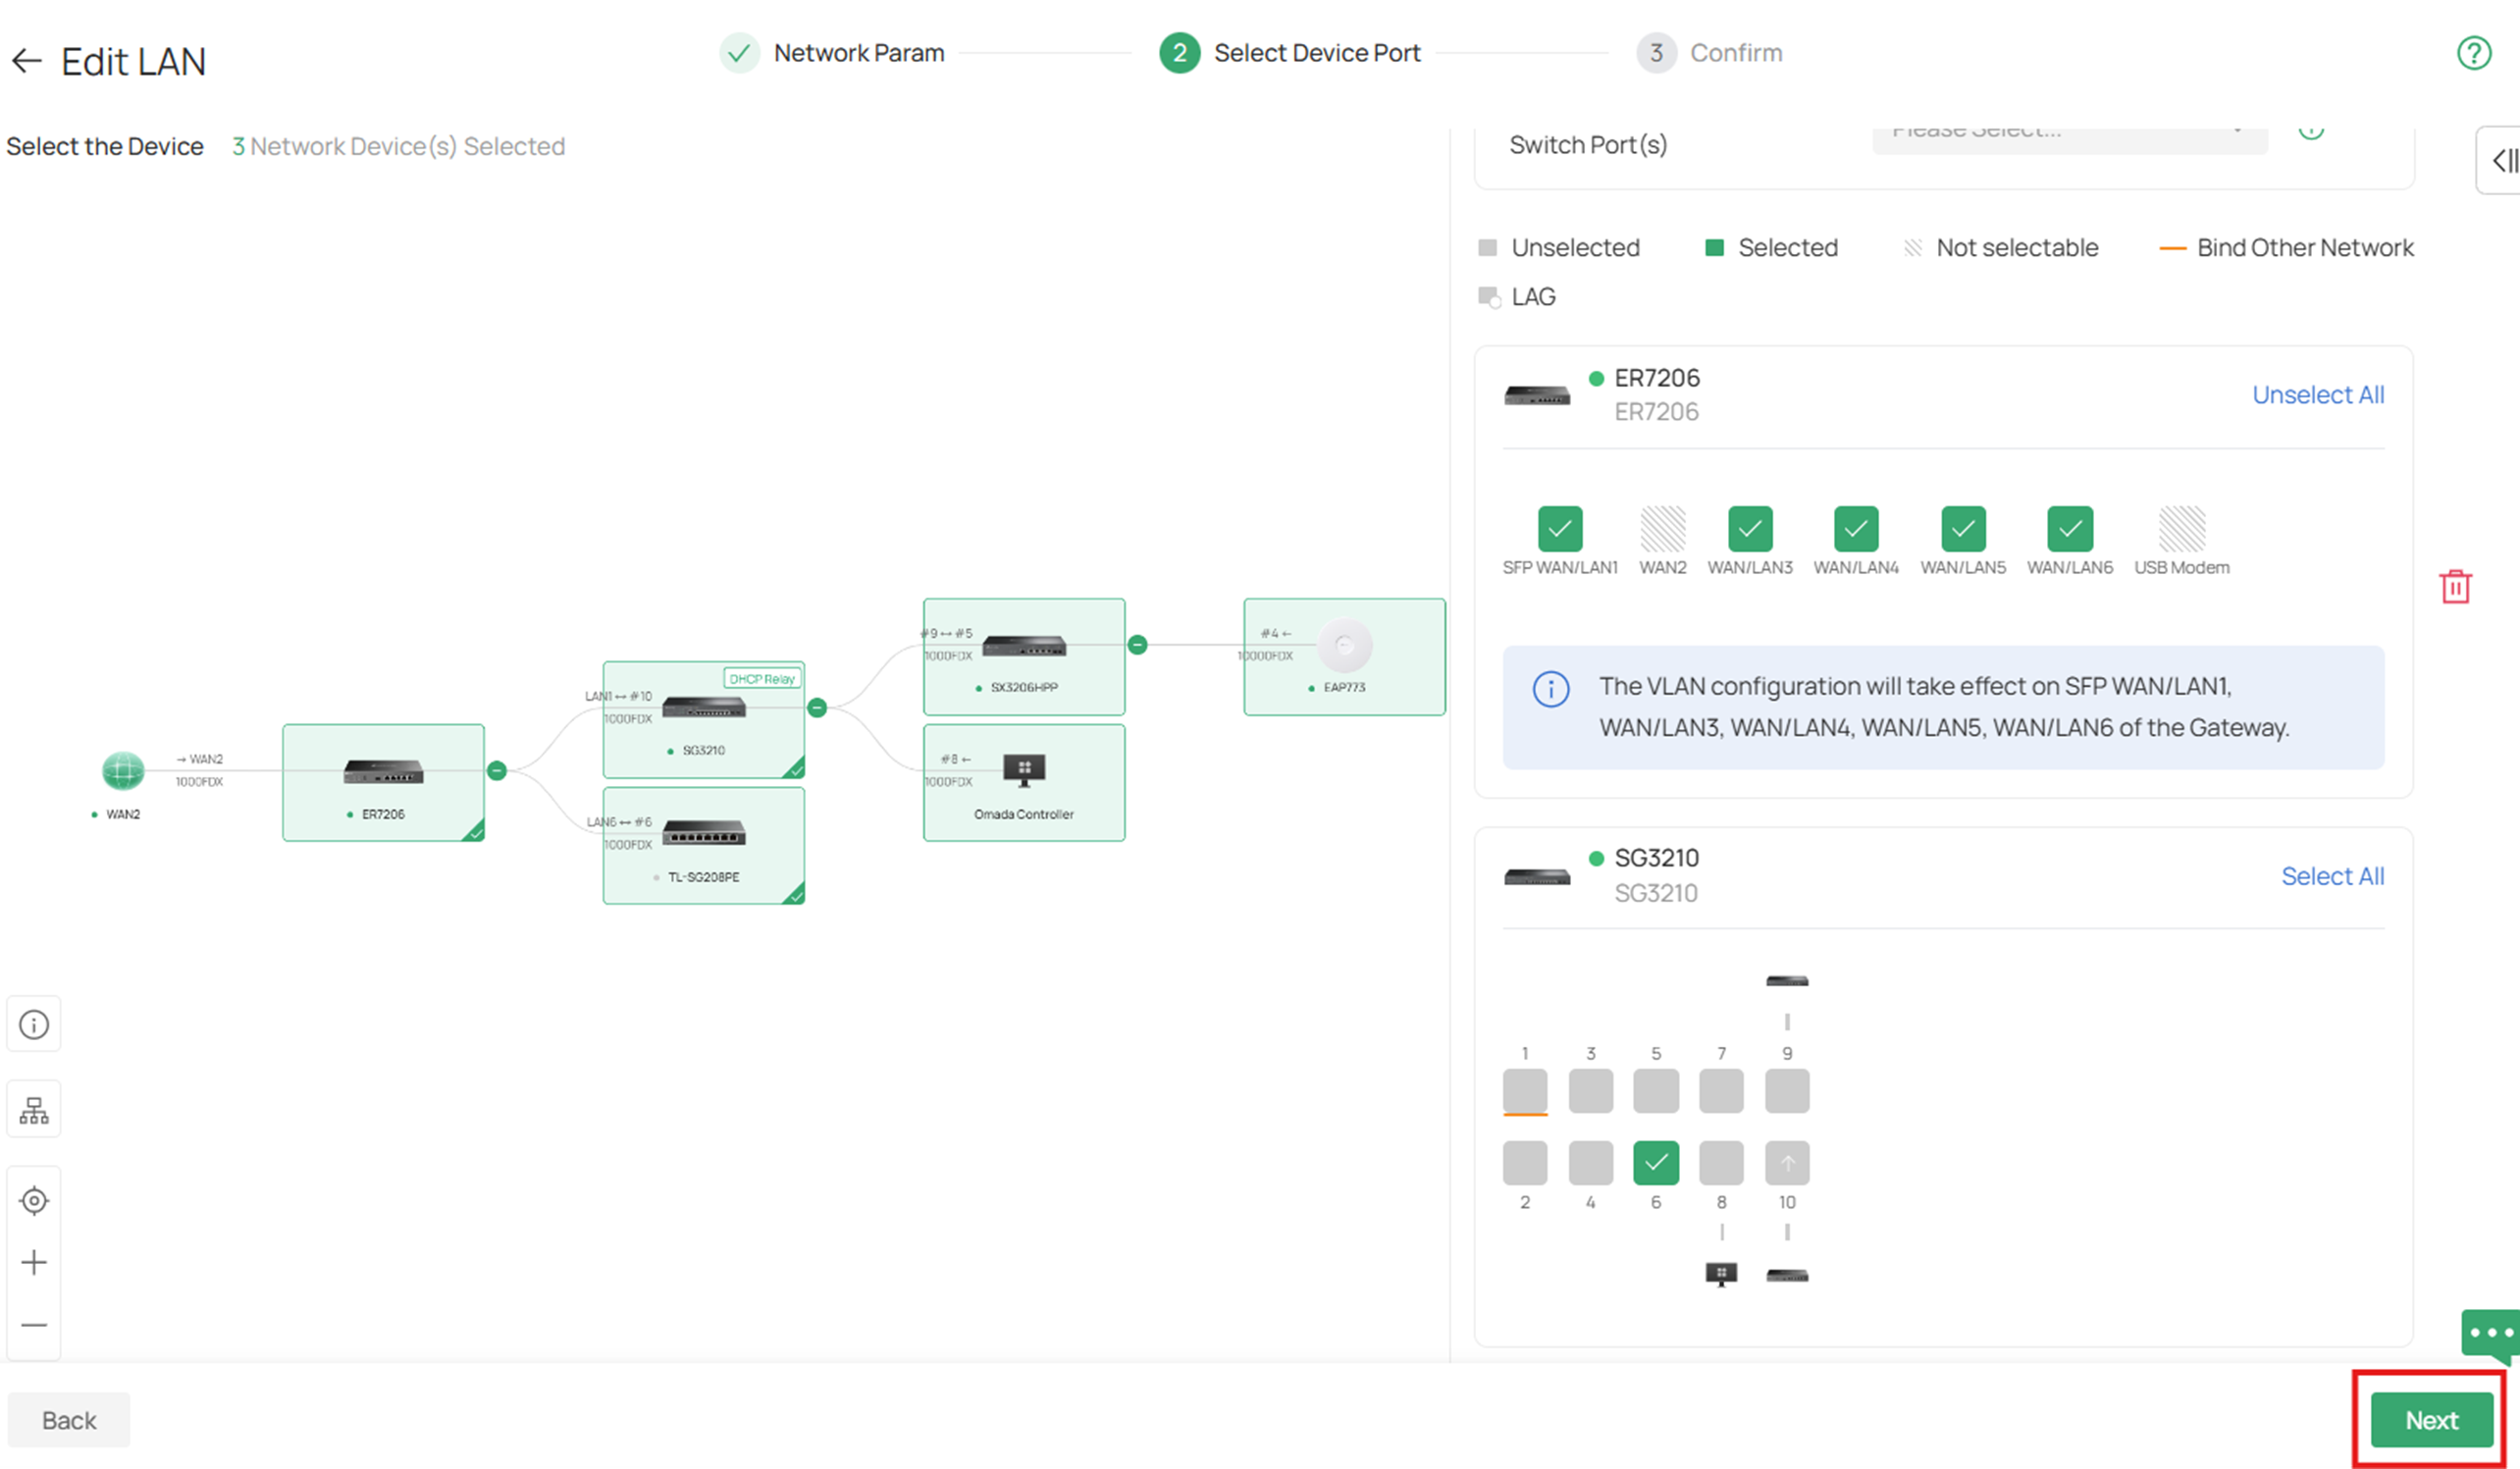
Step 4. Click on the switch in the topology and click on the ports you would like to make an Access port for that VLAN. All other ports that are designated trunk ports will add this VLAN as a tagged port.
If you have an Omada router in the setup make sure that you enable that VLAN on desired interfaces as well.
Step 5. After configuring the VLAN on the proper ports click Next.
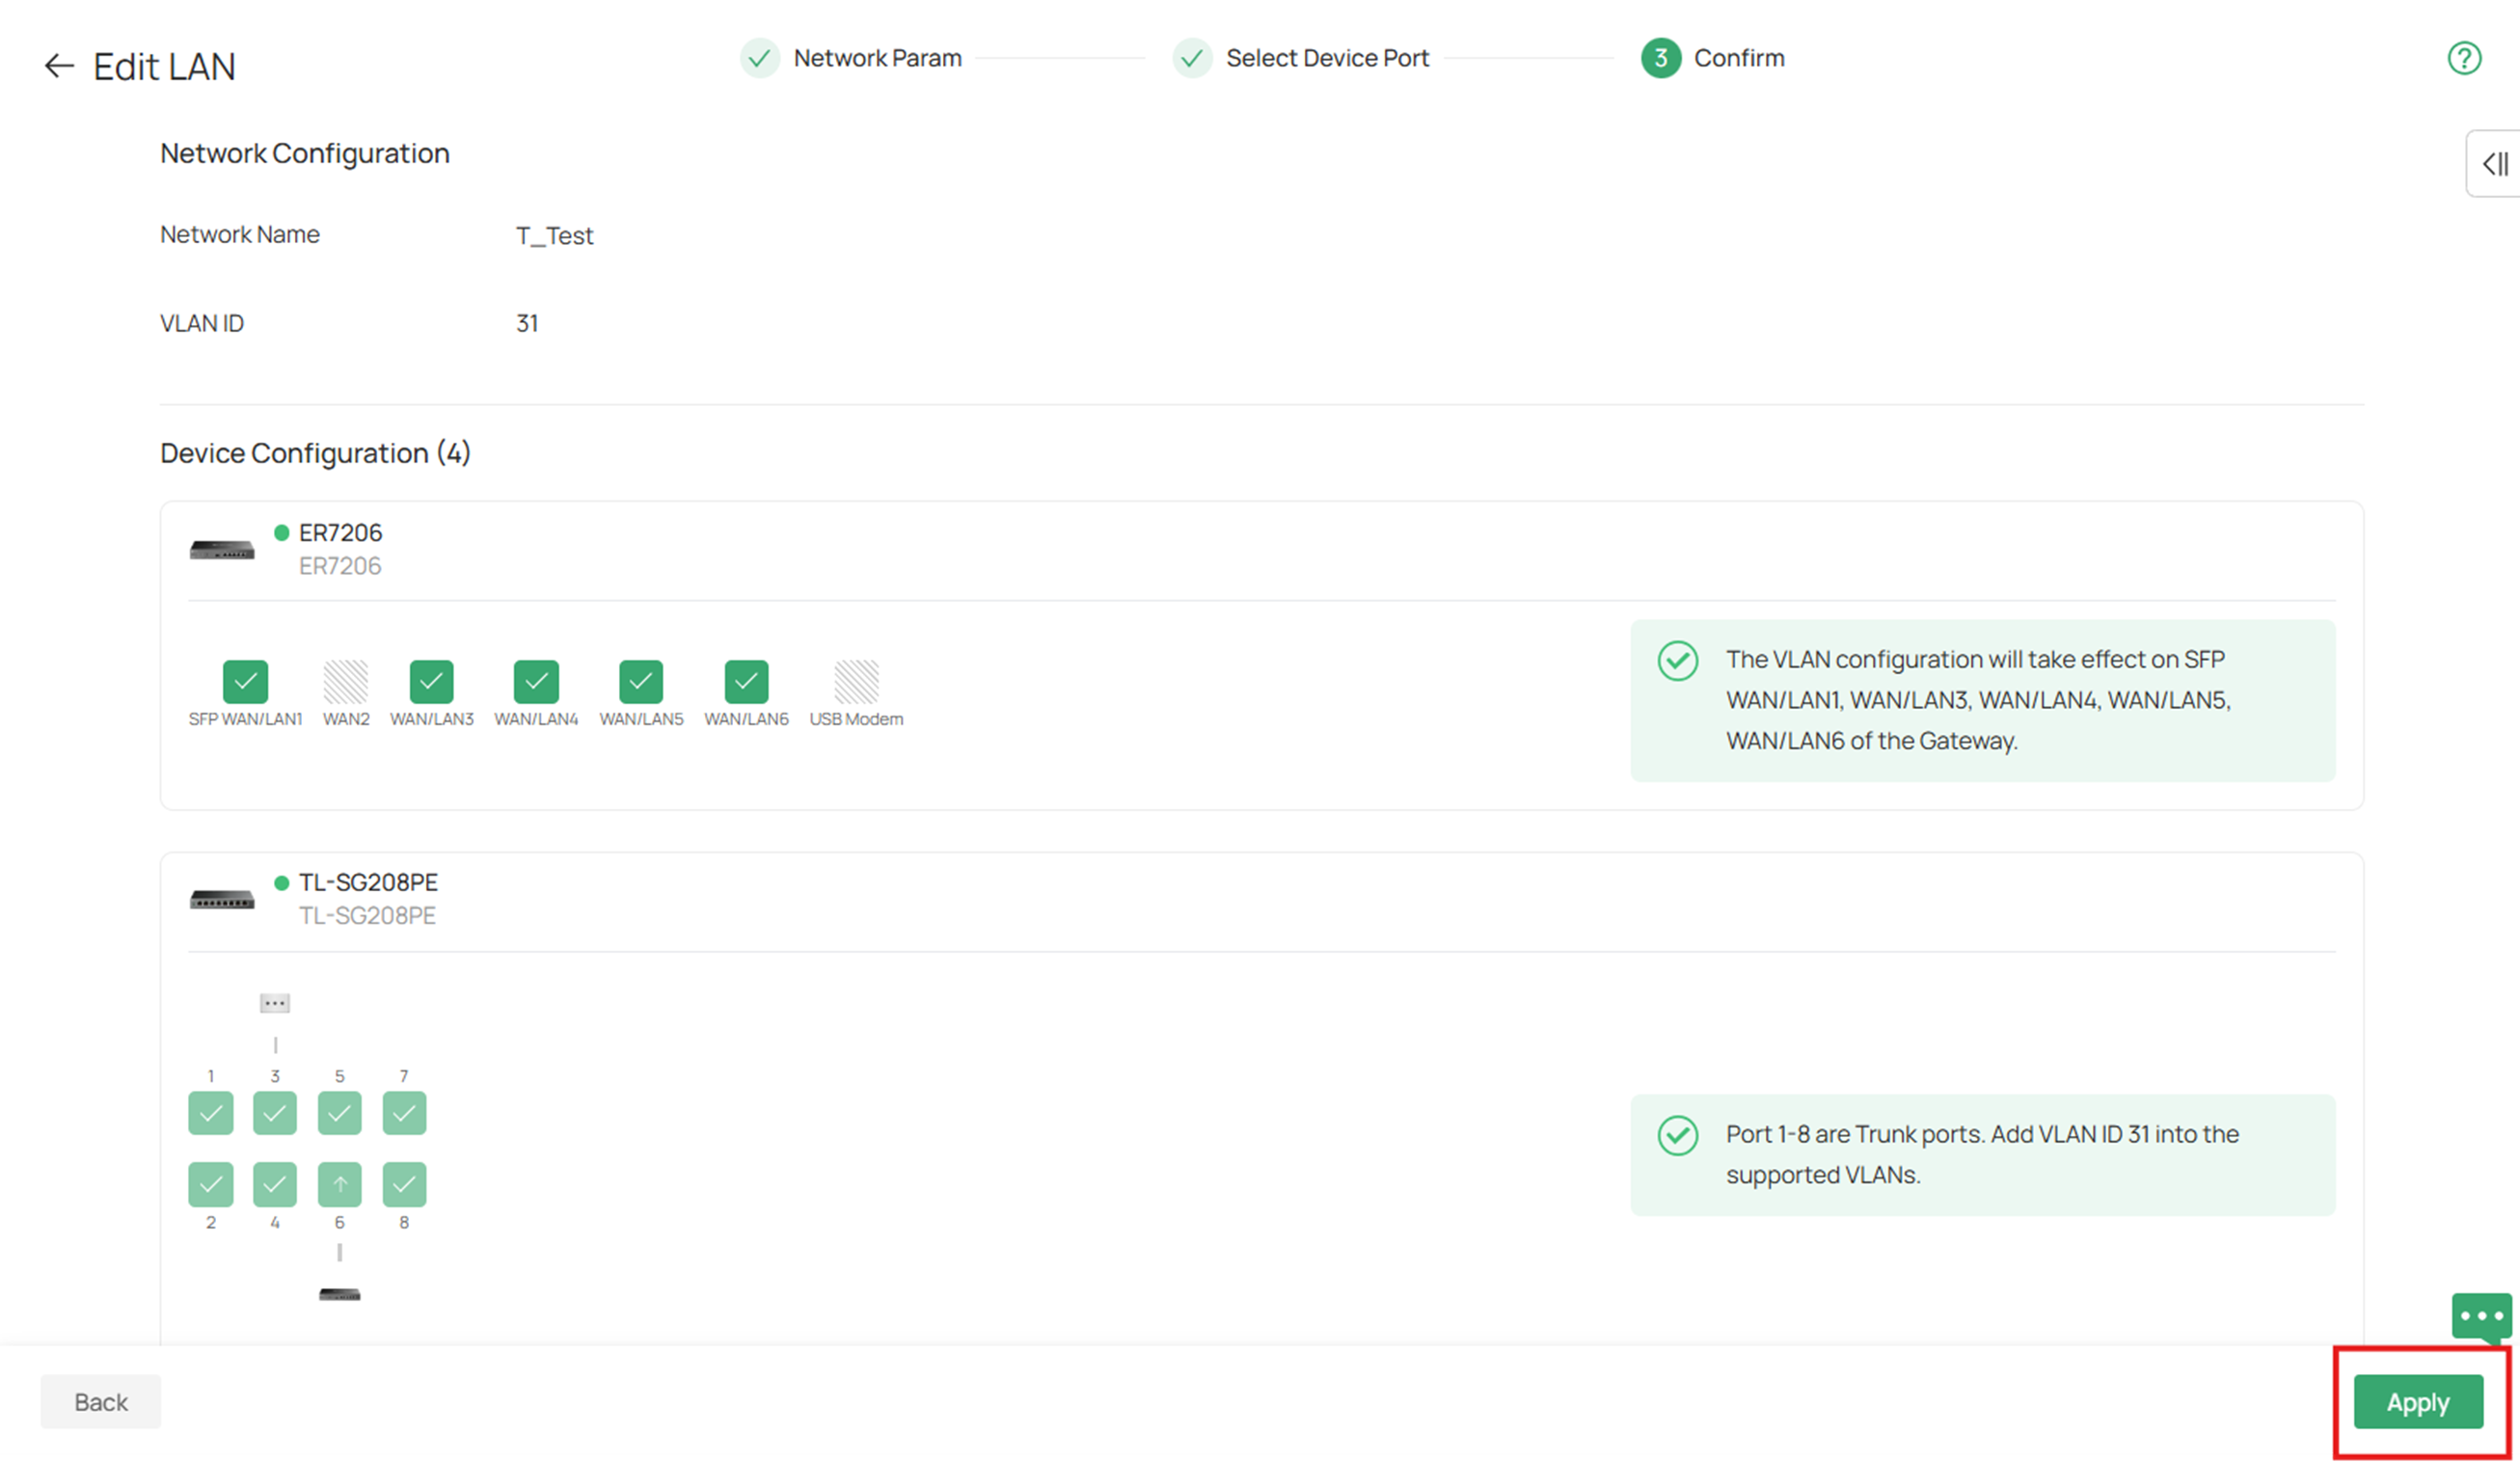
Step 6. After confirming all the settings are correct click Apply.
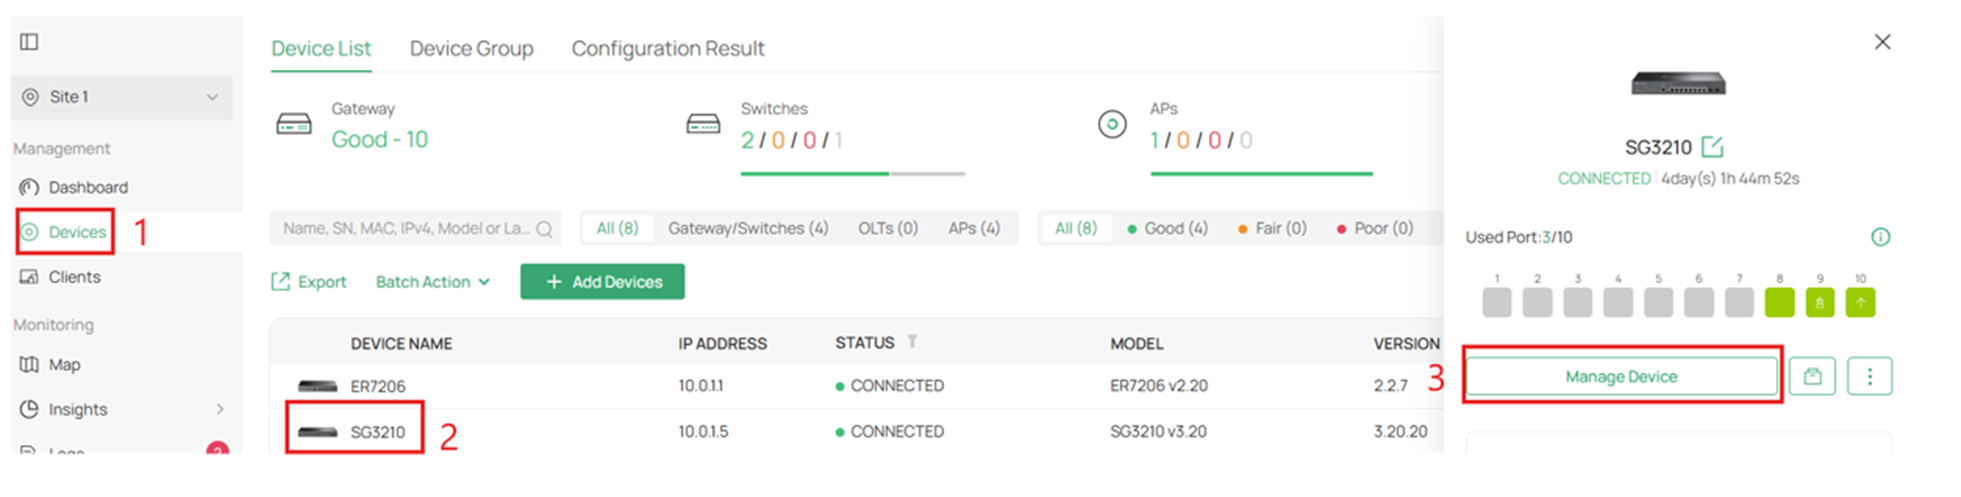
Step 7. Navigate to Devices on the left, select your switch, and click on Manage Device.
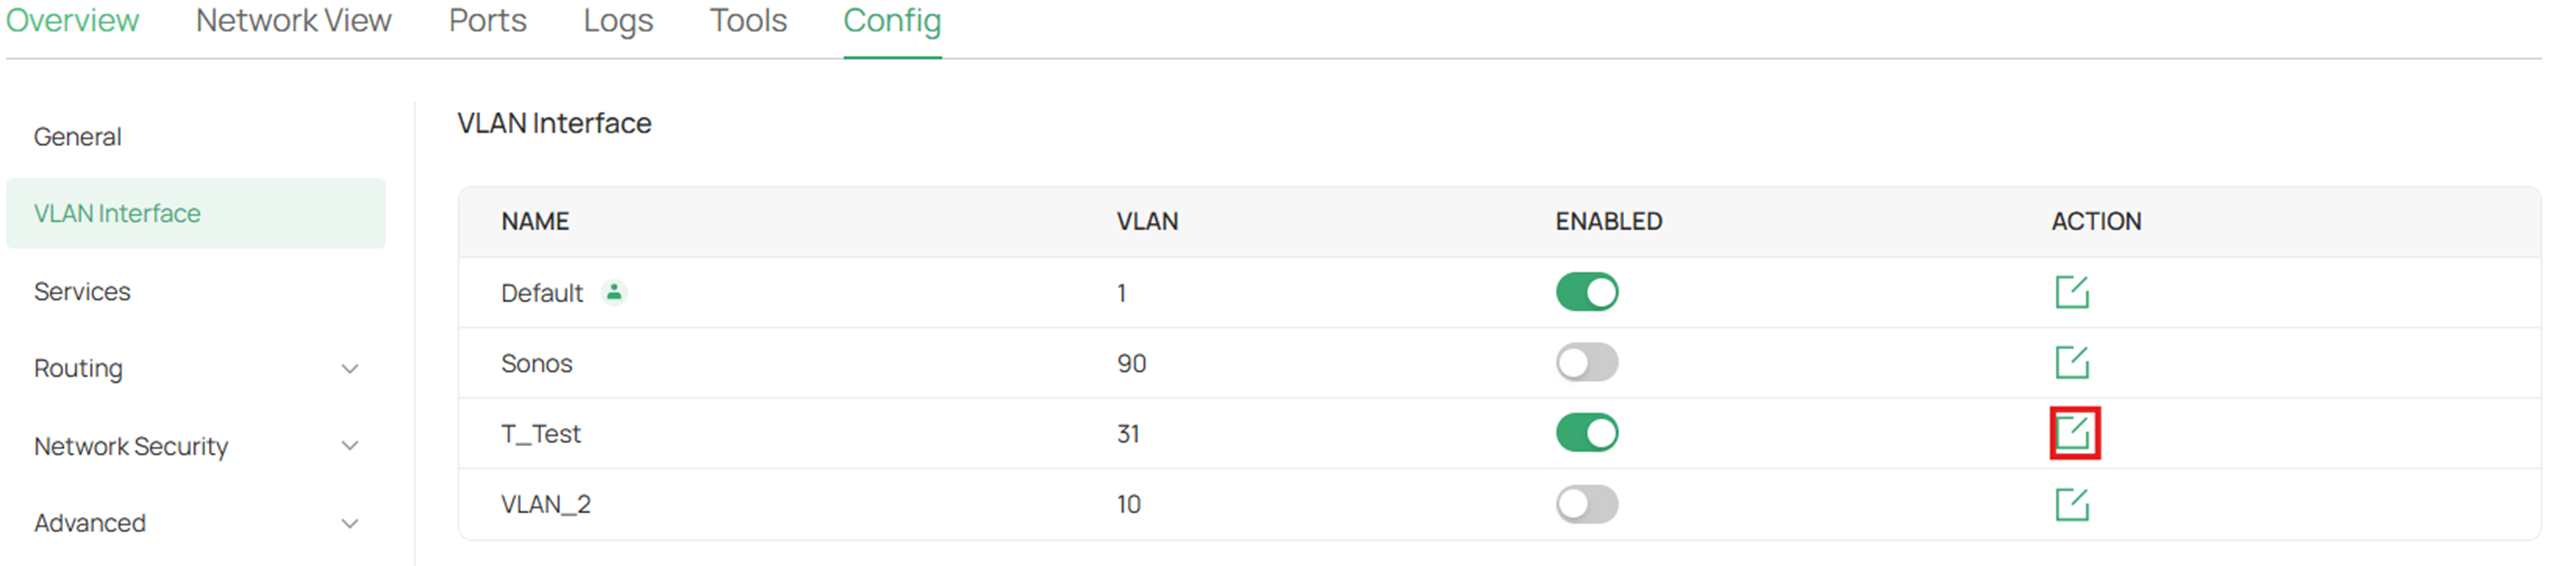
Step 8. Go to Config > VLAN Interface > and enable the VLAN.
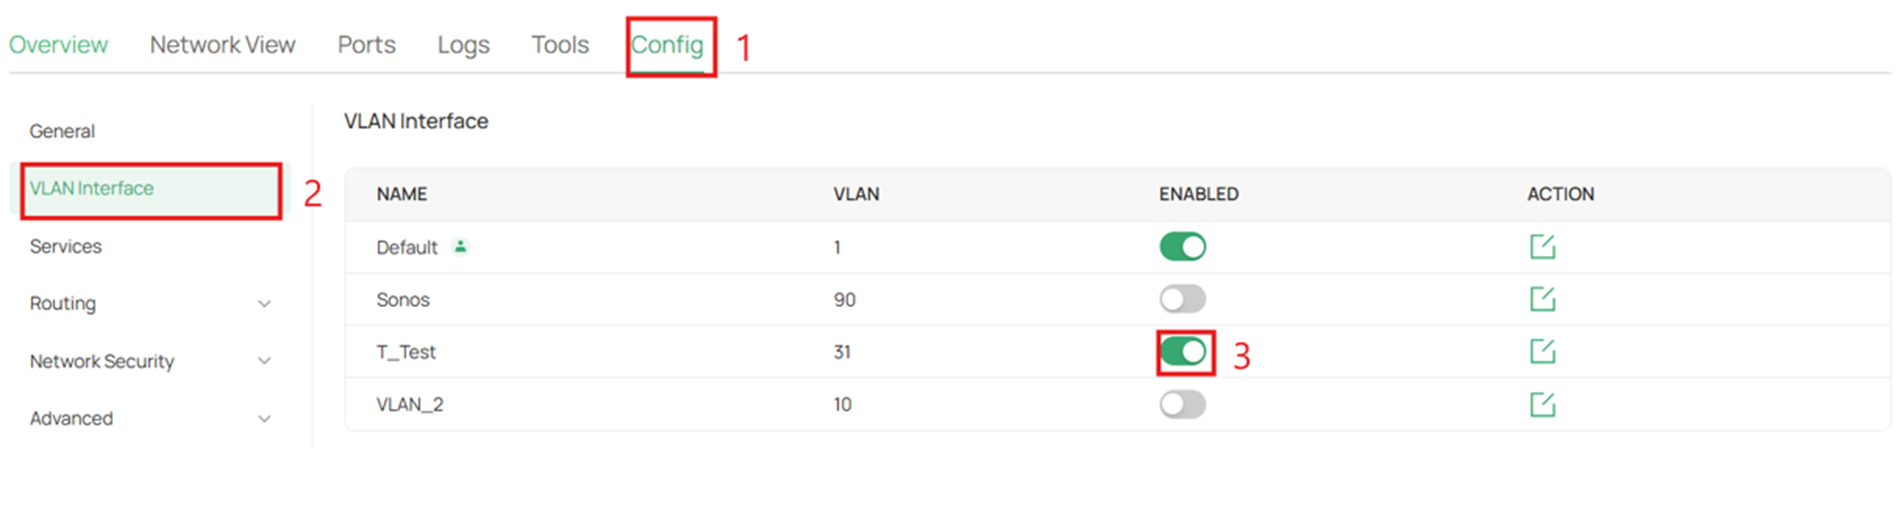
Step 9. After enabling that VLAN interface, click on the Edit action on the right to configure the VLAN.
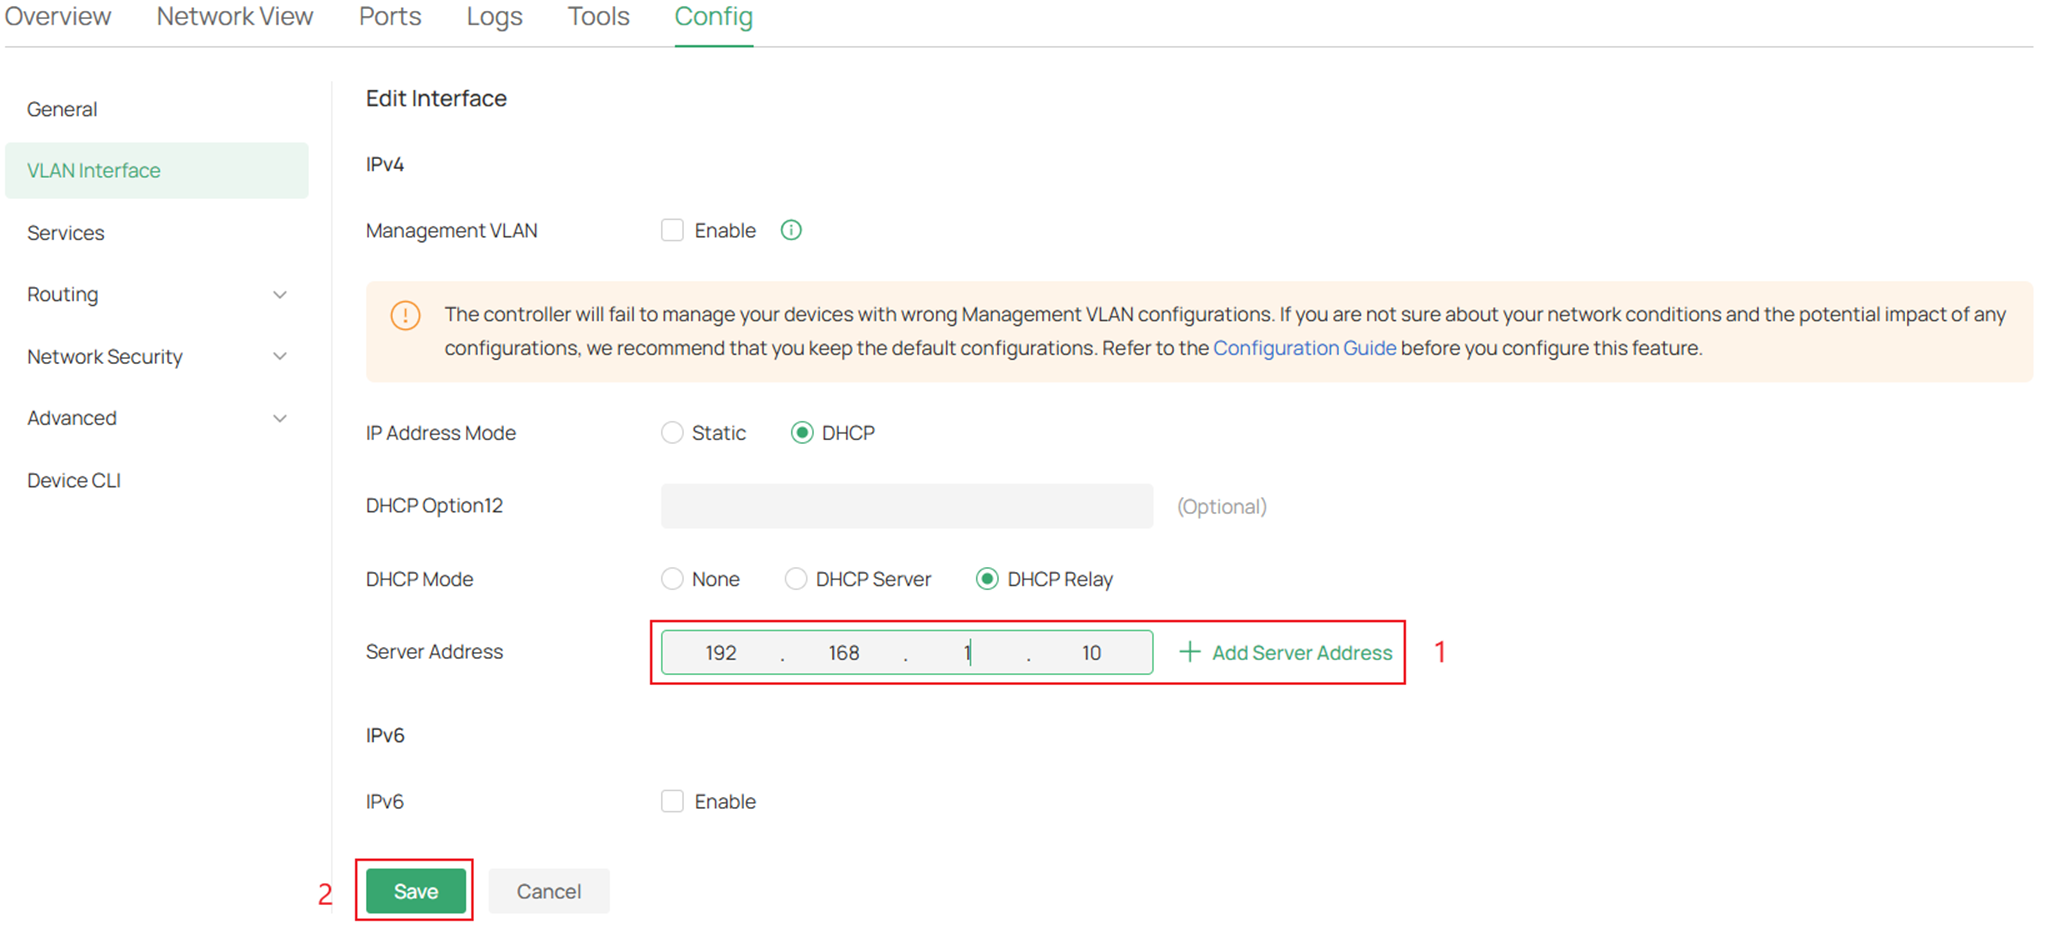
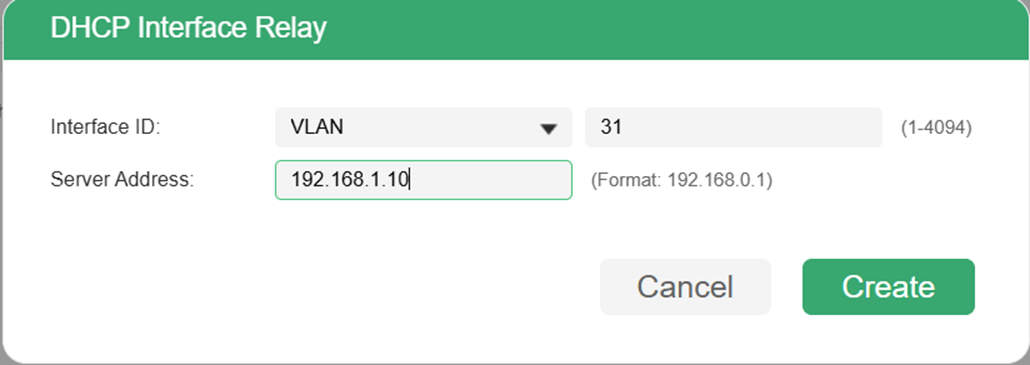
Step 10. On DHCP Mode click on DHCP Relay, enter the IP address of the DHCP server in the Server Address, and click Save.
Configuration for Standalone Mode
Step 1. Make sure that you have the VLAN created in this switch, if not follow the instructions below.
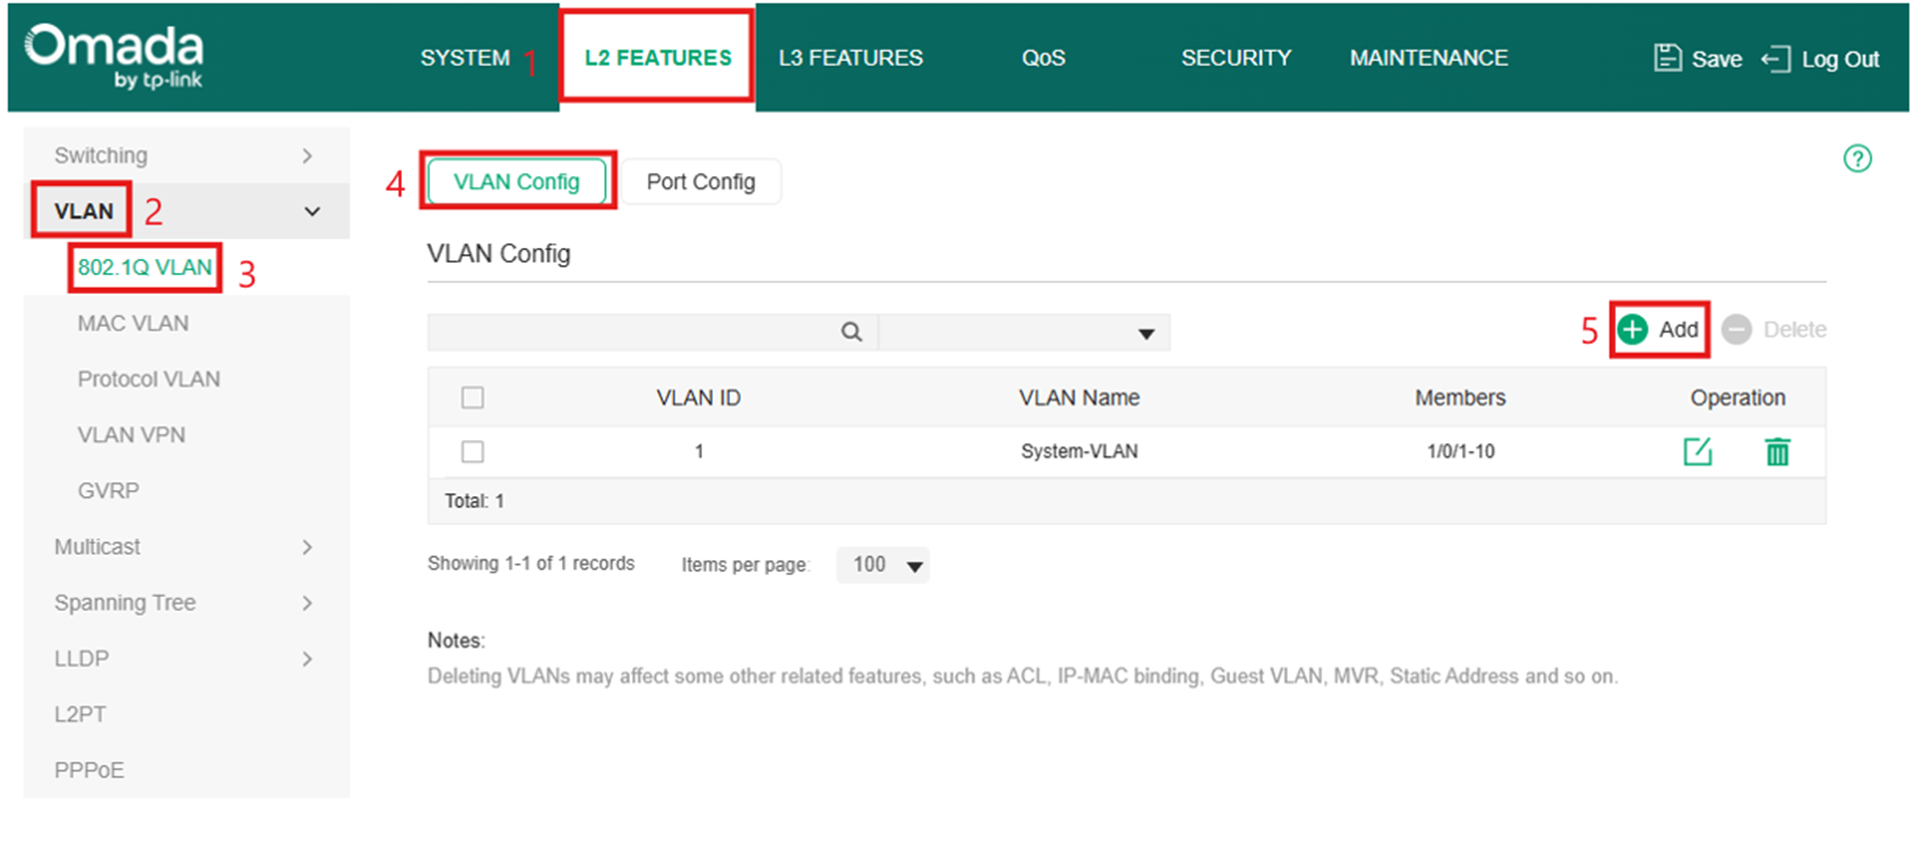
Go to L2 Features > VLAN > 802.1Q VLAN > VLAN Config > Add to create the VLAN
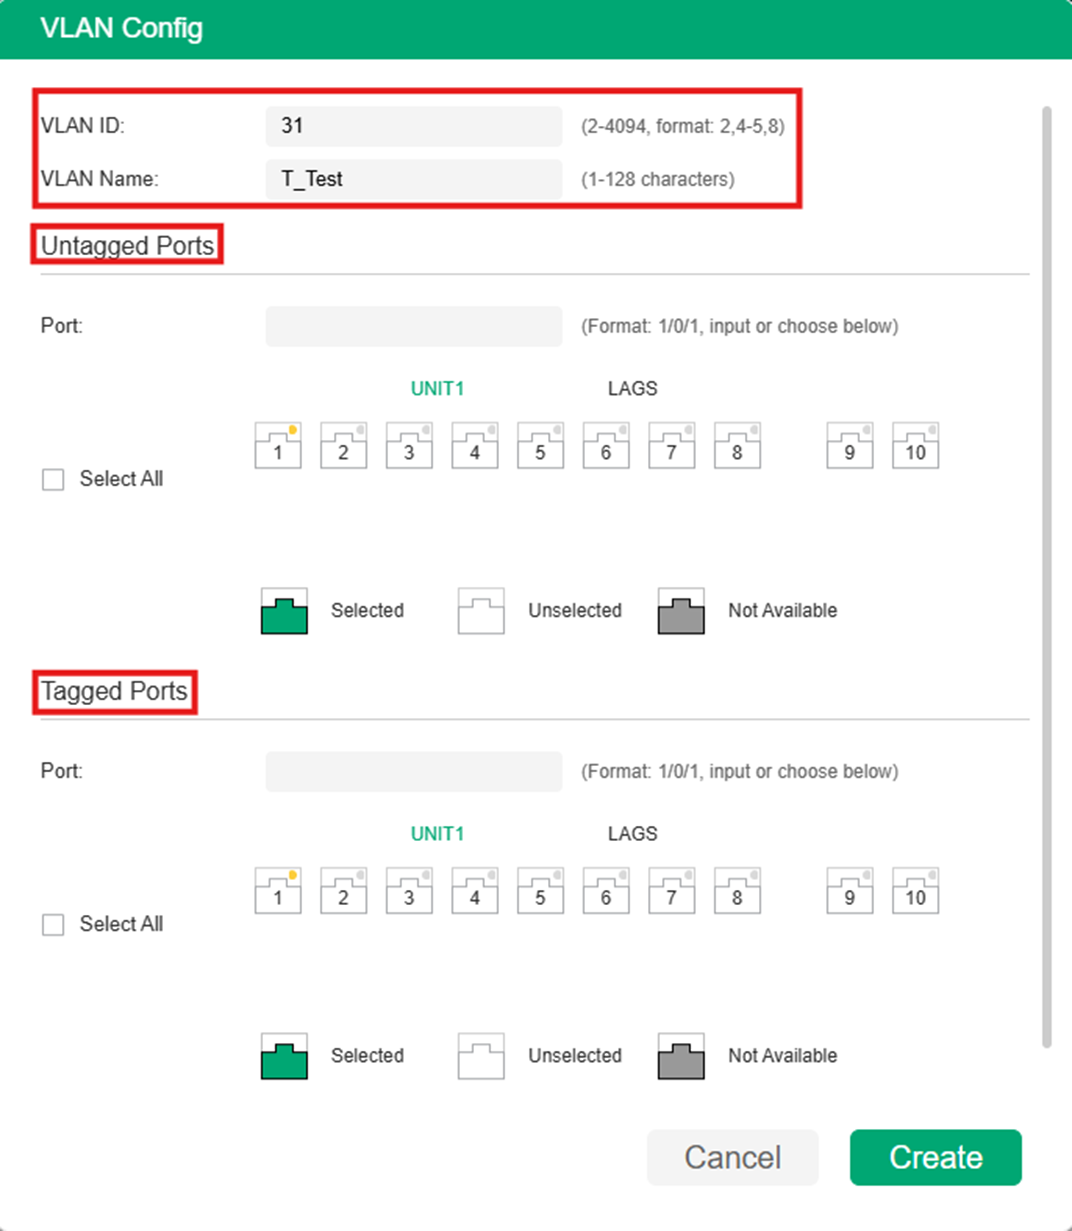
Step 2. Fill in the parameters for your VLAN.
Step 3. Now to specify the VLAN interface go to L3 Features > Interface and click Add
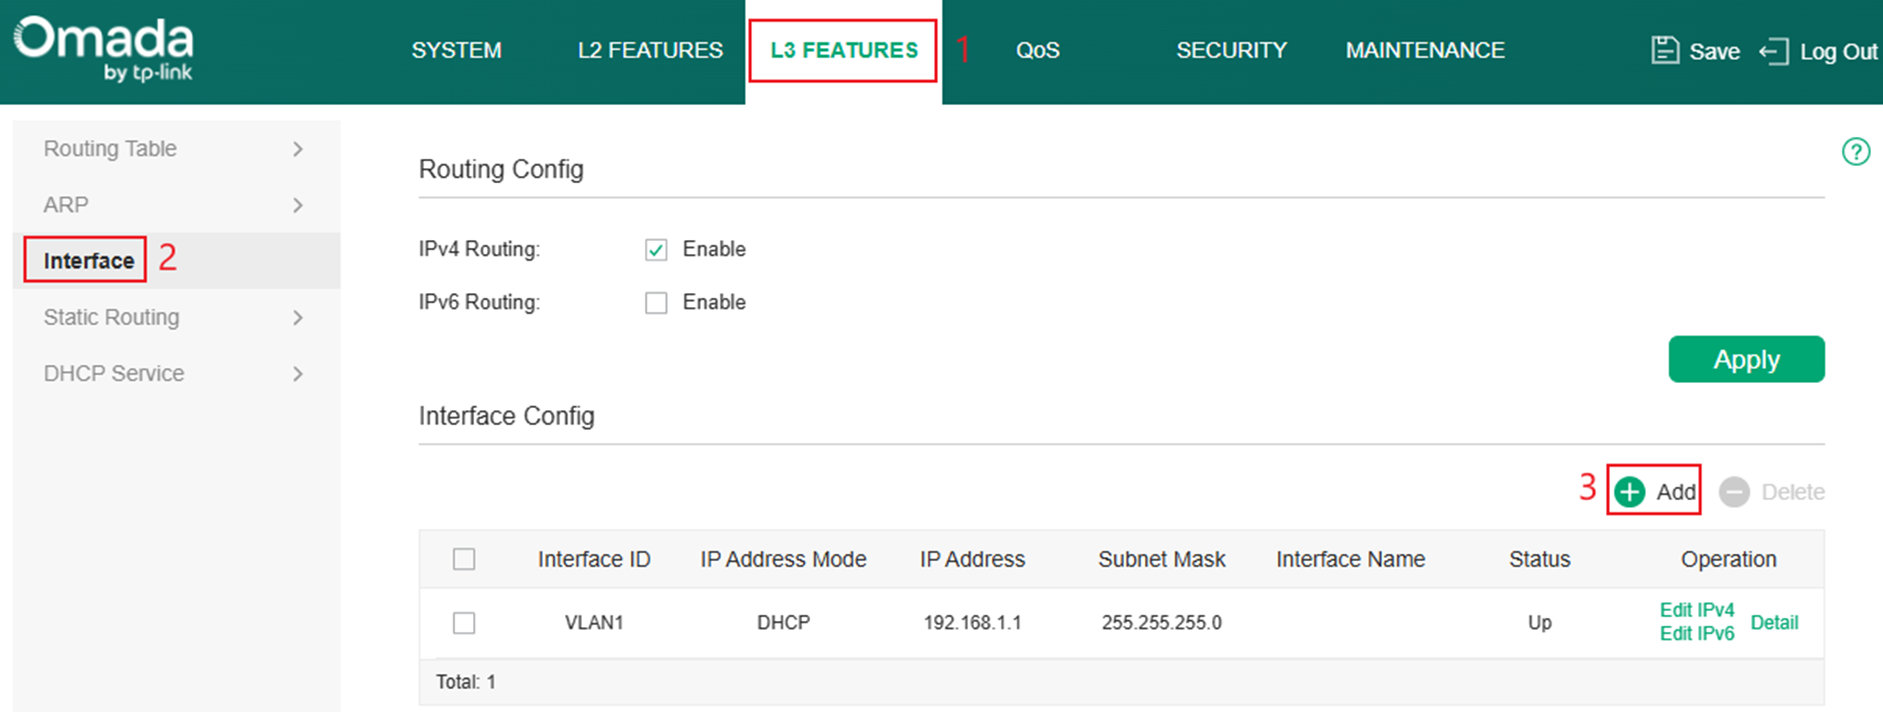
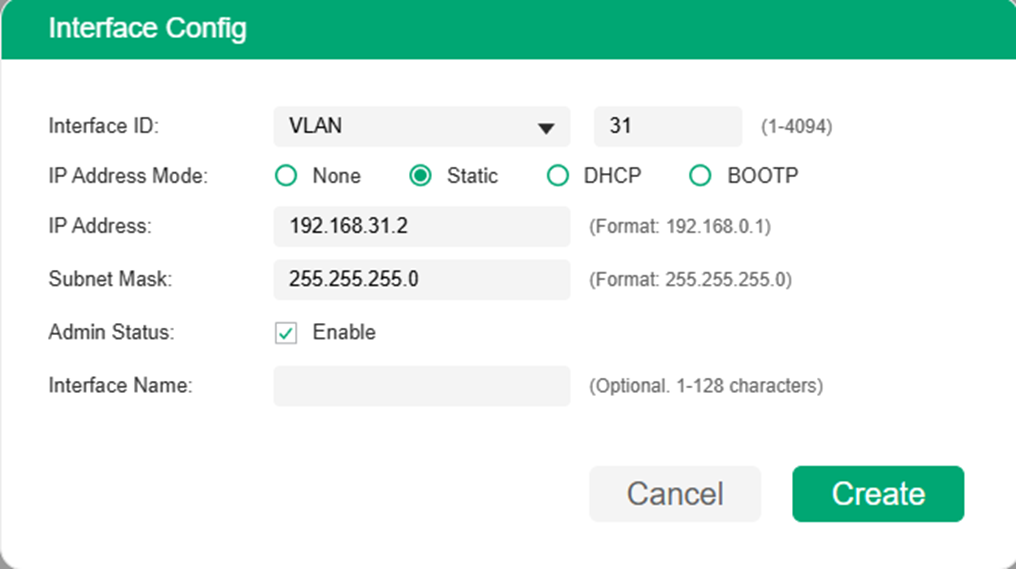
Step 4. Fill in the parameters with the correct information and click Create.
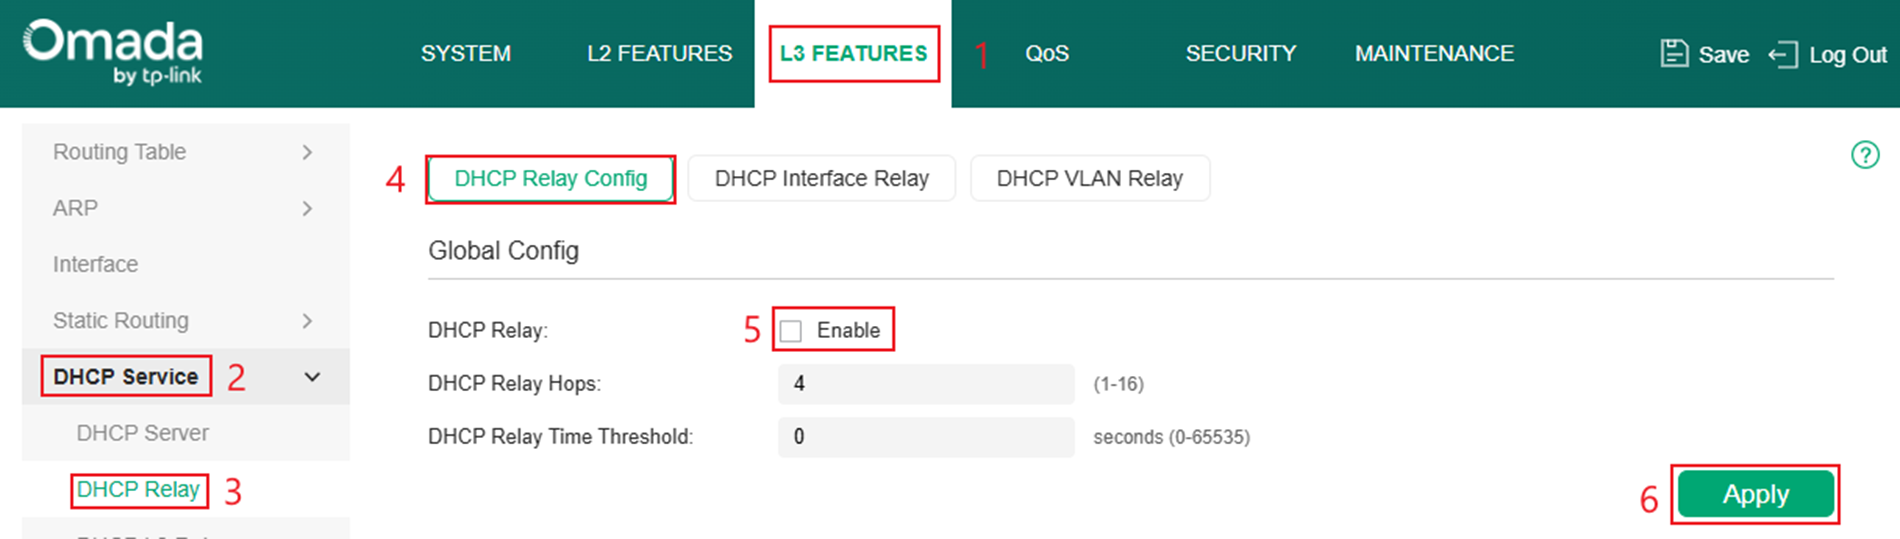
Step 5. After creating the interface on the switch, go to L3 Features > DHCP Service > DHCP Relay and enable DHCP Relay on the DHCP Relay Config.
Step 6. On the same page navigate to the DHCP Interface Relay and click Add.
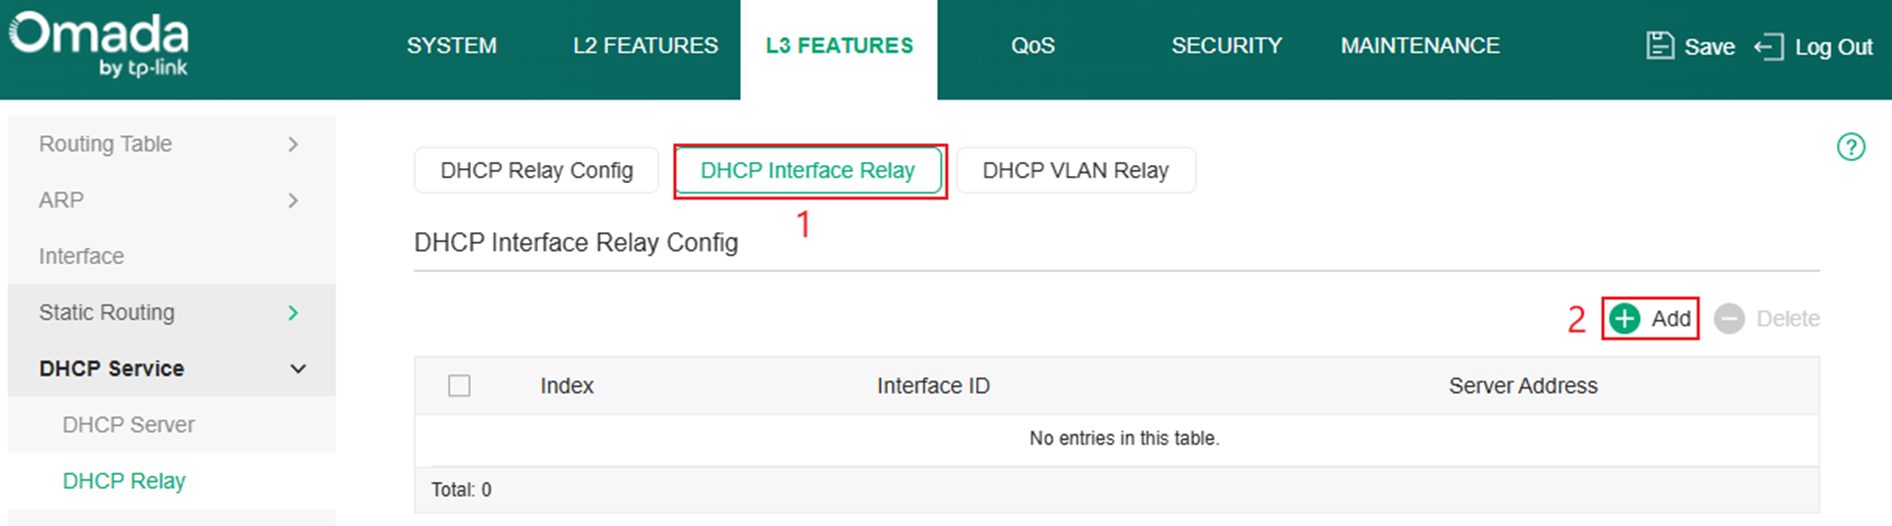
Step 7. Enter the correct information for each parameter.
Verification
Go to your external DHCP server's client list and ensure that clients are populating.
Conclusion
By enabling DHCP Relay on the L2+ switch VLAN interfaces, client broadcast requests are successfully forwarded to an external DHCP server located in the same or different subnet. This allows centralized IP address management across multiple networks while ensuring clients can reliably obtain addressing information regardless of their VLAN.
Get to know more details of each function and configuration please go to Download Center to download the manual of your product.
QA
Q1: What should I do if my device is not getting an IP address?
A1: Check if DHCP relay is enabled on the correct VLAN interface.
