


How to Configure WLAN Using AP Groups in Omada Controller v6.3


Contents
Common application scenarios of AP Group
Merge SSIDs After Omada Controller Upgrade
Introduction
To improve the flexibility and scalability of WLAN configuration, the AP Group–based WLAN configuration optimization introduces a more efficient and intuitive way to manage SSIDs and device associations.
In the traditional workflow, SSIDs are configured within WLAN Groups and applied to devices through binding relationships. However, this approach can lead to several limitations, such as isolated SSID configurations across different groups, lack of global visibility, and increased operational complexity when managing large-scale deployments.
The optimized model aims to address these challenges by enhancing the configuration logic and providing clearer relationships between devices, AP Groups, and SSIDs. This allows you to better understand configuration dependencies, simplify maintenance, and efficiently deploy common SSIDs across multiple scenarios such as hotels, apartments, and campuses.
Additionally, the optimization ensures compatibility with the existing configuration model, enabling a smooth transition without disrupting current deployments.
Requirements
- Omada Controller (Software Controller / Hardware Controller / Cloud-Based Controller, v6.3 and above)
- Omada EAP
Configuration
The following section explains how to add an SSID and configure the AP Group in Omada Controller v6.3.
Create SSIDs in a new site
Step 1. Create a new site in your controller.
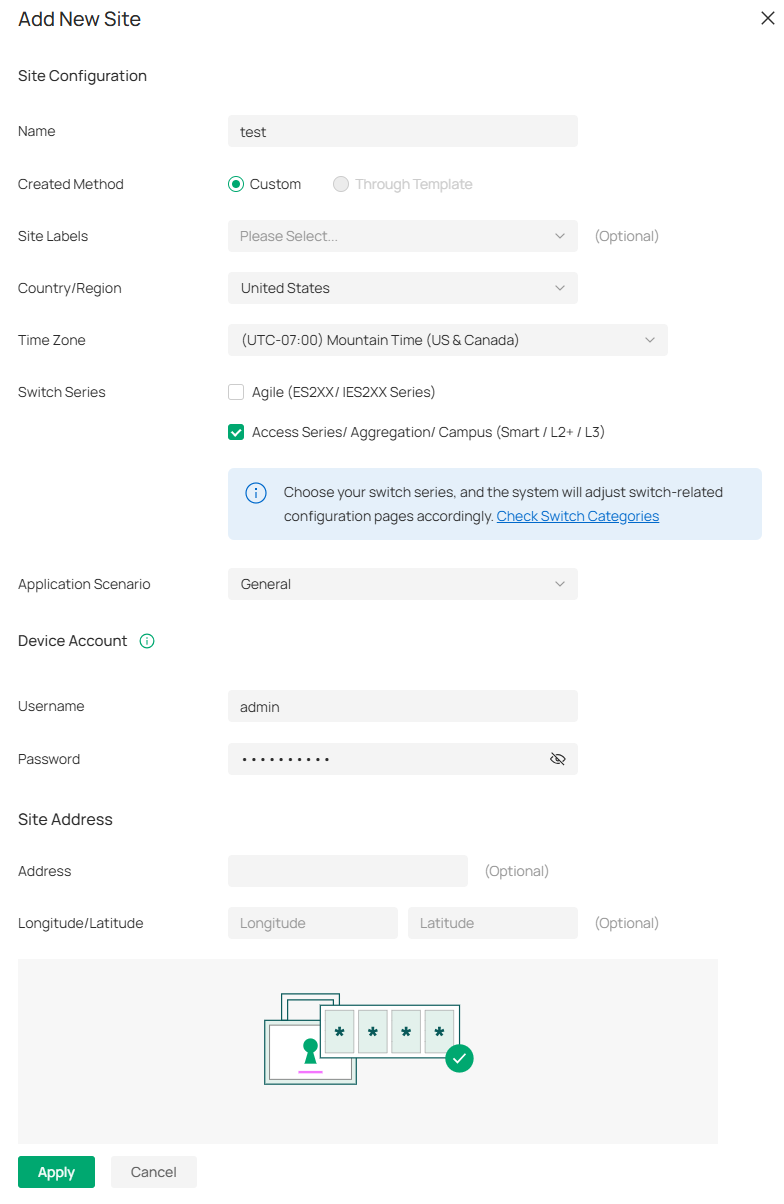
Note: The system automatically creates the Default AP Group, which cannot be deleted.
Step 2. Device Discovery and Adoption. If you can't find your device, you can refer to this FAQ: How to discover Omada devices via Software Controller and Hardware Controller.
Note: By default, an AP will be assigned to the Default AP Group after adoption. Gateways and wireless routers are not associated with any AP Group.
Step 3. Create your SSID in Network Config>WLAN>Add SSID.
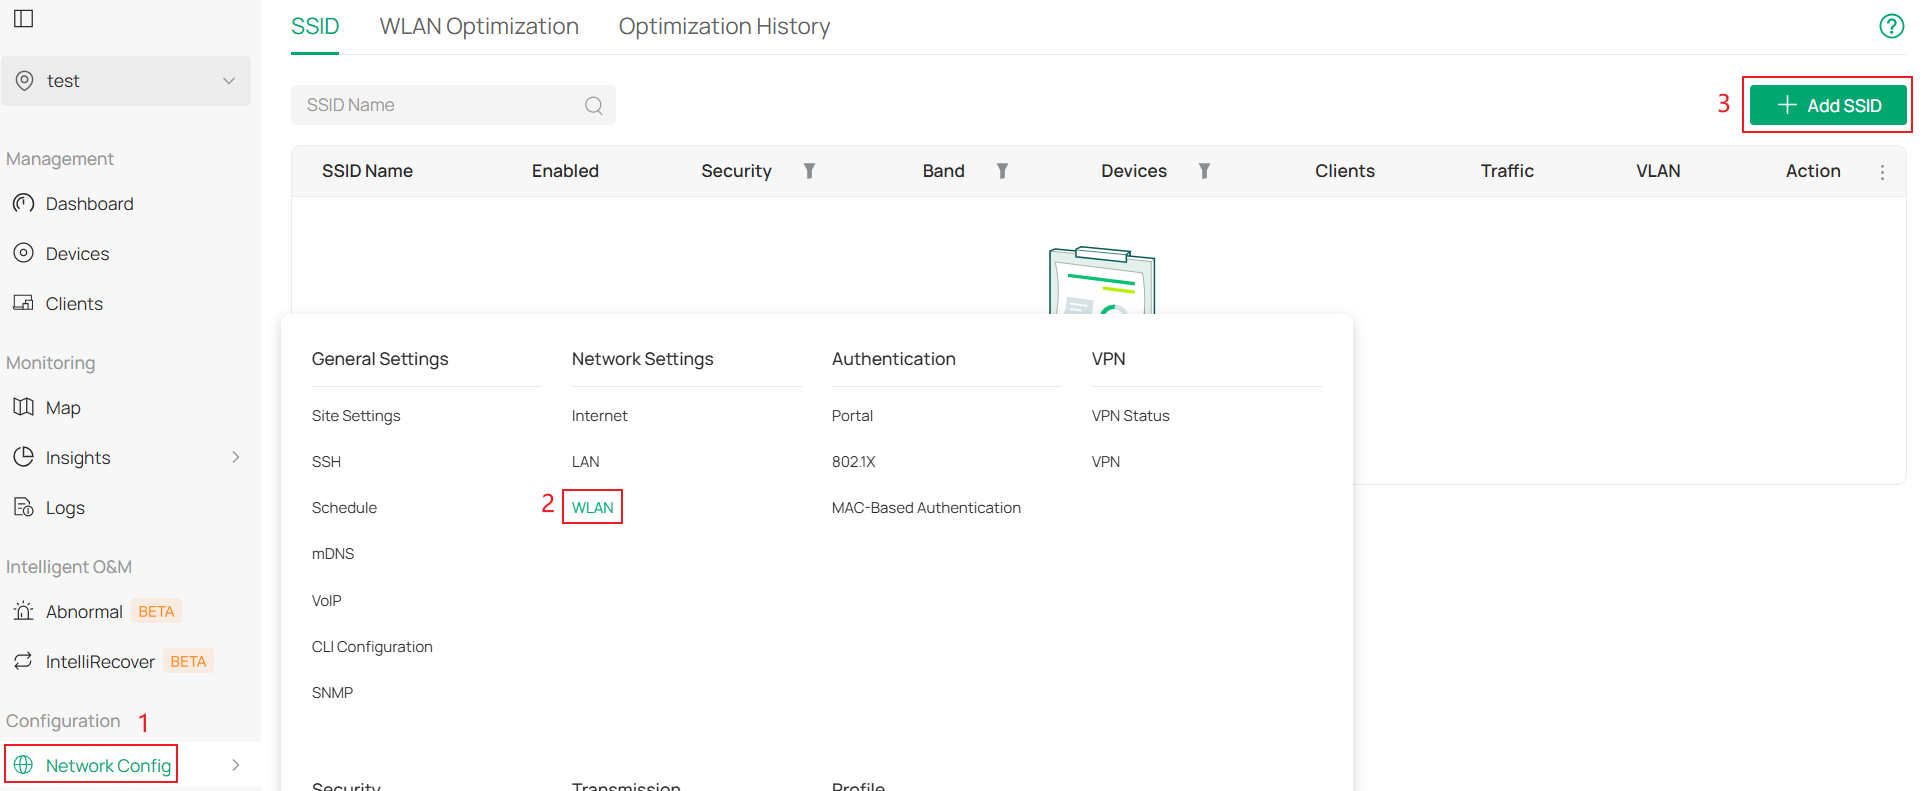
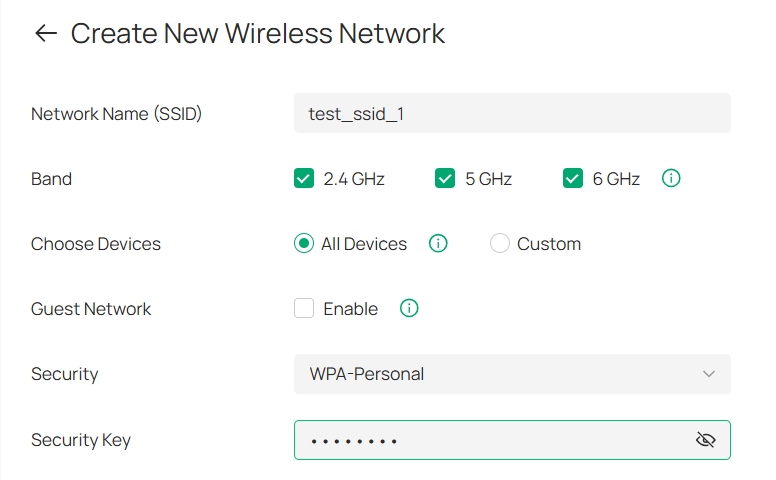
Step 4. Configure the basic parameters of the SSID (name, band, security, VLAN, etc.), and select "Choose Devices".
All Devices: Applies to all devices under the Site that support SSID (including newly adopted ones).
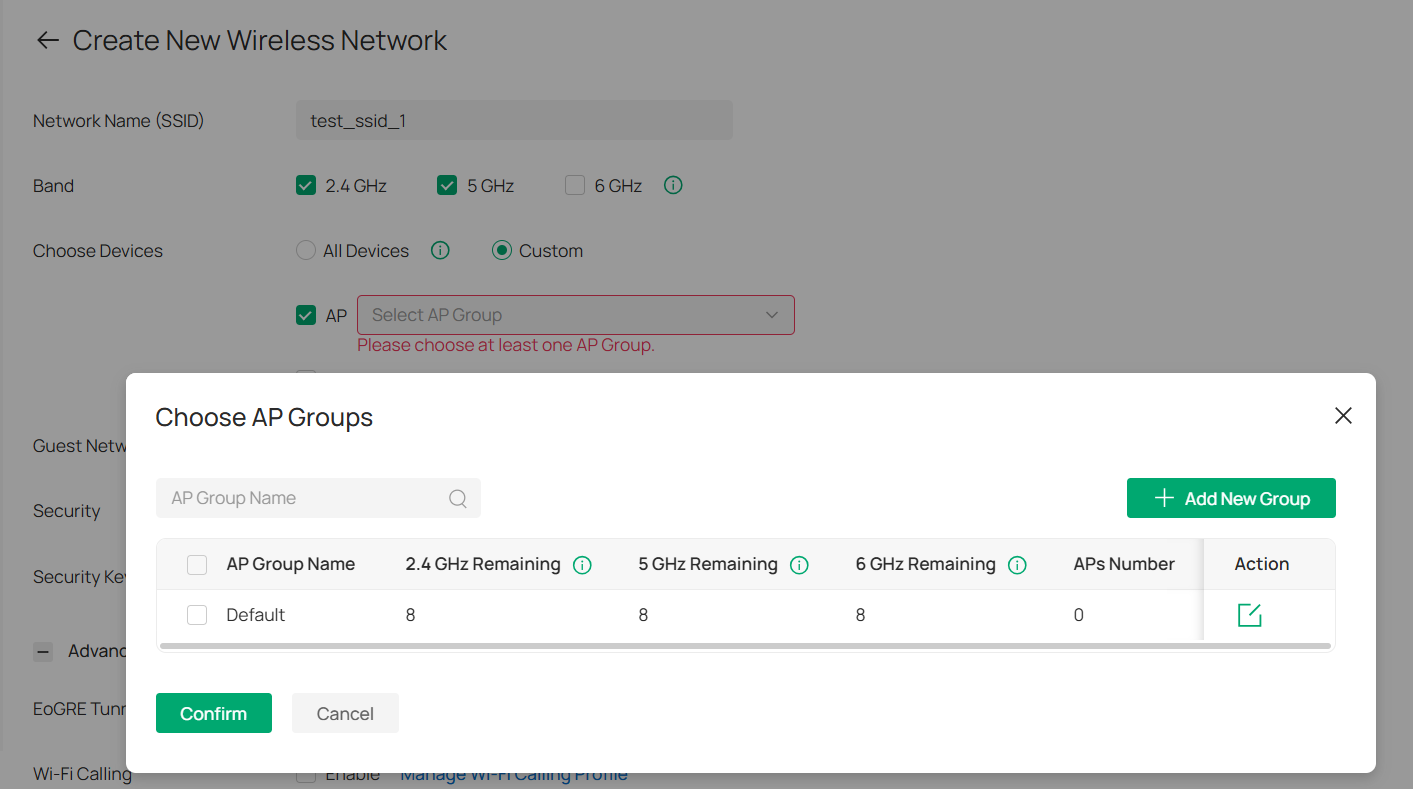
Custom: At least one of the options (AP or Gateway) must be selected.
- Selecting AP: further select one or more AP Groups.
- Selecting Gateway: this SSID is effective for Gateways as well (if the device type supports it).
Note: After an SSID is created, the device type (All Devices / Custom (Gateway / AP)) cannot be modified.
If AP Group is selected, only switching between AP Groups is supported; changing to other types is not allowed.
Within a site, each SSID must have a unique name. Duplicate SSID names are not supported.
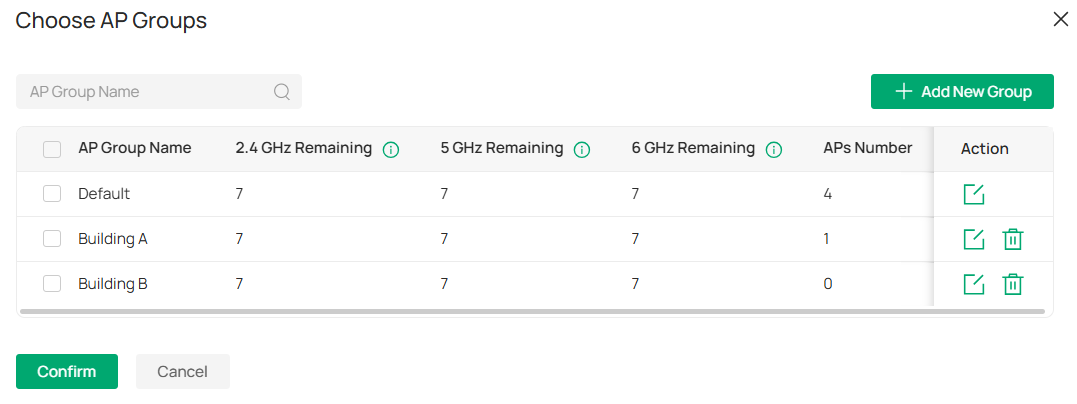
Step 5. Edit/Add AP groups. When choosing an AP group, you can add a new AP group or modify/delete an existing one.
Note: AP Groups bound to an SSID cannot be deleted. Deleting an AP Group that still contains APs requires additional confirmation.
When adding a new AP group, you first need to enter the name of the AP Group, then select the AP and confirm. You can choose to search for the AP by its Name, Model, IP or MAC to find the desired AP. You can also sort the entries by AP Name, IP address, etc.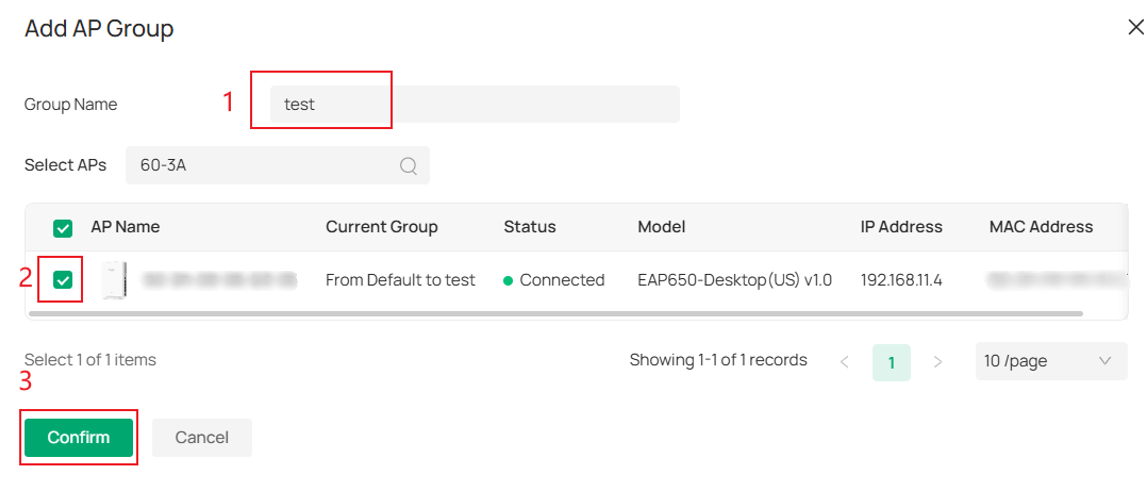
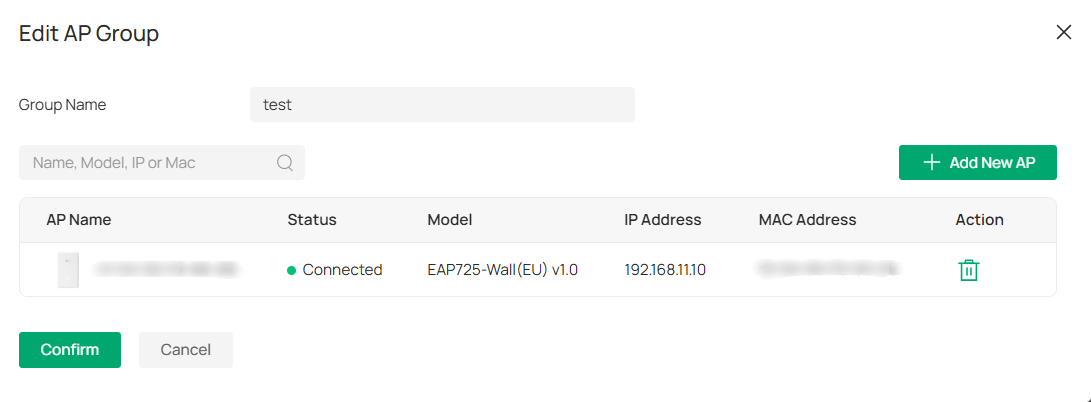
When you edit the AP group, you can perform the following basic operations on AP Groups:
- You can either delete the existing APs in the group or add the APs from other groups into it.
- The deleted AP will be returned to the default AP group, while APs assigned to the Default AP Group cannot be removed.
Note: Newly adopted APs are assigned to the Default AP Group by default.
- When editing an AP Group, you can also add APs to the group.
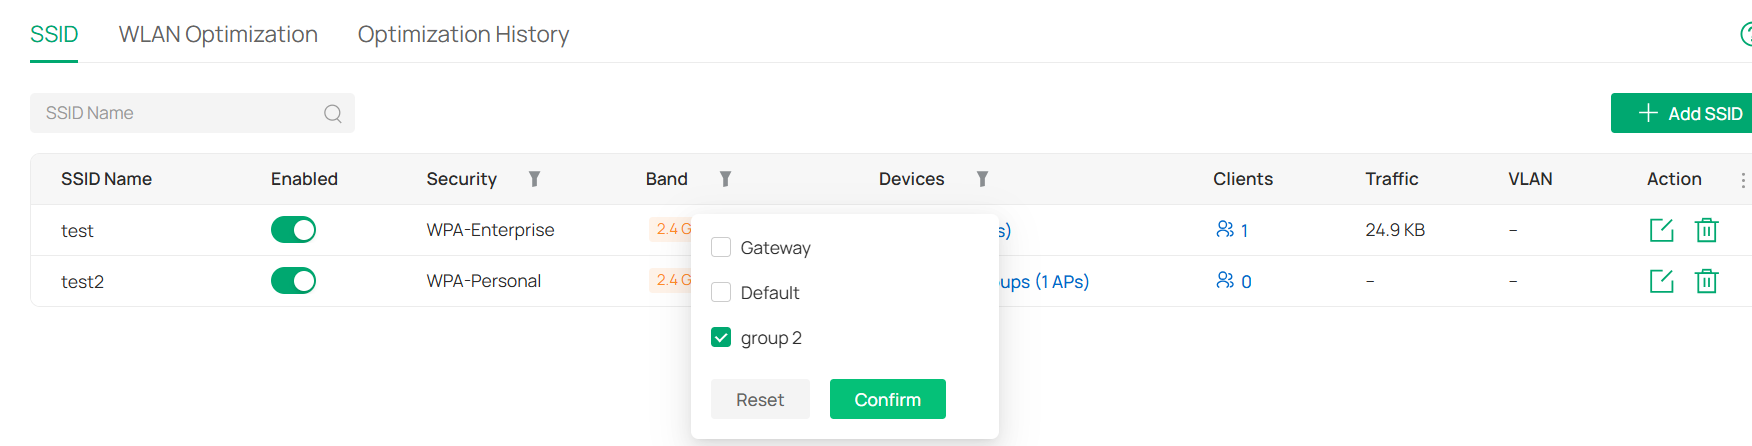
Step 6. After applying the SSID settings, you will see the SSID you created in the SSID list, and it will be in the enabled state.

You can filter SSIDs by AP Groups in the Devices column.
The new interface adds:
Enabled switch: It is enabled by default. Once it is turned off, this SSID will no longer be usable. The Override on the device private management page is equivalent to being ineffective at this time.
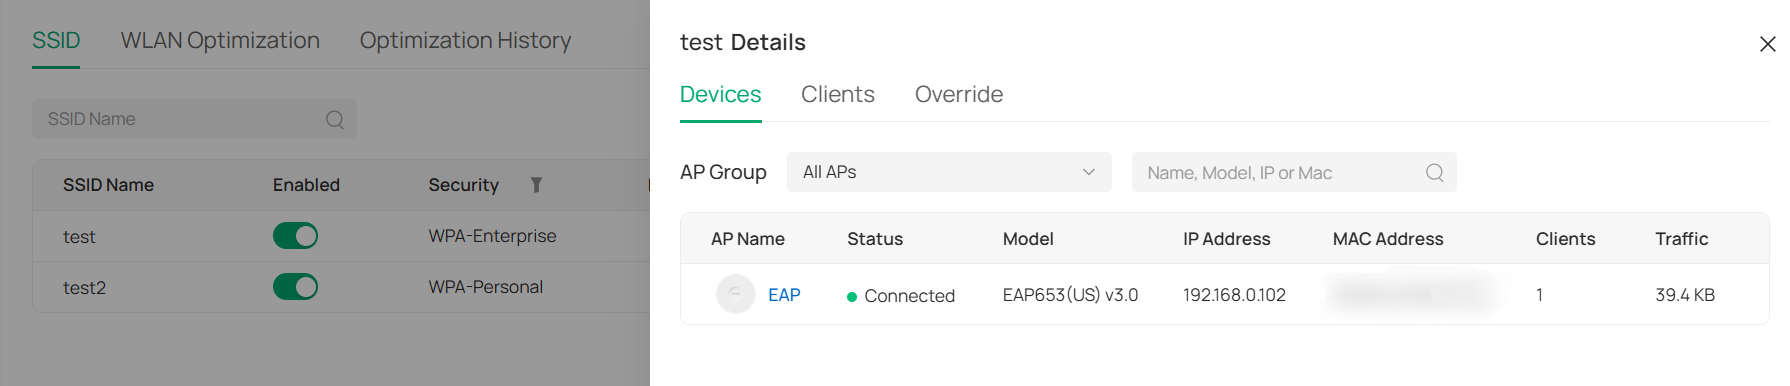
Devices: display the number of devices and AP Groups currently associated with each SSID.
By clicking this column, a side panel will appear, providing access to the SSID Detail – Devices tab, where you can view detailed information about all devices linked to the selected SSID.
In addition, clicking on a device name will open a device drawer panel. From there, you can further navigate to the device detail page to perform device management operations.
Clients: display the number of clients currently associated with each SSID.
By clicking this column, a side panel will appear, providing access to the SSID Details – Clients tab, where users can view detailed information about all clients connected to the selected SSID.
Additionally, clicking on a client name will open a client drawer panel. From there, users can further navigate to the client detail page to perform client management operations.
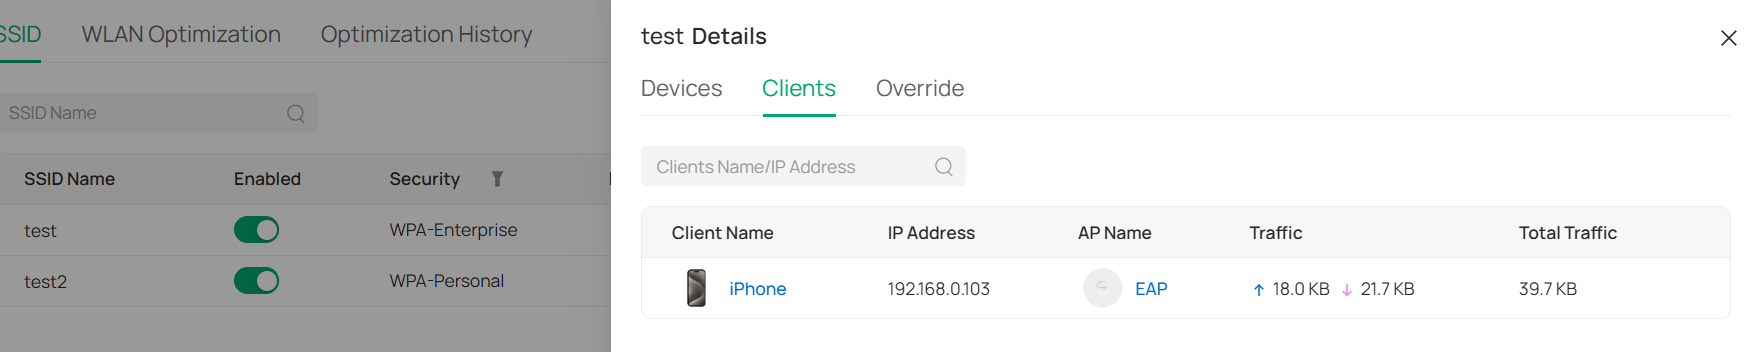
Traffic: the total data traffic consumed by all clients under this SSID.
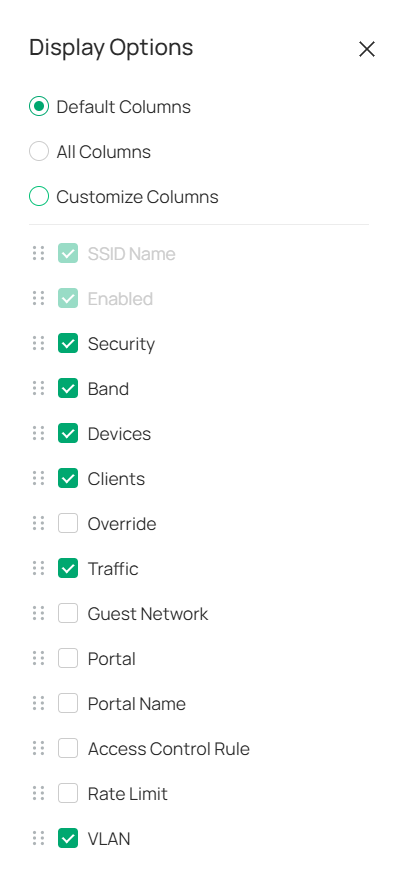
Display Options: It is located on the upper right of the SSID list.

You can customize the information displayed for the ssid. The customizable options are as follows:
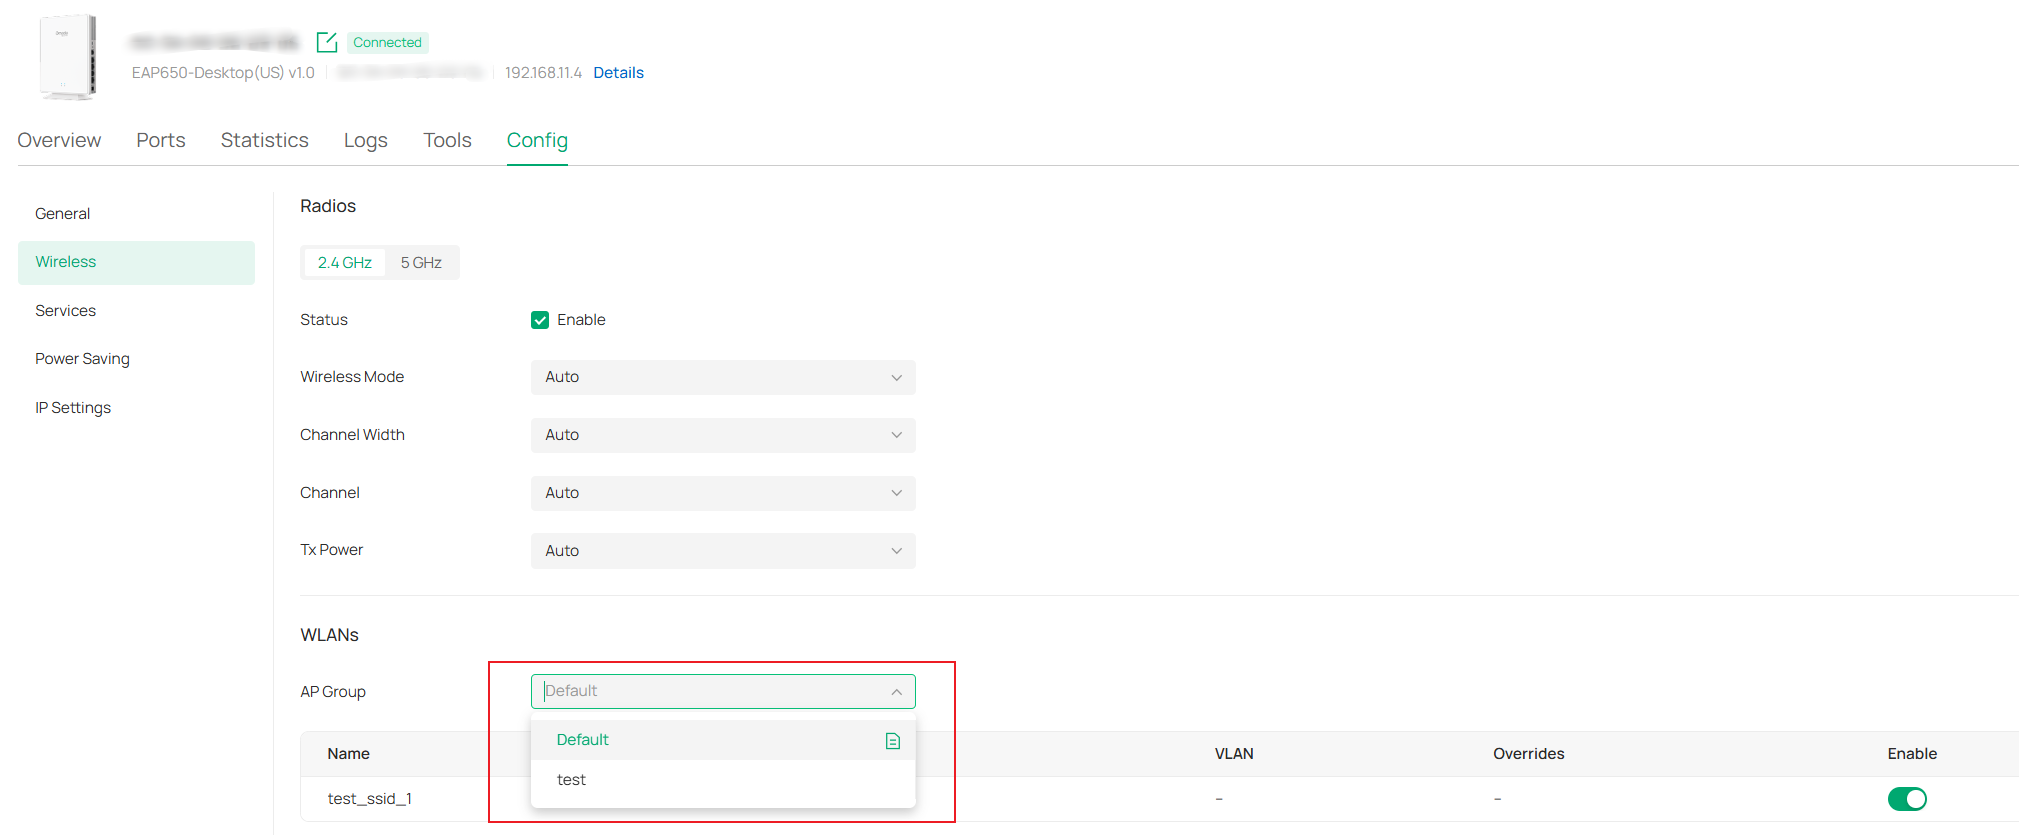
Step 7. For EAPs, Under the "Config> Wireless" section of the device's private management page, the original WLAN group has been changed to an AP Group. You can modify the AP group where the AP is located and override the SSID for that group.
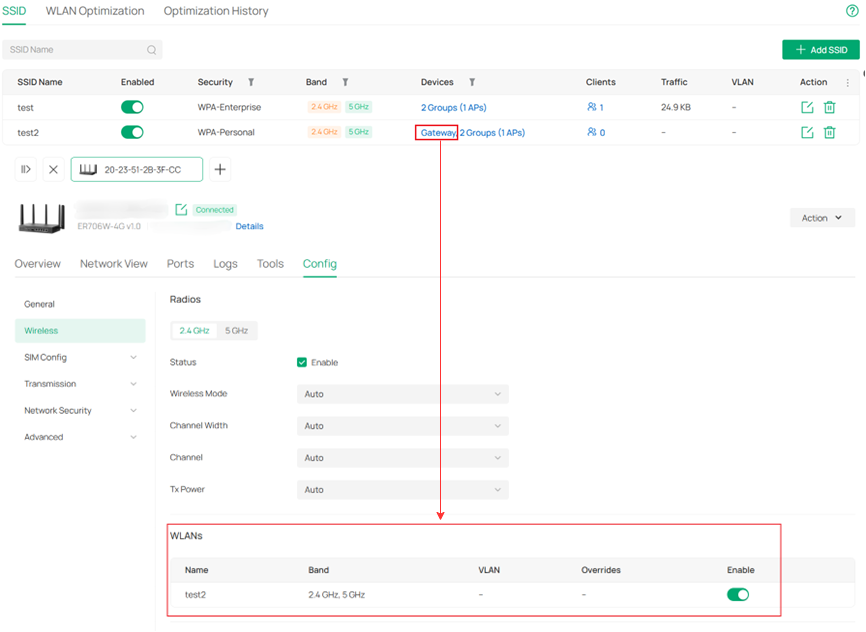
For Wi-Fi Gateways, under the "Config> Wireless" section of the device's private management page, the WLAN Groups have been removed, and the WLANs created by the gateway are now displayed directly.
Common application scenarios of AP Group
Step 1. Enter the SSID interface in the Network Config > WLAN section of the site.
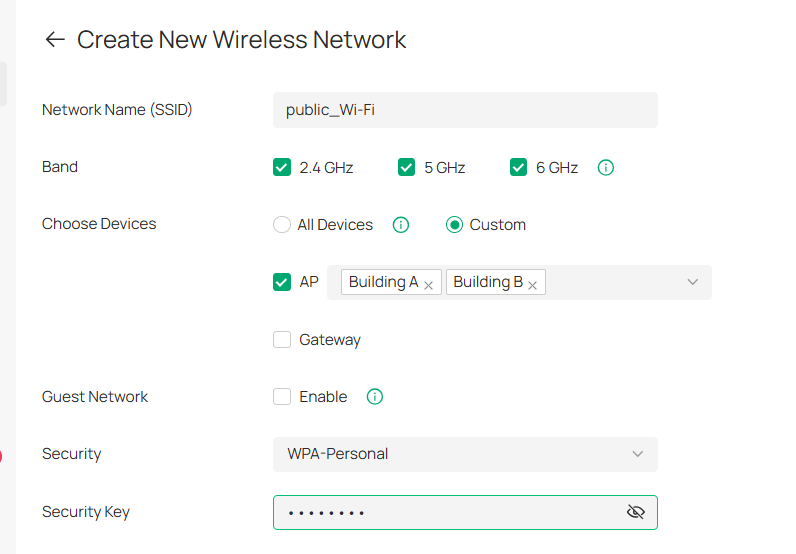
Step 2. Create a public SSID (for configuring coverage across multiple areas):
- Choose Devices > Custom (AP).
- Select multiple AP Groups (create coverage for multiple areas at once).
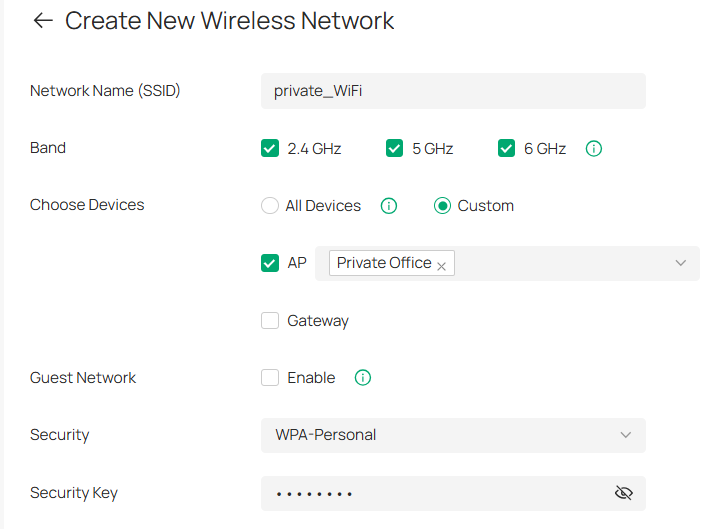
Step 3. Create a region-specific SSID, SSID names must be unique within the same site:
- Select Devices > Custom (AP).
- Only bind to a specific AP Group.
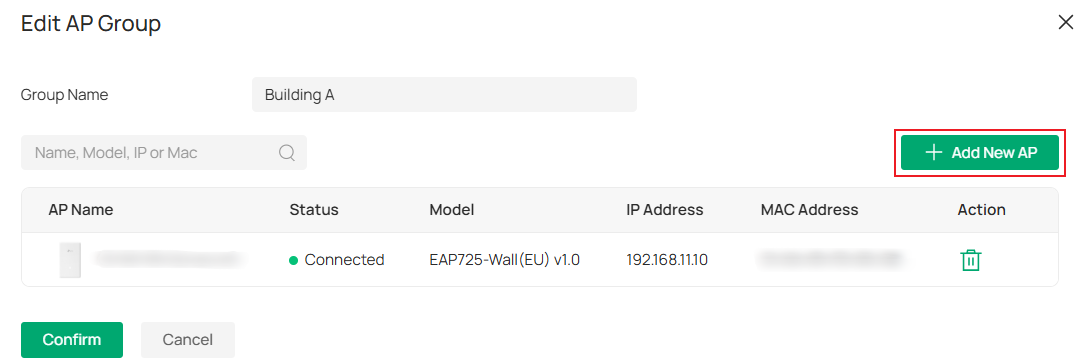
Step 4. Future Expansion
- Adding new APs: Simply assign the AP to the target AP Group to automatically inherit the SSID deployment scope associated with that AP Group.
Merge SSIDs After Omada Controller Upgrade
Prior to Omada Controller v6.3, SSIDs were managed using the WLAN Group mechanism. After upgrading to version 6.3 or later, SSID management will be migrated to the AP Group model.
SSID consolidation is not mandatory immediately after the upgrade. The following section describes how to merge SSIDs and explains how SSID configurations are applied when the merge is not performed.
How to Merge SSIDs
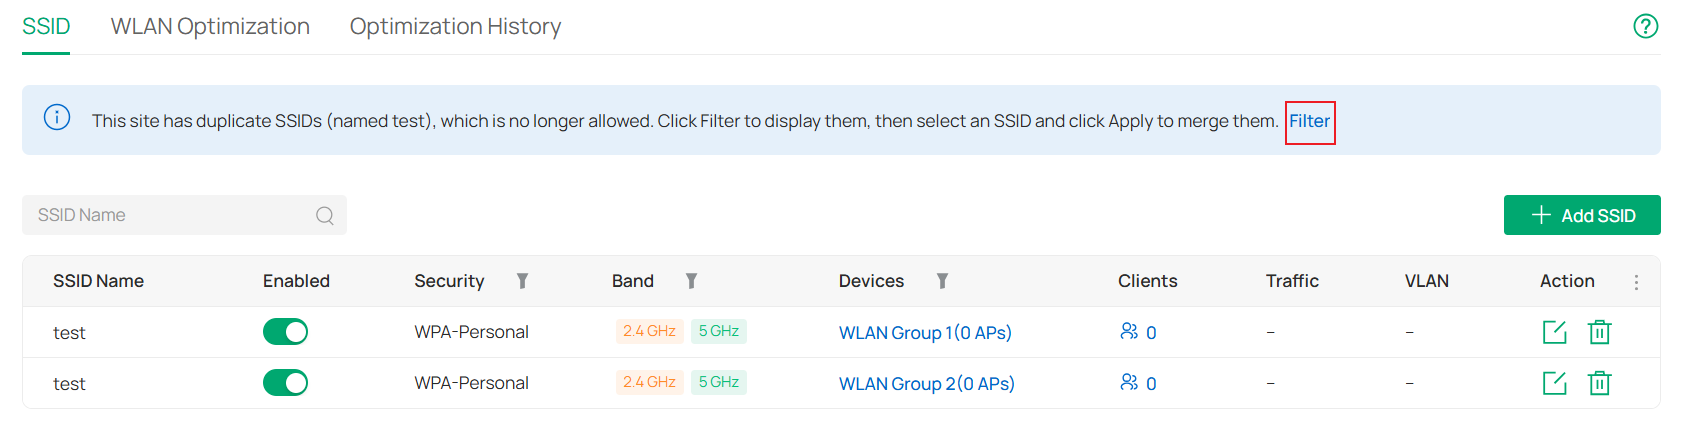
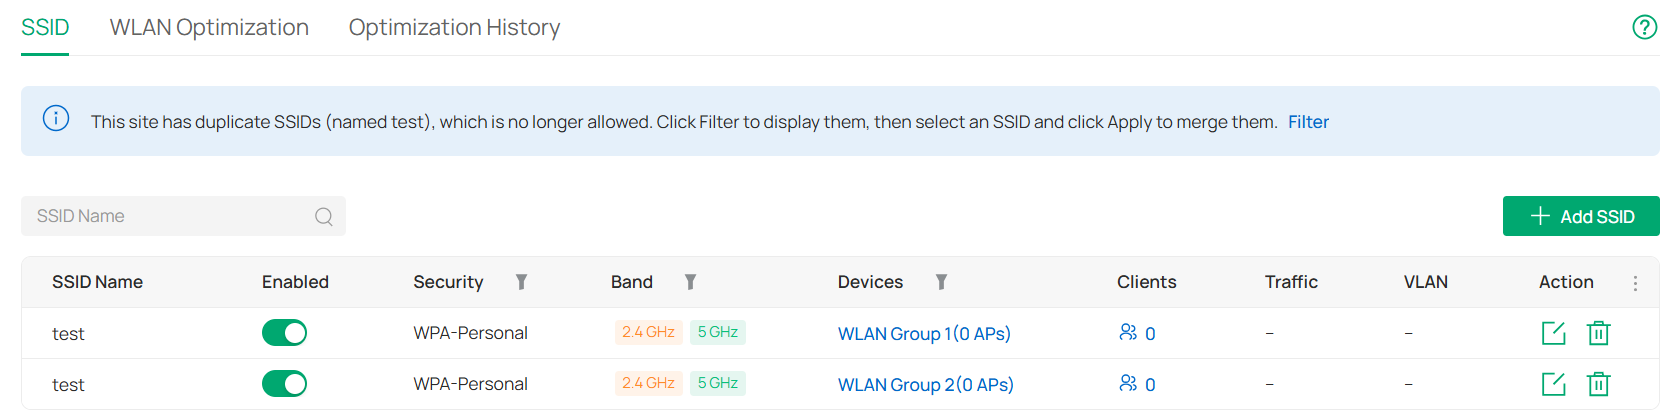
Suppose you created two SSIDs named "test" before the upgrade, with one assigned to WLAN Group 1 and the other assigned to WLAN Group 2.


After the upgrade to Omada Controller v6.3 or above, existing WLAN Groups will be converted into AP Groups with the same names. The system will perform a duplication check during this process. If duplicate SSIDs are detected, you will be notified accordingly. You can then follow the steps below to complete the SSID merge. The original SSID configurations will remain unchanged.
After reading the prompt message, click "Filter".
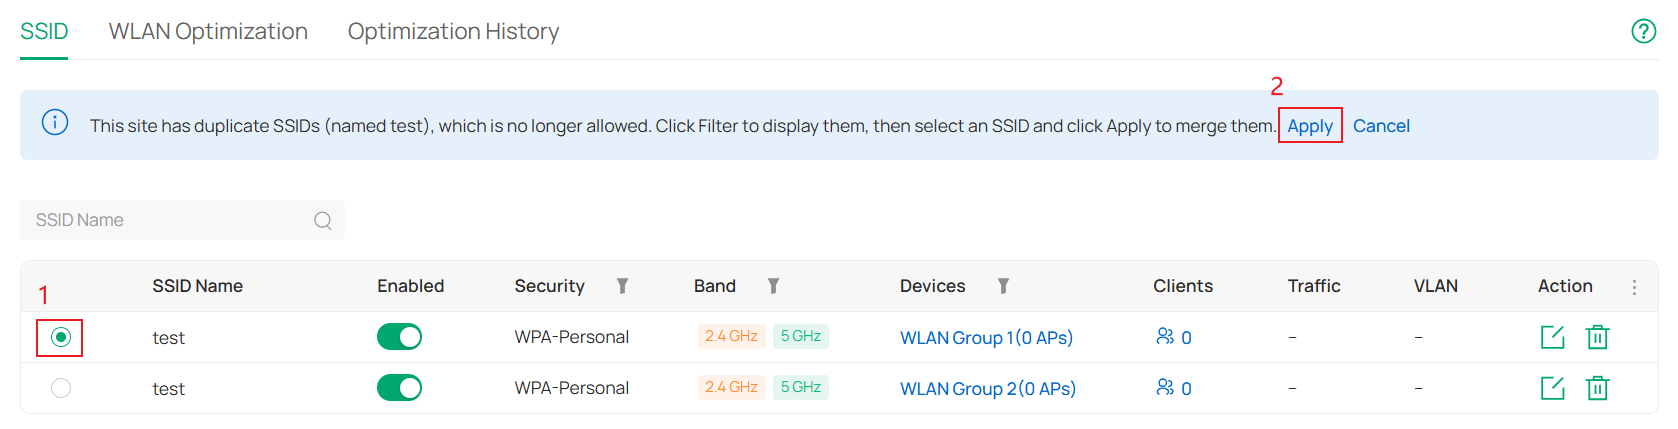
After selecting the SSID you want to keep, click "Apply".
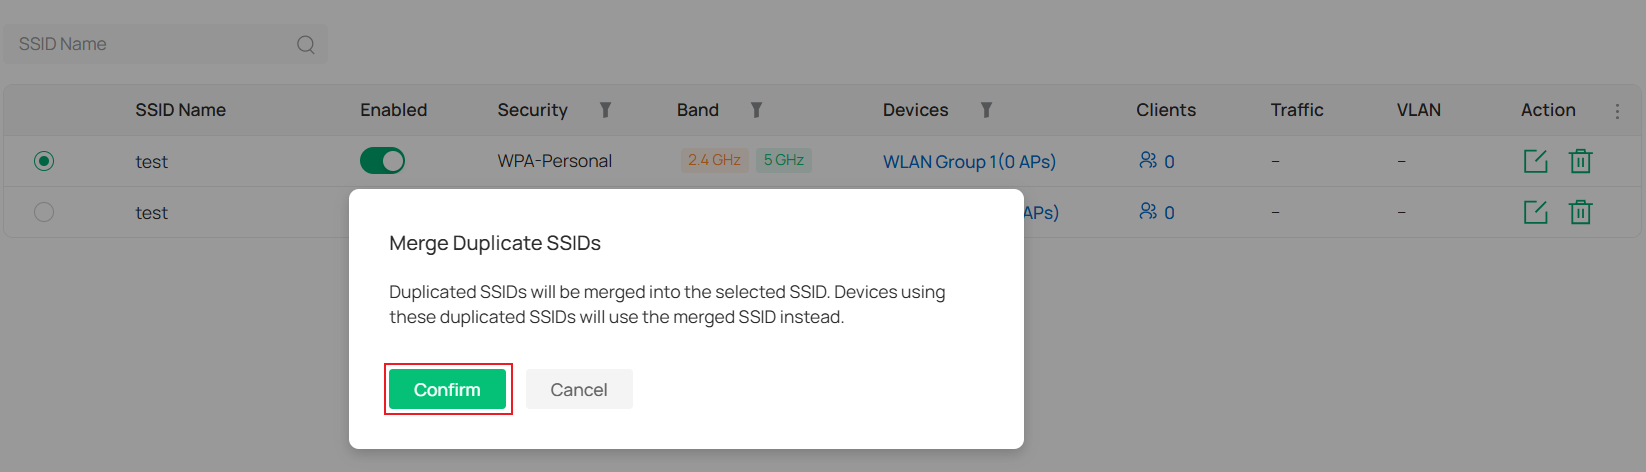
After reading the prompt text, click "Confirm".
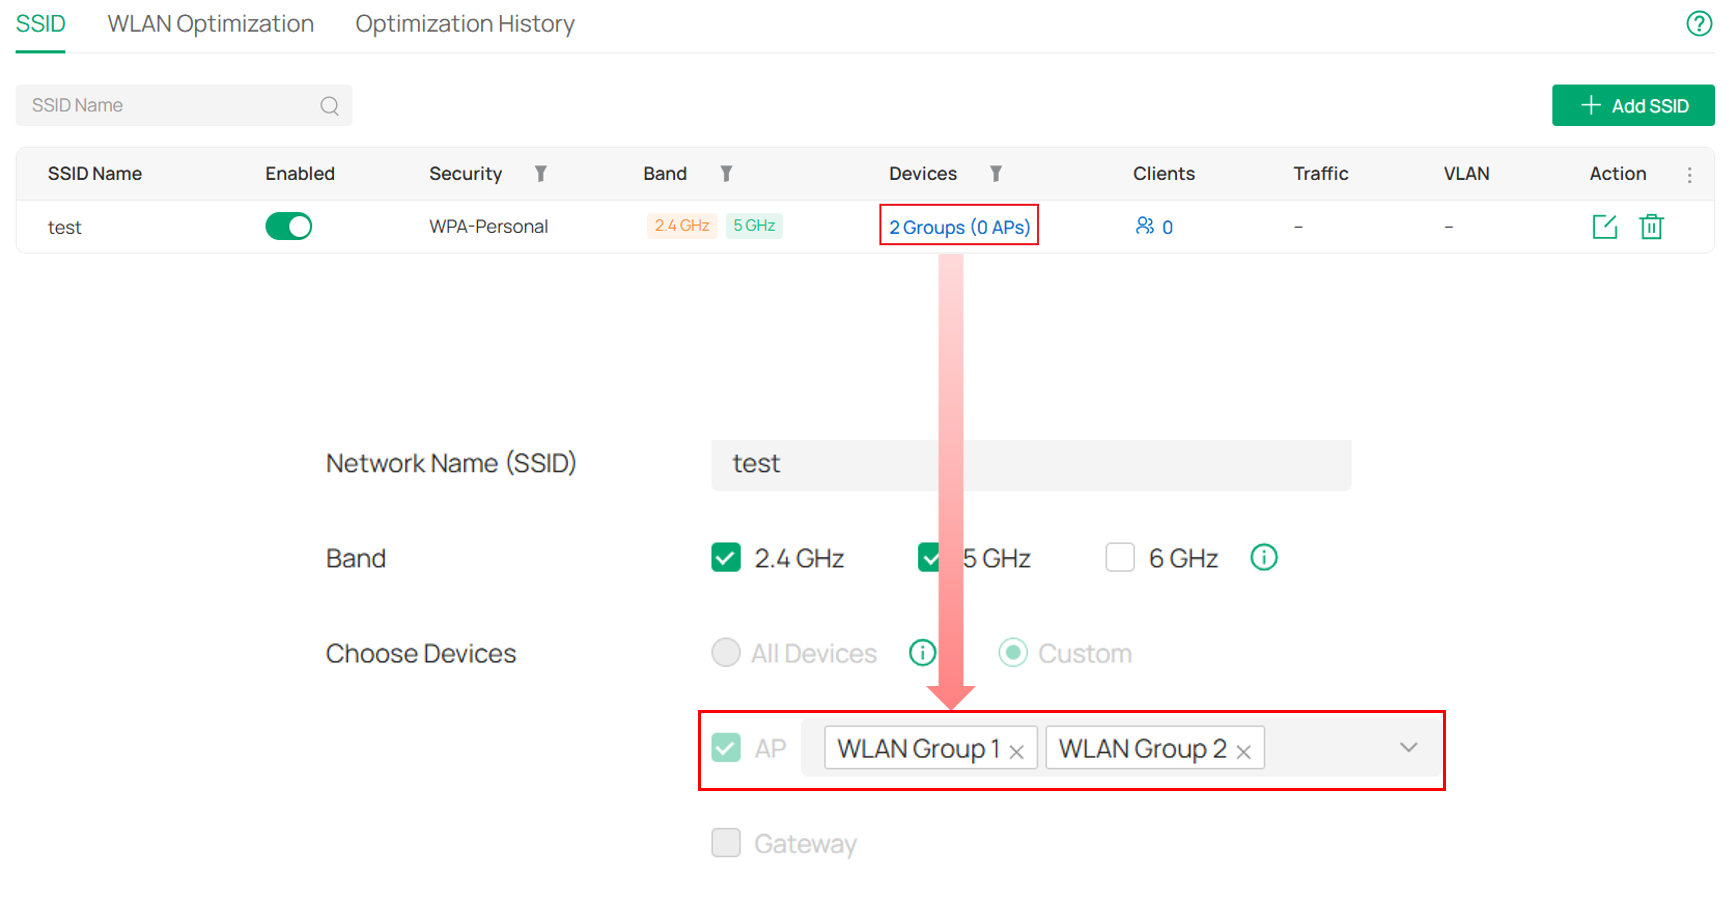
AP Groups associated with SSIDs of the same name will also be merged together. After the merge, you can continue to associate this SSID with additional AP Groups as needed.
What Happens If SSIDs Are Not Merged
Suppose you created two SSIDs named "test" before the upgrade, with one assigned to WLAN Group 1 and the other assigned to WLAN Group 2.


After the upgrade to Omada Controller v6.3 or above, you can choose not to merge duplicate SSIDs.
If SSIDs are not merged, their existing configurations will be preserved and will continue to take effect as they did before the upgrade.
To prevent configuration conflicts caused by duplicate SSIDs with different settings being assigned to different AP Groups, the AP Group association of duplicate SSIDs cannot be modified.
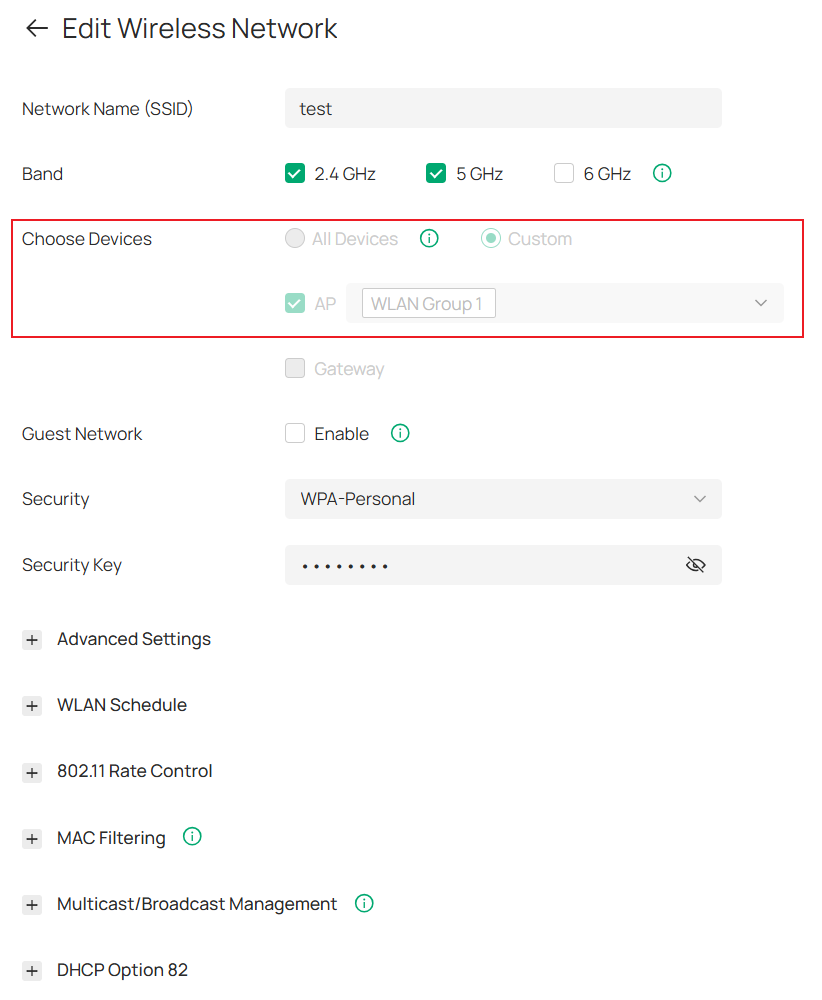
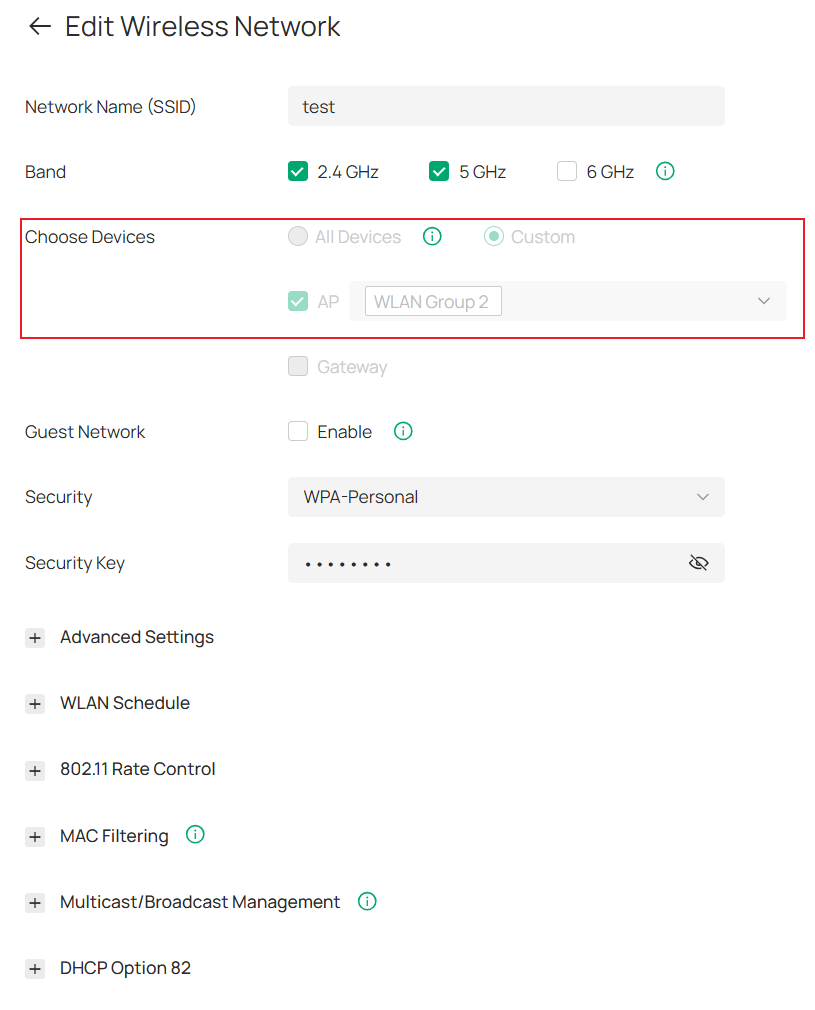
As a result, you cannot change the coverage scope of a duplicate SSID by moving it between AP Groups. Otherwise, devices could receive different configurations for SSIDs with the same name, which may lead to configuration inconsistencies and prevent the devices from operating correctly.
Apart from this AP Group restriction, all other SSID settings can be viewed, modified, and applied normally.
Conclusion
This article introduces the AP Group feature introduced in Omada Controller v6.3, which further optimizes the original WLAN configuration model. By following this guide, you will quickly understand and learn how to effectively use the AP group feature.
To learn more about each function and configuration, please visit Support Home to download or check the manual for your product.
QA
Q1: What impact will the management SSID of the Flex Bridge have?
A1: Flex Bridge 5 only supports Management SSIDs in the device private management page, while site-level SSIDs are not applied. Therefore, a clear message is provided in the SSID>Devices, as shown below:
“This SSID is not applied to the single-pack Bridge APs in the above AP group. To check their applied management SSIDs, go to the AP management page.”
Q2: What App versions are supported? Can older versions of the App still function properly?
A2: The Omada App upgrade is not mandatory. Older versions remain accessible, while version 5.3 is the officially supported release.
Viewing and query functions remain mostly unaffected:
The SSID list and detail pages can be loaded normally, allowing standard inspection and troubleshooting. However, new fields such as AP Groups are not visible in older app versions and may appear blank or truncated, but this does not impact basic viewing.
Editing operations carry potential risks:
When multiple SSIDs with the same name exist within a single site, older app versions cannot distinguish their AP Group associations. This may lead to unintended modifications to SSIDs under different AP Groups, and some changes may not take effect properly.
Compatibility notice:
Upgrading the Controller to version 6.3 will not make older app versions unusable. However, due to inconsistencies with the new configuration model, editing operations may pose risks. It is recommended to upgrade the Omada App to version 5.3 or later to ensure full WLAN configuration support.
Q3: Do I need to reconfigure AP groups immediately after upgrading?
A3: No. After the upgrade, there is no requirement to rebuild configurations immediately. Ensuring current network availability takes priority.
Q4: What happens if the number of Wi-Fi Gateway SSIDs exceeds the limit after upgrading?
A4: In Omada Controller v6.3, only up to 8 Gateway SSIDs per site per band are supported. During upgrade or restore, the system will automatically adjust configurations exceeding the limit.
If an SSID no longer has any applicable devices after adjustment, it will be marked as invalid and can only be deleted.
