


How to Add Additional Flex Bridge 5 Devices to an Existing Network


Contents
Configuration for Standalone Mode Using PC
Configuration for Standalone Mode Using Omada App
Configuration for Controller Mode Using PC
Configuration for Controller Mode Using Omada App
Introduction
This article explains how to add additional Flex Bridge 5 client devices to an existing wireless bridge network consisting of a Sector Bridge 5 and Flex Bridge 5, or multiple Flex Bridge 5 devices. Instructions are provided for Standalone Mode and Omada Controller using both a PC and the Omada App.
Requirements
- Flex Bridge 5
Configuration
Configuration for Standalone Mode Using PC
Scenario 1: Adding Flex Bridge 5 via Pairing DIP Switch
Network Topology
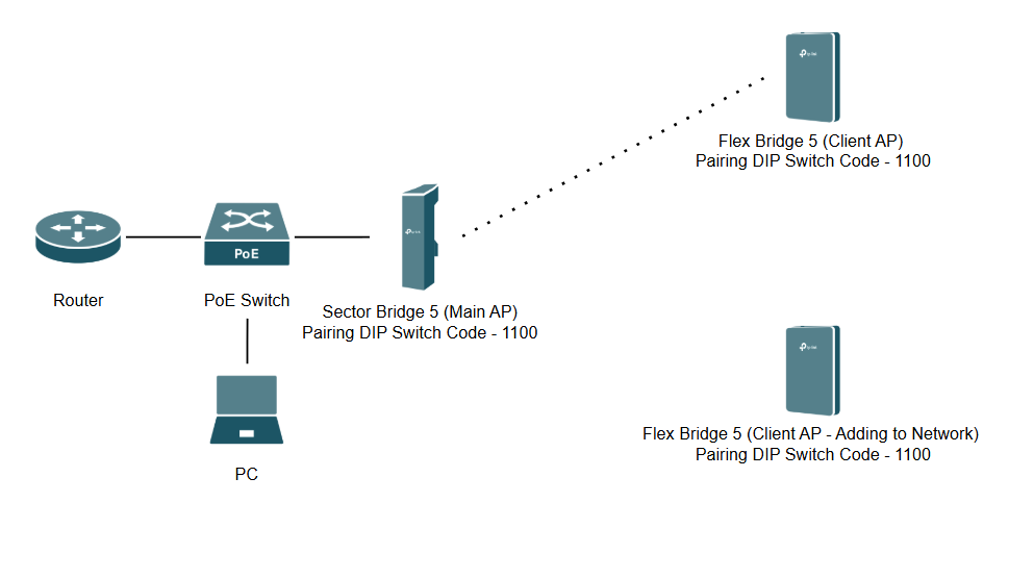
Note: A Windows 11 Laptop is used for this section along with a router, PoE switch, Sector Bridge 5 and Flex Bridge 5. A Flex Bridge 5 can also be used as the Main AP instead of a Sector Bridge 5.
Note: The Pairing DIP Switch is set to 1100 across all units (Sector Bridge 5 and both Flex Bridge 5 APs), and the Role Switch is set to Client AP on the two Flex Bridge 5 APs.
Step 1. Ensure existing Main and Client APs are connected and check that they have the Pairing DIP Switch enabled and are set to the same code:
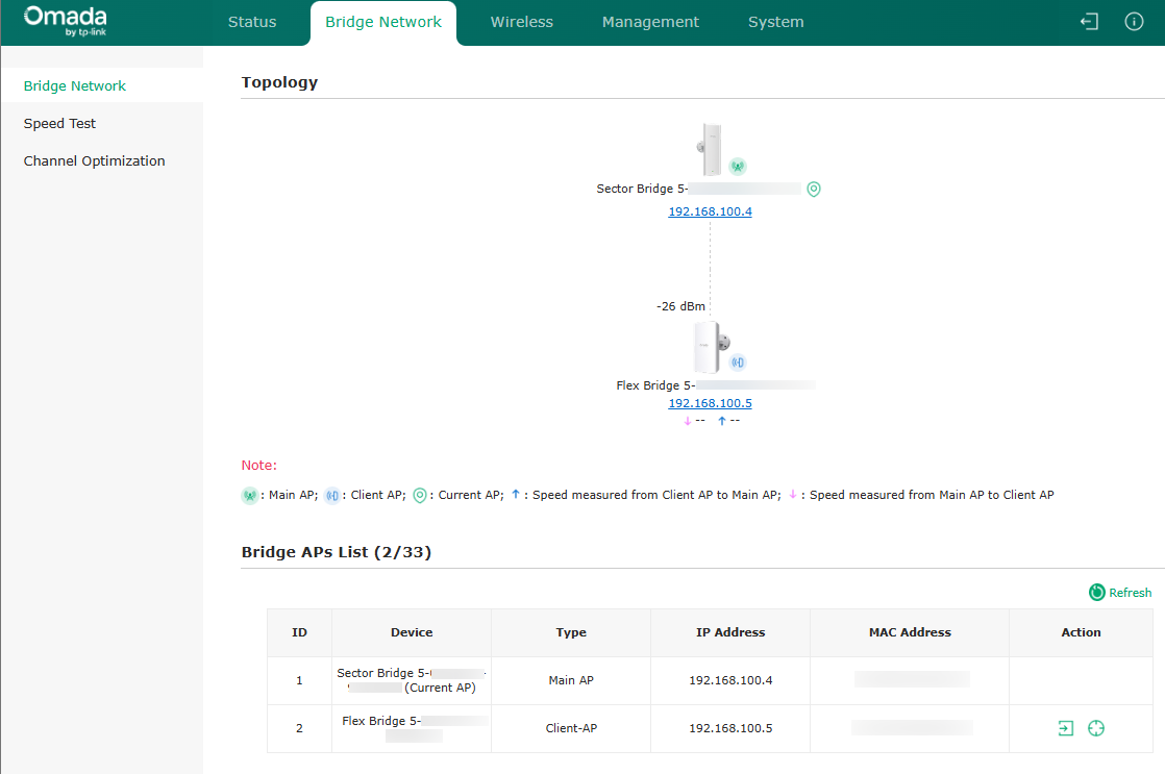
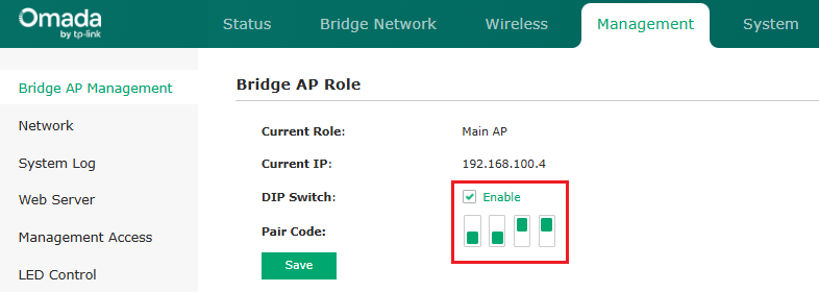
Note: Bridge AP management page of the Sector Bridge 5 which is the Main AP in the network.
Step 2. Ensure the new Flex Bridge 5 being added to the network has the DIP Switch enabled and has the same Pair Code as the Main AP.
Step 3. Enable the Bridge Pairing Window on the Main AP:
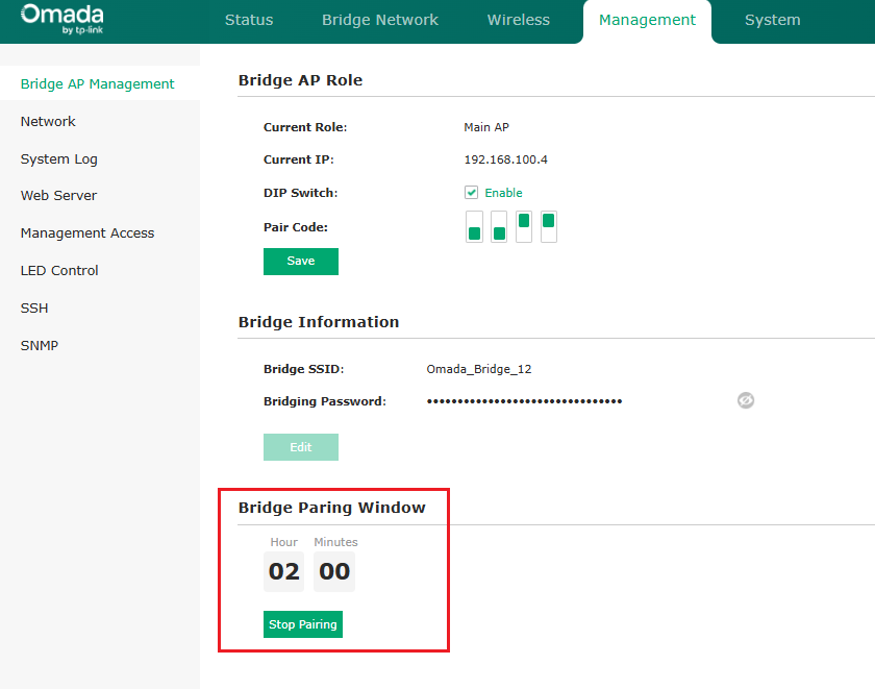
Step 4. The Flex Bridge 5 will automatically connect to the existing network, and you can confirm it’s been added in the Bridge Network tab:
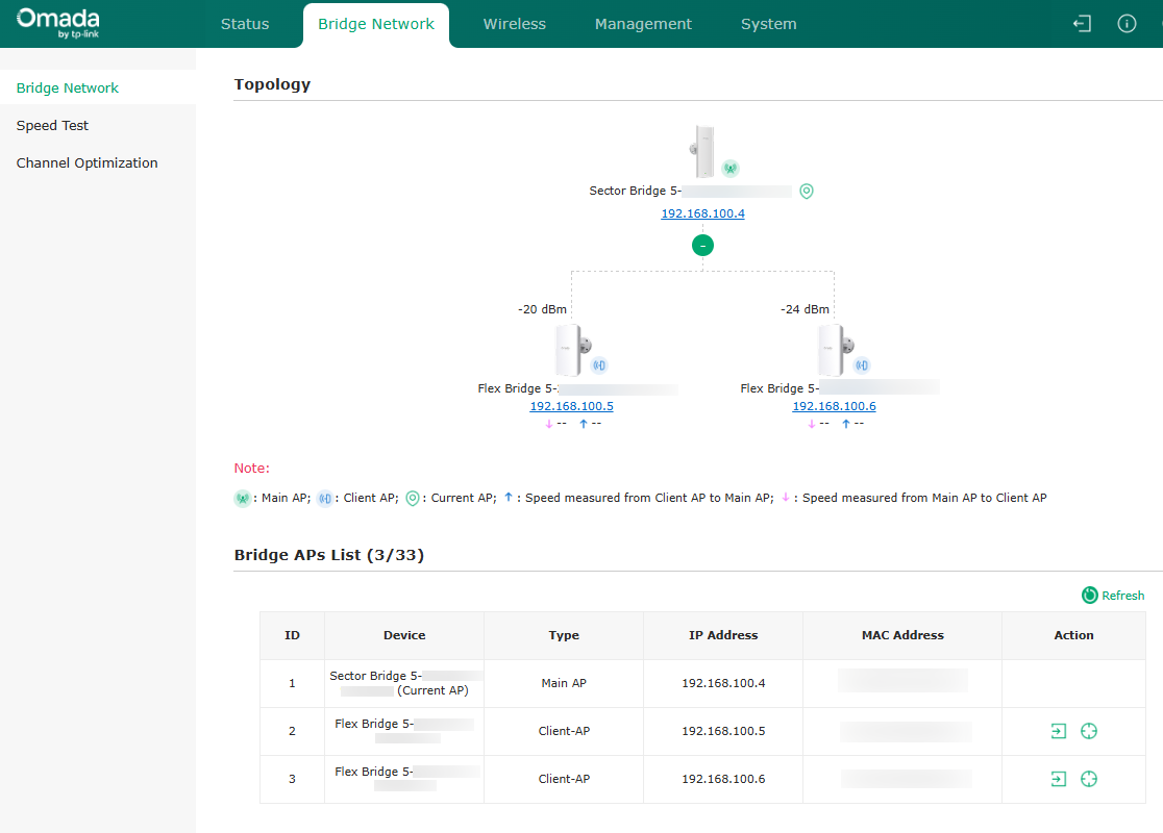
Scenario 2: Adding Flex Bridge 5 via Role Switch (Software-Based Management)
Network Topology
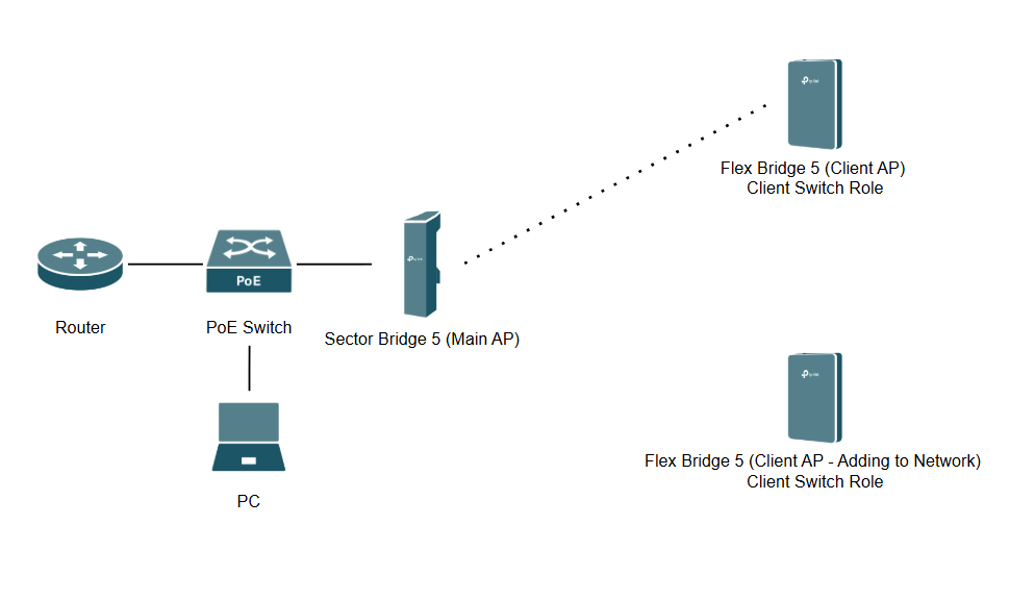
Note: A Windows 11 Laptop is used for this section along with a router, PoE switch, Sector Bridge 5 (DIP Switch disabled), and Flex Bridge 5 (DIP Switch enabled and Switch Role set to Client). A Flex Bridge 5 can also be used as the Main AP instead of a Sector Bridge 5.
Note: During setup, make sure the DIP switches on the Main AP and Client AP are not both set to 'Enable'.
Note: This example adds a Client AP from the Main AP Web UI. To pair and scan a Main AP from the Client AP Web UI, please refer to this following guide: How to Pair and Configure EAP Bridges
Step 1. Ensure existing Main and Client APs are already connected:
Step 2. Go to the Bridge AP Management page of the Main AP (Sector Bridge 5 in this topology) and ensure the DIP Switch is disabled:
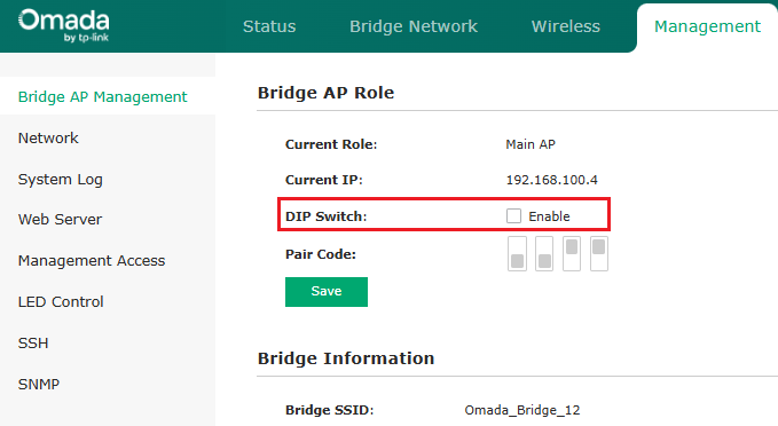
Step 3. Go to the Bridge Network page of the Main AP (Sector Bridge 5 in this topology) and click on Add Client-AP:
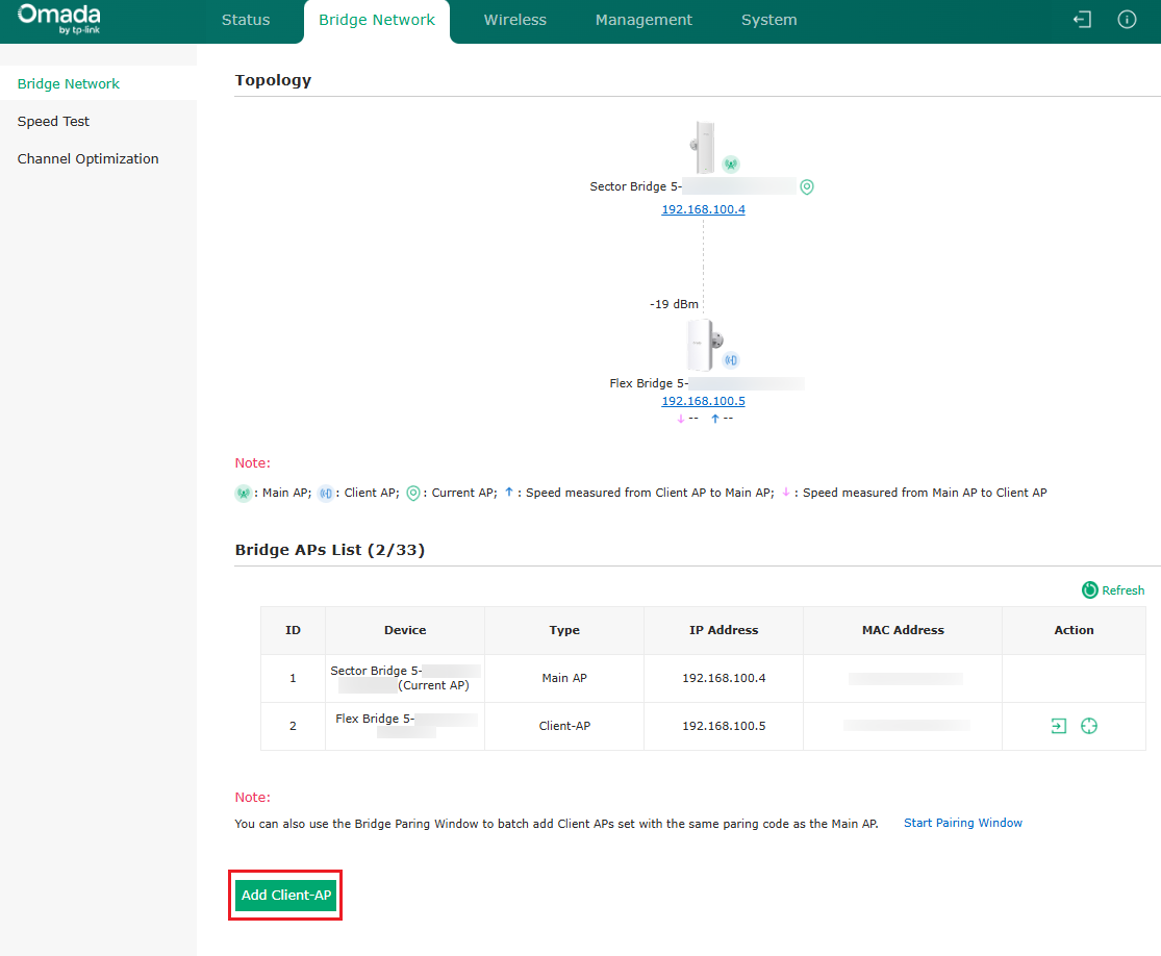
Select the new Flex Bridge 5 that you want to add to the network and select Confirm:
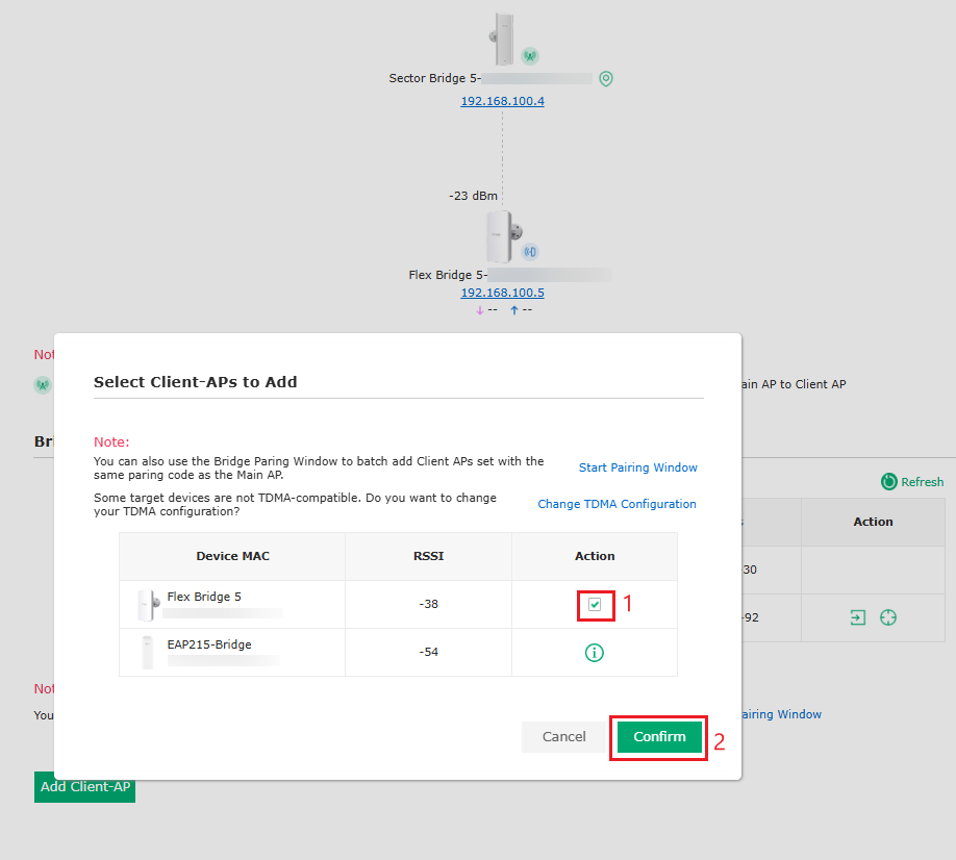
Note: If the DIP Switch was not disabled on the Main AP, the checkbox would not appear and it would be an icon that says the device needs to have the same pairing code as the Main AP.
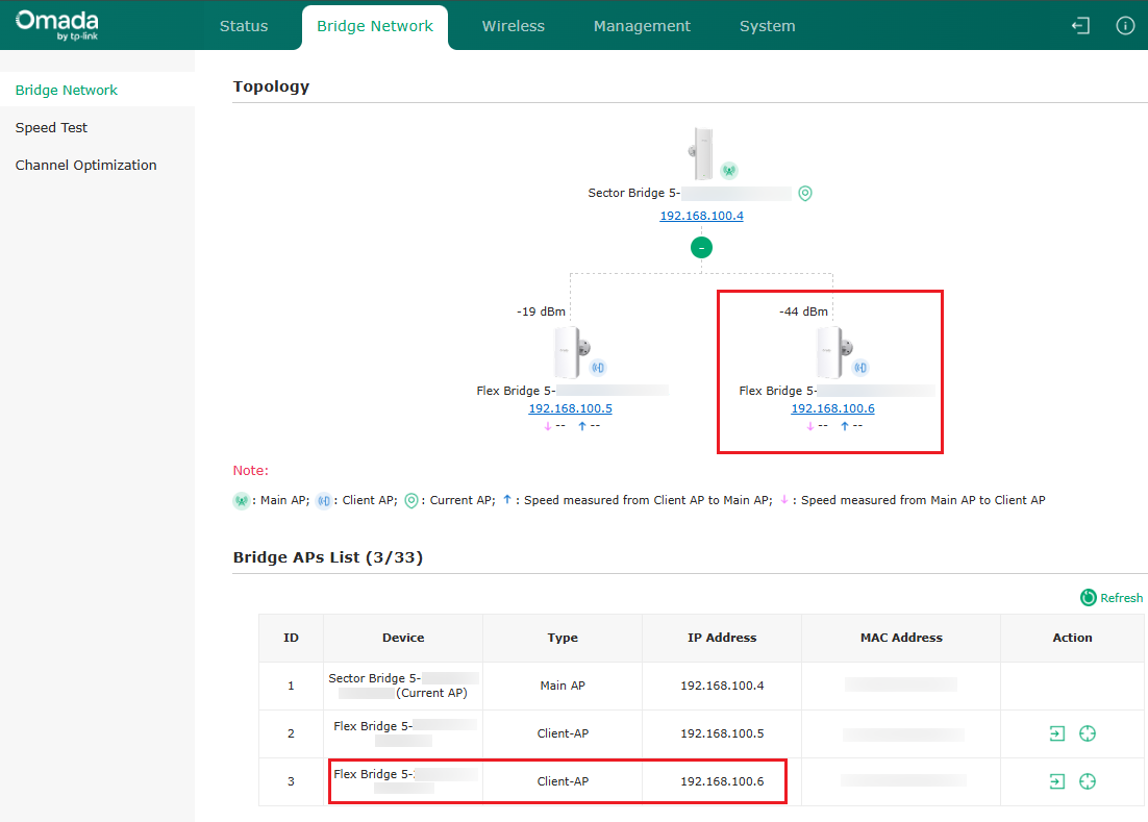
The new Flex Bridge 5 will now be added to the Bridge APs List as a Client AP and will also show in the Topology:
Configuration for Standalone Mode Using Omada App
Scenario 1: Adding Flex Bridge 5 via Pairing DIP Switch
Network Topology
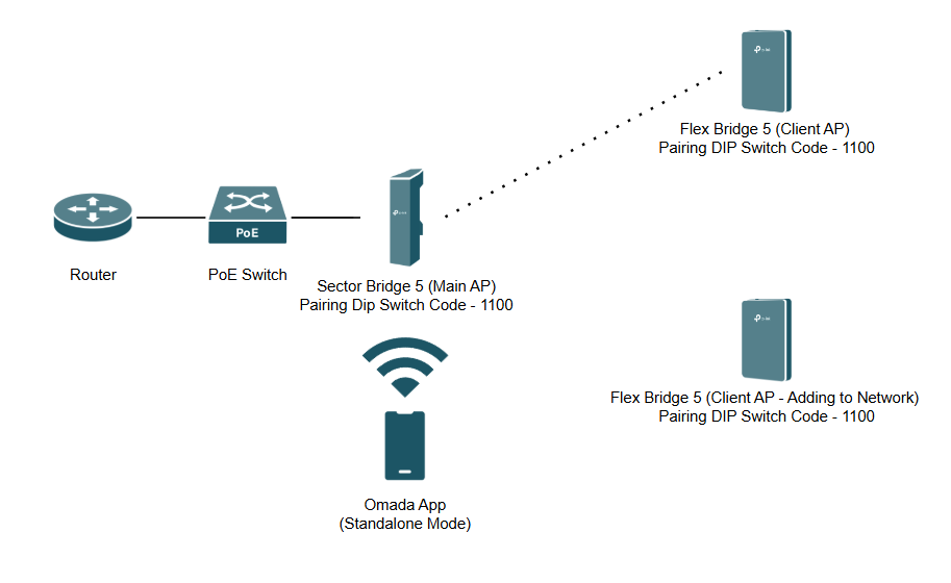
Note: An Android Phone is used for this section along with a router, PoE switch, Sector Bridge 5 and Flex Bridge 5. A Flex Bridge 5 can also be used as the Main AP instead of a Sector Bridge 5.
Note: The Pairing DIP Switch is set to 1100 across all units (Sector Bridge 5 and both Flex Bridge 5 APs), and the Role Switch is set to Client AP on the two Flex Bridge 5 APs.
Step 1. Ensure existing Main and Client APs are connected and check that they have the Pairing DIP Switch enabled and are set to the same code:
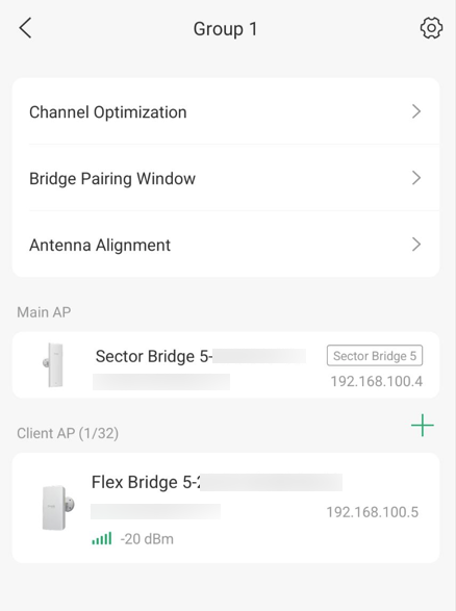
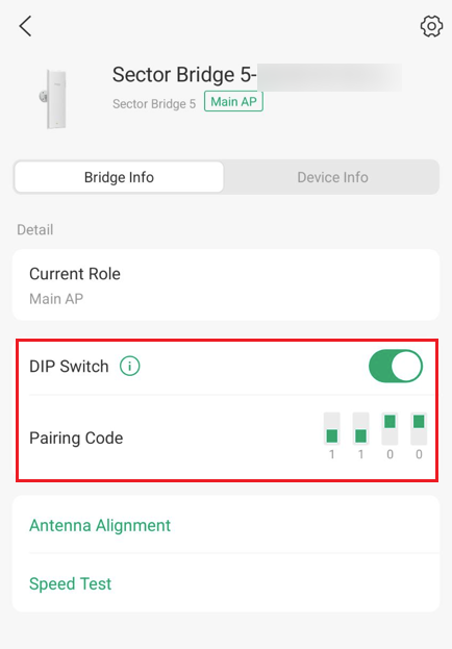
Note: Bridge AP management page of the Sector Bridge 5 which is the Main AP in the network.
Step 2. Ensure the new Flex Bridge 5 being added to the network has the DIP Switch enabled and has the same Pair Code as the Main AP.
Step 3. Enable the Bridge Pairing Window:
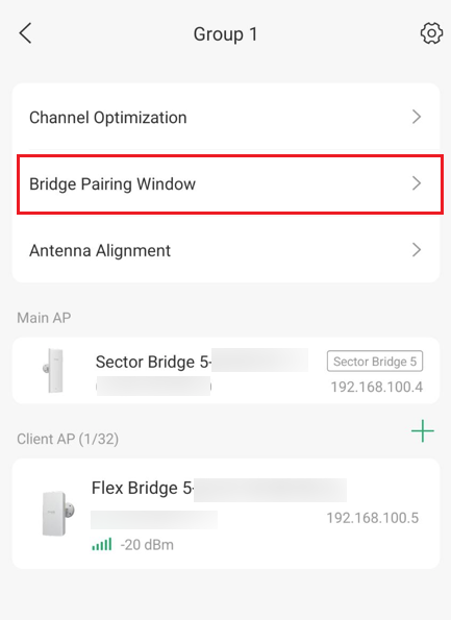
Step 4. The Flex Bridge 5 will automatically connect to the existing group and bridge network:
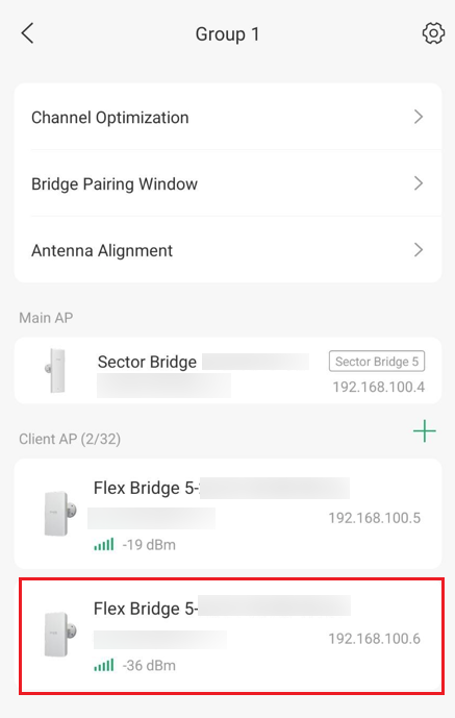
Scenario 2: Adding Flex Bridge 5 via Role Switch (Software-Based Management)
Network Topology
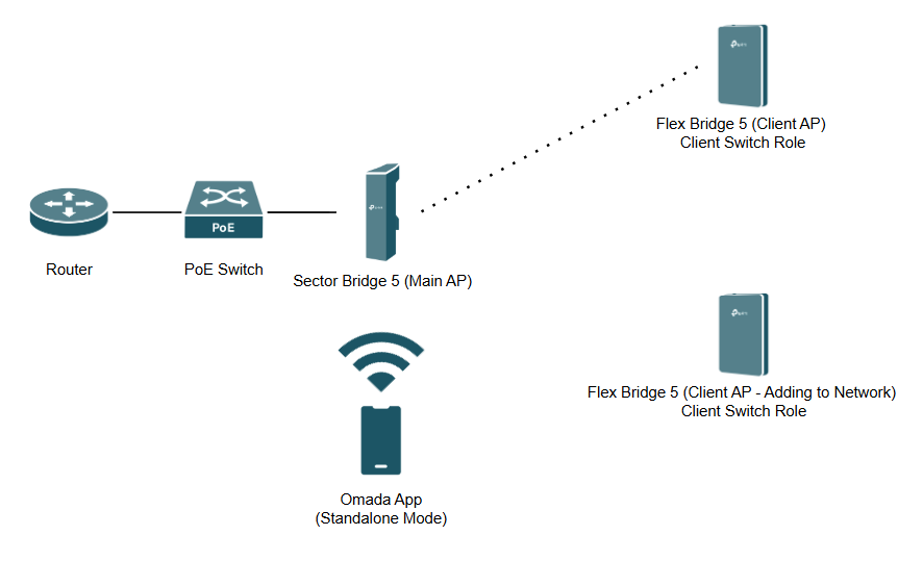
Note: An Android Phone is used for this section along with a router, PoE switch, Sector Bridge 5 (DIP Switch disabled) and Flex Bridge 5 (DIP Switch enabled and Switch Role set to Client). A Flex Bridge 5 can also be used as the Main AP instead of a Sector Bridge 5..
Note: During setup, make sure the DIP switches on the Main AP and Client AP are not both set to 'Enable'.
Note: This example adds a Client AP from the Main AP in the Omada App. To pair and scan a Main AP from the Client AP Web UI, please refer to this following guide: How to Pair and Configure EAP Bridges
Step 1. Ensure existing Main and Client APs are already connected:
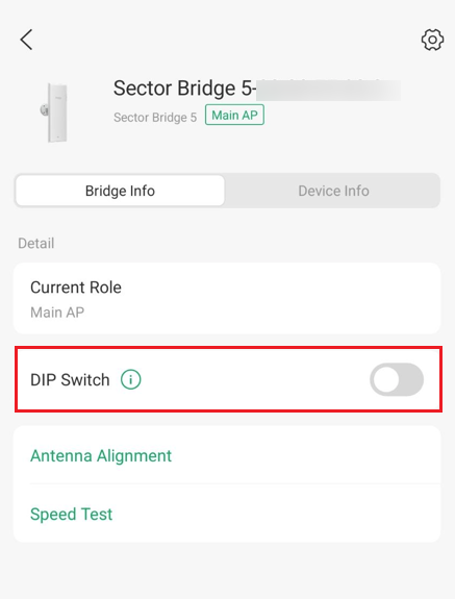
Step 2. Select the Main AP (Sector Bridge 5 in this topology) and ensure the DIP Switch is disabled:
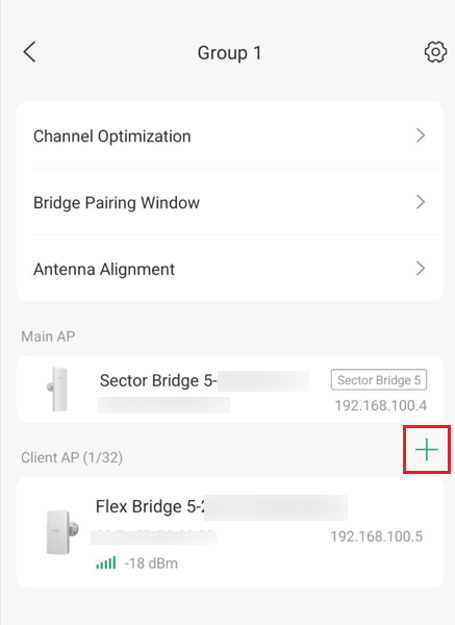
Step 3. Select the “+” icon on the Bridge Group page to add a Client AP:
Select the new Flex Bridge 5 that you want to add to the network and select Add Selected Device(s):
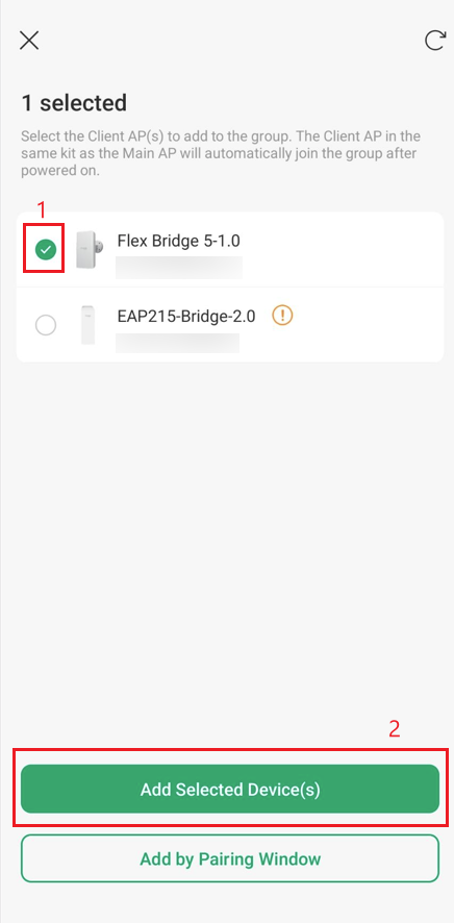
Note: If the DIP Switch was not disabled on the Main AP, the checkbox would not appear and it would be an icon that says the device needs to have the same pairing code as the Main AP.
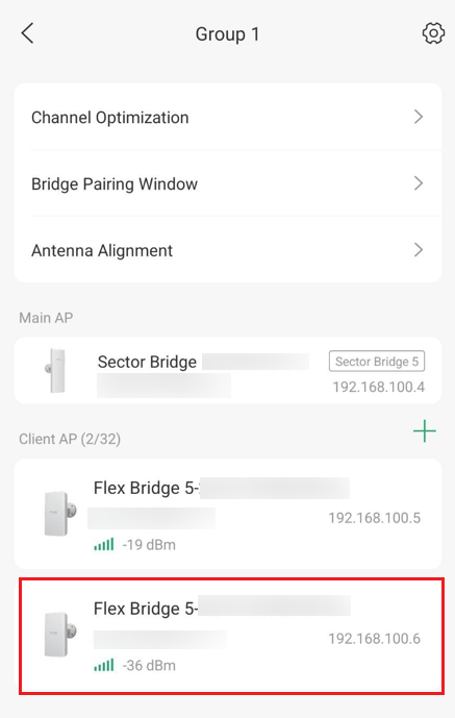
The new Flex Bridge 5 will now be added to the Bridge APs List as a Client AP:
Configuration for Controller Mode Using PC
Scenario 1: Adding Flex Bridge 5 via Pairing DIP Switch
Network Topology
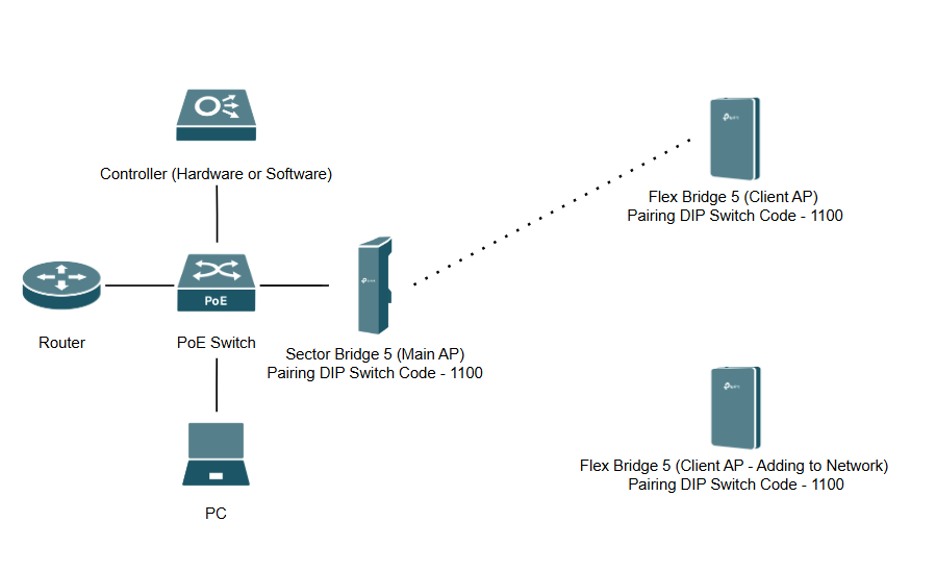
Note: A Windows 11 Laptop is used for this section along with a hardware controller, router, PoE switch, Sector Bridge 5, and Flex Bridge 5. A Flex Bridge 5 can also be used as the Main AP instead of a Sector Bridge 5.
Note: The Pairing DIP Switch is set to 1100 across all units (Sector Bridge 5 and both Flex Bridge 5 APs), and the Role Switch is set to Client AP on the two Flex Bridge 5 APs.
Step 1. Ensure existing Main and Client APs are connected and check that they have the Pairing DIP Switch enabled and are set to the same code:
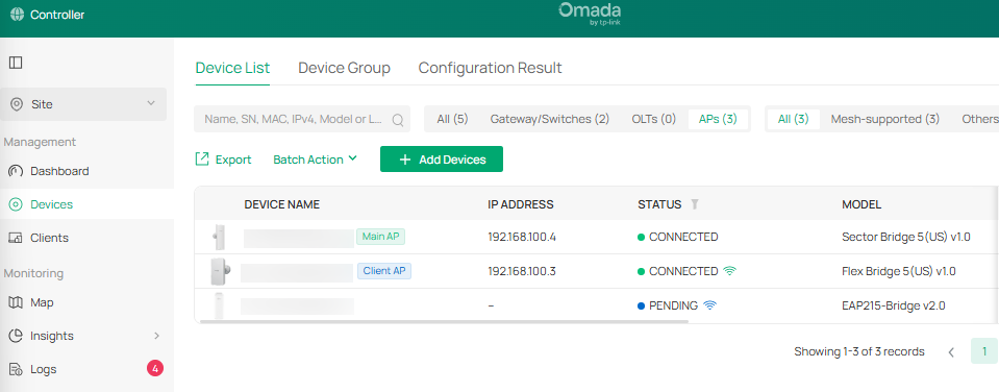
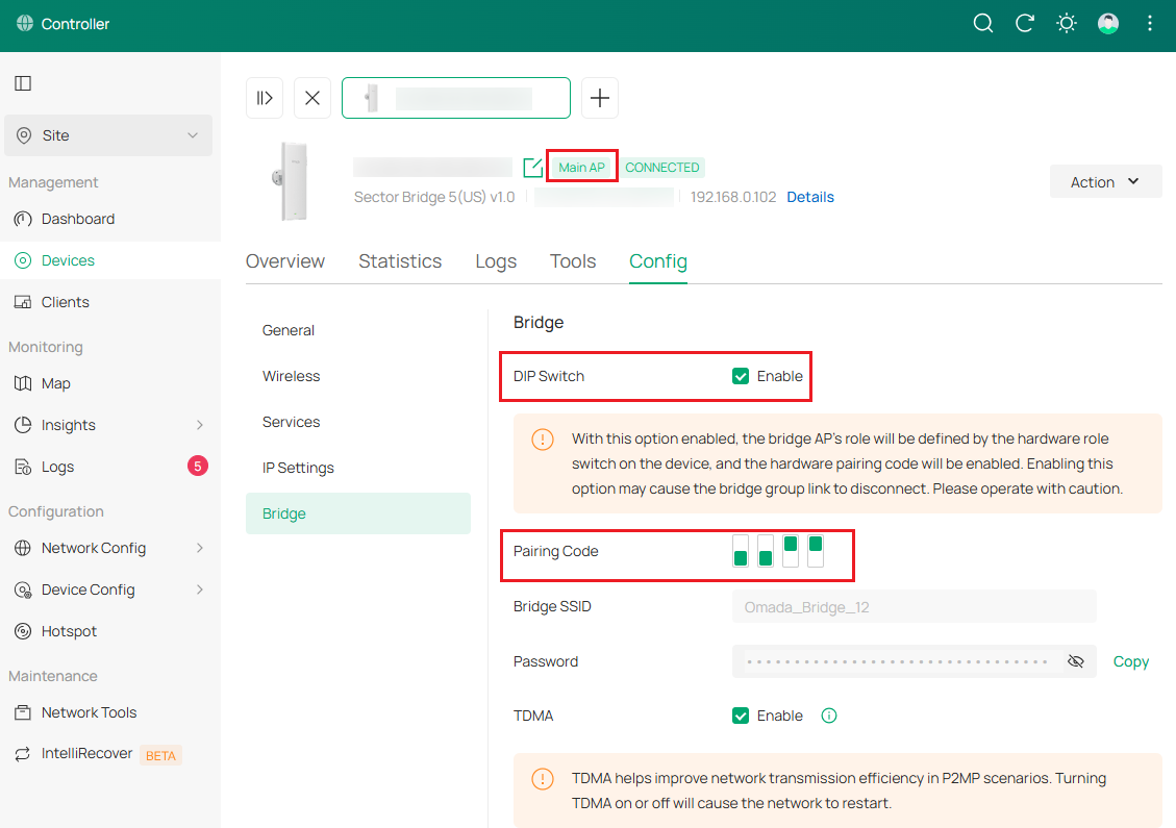
Note: Bridge AP management page of the Sector Bridge 5 which is the Main AP in the network.
Step 2. Ensure the new Flex Bridge 5 being added to the network has the DIP Switch enabled and has the same Pair Code as the Main AP.
Step 3. Enable the Bridge Pairing Window on the Main AP:
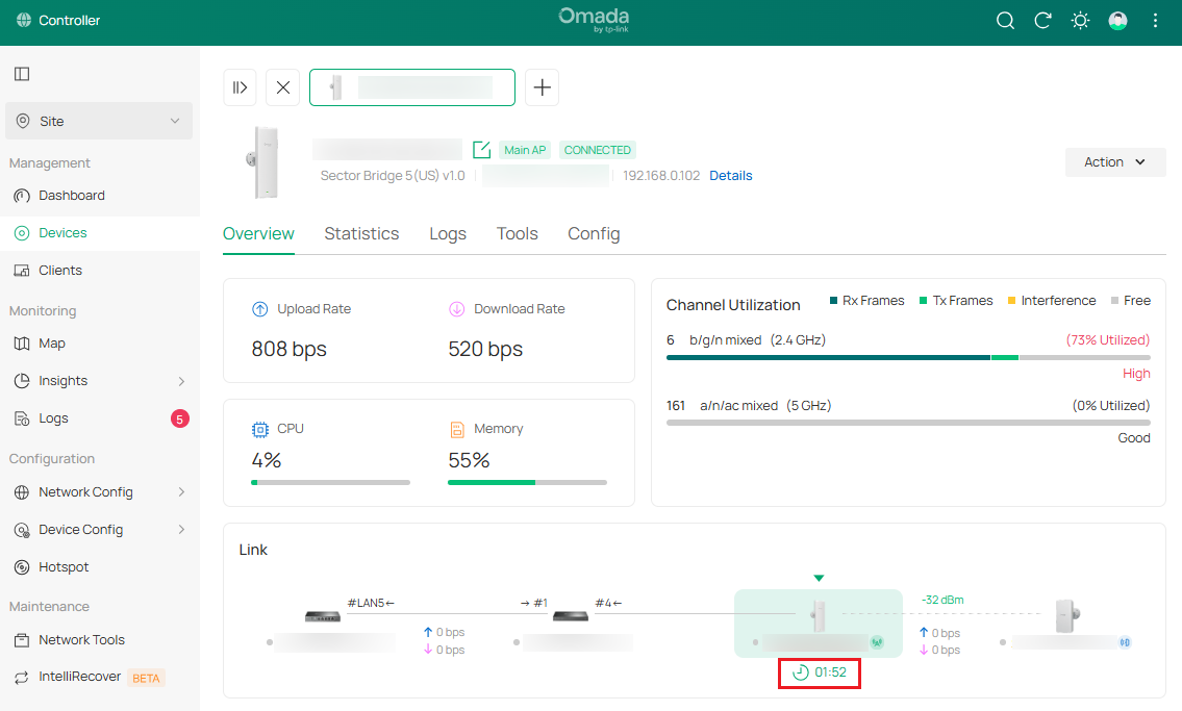
Step 4. The Flex Bridge 5 will automatically connect to the existing network, and you can confirm it’s been added in the Device List tab:
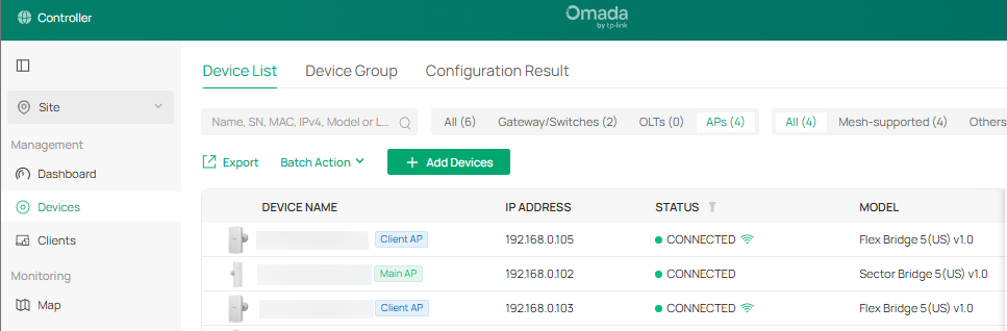
Scenario 2: Adding Flex Bridge 5 via Role Switch (Software-Based Management)
Network Topology
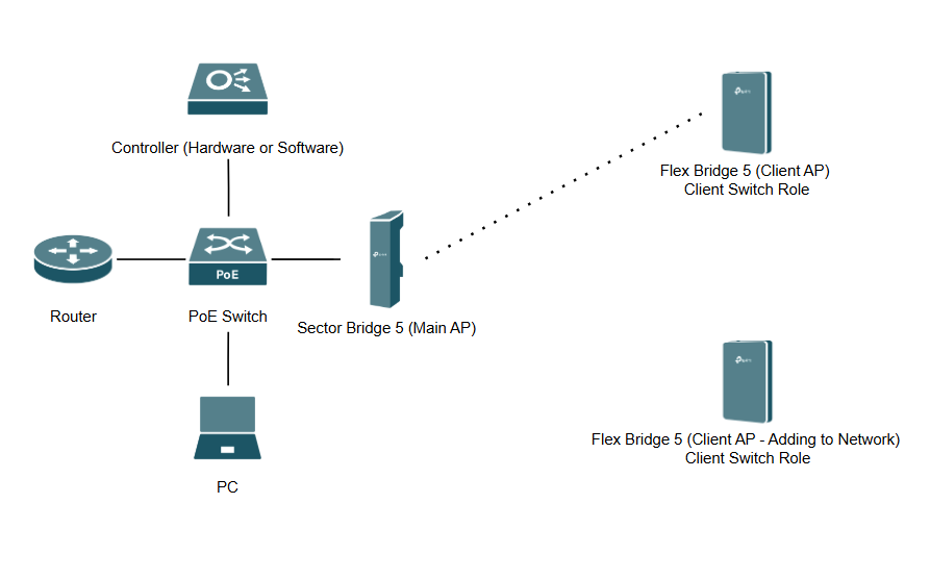
Note: A Windows 11 Laptop is used for this section along with a hardware controller, router, PoE switch, Sector Bridge 5 (Pairing DIP Switch disabled), and Flex Bridge 5 (Pairing DIP Switch enabled and Switch Role set to Client). A Flex Bridge 5 can also be used as the Main AP instead of a Sector Bridge 5.
Note: During setup, make sure the DIP switches on the Main AP and Client AP are not both set to 'Enable'.
Note: This example adds a Client AP from the Main AP Web UI. To pair and scan a Main AP from the Client AP Web UI, please refer to this following guide: How to Pair and Configure EAP Bridges
Step 1. Ensure existing Main and Client APs are already connected:
Step 2. Go to the Bridge page of the Main AP (Sector Bridge 5 in this topology) and ensure that the DIP Switch is disabled.
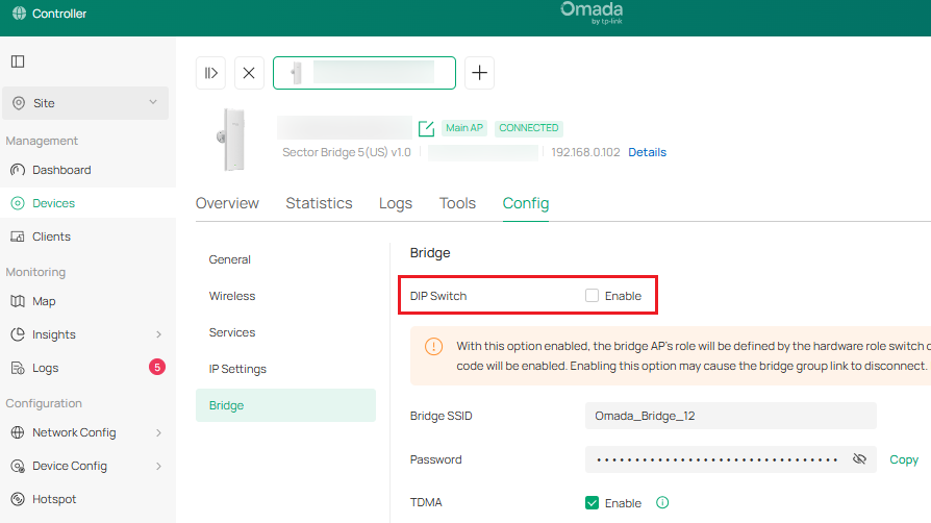
Step 3. Go to the Devices page of the Main AP and click on Add Device:
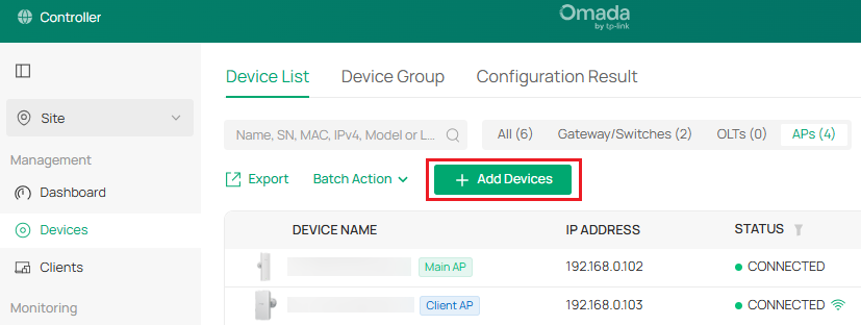
Select the new Flex Bridge 5 that you want to add to the network and select Apply:
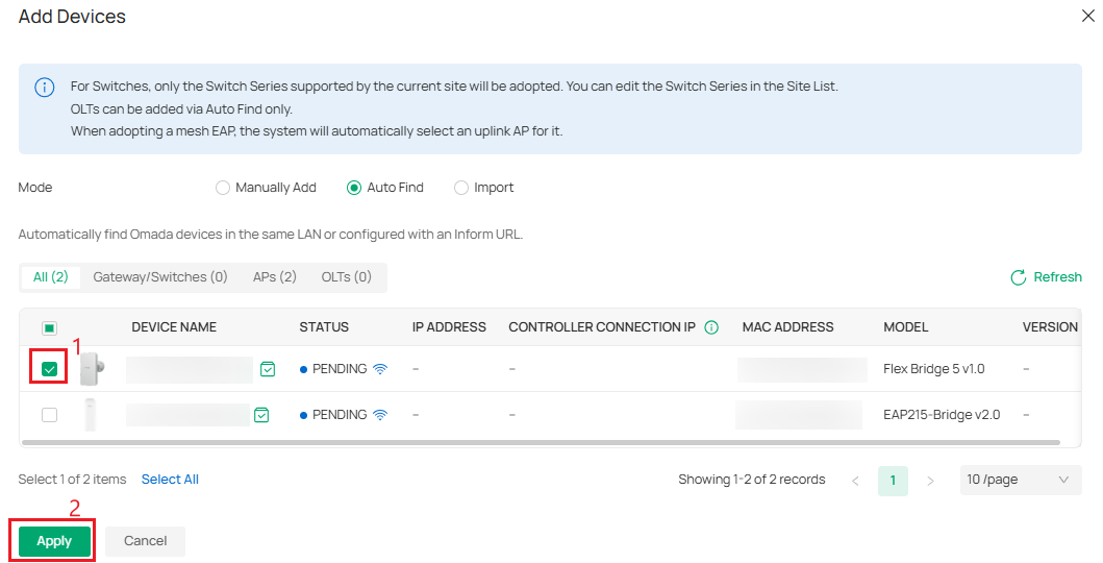
Note: If the DIP Switch was not disabled on the Main AP, the checkbox would not appear and it would be an icon that says the device needs to have the same pairing code as the Main AP.
The new Flex Bridge 5 will be added to the network:
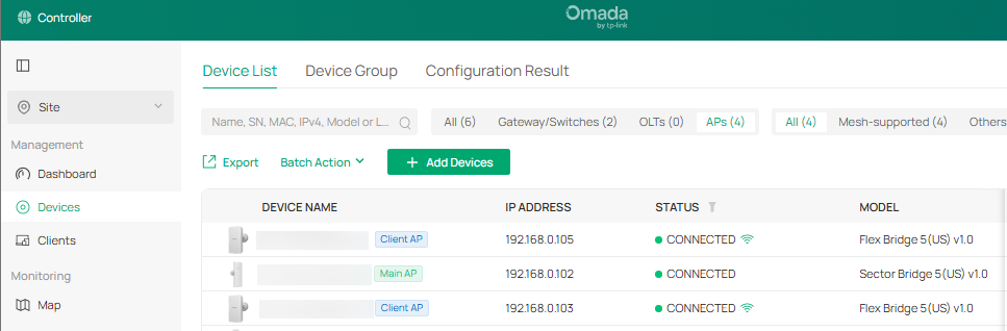
Configuration for Controller Mode Using Omada App
Scenario 1: Adding Flex Bridge 5 via Pairing DIP Switch
Network Topology
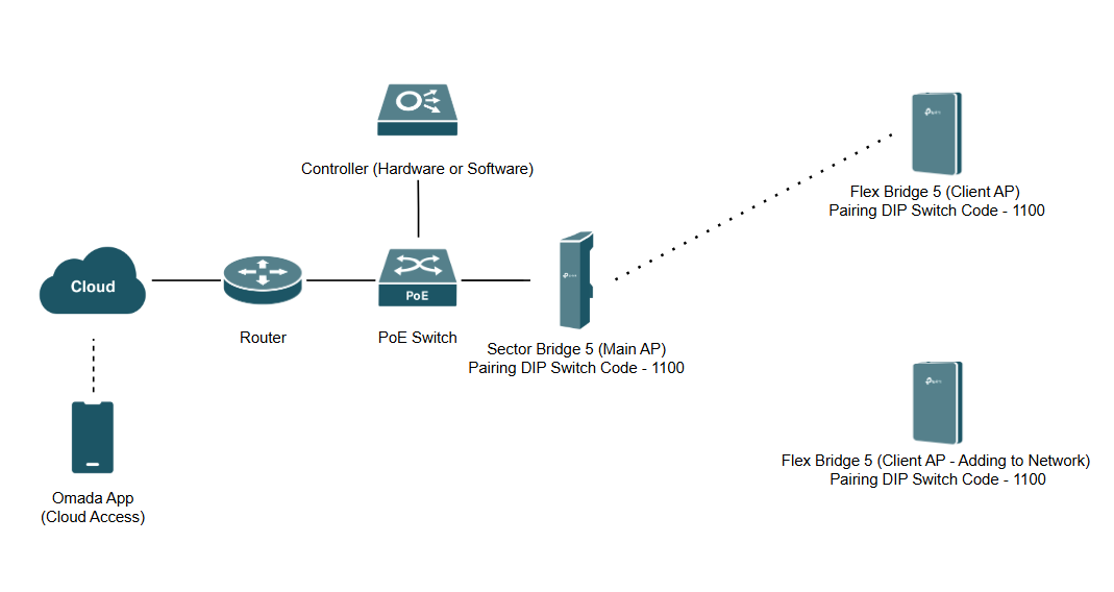
Note: An Android Phone is used for this section along with a router, PoE switch, Sector Bridge 5 and Flex Bridge 5. A Flex Bridge 5 can also be used as the Main AP instead of a Sector Bridge 5.
Note: The Pairing DIP Switch is set to 1100 across all units (Sector Bridge 5 and both Flex Bridge 5 APs), and the Role Switch is set to Client AP on the two Flex Bridge 5 APs.
Step 1. Ensure existing Main and Client APs are connected and check that they have the Pairing DIP Switch enabled and are set to the same code:
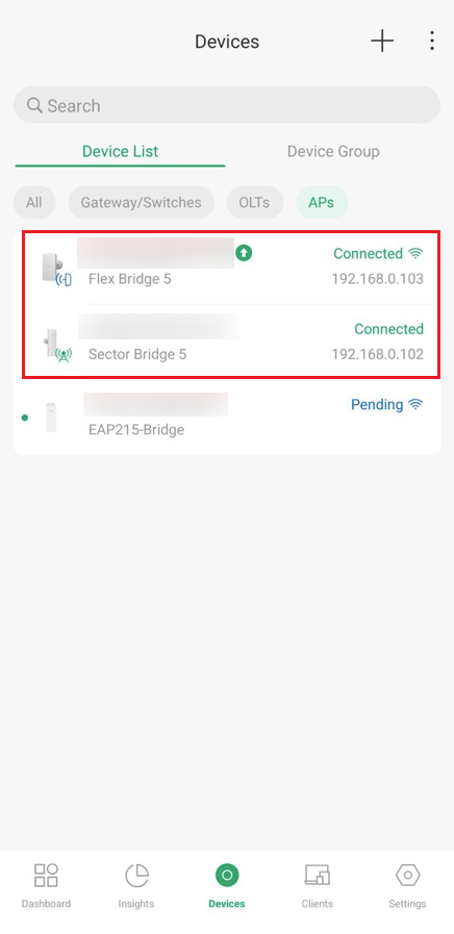
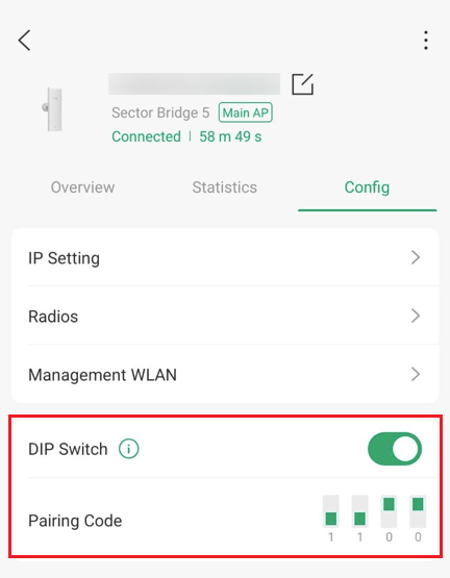
Note: Bridge AP management page of the Sector Bridge 5 which is the Main AP in the network.
Step 2. Ensure the new Flex Bridge 5 being added to the network has the DIP Switch enabled and has the same Pair Code as the Main AP.
Step 3. Enable the Bridge Pairing Window on the Main AP:
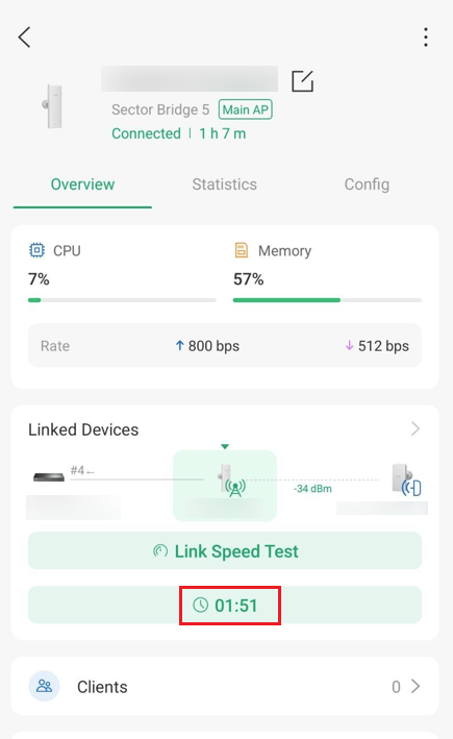
Step 4. The Flex Bridge 5 will automatically connect to the existing group and bridge network:
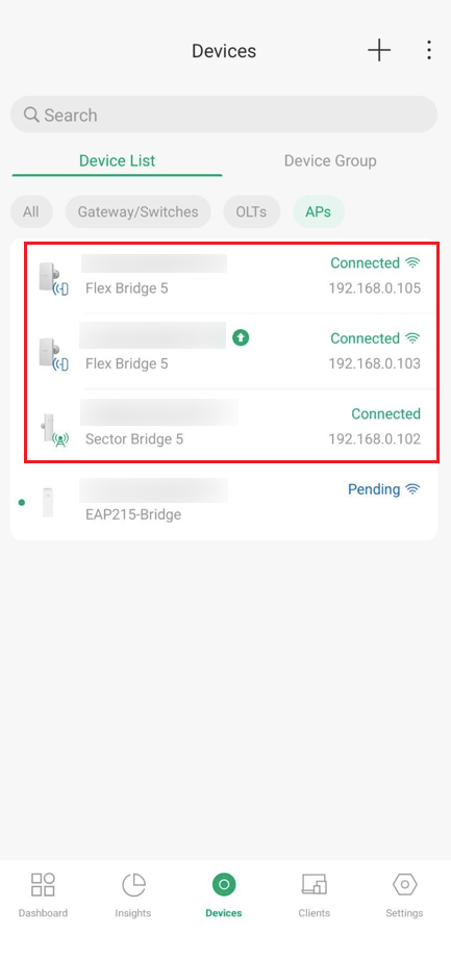
Scenario 2: Adding Flex Bridge 5 via Role Switch (Software-Based Management)
Network Topology
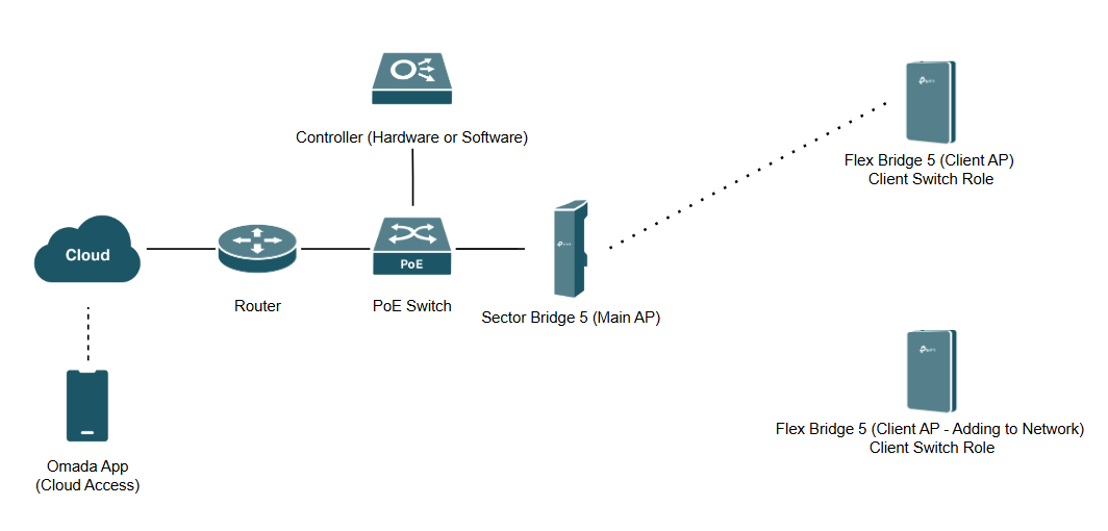
Note: An Android Phone is used for this section along with a hardware controller, router, PoE switch, Sector Bridge 5 (Pairing DIP Switch disabled), and Flex Bridge 5 (Pairing DIP Switch enabled and Switch Role set to Client). A Flex Bridge 5 can also be used as the Main AP instead of a Sector Bridge 5.
Note: During setup, make sure the DIP switches on the Main AP and Client AP are not both set to 'Enable'.
Note: This example adds a Client AP from the Main AP in the Omada App. To pair and scan a Main AP from the Client AP Web UI, please refer to this following guide: How to Pair and Configure EAP Bridges
Step 1. Ensure existing Main and Client APs are already connected:
Step 2. Select the Main AP (Sector Bridge 5 in this topology) and ensure the DIP Switch is disabled:
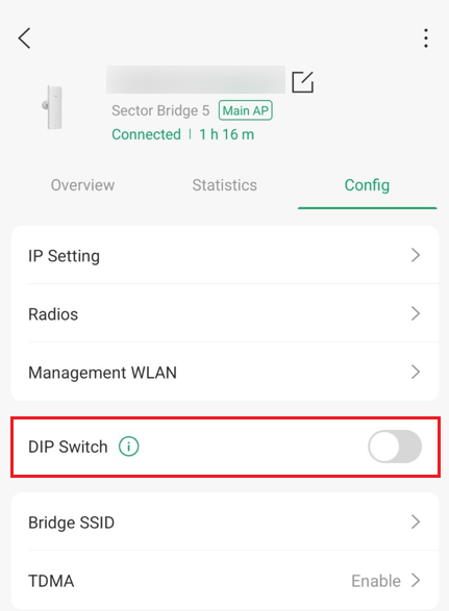
Step 3. Select the “+” icon on the Bridge Group page to add a Client AP:
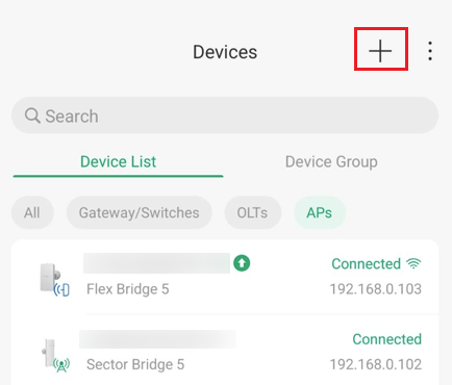
Select the new Flex Bridge 5 that you want to add to the network and select Add Selected Device(s):
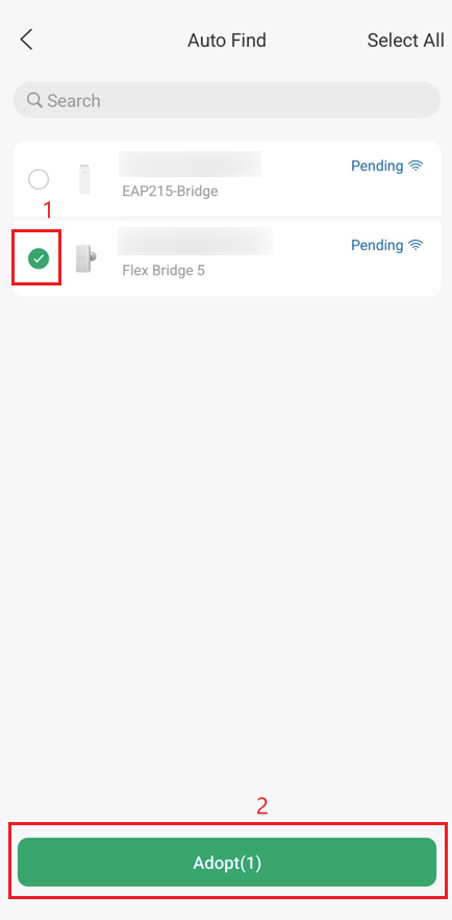
Note: If the DIP Switch was not disabled on the Main AP, the checkbox would not appear and it would be an icon that says the device needs to have the same pairing code as the Main AP.
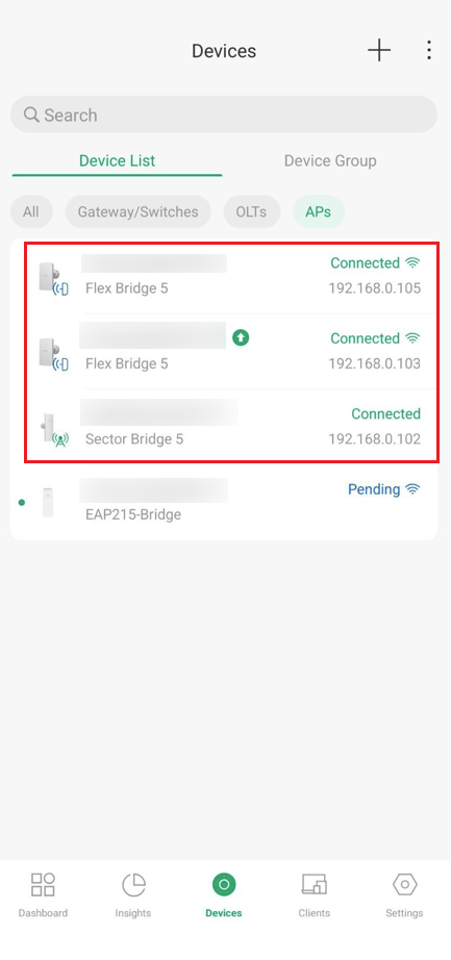
The new Flex Bridge 5 will now be added to the Bridge APs List as a Client AP:
Conclusion
You have successfully added additional Flex Bridge 5 devices to an existing wireless bridge network using Standalone Mode or Omada Controller through a PC or the Omada App.
To learn more about each function and configuration, please visit Support Home to download or check the manual for your product.

