


How to Configure Root Node Feature on an Omada Controller


Contents
Introduction
The Root Node function in Omada allows you to specify the device that should be treated as the top of the network topology. The Controller uses the selected root node as a reference to reorganize the topology and more accurately identify uplink relationships between devices.
If no Omada gateway is adopted on the site, you can manually set a switch, OLT, or third-party device as the Root Node. If only APs are adopted, an AP can also be selected as the root node. The example within this article will use a switch as the root node.
Requirements
- Omada SDN
- A site without an adopted Omada gateway
Scenario
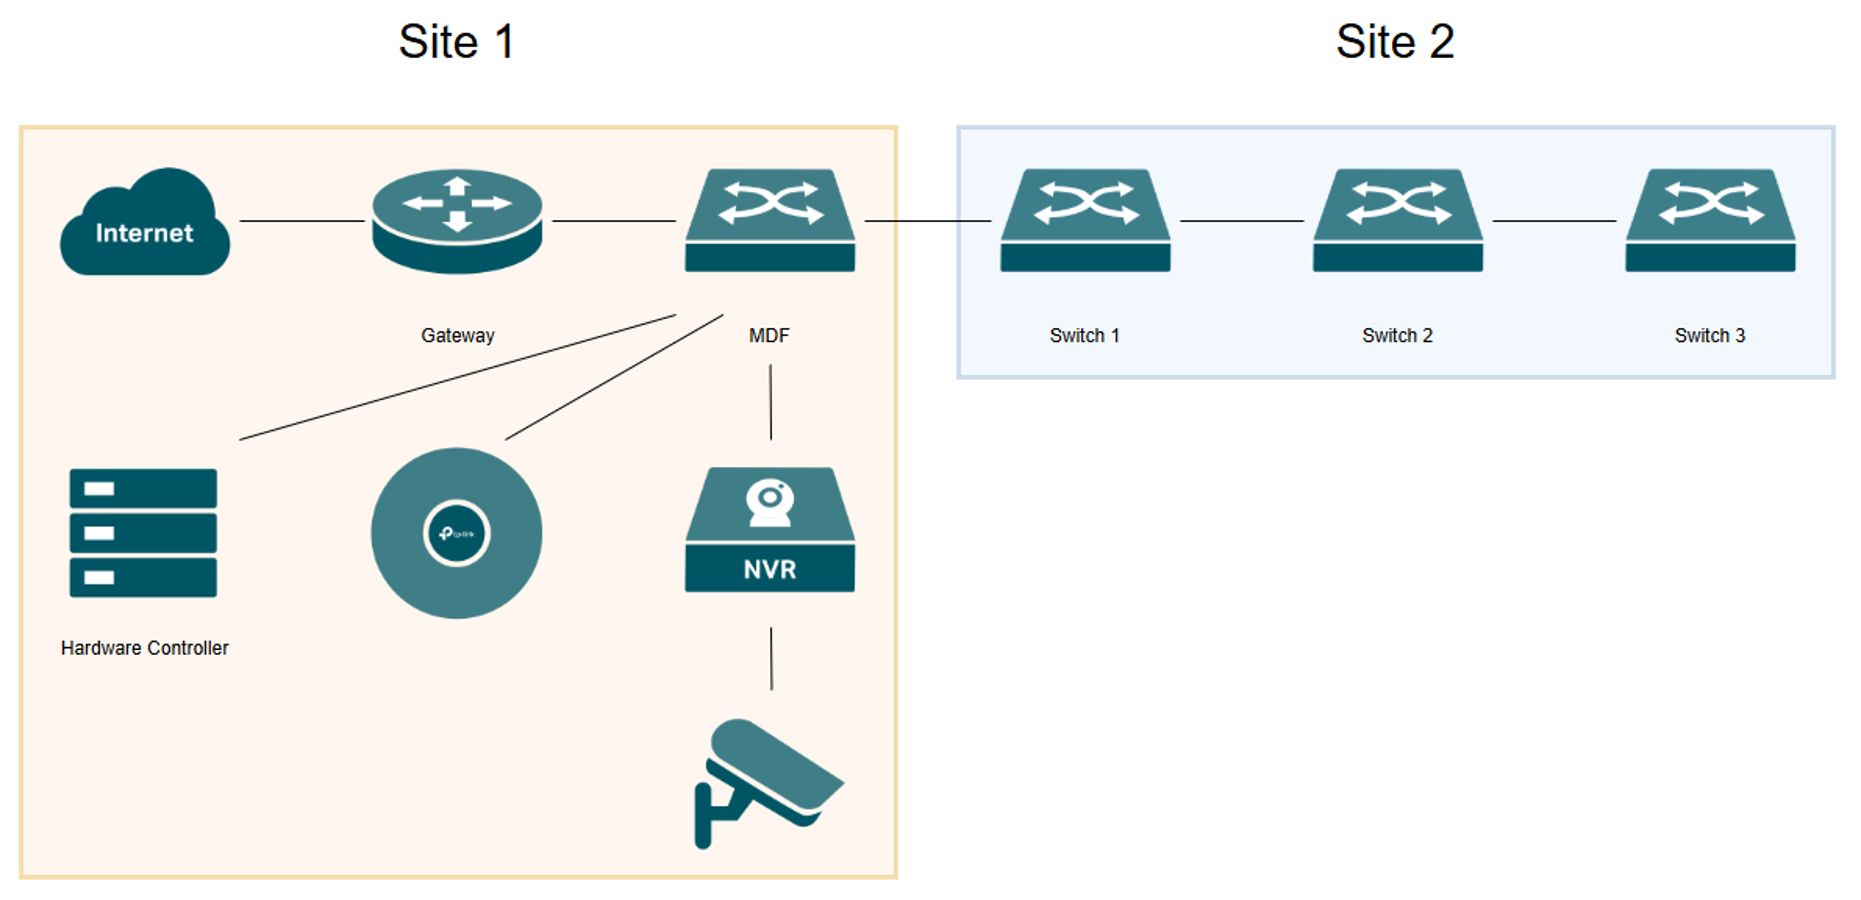
In this example, an existing network branch is separated into its own site. Site 1 contains the Gateway and MDF switch, while Site 2 consists of three switches. Connectivity between the sites is provided by an uplink from the Site 1 MDF switch to Switch 1 at Site 2. The focus of this FAQ is to ensure that the topology of Site 2 displays correctly on the Omada Controller UI.
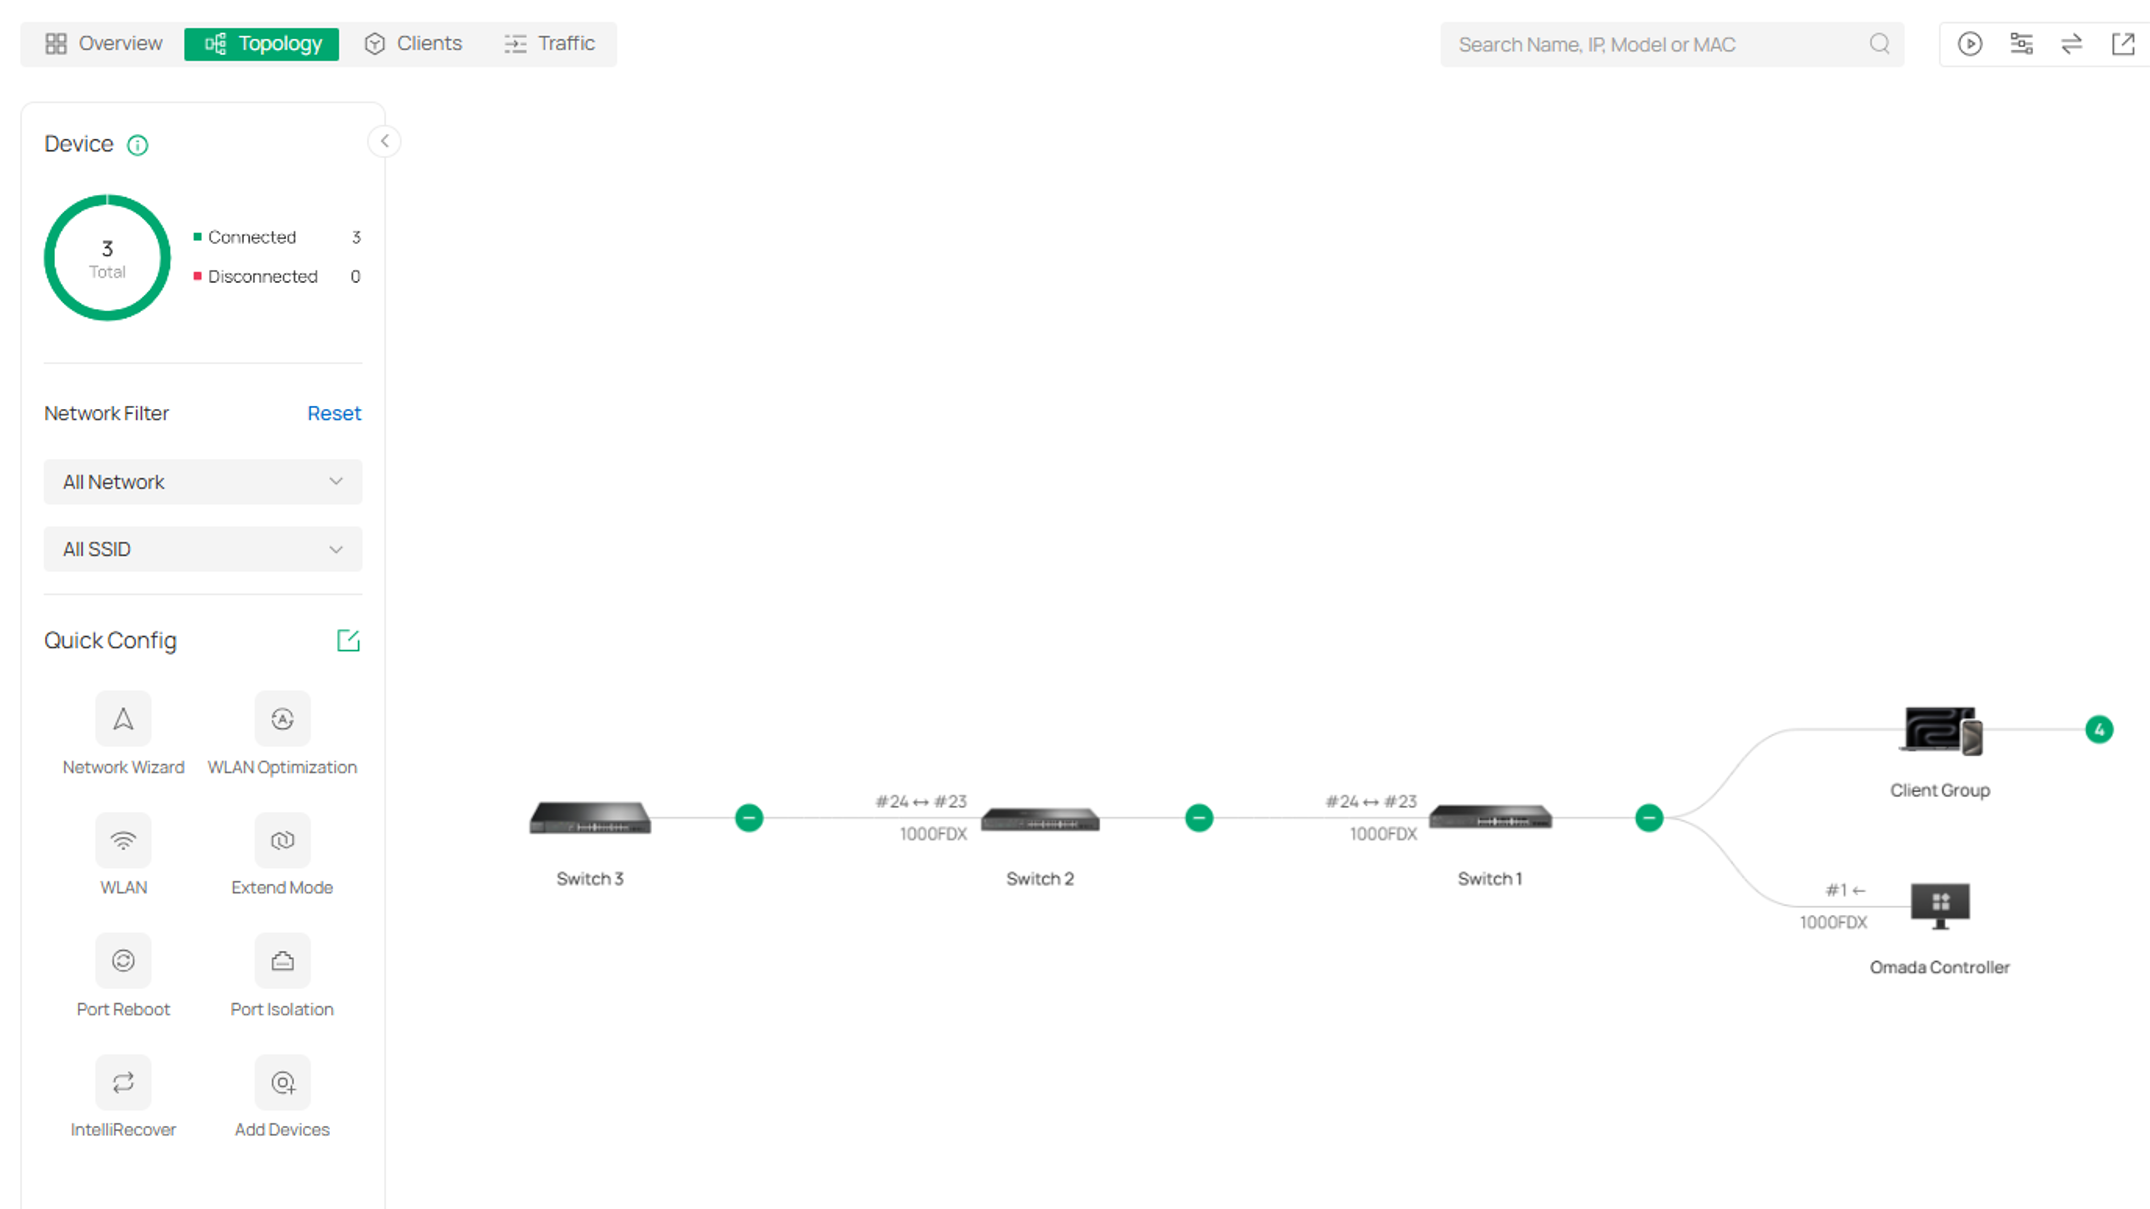
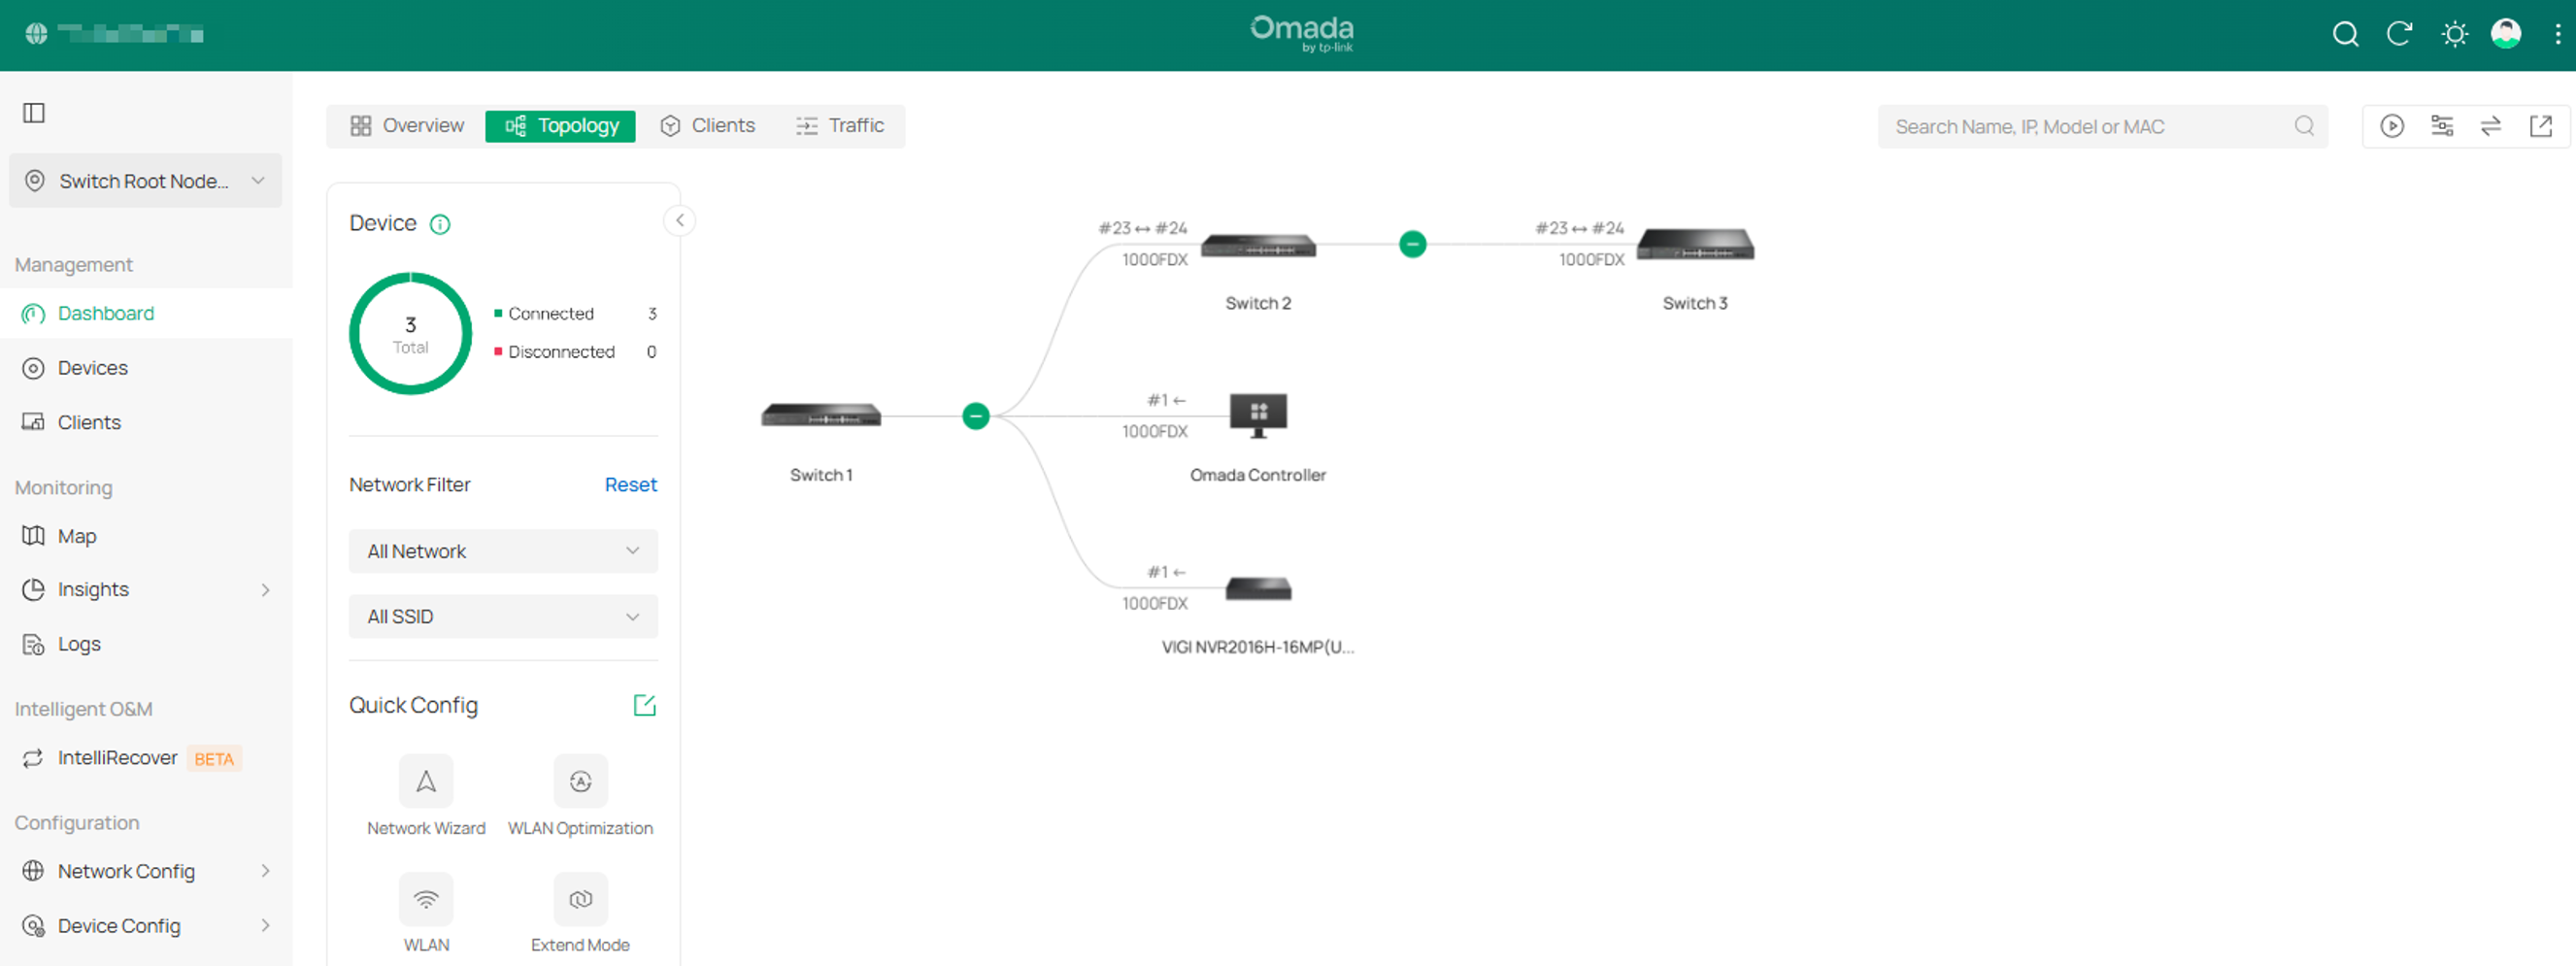
The following image shows the current topology view of Site 2 on the Controller. The switches are shown as connected, but the Controller has not identified which device should be treated as the Root Node. To view the topology, go to Site View > Dashboard > Topology.
Configuration
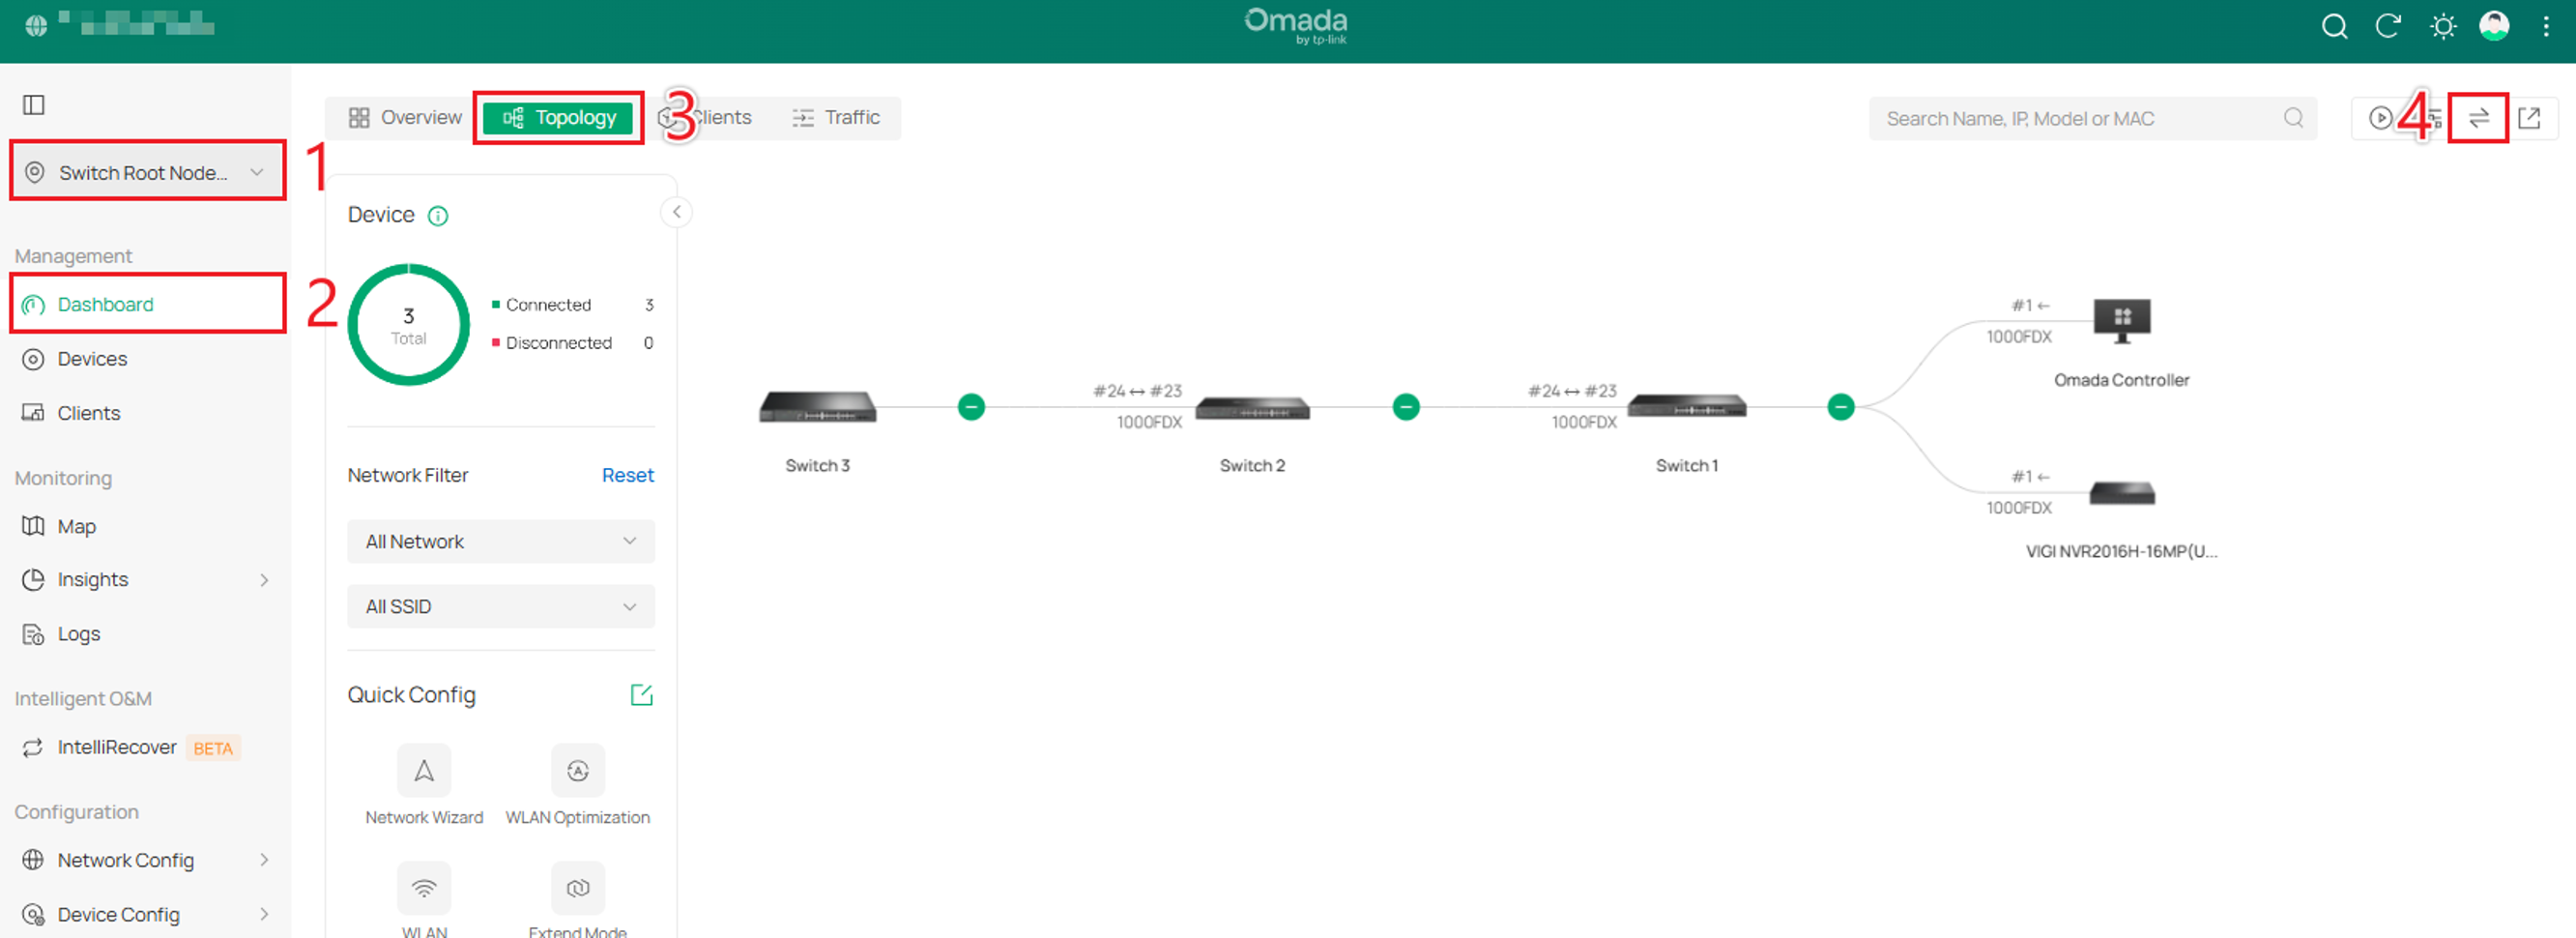
To configure the Root Node, follow these steps.
Step 1. Go to Site View > Dashboard, select the Topology tab, and select the Root Node icon.
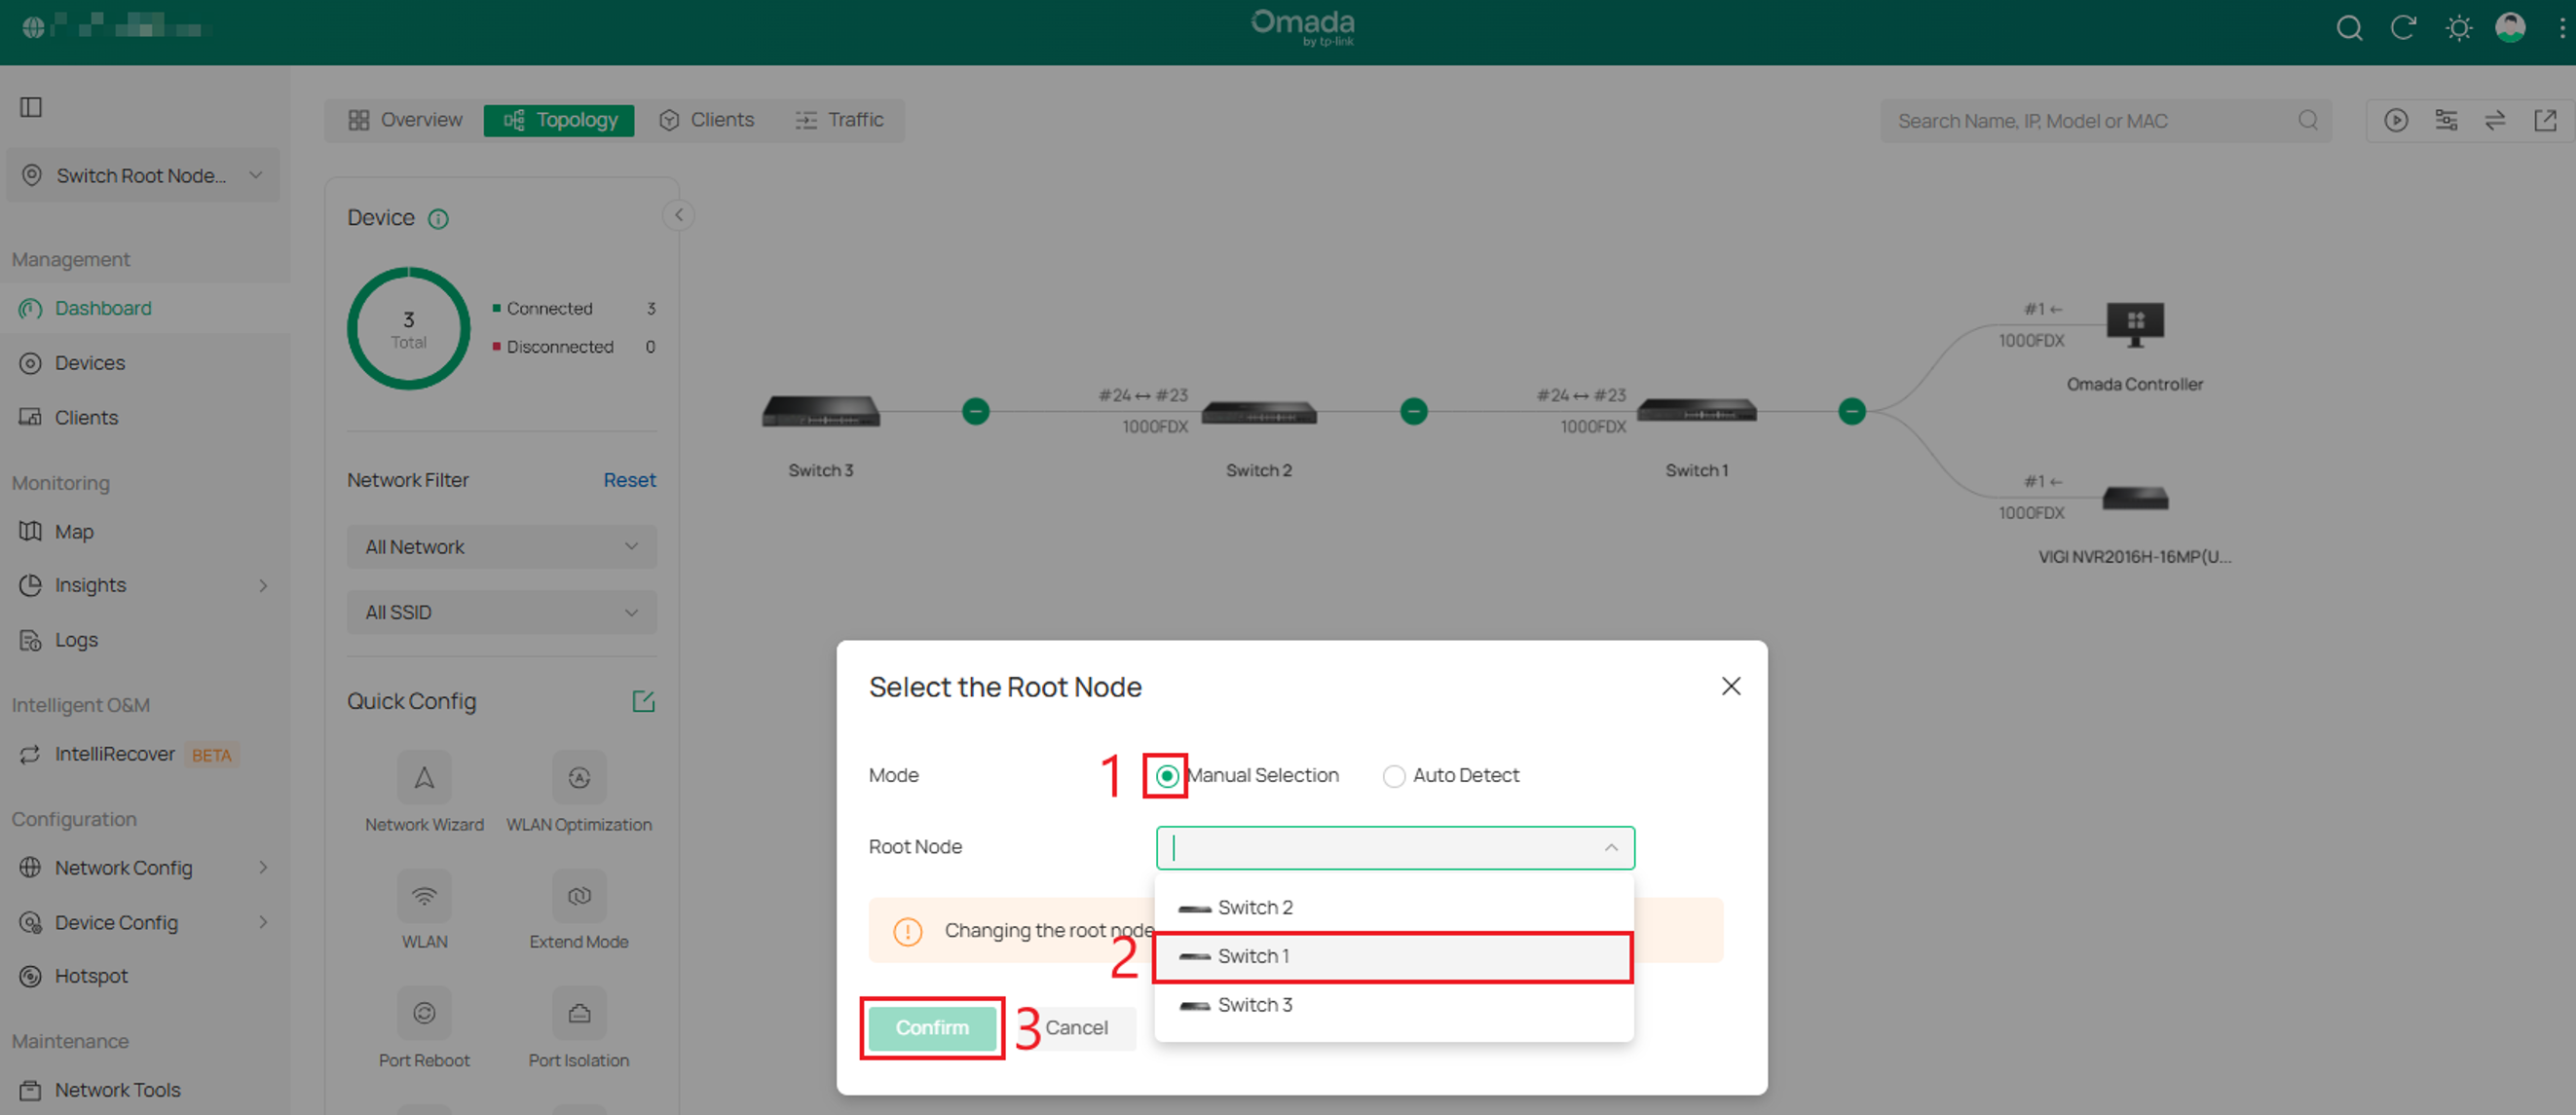
Step 2. Select Manual Selection, choose the device from the Root Node drop-down menu, and select Confirm. The Controller will recalculate and reorganize the topology using the selected device as the Root Node.
Verification
After a few seconds, the topology will update, with the selected Root Node displayed at the top of the network.
Conclusion
The Root Node feature provides the Controller with a reference point for determining network hierarchy and device relationships. Once a Root Node is configured, the topology view can more accurately display upstream and downstream connections within the site.
For deployments without an adopted Omada gateway, configuring a Root Node can improve topology visibility, simplify network monitoring, and provide a clearer representation of how devices are connected throughout the network.
To learn more about each function and configuration, please visit Support Home to download or check the manual for your product.
QA
Q1: When should I manually configure a Root Node?
A1: Configure a Root Node when the site does not have an adopted Omada gateway and the topology does not correctly display the relationships between devices.
Q2: Which devices can be selected as the Root Node?
A2: You can manually select a switch, OLT, or third-party device as the Root Node. If the site contains only adopted APs, an AP can also be selected.
Q3: Which device should I select as the Root Node?
A3: Select the device that serves as the upstream-most device within the site and connects the site to the upstream network.
Q4: Why is the Root Node option useful when there is no Omada gateway?
A4: Without an Omada gateway, the Controller may not automatically determine the top of the topology. Selecting a Root Node provides the Controller with a reference point for displaying device relationships.
Q5: How long does it take for the topology to update after changing the Root Node?
A5: The topology should update after a few seconds. Allow some time for the Controller to recalculate and display the device relationships.
Q6: What should I do if the topology still appears incorrect after selecting a Root Node?
A6: Verify that you selected the correct upstream device and confirm that the physical connections between devices match the expected network topology.
Q7: Can I change the Root Node after it has been configured?
A7: Yes. Return to Site View > Dashboard > Topology > Root Node and select a different device using Manual Selection.
Q8: Does configuring the Root Node change the physical network connections?
A8: No. The Root Node provides the Controller with a reference for displaying topology relationships. It does not change the physical cabling between devices.
Q9: Can I configure a Root Node if an Omada gateway is already adopted on the site?
A9: This FAQ is intended for sites without an Omada gateway. When an Omada gateway is present, the Controller will use the gateway as the top of the site topology.
Q10: Where can I verify that the Root Node configuration was successful?
A10: Go to Site View > Dashboard > Topology and confirm that the selected Root Node appears at the top of the network topology with the expected downstream relationships.
